1
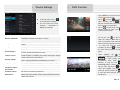
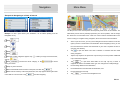
Important Safety Instructions Accessories EN Prestigio GeoVision 5850HDDVR–Accessories List ITEM NAME QTY Car Charger 1 USB Cable 1 Car Mount 1 User Manual 1 Warranty Card 1 Driver/Document CD 1 The exclamation point within an equilateral triangle is intended to alert the user to the presence of important operating and maintenance (servicing) instructions in the literature accompanying the appliance. The lightning flash with arrowhead symbol, within an equilateral triangle, is intended to alert the user to the presence of un-insulated “dangerous voltage” within the product’s enclosure that may be of sufficient magnitude to constitute a risk of electric to persons. CAUTION 1. To reduce the risk of electric shock, do not remove the cover (or back). No user-serviceable parts inside. Refer servicing to qualified service personnel. 2. The manufacturer should not hold responsibility for the damage caused by any substitutions and modifications of the product without authorization from the manufacturer or authorized unit. WARNING The device should not be exposed to dripping or splashing and no objects filled with liquids should be placed on the device. EN – 1 View of Main Unit View of Main Unit EN Prestigio GeoVision 5850HDDVR Prestigio GeoVision 5850HDDVR Front and Side View Rear and Top View 2 1 2 3 4 5 4 6 3 1. 1 LCD Touch Screen Tap the screen with touch pen or finger to select menu commands or to enter information. 2. Battery Status Indicator The indicator glows in bright green color when battery is fully charged and in red color when charging. 3. Microphone 4. Earphone Jack Records sound Connect to earphone or headset. 5. microSD Slot Insert micro SD memory card for data access or memory expansion. 6. mini USB Port Connect to USB Cable for data access or battery charging EN – 2 1. Speaker Emit sound, voice or music. 2. Camera lens Take photos or record videos when you’re driving 3. Reset Button Press to reboot the device. 4. Power Button Press to power the device ON/OFF. 5. Lock Button Press to lock the current video 5 Device Connections Device Connections EN Inserting microSD Card Connecting to Car Charger To insert a microSD card, place the connector towards the device and the card label towards the front side of Insert the USB connector into the appropriate USB port. the device. To remove a microSD card, gently Insert car charger connector into vehicle 12V accessory/cigarette press the edge of the card to release socket to start charging. the safety lock and pull the card out of the slot. NOTE: Please always make sure that no application is accessing to the micro SD card before extraction. NOTE: Please connect the car charger to vehicle 12V accessory/cigarette socket after the vehicle engine is started to protect the device from Connecting to External USB Device (Charging) sudden current impulse. Insert the USB connector into the appropriate USB port. Insert the other USB connector into the USB port on PC to start charging. EN – 3 EN Cautions on Battery Charging About Rechargeable Battery The device is equipped with a built-in rechargeable battery. Please fully charge the Getting Started 1. Press and hold Power Button to turn on the device. battery (for at least 5 hours) before initial use. The battery status indicator glows in red color when charging and turns bright green color when charging is complete. Charging time is approximately 4 hours. Working conditions and precautions for the rechargeable battery Devices with new batteries should be fully charged before initial use. It is not necessary to start charging the device before the battery is fully discharged. 2. Shortly after the greeting screen is shown, the main menu will be displayed. 3. Tap the corresponding buttons with touch pen included to navigate through various functions. 4. Press and hold Power Button to turn the device off or to allow the device to enter sleep mode. 5. Tap Sleep icon to put the device to sleep mode or Power Off icon to turn the device off. EN – 4 Device Settings DVR Function EN 1. Tap on DVR icon on the main menu 2. Tap on to start using DVR function. In the main menu, tap on to to start or stop to enter the device settings. video recording; Tap on You can scroll on the screen play the recorded video; Tap on lock upwards key to lock the recording video. / downwards to display other settings. 3. Tap on to to format the TF card & start-up method of video; Tap on to exit the DVR function. 4. Wireless & Networks Configure the wireless connections, eg: Wi-Fi Sound Adjust sound volume, mute device, or enable warning messages. Display Storage Set the screen brightness, auto-rotate, animation & screen timeout Check the available storage card & device memory. Language & Keyboard Manage downloaded and running applications Log in / out from the social network accounts, such as Google Account, Exchange ActiveSync account. Enable applications using data from sources such as Wi-Fi and mobile networks to orientate your location and improve Google search results via check the options. Set the screen lock mode and owner information, encrypt your device, manage password and administrate your device. Set the operating system language & onscreen keyboard options Backup &reset Enable or disable the automatic backup feature and reset the device. Date & Time setting Set up Time Zone/Date/Time. Accessibility Enable your installed services and adjust related settings. Developer options Set options for application development. About device View the device system info, such as network type & name, battery power level, Model number, legal information & software version of the device. Apps Accounts& Sync Location service Security settings To protect the current video file, you can tap the icon to save it under the directory Save File in case of overwriting of the video file when the memory capacity is in lack. 5. To check and view the video recorded, tap the icon to enter the Video Record interface as left figure. 6. When playback, tap to stop/resume playing the video, tap / to select playing previous/next video under the this directory, or drag the icon leftward/rightward to view the video clip you want. Tap the icon to check the longitude and latitude when this video recorded. Tap to save this video under the Save File directory. EN – 5 EN 7. Device Settings Connecting to Wi-Fi 1. Select Settings icon to access the list of To set the parameters of car DVR function, tap the icon setting options options. Select Wireless & networks. to enter the 2. To turn on/off Wi-Fi, simply slide your interface as follows: finger rightward/leftward on the control bar. Picture- in-Picture function: tap to prompt 3. The device will scan for available Wi-Fi the dialog box, select open, the car networks and display them at the bottom of DVR window will appears on other the screen. interface when recording, double tap 4. Tap on the network you want to connect on the window to enter the recording to. Then tap inside the Wireless password interface. field to make the virtual keyboard appear. Whether boot start: select YES, and then Enter thX` Connect. the car DVR will automatically run 5. Your device will now attempt to establish a background after booting the device. connection to the Wi-Fi access point with the Gravity sensor sensitivity: there are network parameters you entered. After high/middle/low for options to protect current video being overwritten when connecting to a Wi-Fi network, the crush occurs appears on the status bar on the right side of icon the Home screen. Whether record sound: if select YES, then the sound will be recorded when recording the video; if select NO, it will record only the image. FM Function File selection time: tap to select the time interval for saving the file. 1. Tap (Note: Please insert TF card properly into the device before running the car DVR icon on home menu. 2. Tap on Operation) / or drag the cursor to tune FM frequency down/up. 3. Tap on to enable the FM function. 4. Tap on to exit. (Note: Please make sure GPS is connected to the car charger before using FM Transmitter) EN – 6 When using the navigation software for the first time, an initial setup process starts Select the program language. If your preferred language does not appear on the / or drag the list up or down with your finger to view all available languages. Tap to select your preferred language. Tap to confirm your selection, and proceed to the next page. to confirm your You are offered to watch the tutorial that leads you through the basic steps of if you would like to get an instant understanding of the functions of your software. You can run it later if you choose . You are now asked whether you allow the software to collect usage information and if you agree with the terms of use. The Configuration wizard starts in the selected language. Tap Set your preferred route planning options. Tap preferences. navigation. Tap Read the Software and Database End User Licence Agreement, and tap to continue. GPS logs that may be used for improving the application and the quality and coverage of maps. Tap Select the voice guidance language profile. If your preferred language does not appear on the screen, scroll the list for other available profiles. Tap any item in the list for a short voice sample. Tap to confirm your preferences. automatically. Do as follows: screen, tap Set your preferred time format and units. Tap EN Initialization and Software Activation Initialization and Software Activation to allow the anonymous statistics or to disable this function. The initial setup is now complete. The application starts. to confirm your selection, and proceed to the next page. EN – 7 Navigation Navigation EN Introduction Destination Menu After the initial setup, and whenever the software is started, the Navigation menu appears. You have the following options: Tap to select your destination by entering an address or selecting In the Navigation menu, tap . The Find menu provides you with the following options: a place of interest, a location on the map or one of your Favourite destinations. You can also look up your recent destinations from the Smart History, enter a Tap to specify an address as your destination. Tap to select a place of interest as your destination. Tap to navigate to a location selected on the map. Tap Tap coordinate or use the location saved in a photo. Tap to display the route parameters. You can view the route in its full length on the map. You can also perform route-related actions such as editing or cancelling your route, setting a start point for the route, picking route alternatives, avoiding parts of the route, simulating navigation or adding the destination to your Favourites. Tap to customize the way the navigation software works, watch the Tutorial, simulate demo routes, or to run some additional applications. Tap Tap EN – 8 to navigate to the recent destination that is shown on the button. to start navigating on the map. to stop navigation and exit the software. to choose from the list of your favourite destinations. or Tap Tap to choose from the list of all recent destinations. to navigate to a coordinate or to a location saved in a photo. Navigation Navigation EN Navigating to An Address Navigating to An Address Enter the street name: In the Navigation menu, tap , then tap . By default, the screen proposes the city or town where you are located. If needed, change the country. Tap the button showing the name of the country. 1. Use the keyboard to enter the name of the country. 2. After entering a couple of characters, the list of countries that match the entered 1. 2. Tap 3. Tap and use the keyboard to enter a part of its name. As you enter letters, the most likely to select the street that is offered in the input field or tap to browse the list of all streets matching your input. Select a street from the list. string appears. Tap the country of your choice. If needed, change the city/town. Tap the button showing the name of the city/town, . Use the keyboard to enter a part of the street name. Enter the house number: 1. 2. Tap . Use the keyboard to enter the house number. city/town name is always shown in the input field. You have the following options: 3. Tap to select the city/town that is offered in the input field. Tap to correct your entry. Tap Tap to finish entering the address. The map appears with the selected destination in the middle. Tap another map location if necessary, then tap to browse the list of city/town names matching your input. to confirm the destination. After a short summary of the route parameters, the map appears showing the entire route. Wait for a few seconds or tap and start navigating. Select a city/town from the list. EN – 9 Navigation Navigation EN Navigating to a Place of Interest (POI) Navigating to a Place of Interest (POI) If none of the above is appropriate, tap to find a place of interest at the following locations: Tap Tap to search for a place within a selected city or town. Tap to search for a place around the destination of the active Tap to search around the current position or if it is not available, around the last know position. On the Map screen, tap menu, tap to return to the Navigation menu. In the Navigation , then tap . You are offered the following preset search categories: Tap route. to get a list of petrol stations along the route or if it is not available, around your current position or your last known position. Tap to get a list of parking lots near the destination or if it is not available, around your current position or your last known position. Tap to get a list of restaurants along the route, around your current position or your last known position. Tap to get a list of accommodation near the destination, around your current position or your last known position. You can also tap EN – 10 and search for a place by entering its name. to search along the active route, and not around a given point. This is useful when you search for a later stopover that results in a minimal detour only, such as searching for upcoming petrol stations or restaurants. More Menu Navigation EN Example for Navigating to a Place of Interest The Map screen is the most important and frequently used screen of the software. The Example: To find a park around your destination, do as follows (starting from the Vehimarker (a blue arrow by default) represents your current position, and the orange Navigation menu): line shows the recommended route. There are screen buttons and data fields on the screen to help you navigate. During navigation, the screen shows route information. Tap . At the top of the screen, you see your heading and the house numbers on left and right if you have not selected a route destination. When navigating a route, you see Tap . Tap . the next manoeuvre and the next street/road on your route. Tap either of them to open the route itinerary. Tap Tap Tap Tap the map anywhere to explore the map around your current position. Additional to open the Quick menu with a selection of functions that are useful during navigation. . The list of place categories appears. Tap and tap or slide your finger to browse the list, map control buttons appear. . to browse the whole category, or tap to narrow Tap any of the list items. Check the details and the location of the place, and then tap . After a short summary of the route parameters, the map appears showing the entire route. Wait for a few seconds or tap Tap to open three data fields on the map. Tap any of them to suppress the others. The default values (you can change them in Map settings): down your search. and start navigating. the remaining distance to the destination, the estimated time of the arrival at the destination, and the remaining time of the trip. Tap to return to the Navigation menu. EN -11 Settings More Screen EN The 'More' menu provides you with various options and additional applications. In the Navigation menu, tap . In the Navigation menu, tap : Fine-tune route planning options, change the look of the Map screen, turn on or off warnings, or restart the Configuration wizard, etc. : Visit www.naviextras.com to get additional content, such as new maps or 3D landmarks and useful applications. : Access multimedia applications: the Picture Viewer or the Music Player. , then tap . The Settings menu provides you with the following options (scroll the list to see all): : Adjust the different sound volumes, change the voice guidance profile, or enable and set up warnings. : Change the function buttons in the Quick menu of the Map screen. : Before selecting one of the Lorry profiles as the Vehicle type used in route calculation, set up the editable lorry attribute profile with the parameters of your lorry. These parameters will be used in route calculation. : Access travel applications: the unit converter, the clothing size converter or country information. : You can turn Smart Routes on or off, select whether to take traffic events into consideration when calculating the route or you can change the : Access other useful applications: the calculator, the fuel and maintenance monitor, sunrise and sunset information or the trip and track log monitor. radio station. : Read the Tutorial to get instant understanding of the functions of your software, or run the Demo to watch sample route simulations to see how navigation works. EN -12 : Select the type of vehicle you are driving, the road types used in route planning, and the route planning method. : These settings determine how Green routes will be calculated. Settings Troubleshooting EN They are also used to display the cost and CO2 emission of routes. Take steps described in the tables below to solve simple problems before contacting customer service. : Adjust map related settings: change the daytime and night colour schemes, change the default zoom level, switch between 2D and 3D map, NOTE: suppress buildings or change the Vehimarker. Immediately turn off the device and disconnect the power adapter if the device is not working properly. Never try to repair the unit without : Change the values of the data fields on the Map screen, show or suppress junction views and signpost or display a route progress bar on the left authorized professionals for it may damage the unit. PROBLEM POSSIBLE CAUSE POSSIBLE SOLUTION of the map. : Turn the menu animations on or off, select a different skin for the application, adjust the display backlight. The adaptor is not connected well. Connect the adaptor correctly. The built-in rechargeable battery is weak. Use the adaptor to supply power or charge the battery. There is no sound. The volume may be turned down or mute. Turn up the volume or turn on the sound output. There is no picture. The brightness may be turned down. Adjust the brightness of the LCD. The built-in rechargeable battery is weak. Use the adaptor to supply power or charge the battery. The unit may be obstructed by material, such as heat insulation paper. Remove the material. Users cannot turn on the unit. : Change the program language, the time format and units or the time zone. : Turn the automatic trip or track log saving on or off, check the current size of the trip database. : The application collects usage information and GPS logs that may be used for improving the application and the quality and coverage of maps. Here you can enable or disable collecting these logs. : Modify the basic software parameters set during the initial setup process. : Delete all saved data and reset all settings to their factory defaults. Irregularity or instability in signal receiving. EN – 13 Technical Specifications EN MODEL Navigation Software GPS Chipset DVR Antenna Interface Display size Resolution Display type RAM Flash Expansion slot Battery type/capacity Operating system Speaker Video formats supported Audio formats supported Earphone jack Operating Temperature Operating humidity GV5850HDDVR IGO Primo BCM4751 120 degrees/720P/1.0 MP/IR Light/30FPS Internal USB 5" 800*480 TFT, Touch screen 512 MB,DDR3 8GB, MLC Micro SD-Card slot, max 32GB Li-poly/1000mAh Android 4.0 Built-in, 1.5W MPEG4,WMV, AVI, ASF,MP4, MPG,3GP (not support RM,RMB) WMA, MP3,WAV,M4A,OGG, AAC 3.5mm -10 ºC ~ +50ºC 10% to 90% non-condensing Disclaimer As the Prestigio products are constantly updated and improved, your device’s software and hardware may have a slightly different appearance or modified functionality than presented in this Quick Start Guide. Prestigio hereby states that this GPS Navigator complies to basic requirements and another relevant regulations given by the EU directive1999/5/ES. Full version of the declaration of conformity is available on http://www.prestigio.com/compliance. EN – 14