1
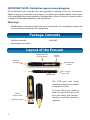
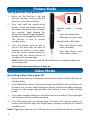
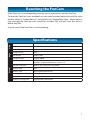
MPEN720141113E
Before You Begin
IMPORTANT NOTE: Prohibition against eavesdropping
All jurisdictions have specific laws and regulations relating to the use of cameras.
Before using any camera for any purpose, it is the buyer’s responsibility to be aware
of all applicable laws and regulations that prohibit or limit the use of cameras and to
comply with the applicable laws and regulations.
Warnings:
• Modifications not approved by the party responsible for compliance could void
user’s authority to operate the equipment.
Package Contents
• PenCam recorder
• Ink Refill
• Operating Instructions
Layout of the Pencam
Hidden USB Port
(Twist to reveal)
Hidden
Camera
Working
Pen Tip
Power/Record
button
Reset Button
Blue / Orange
Status LED
The USB port and mode
selection switch are concealed
inside the PenCam.
Mode
Select Switch
USB Connection
2
To access them, you need to
hold one end of the pen and
twist the other end counterclockwise until the two parts
separate.
Operating the Pencam
Turning the PenCam On
• Press the power/record button (on top off the pen) and hold until the both the
orange and blue lights turn on then release it. When the camera is ready to use
the orange standby light will stay on and the blue light will turn off.
• The orange light will blink when it is on standby in picture mode or stay lit when
it is on standby in video mode.
Turning the PenCam Off
• Leave the Pencam in standby mode and it will automatically turn off after 60
seconds of inactivity
• The PenCam will not switch off while it is actually recording.
• If the PenCam is recording you must press the button once to stop recording and
return to standby (static orange light) then leave the camera for 60 seconds until
the orange light turns off indicating that the Pencam has turned off automatically.
Switching between Video and Picture
To switch between Video and Picture mode,
unscrew the PenCam to reveal the USB
connector. Using the tip of a pen or fingernail,
move the selection switch (pictured) to the
right for PICTURE or left for VIDEO.
Video
mode
Picture
mode
Charging the PenCam
The PenCam has a built in lithium-ion battery that provides approximately 45
minutes of power when fully charged.
Charge the PenCam by connecting the hidden USB connector inside the PenCam to
a USB port on your computer. The status LED will slowly flash orange while charging.
Full charge time is approximately 90 minutes. The PenCam will stop flashing when it
is fully charged.
IMPORTANT NOTE: Before using the PenCam for the first time, connect it to a USB
port and charge it fully. The PenCam will not function as a camera while it is plugged
into the USB port.
3
Picture Mode
Taking pictures from power off
1.
Make sure the PenCam is off and
that the selection switch inside the
PenCam is set to Picture Mode.
2.
Press and hold the power/record
button. A blue and orange light will
illuminate simultaneously for about
two seconds. Keep holding the
button until the blue light disappears
leaving just the orange light blinking.
The PenCam is now in picture
standby mode.
3.
Press the button once to take a
picture. The blue light will flash to
indicate the photo is being taken.
Hold the camera steady during this
period until the camera returns to
standby mode (orange light).
Standby mode = Orange
light
• Static for video mode
• Blinking for picture mode
Record mode = Blue light
• Blue light flashes while
video recording
• Blue light flashes once
when picture taken
Note: The PenCam switches itself off after 60 seconds in standby mode to preserve battery life.
Press the button again to turn it back on.
Video Mode
Recording video from power off
1.
Make sure the PenCam is off and that the selection switch inside the Pencam set
to Video Mode.
2.
Press and hold the button. A blue and orange light will illuminate simultaneously
for about two seconds. Keep holding the button until the blue light disappears
leaving just the orange light glowing. The PenCam is now in video standby
mode.
3.
From video standby mode, press the button to start recording. The orange light
will change to blue to indicate recording.
4.
Press the button again to end recording. The camera will save the video to its
memory and the blue light will change back to orange to indicate it is back in
standby mode.
Note: Plugging the PenCam into a USB port during recording will stop the recording.
4
Mounting the Camera
IMPORTANT NOTE: When stopping a recording push the button only 1 time. The
PenCam will write the video to memory. Depending on the length and complexity of
the video there may be several seconds delay. Do not push the button again during
this time or data loss may occur.
Note: The PenCam will automatically save video in 20 minute blocks.
Note: If you shift the selection switch from video mode to camera mode while recording video, the Pencam will save the video and then enter camera standby mode.
Setting the Date and Time on a PC
To set the Date and Time so that your photos and video files are time and date
stamped:
1.
Connect the PenCam to your PC and allow your computer to install the drivers.
2.
When asked, click “Open folder to view files” and then double click on “TimeSet_
USB Driver_Manuals”, “timeSet” and then the WriteTime.exe file. It will find your
PenCam after a few seconds and the “Update” button will become clickable.
3.
Click on the “Update” button. The PenCam will be set with the current date and
time from your computer by creating a file directly to the PenCam’s memory. Do
not delete the file.
4.
Remove the PenCam from the computer and turn on the PenCam. Pictures and
videos will now be time stamped with the updated date and time.
Setting the date and time on Mac OS X
The writetime.exe file is for use only on PC. To set the time using Mac OS X, you will
need to create a text file and copy it to the PenCam.
The text file must be called time.txt.
Inside the text file, type the date and time in the format: yyyy-mm-dd hh:mm:ss.
Therefore, fifteen seconds past 2:02pm on December 25th 2012 would be written as:
2012-12-25 14:02:15. Note the use of 24-hour time. Ensure you save your changes
and that the text file is located in the root directory. This means it should not be in
any folders or sub-folders.
Remove the PenCam from the computer and turn on the PenCam. Pictures and
videos will now be time stamped with the updated date and time.
5
Downloading and Viewing Video
When the PenCam is connected to a computer running Windows XP, Windows
Vista, Windows 7, Windows 8 or Mac OS X, the operating system will automatically
recognize the device and install the correct drivers.
Navigate to the Removable Disk in My Computer to view, copy or delete files just like
a portable hard drive or flash drive.
Playback video recordings on your PC with media players such as VLC, Windows
Media Player, winDVD, powerDVD etc., (not supplied) capable of decoding H263
format AVI files.
Troubleshooting
Problem: The PenCam takes a long time to boot or save recordings
Solution: Clear or back up some or all of the files from the PenCam. The more storage
used up in the PenCam the longer it may take to boot or process saved files.
Problem: Some of my videos or image won’t play on my computer.
Solution: Videos and images can become corrupt and will not play if the PenCam is
not used as described in this manual. Pushing the button several times or holding
the button can result in corrupt videos. Wait until the PenCam has finished processing before pressing the button again.
Problem: My PenCam will not record.
Solution: Make sure the PenCam is not plugged into a USB port. Make sure the PenCam is charged.
Problem: I cannot turn my PenCam off or it is not responding.
Solution: Make sure the PenCam is not recording. If the blue light is on, push the
button once, when the light changes to orange, press and hold until the orange light
turns off. If you are still unable to turn off the PenCam, push the reset button.
Changing Ink Cartridges
To change cartridges, unscrew the bottom half of the pen from the top half and using
a Phillips head screwdriver, unscrew the ink cartridge.
Replace the ink cartridge with a compatible refill and screw it into place.
6
Resetting the PenCam
If the PenCam is not responding correctly you may need to reset the PenCam.
To reset the PenCam use a toothpick or non-metal pointed object to push the reset
button which is located about 1 inch below the Orange/Blue light. Metal objects
may damage the PenCam and should be avoided. This will not reset the time or
delete any files.
Use this only if the PenCam is not responding.
General
Image
Video
Specifications
Video Format
AVI
Resolution
1280x720
Video file size
approx. 100MB per minute
Image Format
JPEG
Resolution
1600 x 1200
Image File Size
Approx 200KB
Operating Systems
Microsoft Windows XP, Microsoft Windows Vista, Microsoft
Windows 7, Microsoft Windows 8, Max OS X
Memory interface
Built-In 4GB / 8GB (varies by model)
Backup Type
USB
Battery Type
Rechargeable Lithium-ion
Charging
USB via computer
Record Time per charge
Approximately 45 minutes
Battery Charging Time
Approximately 90 minutes
7
Helpdesk / Technical
Support Details
Swann Technical Support
All Countries E-mail: [email protected]
USA toll free
AUSTRALIA toll free
Telephone Helpdesk 1300 138 324
1-800-627-2799
(Su, 2pm-10pm US PT)
(M 9am-5pm AUS ET)
(M-Th, 6am-10pm US PT)
(Tu-F 1am-5pm AUS ET)
(F 6am-2pm US PT)
(Sa 1am-9am AUS ET)
USA Exchange & Repairs
NEW ZEALAND toll free
1-800-627-2799 (Option 1)
0800 479 266
(M-F, 9am-5pm US PT)
UK
0203 027 0979
See http://www.worldtimeserver.com for information on time zones and the current time in Melbourne,
Australia compared to your local time.
Warranty Information
Swann Communications USA Inc.
12636 Clark Street
Santa Fe Springs CA 90670
USA
Swann Communications
Unit 13, 331 Ingles Street,
Port Melbourne Vic 3207
Swann Communications LTD.
Stag Gates House
63/64 The Avenue
SO171XS
United Kingdom
Swann Communications warrants this product against defects in workmanship and material for a period
of one (1) year from its original purchase date. You must present your receipt as proof of date of purchase
for warranty validation. Any unit which proves defective during the stated period will be repaired without
charge for parts or labor or replaced at the sole discretion of Swann. The end user is responsible for all
freight charges incurred to send the product to Swann’s repair centers. The end user is responsible for all
shipping costs incurred when shipping from and to any country other than the country of origin.
The warranty does not cover any incidental, accidental or consequential damages arising from the use of
or the inability to use this product. Any costs associated with the fitting or removal of this product by a
tradesman or other person or any other costs associated with its use are the responsibility of the end user.
This warranty applies to the original purchaser of the product only and is not transferable to any third
party. Unauthorized end user or third party modifications to any component or evidence of misuse or
abuse of the device will render all warranties void.
By law some countries do not allow limitations on certain exclusions in this warranty. Where applicable by
local laws, regulations and legal rights will take precedence.
For Australia: Our goods come with guarantees which cannot be excluded under Australian Consumer
Law. You are entitled to a replacement or refund for a major failure and for compensation for any other
reasonably foreseeable loss or damage. You are also entitled to have the goods repaired or replaced if the
goods fail to be of acceptable quality and the failure does not amount to major failure.
FCC Verification
This equipment has been tested and found to comply with the limits for Class B digital device, pursuant
to part 15 of the FCC Rules. These limits are designed to provide reasonable protection against harmful
interference in a residential installation. This equipment generates, uses and can radiate radio frequency
energy and, if not installed and used in accordance with the instructions, may cause harmful interference
to radio or television reception, which can be determined by turning the equipment off and on, the user is
encouraged to try to correct the interference by one or more of the following measures:
•
Reorient or relocate the receiving antenna
•
Increase the separation between the equipment and the receiver
•
Connect the equipment into an outlet on a circuit different from that to which the receiver is connected
•
Consult the dealer or an experienced radio/TV technician for help
WARNING: Modifications not approved by the party responsible for compliance could void user’s authority
to operate the equipment.
© Swann Communications 2012