1
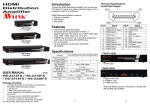
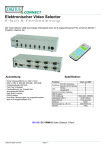
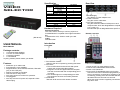
Specification Function CPU HD-15 Female Connectors Monitor HD-15 Female On-Line LED Selected Remote Controller Operation OSD Function VGA Resolution Power Adapter (Min.) Scan Interval Case Dimension (LxWxH) Weight VIDEO SELECTOR Rear View DS-46100 8 1 8 8 √ √ 1920x1440, 250MHz DC9V 1A 5~30 seconds Metal 200x75x45 mm 420g Hardware Required (DS-46100) USER MANUAL Monitor (Projector) The VGA, SVGA, multi-sync monitor, projector or PLASMA Monitor is capable of the highest resolution. PC Inserted with a VGA, SVGA or multi-sync card. Cable Standard cable. 1. Power Supply Plug DC9V 1A power adapter here. 2. Video Connector Plug the monitor cable here. 3. CPU Port Connectors Plug the extension cables of VGA port on each computer here which are designated as computer (1,2,3,4,5,6,7,8). The individual port is designated with a specific icon. Remote Controller Introduction Front View DS-46100 Package contents 1 DS-46100 Video Selector 1 DC 9V 1A Power Adapter 1 Remote Controller 1 User Manual Anything missed, please contact your dealer. Features Resolution up to 1920x1440. Pixel frequency up to 250MHz. Supports DDC1, DC2, DDC2B, DDC2B+, DDC2AB (only on line CPU port). Remote controller for operation. OSD function for easy check. Auto scan function to monitor PC operation. Hot pluggable. Auto skip over the PC power off, suspend & VGA cable unplug. 1. Port Selection Switch Switch to the next computer by pressing this button. 2. Port LEDs The red LEDs flash back and forth after power supply well connect with video selector. The green on line LED lights while the computer has well connected with the corresponding port & is running. The red LED lights on corresponding port while the computer has been successfully selected. 3. IR Receiver Take aim at IR receiver with remote controller. 1. Power on/off: Turn video selector on/off. 2. OSD on/off: Enable/disable OSD function. 3. Audio on/off: Reserved. 4. Scan on/off: Enable/disable auto-scan function. Auto-scan time can be increased progressively from every 5 seconds to 30 seconds by pressing up arrow. Conversely, pressing down-arrow makes the time decreased from 30 seconds to 5 seconds. While auto scan function is applied, port selection keys don’t work. 2. Remote control Port selection Switch computer by pressing number keys or right/left arrow (forward/backward). 1. Manual Port selection Press the button of “port selection switch” to shift to the computers wanted. The selected corresponding port will light red to indicate which port is active. 2 ways available as below: Operation Please make sure that video selector & monitor (projector) are off before beginning installation. 1. Make sure all equipment are turned off. 2. Plug the monitor cable to video connector of selector. 3. Plug the extension cables of VGA port on computer to CPU port connector of selector. 4. Put the power adapter plug in wall socket. 5. Connect power adapter with the video selector. 6. The red LEDs will flash back and forth. If not, please go back to check step 4&5. 7. Power on PC & monitor. 8. The green on line LED lights while the computer has been well connected with the corresponding port & is running. 9. About the change of battery, please refer “how to change battery” in the previous introduction of “remote controller”. Installation 6. How to change battery? Please use the battery model “CR2025”. 6-1. Push the hook to right. 6-2. Pull the battery holder out. 6-3. Put the battery up-side on holder then push the holder back. 5. Port selection The number keys 1~8 individually correspond to the computers 1~8. Switch computer by pressing number keys or left/right arrows. The number selected will be shown on screen if applied OSD function. If an “x+ number” displayed on screen, it means the corresponding computer is not on line. For batteries: Please recycle only completely discharged batteries. Trademarks: All the companies, brand names, and product names referred to this manual are the trademarks or registered trademarks belonging to their respective companies. Power on/off Turn the video selector on or off. All the LEDs will be off when you turn off the video selector. If restart video selector, the video selector will stay in the last status prior to selector off. Up/down arrows (forward/backward) work only if auto scan function applied. You are not allowed to switch computer until auto scan function removed. Power on/off function is not limited by scan mode. Auto-scan time can be increased progressively from every 5 seconds to 30 seconds by pressing up arrow. Conversely, pressing down-arrow makes the time decreased from 30 seconds to 5 seconds. Scan mode function Watch the status of all on-line PCs. Press the scan mode on/off key on remote controller to enable or disable auto scan function. OSD function Show you the active port on screen. Press OSD on/off key on remote controller to enable or disable OSD function. The computer number will be displayed on the left top of screen while you apply OSD. The selected corresponding port will light red to indicate which port is active.