1
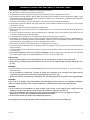
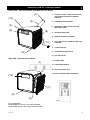
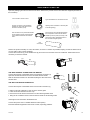
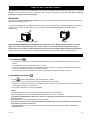
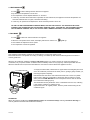
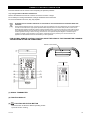
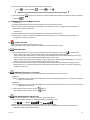
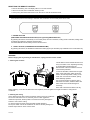
EN PORTABLE AIR CONDITIONER dados XL OPERATING INSTRUCTIONS Read the instructions carefully before operating the appliance or carrying out maintenance work. Observe all the safety instructions; failure to observe the instructions may lead to accidents and/or damage. Keep these instructions in a safe place for future reference. V 01/12 12 GENERAL OPERATING AND SAFETY INSTRUCTIONS This appliance is a portable air-conditioner, designed for domestic use. Only use this air-conditioner as described in this manual. Ensure that the required voltage and frequency (220-240V/50Hz) match the available power source. Ensure that the electricity system is able to deliver the operating current needed by the air-conditioner in addition to that normally absorbed by other appliances (electrical appliances, lighting, etc.). Please refer to the maximum absorption data given on the air-conditioner data plate. Connection to the electricity grid must take place in accordance with current installation standards. Ensure that the automatic switches and system protection valves are able to withstand start-up current of 10A (normally for less than 1 second). The system socket must always be fitted with an efficient earth. Make sure the plug is inserted fully. Do not use multiple adapters. Do not touch the plug with wet hands. Make sure the plug is clean. Do not use the plug as a means by which to start/stop the air-conditioner: use the power button on the remote control or on the side control panel under the intake grille. Do not install the air-conditioner in rooms that may be subject to water spray (e.g. laundries). This appliance is not suitable for use by persons (including children) with reduced physical, sensory or mental abilities, or persons without the necessary experience and knowledge, unless they have been adequately supervised and instructed concerning the use of the appliance by a person responsible for their safety. Before moving or cleaning, ensure that the device is unplugged from the socket. Do not move the air-conditioner while it is operating; first turn the appliance off, check and remove any condensation that may have formed. To turn the appliance off, set the remote control to OFF and remove the plug from the socket. Only pull on the plug. Do not pull the cord. Do not use the appliance if the cord or plug are damaged. If the power supply cord is damaged, it must be replaced by the manufacturer, dealer or a similarly qualified person so as to avoid any safety risks. PRECAUTION! Do not insert any objects into the air-conditioner: this is very dangerous as the fan turns very quickly. Ensure that air circulates freely around the unit. Do not cover the air intake and delivery grilles with drapes or in any way. WARNING! The air-conditioner must be positioned at least 50 cm from the wall and any other obstacles, on a firm, flat surface to avoid water leaks. The air-conditioner is fitted with a system to protect the compressor from overload. This means that the compressor only starts once 3.5 minutes have passed from its previous stop. Please wait at least 3.5 minutes before starting the unit. This helps prevent the compressor from being damaged. WARNING! In the event of an anomaly, switch the appliance off and unplug from the socket. Do not dismantle or attempt to repair or modify the product. In the event of a malfunction, contact the after-sales service centre directly. WARNING! Do not expose the air-conditioner to direct sunlight, as the colour of the materials may change and if the appliance overheats, this may activate the protection mechanism, causing it to switch off. Do not use insecticides, oils, detergents or spray paints near the appliance; do not use aggressive chemical detergents to clean the casing: this may damage the finish and colour. Close all open windows to maximise air-conditioning efficiency. The manufacturer will not be held liable if safety and accident prevention rules are not observed. V 01/12 13 DESCRIPTION OF THE APPLIANCE FRONT VIEW - SIDE FOR COOLING, DEHUMIDIFYING, FAN MODES (3) 1) CONTROL PANEL - FUNCTION BUTTONS FOR OPERATION WITHOUT REMOTE CONTROL 2) CONDENSATE DRAIN TUBE 3) TERMINAL CONNECTOR OF THE AIR EXPULSION TUBE 4) AIR EXPULSION TUBE 5) REMOTE CONTROL RECEIVER 6) COOL AIR OUTLET (COMPLETE WITH AIR LOUVERS ) 7) 8) INLET GRILLES 9) CONDENSATE DRAIN HOLE (13) (4) (5) (6) (8) (11) (12) 10) HOT AIR OUTLET REAR VIEW – SIDE FOR HEATING MODE 11) POWER CORD (1) 12) CONCEALED WHEELS 13) BLUE OPERATING LED 14) TOUCH SCREEN REMOTE CONTROL (10) (7) (9) (2) (14) Fix Led: Operation Flash ON-OFF (1 sec. ON – 1 sec. OFF): Stand-By Flash ON-OFF (1/6 sec. ON - 1/6 sec. OFF): Full Tank V 01/12 14 APPLIANCE START-UP Open the packaging and remove the box from above. Remove the product and the other elements supplied (illustrated in the box below). SUN MON W 1 "Touch Screen" remote control 0 TUE S E T WED THU FRI SAT AM PM AUTO FUNC POWE R TIME R SPEED CLOCK/CA N SLEEP CHECK Type AAA batteries for the remote control. WEEK 7 Circular connection to be positioned between the end of the tube and the terminal connection (A+B). Opening kit for installation in window (also for double glazing). Flat connection to be positioned between the air expulsion mouth and the flexible divided up into two parts (A and B), to be joined hose, easily applicable thanks to the convenient magnet system. Flat connection to be positioned between the air expulsion mouth and the flexible hose, positioned between the window leafs. (A) (B) Flat connection Position the product vertically on a firm, flat surface, as close to a window as possible, keeping a minimum distance of 50 cm from walls or other nearby obstacles. Connect the connection (1) to the flexible hose (2) and connect it to the back of the air-conditioner. Extend the hose as necessary to reach the outside. (1) (A) (2) (B) USE WITH TERMINAL CONNECTION FOR WINDOW Connect the end part of the flexible hose to the terminal connection (4) Open the windows and block one of the two leafs with the handle. Rest the terminal connection on the fixed leaf,bring the other leaf of the window close. (4) USE WITH THE WINDOW OPENING KIT Connect the end part of the flexible hose to the circular connection (3) (3) Make a hole with a diameter of 140 mm in the window glass. Insert the window without its closure cap. Remove the hot air terminal connection from the retracting flexible hose. Bring the air-conditioner close to the window and insert the air discharge tube. Avoid tight curves and folds in the flexible hose. NO! Connect the power cord to a suitable electrical socket (230V). Insert the batteries supplied into the remote control, respecting polarities. V 01/12 15 HOW TO USE THE APPLIANCE This appliance can be used to Cool, Dehumidify, Fan and Heat. In changing from one mode to another, the fan continues operating but the compressor stops; the compressor starts up again 3 and a half minutes later. This delay in start-up protects the compressor from any damages. IMPORTANT! To operate in Cooling, Dehumidifying and Fan mode, the air-conditioner must be positioned with the air outlet fitted with deflectors positioned to the front. To operate in Heating mode, the appliance must be rotated 180º so as to have the air outlet without deflectors to the front; using the remote control or Power switch on the control panel, select the Heating mode (see the chapter entitled OPERATION). Cooling, Dehumidifying and Fan Heating THE DISCHARGE TUBE MUST BE CONNECTED to the appliance AT ALL TIMES: the only exception is when the appliance is used for Dehumidification only, in which case it is recommended that the appliance discharges directly into the environment to obtain maximum efficiency (see the paragraph entitled "Dehumidification Mode"). Clean the air filters under the easily removable side panels regularly to keep the air-conditioner working efficiently. OPERATING MODES 1. COOLING MODE The first time it is turned on, the air-conditioner will operate in Cooling mode with the temperature set to 25ºC by default. The temperature can be adjusted between 17° and 30°C. In this way, each time the Power button is pressed, the unit switches off, the appliance saves the temperature set and when switched back on again, it will retain this setting. In this way, fan speed can be adjusted, the Timer, Sleep function and day of the week can be set. 2. DEHUMIDIFICATION MODE Press to select Dehumidification until the relevant icon appears. The temperature is controlled by the electronic card and cannot be regulated. In this way, each time the Power button is pressed, the unit switches off, the appliance saves the settings and when switched back on again, it will retain them. Fan speed is fixed to low and cannot be adjusted. NOTE The air-conditioner does not cool the environment when operating as a dehumidifier. When the appliance is used as a dehumidifier, the flexible hose must not be connected. For maximum dehumidification efficiency, leave the rear discharge attachment free to discharge directly into the environment. Dehumidification mode is recommended in autumn and winter. If used in the summer, it is best to leave the flexible hose attached, in order to send the hot air outside rather than releasing it into the environment. During dehumidification, it is best to ensure continuous drainage (see paragraph entitled "HOW TO ELIMINATE CONDENSATION"). V 01/12 16 3. HEATING MODE Press to select Heating until the relevant icon appears. By default, the temperature is set to 25ºC. The temperature can be adjusted between 15° and 25°C. In this way, each time the Power button is pressed, the unit switches off, the appliance saves the temperature set and when switched back on again, it will retain this setting. In this way, fan speed can be adjusted, the Timer and Sleep function can be set. TO USE THE AIR-CONDITIONER IN HEATING MODE, ROTATE THE PRODUCT 180º AROUND ITSELF AND CONNECT THE CONNECTOR AND THE FLEXIBLE HOSE AS USUAL; THEN SELECT THE HEATING FUNCTION ON THE REMOTE CONTROL OR, IF YOU DO NOT HAVE A REMOTE CONTROL, ON THE CONTROL PANEL. 4. FAN MODE Press to select Fan until the relevant icon appears. When the unit operates in this mode, the display will show FF and the icon This enables the adjustment of fan speed. The temperature cannot be regulated. lights up. HOW TO ELIMINATE CONDENSATE This equipment automatically vaporises the condensation in Cooling and Heating mode. Ensure that when the unit operates as Cooling or Heating, the rubber cap that closes the discharge hole at the back is correctly positioned. When the air-conditioner operates on Cooling and Heating, there is no need to arrange for continuous drainage of condensate; only in specific weather conditions where air humidity levels are very high may water deposit within the unit. When the internal tank is full, the blue LED flashes to warn that it is full and blocks the appliance function. To empty the internal tank, release the two upper sides of the left grille (front view of the air-conditioner) and remove the lower part too, pulling it gently towards you, removing the panel completely. Release the tube from above and rotate downwards; then connect to a plastic tube or tank to drain the condensation, placing the other end above a normal drain: press the PUMP BUTTON on the control panel near this tube to activate the condensation drainage pump. This will enable the easy elimination of the condensation from the unit, collecting it into another container for potential re-use. Replace the tube in its original position, close the panel and start using the airconditioner again. ATTENTION! When using the air-conditioner in Dehumidification mode, we recommend always ensuring continuous drainage, in order to guarantee maximum dehumidification efficiency. V 01/12 17 REMOTE CONTROL OPERATION Insert the batteries into the remote control respecting the specified polarities. Only use type AAA or IEC R03 1.5V batteries. Remove the batteries if the remote control is not used for a month or longer. Do not attempt to recharge the batteries. Change all batteries at the same time. Do not throw batteries onto a fire, they may explode. INFORMATION FOR CORRECT DISPOSAL OF THE PRODUCT IN ACCORDANCE WITH EUROPEAN DIRECTIVE 2006/66/EC Please replace batteries when flat: at the end of their useful life, batteries must not be disposed of with unsorted waste. It must be must be delivered to appropriate separated waste disposal plants or to dealers that provide a similar service. Separate waste disposal of batteries prevents potential negative effects on the environment and human health resulting from inadequate disposal, and also allows the materials from which it is made to be recovered and recycled in order to achieve significant savings in terms of energy and resources. The separate disposal obligation is underlined by the crossed-out dustbin symbol appearing on the battery. Illegal disposal of the product by the user shall result in the application of administrative sanctions as defined by current regulations. FOR OPTIMAL REMOTE CONTROL FUNCTION, POINT THE HEAD OF THE TRANSMITTER TOWARDS THE RECEIVER ON THE AIR-CONDITIONER. Remote control receiver Transmitter head (1) SIGNAL TRANSMITTER (2) FUNCTION DISPLAY (3) FUNCTION SELECTION BUTTON Press this button to select the different operating modes. 1) Pre-set function: Cooling. V 01/12 18 2) Function sequence (select by pressing this button consecutively) Cooling → Dehumidification 4)Press and hold the Fahrenheit → Heating → Fan button for ten seconds to change the temperature display from degrees Celsius to degrees . (4) TEMPERATURE ADJUSTMENT BUTTON Increase (+): 1) Enables the adjustment of the temperature desired in Cooling and Heating modes 2) Each time the (+) button is pressed, the temperature set increases by 1ºC; by holding the button pressed, the temperature increases continuously. Decrease (-): 1) Enables the adjustment of the temperature desired in Cooling and Heating modes. 2) Each time the (-) button is pressed, the temperature set decreases by 1ºC; by holding the button pressed, the temperature increases continuously. (5) ON/OFF BUTTON Press the POWER button to switch the unit on or off. When switched on, the appliance will start to operate as it was last set (save function). (6) SLEEP BUTTON 1) By pressing the button once, the unit enters sleep mode and the display shows the icon ; by pressing the button a second time, the unit leaves sleep mode and the icon disappears from the display. When activating the sleep function in Cooling mode, the temperature set increases automatically by 0.5ºC every half hour for the next 2 hours: it then remains stable for the rest of the night. When activating the sleep function in Heating mode, the temperature set decreases automatically by 0.5ºC every half hour for the next 2 hours: it then remains stable for the rest of the night. 2) Each time the electricity power supply is disconnected, sleep mode is cancelled. To restore, simply press the SLEEP button once. Each time the appliance is switched off, sleep mode is cancelled. To restore, simply press the SLEEP button once. (7) TIMER BUTTON (Auto-on/ Auto-off) If the date and time have been set, by pressing this button consecutively, the timer can be set. 1)Auto-on When the appliance is off, by pressing the TIMER button the time remaining before the unit is to switch on can be set: select hours and minutes. 2)Auto-off When the appliance is on, by pressing the TIMER button the time remaining before the unit is to switch off can be set: Select hours and minutes. 3)When setting the Auto-on timer, the icon lights up. When setting the Auto-off timer, the icon lights up. FAN SPEED SELECTION BUTTON (8) Press and hold this button for 1 second to select the different fan speeds. 1) There are 3 possible speeds to be selected in addition to Automatic mode: ) Medium( ) High( ) Low( 2) When activating the unit for the first time, fan speed is pre-set to medium. 3) In all modes, each time POWER is pressed to switch the unit off, the appliance saves the fan speed set and maintains it when switched back on again. V 01/12 19 (9) CALENDAR and CLOCK BUTTON 1) Clock settings: With the air-conditioner off, press and hold the button for 5 second to display the time and date. Use the (+) and (-) buttons to choose the correct date and press clock to set the hours, again using (+) and (-), then clock to move onto the minutes, to be set using (+) and (-), and then confirm by pressing clock once again. 2) When the parameters flash, adjust the value. After having set it, press to confirm and move onto the next setting. If no action is taken within 15 seconds, the clock settings are reset. 4)DAILY/WEEKLY TIMER After having set the clock, press and hold The first icon on the display for 1 second to set the time with reference to a day of the week. indicates that the unit is set to auto-on mode; set hours and minutes for auto switch on by using the TIMER button to move from one setting to the next. After having set the auto-on time, the icon will appear, which indicates auto-off: set the hour and minutes for auto-off by using the TIMER button to move from one setting to the next. Upon completion, the icon will appear, indicating that the unit starts the weekly cycle. Each time the button is pressed, the parameters follow on from each other in the following order: Setting day of the week→ auto-on hour → auto-on minutes → auto-off hour → auto-off minutes → weekly cycle. (when the parameters flash, if no action is taken within 15 seconds, the display reverts to showing normal time). To change the day of the week, use the (+) and (-) buttons. When the parameters flash, adjust the value using "+" and "-". Upon completion, press onto the next setting. During settings, press and hold to confirm and move can be pressed to cancel prior settings. After having set all parameters, for 3 seconds to activate the timer function and the icon will appear; press and hold or for 3 seconds to pause or cancel the timer and the icon disappears. To reactivate the timer, simply press and hold for 3 seconds. When the timer starts, the display will show the icon the weekly programme. for auto-on, the icon for auto-off and the icon for 3 consecutive sounds “bi bi bi” indicate that weekly timer is active. (10) CHECK BUTTON Press and hold the button for 1 second to show all timer settings of the week: press "+" and "-" to control these settings. When checking the settings, press Press and hold Press and to cancel the setting you are checking. for 10 seconds to lock the control panel, with the icon at the same time to remove the lock and the icon . will disappear. Once all these settings are complete, remote control back-lighting will turn off: to reactivate, simply press any button. V 01/12 20 RESETTING THE REMOTE CONTROL Remove the battery; the LCD display will turn on for two seconds. After two seconds, the unit will enter stand-by mode. At this point, press the Power button to turn the unit on and set the desired mode. OPERATION WITHOUT A REMOTE CONTROL If the remote control is not working or has been lost, the buttons on the control panel can be used. 1. "POWER" BUTTON (SWITCHING ON/FUNCTION SELECTION (Cooling/Heating/SWITCHING OFF) By pressing this button consecutively on the control panel, the unit is activated, cooling mode is selected, heating mode is selected and finally the appliance is deactivated. For Dehumidification mode, always use the remote control. 2. "PUMP" BUTTON (CONDENSATION DRAINAGE PUMP) By pressing this button, the facilitated condensation drainage pump is activated (only available for the model dados XL). CARE AND MAINTENANCE WARNING! Before carrying out any cleaning or maintenance, unplug from the electric socket. 1. Cleaning the air filters. The air filters must be checked at least once every two weeks of use. Operating with dirty or blocked filters will decrease the effectiveness of the air-conditioner and can cause serious problems. To remove the filters, release the two upper sides of the side suction grilles and leave them in an inclined position, resting on the lower side: now remove the filters, pulling them delicately upwards. Use a vacuum cleaner to remove dust. If this should not suffice, wash the filters with warm water and a neutral detergent if necessary. Rinse with cold water and leave to air dry before replacing. Once the two filters have been replaced, close the grilles once again and return to using the airconditioner. 2. Cleaning the casing. Use a damp and soft cloth to clean the exterior surface of the air-conditioner. Do not use water that is too hot, solvents, petrol or other aggressive chemical compounds, talcum powder or brushes: these may damage the surface or colour of the casing. To remove stains use warm water with a little neutral detergent. Do not pour water onto the air-conditioner to clean it: this may damage the internal components or cause a short circuit. V 01/12 21 3. Storage. When you do not envisage using the air-conditioner for a long time, before storing it away, clean the filters. Keep the appliance in a vertical position at all times. Do not rest heavy objects on the top and, if possible, protect the air-conditioner with a sheet of plastic. 4. Transport. If possible, transport the air-conditioner in a vertical position. If not possible, lie it on its right side; when you reach your destination, immediately return the appliance to a vertical position and wait at least 4 hours before using it to cool. 5. For complete safety, regularly check the condition of the power cord; if it should be damaged through use, to replace it contact the Service Centre. ADVICE FOR MAXIMUM COMFORT AND MINIMUM CONSUMPTION CHECK that: the unit suction and delivery grilles are always free; the air filters are always clean; a dirty filter will decrease the passage of air and reduce the unit performance; doors and windows are closed, to avoid the infiltration of unconditioned air; the flexible hose is correctly positioned, without sharp bends or curves; the room temperature is above 17ºC for cooling, 5ºC for Heating and Dehumidification F-GAS REGULATION (EC) no. 842/2006 Do not release R410A into the atmosphere: R410A is a fluorinated greenhouse gas covered by the Kyoto protocol, with a global warming potential (GWP) of 1975. INFORMATION FOR THE CORRECT DISPOSAL OF THE PRODUCT IN ACCORDANCE WITH EUROPEAN DIRECTIVE 2002/96/EC When this appliance reaches the end of its useful life, it must not be disposed of with household waste. It must be delivered to appropriate separated waste disposal plants or to dealers that provide a similar service. Separate waste disposal of an electrical appliance prevents potential negative effects on the environment and human health resulting from inadequate disposal, and also allows the materials from which it is made to be recovered and recycled in order to achieve significant savings in terms of energy and resources. The separate disposal obligation is underlined by the crossed-out dustbin symbol appearing on the product. Illegal disposal of the product by the user shall result in the application of administrative sanctions as defined by current regulations. www.argoclima.com V 01/12 22