1
Register your product and get support at
www.philips.com/welcome
220TV4LB
EN
User manual
Contents
1 Notice 2
7 Troubleshooting 19
Picture issues 19
Sound issues 19
Computer connection issues 20
Contact us 20
2 Important 3
3 Your Monitor 6
Monitor controls 6
Remote Control 6
Remote control usage 8
4 Use your Monitor 9
Switch channels 9
Watch connected devices 10
Adjust Monitor volume 10
5 Use more of your Monitor 11
Access Monitor menus 11
Picture Setting 11
Sound Setting 11
Settings Menu 12
Channel Search 12
Channel Edit Menu 13
Other Adjustments 13
Sound and OSD 14
PC setting 14
Media Functions (USB) 14
USB menu settings for Music play 15
6 Product information 17
Supported display resolutions 17
Multimedia 17
Tuner/Reception/Transmission 17
Remote control 17
Power 17
Supported Monitor mounts 17
Product specification 18
EN
1
1Notice
2012 © Koninklijke Philips Electronics N.V.
All rights reserved.
Philips and the Philips Shield Emblem are
registered trademarks of Koninklijke Philips
Electronics N.V. and are used under licence
from Koninklijke Philips Electronics N.V.
Specifications are subject to change without
notice.
Warranty
• Risk of injury, damage to monitor or void
of warranty! Never attempt to repair the
monitor yourself.
• Use the monitor and accessories only as
intended by the manufacturer.
• Any operation expressly prohibited in
this manual, or any adjustments and
assembly procedures not recommended
or authorised in this manual shall void the
warranty.
• Warranty coverage begins from the day
you purchase your monitor. For two years
thereafter, your monitor will be replaced
by at least an equivalent monitor in case
of defects provided by the warranty
coverage.
2
EN
Pixel characteristics
This monitor product has a high number of
color pixels. Although it has effective pixels of
99.999% or more, black dots or bright points of
light (red, green or blue) may appear constantly
on the screen. This is a structural property of
the display (within common industry standards)
and is not a malfunction.
Please refer to the Pixel Policy section in this
manual for details.
VESA, FDMI and the VESA Mounting Compliant
logo are trademarks of the Video Electronics
Standards Association.
® Kensington and Micro Saver are registered
US trademarks of ACCO World Corporation
with issued registrations and pending
applications in other countries throughout the
world.
2Important
Read and understand all instructions before you
use your Monitor. If damage is caused by failure
to follow instructions, the warranty does not
apply.
Safety
Risk of electric shock or fire!
• Never expose the Monitor to rain or
water. Never place liquid containers, such
as vases, near the Monitor. If liquids are
spilt on or into the Monitor, disconnect
the Monitor from the power outlet
immediately. Contact Philips Consumer
Care to have the Monitor checked before
use.
• Never place the Monitor, remote control
or batteries near naked flames or other
heat sources, including direct sunlight.To
prevent the spread of fire, keep candles
or other flames away from the Monitor,
remote control and batteries at all times.
•
Never insert objects into the ventilation
slots or other openings on the Monitor.
• When the Monitor is swivelled ensure
that no strain is exerted on the power
cord. Strain on the power cord can
loosen connections and cause arcing.
Risk of short circuit or fire!
• Never expose the remote control or
batteries to rain, water or excessive heat.
• Avoid force coming onto power plugs.
Loose power plugs can cause arcing or
fire.
Risk of injury or damage to the Monitor!
• Two people are required to lift and carry
a Monitor that weighs more than 25 kg
or 55 lbs.
•
When stand mounting the Monitor, use
only the supplied stand. Secure the stand
to the Monitor tightly. Place the Monitor
on a flat, level surface that can support
the combined weight of the Monitor and
the stand.
• When wall mounting the Monitor, use
only a wall mount that can support the
weight of the Monitor. Secure the wall
mount to a wall that can support the
combined weight of the Monitor and wall
mount. Philips Electronics Ltd bears no
responsibility for improper wall mounting
that result in accident, injury or damage.
Risk of injury to children!
Follow these precautions to prevent the
Monitor from toppling over and causing injury
to children:
• Never place the Monitor on a surface
covered by a cloth or other material that
can be pulled away.
• Ensure that no part of the Monitor hangs
over the edge of the surface.
• Never place the Monitor on tall furniture
(such as a bookcase) without anchoring
both the furniture and Monitor to the
wall or a suitable support.
• Educate children about the dangers
of climbing on furniture to reach the
Monitor.
Risk of swallowing batteries!
• The product/remote control may
contain a coin-type battery, which can be
swallowed. Keep the battery out of reach
of children at all times!
Risk of overheating!
• Never install the Monitor in a confined
space. Always leave a space of at least
4 inches or 10 cm around the Monitor
for ventilation. Ensure curtains or other
objects never cover the ventilation slots
on the Monitor.
Risk of damage to the Monitor!
• Before you connect the Monitor to the
power outlet, ensure that the power
voltage matches the value printed on
the back of the Monitor. Never connect
EN
3
the Monitor to the power outlet if the
voltage is different.
Risk of injury, fire or power cord damage!
• Never place the Monitor or any objects
on the power cord.
• To easily disconnect the Monitor power
cord from the power outlet, ensure that
you have full access to the power cord at
all times.
• When you disconnect the power cord,
always pull the plug, never the cable.
• Disconnect the Monitor from the power
outlet and antenna before lightning
storms. During lightning storms, never
touch any part of the Monitor, power
cord or antenna cable.
Risk of hearing damage!
• Avoid using earphones or headphones at
high volumes or for prolonged periods of
time.
Low temperatures
• If the Monitor is transported in
temperatures below 5°C or 41°F, unpack
the Monitor and wait until the Monitor
temperature matches room temperature
before connecting the Monitor to the
power outlet.
Screen care
• Avoid stationary images as much as
possible. Stationary images are images
that remain on-screen for extended
periods of time. Examples include:
on-screen menus, black bars and time
displays. If you must use stationary
images, reduce screen contrast and
brightness to avoid screen damage.
• Unplug the Monitor before cleaning.
• Clean the Monitor and frame with a soft,
damp cloth. Never use substances such as
alcohol, chemicals or household cleaners
on the Monitor.
• Risk of damage to the Monitor screen!
Never touch, push, rub or strike the
screen with any object.
4
EN
•
To avoid deformations and colour fading,
wipe off water drops as soon as possible.
Disposal of your old product and batteries
Your product is designed and manufactured
with high quality materials and components,
which can be recycled and reused.
Waste Electrical and Electronic EquipmentWEEE
This marking on the product or on its
packaging illustrates that, under European
Directive 2002/96/EC governing used electrical
and electronic appliances, this product may
not be disposed of with normal household
waste. You are responsible for disposal of
this equipment through a designated waste
electrical and electronic equipment collection.
To determine the locations for dropping off
such waste electrical and electronic, contact
your local government office, the waste disposal
organization that serves your household or the
store at which you purchased the product.
Your new monitor contains materials that can
be recycled and reused. Specialized companies
can recycle your product to increase the
amount of reusable materials and to minimize
the amount to be disposed of.
All redundant packing material has been
omitted. We have done our utmost to make
the packaging easily separable into mono
materials.
Please find out about the local regulations
on how to dispose of your old monitor and
packing from your sales representative.
Recycling Information for Customers
Your display is manufactured with high quality
materials and components which can be
recycled and reused.
To learn more about our recycling program
please visit www.philips.com/about/
sustainability/recycling.
EN
5
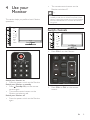
3 Your Monitor
Remote Control
1
3
2
Congratulations on your purchase, and
welcome to Philips! To fully benefit from the
support that Philips offers, register your Monitor
at www.philips.com/welcome.
TV
AV
Ypbpr
HDMI
PC
USB
4
5
6
7
9
Monitor controls
Back
8
Source
10
VOL
CH
11
Mute
VOL
VOL
1
13
VOL
Display
Sleep
15
CH
CH
2
12
14
16
CH
17
MENU
MENU
3
INPUT
/OK
4
POWER
5
20
21
24
25
POWER
a
b CH
: Press to select the next higher
or lower program number.
•
cMENU: Press to open or exit the OSD
menu.
dINPUT/OK: Press to select the input
source.
ePower: Switches the product on/standby
or off.The product is not powered
off completely unless it is physically
unplugged.
b
c
d
e
f
6
EN
Menu
18
19
INPUT
/OK
a VOL +/-: Press to increase or decrease
the sound volume level.
Zoom
•
Freeze
Picture
Audio
MTS
22
23
26
27
(Power)
Press to turn on and off the
Monitor. The Monitor will not
completely power off unless
Monitor power cord is physically
unplugged from the AC power
supply.
(TV)
Press to select TV source mode.
•
(AV/Ypbpr)
Press repeatedly to choose AV or
Ypbpr source mode.
•
(HDMI/PC)
Press repeatedly to choose HDMI
or PC source mode.
AV
Ypbpr
•
PR
•
(USB)
Press to select USB source mode.
(0-9)
Press any number key among 0-9 to
select desired Monitor channel.
g
h
i
•
•
(Source)
• Press to show the list of available
input sources,Press to turn on the
while the Monitor is in standby
mode .
(VOL+/-)
• Press this key to adjust the volume.
k
(CH+/-)
• Press to scroll through the Monitor
channels, also the Monitor will be
turned on while the Monitor is in
standby mode.
m
n
o
•
Display
•
Sleep
•
•
•
(Back)
Press to return back and display the
previous channel or source.
j
l
•
(-/--)
Toggle the channel number bits to (1 digit) / - -(2 digits) / - - - (3 digits)
for faster switching of channels.
•
p
q
(OK)
Press to confirm the setting/
selection of OSD menu unctions.
• TV mode: Press OK key to Display
channel list or favorite channel.
• USB mode: Press OK key to dispaly
media setting function menu while
playing Video/Music/Photo/Text
files.
•
•
(Mute)
Press this key to mute Monitor
sound. Press it again or press the
volume + key to cancel mute.
(Display)
Press to show the information
about the input source or Monitor
channel.
r
(Sleep)
Press to automatically turn off the
Monitor to stand by mode after a
preset period of time.Sleep timer
can be set to off,15,30,60,90 & 120
minutes.
s
(Navigation buttons)
Press to navigate through OSD
menu.
Press DOWN arrow key to enter
into Sub menu from OSD Main
menu.
TV mode: RIGHT/LEFT arrow keys
function are the same as VOL+/, and UP /DOWN arrow keys
function are the same as CH+/-.
USB Media: Used for fast forward or
rewind when music/video playback.
Menu
•
•
•
•
•
•
(Zoom)
Press to resize the aspect ratio of
the picture or optimum viewing
Available aspect ratio are: wide
mode, normal mode, zoom 1, zoom
2; For computer input: normal
mode and wide modes.
(Menu)
Press to activate/exit OSD menu
or return back to previous level of
OSD.
(Red Green Yellow Blue)
Hotkeys, these keys can execute the
action according to the OSD info.
TV mode:Channel menu.
Red:Press to mark selected channel
as Favorite.
Green:Press to Skip the selected
channel from the list.
Yellow:Press to Lock the selected
channel from the list.
EN
7
•
•
•
t
u
v
w
x
y
z
{
8
•
•
MTS
•
•
•
•
•
•
EN
Blue:Press to Delete the selected
channel from the list.
USB mode:
Photo play:Press Red/Green key to
rotate image,Yellow key to display
image info and Blue key to set slide
time. Music/Video play:Press Red
key to change repeat mode.
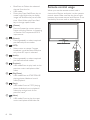
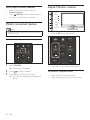
Remote control usage
When you use the remote control, hold it
close to the Monitor and point it at the remote
control sensor. Make sure that the line-of-sight
between the remote control and Monitor is not
blocked by furniture, walls or other objects.
(Freeze)
Press to freeze the current picture
frame while the Monitor is operating
in Monitor AV,Component,HDMI
input source.
(Picture)
Press repeatedly to select required
pre-defined picture modes.
(MTS)
Select mono or stereo if stereo
broadcast is availale.Note: Effective
only when RF input is selected.
(Audio)
Press repeatedly to select required
pre-defined sound modes.
(Previous)
USB mode:Press to play back to the
previous music track/photo slide/
video.
(Play/Pause)
USB mode:Press to START/PAUSE
playing photo slideshow/ music/
video playback.
(Stop)
USB mode: Press to STOP playing
photo slideshow/ music playback/
video play and go back to the
previous menu.
(Next)
USB mode: Press to play the next
music track/photo slide/video file.
~5m
~30˚
TV
AV
Ypbpr
HDMI
PC
USB
Back
Source
VOL
CH
Mute
Display
Sleep
Zoom
Freeze
Menu
Picture
Audio
MTS
4 Use your
Monitor
•
The remote control sensor on the
Monitor switches off.
Tip
•• Your product consumes very little power in
standby mode, but it will still consume a little
power. Unplug the power plug of your Monitor
from the wall socket if it is not to be used for
long time.
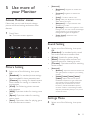
This section helps you perform basic Monitor
operations.
VOL
VOL
1
Switch channels
VOL
CH
VOL
CH
2
VOL
1
VOL
CH
CH
MENU
MENU
3
4
POWER
5
CH
2
INPUT
/OK
CH
INPUT
/OK
MENU
MENU
3
POWER
INPUT
/OK
4
POWER
5
•
INPUT
/OK
POWER
Press CH +/- on the Monitor.
Back
TV
AV
Ypbpr
HDMI
PC
USB
Source
VOL
CH
Mute
Switch your Monitor on
• Press the power switch on the Monitor.
Switch your Monitor to standby
• Press (Standby-On) on the remote
control again.
• The remote control sensor on the
Monitor switches to red.
Switch your Monitor off
• Press the power switch on the Monitor
again.
Display
•
Sleep
Press CH+ or CH- on the remote
control.
EN
9
Other ways to switch channels
•
•
Enter a channel number using the
Numeric buttons.
Press
(BACK) on the remote control
to return to the previous channel.
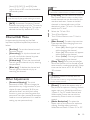
Adjust Monitor volume
VOL
VOL
1
VOL
CH
CH
2
CH
MENU
Watch connected devices
INPUT
/OK
4
POWER
5
Note
•• Before you select a device as a source, switch
the device on.
MENU
3
•
INPUT
/OK
POWER
Press VOL+/- on the Monitor.
Back
Select a device from the source list
Back
Source
VOL
Source
VOL
CH
CH
Mute
Mute
Display
1Press SOURCE
»» The source list appears.
2Press to select a device.
3Press OK to confirm your choice.
»» The Monitor switches to the selected
device.
10
EN
Display
Sleep
•
Sleep
Press Vol +/- on the remote control.
To mute or unmute sound
•
•
Press mute to mute the sound.
Press mute again to restore the sound.
5 Use more of
your Monitor
•
•
•
•
Access Monitor menus
•
Menus help you to install channels, change
picture and sound settings and access other
features.
1
•
Press Menu.
»» The menu screen appears.
Channel
Picture
1---------2---------3---------4---------Favorite
Sound
Setting
•
Lock
Delete
Media
•
Menu Back
Display Exit
1/25
•
•
•
Picture Setting
2 Select one of the following, then press
•
•
•
•
•
•
picture.
[Contrast]: Brightens or darkens the
picture.
[Color]: To add or reduce color.
[Tint]: Video tint adjustment ,Can only
select with NTSC signal.
[Sharpness]: To improve details. Not
available in PC mode.
[Backlight]: Control the brightness of the
backlight from 0 to 100. Lower the backlight
value brightness is low and Higher the
backlight value higher the brightness.
[Color Temp]: Select the color
temperature.
Sound Setting
3 Select one of the following, then press
5---------6---------7---------8---------Skip
[Personal]
• [Brightness]: Brightens or darkens the
OK.
[Standard]: For standard picture settings.
Recommended for home entertainment.
[Cinema]: For viewing film-based content.
Most suitable for viewing in a theater like
environment.
[Vivid]: For Enhancing picture contrast
and sharpness.
[Mild]: Optimizes video for viewing more
mild.
[Sport]: Optimizes video for watching
sports event.
[Game]: Optimizes video for playing game
and entertainment content.
•
OK.
[Standard]: For standard quality sound
with treble and bass at medium level.
[Voice]: Suitable for spoken dialog.
[Music]: Enhance treble and bass and
optimizes sound for listening to music.
[Theatre]: Optimizes sound for watching
movie content.
[Personal]
• [Balance]: Adjust the balance between left
•
and right speakers to adapt to your listening
position.
[300Hz]/[1KHz]/[3KHz]/[8KHz]/
[15KHz]: Adjusts the level of specific
bandwidth frequencies to get customized
sound quality.Increase 300Hz bandwith
frequency bar increases Bass in sound.
Increase in 15KHz bandwidth frequency
increases Treble in sound.Change middle
frequency bandwidth (3KHz) to vary Voice
content in sound.
Settings Menu
4 Select one of the following, then press
OK.
EN
11
•
[Channel Search]: Auto Search, Update
Search, Manual Search.
»» Please refer to “Channel Search”
(p12) for details.
•
[Other Adjustments]: Password Setting
,TV Lock, Blue Screen,Sleep Time, Zoom,
Noise Reduction, DCR, DCC, HDMI/DVI
Switch.
»» Please refer to “Other Adjustments”
(p13) for details.
•
[Sound and OSD]: Language, Menu
Transparency, Menu Timeout, DSS Effect,
AVL, Sound Mode.
»» Please refer to “Sound and OSD”
(p14) for details.
•
[PC]: Auto Adjust, H.Position, V.Position,
Phase and Clock.
»» Please refer to “PC setup” (p14) for
details.
•
[System Reset]
»» You can restore the factory default
picture and sound settings of your
Monitor.The channel settings and TV
lock remains the same.
•
1 Select Channel Search menu.
2 Select Manual Search and press OK key
•
•
•
Channel Search
5 This setting is only available in TV mode.
•
[Auto Search]: Monitor automatically
searches for the channel in the available
frequency band and stores sequentially.
1 Select Channel Search menu.
2 Select Auto Search and press OK
•
key or ► arrow key to tune channels
automatically and store.
3 During auto searching Press Menu key to
•
12
stop search.
[Update Search]: Updates your channel
list by adding new/missed channels to the
end of the list without disturbing previously
stored channels. Updated Search can be
done when Auto Search is interrupted
EN
before searching all channels. It takes same
time as auto search.
[Manual Search]: Search for the
channels manually and store it to the
desired channel number. It can also be
used for editing of channels searched by
auto search if required. Please refer to
“Manual Search description” in next page
for details.
or ► arrow key to get Manual search
sub-menu.
[Channel No.]: Press the ◄/► arrow
button to select desired channel number.
[Channel Name]: To Enter a name
for the selected channel.Press ► arrow
button and then press ▲/▼ arrow
button to select a character.Press ►
arrow to move the cursor to next
position.Program Name can be a word of
maximum 10 characters.To confirm the
name press Menu button.
[Fine Tune]: Press numeric buttons on
remote to manually enter the frequency
if the desired channel frequency is
known.If the desired channel frequency
is unknown then simply press hold ►
button for 3 second to enter into Manual
search mode. If the desired channel is
found press Menu button to store the
channel found to the specified channel
number else press ► button till desired
channel is found.
[Color System]: Press the ◄/► button
to select the required Color system.
Available color systems are [Auto], [PAL],
[NTSC] and [SECAM].India region: Auto
or PAL must be selected as the color
system.
Tip
•• Skip this step if your system setting is correct.
•
[Sound System]: Press the ◄/►
button to select the required Sound
system.Available sound systems are
[Auto], [M], [BG], [I] and [DK].India
region: Auto or BG must be selected as
the sound system.
Tip
Note
•• All the passwords are cleared after a valid
password is entered once in power on mode.
•
•• Skip this step if your system setting is correct.
•
[AFC]: Automatic Frequency Control:
Reduces the tuning error of a TV tuner by
automatically fine tuning the TV tuner to
desired channel. By default AFC is On.
Channel Edit Menu
In these case the shortcut key like Red
key,Green key,Yellow key,Blue key action as
below.
•
•
•
•
[Red key]: To set the channel as user’s
favourite channel.
[Green key]: To skip the channel and
you will not find this channel by press
ch+/- key to change channel.
[Yellow key]: To lock the channel and
user will get the channel only by entering
the password.
[Blue key]: To delete the channel and
user will get the channel only by researching the channel.
Other Adjustments
•
[Password Setting]: The initial
password is 0000. You can change the
password to any 4-digit number of your
choice.A super password 3448 is predefined to enter into child lock setup
function in case you have forgotten the
password.The super password cannotbe
used as a normal password. It is used for
setting up user password only.
1
2
3
•
•
[TV Lock]: You can restrict to access of
the Channel Search menu, so that initial
tuned channels are not disturbed by the
unauthorized users. Access to locked
channels in channel edit menu will be
denied only when TV lock is On.How to
enable the TV lock?
Select the TV lock ON .
Turn off the Monitor.
Turn ON the Monitor, now TV lock is
enabled.
[Blue Screen]: To select the transition
type required while changing from one
channel to another.
• Select [off] : Blank signal will appear
while changing the channel.
• Select [on] : Blue screen will appear
while changing the channel.
• Select [freeze] : Picture get freezed
while changing the channel.
[Sleep Time]: Set a time period after
which the Monitor will be turned off and
enter stand by mode automatically. Sleep
timer can be set to off,15, 30, 60, 90 &
120 minutes.
Tip
•• The Monitor switches to standby after the
specified time.
•• This can also be set by using the Sleep button
on the remote control.
•
•
[Zoom]: To resize the aspect ratio of
the picture for optimum viewing. Availale
aspect ratio are : Wide,Normal,Zoom
1,Zoom 2. For PC mode: Normal and
Wide mode. Picture size can also be
accessed by Zoom button on remote
control.
[Noise Reduction]: To resize the
aspect ratio of the picture for optimum
viewing. Availale aspect ratio are :
Wide,Normal,Zoom 1,Zoom 2. For PC
EN
13
•
•
•
•
mode: Normal and Wide mode. Picture
size can also be accessed by Zoom button
on remote control.
[DCR]: Dynamic contrast ratio: Setup
the contrast of the Monitor set to vary
in accordance with the brightness and
darkness of the picture.
[DCC]: To strengthen the contrast ratio
of Monitor picture. (Not support in PC
source mode).
[HDMI/DVI Switch]: Setting HDMI/
DVI switch, available only in HDMI
source.
[Color System]: Select the required
color system. Available only in AV source.
Note
•• Passwors Setting, TV Lock, Blue Screen
functions are available only in TV mode.
•• Noise Reduction, DCR, DCC will be enable
PC setting
•
•
•
•
•
[Auto Adjust]: Press ► arrow button
to adjust the screen automatically to the
optimal position of the picture.
[H.Position]: Adjusts the horizontal
position of the picture.
[V.Position]: Adjusts the vertical
position of the picture.
[Phase]: Eliminate the vertical interfering
lines.
[Clock]: Eliminate the vertical interfering
lines by adjusting clock frequency.
Note
•• If the PC is connected to the Monitor and no
signal has been input from the PC for more
than 30 seconds, the Monitor enters the
standby mode automatically.
•• This setting is only available in VGA source.
only when the Picture mode is Personal.
•• Press Red key on remote control to reset Blue
screen, Sleep time, Zoom, Noise Reduction,
DCR,DCC,HDMI/DVI Switch, Color System
functions to the default settings.
Sound and OSD
•
•
•
•
•
•
14
[Language]: Select required Language.
English will be the default OSD language.
[Menu Transparency]: To set Menu
Transparency(0%~100%).
[Menu Timeout]: Set time duration for
OSD display.
[Surround Effect]: It can create the
perception that there are many more
sources of sound than are actually
present.
[AVL]: Automatically reduces sudden
volume changes, for example, when
switching between the channels.
[Sound Mode]: Select sound mode:
Mono or Stereo. It is default FM mono
for India region. It can also be accessed by
pressing MTS on the remote control to
directly toggle the modes. Only support
in Monitor source mode.
EN
Media Functions (USB)
Monitor USB port can be used to view JPEG
photos, play mp3 music and Video files,and read
text present in USB devices.
Entering to USB Media
•
•
Press the
Direct USB key on
remote to get USB Media menu as shown
above Or Press the Source key and
▲/▼/◄/► keys on remote and select
USB source to get USB Media menu as
shown above.
Select the Media type (Photo/ Music/
Video/ Text) to be viewed and press OK
key to enter into USB Media and When
USB drive is detected by the Monitor,
USB drive is displayed as a folder on the
screen as shown below. If more then one
USB is pluged to the Monitor two folders
will be displayed. Select the required
drive and press OK key to view subfolder
or files in the USB drive.
Note
•• If USB storage device is plug-in to Monitor
USB port, Media menu will pop up on Monitor
screen irrespective of Input Source.
•• Files of selected Media type can only be
viewed through USB. Media type can be any
one amoung Photo / Music / Video / Text.
Viewing Photos
1
2
3
Thumbnail of the available images will be
displayed on the screen. If no images are
displayed then select the folder containing
the Photos.
To select a particular image and to display
it in fullscreen press key and press OK
key. Slide show starts automatically when
image is viewed in full screen.
Press
key to play/pause slideshow.
Press
to view previous or next
image. Press
key to stop slideshow.
USB menu settings for Photo Slide
show
Press OK key to get following Menu setup
shown above.
1
[Transition Effect] : Select the slide
transition as None, Top To Bottom,
Bottom To Top, Left To Right, Right To
Left, Random.
2
3
4
[Rotate] : Rotate the select photo by 90°
clock wise direction.
[Play Time] : Select the duration of time a
photo is to be displayed.
[Information] : Display the information of
the file.
Playing Music files
1
2
3
Thumbnail of the available music files will
be displayed on the screen. If no files are
displayed then select the folder containing
the music files.
To play particular music file select the
required file and press OK key.
Press
Press
key to play/pause music. Press
to play previous or next track.
key to stop Music play.
USB menu settings for Music
play
Press OK key to get following Menu setup
shown above.
1
2
3
4
5
[Repeat Mode] : Select the repeat mode
as None, Single,Random,All.
[Sound Mode] : Select sound mode like
Pop,Rock,Classical,Dance,Music,Personal.
[Surround Effect] : Turn on or off
Monitor Surround effect.
[Background Music] : Select it to on to
turn off dispaly and to get only sound
from Monitor.
[Information] : Display the information of
the file.
Playing Video files
1
Thumbnail of the available video files will
be displayed on the screen. If no files are
displayed then select the folder containing
the video files.
EN
15
2
3
To play particular video file select the
required file and press OK key.
Press
key to play/pause video. Press
to play previous or next
video. Press
key to stop video play.
USB menu settings for Video play
Press OK key to get following Menu setup
shown above.
1
2
[Repeat Mode] : Select the repeat mode
as None, Single,All,Random.
[Information] : Display the information of
the file.
Reading Text files
1
2
3
[Next Page] : Select the duration of time
a page is to be displayed.
[Display Mode] : Select the text display
mode as 4:3 and 16:9.
[Font Size] : Select the text font size.
Formats supported to multimedia
mode: Photo, Music, and Video.
Picture
Audio
Video
16
EN
Format
Resolution
Type
JPEG
16128x16128
Baseline JPEG
Note
Format
Sample Rate
Date Rate
Channel
MP3
8-48 KHz
8-320 Kbps
Mono/
Stereo
Format
File Extension
Codec
Data Rate
Real
media
RM/.RMVB
RealVideo
8/9
Max
1200Kbps
MPEG1/2
DAT/.MPG
MPEG-1/2
Video
Max
3000Kbps
MPEG4
AVI /.MP4
DIVX3/4/5/6/
XviD/H.264
Max
1500Kbps
Tip
•• USB interface of digital multimedia player is
not all-purpose. So when some USB devices
could not be recognized, the problem is usually
not the performance failure but due to device
driver.
•• Because USB devices and memory capability
are different, the time needs for multimedia
player to read information are also different.
So the information reading speed of the
player temporarily getting slow are not the
performance failure.
•• The voltage supplied to USB interface is 5V,
and the most electrical current is 500mA.
When some interface criteria of USB devices
are different from standard USB protocol,
digital multimedia player may be unable to
recognize USB devices correctly, which is
normal status.
•• USB could be used as an interface to update
software.
•• If some files source could not play because
of the parameter decoding-limitation, the
problem is not performance failure.
•• The system only applies to memory medium
with FAT format.
•• The system can not support dynamic Gif
format.
6Product
information
Product information is subject to change
without notice. For detailed product
information, go to www.philips.com/support.
Supported display resolutions
Computer formats
• Resolution - refresh rate:
• 640 x 480 - 60Hz
• 800 x 600 - 60Hz
• 1024 x 768 - 60Hz
• 1360 x 768 - 60Hz
• 720 x 400 - 70Hz
• 1920 x 1080 - 60Hz
Video formats
• Resolution - refresh rate:
• 480i - 60Hz
• 480p - 60Hz
• 576i - 50Hz
• 576p - 50Hz
• 720p - 50Hz, 60Hz
• 1080i - 50Hz, 60Hz
• 1080p - 50Hz, 60Hz.
Multimedia
•
•
Supported storage device: USB (Only
FAT or FAT 32 USB storage devices are
supported)
Supported multimedia file formats:
• Images: JPEG
• Audio: MP3, WMA
• Video: MPEG 2/MPEG 4, H.264,
WMV
Tuner/Reception/
Transmission
•
•
•
•
Antenna input: 75ohm coaxial (IEC75)
Monitor system: PAL,B/G
Video playback: NTSC, SECAM, PAL
Tuner Bands: UHF, VHF
Remote control
•
•
Type: RL76E-1
Batteries: 2 x AAA (LR03 type)
Power
•
•
•
•
Mains power: 100-240V, 50Hz-60Hz
Standby power: ≤1W
Ambient temperature: 5 to 40 degrees
Celsius
Power consumption
• 220TV4LB: 50W
Supported Monitor mounts
To mount the Monitor, purchase a Philips
Monitor mount or a compatible Monitor mount.
To prevent damage to cables and connectors,
leave a clearance of at least 2.2 inches or 5.5cm
from the back of the Monitor.
Warning
•• Follow all instructions provided with the
Monitor mount. PE Electronics Ltd bears no
responsibility for improper Monitor mounting
that results in accident, injury or damage.
EN
17
Monitor
screen
size
(inches)
21.5
Required
pitch (mm)
75 x 75
Required mounting
bolts
4 x M6
(Suggested length
18mm)
Product specification
Design and specifications are subject to change
without notice.
220TV4LB
• Without Monitor stand
• Dimension(WxHxD): 520 x 340 x
38 (mm)
• Weight: 3.62 kg
• With Monitor stand
• Dimension(WxHxD): 520 x 380 x
144 (mm)
• Weight: 3.8 kg
18
EN
7Troubleshooting
This section describes commonly encountered
issues and accompanying solutions.
Picture issues
No picture:
•• Check the Power Saving settings.
Cannot receive any channels:
•• Make sure the power cord is connected
securely. Turn on the power of the
Monitor.
•• Check antenna/cable connections. Make
sure the Cable setting is correct for your
Monitor signal source.
Monitor is locked to one channel:
•• Perform Auto Program to add receivable
channels that are not present in the
Monitor’s memory.
Cannot receive or select:
•• Perform Auto Program to add receivable
channels that are not present in the
channels Monitor’s memory.
•• To receive or select cable channels, make
sure that Cable in the Channel settings is
set to On.
•• To receive or select UHF channels over
an antenna, make sure Cable is set to Off.
The Monitor turns off:
•• Check if Sleep Timer is activated, or
confirm the Duration setting of Timer
automatically.
•• Check PC Power Management in General
Settings.
No picture from some video:
•• Check the connection between the
optional video equipment and the
Monitor Sources.
•• Press INPUT on the remote control.
•• Select your desired input from the
External Inputs list.
The quality of the images is not as good as
what I saw at the store:
•• Picture quality depends on the signal
content. See Quick Start Guide (supplied)
to display the best possible picture for
that signal.
Double images or ghosts:
•• Check antenna/cable connections.
•• Check the antenna location and direction.
Only snow and noise appear on the screen.
•• Check if the antenna is broken or bent;
Check if the antenna has reached the end
of its serviceable life. (3-5 years in normal
use, 1-2 years at the seaside.)
Dotted lines or stripes:
•• Keep the Monitor away from noise
sources such as cars, motorcycles, or hairdryers.
•• If using 300 ohm twin lead, move the
excess lead away from the Monitor or try
using 75 ohm coaxial cable instead.
No color/Dark picture/Color is not correct/
The picture is too bright:
•• Press PICTURE to select the desired
Picture Mode; Adjust the Picture Mode
options in the Picture settings.
Noisy picture:
•• Make sure that the antenna is connected
using a 75-ohm coaxial cable.
•• Keep the antenna cable away from other
connecting cords.
•• To avoid Monitor interference, make sure
to use an undamaged antenna cable.
Sound issues
Good picture, no sound:
•• Check the volume control. Press MUTE
or VOL + so that
disappears from
the screen.
•• Disconnect your headphones.
•• For HDMI equipment, confirm that the
audio output setting of the connected
equipment is set to PCM.
EN
19
••
This Monitor's HDMI inputs support
PCM 32, 44.1 and 48kHz.
Audio noise:
•• Make sure that the antenna is connected
using a 75-ohm coaxial cable.
•• Keep the antenna cable away from other
connecting cords.
•• To avoid Monitor interference, make sure
to use an undamaged antenna cable.
Computer connection issues
No Picture / No Signal:
•• Confirm the PC is correctly connected to
the Monitor with either the PC IN (with
an HD15 cable) or with the HDMI IN.
•• Ensure the output signal from the PC is
one of the formats listed on page 15.
•• Turn the PC off. Confirm the PC
connection and restart the PC. Plug and
play will auto-detect the Monitor and
correctly set up PC timing.
•• Verify PC Power Management is
activated.
Poor Picture:
•• Adjust the resolution. Adjust Pitch and
Phase.
Suddenly the picture gets smaller:
•• The picture gets smaller during the
commercials, this is due to the method
the provider broadcasts their contents.
When HD content channels switch to
SD definition content (commercials), the
picture may be small with a black border.
Black bands appear at the edges of the screen:
•• Some wide screen programs are filmed
in aspect ratios that are greater than 16:9
(this is especially common with theatrical
releases). Your Monitor will show these
programs with black bands at the top and
bottom of the screen. For more details,
check the documentation that came with
your DVD (or contact your program
provider). Programs in 4:3 aspect ratio
will have bands on left and right sides of
the screen.
20
EN
Certain programs on DVD or other digital
sources display a loss of detail, especially
during fast-motion or dark scenes:
•• This is due to the digital compression of
the source content used by certain digital
broadcasts and DVDs which may cause
your Monitor’s screen to display less
detail than usual, or cause artifacts (small
blocks or dots, pixilation) to appear on
your screen. These signal compressions
are more visible and are dependent on
the clarity and resolution of the Monitor.
Remote control does not operate:
•• Check the polarity of the batteries or
replace the batteries.
•• Point the remote control at the remote
control sensor located at the front of the
Monitor.
•• Fluorescent lamps can interfere with your
remote control operation; try turning off
the fluorescent lamps.
•• Keep the remote control sensor area
clear from obstacles.
Contact us
If you cannot resolve your problem, refer to
the FAQs for this product at www.philips.com/
support.
If the problem remains unresolved, contact
Philips Consumer Care in your country as
listed in the Addendum.
Warning
•• Do not attempt to repair the product yourself.
This may cause severe injury, irreparable
damage to your product or void your
warranty.
Note
•• Make a note of your Monitor model and serial
number before you contact Philips. These
numbers are printed on the back of the
Monitor and on the packaging.
Version: M4220TVE1INT
2012 © Koninklijke Philips Electronics N.V. All rights reserved.
Specifications are subject to change without notice.
Philips and the Philips Shield Emblem are registered trademarks of
Koninklijke Philips Electronics N.V. and are used under license
from Koninklijke Philips Electronics N.V.
www.philips.com
X41G22MV81301A


![[User manual] - KX_series_user_EN](http://vs1.manualzilla.com/store/data/005985322_1-73e2348e6003cbf1e0abe0da04f5dcec-150x150.png)