1
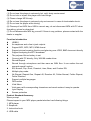
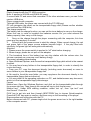
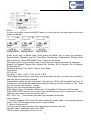
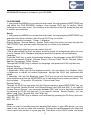
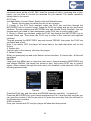
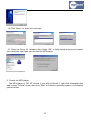
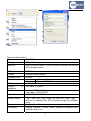
MP186
MP3 & VIDEO PLAYER
with FM radio
Instruction manual
please read this manual carefully before operation
Read Before USE
(1) Do not use this player in extremely hot, cold, dusty environment.
(2) Do not rub or impact this player with hard things.
(3) Please charge MP4 timely.
(4) Do not use this player in extremely dry environment in case of electrostatic shock.
(5) Do not use the player while driving.
(6) Please pull out MP4 from USB in correct way, do not disconnect MP4 with PC when
formatting, upload or download.
(7) Do not disassemble MP4 by yourself. If there is any problem, please contact with the
dealer or supplier.
Function introduction
z
USB2.0
z
An earphone and a line-in jack outputs
z
Support MP1, MP2, MP3, WMA format
z
Support picture browsing function and glancing over JPEG, BMP document directly
z
Support analyzing the MTV broadcast
z
The polymer lithium battery in set
z
Connect with PC directly, Only WIN 98 needs driver.
z
Record/Repeat
z
Record through microphone and then save as WAV files. It can realize the real
numeral repeat function.
z
EQ: Normal, Pop, Rock, Classical, Jazz, Bass, and Custom EQ.
z
Multiple play mode:
z
No Repeat, Repeat One, Repeat All, Random All, Folder Normal, Folder Repeat,
Folder Random.
z
Support multiple languages
z
FM function
z
Vivid Menu
Vivid menu with corresponding characters and words makes it easy to operate.
z
Lyric Display
z
Screen protection
Product Standard Accessory
Warm prompt:
Please inspect in your MP4 player packet whether has following things:
1. MP4 player
2. Earphone
3. Instruction book
4. USB cable
1
Key Operation
1.
PLAY: Play/Pause /On/Off
2.
MENU: Return to the menu/Enter to the menu
3.
VOL+: Increase Volume
4.
VOL-: Decrease Volume
5.
NEXT: Next. Fast backward
6.
PREV: Last. Fast forward
7.
A/B: A/B Repeat
8.
Power: Power On/ Power Off
Key definition
Key press includes: short press/long press /press/press once. (NO definition, belongs to
short press)
Short press: Will be valid when press
Long press: Will be valid if pressing after 2 seconds.
Press once: Will be valid frequency when you loose your hands if press all the time.
Press: Will be valid when off the pressing, it can be affected in certain frequency, such as;
fast forward/fast backward.
Lock function
In starting condition, simultaneously presses the Play key and the MENU key to realize
the lock function, Press again to unchain lock.
A/B function
In the play state, short press the VOL key, then get into the A/B mode.
VOL+/VOL- function
When the player is on, in any state, long press the
VOL key then the volume icon gets into green, through the PREV key, the volume would
be decreased, and through the NEXT key, the volume would be increased. Long press
the VOL key again or wait for a moment, the volume icon will back to the color before
change.
Display of battery icon
The power is 3.7V;it indicates full power, as been used, the remained real time of the
power will be displayed.
When the battery is used up, the battery icon becomes empty to show a recharge is
needed.
2
Use player first step
Player connects with the PC USB connection
Note: It applies to WIN 98 and WIN98 SE users.
If connect with PC and cannot find moveable CD for other windows users, you can fix the
random USB drive.
Player connects with computer
Through USB cable, the player can connect with the PC USB port.
PC can recognize the player as the transportable floppy disk (Please confirm whether
you had fixed the USB drive).
The charge explained
The battery has the charge function; you can set the inner battery to carry on the charge.
When first use, in order to lengthen the batteries service life, you must exhaust the
battery capacity, then carry on the charge.
1.
Carry on the charge through the player connecting with the computer, this time
press any key randomly is invalid.
2.
Connect with the power source to start the charge. When normal charge, the red
and green light of the power source adapter become bright. If the play filled with
electricity, the green light will extinguish automatically.
Attention:
1. Please ensure the power switch is pushed to “off” state before charging.
2. When charge, please do not pull out the adapter.
3. The broadcast time of the battery has very big relation with the volume size; the
volume oversized can consume much battery energy.
Document uploading/downloading
a. Open Windows Explorer, and choose the transportable floppy disk which is the newest
founded.
b. You may found many folders in the transportable floppy disk, in order to classify the
music document.
c. From your PC, copy the document directly (including music document) or move to
some folders in your transportable floppy disk.
d. No need to found the new folder, you may copy/move the document directly to the
transportable floppy disk root directory.
e. You may defer to the operating procedure on PC, and delete/rename any document,
which is in the transportable floppy disk storage.
Format
Method one: Open the Windows Explorer, and click on the transportable plate through
the mouse right key. Then through the mouse left key to click format menu.
Method two: Under MP4 starting condition, select “set up”, then “sys tool” and
then“format”. Press the
PLAY key to get into and then through NEXT/PREV key to choose Quick/complete.
Press the PLAY key again to confirm, and then carry on the formatting of the player.
Disconnection and connection with the PC
Before disconnect with PC, please single-click the green arrow icon in the right taskbar
of the computer screen.
3
When system prompts safely detachment of the hardware, only then you can pull out the
player from the USB connection.
If above steps not completed, pull out the player may cause great error or the data of the
player will get lost.
Display and operation explanation
Power on
Power off
Main menu
1. On
In power-on state, long press the PLAY key to enter the main menu options selection
interface. Under main menu condition, short press the PREV/NEXT key you can repeat
choosing each option. Then press the PLAY key to enter the submenu or to determine
this function.
Entering the different function pattern from the main menu and the main function as
below:
MUSIC
FM RADIO
VOICE
PHOTO
VIDEO
FILE BROWSE
SETUP
EBOOK
2. Off
2.1Exit
Long press the MENU key then it will get out from the running menu and return to the
main menu interface.
2.2off
Under the start condition, Long press the PLAY key, the player can enter the closedown
condition or turn the power key to the left to shut off the power.
3. Interface explanation
4
Music
In main menu state, select the MUSIC option, you will get into the stop state of the music
pattern as default.
Waiting status
playing status
Pause status
Under music play or pause state, short press the MENU key to enter the submenu:
Repeat Mode, Equalizer, and 3D, Play Rate, File Browse, Classification, Playlist, Slide
Show, and ACL. Press PREV/NEXT key to carry on the choice.
Through the PLAY key to confirm your choice and each option also has the submenu:
Repeat: No Repeat; Repeat One; Repeat All;; Random All; Dir Normal; Dir All Repeat;
Dir Random All.
Equalizer: Normal; Pop; Rock; Classic; Jazz; Bass;
Custom EQ.
3D: Off; On.
Play Rate: 1.00X; 1.14X; 1.33X; 0.67X; 0.80X
File Browse: Select the file you want, and press the play key to confirm your selection,
and then the song would be played.
Classification: when the first time used, it will ask you YES or NO to refresh the files. To
choose yes, the files will be classified according to Genre or Artist or Album or Title. Then
you can choose your favorer to play.
Playlist: you can choose playlist to play.
Slide Show: Close, 5 Seconds; 10Seconds; 15 Seconds; 30 Seconds; 60 Seconds.
Press PREV/NEXT key to carry on the choice, press the play key to confirm your choice,
and press the menu key to exit out the menu.
ACL: Off or On. This function can make you listened comfortably.
Lyrics display
1. The play supports LRC format file, when entering the play state, it can display relevant
lyrics if only LRC file name same as the song file name.
2. How to use lyrics file?
Let the Lyrics file name and song file name keep the same, such as:
Song file name: yesterday once more .MP4
LRC file name: yesterday once more .lrc
5
A/B Repeat function
Under play condition, press the A/B key one time, choose the start point of the repetition;
press A/B key two times, then choose repetition end point, and start to duplicate
broadcasts the paragraph which has been selected; press A/B key for the third time, then
cancels the repeat paragraph.
Slide show
The explanation for the “slide show”as below:
1.Install the folder named “Slide Show Maker” in the CD attached.
2. Open the slide show maker folder to find “SLS maker.exe”.
3. Double click the icon “
”,and then you will get below picture:
3. Load the images from your computer (the image size is 160X128), you can move the
image up/down or delete the image.
4. Select the preview mode and then click “preview”.
5. Click “transform” and save the file in the SLS.DIR folder, which you have set up in step
1. The picture as below:
6. Move the player from the computer.
7. Open the player and in the music play mode, short press the menu keys then get into
the submenu. Select” Slide Show” and press the play key for confirmed, you can select
the slide show time, press the play key to confirm and press the menu key to exit out.
8. When return to the music play mode, after the slide show time, the display screen
would play slide show.
FM
Long press the MODE key to enter the main menu, through pressing NEXT/PREV key
and choose FM, then press PLAY key to confirm enters. (As picture 1)
Picture1
Picture2
Picture3
Picture4
6
Press the play key again, you can adjust the FM frequency by hand through the
NEXT/PRVE key. Press the MENU key then get into FM Submenu, through the
NEXT/PREV key, you can select: Save Station, Auto Scan (as picture 2)
If you select the “Save Station” option, and press the play key for confirmed then the
station would be kept. Press the play key again, you can see that the station has been
saved (as picture 3). Press the menu key, then you can select: Del Station or Auto Scan.
If you select “Del Station” and press the play key for confirmed then the present station
would be delete.
Note: if there is station kept in the player you can change the state between “Normal”
and “Preset”(picture 1 and picture 3), and only in the Preset state, you can get into
picture 4(that is to say you can Delete station)
If you select the “Auto Scan” option, press the play key for confirmed, then you will get
into the preset state (as picture 3). But the frequency would be changed quickly.
After Auto scan, the station that scanned would be
Saved, and the station also can be deleted as above measure. When Auto Scan, press
PREV key or NEXT key would stop Auto scan.
FM Record
Press the VOL key, then it begins FM Record, press the play key, it would pause the
record; long press the menu key then the record would be saved and back to the
"Normal" state. The picture as below:
Recording
Record Pause Saving record Normal state
VOICE
Long press MENU key to enter the main menu, through pressing NEXT/PREV key to
choose Voice, and press PLAY key to confirm.
If there are recorded files in the player, press the play key and then begin to play.
Record
In voice pause/stop state, press the vol key, then begin to record, the picture as below:
Voice stopped
Voice playing
Recording
Press the menu key and then the recorded file would be saved and return to the voice
stopped interface .In voice state, press the menu key, you can get the submenu: Repeat
Mode, Equalizer, 3D, Play Rate, File Browse; which is same as the Music mode, please
refer to it.
PHOTO
7
1. Long press the MENU key to enter the main menu, through pressing NEXT/PREV key
and select the Photo interface, then through PLAY key to confirm. When entering from
the main menu, the condition is the selection of the file. (As picture 1)
If there is no document, the directory is empty.
Press the PLAY key, and then enter the picture browsing condition.
Press the NEXT/PREV key, you can choose the next/previous picture.
2. Enter the picture browsing condition, as picture 2.
Picture1
Picture2
Press the NEXT/PREV key, and choose next/previous picture.
Short press the MENU key, and return to the selection of the file condition.
Long press the MENU key to return to the main menu.
VIDEO
Long press the MENU key to enter the main menu, through pressing NEXT/PREV key
and select the VIDEO interface, then through PLAY key to confirm. When entering from
the main menu, the condition is the selection of the file. (As picture1)
Press the PLAY key, and then enter the video condition. (As picture 2) then MTV would
be played automatically.
In MTV condition, press the menu key then you can set up the “Repeat” option, which is
same as the option in music, please refer to it. Here after setting the repeat mode, it will
enter video file list.( As picture 1)
Press the NEXT/PREV key, you can choose the next/previous MTV files.
When return to the selection of the file condition, Short press the MENU key again to
return to the main menu.
Picture1
Picture2
Video Conversion
For movie and music synchronization and conversion, please use MPMANAGER
software supplied in the CD ROM.
This software can be used also for UPDATED of your player.
8
MPMANAGER manual is included in your CD-ROM.
FILE BROWSE
1. Long press the MENU key to enter the main menu, through pressing NEXT/PREV key
and select the FILE BROWSE interface, then through PLAY key to confirm. When
entering from the main menu, the condition is the selection of the file, press the play key
to confirm your selection.
Set up
1. Long press the MENU key to enter the main menu, through pressing NEXT/PREV key
and select the Setup interface, then through PLAY key to confirm.
The setup interface includes:Power、Language、
Display Setting、Record Setting、System Tools, select the option you want through the
“NEXT/PREV” key, and then press the play key to confirm your selection.
Power
In power selection interface you can select: Auto off
(That is after setting the time, the player would be power off automatically when the time
is over); Always On In Playback (the player would not be power off automatically).
Language
Press the PLAY key to enter the selection interface of the language, press NEXT/PREV
key you can choose: English, Chinese (Simp), Chinese (Trad), French, German, Italian,
Spanish, Portuguese, Polish, Russia.
Through NEXT/PREV key to choose the language, and press the PLAY key then exit.
Display Setting
Include: Brightness, Backlight.
1. Brightness: When get into the brightness option, you can select: Low, Medium, High,
or Maximum to adjust the screen brightness, through the PLAY key confirmed and
exited.
2. Backlight: Get into the Backlight, press PLAY key to get into the screen protection
setup interface and through NEXT/PREV key to adjust the time of screen protection. The
time includes: 15 seconds, 30 seconds, 1 minute and Close.
Record Setting
Through the PLAY key and enter into the Record interface, press NEXT/PREV key you
can choose the 'Record Source' and 'Record Quality' and VAD and AGC. If you want to
choose 'Record Source', you can select between 'MIC 'and' Line In' and then confirmed
by pressing the PLAY key then exit. If you want to choose ' Record Quality', you can
select ‘Long Time’, 'Normal Qty', and, 'High Qty'.
Through NEXT/PREV key to choose, and confirmed by pressing the PLAY key then exit.
VAD: Off , On.
AGC: Off, On.
Line-in
When you want to transfer song from another Mp3 player to your MP3 player, you only
need to use the Line-in cable (not included). Through the back/forward key to select the
Line in option and confirm it by the play key. Then back to the VOICE mode, and press
9
VOL key to start record. After completing recording, long press the mode key for
confirmed, there will be a LINE_REC folder for storage of Line-in recording files in your
player, you are able to choose the recorded file you wanted. The details operation,
please refer to the record.
SYS Tools
Includes Delete, Format, Reset, System Info and DeleteLicense.
1.
Delete: this function can delete the file you do not want.
2. Format: In the SYS Tools interface, press the PLAY key and then through the
NEXT/PREV key to choose Format. Press the PLAY key again and get into the format
interface. Through pressing the NEXT/PREV key and choose Quick/ complete. You can
choose which you need to, after designated, press PLAY key to confirm and to exit.
3. Reset: In Reset sys interface, press the PLAY key through the NEXT/PREV key to
choose Reset sys. Then press the PLAY key to enter to the resumed and signaled
interface.
Through pressing the NEXT/PREV key and choose YES/NO, then press the PLAY key
confirmed and to exit.
Note: If you select YES, the player will come back to the state that when exit out the
factory.
4. System Info
You can refer to the memory info about the player.
5. Delete License
When you press play key and enter Delete License interface. To choose Yes , all files will
be deleted.
EBOOK
Long press the MENU key to enter the main menu, through pressing NEXT/PREV key
and choose EBOOK (the ebook file format is text), then press PLAY key to confirm
enters. When entering through the main menu, the condition is the selection of file, the
following picture shows:
Picture1
Picture2
Press the PLAY key, and then enter the EBOOK selection condition.(as picture 1)
Press the NEXT/PREV key, and choose next/previous File. Press the play key then you
can read the content of the file (as picture 2) press the menu key then you will back to
the file selection interface.
USB Connection
Once you connect with PC and you player will show as below picture:
10
You could download the music (mp3 or wma) files through USB port of your PC to your
player and following show the downloading status:
Store digital audio files on your computer;
Transfer files to your Network Walkman;
Enjoy music with your Net work Walkman.
Transform tool for use
Open the folder of “MTVConverter_V2.12.0.” in the CD, open the folder, and double click
“Video Convert.exe”, it will show below picture:
The detail instruction please refer to the file named “
USB Driver installation MTV_Video_Converter_AP
.doc”,which is in “MTVVideoConverter_V2.12.0”.
98-driver installation
Note: Please remove MP4 player from the computer when you install USB Disk Win98
driver in Windows98se Operating system.
1. Install USB Disk Win98 driver for computer windows98 Operating system
(1) Put CD disk to CD driver.
(2) Double click the USB Disk Win98 driver to start setup.
(3) Select installation language and click “OK” to enter into next step (Please select the
default language).
11
(4) Click “Next>” to enter into next step.
(5) Close the Driver (G:) window, then clicks “OK” to finish setup process and restart
your computer now, then you can use the MP4 player.
2. Format the MP4 player
The MP4 player is “FAT 32” format. If you wish to format it, right click removable disk
and choose “Format” mode, then click “Start” to format in operating system. As following
pictures show:
12
Technical Specification
Dimension
90*40*7.7mm
Display
Memory
TFT (1.8 inches)
64M/128/256/512MB; 1/2/4/8/16 GB(It is normal that the sys
file hold same place)
USB
Power
USB2.0
Polymer lithium battery
Playback time
Record
5 hours
Format
WAV
Time
8Hours128M Flash
>= 80dB
Max 5mw*1(32ohm)
SNR
Output
earphone
EQ
Audio Format
Video Format
Temperature
Language
of
Natural, PoP, Rock, Classial,
Jazz, Bass, CUSTOM EQ
MP1,MP2, MP3,WMA
*.Avi,*.wmv,*.asf,*.mpg,*.mov,*.qt,*.vob,*.rm,*.rmvb,*.3gp
and so on translate into MTV format through the software
tools.
0。C to 40 。C
English, German, French, Italian, Spanish,Portugues,Dutch
swedish, and so on.
13
Picture format
Sys
Jpg,Bmp
Windows98/SE/ME/2000/XP/2003/LINUX2.42
Bit rate
MP3:8-320kbps
Wma:32-192kbps
Notice:
Attention should be drawn to the environmental aspects of battery disposal.
Can’t identify the sixth and above sixth level of directory.
The user guide is only for reference. It is standard by the sample.
14
15