1
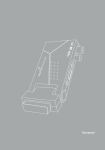
Title_.fm Page 1 Jeudi, 4. février 2010 1:15 13
DTR 230
DTR 232
www.philips.com/support
For support call 0800 331 60 15
EN Digital Terrestrial Receiver
3
DSR220co.book Page 2 Lundi, 18. janvier 2010 6:23 18
Contents
1
1.1
1.2
Quick Start Guide
Connecting to a television
Connecting to a television and
recorder
3
3
2
2.1
2.2
2.3
Introduction
About this user manual
Safety and precautions
Environmental Markings
4
4
4
7
3
3.1
3.2
3.3
3.4
3.5
Getting Started
Identification of parts
The remote control
Digital Terrestrial Receiver
Power supply
Connecting your Digital Terrestrial
Receiver to other equipment
8
9
9
10
10
Operation
Switch-on/switch-off
Initial installation
Ready for watching TV
Change of channel
Volume control
Calling up information banner
Using options
13
13
13
14
14
15
15
16
4
4.1
4.2
4.3
4.4
4.5
4.6
4.7
2
3
11
4.8
4.9
4.10
4.11
4.12
4.13
4.14
4.15
4.16
4.17
4.18
4.19
4.20
4.21
4.22
4.23
Using teletext
Using channel list
Creating and editing channel list
Extended installation
EPG
Timer
Miscellaneous functions
Radio
Settings
Picture settings
Language settings
Menu settings
Power Settings
Miscellaneous Settings
Calling up default settings
Security
16
16
17
18
19
20
21
22
22
23
24
24
25
25
25
25
5
5.1
5.2
5.3
5.4
Upkeeping
Cleaning
Maintenance
Disposal
Trademarks and partner logos
27
27
27
27
27
6
Troubleshooting
28
7
Technical Data
30
Contents
DSR220co.book Page 3 Lundi, 18. janvier 2010 6:23 18
1.1
Quick Start Guide
ENGLISH
1
Connecting to a television
TV set - rear
UHF aerial
SCART input on TV
RF cable
(not supplied)
RF Out
connector
Receiver
rear panel
1.2
SCART cable
(not supplied)
Mains adapter
(supplied)
SCART output
RF In
to TV
connector
12V DC
Connecting to a television and recorder
UHF aerial
TV set - rear
SCART input on TV
RF Out RF In
connector connector
Receiver rear panel
SCART output
to TV
SCART to VCR
Example VCR set,
rear panel
Quick Start Guide
RF cable
VCR RF In connector
VCR RF Out connector
3
DSR220co.book Page 4 Lundi, 18. janvier 2010 6:23 18
2
Introduction
Thank you for purchasing this product which has been designed and manufactured to give you
many years of trouble-free service.
2.1
About this user manual
This user guide contains all the information you need to know about how to setup and watch
available 'Freeview' channels using your digital terrestrial receiver.
2.2
Safety and precautions
Safety is important
To ensure your safety and the safety of others, please ensure you read the Safety Instructions
before you operate this product.
Note
Keep this information in a safe place for future reference.
Safety warnings
Before you connect and start the receiver, please observe the following points:
•
The device is designed for domestic use.
•
Only the functions described in these Operating Instructions may be carried out with this
device.
•
If possible, keep the Operating Instructions ready at hand near the appliance.
•
If you hand the device on to other persons, please also include these Operating Instructions.
Danger caused by electricity
In the interior of the device there are hazardous voltages. Never open the housing or insert objects
through the ventilation openings.
•
Only connect the device to a 230 V power outlet installed according to regulations, being
accordingly fused.
•
The power outlet has to be easily accessible so that you are able to disconnect the power
plug immediately if necessary.
•
Observe that the connector cables are not clamped or squeezed.
•
Do not start the device if the device or the connector cables show visible damage, or if the
device has fallen down.
•
If an apparent damage occurs (e. g. smoke or similar) during operation, immediately
disconnect the pluggable power supply from the power outlet. In doing so, always take hold
of the plug, never of the cable.
•
Power outlets and extension cables may not be over-loaded, otherwise there is fire hazard!
When purchasing the product, enquire for the maximum permissible current consumption.
4
Introduction
•
In order to completely disconnect the device from the power supply, the pluggable power
supply has to be disconnected from the power outlet.
•
Have repairs or settings on your receiver carried out by qualified skilled personnel only.
Unauthorised opening and repair attempts will result in loss of warranty. The manufacturer
accepts no liability for accidents of the user if the device is opened. Incorrect wiring of the
connections can result in failures or malfunctions on the device.
•
Do not effect modifications on this device.
•
Use provided cables and pluggable power supplies only.
•
During thunderstorms, devices connected to the mains supply may be damaged. Therefore,
in case of a thunder-storm always disconnect the pluggable power supply from the power
outlet.
•
If you are absent for a longer period of time or in case of approaching thunderstorm,
disconnect the receiver from the power supply unit and from the antenna. This also applies
to devices connected to the receiver. Do not touch any part of the digital terrestrial
receiver, power adaptor or antenna cord during thunderstorms.
ENGLISH
DSR220co.book Page 5 Lundi, 18. janvier 2010 6:23 18
Danger of electric shock by humidity
•
The device may not be exposed to dripping or splashing water. Prevent liquids from entering
into the device. In case of need, immediately disconnect the power plug.
•
The device may not be used in damp locations (e. g. bathroom) or rooms with heavy dust
accumulation.
•
Objects filled with water, e.g. vases, may not be placed on the device.
Danger of injuries by other causes
•
Observe that nobody can trip over the connector cables.
Danger for children
•
Never leave children unattended with this device. Children underestimate the danger
associated with electric appliances.
Notes regarding the installation site
•
•
•
•
•
Install device on horizontal surface only.
Do not expose this device to extreme temperatures. Therefore:
Avoid direct solar radiation and radiator heat;
Do not obstruct the air ventilation by covering the ventilation openings with objects, like for
example magazines, table cloths, curtains, etc.;
Leave a minimum clearance of approx. 10cm above and to the sides. The heat may not
accumulate in the device! Otherwise the heat can damage the device, and there is fire hazard!
The device may not be installed close to inflammable material (e. g. curtains, flammable liquids,
etc.).
Introduction
5
DSR220co.book Page 6 Lundi, 18. janvier 2010 6:23 18
Batteries
•
Batteries are to be kept away from children.
•
After swallowing a button cell or battery, the person concerned has to consult a doctor
immediately.
•
Do not try to reactivate used batteries by heat, charging, or by other means.
•
Batteries may not be thrown into the fire, disassembled, or short-circuited.
•
Replace the batteries at least one a year to prevent them from leaking.
•
Always replace both batteries and use batteries of the same type only (e. g. alkaline cells or zinc/
carbon).
•
If you are absent for a longer time, remove the batteries from the RC unit.
Miscellaneous notes
•
Do not place open fire sources, like for example burning candles, on the device.
•
The antenna that is used has to be grounded.
•
Only switch the device on after the connections with the antenna and the SCART cable have
been established.
•
The bottom side of the device features the device feet. Because the furniture or floor surfaces
consist of various materials and are treated with various care products, it cannot be completely
ruled out that some of these materials contain components affecting and moistening the feet of
the device. If required, place a non-slip mat underneath the feet.
•
Opening the device results in loss of warranty.
This symbol indicates that the adapter is a Class II appliance and does not require a
ground connection.
This symbol indicates that the adapter is for indoor use only.
This symbol indicates that the adapter conforms to CE regulations.
Environment
This set-top box is designed to reduce its impact on the environment and complies with European
Directive 2009/125/EC. This is part of Pace's ongoing commitment to lead the way in
environmental responsibility.
It has a standby mode that needs very little power: Refer to Power settings chapter 4.20 to
choose the most appropriate mode.
6
Introduction
DSR220co.book Page 7 Lundi, 18. janvier 2010 6:23 18
•
"By using the standby mode you will save energy (and therefore money) and reduce carbon
dioxide emissions that damage the environment.
•
"You use the standby button on your remote control to switch between On and Standby modes.
•
"There will be an additional delay (few seconds) when you switch on your set-top box from the
standby mode.
•
"If you will not be using your set-top box for several days, you can cut its energy consumption to
zero by unplugging the AC/DC adaptor from the mains.
ModeFront panel shows:Typical power
Mode
AC/DC adaptor
Unplugged
Standby
On
Front panel shows:
Typical power
consumption (W)
Nothing lit up
0
LED is switched on
Green
<0.7
Nothing lit up
<4.7
Typical annual
energy use (kWh)
13*
* Based on set-top box being on for 4.5 hours daily and being in Standby for 19.5 hours.
2.3
Environmental Markings
Your product has been designed and manufactured with high-quality materials and
components, which can be recycled and reused.
When this crossed-out wheeled bin symbol is attached to a product or his packaging,
it means the product is covered by European Directive 2002/96/EC.
Please inform yourself about the local separate collection system for electronic
products.
Please act according to your local rules and do not dispose of your old products with
your normal household waste. The correct disposal of your old product will help
prevent potential negative consequences for the environment and human health.
The "Material recyclability symbol" affixed on package cardboard and user manual
means these parts are recyclable. So do not dispose of them with your normal
household waste.
The "Material recyclability symbol" affixed on plastic packaging parts means these parts
are recyclable. So do not dispose of them with your normal household waste.
The symbol on the box indicates that the company commercializing this product
contributes financially to the selective disposal of packaging.
Introduction
7
ENGLISH
See the table below and please note that:
DSR220co.book Page 8 Lundi, 18. janvier 2010 6:23 18
3
Getting Started
Remove your Digital Terrestrial Receiver carefully from the box, and remove the packaging from
each part.
In the box
You will find the following items:
•
Digital Terrestrial Receiver
•
Remote control (AAA batteries)
•
Power supply 230 V AC/50 Hz to 12 V DC
•
User Manual (this publication)
If any of these items are damaged or missing, please contact us at 0800 331 60 15.
Please make sure that you have the model number of your receiver, before contacting us. The
label showing the type and serial number is underneath your receiver.
Note
For optimum placement and use of product, ensure that the rear or the product is placed at least
10 cm from the edge of the table or shelf.
Batteries are removable from the remote using common household tools (like a screwdriver…)
The batteries supplied do not contain hazardous substances such as Mercury,
Cadmium or Lead.
However, they must not be disposed of with your household waste but to a local
separate collection system.
8
Getting Started
DSR220co.book Page 9 Lundi, 18. janvier 2010 6:23 18
3.1
Identification of parts
ENGLISH
Remote Control
Power On/Off (Stand-By)
I-II key
(Audio selection)
TIMER key
Colour keys
Teletext
TEXT / Pg UP key
Pg DOWN key
INFO key
OK key
EXIT key
Volume up/down
EPG key
Cursor keys
BACK / P<P key
LIST/FAV key
Channel up/down
Mute key
Number keys
MENU key
3.2
RADIO key
The remote control
Using the remote control
To use the remote control, point it towards the front of the receiver.
The remote control will not operate if its path is blocked.
Attention
Sunlight or very bright light will decrease the sensitivity of the remote control.
Getting Started
9
DSR220co.book Page 10 Lundi, 18. janvier 2010 6:23 18
3.3
Digital Terrestrial Receiver
Front view
IR receiver / Green LED,
Normal operation - off,
Standby - on
Rear view
RF In
from antenna
RF Out
Scart output/input
connector for VCR
and DVD units
3.4
Scart output
connector for TV
Power supply,
12 V DC
SPDIF
(digital audio out)
Power supply
Power cable (1.5 m)
Plug the power supply into a
230V AC outlet socket
Power connector for connection to
Receiver
A mains power adaptor has been supplied for powering this equipment. It has an integral cable
terminated in a power connector to plug directly into the 12V connector on the back of the
Digital Terrestrial Receiver.
Plug the cable into the 12V DC connector on the rear panel of the Digital Terrestrial Receiver.
Insert the adaptor body into a suitable mains outlet socket.
10
Getting Started
Note that the only recommended way to disconnect the Digital Terrestrial Receiver from the
mains supply is to remove the adaptor from the mains socket. If the mains socket is fitted with a
switch, this could be used instead.
Receiver
Power supply adaptor
+12V DC
To 230V AC
mains supply
Receiver rear panel
3.5
Connecting your Digital Terrestrial Receiver to other equipment
The following diagrams are of typical configurations only, and may differ slightly to your existing
external equipment. If you are unsure on how to connect to your receiver, always consult your
manufacturer's user guide supplied with your equipment.
Connecting to a television and DVD player
UHF
antenna
TV set - rear
SCART input on TV
RF Out
connector
RF In
connector
SCART output
to TV
Receiver rear panel
SCART to DVD player
DVD player - rear
If you decide to connect a DVD player or recorder to the VCR Scart of your digital receiver, we
advise to set the DVD output format to CVBS or PAL.
Refer to the user manual of your DVD player or recorder. You can use a S/Pdif connector to
connect your Receiver to a digital sound input device, such as a receiver.
Getting Started
11
ENGLISH
DSR220co.book Page 11 Lundi, 18. janvier 2010 6:23 18
DSR220co.book Page 12 Lundi, 18. janvier 2010 6:23 18
Connecting to a TV and audio equipment
TV set - rear
UHF antenna
SCART input on TV
RF Out
connector
RF In
connector
SCART output
to TV
Receiver rear panel
Example audio equipment, rear
panel
12
SPDIF
Digital audio out
Getting Started
DSR220co.book Page 13 Lundi, 18. janvier 2010 6:23 18
4.1
Operation
Switch-on/switch-off
Switch the receiver on by pressing the ON/OFF 1
key (standby key) on the remote control and wait
until you see the welcome image on your screen. •
The LED is off if the receiver is switched on.
•
When you switch on your receiver for the first
time, the LED is blinking while the software is
loading. Follow the steps explained in the section 2
Initial installation on this page.
When the receiver is in stand-by mode the LED
is green.
During a software update process the LED is
blinking.
4.2
Initial installation
After the first switch-on, the following window is
displayed on your screen.
By using the arrow keys or, you
change the displayed values,
By using the arrow keys or , you
switch between the individual setting
possibilities.
Then highlight the OK field by using the
arrow key or , and press the OK key.
Entering the postcode
3 Select the item Postcode and press the OK
key.
4 Use the arrow keys to select a figure or
letter. Press the OK key.
5 Repeat the previous steps until having
completely entered your postcode.
6
Note
Now successively set the desired values. In
doing so, observe the following:
Again press the OK key.
Note
Also observe the information messages displayed The menu item General allows for entering and
on the screen. These will help you to set the
later changing of the postcode.
correct values. Also with regard to further
operation, information messages are displayed.
Operation
13
ENGLISH
4
DSR220co.book Page 14 Lundi, 18. janvier 2010 6:23 18
Automatic search
The next window is displayed:
Note
The displayed values for the start and stop
frequency can normally be maintained.
7 Make use of the arrow keys orto
modify the start and end frequency values, if
desired.
8 By means of the arrow keys oryou
determine the channels to be searched for:
All channels, or channels that are Free-toair only.
9 Then highlight the OK field by using the
arrow key or next to Start scan
mode, and press the OK key.
The scan mode is started. The screen dialog
thereby provides information on the progress of
the channel search.
14
Note
By pressing the EXIT key you can stop the scan
mode at any time.
During receiver set-up and channel scanning, the
signal strength will indicate your antenna
reception. If you reach at least 50% Signal
Strength, then your antenna and receiver are
properly connected. If it remains under the 10%
gauge, then you need to first check the cable
connection. If the "Quality" gauge reaches at
least 50%, then you can be sure that you are
indeed receiving digital broadcast signals.
If your reception is not optimal (few channels or
"blocky" image), your antenna installation should
be checked by a professional as it may need to be
redirected or fixed.
Terrestrial service coverage
Digital terrestrial broadcasting is progressing
throughout Europe. Please note that the
reception of digital signals may need to be
verified as it can be aversely affected by physical
elements, such as mountainous areas, high
buildings, etc. When analogue broadcasting in
your region is switched off, there should be a
quality improvement for all digital broadcasting.
As analogue switch off occurs, the number of
digital channels available in each region may also
be affected. Please check what is available in your
area on the relevant website:
- www.digitaluk.co.uk (UK)
- www.tnt-gratuite.fr (France)
- www.tdt.es (España)
- www.ueberallfernsehen.de (Deutschland)
- www.dtgvi.com (Italia)
- www.digi-tv.dk (Denmark)
- www.digitv.fi (Finland)
- www.teracom.se (Sweden)
- www.digitalinfo.cz (Czech Republic)
Operation
DSR220co.book Page 15 Lundi, 18. janvier 2010 6:23 18
4.3
Ready for watching TV
4.5
Volume control
•
Use the volume keys + and - for increasing
or decreasing the volume, or
•
use the arrow keys or for this
purpose.
Mute function
By pressing the MUTE key, the sound
reproduction is stopped. The sound is audible
again if you ...
•
... press the MUTE key again, or
... press one of the volume control keys.
As soon as the search is completed, an according •
message is displayed. Acknowledge this and the
following message by OK, in order to proceed to 4.6 Calling up information banner
Every time you change the channel, the
the TV replay.
information banner is displayed.
Note
In order to carry out a new initial installation, you
have to reset the device to its default settings, see
page 21.
4.4
Change of channel
You can change the channel in different ways:
•
By pressing the channel key + or -.
•
By pressing the arrow keys or.
•
By pressing the BACK / P<P key, you
switch between the two last selected
channels.
•
By selecting the channel directly via the
channel list, see page 17.
•
By entering the channel number in the
channel list. For this purpose, enter the
number via the numerical keys. If, for
instance, the channel number is 0014,
quickly press the numerical keys 1 and 4
successively. The zeros do not have to be
entered.
Operation
1
Press the INFO key to call up the
information banner without changing the
channel.
The information banner displays the selected
channel memory number and the channel name.
In addition, the time is displayed on the left edge
of the information banner.
The display bar on the right next to the time
graphically indicates the program time that has
already elapsed. The lower menu line displays the
current and the next program including its
broadcasting time. After several seconds, the
information banner is automatically hidden again.
Note
You can define the display time of the information
banner for yourself, or completely prevent the
automatic display, see “Menu settings” on
page 24.
While the information banner is displayed on the
lower screen edge, you can call up the extended
15
ENGLISH
Retuning
Please first your installation (both the receiver
and, if necessary, the antenna set-up*). It must
be clear that during digital switchover, there are
a lot of modifications on the broadcasting/
transmitters that may even need a few days or
even weeks before stabilizing. This is
unfortunately an unavoidable consequence of the
digital switchover technology change. Please
refer to the relevant local information website
for information on upgrade to the broadcast
network.
DSR220co.book Page 16 Lundi, 18. janvier 2010 6:23 18
information banner by pressing the INFO key
again. The extended information banner supplies
further details with regard to the current
program.
This means that, for instance, a sound, subtitles,
or text selection is provided.
How to use the options:
1 Call up the desired channel.
If the text is more extensive, it is distributed 2 Press the I-II key for sound selection.
to several pages. By repeatedly pressing the •
If a teletext is offered, you can call it up by
OK key, you browse the pages (arrow keys
using the TEXT key or Red key.
and are also possible).
4.8 Text/MHEG
If you press the INFO or arrow key ,
Observe:
•
•
information on the next program is
displayed. By pressing the arrow key ,
you return to the information on the current
program.
With the TEXT key you may access additional
Text and Multimedia contents. MHEG
(Multimedia and Hypermedia Expert Group) is a
standard that offers you information about
various contents like life style, shopping or sports
Note
events and results.
The extended information banner is not
1 Press the TEXT key or RED key to bring
automatically closed.
up the text menu for the current channel.
2 Press the EXIT key in order to close the
2 Use the arrow keysorto navigate
information banner.
through the menu.
3 Use the OK key to select an item.
4.7 Using options
Additionally the four colour keys (Red,
Some channels occasionally provide several
Green, Yellow and Blue) help you to navigate
through the content of a page. Their use
sound tracks and/or subtitles tracks.
varies for different stations. Function is
If a channel provides one or more of these
commonly explained at the bottom of the
options, the respective key name is displayed in
display.
the right corner when calling up the channel,
4 Press the Text key again to leave the
whereby also several names can be displayed, e. g.
MHEG, or press the EXIT key.
and I-II.
16
Operation
DSR220co.book Page 17 Lundi, 18. janvier 2010 6:23 18
Press the I-II key for quick access to language
selection.
TIMER
Press the TIMER key for quick access to the
Timers menu.
LIST/FAV
Press the LIST key for quick access to Favourite
Lists menu.
4.9
Using channel list
1
By using the arrow keys or , you skip
eight positions in the channel list forwards
or backwards.
3 Use the TEXT /Page up and the Page
down keys to display the proceeding or the
next page.
4 Press the OK key after you have selected
the desired channel.
The program of the selected channel is displayed
in the background; the channel list remains open
for another several seconds.
During this time, you can select another channel
by using the arrow keys, or press the OK key in
order to close the channel list immediately.
Press the LIST/FAV key or OK button to
Note
call up the channel list.
This list contains all TV channels the device has
If the device is switched to radio mode, you can
found and stored during automatic channel scan. also carry out the previously described actions in
the same manner for the stored radio channels.
You can switch from TV list to RADIO list
using the RADIO key.
4.10 Creating and editing channel list
Note
After having pressed the LIST/FAV key again,
the favourites list is displayed. This individual
channel list only contains the channels you have
"favoured". For further information on this, see
Chapter 4.10. Favourites are indicated by an
asterisk in the channel list.
2 Use the arrow keys to select the desired
channel from the list.
•
Possibly the channel list may appear too complex
to you or contain channels that you are not
interested in watching.
Via the main menu, you can edit and create your
own favourite list.
1 Press the MENU key.
2 Select the menu item Sort channels by
using the arrow keys or and press
the OK key.
By using the arrow keys or , you
highlight the next or the previous channel in
the list.
Operation
17
ENGLISH
•
I-II
DSR220co.book Page 18 Lundi, 18. janvier 2010 6:23 18
3
After you have carried out the desired
settings, press the EXIT key in order to
close the window.
Defining channels as your favourites
The favourites list contains all channels you have
defined as favourites. By means of this list, you
can create a personalised channel list.
1 Select the channel you want to indicate as a
favourite by using the arrow keys or .
2 Press the OK key to add the channel to the
favourite list.
3 Repeat this process with all channels that
you want to indicate as favourites.
4.11 Extended installation
In the main menu you can choose between
Automatic search and Manual search.
Note
The previously described functions are also
provided to you with regard to the radio channel
list.
Press the RADIO key to call up the overview
for the radio channels. You can return to the TV
channel list by pressing the RADIO key again.
Shifting channels in the favourite list
You can individually set the sequence of the
channels within the channel list.
1 Press MENU key.
2 Highlight Search Channels, press OK key.
3 Highlight the Favorite list.
4 Highlight the channel you want to shift by
using the arrow keys or .
5 Press the OK key to confirm the channel to
be shifted.
6 Shift the highlighted channel to the desired
position by using the arrow keys or .
7 Press the OK key to store the channel at
the desired position.
Deleting channels in the favourite list
1 Highlight the channel you want to delete by
using the arrow keys or .
2 Press the red colour key.
3 To delete all the channels in the favourite list,
press the yellow colour key
18
After the initial installation, see page 13, it may be
required to search for channels again, or to add
specific channels that are additionally broadcast.
Channel search settings
1 Highlight the item Channel search
settings and press OK.
2 Specify whether the channel list is to be
automatically updated (Automatic) or not
(Off).
Automatic search
This scan mode is recommended due to its
feature of automatically finding all receivable
channels.
1 Highlight Automatic search and press the
OK key.
Note
If above parameter is set to Automatic, your
digital terrestrial receiver will automatically
search for new channels every time that the box
enters in Standby mode.
2 Press the OK key to start the automatic
scan mode
Operation
DSR220co.book Page 19 Lundi, 18. janvier 2010 6:23 18
Following, the scan mode is started.
•
If some channels were found, you receive the
same request as with regard to the
automatic scan mode, see previous
paragraph.
•
If no channels were found, a message is
displayed. Press the OK key.
4.12 EPG
3
By using the arrow key or choose
whether
•
the channels found are to be added to the
old list (standard setting),
The electronic program guide (EPG) offers you
an overview of all programs to be broadcast in
the next week on the current channel.
Observe:
•
the old channel list is to be overwritten,
•
•
4
the new found channels are to be discarded. •
Press the OK key.
Manual search
•
This type of scan mode allows you to install a
group of channels for which you know the
•
frequency.
1 Highlight Manual search and press the OK
1
key.
2
Not all channels offer an extensive EPG.
Many broadcasting services broadcast the
current day program but do not offer
detailed descriptions.
There are broadcasting services that do not
offer any EPG information.
Due to the progressive technical
development, more and more broadcasting
services will extend this offer in the future.
Select the desired channel.
Press the EPG key to call up the electronic
program guide.
2
Successively select the adjustable values by
using the arrow key or .
•
The desired Frequency is set by the arrow
key or .
The following functions are offered to you by the
The Frequency in MHz is entered via the EPG:
numerical keys of the remote control.
•
If you require more information on a
Choose whether All channels or channels
program, highlight it by using the arrow key
that are Free-to-air only are to be
5 or 6, and press the INFO key.
searched for.
•
Change to the program of another day by
Then highlight OK and press the OK key to
using the green key (next day) or the red key
start the expert scan mode.
(yesterday).
•
3
4
Operation
19
ENGLISH
Following, the scan mode is started. After the
search is completed, the following is displayed:
DSR220co.book Page 20 Lundi, 18. janvier 2010 6:23 18
•
•
•
Via the arrow key and , you can select
4.13 Timer
programs earlier or later in the day.
By pressing the channel + or - key, you can The Timer settings allows you:
view the EPG for another channel.
If you want to adopt a program into the
timer list, highlight it and press the TIMER
key. Acknowledge the following request by
pressing the OK key.
Note
Detailed information on the subject "timer" can
be found in the next paragraph.
3 Close the EPG by pressing the EXIT key.
Weekly EPG
1 Select the desired channel.
2 Press the EPG key to call up the electronic
programm guide.
3 Press the EPG key again.
The following functions are offered to you by the
EPG:
•
If you require more information on a
program, highlight it by using the arrow
keys or , and press the INFO key.
•
to set your digital terrestrial receiver to
record a program using a video recorder or
a DVD recorder.
•
to set up a program reminder.
If your digital terrestrial receiver is operating, it
will switch automatically on the selected
program.
Note
Remember to program your video-tape recorder
to the respective time.
Adding program to timer list from the
EPG
The timer function is included into the timer list
via the EPG, see previous paragraph.
1 Open the EPG and highlight the desired
program.
2 Press the TIMER key.
•
Change to the program of another day by
using the arrow keys (day before) or (next day).
4 In order to switch between programs in the
morning, in the afternoon or in the evening,
press the colour keys as indictated in the
EPG.
5 If you want to adopt a program into the
timer list, highlight it and press the TIMER
key. Acknowledge the following request by
pressing the OK key.
3 Press the OK key.
The window is closed and the selected program
Note
is stored in the timer list.
Detailed information on the subject "Timer“ can
Creating or Modifying a timer
be found in the next paragraph.
6 Close the EPG by pressing the EXIT key.
•
Press TIMER key to display the list of
timers.
•
To create a new Timer, highlight ... and press
the OK key.
20
Operation
DSR220co.book Page 21 Lundi, 18. janvier 2010 6:23 18
Switching off current timer functions
To modify an existing Timer, highlight the
relevant Timer in the list and press the OK
Note
key.
During a timer program, only few keys can be
activated: I-II, the volume keys + and -, as well
as the MUTE key.
To switch off the timer function:
1 Press On / Off.
A program message is displayed.
The Station field displays the channel name
2 Press the OK key.
and is highlighted. To change the channel
press OK. A list of channels appears.
4.14 Miscellaneous functions
2 Select a channel in the list and press OK
Restoring Factory Settings
Edit Timer
You can reset the device to default settings. In
doing so, the individually composed favourites list
is deleted.
1 Press the MENU key to open the main
menu.
2 Highlight the item Box settings by using
the arrow keys or and press the OK
key.
3 Highlight the item Restore factory
settings and press the OK key.
1
1
Alter the displayed settings by using the
arrow and numerical keys. In doing so,
you can:
•
Change the date (month and day)
•
The time (starting time and duration)
•
The cycle (interesting for series and regularly
recurring programs)
Then highlight OK, and press the OK key.
2
Deleting timer(s)
1 Select the desired timer.
2 Press the respective colour key:
red: the selected timer is deleted
yellow: all timers are deleted.
3 Press the OK key to acknowledge the
request.
Operation
4
Set Yes by using the arrow key , and
press the OK key.
The device carries out a reboot. It switches off,
and shortly afterwards switches on again.
5 Carry out an initial installation, see page 13.
21
ENGLISH
•
DSR220co.book Page 22 Lundi, 18. janvier 2010 6:23 18
Displaying channel and system information
/ adjusting the antenna
This function solely serves to supply information
on one channel. However, you can use it for
adjusting your antenna and for improving the
television reception.
1 Press the MENU key to open the main
menu.
2 Highlight the item Technical information
by using the arrow keys or , and press
the OK key.
3 Select the item Channel information and
press the OK key.
Displaying the time
1 Press the TEXT key to receive a time
display on the screen during program replay.
2 Press the TEXT key to hide the time again.
4
4.15 Radio
Adjust your antenna so that the two
specifications Signal strength and Signal
quality display a preferably high value.
Update Software
Note
For this purpose, the device has to be set to
standby operation.
Every night between 1 am and 5 am, the device
checks whether a software update is available. If
this is the case, you'll receive an according
message when switching the receiver on the next
time, and you can start the software update.
You can also start the search process manually.
1 Open the main menu and select the option
System information from the field
Technical information.
2 Highlight the item Software update by
using the arrow keys.
3 Press the OK key to start the software
update.
Note
A digital radio program currently is not broadcast
in all countries via antenna.
Depending on your antenna, you can possibly also 1 If a digital radio program is broadcast in your
country, press the RADIO key to receive it.
carry out settings on your antenna.
2 In order to view the TV program again, press
5 Press the EXIT key once highlight System
the RADIO key again.
Information by using the arrow keys or
4.16 Settings
and press the OK key.
Here you find technical information on your 1 Press the MENU key to open the main
device. This information normally is only
menu. The menu item Box settings is
relevant with regard to support.
highlighted by default.
6 Press the EXIT key 3 times to return to
2 Press OK.
the TV program.
Note
22
Operation
DSR220co.book Page 23 Lundi, 18. janvier 2010 6:23 18
Automatic
Presents the images in
the 4:3 format in a
screen-filling manner.
However, the image is
vertically compressed
to avoid cutting of the top and bottom picture
border.
Pillar box
Reduces a 4:3 mode
picture for 16:9 format
TVs to scale, and for
this purpose inserts a
black bar left and right
3 By using the arrow key or , highlight
the desired option and press the OK key in on the screen.
order to call it up.
Zoom
Presents images in 4:3
Note
format in a screenIn either case, observe the information texts
filling
displayed on the screen. These will help you to
manner.Therefore, the
select the correct settings.
top and bottom picture
border are cut off.
Selecting and altering the settings is effected as
usual by means of the arrow keys / / /
Screen format 4:3
; a window that is inserted can be closed by
When having connected a (Standard) screen, you
pressing the EXIT key.
are free to select one of the following options
regarding 16:9 (Widescreen) pictures.
4.17 Video settings
Letter box 16:9
The video displayed on the TV depends on:
Reduces films in 16:9
screen format, decoder setting (picture format)
mode for 4:3 format
and broadcast content format setting.
TVs to scale, and for
•
Screen format: You can select screen
this purpose inserts a
format according with the TV you have: 4:3
black bar above and
or 16:9 Widescreen TV.
below on the screen.
•
Picture Scaling: Specify what is to happen
in case the format of the transmitted picture Pan & Scan / CCO
Presents films in the
does not correspond to that of your screen.
The selected function's effect becomes
16:9 format in a screenvisible immediately in the background.
filling manner. With
regard to 4:3 TVs, the
Screen format 16:9 Widescreen TV
left and right picture
When having connected a 16:9 (Widescreen)
border is cut off.
screen, you are free to select one of the following
options regarding 4:3-formatted pictures.
Operation
23
ENGLISH
You'll receive the following screen:
DSR220co.book Page 24 Lundi, 18. janvier 2010 6:23 18
Letter box 14:9
This setting represents
a compromise between
the other two settings.
Small black bars are
inserted and only a bit
of the left and right
picture border is cut
off.
TV Output Format
For the "TV Output Format", the formats RGB,
video (CVBS) and S-Video (Y/C) are
provided. Here RGB presents the correct
selection in most cases.
VCR Output Format
Note
This item can only be selected, if you did not
selected RGB with regard to the "TV Output
Format".
Here you can choose between Video (CVBS)
and S-Video (Y/C).
AFD Automatic
The broadcast picture format may deviate from
the picture format to be displayed. AFD
recognizes and corrects the presentation if you
select the option ON.
Audio language
Select a reproduction language for the programs.
Audio language #2
Select an optional reproduction language for the
programs.
Audio Description Automatic
Select Off or On to enable or disable audio
description provided by the broadcaster.
Note
If the desired program is not broadcast in the
language set under "audio language", the "Audio
language #2" is used.
Subtitle language
Select a language for the subtitles.
Subtitle language #2
Select an optional subtitle language for the
subtitles, see also "Audio language #2".
Subtitles Automatic
Set this option to On if you want to
automatically show broadcast subtitles in the
selected subtitle language (default: Off).
4.19 Menu settings
Info Banner Duration
Here you define for how long the information
Restore Default settings
banner is to be shown with regard to a change of
By means of this function you reset the
configuration for the picture settings to previous channel (see page 15). If you want to completely
eliminate the information banner in case of a
set default values. These settings in most cases
change of channel, select None.
allow for an acceptable image & language
reproduction.
Info Banner Automatic
4.18 Language settings
Menu language
Here you set the language of the OSD (on-screen
display).
24
At the start of a new program, the information
banner is automatically shown as a default. If you
do not want this, select Off.
Operation
DSR220co.book Page 25 Lundi, 18. janvier 2010 6:23 18
4.21 Miscellaneous Settings
This option is only available if the value set under
"display duration information banner" is at least Setting a time zone
Select whether the local time offset with regard
4 seconds.
to Greenwich mean time is to be set
Menu Transparency
automatically, or if you want to specify it yourself.
Here you set the transparency of the OSD. If you
have difficulties to read the OSD with transparent Time zone
Select the entry GMT +01:00 for Germany and
setting, select Not any.
Central Europe (time difference with regard to
Remote Control Audio Feedback
the Greenwich mean time).
Select a type of audio feedback for remote
Summer time
control key presses.
The options are: Off (no sound), Low, High and Set the menu item Summer time to Off if it is
not summer time at the moment. You can also
Key Dependent.
select the setting Automatic. In case of this
setting, the receiver obtains the information
4.20 Power Settings
regarding summer time from the currently
selected channel.
Post code
If applicable, you can enter your post code here,
e.g. following a move. This way, channel list
updates can be optimized.
Channel List Update
Select Automatic or Off .
Super Eco Mode
This feature helps you to save energy. Use orkeys to active / inactive Super Eco Mode.
Note: Important Information
The antenna signal is disabled (RF out) : you will
not be able to watch TV.
Automatic standby
Select the time after which the box switches to
Standby to save energy.
Operation
Audio output format
For the audio output, the formats Mono and
Stereo are provided to you.
Dolby Digital Automatic
This options allows you to Enable/Disable the
automatic detection of Dolby Digital audio
channels. A message warns you to connect a
Dolby Digital Home entertainment to your
Digital Terrestrial Receiver if you select On.
Sorting
Modify the appearance and behaviour of the
channel lists. The options are: A to Z, Z to A,
Provider, Service ID and None.
25
ENGLISH
Note
DSR220co.book Page 26 Lundi, 18. janvier 2010 6:23 18
4.22 Calling up default settings
This function has already been described
elsewhere, see page 21.
4.23 Security
1
2
3
Press the MENU key.
Highlight the item Security by using the
arrow keys and press the OK key.
Enter the PIN code and acknowledge by
OK.
When the menu is called up the next time, the
PIN request is effected (the PIN code is set to
0000 by the factory).
Channel lock
Here you can protect specific channels from
unauthorized access (e. g. by minors). These
channels are protected with a PIN and are
unlocked by a PIN request.
Changing device PIN
Here you can specify your personal PIN code.
1 Press the OK key.
2 For this purpose, enter the current PIN
code and acknowledge by pressing the OK
key.
3 Following, enter your new PIN code and
press the OK key.
4 For acknowledging your new PIN code,
enter it again and press the OK key.
Note
The PIN code is set to 0000 by the factory. Also
observe the displayed information. These will
help you to select the correct settings.
Observe:
•
Selecting and altering the settings is carried
out as usual by means of the arrow keys.
•
A displayed window can be closed by
pressing the EXIT key.
Receiver lock
Set this option to On if you want to protect your
complete device against unauthorized access.
When the receiver is switched on the next time,
the PIN request is effected (the PIN code is set
to 0000 by the factory).
Menu lock
Set this option to On if you want to protect your
menu against unauthorized access.
26
Operation
DSR220co.book Page 27 Lundi, 18. janvier 2010 6:23 18
Upkeeping
Trademarks and partner logos
PHILIPS and, the PHILIPS Shield Emblem are
registered trademarks of Koninklijke Philips
Use a soft, moist (but not wet) cloth for cleaning. Electronics N.V. and are used by Pace PLC under
You must not use scouring cloths or sponges or license from Koninklijke Philips Electronics N.V.
spraying bottles.
Pace and
are trademarks and/or
5.2 Maintenance
registered trademarks of Pace plc.
The Receiver does not contain any parts
designed for maintenance or replacement. Do
not try to open the housing. Only qualified and
specialized personnel is allowed to execute any
necessary maintenance work.
5.1
Cleaning
5.3
Disposal
High-quality materials were used to manufacture
the device which may be recycled.
Please inform yourself about collecting sites for
recycling electronic products nearby.
The device must not be disposed of together
with the household waste. Proper disposal
prevents negative effects for the environment and
your personal health.
Upkeeping
27
ENGLISH
5
DSR220co.book Page 28 Lundi, 18. janvier 2010 6:23 18
6
Troubleshooting
If you experience an operating problem with your Digital Terrestrial Receiver, please refer to the
trouble-shooting table below and then the notes that follow.
Symptom
Possible cause
Remedy
No picture and no sound
No channel list or wrong
channel list
Do an automatic station scan
Short circuit in aerial lead
Turn off receiver, remove short
circuit and then turn on again
Defective or missing cable
connection
Check all cables
Poorly adjusted aerial
Adjust aerial
Loose connectors or cable too Check connectors and shorten
long
cable
No picture or picture is blocky Aerial too small
in appearance
SCART connector not fully
plugged in
Check SCART connector
Sound but no picture
Check aerial
Aerial poorly adjusted or
defective
Use a bigger aerial
Program is being broadcast with Do an automatic search (see
altered parameters
Advanced Installation)
SCART connector not fully
plugged in
Check SCART connector
Cannot receive station that you Program is no longer broadcast None
could receive before
Interference with „DECT"
Move phone/wireless equipment
phones or wireless equipment away from the receiver to a
location where interference
ceases
Program is being broadcast with Do an automatic station scan.
altered parameters
Remote control is not
working
28
Obstacle in between remote
control and receiver
Remove obstacle
Transport stream defect
Unplug receiver and then plug
in again
Flat battery
Replace battery
Troubleshooting
DSR220co.book Page 29 Lundi, 18. janvier 2010 6:23 18
Possible cause
Certain stations cannot be
received from time to time
These services are not transmitted 24 hours a day and can
sometimes be unavailable. This is not a fault.
Poor image quality or no
colours
Wrong TV SCART out signal
Try changing from RGB to
CVBS or vice versa (see
Configuration)
Inappropriate video type
selected
Set video output according to
TV set video requirements
(see Configuration)
You have forgotten or lost
your PIN code
Remedy
ENGLISH
Symptom
Reset from the Parental Control Screen. To access the Parental
Control Screen, use the following 4-digit code: 1978. Keep this
code secret to prevent others from using it.
If none of the above suggestions seem to work, try switching your Receiver off and then on again. If
this does not work, contact either your supplier or a qualified repair technician. Never attempt to
repair your receiver yourself.
Troubleshooting
29
DSR220co.book Page 30 Lundi, 18. janvier 2010 6:23 18
7
Technical Data
Reception- Demodulation
• 7 days Electronic Program Guide (EIT-S)
• Standard: DVB-T
• Now & Next ESG (EIT p/f)
• Input frequency range (target):UHF IV / V
• Event timer / reminder:8
• RF Loop-through bandwidth: 47 - 862 MHz
• Event programming via EPG or ESG
• Channel bandwidth (BW) (target): 8 MHz
• DVB subtitling
• Network:MFN / SFN
• Digital TXT / MHEG
• Demodulation type:
COFDM FFT 2K/8K
• Digital audio bit stream output
• Constellation:QPSK, 16 QAM, 64 QAM
• ECO power management
• Code rate (CR): ½, 2/3, ¾, 5/6, 7/8
• Software update:
Update via OTA download
Local update (servicing only)
• Guard interval (GI):1/32, 1/16, 1/8, ¼
• Input level range:-78 (*) to -25 dBm
(*) BW 8MHz, FFT 8K, 64 QAM, CR 3/4, GI ¼,
no echo, no noise
Video decoding
Standard definition
• MPEG2 MP@ML
• Video bit rate ≤ 15 Mbit/s
• Resolution: 576i max (720x576 pixels
interlaced)
• Picture format: 4:3 and 16:9
Audio Decoding
• MPEGI layer I, II
Application system resources
• Processor: PNX 8300
• SDRAM for AVG + System: 16 MB
• Flas - Data/Code: 2MB
Reception- Demodulation
• Band Reception: Band IV
Channel 21-68
• Active RF Loop-through:
Reception bandwidth (MHz): 470 - 854 MHz
• Switch to passive loop-through in OFF mode
• Channel bandwidth (BW) (target): 8 MHz
Convenience
• Network: MFN / SFN
• Automatic installation
Rear connections
RF in: type IEC 169-2 female
RF out: type IEC 169-2 male
• Up to 1000 channels
• Signal quality indicator
• Automatic channel update
• 4 x favorite TV channel lists
EXT1 SCART
Outputs:
• 4 x favorite Radio channel lists
• CVBS*or RGB/FB, adjustable level L/R audio
• Program list editing: Add, Move, Delete
•
• TV and Radio modes
and Slow blanking
• Parental control - Child lock
30
Technical Data
DSR220co.book Page 31 Lundi, 18. janvier 2010 6:23 18
EXT 2 SCART
• Outputs:
ENGLISH
• CVBS* , L/R audio
Inputs:
• CVBS* or RGB/FB, L/R audio, Slow blanking
Digital audio output: Cinch
* Video standard: PAL
Front panel: Display / Buttons
• 1x LED
Accessories
• Remote control
• Batteries: 2 x 1.5V type AAA/R03
• User manual
• AC /DC Power adaptor incl. mains cord
Miscellaneous
Temperature range (°C)
• Operating +5 to 45
• Storage -25 to +70
Mains: AC 230 V +/- 10% 50 Hz
Power consumption: < 5W
Standby: < 1 W
Weight: 0.4 Kg
Including packaging :1Kg
Dimensions:
• Product (mm): 200 x 35 x 95
• Packaging (mm): 260 x 55 x 175
Temperature
• Temperature-Range: +5°C +40°C
This product complies with the requirements of
the 95/47/EC and 2002/21/EC directives.
The product complies with
the following European
council Directives: 2006/95/
EC and 2004/108/EC.
Technical Data
31
DSR220co.book Page 33 Lundi, 18. janvier 2010 6:23 18
© 2009 Koninklijke Philips Electronics N.V.
All rights reserved.
Document order number: 502-1022400