1
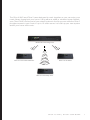
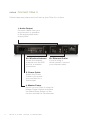
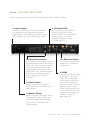
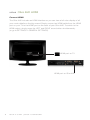
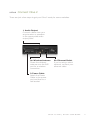
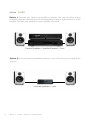
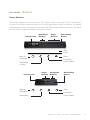
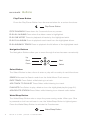
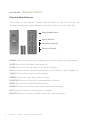
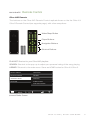
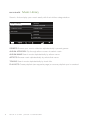
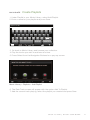
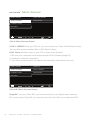
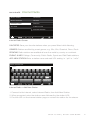
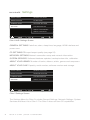
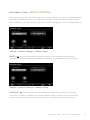
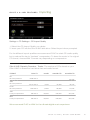
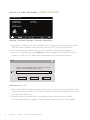
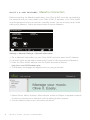
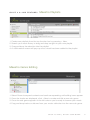
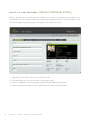
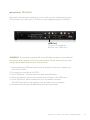
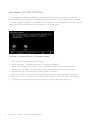
USER GUIDE
OLIVE 4 & 4HD | OLIVE 2
WELCOME
And thank you for your purchase.
You’re about to experience digital
music in true high fidelity. With easy,
intuitive access to your complete music
collection and no compromise in sound
quality, now you can experience all of it.
(Yes, Olive it.)
2
OLIVE 4 & 4HD | OLIVE 2 USER GUIDE
The Olive 4/4HD and Olive 2 were designed to work together so you can enjoy your
music library throughout your home. Using either a wired or wireless home network,
your Olive 4/4HD can be part of your stereo system in the living room while the Olive 2
provides access to your music in up to 10 other rooms. Let’s set up your new system
and fill your home with music.
Olive 4HD in the living room.
Olive 2 in the master bedroom.
Olive 2 in the office.
Olive 2 in the family room.
OLIVE 4 & 4HD | OLIVE 2 USER GUIDE
3
IT’S ALL HERE.
OLIVE IT.
HOW DOES THAT SOUND?
4
OLIVE 4 & 4HD | OLIVE 2 USER GUIDE
06
07 08
09
10
11
Setup
Olive 4/4HD Components
Olive 2 Components
Connect Olive 4
Connect Olive 4HD
Olive 4HD HDMI
Connect Olive 2
Navigate
13
15 17
19
20
21
22
23
Buttons
Navigation Bar
Remote Control
Music Library
Create Playlists
Music Sources
Internet Radio
Settings
Network Setup
23 Wired & Wireless
Olive 4 & 4HD Features
25 26
27
28
29 30 31
32
33 Importing
Import From PC
Import From MAC
Burn CDs
Maestro: Overview
Maestro: Connection
Maestro: Playlists
Maestro: Edit Genre
Maestro: Edit Metadata
Maintain
32 33
34 Backup
Update Software
Safety & Care
Resources
35
36 37 39 40
Q&A
Regulation Information
Legal Notices
Warranty
Copyright
OLIVE 4 & 4HD | OLIVE 2 USER GUIDE
5
SETUP
Olive 4 & 4HD Components
Unpack your box and you find the following items:
6
Olive 4
Olive 4HD
User Guide
User Guide
Power Cable
Power Cable
Wireless Antenna
Wireless Antenna
Remote + Batteries
Remote + Batteries
OLIVE 4 & 4HD | OLIVE 2 USER GUIDE
SETUP
Olive 2 Components
Unpack your box and you find the following items:
Olive 2
User Guide
Power Cable
Wireless Antenna
Remote + Batteries
OLIVE 4 & OLIVE 4HD | OLIVE 2 USER GUIDE
7
SETUP
Connect Olive 4
Follow these easy steps and you’ll set up your Olive 4 in no time.
1. Audio Output
Connect cables from your
amp/receiver or speakers
to the appropriate audio
output jacks.
2a. Wireless Antenna
Screw the wireless
antenna onto the WiFi
port for a wireless
connection.
2b. Ethernet Outlet
If you’re using a
wired network, connect
your ethernet cable.
3. Power Cable
Attach the Power
Cable to the power
port and then to a
wall socket.
4. Master Power
Switch on your Olive 4 using the
Master Power Switch and press
the Wake/Sleep Button on the
front to activate the Touchscreen.
8
OLIVE 4 & 4HD | OLIVE 2 USER GUIDE
SETUP
Connect Olive 4HD
Follow these easy steps and you’ll set up your Olive 4HD in no time.
1. Audio Output
Connect cables from your amp/receiver
or speakers to the appropriate audio
output jacks. The analog connectors (for
RCA cables) are most commonly used.
2. Outboard DAC
By connecting to Digital IN,
use the Olive 4HD as an
outboard DAC for any digital
music source. From the
SOURCES menu, select
DIGITAL INPUT.
3a. Wireless Antenna
For wireless connectivity, attach
the enclosed antenna to the top
WiFi port. For a stronger signal,
you may attach a secondary
antenna (not included) to the
lower WiFi port. Please ensure
that the two antennas are at
a 90º angle (e.g. 12 and 3
o-clock).
5. Power Cable
Attach the Power Cable to
the Power Port and then to a
wall socket.
6. Master Power
Switch on your Olive 4HD using
the Master Power Switch and
press the Wake/Sleep Button
on the front to activate the
Touchscreen.
3b. Ethernet Outlet
For wired connectivity,
attach your ethernet
cable here.
4. HDMI
Connect an HDMI cable
from your TV to your
Olive 4HD to see the
color display with all of
your music details on
your big screen. Simply
press the LEFT and
RIGHT arrow button on
your Olive 4HD and the
navigation interface will
appear on your TV.
(see page 10)
OLIVE 4 & 4HD | OLIVE 2 USER GUIDE
9
SETUP
Olive 4HD HDMI
Connect HDMI
The Olive 4HD includes an HDMI interface so you can view a full color display of all
your music details on the big screen! Simply connect an HDMI cable from the HDMI
port on your TV to the HDMI port on the back of your Olive 4HD. To switch to the
HDMI output, simply press the LEFT and RIGHT arrow button simultaneously
(or go to SETTINGS > GENERAL SETTINGS).
HDMI port on TV
HDMI port on Olive 4HD
10
OLIVE 4 & 4HD | OLIVE 2 USER GUIDE
SETUP
Connect Olive 2
There are just a few steps to get your Olive 2 ready for some melodies.
1. Audio Output
Connect cables from your
amp/receiver or speakers
to the appropriate audio
output jacks.
2a. Wireless Antenna
Screw the wireless
antenna onto the WiFi
port for a wireless
connection.
2b. Ethernet Outlet
If you’re using a wired
network, connect your
ethernet cable.
3. Power Cable
Attach the Power
Cable to the power
port and then to a
wall socket.
OLIVE 4 & 4HD | OLIVE 2 USER GUIDE
11
SETUP
Audio
Option 1: Connect your Olive to an amplifier or receiver. You may use either analog
or digital cables by connecting to the corresponding analog or digital (optical or coax)
outputs. Connect your speakers to your amplifier or receiver.
Passive Speakers > Amplifier/Receiver > Olive
Option 2: Connect powered speakers directly to your Olive using the analog audio
outputs.
Powered Speakers > Olive
12
OLIVE 4 & 4HD | OLIVE 2 USER GUIDE
N AV I G AT E
Buttons
Player Buttons
The Player Buttons are used like a CD player. When you push once, Play/Pause,
Forward and Back buttons allow you to navigate tracks within an album or playlist
while playing music. When you push and hold, Play/Pause stops your music, Forward
moves Fast Forward and Back moves Fast Back.
Touchscreen
Navigation
Buttons
Player
Buttons
Wake/Sleep
Button
Disc
Drive
Eject
Back or
Fast Back
Forward or
Fast Forward
Play/Pause
or Stop
Touchscreen
Back or
Fast Back
Play/Pause
Player
Navigation
Buttons Buttons
Wake/Sleep
Button
Stop
Forward or
Fast Forward
OLIVE 4 & 4HD | OLIVE 2 USER GUIDE
13
N AV I G AT E
Buttons
Play/Pause Button
Press the Play/Pause Button from the menus below for a various functions:
Play/Pause Button
STOP PLAYBACK Press down for 3 sceonds from any screen.
PLAY ALL ALBUMS Press when the album menu is highlighted.
PLAY ONE ARTIST Press to playback all tracks by the highlighted artist.
PLAY FULL ALBUM Press to playback each track from the highlighted album.
PLAY ALBUM BY TRACK Press to playback the full album of the highlighted track.
Navigation Buttons
The Navigation Buttons allow you to move through the touchscreen conveniently.
Up
Back
Next
Down
Select
Select Button
The Select Button is also a form of enter or play with a variety of useful functions:
SEARCH Access the Search mask from the Artist/Album/Track menus.
RATE TRACK Press Select while listening to a track.
ADD TRACK TO PLAYLIST Press Select while listening to a track.
PLAYLISTS Pres Select to play, delete or burn the highlighted playlist (page 24).
ADD/DELETE STATION Press Select while listening to an internet radio station.
Wake/Sleep Button
The Wake/Sleep Button sets or stops the power saving mode. When your Olive
is powered on but has not been in use, the Wake/Sleep Button is lighted green.
Press the Wake/Sleep Button to activate the Touchscreen.
Wake/Sleep Button
14
OLIVE 4 & 4HD | OLIVE 2 USER GUIDE
N AV I G AT E
Navigation Bar
Touchscreen
The Touchscreen icons in the Navigation Bar also function as buttons. Tap the icon
to access the settings. Adjustments may also be made under General or Network
Settings. Active or set icons will be displayed in orange. See page 23 for important
notes on wired and wireless indications. See page 17 for remote control functions.
10:25PM
-03:29
BACK Navigate to the previous screen.
10:25PM
CLOCK Set time and date. Tap icon or access from Settings menu.
ALARM Set an alarm to wake up to your music.
SLEEP TIMER Fall asleep to your music without it playing all night.
REPEAT ALL TRACKS Play the current music selection continuously.
REPEAT ONE TRACK Repeat a single track.
SHUFFLE Playback the current tracks/albums in random order.
PLAY/PAUSE/STOP Play, pause or stop the current track, album or artist.
-03:29
TRACK COUNTDOWN Indicates the current track time remaining.
CD BURNING/BACKUP/RESTORE Indicates a CD is burning or importing,
or the backup or restore process is taking place.*
VOLUME Reflects the current volume level. Tap to adjust
MUTE Select the volume icon to set mute.
WIRELESS Indicates wireless network connection and strength.
WIRED NETWORK (ETHERNET) Indicates wired network connection.
NO CONNECTION Indicates that you are disconnected from your network.
*During these processes no other activity should take place on your Olive.
OLIVE 4 & 4HD | OLIVE 2 USER GUIDE
15
N AV I G AT E
Remote Control
Olive 4 & Olive 2 Remote
The buttons on the Remote Control duplicate those on your Olive device. The
Remote Controls vary slightly between the Olive 4 & Olive 2 vs. the Olive 4HD.
Wake/Sleep Button
Player Buttons
Navigation Buttons
Shortcut Buttons
RATING Shortcut to the pop-up to adjust your personal rating of the song playing.
SLEEP Shortcut to the Sleep Timer (page 15).
HOME Shortcut to the main menu of the Olive 4 & Olive 2.
OK This button functions as the Select Button on your Olive 4 or Olive 2 (page 14).
TRACK Shortcut to the track currently playing.
LIBRARY Shortcut to your Olive 4 Music Library
SOURCES Shortcut to the list of connected Music Sources.
RADIO Shortcut to the Internet Radio selection.
REPEAT Shortcut to set the repeat mode while a track is playing.
ADD Shortcut to add the current track to a playlist.
SHUFFLE Shortcut to set the shuffle mode while a track is playing.
16
OLIVE 4 & 4HD | OLIVE 2 USER GUIDE
N AV I G AT E
Remote Control
Olive 4HD Remote
The buttons on the Olive 4HD Remote Control replicate those on the the Olive 4 &
Olive 2 Remote Control (see opposite page), with a few execptions:
Wake/Sleep Button
Player Buttons
Navigation Buttons
Shortcut Buttons
PLAYLIST Shortcut to your Olive 4HD playlists.
SEARCH Shortcut to the pop-up to adjust your personal rating of the song playing
LIBRARY Shortcut to the main menu. Same as HOME button for Olive 4 & Olive 2.
MUSIC LIBRARY
FAVORITES
MUSIC SOURCES
GENRES
INTERNET RADIO
REGIONS
SETTINGS
PUBLIC & INFO
ADD NEW STATION
10:43
10:25
0:25PM
PM
.Internet Radio Screen
OLIVE 4 & 4HD | OLIVE 2 USER GUIDE
17
N AV I G AT E
Music Library
Search, find and play your music easily with the intuitive categorization.
MUSIC LIBRARY
GENRES
MUSIC SOURCES
ALBUM ARTWORK
INTERNET RADIO
ALBUM NAME
SETTINGS
ARTISTS
TRACKS
PLAYLISTS
10:43
10:25
0:25PM
PM
GENRES Browse your music collection alphabetically in preset genres.
ALBUM ARTWORK Flip through album covers to select music.
ALBUM NAME Search music alphabetically by album name.
ARTISTS Browse music alphabetically by artists first name.
TRACKS Search music alphabetically by track title.
PLAYLISTS Create playlists (see opposite page) or access playlists you’ve created.
18
OLIVE 4 & 4HD | OLIVE 2 USER GUIDE
Create Playlists
N AV I G AT E
1. Under Playlist in your Music Library, select Add Playlist.
2. Enter a name for your playlist and press Save.
NEW PLAYLIST
Q
W
A
E
S
Z
R
D
X
12 3,?!
T
F
C
Y
G
V
U
H
B
I
J
N
O
K
P
L
M
SAVE
CANCEL
10:43
10:25
0:25PM
PM
3. Go back to Music Library and browse your collection.
4. Play the tracks you wish to add one at a time.
5. Press Select from the Navigation Buttons for a pop-up screen.
Music Library > Playlists > Add Playlist
6. The Rate Track screen will appear with the option Add To Playlist.
7. Add the current track playing, select the playlist you created and press Save.
OLIVE 4 & 4HD | OLIVE 2 USER GUIDE
19
N AV I G AT E
Music Sources
MUSIC LIBRARY
OLIVE 4HD LIBRARY
MUSIC SOURCES
UPNP DEVICE
INTERNET RADIO
SETTINGS
10:43
10:25
0:25PM
PM
Olive 4 Music Sources Screen
OLIVE 4 LIBRARY From your Olive 2, you can access your Olive 4/4HD Music Library.
You can aslo access another Olive 4/4HD Music Library.
UPnP Device Access music on your PC or other music libraries:
1. Be sure your computer has the appropriate UPnP software (page 36).
2. Establish a network connection.
3. Your other music libraries will appear automatically under Music Sources.
MUSIC LIBRARY
DIGITAL IN
MUSIC SOURCES
OLIVE 4 LIBRARY
INTERNET RADIO
UPNP DEVICE
SETTINGS
10:43
10:25
0:25PM
PM
Olive 4HD Music Sources Screen
Digital IN From your Olive 4HD, you can access all of your digital music sources.
By connecting to Digital IN, you can then use the Olive 4HD as an outboard DAC.
20
OLIVE 4 & 4HD | OLIVE 2 USER GUIDE
Internet Radio
N AV I G AT E
MUSIC LIBRARY
FAVORITES
MUSIC SOURCES
GENRES
INTERNET RADIO
REGIONS
SETTINGS
PUBLIC & INFO
ADD NEW STATION
10:43
10:25
0:25PM
PM
Internet Radio Screen
FAVORITES Save your favorite stations when you press Select while listening.
GENRES Stations are filed by preset genres, e.g. 50s, 60s, Classical, Disco, Rock.
REGIONS Radio stations are available all over the world by country or continent.
PUBLIC & INFO College, Community, Public Radio, Sports and Talk Radio stations.
ADD NEW STATION Enter a station name and web URL ending in “.pls” or “.m3u”.
ENTER STATION URL
http://
Q
W
A
E
S
Z
R
D
X
12 3,?!
T
F
C
Y
G
V
U
H
B
I
J
N
SAVE
O
K
P
L
M
CANCEL
10:43
10:25
0:25PM
PM
Internet Radio > Add New Station
1. Connect to the internet, select Internet Radio, then Add New Station.
2. When prompted, enter the station name followed by the station URL.
3. Find the URL on the internet station page or contact the station for the stream.
OLIVE 4 & 4HD | OLIVE 2 USER GUIDE
21
N AV I G AT E
Settings
MUSIC LIBRARY
GENERAL SETTINGS
MUSIC SOURCES
CD SETTINGS
INTERNET RADIO
NETWORK SETTINGS
SETTINGS
SYSTEM SERVICES
ABOUT YOUR LIBRARY
ABOUT YOUR OLIVE
10:43
10:25
0:25PM
PM
Olive 4/4HD Settings Screen
GENERAL SETTINGS Date/time, alarm, sleep timer, language, HDMI interface and
power save.
CD SETTINGS CD Import/export quality (see page 25).
NETWORK SETTINGS Network connection setup and network information.
SYSTEM SERVICES Software/database updates, backup/restore info, calibration.
ABOUT YOUR LIBRARY Number of tracks, albums, artists, genres and composers.
ABOUT YOUR OLIVE Capacity, serial number, software versions and storage.
MUSIC LIBRARY
GENERAL SETTINGS
MUSIC SOURCES
NETWORK SETTINGS
INTERNET RADIO
SYSTEM SERVICES
SETTINGS
ABOUT YOUR OLIVE 2
10:43
10:25
0:25PM
PM
Olive 2 Settings Screen
The Settings Menu for Olive 2 includes General Settings, Network Settings, System
Services and About Your Olive 2. The Olive 2 does not have CD capabilities.
22
OLIVE 4 & 4HD | OLIVE 2 USER GUIDE
NETWORK SETUP
Wired & Wireless
By connecting to the internet through your home network you can: Download album
artwork automatically when you import new music; Listen to internet radio; Import
music stored on a computer to your Olive 4/4HD; Manage your music using Maestro.
Settings > Network Settings > Network Setup
WIRED
You can choose to connect to your home network router directly
through an ethernet cable; Successful connection is indicated by the Wired icon.
Settings > Network Settings > Network Setup
WIRELESS
You can also connect wirelessly. Based on the ISP service you
have (DSL, cable or satellite), this configuration shares network access with other
connected devices. A successful connection is indicated by the Wireless icon.
OLIVE 4 & 4HD | OLIVE 2 USER GUIDE
23
NETWORK SETUP
Wired & Wireless
Both Wired and Wireless options require you to select a Manual or Automatic
connection. Automatic enables your router to dynamically assign an IP address to
connect. Manual requires that you enter the IP address of your Olive.
Settings > Network Settings > Network Setup
If you are connecting automatically, entering the security code will be your last
step. If connecting manually, you will need to establish your IP settings.
Enter your IP Address and press Save.
When you successfully connect to a network, the Wired or Wireless icon will appear.
If the icon appears white, you are connected to the internet. If the icon appears
orange, you have access to your home network but are not connected to the internet.
*Power cycle modem and router often improves connections. Reboot your modem,
then reboot your router followed by your Olive to resolve connection issues.
24
OLIVE 4 & 4HD | OLIVE 2 USER GUIDE
O L I V E 4 & 4 H D F E AT U R E S
Importing
Settings > CD Settings > CD Import Quality
1. Select the CD Import Quality you desire.
2. Insert your CD into the Olive 4/4HD disk drive. Select Import when prompted.
For the different import qualities we recommend FLAC to retain CD audio quality
but to reduce file size to “lossless” compression. To leave the music in it’s original
CD format, choose WAV. Formats vary depending on compression.
Olive 4/4HD Capacity Overview - Tracks The number of CDs stored on your
Olive 4/4HD is based on hard drive size and audio format.
FORMAT
QUALITY
500GB
1000GB/1TB
2000GB/2TB
HD
No Compression
4608 kbit/s
WAV
No Compression
1411.2 kbit/s
8,120
16,380
32,760
FLAC
No Compression
800 kbit/s
1,4330
28,890
57,780
AAC
Lossy Compression
128 kbit/s
89,570
180,590
361,180
MP3
Lossy Compression
128 kbit/s
89,570
180,590
361,180
20,000
We recommend FLAC or WAV for the ultimate digital music experience.
OLIVE 4 & 4HD | OLIVE 2 USER GUIDE
25
O L I V E 4 & 4 H D F E AT U R E S
Import From PC
NETWORK SETUP
NETWORK SETUP
IP ADDRESS
WIRELESS
xx.x.x.xx
INTERNET
AVAILABLE
REFRESH
CLOSE
10:43
10:25
0:25PM
PM
Settings > Network Settings > Network Information
1. If possible, connect your Olive 4/4HD to your network using an ethernet cable.
This will result in faster music transfer from your PC to your Olive 4/4HD.
2. Go to Network Information on your Olive 4/4HD and note the IP address.
3. On your PC keyboard press Windows + R to access the IP Address pop-up
screen or click your PC Start Menu followed by the Command Prompt.
x
Run
Type the name of a program, folder, document, or Internet
resource, and Windows will open it for you.
Open: \\ x x.x.x.xx
OK
Cancel
Browse...
Windows Icon + “R”
4. Select the Olive IP Address listed and an Import Folder will be published on the
home network once active. The Import Folder is a default configuration by Olive
as a Windows file server.
5. Drag and drop individual files or complete folders into the Import Folder.
Files are automatically tagged, organized and filed within your Olive system.
26
OLIVE 4 & 4HD | OLIVE 2 USER GUIDE
O L I V E 4 & 4 H D F E AT U R E S
Import from Mac
NETWORK SETUP
NETWORK SETUP
IP ADDRESS
WIRELESS
xx.x.x.xx
INTERNET
AVAILABLE
REFRESH
CLOSE
10:43
10:25
0:25PM
PM
Settings > Network Settings > Network Information
1. If possible, connect your Olive 4/4HD to your network using an ethernet cable.
This will result in faster music transfer from your Mac to your Olive 4/4HD.
2. Go to Network Information on your Olive 4/4HD and note the IP address.
3. On your Mac keyboard, open the Finder window (not the spotlight search).
4. Click the GO option next to File, Edit, View, etc. in the nav bar.
smb://xx.x.x.xx
Finder Window > GO
6. Type in smb://xx.x.x.xx (x’s are for the Olive IP address from step 2).
7. Click Connect and an Import Folder will appear on the home network once active.
The Import Folder is a default configuration by Olive as a Windows file server.
5. Drag and drop individual files or complete folders into the Import Folder.
Files are automatically tagged, organized and filed within your Olive system.
OLIVE 4 & 4HD | OLIVE 2 USER GUIDE
27
O L I V E 4 & 4 H D F E AT U R E S
Burn CDs
Burn a playlist or an album from the Olive 4/4HD to a CD for music to go.
ADD PLAYLIST
OVERLAND
DINNER PARTY
GYPSY LADY
MORNING RUSH
MOONLIGHT SONATA
OLIVE MUSIC LIST
REVOLUTION
OPERA MIX
SOMEWHERE OVER THE R...
ROCK HITS
YELLOW
10:43
10:25
0:25PM
PM
Music Library > Playlist > Select Playlist
1. Locate the playlist or album that you wish to burn from your Olive collection.
2. IMPORTANT: Be sure to have the playlist or album highlighted for step 3.
3. Press Select (page 14) from the navigation buttons.
Playlist Option Menu
4. Select Burn To CD from the pop-up screen.
5. Insert a blank CD when prompted. The CD will eject when complete.
28
OLIVE 4 & 4HD | OLIVE 2 USER GUIDE
O L I V E 4 & 4 H D F E AT U R E S
Maestro Overview
Maestro is a music management software program which allows you to further
organize and edit your music collection. Manage the music on your Olive 4/4HD (not
Olive 2) from your computer using the features below.
Please note that Maestro may appear to run slowly. As you edit music infrormation,
you are also changing it in your Olive Music Library. With large music collections
and/or network bandwidth limitations, these processes may be time consuming.
Please be patient. Your music will thank you.
CREATING
PLAYLISTS
From the Playlists screen, create a playlist by clicking the +
New button in the top right. Drag and drop tracks from anywhere within your library into your new playlist.
ADD/CHANGE
ALBUM
ARTWORK
Update or add album artwork within your music library by
clicking Album Artwork in the left column. First download or
scan the album artwork as a JPEG file and save it to your
computer. You will then find and upload your selected album
artwork in Maestro.
CHANGE
ALBUM GENRE
Create a new sub-genre of music or move music to different
genres. From within Genres on the left, click the + New button to create a new genre title.
EDIT METADATA
Add or change music information. For example, with classical
music, the composer and work fields of a track may be pretagged with the artist and album title fields. Select a track,
or highlight several, click Edit on the right and adjust track
information where desired.
MERGE TWO
ALBUMS INTO
ONE
Combine multiple CDs from a box set into one album for continuous playback. Similar to creating a playlist, simply drag
and drop tracks to combine albums.
OLIVE 4 & 4HD | OLIVE 2 USER GUIDE
29
O L I V E 4 & 4 H D F E AT U R E S
Maestro Connection
Before launching the Maestro application, your Olive 4/4HD must be connected to
the network and you must obtain your Olive 4/4HD IP address. Your Olive 4/4HD
must be powered on but can also be in standby mode. You can not play music while
editing with Maestro. Follow the steps below to launch Maestro.
NETWORK SETUP
NETWORK SETUP
IP ADDRESS
WIRELESS
xx.x.x.xx
INTERNET
AVAILABLE
REFRESH
CLOSE
10:43
10:25
0:25PM
PM
Settings > Network Settings > Network Information
1. Go to Network Information on your Olive 4/4HD and write down the IP address.
2. Launch Firefox as the web browser (only Firefox is fully supported on Maestro).
3. Enter the Olive 4/4HD address into the Firefox browser as shown:
http://xx.x.x.xx:8163/maestro.php
4. The Maestro homepage will appear and you can get started!
1. Select Genre, Album Artwork, Album Name, Artists or Playlist to expand contents.
Continue to expand your selection until the editing buttons appear.
2. To edit, delete or play music, first select an album.
30
OLIVE 4 & 4HD | OLIVE 2 USER GUIDE
O L I V E 4 & 4 H D F E AT U R E S
Maestro Playlists
1. Create new playlists from the top function bar by pressing + New.
2. Search your music library to drag and drop songs into your new playlist.
3. Drag and drop the selection into the playlist.
4. A confirmation screen will pop up once a track has been added to the playlist.
Maestro Genre Editing
1. Select Genre to expand contents and continue expanding until editing icons appear.
2. Once the tracks are displayed, click + New to create and title a new sub-genre.
3. Once the sub-genre appears in the left column you’re ready to browse your music.
4. Drag and drop tracks or albums from your music collection into the new sub-genre.
OLIVE 4 & 4HD | OLIVE 2 USER GUIDE
31
O L I V E 4 & 4 H D F E AT U R E S
Maestro Metadata Editing
Before starting you should decide whether you want to edit tag information for a
single track or for a whole album (changing the tag information of a whole album has
the advantage of applying your changes to all tracks at once).
1. Highlight the track or album you wish to edit.
2. Choose Edit from the action bar in the upper right.
3. Once the editing screen appears (above) begin editing attributes.
4. Save changes and click on the tabs above to edit more attributes.
32
OLIVE 4 & 4HD | OLIVE 2 USER GUIDE
M A I N TA I N
Backup
We highly recommend backing up your music as your collections grows.
This process can take up to 10 hours so we suggest doing it overnight.
USB Port
Connect the external
drive to your USB port.
WARNING: The backup process will erase all data stored on your external
hard drive, and replace it with the backup files. Please make sure you are
using a dedicated hard drive for this process.
1. Use an external USB hard drive with at least the minimum capacity as
your Olive 4/4HD.
2. Format your hard-drive in FAT32.
3. Go to Settings > System Services and select Backup.
4. When prompted, connect the external hard drive to the USB port.
5. Press Continue. Allow ample time for the transfer process.
The CD Burning icon will appear until the back up is complete.
6. No other activity should take place during this process.
OLIVE 4 & 4HD | OLIVE 2 USER GUIDE
33
M A I N TA I N
Update Software
Olive engineers regularly update our software to offer you more features. We recommend that you check for updates every two months. To be notified about software
updates, please register your products at www.olive.us or contact us with your email
address. Follow these steps to update your Olive software:
Settings > System Services > Software Update
1. You must be connected to the internet.
2. Go to Settings > System Services > Software Updates
3. Once the update is successful, your Olive device will restart automatically.
4. Switch off your Olive 4/4HD Master Power (disconnect Olive 2 from power.)
5. Recalibrate your Touchscreen under System Services.
6. Follow the black “+” symbol by tapping it lightly as it moves across the screen.
7. After you tap the “+” symbol you will be redirected to the Olive welcome screen.
8. Tap the Touchscreen to access your Music Library and main screens.
34
OLIVE 4 & 4HD | OLIVE 2 USER GUIDE
M A I N TA I N
Safety & Care
PLACE YOUR OLIVE on a secure, level surface. Do not put heavy objects on top.
DO NOT use force on switches, the Touchscreen, controls or connection wires.
TURN OFF OTHER STEREO COMPONENTS before switching off the Master
Power Swtich on your Olive 4/4HD or unplugging your Olive 2. Turn down
amplifier/receiver volume before pressing the Wake/Sleep Button to ensure there
is no volume surge that could impact other components.
BEFORE MOVING YOUR OLIVE disconnect the power cable and all wires.
BEFORE PLUGGING your Olive device into the AC main supply, check that the
voltage indicated on the back complies with the local voltage.
THIS UNIT IS NOT TO BE DISCONNECTED from the AC power source as long
as it is connected to the wall outlet and the Master Power Switch on the back is
on (Olive 4/4HD). When the Wake/Sleep Button is lighted, your Olive is in power
saving mode. This means your Olive is “asleep” and using very little power but it is
not off. Power off the Master Power Switch and then unplug your Olive 4/4HD or
simply unplug the Power Cable from your Olive 2.
WHEN PLANNING NOT TO USE YOUR OLIVE for long periods of time (e.g.
vacation, etc.) disconnect the Power Cable from the wall outlet. Always grab the
plug, never the cable itself.
NEVER PUSH OBJECTS OF ANY KIND into the product through openings. Never
spill liquid of any kind on the product. Contact Olive support if something drops
into the case.
USE A CLEAN SOFT AND DRY CLOTH to remove dust or fingerprints from your
Olive. Unplug your Olive from the wall outlet before cleaning to ensure you don’t
shock the Olive device with static electricity.
DO NOT CLEAN YOUR OLIVE WITH aerosol sprays, chemical solvents, alcohol
or abrasives. Do not remove dust with air pressure.
OLIVE 4 & 4HD | OLIVE 2 USER GUIDE
35
RESOURCES
Q&A
IS YOUR OLIVE NOT RESPONDING? Press and hold the Wake/Sleep Button on the
front for about 5 seconds. The system will restart. Allow 40-60 seconds for the main
menu to reappear and for network connections to re-establish.
STILL CAN’T CONNECT? If you are using a wired connection please make sure
that your Olive is set to wired mode in the networking settings and that your wires
are plugged in correctly on the Olive and the router. The connector on both devices
should have a green LED that is lighted. Please also verify that your router is
providing a valid signal. To test the signal please plug the same wire into a PC/Mac
and test if you can access the internet.
If you still cannot access the network or are using a wireless connection please call
us toll free at 1.877.296.5483 and have the following information ready:
1. Retrive the Brand and Model of your router.
2. Encryption mode (e.g. WEP, WEP3, WPA, etc)
3. Enctryption depth (64-, 128-bit)4.
4. Networked password you are using
HOW DO I RECOVER MY MUSIC? Software for recovering your music collection is
available for download and updates are applied when you download the software.
Visit the Olive website for instructions downloading the software to your Olive device.
http://www.olive.us/contact/software/installation.html
PLAY MUSIC FROM NETWORKED PC/MAC/NAS? Devices must be on the same
network and support the UPnP standard and have relevant software running. Music
sources that broadcast themselves on the home network are displayed on the Olive
4/4HD under Music Sources. They must be connected to the network, turned on,
support the UPnP/AV (DLNA) standard and the music libraries must be published
and able to be shared.
36
OLIVE 4 & 4HD | OLIVE 2 USER GUIDE
RESOURCES
Regulation Information
USA
This equipment has been tested and found to comply with the limits for a Class B digital device, pursuant to part 15 of the FCC Rules. These limits are designed to provide reasonable
protection against harmful interference in a residential installation. This equipment generates,
uses and can radiate radio frequency energy and, if not installed and used in accordance with
the instructions, may cause harmful interference to radio communications. However, there is
no guarantee that interference will not occur in a particular installation. If this equipment does
cause harmful interference to radio or television reception, which can be determined by turning the equipment off and on, the user is encouraged to try to correct the interference by one
or more of the following measures: Reorient or relocate the receiving antenna; Increase the
separation between the equipment and receiver; Connect the equipment into an outlet on a
circuit different from that to which the receiver is connected; Consult the dealer or an experienced audio technician for help. Modifications not expressly approved by the manufacturer
may void the user’s authority to operate the equipment under FCC rules.
Canada
This Class B digital apparatus complies with Canadian ICES-003 and RSS-210. Operation
is subject to the following two conditions: (1) this device may not cause interference, and (2)
this device must accept any interference, including interference that may cause undesired
operation of the device.
Industry Canada: The installer of this radio equipment must ensure that the antenna is located
or pointed such that it does not emit RF field in excess of Health Canada limits for the general
population; consult Safety Code 6, obtainable from Health Canada’s Web site www.hc-sc.
gc.ca.
Europe EU Declaration of Conformity
Olive declares that this product complies with the requirements and other relevant provisions
of the R&TTE Directive (1999/5/EC). A copy of the full Declaration of Conformance may be
obtained at www.olive.us/euro/compliance. In France, operation is limited to indoor use within
the band 2.454-2.4835 GHz. (Attention. En France, l’utilisation en intérieur est limitée à la
bande de fréquences 2,454-2,4835 GHz.)
RF Exposure Requirements
To comply with FCC and EU exposure essential requirements, a minimum separation distance of 20cm (8 inches) is required between the equipment and the body of the user or
nearby persons.
OLIVE 4 & 4HD | OLIVE 2 USER GUIDE
37
RESOURCES
Legal Notices
Data Loss
The manufacturer of this device shall not be liable for damage or loss of data including but not
limited to music recorded to storage devices. It is the customer’s responsibility to maintain
the original media and/or appropriate backup copies within the specific rights of the media’s
copyright holder.
Manual Disclaimer
At the time of printing, the screen shot images in this manual matched the interface screens.
However, since these products have the capability of downloading software updates and
enhancements on a regular basis, the resulting screen updates may no longer match the
images in this manual. Check the Olive website for more information on software updates.
Recycling Information
This symbol on the product or on its packaging indicates that this product shall not be
treated as household waste. Instead please deliver it to the applicable collection point for the
recycling of electrical and electronic equipment. By recycling this product correctly, you will
help conserve natural resources and prevent potential negative environmental consequences.
For more detailed information about recycling of this product, please contact your local city
office, your household waste disposal service or the store where you purchased the product.
Trademarks + Service Marks
The Olive logo is a trademark of Olive Media, Inc. Other product names mentioned herein are
used for identification purposes only and may be trademarks of their respective companies.
MPEG Layer-3 audio coding technology licensed from Fraunhofer IIS and Thomson. Supply
of this product does not convey a license nor imply any right to distribute content created
with this product in revenue-generating broadcast systems (terrestrial, satellite, cable and/or
other distribution channels), streaming applications (via Internet, intranets and/or other networks), other content distribution systems (pay-audio or audio-on-demand applications and
the like) or on physical media (compact discs, digital versatile discs, semiconductor chips,
hard drives, memory cards and the like). An independent license for such use is required. For
details, please visit http://mp3licensing.com. Supply of this implementation of AAC technology does not convey a license nor imply any right to use this implementation in any finished
end-user or ready-to-use final product. An independent license for such use is required. Music recognition technology and some data are provided based on FreeDB. For more information, visit www.freedb.org.
38
OLIVE 4 & 4HD | OLIVE 2 USER GUIDE
RESOURCES
Legal Notices
LPGL Library + GPL Package Written Offer
This product contains Linux 2.6.12, which is made available under the GNU GPL license version 2 (hereafter called “The Program”). Olive Media, Inc. hereby offers to deliver or make
available, upon request, for a charge no more than the cost of physically performing source
distribution, a complete machine-readable copy of the corresponding source code of “The
Program” on a medium customarily used for software interchange. This offer is valid for a
period of three years after the date of purchase of this product.
Please contact:
Olive Media, Inc.
555 Howard Street
San Francisco, CA 94105
USA
Music Is Intellectual Property
Intellectual property, including music, is subject to worldwide copyright protection. In most
countries it is permitted to make a copy of a sound storage medium (e.g. CDs) that has
been legally acquired or of music data (e.g. from the Internet) for personal use, except for
CDs with copy protection. In no case is it permitted to offer these copies for commercial
sale or to pass them to third parties. Always make sure that the music you acquire is properly licensed, i. e. that the party offering them also possesses the rights to the titles being offered. Olive products must not be used for unauthorized duplication of CDs or any
other works protected by copyright. No license to infringe copyright is granted by the sale
of this equipment. Recording and playback of some material may require permission.
OLIVE 4 & 4HD | OLIVE 2 USER GUIDE
39
RESOURCES
Warranty
FOR CONSUMERS, WHO ARE COVERED BY CONSUMER PROTECTION LAWS OR
REGULATIONS IN THEIR COUNTRY OF PURCHASE OR, IF DIFFERENT, THEIR COUNTRY
OF RESIDENCE, THE BENEFITS CONFERRED BY THIS WARRANTY ARE IN ADDITION TO
ALL RIGHTS AND REMEDIES CONVEYED BY SUCH CONSUMER PROTECTION LAWS AND
REGULATIONS. THIS WARRANTY DOES NOT EXCLUDE, LIMIT OR SUSPEND ANY RIGHTS
OF CONSUMERS ARISING OUT OF NON-CONFORMITY WITH A SALES CONTRACT.
SOME COUNTRIES, STATES AND PROVINCES DO NOT ALLOW THE EXCLUSION OR
LIMITATION OF INCIDENTAL OR CONSEQUENTIAL DAMAGES OR ALLOW LIMITATIONS
ON HOW LONG AN IMPLIED WARRANTY OR CONDITION MAY LAST, SO THE LIMITATIONS
OR EXCLUSIONS DESCRIBED BELOW MAY NOT APPLY TO YOU. THIS WARRANTY GIVES
YOU SPECIFIC LEGAL RIGHTS, AND YOU MAY ALSO HAVE OTHER RIGHTS THAT VARY
BY COUNTRY, STATE OR PROVINCE. THIS LIMITED WARRANTY IS GOVERNED BY AND
CONSTRUED UNDER THE LAWS OF THE COUNTRY IN WHICH THE PRODUCT PURCHASE
TOOK PLACE.
Olive Media, Inc. (“Olive”) warrants this hardware product against defects in materials and
workmanship for a period of one (1) year from the date of delivery. If a defect exists, Olive will,
at its option: Repair the product at no charge, using new or refurbished replacement parts,
or exchange the product with a product that is new or which has been manufactured from
new or serviceable used parts and is at least functionally equivalent to the original product.
A replacement product assumes the remaining warranty of the original product or 90 days,
whichever provides greater coverage. When a product or part is exchanged, any replacement
item becomes your property, while the replaced item becomes Olive property. The following
exclusions and limitations apply: Olive is not liable for any damage to or loss of any programs,
data, or other information stored on any media not covered by this warranty; Recovery and
reinstallation of system and application software and user data are not covered under this
Olive Limited Hardware Warranty.
THIS WARRANTY AND REMEDIES SET FORTH ABOVE ARE EXCLUSIVE AND IN LIEU
OF ALL OTHER WARRANTIES, REMEDIES AND CONDITIONS, WHETHER ORAL AND
WRITTEN, EXPRESS OR IMPLIED. OLIVE SPECIFICALLY DISCLAIMS ANY AND ALL IMPLIED
WARRANTIES, INCLUDING, WITHOUT LIMITATION, WARRANTIES OF MERCHANTABILITY
AND FITNESS FOR A PARTICULAR PURPOSE. IF OLIVE CANNOT LAWFULLY DISCLAIM
IMPLIED WARRANTIES UNDER THIS LIMITED WARRANTY, ALL SUCH WARRANTIES,
INCLUDING WARRANTIES OF MERCHANTABILITY AND FITNESS FOR A PARTICULAR
PURPOSE ARE LIMITED IN DURATION TO THE DURATION OF THIS WARRANTY. OLIVE IS
NOT RESPONSIBLE FOR DIRECT, SPECIAL, INCIDENTAL OR CONSEQUENTIAL DAMAGES
RESULTING FROM ANY BREACH OF WARRANTY OR CONDITION, OR UNDER ANY
OTHER LEGAL THEORY, INCLUDING BUT NOT LIMITED TO LOST PROFITS, DOWNTIME,
GOODWILL, DAMAGE TO OR REPLACEMENT OF EQUIPMENT AND PROPERTY, ANY
COSTS OF RECOVERING, REPROGRAMMING, OR REPRODUCING ANY PROGRAM OR
DATA STORED IN OR USED WITH OLIVE PRODUCTS, AND ANY FAILURE TO MAINTAIN
THE CONFIDENTIALITY OF DATA STORED ON THE PRODUCT. OLIVE SPECIFICALLY
DOES NOT REPRESENT THAT IT WILL BE ABLE TO REPAIR ANY PRODUCT UNDER
THIS WARRANTY OR MAKE A PRODUCT EXCHANGE WITHOUT RISK TO OR LOSS OF
PROGRAMS OR DATA.
40
OLIVE 4 & 4HD | OLIVE 2 USER GUIDE
RESOURCES
Copyright
Both the product described in this user guide and this documentation are protected
by copyright law. Copyright remains with the author. Software and documentation
may not be copied, reproduced, translated or distributed in any form, not even in
part, without prior written consent by the copyright owner. The authors decline any
liability with regard to the software described herein. They do not make any warranties for the correctness of the contents of this documentation, nor are they liable for
any direct or indirect damages which may arise from the use of, or the inability to
use, either the software or the accompanying documentation, even if the possibility
of such damages may have been brought to their attention. The authors do not assume responsibility for any bugs or defects in the software. This restriction of liability
extends also to their distributors and retailers.
6th edition Olive Media, Inc.
© February 2010
Olive Media Inc.
555 Howard Street
San Francisco, CA 94105
USA
Email: [email protected]
http://www.olive.us
OLIVE 4 & 4HD | OLIVE 2 USER GUIDE
41
42
OLIVE 4 & 4HD | OLIVE 2 USER GUIDE
Olive Media Inc.
555 Howard Street
San Francisco, CA 94105
T +1.877.296.5483
F +1.415.908.3680
E [email protected]
www.olive.us
OLIVE 4 & 4HD | OLIVE 2 USER GUIDE
43
OLIVE 4 & OLIVE 4HD | OLIVE 2 USER GUIDE