1
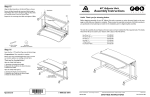
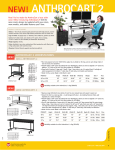
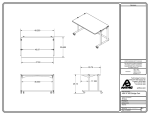
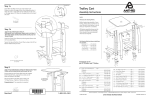
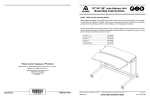
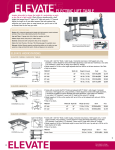
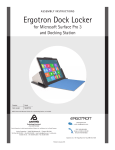
A s s e mb ly i nstr u c ti ons
Zido® Adjustable-Height Cart
Zido Adjustable, NO LIP
Part#
Zido Adjustable, WITH LIP
Part#
Adjustable, Heavy Load, 22" w
ZAH22SB/CG4
Adjustable, Heavy Load, 22" w
ZLH22SB/CG4
Adjustable, Heavy Load, 25" w
ZAH25SB/CG4
Adjustable, Heavy Load, 25" w
ZLH25SB/CG4
Adjustable, Light Load, 22" w
ZAL22SB/CG4
Adjustable, Light Load, 22" w
ZLL22SB/CG4
Adjustable, Light Load, 25" w
ZAL25SB/CG4
Adjustable, Light Load, 25" w
ZLL25SB/CG4
Anthro Corporation® | 10450 SW Manhasset Dr. | Tualatin, OR 97062
Toll-free: 800.325.3841 | Fax: 800.325.0045 | email: [email protected] | anthro.com
Outside the U.S. | Tel: 503.691.2556 | Fax: 503.691.2409
Rev K, January 2011
01
09
02
11
07
08
04
10
03
05
06
we l c o m e
PA RTS LIST
Thank you for purchasing this Zido
Height-adjustable cart!
Before beginning assembly of your Zido Height-adjustable
Cart, please review the parts list to verify that your shipment
is complete.
If you have any questions or if we
can help you in any way, please
contact us at 800.325.3841.
2
Product
01
Quantity
Cap Shelf
1
For small cart, no lip
For small cart, with lip
For large cart, no lip
For large cart, with lip
Part Number
101-1025-06-50
101-1072-03-50
101-1026-06-50
101-1073-03-50
02 Cap Shelf Bracket
1
225-2620-51
03 Base
For Small Cart
For Large Cart
1
1
250-5064-52
250-5065-52
04 Column
For Light Load Cart
For Heavy Load Cart
1
1
835-5290-00
835-5291-00
05 4" Non-locking Caster
2
150-5010-03
06 4" Locking Caster
2
150-5011-03
07 Release Lever and Paddle
1
835-5393-00
08 Lock Nut
4
325-5263-00
09 1" Cap Screws
4
325-5537-00
10 3/4" Flat-head Patch Screws
2
325-5466-00
11 3/4" Wood Screws
8
325-5106-000
12 3/16" Hex Key (not shown)
1
375-5028-00
13 5/32" Hex Driver (not shown)
1
375-5000-00
ASSEMBLY SE Q UENCE
Plan out the assembly sequence to make your installation easier.
1.
2.
3.
4.
5.
6.
7.
8.
Pre-drill the top for accessories (Mouse Holder, Side Bin, Gel Cup/Probe Holder, Extension Tube).
Assemble the cart.
Base Storage Shelf.
Drawer, Keyboard Drawer, Handle.
SideRacks, Additional Shelves, Equipment Shelves, Metal Bin, IV bracket, SideRack.
Cable Bin, Glove Box Holder, Tank Holder.
Mouse Holder, Side Bin, Gel Cup & Probe Holder, Extension Tube.
Pole Cart Handle, 8" Handle, Flat Panel Mounts.
STEP 1A
Connect the Base with the Tube
¡ The column of your Zido cart comes with
two fasteners installed at the base to keep
the column components in place during
transit. Using the 5/32" hex driver provided,
remove those screws and discard them.
¡ Holding the column from the center (don't push from
the top) slide the tube into the base so that the tube
goes all the way to the bottom of the base.
¡Align the upper hole on the base with a threaded
hole in the column. (For the large cart, you'll use
the top hole; for the small cart, you'll use the second
hole.) Loosely attach the column to the base with the
second 3/4" Flat-head Screw.
3/4" Flat Hd Screw
325-5466-00
STEP 1b
Insert the Casters
¡ Place Zido on its side. Add the locking casters
(the ones with the brakes) to the front of the
base assembly. Add the non-locking casters
to the back of the base assembly.
¡Use the 3/16" Hex Key to tighten the
adjustment screw at the bottom of the
column. Turn Zido right side up.
Adjustment Screw
Zido Height-adjustable Carts Assembly Instructions
3
STEP 2
Install the Lever and the Top Plate
1" Cap Screws
¡ Align the lever with the top of the trunk
assembly as shown.
¡ Locate the bracket. The bottom of the bracket is flat
and has no sticker. The top of the bracket has a sticker
that says "TOP" and has bumps with threads inside.
The bumps on the top of the bracket will nest inside
the holes on the cap shelf.
¡ Align the cap shelf bracket with the trunk assembly so the bracket's tabs are at
the back and the "TOP" label is on top.
Lock Nuts
¡ Using the 3/16 hex key, insert four 1" Socket-head Cap screws through the
holes on the top of the Top Plate and capture with four lock nuts inserted in to
the holes in the top of the columns.
¡ Pull up on the lever to move the column up and down. Repeat a few times to
make sure the column moves smoothly. If the lever was installed upside down,
the column won’t move. If that happens, remove the top plate, invert the lever,
and try it again.
1” Button-head Screw
325-5537-00
Nylock Nut 5/16-18
325-5189-00
STEP 3
Install the Cap Shelf
¡ Align the indentations on the bottom of the cap shelf with the screw heads and
bumps on the top of the top plate.
¡ Secure the cap shelf to the cart with eight 3/4" wood screws.
¡Tighten the 3/4" flat-head screws that connect the column to the base.
¡ Pull the paddle up and move the column up and down a few times to loosen the
mechanism. Be sure to operate the column from the back of the cart so you
have plenty of leverage.
3/4" Wood Screw
325-5106-00
CONGR ATULATIONS !
YOUR Z I D O AD J USTA BLE C A RT ASSEMBLY IS COM PLETE !
Anthro Corporation® | 10450 SW Manhasset Dr. | Tualatin, OR 97062
Toll-free: 800.325.3841 | Fax: 800.325.0045 | email: [email protected] | anthro.com
Outside the U.S. | Tel: 503.691.2556 | Fax: 503.691.2409
*300-5418-00*
300-5418-00
Warranty:
Zido carts have a Lifetime Warranty; the cylinder has a five-year warranty.
Notices:
Technology Furniture and Zido are trademarks of Anthro Corporation. Anthro reserves the right to modify the design and specifications without prior notice.