1
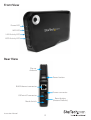
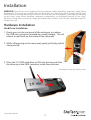
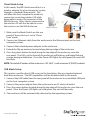
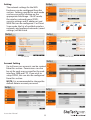
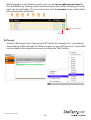
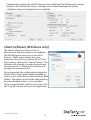
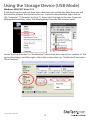
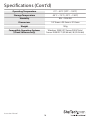
WiFi/ USB 2.0 to 2.5” SATA Hard Drive Enclosure
S2510U2WF
S2510U2WUKEU
*actual product may vary from photos
DE: Bedienungsanleitung - de.startech.com
FR: Guide de l'utilisateur - fr.startech.com
ES: Guía del usuario - es.startech.com
IT: Guida per l'uso - it.startech.com
NL: Gebruiksaanwijzing - nl.startech.com
PT: Guia do usuário - pt.startech.com
For the most up-to-date information, please visit: www.startech.com
Manual Revision: 06/08/2012
FCC Compliance Statement
This equipment has been tested and found to comply with the limits for a Class B digital
device, pursuant to part 15 of the FCC Rules. These limits are designed to provide reasonable
protection against harmful interference in a residential installation. This equipment generates,
uses and can radiate radio frequency energy and, if not installed and used in accordance with
the instructions, may cause harmful interference to radio communications. However, there
is no guarantee that interference will not occur in a particular installation. If this equipment
does cause harmful interference to radio or television reception, which can be determined by
turning the equipment off and on, the user is encouraged to try to correct the interference by
one or more of the following measures:
• Reorient or relocate the receiving antenna.
• Increase the separation between the equipment and receiver.
• Connect the equipment into an outlet on a circuit different from that to which the receiver
is connected.
• Consult the dealer or an experienced radio/TV technician for help.
Use of Trademarks, Registered Trademarks, and other Protected Names and
Symbols
This manual may make reference to trademarks, registered trademarks, and other
protected names and/or symbols of third-party companies not related in any way to
StarTech.com. Where they occur these references are for illustrative purposes only and do not
represent an endorsement of a product or service by StarTech.com, or an endorsement of the
product(s) to which this manual applies by the third-party company in question. Regardless
of any direct acknowledgement elsewhere in the body of this document, StarTech.com hereby
acknowledges that all trademarks, registered trademarks, service marks, and other protected
names and/or symbols contained in this manual and related documents are the property of
their respective holders.
Instruction Manual
Table of Contents
Introduction.............................................................................................1
Packaging Contents.................................................................................................................................. 1
System Requirements............................................................................................................................... 1
Front View..................................................................................................................................................... 2
Rear View....................................................................................................................................................... 2
Installation...............................................................................................3
Hardware Installation............................................................................................................................... 3
Hard Drive Installation....................................................................................................................................3
AP Mode Setup..................................................................................................................................................4
Client Mode Setup............................................................................................................................................5
USB Mode Setup...............................................................................................................................................5
Driver Installation....................................................................................................................................... 6
How to Use...............................................................................................7
Web Interface.............................................................................................................................................. 7
System Setting...................................................................................................................................................7
Web Folder..........................................................................................................................................................9
BitTorrent.............................................................................................................................................................10
Client Software (Windows only)........................................................................................................... 11
Samba (SMB)/ FTP Access....................................................................................................................... 12
Automatic Discovery (Windows Vista/ 7/ 8, Mac OS 10.6/ 10.7)......................................................12
Mapping Network Drive.................................................................................................................................12
Using the Storage Device (USB Mode).................................................13
Specifications...........................................................................................15
Technical Support...................................................................................17
Warranty Information.............................................................................17
Instruction Manual
i
Introduction
The S2510U2WF/S2510U2WUKEU WiFi/USB 2.0 to SATA Hard Drive Enclosure is a
unique combination of wireless external storage device and wireless access point (AP)
in one, enabling you to access data over a WiFi connection or a USB 2.0 connection
(as a normal 2.5-inch SATA HDD enclosure), or create a local wireless hot spot with a
shared hard drive (NAS).
The perfect solution for users who are on the road and need a simple way to create
their own portable wireless LAN (WLAN), the WiFi enclosure enables you to turn a
hardwired Internet connection into a wireless access point for networking laptops
or netbooks or Personal Electronic Devices such as smartphones or tablets. While
connected, users can access data on the enclosed hard drive, making it easier and
more secure to share files with multiple computers at the same time over FTP, SMB or a
dedicated web interface.
Packaging Contents
•
•
•
•
•
•
•
1 x 2.5” SATA HDD Enclosure
1 x USB Cable
1 x Ethernet Cable
1 x Power Adapter (S2510U2WF)
2 x Power Adapters (S2510U2WUKEU)
1 x Software CD
1 x Instruction Manual
System Requirements
• Available AC electrical outlet
• AP Mode:
• Wired Ethernet router, or switch, or modem
• Computer system with WiFi capabilities
• Client Mode:
• Wireless router
• Computer system with available RJ45 Ethernet port
• USB Mode : USB enabled computer system with available USB port
• Client Software : Microsoft® Windows® 2000/ XP/ Server 2003/ Vista/
Server 2008 R2/ 7 (32/64-bit) / 8 (32/64-bit) and .Net Framework 2.0
Instruction Manual
1
Front View
Power LED
WiFi LED
LAN Activity LED
HDD Activity LED
Rear View
Flip-up
Antenna
Power button
RJ45 Ethernet connector
Power connector
USB mini-B connector
Reset button
(Restore Defaults)
Mode Switch
Instruction Manual
2
Installation
WARNING! Hard drives and storage enclosures require careful handling, especially when being
transported. If you are not careful with your hard disk, lost data may result. Always handle your
hard drive and storage device with caution. Be sure that you are properly grounded by wearing
an anti-static strap when handling computer components or discharge yourself of any static
electricity build-up by touching a large grounded metal surface (such as the computer case) for
several seconds.
Hardware Installation
Hard Drive Installation
1. Firmly press on the rear panel of the enclosure, just above
the USB mini connector (marked by a small triangle). This will
release a small latch on the inside of the side panel.
2. While still pressing on the rear panel, gently yet firmly pull the
side panel off.
3. Place the 2.5” SATA hard drive or SSD into the tray and slide
the drive up to the SATA connector inside the enclosure.
*installation images for reference only
Instruction Manual
3
4. Place the side panel back onto the enclosure, making sure to properly line up the
latches before snapping the cover into place.
AP Mode Setup
In this mode, the WiFi Enclosure will act
as a wireless access point (AP), enabling
computers with wireless adapters to
connect to it. All connected clients will then
be able to access the resources of the WiFi
Enclosure. The WiFi Enclosure can also be
connected directly to an Internet enabled
router/switch/broadband modem to share
Internet access to all connected clients.
Modem /
Router
Computer
1. Make sure the Mode Switch on the rear
panel of the enclosure is set to “AP” mode.
2. OPTIONAL: Connect an Ethernet cable from the enclosure to the Ethernet port on a
router/switch/broadband modem.
3. Connect the included power adapter to the enclosure.
4. Extend the flip up antenna, located along the top edge of the enclosure.
5. Press the power button located along the top edge of the enclosure, near the
rear panel. The LEDs on the front of the enclosure will light up and begin flashing
orange during initialization. Once the Power LED lights up solid green, the unit will
be ready.
NOTE: The default wireless network name (SSID) is “S2510U2WF”, with an IP address of
192.168.2.1. Automatic IP (DHCP) is also enabled.
Instruction Manual
4
Client Mode Setup
Computer
In this mode, the WiFi Enclosure will act as a
wireless adapter for a host computer system
through a standard Ethernet port. This
will allow the host computer to wirelessly
connect to an existing wireless AP, while
being able to access the resources of the
WiFi Enclosure. Other clients connected to
the wireless AP will also be able to access
the resources on the WiFi Enclosure.
Modem/Router
1. Make sure the Mode Switch on the rear
panel of the enclosure is set to “Client
Scan” mode.
2. Connect an Ethernet cable from the enclosure to the Ethernet port on the host
computer system.
3. Connect the included power adapter to the enclosure.
4. Extend the flip up antenna, located along the top edge of the enclosure.
5. Press the power button located along the top edge of the enclosure, near the
rear panel. The LEDs on the front of the enclosure will light up and begin flashing
orange during initialization. Once the Power LED lights up solid green, the unit will
be ready.
NOTE: The default IP address of the enclosure is 192.168.2.1, with automatic IP (DHCP) enabled.
USB Mode Setup
This mode is used for direct USB access to the hard drive, like any standard external
hard drive enclosure. The WiFi capabilities will be disabled while in this mode.
1. Connect the USB cable from the rear panel of the enclosure to an available USB port
on the host computer system.
2. Connect the power adapter from the enclosure to an AC electrical outlet.
3. Press the power button located along the top edge of the enclosure, near the rear
panel. Once the Power LED lights up solid green, the unit will be ready.
4. The enclosure will be automatically detected by the operating system.
Instruction Manual
5
Driver Installation
No drivers are required to be installed to access the date on the WiFi Enclosure through
USB mode.
An optional client software for Windows operating systems is available to make
locating and configuring the enclosure simple (AP and Client Scan settings only), for
those whom do not wish to use the web interface.
1. To install the client software, insert the included Software CD into the computers
CD/DVD drive.
2. AutoPlay should automatically launch and display all of the folders on the CD or
prompt you to view all files. If not, open “My Computer” and double-click on the
CD/DVD drive.
3. In the root directory, there will be the file “Setup.exe”. Double-click the file.
4. This will launch the software Installation wizard. Continue through the wizard and
once complete, the software will be installed and ready to use. A shortcut for the
utility will appear on the desktop.
Instruction Manual
6
How to Use
Once the hardware has been setup, changes to the network configuration may be
necessary. These changes can be made either through the built-in web interface, or
the Client software (Windows only).
Web Interface
A built-in web server offers a convenient interface for accessing the hard drive
contents, as well as network configuration and the built-in Bit Torrent client and
general maintenance and setup options of the WiFi Enclosure.
To access the web interface, launch a web browser window and type in the IP address
of the enclosure (default: 192.168.2.1). The default account is “Admin” and default
password is “admin”, without the quotes.
*all screenshots for reference only
System Setting
Status
This section provides general information
about the running status of the WiFi
Enclosure. Services such as SMB, FTP and
BitTorrent can be disabled/enabled from
this section as well.
Instruction Manual
7
Setting
The network settings for the WiFi
Enclosure can be configured from this
section. Settings specific for each mode
can be accessed by clicking on the
appropriate link/image. For AP mode,
the wireless network name (SSID),
security settings and IP addresses and
WAN Port can be configured. For Client
Scan mode, the list of available wireless
networks and preferred networks (saved
settings) will be listed.
AP Mode
Client Scan Mode
Account Setting
Up to 8 new user accounts can be created
from this section. Permissions can also
be set for each user account for the web
interface, SMB and FTP. If you wish to
setup DDNS, this can also be configured
from this section.
NOTE: It is recommended to change the
default Admin account password.
Instruction Manual
8
Maintenance
Updates to the firmware and software
on the WiFi Enclosure can be performed
from this section, as well as rebooting and
shutting down the enclosure. The latest
firmware can be downloaded from the
StarTech.com website
(www.startech.com). The Disk Format
utility is found here and can be used to
format the SATA drive and create one or
two partitions. NOTE: The web interface
will only recognize up to 2 partitions on
the hard drive.
Web Folder
The Web Folder allows for access and maintenance of the files and folders on the
hard drive. The different tasks that can be performed, are accessible through the
buttons along the top of the file browser window, such as uploading files, deleting
files and searching for files.
To upload files to the WiFi Enclosure, click the “Upload” button and then select each
file you wish to upload by clicking the “Browse” button. You can only select one file
per line. Once you have selected all the files, click the “Upload File” button to begin
the upload. To download files, simply click on the file name in the file browser window
The Copy, Cut and Paste buttons allow for duplicating or moving files and folders
around the hard drive. Select the files/folders you wish to copy/move by check
marking them and click the “Copy” or “Cut” button. Next, navigate to the destination
folder where you want the files and click the “Paste” button.
To delete files/folder, select it by check marking it, then clicking the “Delete” button.
Instruction Manual
9
While logged in as the Admin account, you can set access rights/permissions for
files and folders by clicking on the round icon under the “Action” heading on the far
right side of each folder. The icon next to this is for the rename action, which allows
for renaming files and folders.
Access Rights
Rename
BitTorrent
A built-in BitTorrent client (Transmission BT) allows for computer-less (standalone)
downloading of files through the BitTorrent peer-to-peer (P2P)protocol. Torrent files
can be added to the download queue by clicking the “Add” button.
Instruction Manual
10
Configuration options for the BT client are accessible from the Preferences settings
button in the bottom left corner. Settings such as download/upload speeds,
schedules and port configuration are available.
Client Software (Windows only)
The client software can be used as an
alternative to the web interface to configure
the WiFi Enclosure and access some of it’s
features. While connected to the same
network as the enclosure (either AP or Client
Scan modes), click on the “Search” button. The
software will attempt to locate the enclosure
and connect to it. If found, the software will
prompt you to connect to it.
Once connected, the configuration settings for
AP and Client Scan modes will be available, as
well as access to the files on the hard drive (Web
Folder). The option to launch the web interface,
for more detailed options, is also available.
Once you are finished with the enclosure, click
the “Log Off” button and close the application.
Instruction Manual
11
Samba (SMB)/ FTP Access
Once the WiFi Enclosure has been properly configured, the files and folders on the
WiFi Enclosure can be accessed directly through SMB or FTP with the appropriate
client software. SMB and FTP access are enabled by default, but can be disabled (or
re-enabled) from the web interface’s System Settings -> Status page.
Many FTP clients are available for any operating system, so please consult the
software’s documentation for exact setup details.
Automatic Discovery (Windows Vista/ 7/ 8, Mac OS 10.6/ 10.7)
The WiFi Enclosure can be setup to be automatically discovered as a networked
storage device. Any Vista/ 7 or Mac OS 10.6/10.7 computer connected to the same
network as the WiFi drive will be able to see and access the drive (with appropriate
login credentials).
1. To setup the WiFi Enclosure as discoverable, at least one User account must be
created through the web interface.
2. Windows 7/8: Make sure that Network Discovery is enabled in the “Network and
Sharing Center”, then the “Advanced sharing settings”.
Windows Vista: Make sure that Network Discovery is enabled in the “Network and
Sharing Center”, then “Sharing and Discovery” then “Network Discovery”.
Mac OS: Network Discovery is enabled by default.
3. With SMB enabled and a User account created, the WiFi Enclosure will appear in the
“Network” screen under the Start menu (Windows) or under “Shared” in the Finder
window (Mac OS). The name of the WiFi Enclosure will be the same as the device’s
SSID (default SSID: S2510U2WF).
4. When trying to access the WiFi Enclosure, it will prompt you for a user name/
password. Use any User account (including Admin) to login.
Mapping Network Drive
The WiFi Enclosure can be manually mapped as a network drive on any computer
system that supports SMB. This method allows each directory on the WiFi Enclosure
to be mapped as a separate network drive (i.e. The “Share” folder mapped to Z:, and
“Public” mapped to Y:).
Through Windows, this can be accomplished through the “Map Network Drive”
command found in the Explorer window. Enter the IP address of the WiFi Enclosure
in the format: \\ipaddress\sharename (where ‘sharename’ is the name of a directory/
partition on the WiFi Enclosure but is optional).
Through Mac OS access the “Connect to Server...” command found in Finder. Enter
the IP address of the WiFi Enclosure in the format: smb://ipaddress/sharename (where
‘sharename’ is the name of a directory/partition on the WiFi Enclosure but is optional).
Instruction Manual
12
Using the Storage Device (USB Mode)
Windows 2000/ XP/ Vista/ 7/ 8
If you are using a brand new hard drive that does not contain any data, then you will
first need to prepare the hard drive for use. From the main desktop, right-click on
“My Computer” (“Computer” in Vista/ 7), then select Manage. In the new Computer
Management window, select Disk Management from the left window panel.
Locate the Disk that says it is “Unallocated” (check hard drive capacity to confirm it’s the
correct hard drive) and then right-click in the section that says “Unallocated” and select
“New Partition”.
Instruction Manual
13
The New Partition Wizard will appear. Follow the instructions in the wizard to
complete setting up the drive. Once complete, the Disk should show up as “Healthy”
with a drive letter assigned (i.e. E:). This drive letter should now appear within My
Computer.
If you are installing a hard drive that already has data on it, then after plugging it in, the
drive should automatically show up with a drive letter assigned within My Computer.
Instruction Manual
14
Specifications
Number of Drive Bays
1
Host Interface
USB 2.0
Chipset ID
Ralink RT3052
1 x USB 2.0 mini-B female
External Connectors
1 x RJ45 Ethernet female
1 x DC Power
1 x Power
1 x WiFi Status
LEDs
1 x LAN Status
1 x HDD Activity
2.5” SATA hard drive or solid state drive,
9.5mm height
Compatible Hard Drives
Supported File System Type
FAT32, NTFS
IEEE 802.3, IEEE 802.3u
Networking Standards
IEEE 802.11b/g/n
Wireless Frequency
2.4 GHz
Antenna Configuration
2x2:2
Supported Wireless Security Protocols
WEP (64/128-bit), WPA-PSK (AES, TKIP),
WPA2-PSK (AES), WPA+WPA2
WAN Connection Type
DHCP, PPPoE, Static/Fixed
Supported Network Protocols
BitTorrent, SMB, FTP
USB 2.0: 480 Mbps
Maximum Data Transfer Rate
LAN: 10/100 Mbps
WLAN: 300 Mbps
Power Adapter
5V DC, 2000mA, center positive
Enclosure Material
Plastic
Instruction Manual
15
Specifications (Cont’d)
Operating Temperature
0°C ~ 40°C (32°F ~ 104°F)
Storage Temperature
-30°C ~ 70°C (-22°F ~ 158°F)
Humidity
8% ~ 90% RH
Dimensions
147.0mm x 93.0mm x 31.0mm
Weight
155g
Compatible Operating Systems
(Client Software only)
Windows 2000/ XP/ Server 2003/ Vista/
Server 2008 R2/ 7 (32/64-bit)/ 8 (32/64-bit)
Instruction Manual
16
Technical Support
StarTech.com’s lifetime technical support is an integral part of our commitment to
provide industry-leading solutions. If you ever need help with your product, visit
www.startech.com/support and access our comprehensive selection of online tools,
documentation, and downloads.
For the latest drivers/software, please visit www.startech.com/downloads
Warranty Information
This product is backed by a two year warranty.
In addition, StarTech.com warrants its products against defects in materials
and workmanship for the periods noted, following the initial date of purchase.
During this period, the products may be returned for repair, or replacement with
equivalent products at our discretion. The warranty covers parts and labor costs only.
StarTech.com does not warrant its products from defects or damages arising from
misuse, abuse, alteration, or normal wear and tear.
Limitation of Liability
In no event shall the liability of StarTech.com Ltd. and StarTech.com USA LLP (or their
officers, directors, employees or agents) for any damages (whether direct or indirect,
special, punitive, incidental, consequential, or otherwise), loss of profits, loss of business,
or any pecuniary loss, arising out of or related to the use of the product exceed the
actual price paid for the product. Some states do not allow the exclusion or limitation
of incidental or consequential damages. If such laws apply, the limitations or exclusions
contained in this statement may not apply to you.
Instruction Manual
17
Hard-to-find made easy. At StarTech.com, that isn’t a slogan. It’s a promise.
StarTech.com is your one-stop source for every connectivity part you need. From
the latest technology to legacy products — and all the parts that bridge the old and
new — we can help you find the parts that connect your solutions.
We make it easy to locate the parts, and we quickly deliver them wherever they need
to go. Just talk to one of our tech advisors or visit our website. You’ll be connected to
the products you need in no time.
Visit www.startech.com for complete information on all StarTech.com products and
to access exclusive resources and time-saving tools.
StarTech.com is an ISO 9001 Registered manufacturer of connectivity and technology
parts. StarTech.com was founded in 1985 and has operations in the United States,
Canada, the United Kingdom and Taiwan servicing a worldwide market.