1
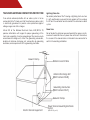
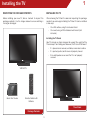
MODELS
MODELS
// E3D320VX
// E3D420VX
// E3D470VX
E240AR
E320AR
E420AR
E500AR
USER
GUIDE
INSTALLING YOUR new TV
CONTROLS & CONNECTIONS
CONNECTING YOUR DEVICES
USING THE ON-SCREEN MENU
USING USB photo slideshow
TROUBLESHOOTING & SUPPORT
SPECs, warranty & LEGAL
This product qualifies for ENERGY STAR in the “factory
default” setting and this is the setting in which power
savings will be achieved. Changing the factory default
picture settings or enabling other features will increase
power consumption that could exceed the limits
necessary to qualify for ENERGY STAR rating.
SRS StudioSound HD and SRS TruVolume
are trademarks of SRS Labs, Inc.
StudioSound
HD
and
TruVolume
technologies are incorporated under
license from SRS Labs, Inc.
Manufactured under license from Dolby
Laboratories. Dolby and the double-D
symbol
are
trademarks
of
Dolby
Laboratories.
HDMI, the HDMI logo and High-Definition
Multimedia Interface are trademarks or
registered trademarks of HDMI Licensing
LLC.
Welcome

Thank You for Choosing VIZIO
Important Safety Instructions
And congratulations on your new VIZIO HDTV.
Your TV is designed and manufactured to operate within defined
design limits. Misuse may result in electric shock or fire. To prevent
your TV from being damaged, the following instructions should
be observed for the installation, use, and maintenance of your
TV. Read the following safety instructions before operating your
TV. Keep these instructions in a safe place for future reference.
To get the most out of your new VIZIO product, read these
instructions before using your product and retain them for future
reference. Be sure to inspect the package contents to ensure
there are no missing or damaged parts.
Product Registration
To purchase or inquire about accessories and installation services
for your VIZIO product, visit our website at www.VIZIO.com or call
toll free at (877) 878-4946.
We recommend that you either:
• To reduce the risk of electric shock or component
damage, switch off the power before connecting other
components to your TV.
• Read these instructions.
• Keep these instructions.
• Heed all warnings.
• Register your VIZIO product at www.VIZIO.com
• Follow all instructions.
• Complete and mail the enclosed registration card
• Do not use this apparatus near water.
Extended Warranties
For peace of mind, and to protect your investment beyond the
standard warranty, VIZIO offers on-site extended warranty service
plans. These plans provide additional coverage during the
standard warranty period. To purchase an extended warranty
service plan, visit www.VIZIO.com.
When Reading this Manual
When you see this symbol, please read the
accompanying important warning or notice. It is
intended to alert you to the presence of important
operating instructions.
When you see this symbol, please read the
accompanying helpful tip.
• Clean only with a dry cloth.
• Do not block any ventilation openings. Install in
accordance with the manufacturer’s instructions.
• Do not install near any heat sources such as radiators,
heat registers, stoves, or other apparatus (including
amplifiers) that produce heat.
• Do not defeat the safety purpose of the polarized or
grounding-type plug. A polarized plug has two blades
and a third grounding prong. The wide blade or the third
prong are provided for your safety. If the provided plug
does not fit into your outlet, consult an electrician for
replacement of the obsolete outlet.
• Protect the power cord from being walked on or pinched,
particularly at plugs, convenience receptacles, and the
point where they exit from the apparatus.
• Only use attachments/accessories specified by the
manufacturer.
• Use only with the cart, stand, tripod, bracket,
or table specified by the manufacturer, or sold

with the apparatus. When a cart is used, use
caution when moving the cart/apparatus
combination to avoid injury from tip-over.
• Unplug this apparatus during lightning storms or when
unused for long periods of time.
• Refer all servicing to qualified service personnel. Servicing
is required when the apparatus has been damaged in
any way, such as when the power-supply cord or plug is
damaged, liquid has been spilled or objects have fallen
into the apparatus, the apparatus has been exposed to
rain or moisture, does not operate normally or has been
dropped.
• Unplug the power cord before cleaning your TV.
• When moving your TV from an area of low temperature
to an area of high temperature, condensation may form
in the housing. Wait before turning on your TV to avoid
causing fire, electric shock, or component damage.
• Do not apply pressure or throw objects at your TV.
This may compromise the integrity of the display. The
manufacturer’s warranty does not cover user abuse or
improper installations.
• The power cord must be replaced when using different
voltage than the voltage specified. For more information,
contact your dealer.
• When connected to a power outlet, power is always
flowing into your TV. To totally disconnect power, unplug
the power cord.
• The lightning flash with arrowhead symbol within an
equilateral triangle is intended to alert the user to the
presence of un-isolated, dangerous voltage within the
inside of your TV that may be of sufficient magnitude to
constitute a risk of electric shock to persons.
• Do not overload power strips and extension cords.
Overloading can result in fire or electric shock.
• A distance of at least three feet should be maintained
between your TV and any heat source, such as a radiator,
heater, oven, amplifier etc. Do not install your TV close to
smoke. Operating your TV close to smoke or moisture may
cause fire or electric shock.
• The wall socket should be installed near your TV and
easily accessible.
• Slots and openings in the back and bottom of the
cabinet are provided for ventilation. To ensure reliable
operation of your TV and to protect it from overheating,
be sure these openings are not blocked or covered. Do
not place your TV in a bookcase or cabinet unless proper
ventilation is provided.
• Do not touch the power cord during lightning. To avoid
electric shock, avoid handling the power cord during
electrical storms.
• Never push any object into the slots and openings on
your TV cabinet. Do not place any objects on the top of
your TV. Doing so could short circuit parts causing a fire
or electric shock. Never spill liquids on your TV.
• Your TV should be operated only from the type of power
source indicated on the label. If you are not sure of the
type of power supplied to your home, consult your dealer
or local power company.
• Only power of the marked voltage can be used for your
TV. Any other voltage than the specified voltage may
cause fire or electric shock.
• Unplug your TV during a lightning storm or when it will not
be used for long period of time. This will protect your TV
from damage due to power surges.
• Do not attempt to repair or service your TV yourself.
Opening or removing the back cover may expose you to
high voltages, electric shock, and other hazards. If repair
is required, contact your dealer and refer all servicing to
qualified service personnel.
• WARNING: Keep your TV away from moisture. Do not
expose your TV to rain or moisture. If water penetrates into
your TV, unplug the power cord and contact your dealer.

Continuous use in this case may result in fire or electric
shock.
• Do not use your TV if any abnormality occurs. If any
smoke or odor becomes apparent, unplug the power
cord and contact your dealer immediately. Do not try to
repair your TV yourself.
• Avoid using dropped or damaged appliances. If your
TV is dropped and the housing is damaged, the internal
components may function abnormally. Unplug the power
cord immediately and contact your dealer for repair.
Continued use of your TV may cause fire or electric
shock.
• Do not install your TV in an area with heavy dust or high
humidity. Operating your TV in environments with heavy
dust or high humidity may cause fire or electric shock.
• Follow instructions for moving your TV. Ensure that the
power cord and any other cables are unplugged before
moving your TV.
• When unplugging your TV, hold the AC/DC power
adapter, not the cord. Pulling on the power cord may
damage the wires inside the cord and cause fire or
electric shock. When your TV will not be used for an
extended period of time, unplug the power cord.
• To reduce risk of electric shock, do not touch the
connector with wet hands.
• Insert batteries in accordance with instructions. Incorrect
polarities may cause the batteries to leak which can
damage the remote control or injure the operator. Do not
expose batteries to excessive heat such as sunshine, fire
or the like.
• If any of the following occurs, contact the dealer:
- The power cord fails or frays.
- Liquid sprays or any object drops into your TV.
- Your TV is exposed to rain or other moisture.
- Your TV is dropped or damaged in any way.
- The performance of your TV changes substantially.
• This apparatus shall not be exposed to dripping or
splashing and no objects filled with liquids, such as vases,
shall be placed on the apparatus.
• The mains plug or appliance coupler is used as the
disconnect device, the disconnect device shall remain
readily operable.
• CAUTION - These servicing instructions are for use by
qualified service personnel only. To reduce the risk of
electric shock, do not perform any servicing other than
that contained in the operating instructions unless you
are qualified to do so.
h
• T he lightning flash with arrowhead symbol within an
equilateral triangle is intended to alert the user to the
presence of uninsulated DANGEROUS VOLTAGE within the
product’s enclosure that may be of sufficient magnitude
to constitute a risk of electrical shock to persons.

Television Antenna Connection Protection
If an outside antenna/satellite dish or cable system is to be
connected to the TV, make sure that the antenna or cable system
is electrically grounded to provide some protection against
voltage surges and static charges.
Article 810 of the National Electrical Code, ANSI/NFPSA 70,
provides information with regard to proper grounding of the
mast and supporting structure, grounding of the lead-in wire to
an antenna discharge unit, size of the grounding conductors,
location of antenna discharge unit, connection to grounding
electrodes, and requirements of the grounding electrode.
Ground Clamp
Lightning Protection
For added protection of the TV during a lightning storm or when
it is left unattended or unused for long periods of time, unplug
the TV from the wall outlet and disconnect the antenna or cable
system.
Power Lines
Do not locate the antenna near overhead light or power circuits,
or where it could fall into such power lines or circuits. Remember,
the screen of the coaxial cable is intended to be connected to
earth in the building installation.
Antenna Lead In Wire
Antenna Discharge Unit
(NEC Section 810-20)
Grounding Conductors
(NEC Section 810-21)
Ground Clamps
Electric Service Equipment
Power Service Grounding Electrode
System
(NEC ART 250, part H)
Table of Contents
Installing the TV................................................. 3
Changing the Input Source................................................ 24
Inspecting the Package Contents...................................... 3
Changing the Screen Aspect Ratio.................................... 24
Installing the TV.................................................................... 3
Setting Up Closed Captioning............................................ 25
Installing the TV Stand...................................................... 3
Changing the Appearance of Digital Closed Captions.. 25
Installing the TV on a Wall................................................. 4
Activating the Sleep Timer................................................... 26
Wall Mount Screw Location.............................................. 5
Setting the Auto Power Off Feature................................... 26
Adjusting the Picture Settings............................................. 26
Controls and Connections............................... 6
Adjusting the Advanced Picture Settings......................... 27
Rear Panel (E240AR)........................................................... 6
Adjusting the Color Temperature..................................... 28
Rear Panel (E320AR & E420AR)........................................... 7
Adjusting the Picture Size and Position............................ 29
Rear Panel (E500AR)........................................................... 8
Resetting the Picture Settings .......................................... 29
Side Panel............................................................................ 9
Adjusting the Audio Settings............................................... 29
Front Panel........................................................................... 10
Adjusting the Advanced Audio Settings.......................... 30
Remote Control................................................................... 11
Resetting the Audio Settings............................................. 31
Replacing the Batteries.................................................... 12
Changing the TV Settings.................................................... 32
Connecting Your Devices.................................. 13
Changing the Input Source.............................................. 32
Connecting A Device (E240AR).......................................... 13
Setting the Tuner Mode..................................................... 32
Connecting A Device (E320AR & E420AR).......................... 14
Scanning for Channels..................................................... 32
Connecting A Device (E500AR).......................................... 15
Adding New Channels..................................................... 33
Connecting A PC (E240AR)................................................. 16
Skipping Channels........................................................... 34
Connecting A PC (E320AR & E420AR)................................ 17
Changing the Audio Language....................................... 34
Connecting A PC (E500AR)................................................. 18
Using the Parental Controls.............................................. 35
Connecting an Audio Device (E240AR)............................. 19
Accessing the Parental Controls Menu............................ 35
Connecting an Audio Device (E320AR & E420AR)............. 20
Enabling or Disabling Program Ratings............................ 35
Connecting an Audio Device (E500AR)............................. 21
Locking and Unlocking Channels.................................... 35
Blocking and Unblocking Content by Rating................... 36
Completing the First-Time Setup....................... 22
Changing the Parental Control Passcode....................... 36
Using the On-Screen Menu............................... 23
Resetting the Content Locks............................................. 36
Navigating the On-Screen Menu........................................ 23
Changing the Names of the Inputs................................. 37
1

Changing the On-Screen Menu Language..................... 37
Setting the Time and Local Settings................................. 38
Adjusting the CEC Settings............................................... 38
Using the Help Menu........................................................... 39
Displaying System Information......................................... 39
Resetting the TV Settings................................................... 39
Restoring the TV to Factory Default Settings..................... 40
Using Setup Wizard........................................................... 40
Using the Info Window......................................................... 41
Using the USB Media Player.............................. 42
Using the USB Photo slideshow............................................ 42
Connecting a USB Thumb Drive to the TV......................... 42
Playing USB Media............................................................ 43
Troubleshooting & Technical Support............... 45
Specifications.................................................... 48
Limited Warranty................................................ 50
Legal & Compliance......................................... 51
2
1
Installing the TV
Inspecting the Package Contents
Installing the TV
Before installing your new TV, take a moment to inspect the
package contents. Use the images below to ensure nothing is
missing or damaged.
After removing the TV from the box and inspecting the package
contents you can begin installing the TV. Your TV can be installed
in two ways:
• On a flat surface, using the included stand
• On a wall, using a VESA-standard wall mount (not
included)
Installing the TV Stand
Your TV includes a stand designed to support the weight of the
TV and keep it from falling over. However, the TV can still fall over if:
• It is placed on an uneven, unstable, or non-level surface
• It is pushed, pulled, or otherwise improperly moved
• If an earthquake occurs and the TV is not properly
secured
VIZIO HDTV
Quick Start Guide
Remote Control with
Batteries
TV on Stand
Package Contents
3
1
Installing the TV on a Wall
To mount your TV on a wall, you will need a wall mount. Consult
the information below to find the appropriate mount for your TV
model:
Installing a TV on a wall requires lifting. To prevent
injury or damage to the TV, ask someone to help you.
E240AR
Screw
Size:
Screw
Length:
E240AR
E320AR
E420AR
E500AR
M4
M6
M6
M6
12mm
12mm
12mm
12mm
200mm (V) x
200mm (H)
300mm (V) x
300mm (H)
300mm (V) x
300mm (H)
Hole 100mm (V) x
Pattern: 100mm (H)
Be sure the mount you choose is capable of supporting the
weight of the TV. After you have determined that you have the
correct mount for your TV, you can begin the installation.
E320AR, E420AR, & E500AR
To install the TV stand:
To install your TV on a wall:
1. Place the TV screen-down on a clean, flat surface. To prevent
scratches or damage to the screen, place the TV on a soft
surface, such as carpet, rug, or blanket.
1. Disconnect any cables connected to your TV.
2. Place the TV face-down on a clean, flat, stable surface.
Be sure the surface is clear of debris that can scratch or
damage the TV.
2. Align the stand with the TV.
3. Remove the stand by loosening and removing the screws.
3. Attach the stand to the TV by tightening the pre-installed
screws.
4. Attach your TV and wall mount to the wall, carefully following
the instructions that came with your mount.
4. Move the TV with attached stand into an upright position
and place on a flat, level, and stable surface.
Use only with a UL-listed wall mount bracket rated for the
weight/load of this TV. See Appendix B - Specifications for the
weight of this TV.
5. To ensure proper ventilation, leave at least 1” of space
between the back of the TV and any other objects (walls,
etc).
For some wall mounts, you may want to use cables
with right-angle connectors. This allows the TV to rest
closer to the wall.
4
1
Wall Mount Screw Location
E240AR
E420AR
E320AR
E500AR
5
2
Controls and Connections
Rear Panel (E240AR)
Stereo Audio Out - Connect 3.5mm audio device, such
as sound bar.
Coaxial - Connect coaxial cable from cable, satellite,
or antenna.
Component/Composite - Connect component or
composite device.
PC Audio In - Connect 3.5mm audio cable from PC.
RGB - Connect VGA cable from PC.
HDMI - Connect HDMI device.
USB - Connect USB thumb drive to play media.
Optical Audio Out - Connect optical/SPDIF audio
device, such as home audio receiver.
Rear Panel - E240AR
6
2
Controls and Connections
Rear Panel (E320AR & E420AR)
Stereo Audio Out - Connect 3.5mm audio device, such
as sound bar.
Coaxial - Connect coaxial cable from cable, satellite,
or antenna.
Component/Composite - Connect component or
composite device.
PC Audio In - Connect 3.5mm audio cable from PC.
RGB - Connect VGA cable from PC.
HDMI - Connect HDMI device.
USB - Connect USB thumb drive to play media.
Optical Audio Out - Connect optical/SPDIF audio
device, such as home audio receiver.
Rear Panel - E320AR & E420AR
7
2
Controls and Connections
Rear Panel (E500AR)
Stereo Audio Out - Connect 3.5mm audio device, such
as sound bar.
RGB - Connect VGA cable from PC.
PC Audio In - Connect 3.5mm audio cable from PC.
HDMI - Connect HDMI device.
Component/Composite - Connect component or
composite device.
Coaxial - Connect coaxial cable from cable, satellite,
or antenna.
Optical Audio Out - Connect optical/SPDIF audio
device, such as home audio receiver.
HDMI - Connect HDMI device.
USB - Connect USB thumb drive to play media.
Rear Panel - E500AR
8
2
Side Panel
POWER - Turn TV off or on.
MENU
MENU - Open the on-screen menu.
CH +
CHANNEL UP/DOWN - Change the channel.
CH –
VOLUME UP/DOWN - Increase or decrease volume level
INPUT
INPUT - Change input source.
Side Panel
9
2
Front Panel
REMOTE SENSOR
When using the remote, aim it directly at this sensor.
Front Panel
10
2
Remote Control
Input
Change the currently-displayed input.
Power
Turn TV on or off.
A/V Controls
Control USB photo viewer.
Info
Display the info window.
Closed Captions
Open the closed caption menu.
Menu
Display the on-screen menu.
Exit
Close the on-screen menu.
Arrow
Navigate the on-screen menu.
Ok
Select the highlighted menu option.
Guide
Display the info window.
Back
Go to the previous on-screen menu.
V Button
Open the USB photo viewer.
Channel Up/Down
Change the channel.
Volume Up/Down
Increase or decrease loudness of the audio.
Last
Return to the channel last viewed.
Mute
Turn the audio off or on.
Dash
Use with number pad to manually enter
a digital sub-channel. (For example,
18-4 or 18-5.)
Number Pad
Manually enter a channel.
WIDE
Switch the display mode.
Remote Control
11
2
Replacing the Batteries
1. Remove the battery cover.
2. Insert two batteries into the remote control. Make sure that
the (+) and (-) symbols on the batteries match the (+) and
(-) symbols inside the battery compartment.
3. Replace the battery cover.
• Use only good quality batteries.
• Inserting the batteries incorrectly may result in
cracking or leakage that may cause a fire or
result in injury.
• Dispose of old or dead batteries in accordance
with local hazardous waste regulations.
• Keep batteries away from children and pets.
Replacing the Batteries
12
3
Connecting Your Devices
Connecting A Device (E240AR)
Your TV can be used to display output from most devices.
1. Verify that your device has a video port that matches an
available port on the TV (HDMI, Component, etc).
Cable/Satellite Box
2. Turn the TV and your device off.
3. Connect the appropriate cable (not included) to the TV and
the device.
4. Turn the TV and your device on. Set the TV’s input to match
the connection you used (HDMI, Component, etc).
DVD/Blu-ray Player
Game Console
BACK OF TV
Connect to
component inputs:
AV CABLE
Y/V
GOOD
L
• ANALOG
• VIDEO (480i)*
• STEREO AUDIO
R
COMPONENT CABLE • ANALOG
• HD VIDEO (1080i)*
• STEREO AUDIO
BETTER
HDMI CABLE
BEST
* Maximum Resolution
13
• DIGITAL
• HD VIDEO (1080p)*
• HD AUDIO
CONNECTING A DEVICE - E240AR
3
Connecting A Device (E320AR & E420AR)
Your TV can be used to display output from most devices.
1. Verify that your device has a video port that matches an
available port on the TV (HDMI, Component, etc).
Cable/Satellite Box
2. Turn the TV and your device off.
3. Connect the appropriate cable (not included) to the TV and
the device.
4. Turn the TV and your device on. Set the TV’s input to match
the connection you used (HDMI, Component, etc).
DVD/Blu-ray Player
Game Console
BACK OF TV
Connect to
component inputs:
• ANALOG
• VIDEO (480i)*
• STEREO AUDIO
AV CABLE
Y/V
GOOD
L
R
COMPONENT CABLE • ANALOG
• HD VIDEO (1080i)*
• STEREO AUDIO
BETTER
HDMI CABLE
BEST
* Maximum Resolution
14
• DIGITAL
• HD VIDEO (1080p)*
• HD AUDIO
CONNECTING A DEVICE - E320AR & E420AR
3
Connecting A Device (E500AR)
Your TV can be used to display output from most devices.
1. Verify that your device has a video port that matches an
available port on the TV (HDMI, Component, etc).
Cable/Satellite Box
2. Turn the TV and your device off.
3. Connect the appropriate cable (not included) to the TV and
the device.
4. Turn the TV and your device on. Set the TV’s input to match
the connection you used (HDMI, Component, etc).
DVD/Blu-ray Player
Game Console
BACK OF TV
HDMI CABLE
BEST
• DIGITAL
• HD VIDEO (1080p)*
• HD AUDIO
COMPONENT CABLE • ANALOG
• HD VIDEO (1080i)*
• STEREO AUDIO
BETTER
Connect to
component inputs:
AV CABLE
GOOD
Y/V
L
• ANALOG
• VIDEO (480i)*
• STEREO AUDIO
R
* Maximum Resolution
15
CONNECTING A DEVICE - E500AR
3
Connecting A PC (E240AR)
Your TV can be used to display output from a personal computer.
To use your TV as a PC display:
1. Connect a VGA cable (not included) to your PC and the
RGB port on the back of the TV. This cable transmits video.
2. Connect a 3.5mm cable (not included) to your PC and the
PC Audio In port on the back of the TV. This cable transmits
audio.
3. Set your PC’s resolution to match the resolution of your TV.
See Appendix B - Specifications.
Personal Computer
3.5mm Cable (For Audio)
VGA Cable (For Video)
CONNECTING A PC - E240AR
16
3
Connecting A PC (E320AR & E420AR)
Your TV can be used to display output from a personal computer.
To use your TV as a PC display:
1. Connect a VGA cable (not included) to your PC and the
RGB port on the back of the TV. This cable transmits video.
2. Connect a 3.5mm cable (not included) to your PC and the
PC Audio In port on the back of the TV. This cable transmits
audio.
3. Set your PC’s resolution to match the resolution of your TV.
See Appendix B - Specifications.
Personal Computer
3.5mm Cable (For Audio)
VGA Cable (For Video)
CONNECTING A PC - E320AR & E420AR
17
3
Connecting A PC (E500AR)
Your TV can be used to display output from a personal computer.
To use your TV as a PC display:
1. Connect a VGA cable (not included) to your PC and the
RGB port on the back of the TV. This cable transmits video.
2. Connect a 3.5mm cable (not included) to your PC and the
PC Audio In port on the back of the TV. This cable transmits
audio.
3. Set your PC’s resolution to match the resolution of your TV.
See Appendix B - Specifications.
Personal Computer
VGA Cable (For Video)
3.5mm Cable (For Audio)
CONNECTING A PC - E500AR
18
3
Connecting an audio device (E240AR)
Your TV can output sound to an audio device, such as a receiver
or sound bar.
1. Verify that your device has an audio port that matches an
available port on the TV (Optical, 3.5mm, etc).
Home Audio Receiver
2. Turn the TV and your audio device off.
3. Connect the appropriate cable (not included) to the TV and
the device.
4. Turn the TV and your device on.
VIZIO Sound Bar
GOOD
3.5mm Cable
BETTER
Optical/SPDIF Cable
CONNECTING AUDIO DEVICE - E240AR
19
3
Connecting an audio device (E320AR & E420AR)
Your TV can output sound to an audio device, such as a receiver
or sound bar.
1. Verify that your device has an audio port that matches an
available port on the TV (Optical, 3.5mm, etc).
Home Audio Receiver
2. Turn the TV and your audio device off.
3. Connect the appropriate cable (not included) to the TV and
the device.
4. Turn the TV and your device on.
VIZIO Sound Bar
GOOD
3.5mm Cable
BETTER
Optical/SPDIF Cable
CONNECTING AUDIO DEVICE - E320AR & E420AR
20
3
Connecting an audio device (E500AR)
Your TV can output sound to an audio device, such as a receiver
or sound bar.
1. Verify that your device has an audio port that matches an
available port on the TV (Optical, 3.5mm, etc).
Home Audio Receiver
2. Turn the TV and your audio device off.
3. Connect the appropriate cable (not included) to the TV and
the device.
4. Turn the TV and your device on.
VIZIO Sound Bar
GOOD
3.5mm Cable
BETTER
Optical/SPDIF Cable
CONNECTING AUDIO DEVICE - E500AR
21
4
Completing the First-Time Setup
The first time you turn on the TV, the Setup App will guide you
through each of the steps necessary to get your TV ready for use.
Before you begin the first-time setup:
• Your TV should be installed and the power cord should
be connected to an electrical outlet.
4. Set up Daylight Saving time.
Use the Up/Down Arrow
buttons to highlight On or Off
and press OK.
Select On when Daylight
Saving is in effect.
• Your devices should be connected.
To complete the first-time setup:
5. Press OK, then use the Up/
Down Arrow buttons to select
Cable or Antenna and press
OK.
1. Press the Power button on the
remote. The TV powers on and
the Setup App starts.
6. Highlight Being Scan and press
OK to start channel scan.
2. Use the Up/Down Arrow
buttons on the remote to
highlight Home Mode Setup
and press OK.
3. Use the Up/Down Arrow
buttons on the remote to
highlight your time zone and
press OK.
7. When you have finished the
channel scan, highlight Exit to
Live TV and press OK.
The First-Time Setup is complete.
• Unless otherwise stated, the Menu illustrations in this
user guide are based on the E240AR.
• Depending on the input source, the menu items
may be different. Unless otherwise stated, the Menu
illustrations in this user guide are based on TV input.
22
I
5
Using the On-Screen Menu
Navigating the On-Screen Menu
Your TV features an easy-to-use on-screen menu.
To open the on-screen menu, press the MENU button on the
remote.
From this menu, you can:
To open the on-screen menu, press
the MENU button on the remote.
EXIT
MENU
Use the Arrow buttons to highlight
a menu option, and press the OK
button to select that option.
• Change the input source
• Change the screen aspect
ratio
INFO
CC
OK
GUIDE
BACK
• Set up closed captioning
• Activate the sleep timer
• Adjust the picture settings
While navigating the on-screen menu, you can press
the BACK button at any time to return to the previous
VOL
menu screen. The EXIT button
will close the on-screen
menu.
• Adjust the audio settings
• Change TV settings
• Access USB photo slideshow
• Access the help menu
VOL
23
CH
CH
1
2
3
4
5
6
7
8
9
3D
0
5
Changing the Input Source
Changing the Screen Aspect Ratio
External devices such as DVD players, Blu-Ray Players, and video
game consoles can be connected to your TV. To use one of these
devices with your TV, you must first change the input source in the
on-screen menu.
The TV can display images in five different modes: Wide, Zoom,
Normal, Panoramic, and Stretch. Each mode displays the picture
differently.
To change the input device:
To change the screen aspect ratio:
1. Press the MENU button on the
remote.
1. Press the MENU button on the
remote. The on-screen menu is
displayed.
2. Use the Arrow buttons to
highlight the Wide icon. Press
OK.
2. Use the Arrow buttons on the
remote to highlight the Input
icon and press OK. The Input
Source Selection menu is
displayed.
3. Use the Arrow buttons to highlight your desired screen mode
and press OK:
• Normal preserves the content’s original aspect ratio. Since the
4:3 aspect ratio is not large enough to fill the TV’s screen, black
bars are added to the left and right of the display image.
3. Use the Up/Down Arrow
buttons on the remote to
highlight the input source and
press OK.
• Wide stretches a 4:3 aspect ratio picture to the edges of the
screen. Since the picture is being stretched, the display image
may appear distorted. If the program is already formatted
for widescreen viewing (1.85:1 or 2.35:1), then black bars will
appear on the top and bottom of the display image (not
available for RGB input).
• Zoom expands images with black bars to fit the screen (not
avalable for RGB input).
• Panoramic expands the display image to fill the screen.
Images may appear wider than intended. If you are
watching widescreen (1.85:1 or 2.35:1) content, black bars
will still appear on the top and bottom of the display image.
This option is only available when the TV is displaying a
480i/480p source (not available for RGB input).
• Stretch expands the display image to fill the screen. Images
may appear wider than intended. If you are watching
widescreen (1.85:1 or 2.35:1) content, black bars will still
appear on the top and bottom of the display image. This
option is only available when the TV is displaying a
720p/1080i/1080p source.
24
5
Setting Up Closed Captioning
Changing the Appearance of Digital Closed Captions
Your TV can display closed captions for programs that include
them. Closed captions display a transcription of a program’s
dialogue.
Digital closed captions can be displayed according to your
preference.
To change the appearance of digital closed captions:
1. From the Closed Caption
menu, use the Arrow buttons to
highlight Digital CC Style.
If the program you are viewing is not being broadcast
with closed captions, the TV will not display them.
2. Use the Left/Right Arrow
buttons on the remote to select
Custom, then press OK. The
Digital CC Style menu appears.
To activate or deactivate closed
captions:
1. Press the MENU button on the
remote. The on-screen menu is
displayed.
3. Use the Up/Down Arrow
buttons on the remote to
highlight the setting you wish
to change, then use the Left/
Right Arrow buttons to change
the setting:
2. Use the Arrow buttons on the
remote to highlight the CC
icon and press OK. The Closed
Caption menu is displayed.
• Caption Style - Choose
As Broadcast to keep
default settings or Custom
to manually change each
setting.
3. Use the Arrow buttons on the
remote to highlight the type
of closed captions you wish to
see:
• Analog Closed Caption for
analog (NTSC) TV channels.
• Text Size - Adjust the size of the text.
• Color - Change the color of the text.
• Digital Closed Caption for
digital (ATSC) TV channels.
• Opacity - Change the transparency of the text.
4. After highlighting the type of closed captions you wish to
see, use the Left/Right Arrow buttons on the remote to select
the caption channel you wish to display, then press EXIT.
• BG Color - Change the background color.
• BG Opacity - Change the transparency of the
background.
• Window Color - Change the edge color.
Caption channels usually display different languages.
For example, CC1 may display English captions and
CC2 may display Spanish captions.
• Window Opacity - Change the edge type.
4. When you are satisfied with the appearance of the closed
captions, press the EXIT button on the remote.
25
5
Activating the Sleep Timer
Adjusting the Picture Settings
When activated, the TV’s sleep timer will turn the TV off after a set
period of time.
Your TV display can be adjusted to suit your preferences and
viewing conditions.
To use the sleep timer:
To adjust the picture settings:
1. Press the MENU button on the
remote. The on-screen menu is
displayed.
1. Press the MENU button on the
remote. The on-screen menu is
displayed.
2. Use the Arrow buttons on the
remote to highlight the Sleep
Timer icon and press OK. The
Sleep Timer menu is displayed.
2. Use the Arrow buttons on the
remote to highlight the Picture
icon and press OK. The Picture
menu is displayed.
3. Use the Up/Down Arrow
buttons on the remote to
highlight Timer and press OK.
The Timer menu is displayed.
3. Use the Arrow buttons on the
remote to highlight Picture
Mode, then use the Left/Right
Arrow buttons to change the
picture mode:
4. Use the Up/Down Arrow
buttons on the remote to
highlight the period of time
after which you want the TV to
turn off: 30, 60, 90, 120, or 180
minutes.
• Standard mode sets the
various picture settings to
values that will produce
the best picture in the
most cases. This is the
recommended setting.
5. Press OK, then press EXIT.
• Movie mode sets the picture settings to values perfect for
watching a movie in a dark room.
Setting the Auto Power Off Feature
To help save energy, your TV is set by default to turn off after 10
minutes if no signal is being displayed on the screen. This feature
can be deactivated.
To set the Auto Power Off feature:
• Game mode optimizes the picture settings for displaying
game console output.
• Vivid mode sets the picture settings to values that
produce a brighter, more vivid picture.
• Football, Golf, Basketball, and Baseball modes optimize
the picture settings for their respective sports. Also try
these modes for other sports.
1. From the Sleep Timer menu, use the Up/Down Arrow buttons
on the remote to highlight Auto Power Off and press OK. The
Auto Power Off menu is displayed.
• Custom picture mode allows you to manually change
each of the picture settings:
2. Highlight Off or 10 min. and press OK. Press Exit.
26
5
Adjusting the Advanced Picture Settings
Backlight - Adjusts the brightness to affect the overall
brilliance of the picture. For the E320AR, E420AR,
and E500AR this option is only available when both
Ambient Light Sensor and Backlight Control are set
to Off.
To adjust the advanced picture
settings:
1. From the Picture menu, use the
Arrow buttons on the remote to
highlight More, then press OK.
Brightness - Adjusts the black level of the picture.
When this setting is too low, the picture may be too
dark to distinguish details. When this setting is too
high, the picture may appear faded or washed out.
2. Use the Arrow buttons on the
remote to highlight Advanced
Picture, then press OK. The
Advanced Picture menu is
displayed.
Contrast - Adjusts the white level of the picture. When
this setting is too low, the picture may appear dark.
When this setting is too high, the picture may appear
faded or washed out. If the setting is too high or too
low, detail may be difficult to distinguish in dark or
bright areas of the picture.
Color - Adjusts the intensity of the picture colors.
Tint - Adjusts the hue of the picture. This setting is
useful in adjusting the flesh tones in the picture. If flesh
appears too orange, reduce the level of color before
adjusting tint.
Sharpness - Adjusts the edge sharpness of picture
elements. It can be used to sharpen non-HD (high
definition) content; however, it will not produce detail
that does not otherwise exist.
3. Use the Arrow buttons to
highlight the setting you wish
to adjust, then press Left/Right
Arrow buttons to change the
setting:
• Noise Reduction Diminishes artifacts in
the image caused by the
digitizing of image motion
content. Select Off, Low,
Medium, or High.
• MPEG NR - Reduces pixelation and distortion for .mpeg
files.
• Color Enhancement - Reduces oversaturation of some
colors and improves flesh tones. Select Off, Normal, Rich
Color, Grn/Flesh, and Grn/Blue.
• Adaptive Luma - Adjusts the average brightness of the
picture to compensate for large areas of brightness.
Select Off, Low, Medium, Strong, or Extend.
• Film Mode - Optimizes the picture for watching film.
Select Auto or Off.
• Backlight Control - Select Off, DCR (Dynamic Contrast
Ratio), or OPC. (Backlight Control setting is not available
for the E240AR)
27
5
• Ambient Light Sensor - The ambient light sensor detects
the light levels in the room and automatically adjusts the
backlight for the best picture. Select Off, Low, Medium, or
High. (Ambient Light Sensor setting is not available for
the E240AR)
Adjusting the Color Temperature
Adjusting the color temperature will change the “warmness” or
“coolness” of the white areas of the picture.
To adjust the color temperature:
4. When you have finished adjusting the Advanced Picture
settings, press the EXIT button on the remote.
1. From the Picture Menu, use
the Arrow buttons to highlight
More, then press OK.
2. Use the Arrow buttons on
the remote to highlight Color
Temperature, then press OK.
The Color Temperature menu is
displayed.
3. Use the Arrow buttons on
the remote to highlight Color
Temperature, then use the
Left/Right Arrow buttons to
change the color temperature
preset:
• Cool produces a blue-hued
picture.
• Computer optimizes the picture for use as a PC monitor.
• Normal is optimized for television viewing.
• Custom allows you to manually change each of the
color temperature settings:
Red/Green/Blue Gain - Adjusts the amount of each
color in the display.
Red/Green/Blue Offset - Adjusts the position of each
color in the display.
4. If you want to reset the color temperatures to the factory
default settings, highlight Reset Color Temperature and
press OK. Then highlight Yes and press OK.
5. When you have finished adjusting the color temperature,
press the EXIT button on the remote.
28
5
Adjusting the Picture Size and Position
Resetting the Picture Settings
When displaying an image, the size and position of the display
image can be adjusted.
To reset the picture settings to the factory default settings:
To adjust the picture size and position:
1. From the Picture menu, use the Arrow buttons to highlight
More, then press OK.
1. From the Picture menu, use the
Arrow buttons on the remote to
highlight More, then press OK.
2. Use the Arrow buttons on the remote to highlight Reset
Picture Mode, then press OK. The TV displays, “Are you sure
you want to RESET Picture Settings to the factory defaults?”
2. Use the Arrow buttons on the
remote to highlight Size &
Position, then press OK. The Size
& Position menu is displayed.
3. Highlight Yes and press OK.
4. Press the EXIT button on the remote.
Adjusting the Audio Settings
3. Use the Arrow buttons to
highlight the setting you wish
to adjust, then press Left/Right
Arrow buttons to change the
setting:
To adjust the audio settings:
1. Press the MENU button on the
remote. The on-screen menu is
displayed.
• Auto Sync - Automatically
adjusts display image to
optimal size and position.
(RGB input only.)
2. Use the Arrow buttons on the
remote to highlight Audio and
press OK. The Audio Settings
menu is displayed.
• Horiz. Position - Adjusts the horizontal (left/right) position
of the display image.
• Vertical Position - Adjusts the vertical (up/down) position
of the display image.
• Vertical Size - Adjust the height of the display image.
(Not available for RGB input)
• Horizontal Size - Adjusts the width of the display image.
3. Use the Arrow buttons to
highlight the setting you wish
to adjust, then press Left/
Right Arrow to change the
setting:
• Balance - Adjusts the
loudness of the audio
output from the left and
right speakers.
• Fine Tune - Adjusts the height of the display image. (RGB
input only.)
4. When you have finished adjusting the size and position,
press the EXIT button on the remote.
• Lip Sync - Adjusts the synchronization between the
display image and the accompanying audio track.
29
5
• TV Speakers - Turns the built-in speakers on or off.
Adjusting the Advanced Audio Settings
• SRS StudioSound HD - StudioSound HD is a
feature-rich surround sound solution which delivers
an immersive surround sound experience from the
TV’s internal speakers. Additionally, StudioSound
HD completes the entertainment experience by
maintaining a steady volume while watching
programming and movies, providing deep, rich bass,
and delivering crisp details and clear, intelligible
dialog. Select Surround or Standard.
To adjust the advanced audio settings:
™
1. From the Audio Settings Menu,
use the Arrow buttons to
highlight Advanced Audio,
then press OK. The Advanced
Audio menu is displayed.
2. Use the Arrow buttons to
highlight the setting you
wish to adjust, then press
Left/Right Arrow buttons to
change the setting:
• SRS TruVolume - TruVolume® intelligently normalizes
volume fluctuations due to television commercials or
channel changes. Select On or Off.
• Advanced Audio - See Adjusting the Advanced Audio
Settings on page 30.
• Digital Audio Out Changes the type of
processing for the Optical
output when connected
to a home theater audio
system. Select Off, Dolby
Digital, or PCM.
• Equalizer Settings - Adjust the boost or attenuation of
different frequencies. Change the equalizer presets
by selecting Flat, Rock, Pop, Classical, or Jazz. To
customize the equalizer settings yourself, set EQ Mode
to Advanced, then adjust each frequency or set EQ
Mode to Basic, then adjust Bass and Treble settings.
(This setting is only available when SRS StudioSound
HD is set to Standard)
• Analog Audio Out Sets the volume control
properties for the analog
3.5mm connector when
connected to a home
theater audio system.
Select Variable to control
the external speakers’
volume from the TV’s
volume controls, or select
Fixed to control the
external speakers’ volume
from your home theater
system controls.
• Reset Audio Mode - Restores the audio settings to the
factory defaults. See Resetting the Audio Settings on
page 31.
4. When you have finished adjusting the audio settings,
press the EXIT button on the remote.
30
5
Resetting the Audio Settings
3. When you have finished adjusting the advanced audio
settings, press the EXIT button on the remote.
To reset the audio settings to the factory default settings:
1. Press the MENU button on the remote. The on-screen menu is
displayed.
2. Use the Arrow buttons on the remote to highlight the Audio
icon and press OK. The Audio Settings menu is displayed.
3. Use the Arrow buttons to highlight Reset Audio Mode and
press OK. The TV displays, “Are you sure you want to RESET
Audio Settings to the factory defaults?”
4. Highlight Yes and press OK.
5. Press the EXIT button on the remote.
31
5
Changing the TV Settings
Setting the Tuner Mode
Using the settings menu, you can:
If you are using a device that is connected to the RF input, such
as an external antenna or cable TV connection, you must set the
tuner mode.
• Change the input source
• Set up the TV tuner
• Name the TV inputs
1. Press the MENU button on the remote. The on-screen menu is
displayed.
• Turn Game Mode on or off.
(Except TV input)
2. Use the Arrow buttons on the remote to highlight the
Settings icon and press OK. The Settings menu is displayed.
• Set up parental controls
3. Highlight Tuner and press OK. The Tuner Settings menu is
displayed.
• Change the on-screen
menu language
4. Highlight Tuner Mode and use the Left/Right Arrow buttons
to select Antenna or Cable.
• Set the time
• Adjust the CEC settings
5. Press the EXIT button on the remote.
Scanning for Channels
Before the TV can detect and display channels and their
associated information, you must scan for channels. A channel
scan may also be necessary when the TV has been moved to an
area where different free-to-air broadcast television channels are
available.
Changing the Input Source
To quickly access the input source menu, press the
INPUT button on the remote.
To change the input source from the Settings menu:
1. Press the MENU button on the remote. The on-screen menu is
displayed.
1. From the Tuner Settings menu,
highlight Auto Channel
Scan and press OK. The auto
channel scan begins.
2. Use the Arrow buttons on the remote to highlight the
Settings icon and press OK. The Settings menu is displayed.
2. Wait until the channel scan is
100% complete. Highlight Done
and press OK.
3. Highlight Input Source and press OK. The Input Source
Selection menu is displayed.
3. Press the EXIT button on the
remote.
4. Highlight the input source you want to display and press OK.
32
5
Adding New Channels
To add a single new analog channel:
Occasionally, you may need to add a new analog channel or
add a new range of channels. You can do this by using the Partial
Channel Search and Add Analog Channel options.
1. From the Tuner Settings menu,
highlight Add Analog Channel
and press OK. The Add Analog
Channel menu is displayed.
To add a range of new channels:
2. Highlight Enter Channel # and
use the Number Pad on the
remote to enter the number of
the channel you are adding.
1. From the Tuner Settings menu, highlight Partial Channel
Search and press OK. The Partial Channel Search menu is
displayed.
2. Highlight Scan Mode and select the type of channel you
are adding: Analog/Digital, Analog, or Digital.
3. Highlight Add Channel and
press OK. The TV scans for the
channel.
3. Highlight From Channel and enter the channel from which
you want to begin the scan. (Use the Number Pad on the
remote to enter the channel.)
4. When the TV is done scanning
for the channel, press the EXIT
button on the remote.
4. Highlight To Channel and enter the channel to which you
want to end the scan. (Use the Number Pad on the remote
to enter the channel.)
5. Highlight Start and press OK. The partial channel search
begins.
6. Wait until the partial channel search is 100% complete.
Highlight Done and press OK.
7. Press the EXIT button on the remote.
33
5
Skipping Channels
Changing the Audio Language
After a channel scan is completed, you may find that some
channels are too weak to watch comfortably. There may also be
some channels you do not want to view. You can remove these
channels from the TV’s memory with the Skip Channel feature.
Some digital free-to-air and cable channels broadcast programs
in more than one language. The TV’s MTS (Multichannel Television
Sound) feature allows you to listen to audio in your preferred
language.
Channels that have been removed with the Skip
Channel feature can still be viewed if the channel
is entered using the Number Pad. If you wish to
completely block a channel from being viewed, use
the parental controls. See Using the Parental Controls
on page 35.
Not all programs are broadcast in multiple
languages. The MTS feature only works when the
program being viewed is being broadcast in the
language you select.
To use the Analog MTS feature:
1. From the Tuner Settings menu,
highlight Analog MTS and
press OK. The Analog MTS
menu is displayed.
To remove a channel:
1. From the Tuner Settings menu,
highlight Skip Channel and
press OK. The Skip Channel
menu is displayed.
2. Select Mono, Stereo, or
SAP (secondary audio
programming). Press OK.
2. For each channel you wish
to remove, use the Up/Down
Arrow buttons on the remote
to highlight the channel and
press OK. An X appears to the
right of each channel you
select.
3. Press the EXIT button on the
remote.
To use the Digital MTS feature:
1. From the Tuner Settings menu,
highlight Digital MTS and press
OK. The Digital MTS menu is
displayed.
3. When you have selected all
of the channels you wish to
remove, press the EXIT button
on the remote.
2. Select your preferred language:
English, French, or Spanish.
Press OK.
3. Press the EXIT button on the
remote.
34
5
Using the Parental Controls
Enabling or Disabling Program Ratings
The TV’s parental controls allow you to prevent the TV from
displaying certain channels or programs without a password.
To manage program content according to its rating, you must
enable the Program Rating feature.
Accessing the Parental Controls Menu
To enable or disable the Program Rating feature:
To access the Parental Controls menu:
1. From the Parental Controls menu, highlight Rating Enable
and press OK. The Rating Enable menu is displayed.
1. Press the MENU button on the remote. The on-screen menu is
displayed.
2. Use the Arrow buttons on the remote to highlight the
Settings icon and press OK. The Settings menu is displayed.
2. Select On or Off and press OK.
Locking and Unlocking Channels
When a channel is locked, it will be inaccessible. Locking
a channel is a good way to prevent children from viewing
inappropriate material.
3. Use the Arrow buttons on the remote to highlight Parental
Controls and press OK.
4. Enter your parental passcode. If you have not set a
passcode, enter the default, 0000. The Parental Controls
menu is displayed.
To lock or unlock a channel:
1. From the Parental Controls menu, highlight Channel Locks
and press OK. The Channel Locks menu is displayed.
To set a custom parental passcode, see Changing
the Parental Control Passcode on page 36.
2. Highlight the channel you want to lock or unlock and press
OK.
3. When a channel is locked, the Lock icon appears locked.
The channel is not accessible unless the parental passcode
is entered.
4. When a channel is unlocked, the Lock icon appears
unlocked. The channel is accessible.
35
5
Blocking and Unblocking Content by Rating
A channel may sometimes broadcast programs that are meant
for children, and at other times broadcast programs that are
meant for mature audiences. You may not want to block the
channel completely using a channel lock, but you may wish to
block certain programs from being viewed.
When this is the case, you can use the TV’s Rating Block feature
to block content based on its rating.
For a list of content ratings and their definitions, visit
www.tvguidelines.org.
5. If you want to block all unrated content, highlight Block
Unrated Shows and use the Arrow buttons on the remote to
select On.
6. When you are finished adjusting the rating level blocks, press
the EXIT button on the remote.
Changing the Parental Control Passcode
If you use the parental controls, you should change the passcode
to prevent children from accessing inappropriate material.
1. From the Parental Controls menu, highlight Change PIN and
press OK. The Change PIN menu is displayed.
2. In the New PIN field, use the Number Pad on the remote to
enter your new 4-digit parental control passcode.
To block or unblock content by its rating:
1. From the Parental Controls menu, highlight the content type
you want to adjust and press OK:
3. In the Confirm PIN field, use the Number Pad on the remote
to re-enter your new 4-digit parental control passcode.
USA - TV - USA television program broadcasts.
4. Write down your new parental control passcode and save it
in a secure location.
USA - Movie - USA movie broadcasts.
5. Press the EXIT button on the remote.
CAN - English - Canadian English television program
broadcasts.
Resetting the Content Locks
To reset the content locks to the factory-default settings:
CAN - French - Canadian French television program
broadcasts.
1. From the Parental Controls menu, highlight RESET LOCKS and
press OK. The TV displays, “Are you sure you want to RESET ALL
LOCKS SETTINGS to the factory defaults?”
2. For each rating type you want to block or unblock, use the
Up/Down and Left/Right Arrow buttons on the remote to
highlight the rating type and press OK.
2. Highlight Yes and press OK.
3. Press the EXIT button on the remote.
3. When the rating type is blocked, the Lock icon appears
locked. Content with this and all higher ratings cannot be
viewed.
4. When the rating type is unblocked, the Lock icon appears
unlocked. Content with this and all lower ratings can be
viewed.
36
5
Changing the Names of the Inputs
Changing the On-Screen Menu Language
To make it easier to recognize the different devices attached to
the inputs on your TV, you can rename the inputs. For example, if
you have a DVD player connected to the Component input, you
can rename that input to display “DVD Player”.
Your TV can display the on-screen menu in different languages.
To change the name of an input:
1. Press the MENU button on the
remote. The on-screen menu is
displayed.
To change the on-screen menu language:
1. Press the MENU button on the
remote. The on-screen menu is
displayed.
2. Use the Arrow buttons on the
remote to highlight the Settings
icon and press OK. The Settings
menu is displayed.
2. Use the Arrow buttons on the
remote to highlight the Settings
icon and press OK. The Settings
menu is displayed.
3. Use the Arrow buttons on the
remote to highlight Menu
Language and press OK.
The Menu Language menu is
displayed.
3. Use the Arrow buttons on the
remote to highlight Name
Input and press OK. The Name
Input menu is displayed.
4. Highlight your preferred
language (English, French, or
Spanish) and press OK.
4. Highlight Input Source and
press OK. Highlight the input
you want to rename and press
OK.
5. Press the EXIT button on the
remote.
5. If you would like to use a preset input label, highlight Input
Labels and press OK. Highlight the input label you want to
use and press OK.
If you would like to name the input yourself, highlight the
field below Input Labels and press OK. Enter your custom
label using the on-screen keyboard. Highlight OK and
press OK. (You can also display the on-screen keyboard by
highlighting Show Keyboard and press OK)
6. When you have finished naming your input, press the EXIT
button on the remote.
37
5
Setting the Time and Local Settings
Adjusting the CEC Settings
To ensure the correct time is displayed when you press the INFO
button, set the TV’s time zone:
The CEC function on your TV enables you to control
HDMI-connected devices with the included remote without any
additional programming.
1. Press the MENU button on the
remote. The on-screen menu is
displayed.
Not all HDMI devices support CEC. See your device’s
user manual for details.
2. Use the Arrow buttons on the
remote to highlight the Settings
icon and press OK. The Settings
menu is displayed.
To enable, disable, or adjust CEC settings:
3. Use the Arrow buttons on the
remote to highlight Time &
Local Settings and press OK.
The Time & Local Settings menu
is displayed.
2. Use the Arrow buttons on the remote to highlight the
Settings icon and press OK. The Settings menu is displayed.
1. Press the MENU button on the remote. The on-screen menu is
displayed.
3. Use the Arrow buttons on the remote to highlight CEC
Settings and press OK. The CEC Settings menu is displayed.
4. Highlight Time Zone and press
OK. The Time Zone menu is
displayed.
4. Use the Arrow and OK buttons to adjust each setting:
• CEC Function - To use CEC, you must select On.
• System Audio Control - When system audio control is on,
you can control your device’s audio using the TV’s remote
control.
5. Highlight your time zone and
press OK.
6. Highlight Daylight Saving and press OK. The Daylight Saving
menu is displayed. Choose On if daylight savings is in effect,
or Off if it is not.
• Device Discovery - Use this function to determine if your
device is connected and supports CEC.
5. Press the EXIT button on the remote.
7. Highlight Postal Code. Enter your ZIP code using the keypad
on the remote, then press OK.
8. Press the EXIT button on the remote.
38
5
Using the Help Menu
Displaying System Information
To display a summary of the TV settings:
You can use the TV’s Help menu to:
1. Press the MENU button on the remote. The on-screen menu is
displayed.
• Display system information
• Reset the TV settings
2. Use the Arrow buttons on the remote to highlight the Help
icon and press OK. The Help menu is displayed.
• Restore the TV to its factory
default settings
3. Highlight System Info and press OK.
• Start setup wizard
4. Use the Up/Down Arrow buttons to scroll through the system
information.
5. When you are finished reviewing the system information,
press the EXIT button on the remote.
Resetting the TV Settings
To reset the TV’s picture and audio settings:
1. Press the MENU button on the remote. The on-screen menu is
displayed.
2. Use the Arrow buttons on the remote to highlight the Help
icon and press OK. The Help menu is displayed.
3. Highlight Reset TV Settings and press OK. The TV displays,
“Are you sure you would like to Restore Defaults? This will
erase any custom settings.”
4. Highlight Yes and press OK.
5. Press the EXIT button on the remote.
39
5
Restoring the TV to Factory Default Settings
Using Setup Wizard
All of the on-screen menu settings can be reset to the factory
defaults.
The TV’s Setup App can be used to easily set up the TV tuner.
If you restore the TV to the factory default settings, all
changes you have made to the settings will be lost!
To start Setup Wizard:
1. Press the MENU button on the remote. The on-screen menu is
displayed.
To restore the TV to its factory default settings:
2. Use the Arrow buttons on the remote to highlight the Help
icon and press OK. The Help menu is displayed.
1. Press the MENU button on the remote. The on-screen menu is
displayed.
3. Highlight Start Setup Wizard and press OK.
2. Use the Arrow buttons on the remote to highlight the Help
icon and press OK. The Help menu is displayed.
4. Enter your parental control passcode. If you have not yet set
up a parental passcode, enter the default, 0000.
The TV displays, “Are you sure you want to RESET SETUP
WIZARD?”
3. Highlight Clear Memory (Factory Default) and press OK.
4. Enter your parental control passcode. If you have not yet set
up a parental passcode, enter the default, 0000.
5. Highlight Yes and press OK. The Setup App will begin.
The TV displays, “Are you sure you would like to Restore
Defaults? This will erase any custom settings.”
5. Highlight Yes and press OK.
6. Wait for the TV to turn off. The TV will turn back on shortly
afterward and the Setup App will begin.
40
5
Using the Info Window
The Info Window can be displayed by pressing the INFO or GUIDE
button on the remote:
• Press the INFO or GUIDE button one time to display
channel and input information.
• Press the INFO or GUIDE button two times to display the
program title and closed captioning information.
• Press the INFO or GUIDE button three times to display the
program description.
Channel Information
Program Title/CC Information
Program Description
Info Window
41
6
Using the USB Media Player
Using the USB Photo slideshow
The USB port on your TV allows you to connect a USB thumb drive
and view a photo slideshow.
USB PORT - E240AR
USB PORT - E500AR
Connecting a USB Thumb Drive to the TV
1. Turn the TV off. Connect your USB thumb drive to the USB port
on the back of the TV.
2. Press the Power/Standby button on the remote or touch the
Power control on the side of the TV to turn it on.
3. The TV displays “USB media detected. Browse content?”.
Highlight Yes and press OK to play USB media.
Do not remove the USB thumb drive while the TV is on.
Doing so may damage the drive.
USB PORT - E320AR & E420AR
42
6
Playing USB Media
To play USB media, you must first save your images onto a USB
thumb drive.
Remember:
• The USB thumb drive must be formatted as FAT32.
• Files on the USB thumb drive must end in a supported file
extension (.jpg).
• The player is not designed to play media from external
hard drives or mp3 players.
To play your USB media:
1. Connect your USB thumb drive to the USB port on the back
of the TV.
2. Press the V Button on the remote.
3. Highlight USB1: MyFlashDrive and press OK.
4. Highlight the type of media you wish to display: Photo. Press
OK.
5. Use the Arrow buttons to highlight the file you want to
display. Press OK. The Modify Photo menu is displayed.
6. Highlight Start Slideshow and press OK to start slideshow.
You can display your photos in fullscreen. Select the
photo, press OK, then highlight Fullscreen and press
OK.
43
6
Back Button
Highlight this button and
press OK if you would like
to return to the previous
screen.
Connected
Source
Displays
connected USB
device.
Back Button
Highlight and press OK to return to left column.
Current Folder
Displays the folder path.
Folder Contents
This area displays the
contents of the currently
selected folder. You can
browse between files using
the Arrow and OK buttons
on the remote.
Current Folder
Start Fullscreen
Slideshow
Sort by Name or Date
View Thumbnails
or Folders
Adjust Slideshow
Settings
Photo Infomation
Displays name,
resolution, and file
size for currently
selected photo.
Page Information
If your USB thumb drive has more
files than can be displayed on a
single screen, the page information
is displayed here.
PHOTO VIEWER
44
Troubleshooting & Technical Support
A
do you have questions?
LET US HELP!
YOUR PRODUCT INCLUDES FREE LIFETIME TECH SUPPORT
The VIZIO support team is highly trained
and is based in the United States.
We can help with:
• New Product Setup
• Connecting Your Devices
• Technical Problems
• And More
Phone: (877) 878-4946 (TOLL-FREE)
Email: [email protected]
Web: www.VIZIO.com/support
Hours of operation: Monday - Friday: 5 am to 9 pm (PST)
Saturday - Sunday: 8 am to 4 pm (PST)
We speak English • Se habla Español • Nous parlons Français
45
A
There is no sound.
• Press Volume Up on the remote control.
The TV displays “No Signal.”
• Press the INPUT button on the remote control to select a
different input source.
• Press the MUTE button on the remote to ensure mute is
off.
• If you are using cable TV, satellite, or antenna
connected directly to the TV, scan for channels. See
Scanning for Channels on page 32.
• Check the audio settings. See Adjusting the Audio
Settings on page 29. Ensure the speakers are set to
On.
There is no power.
• Ensure the TV is plugged into a working electrical outlet.
• Check the audio connections of external devices
(Blu-ray player, game console, cable/satellite box) that
are connected to the TV.
• Press the Power/Standby button on the remote or on
the side of the TV to turn the TV on.
• If you are using an antenna, the signal strength of the
channel may be low. Ensure your antenna is connected
securely to the TV and move the antenna around the
room or close to a window for the best signal.
The colors on the TV don’t look right.
• Adjust the Color and Tint settings in the Picture menu.
See Resetting the Picture Settings on page 29.
The power is on, but there is no image on the screen.
• Ensure all cables are securely attached to the TV.
• Ensure all devices are connected correctly. Devices
differ; see your device’s user manual for details.
• Reset the picture settings. See Resetting the Picture
Settings on page 29.
• Adjust Brightness, Contrast, or Backlight.
• Press the INPUT button on the remote to select a
different input source.
• Check all cables to ensure they are securely attached.
The buttons on the remote aren’t working.
• Ensure you are only pressing one button at a time.
• Point the remote directly at the TV when pressing a
button.
• Replace the remote batteries with new ones. See
Replacing the Batteries on page 12.
46
A
I see “noise” or static on the screen.
• When your TV’s digital capabilities exceed a
digital broadcast signal, the signal is up-converted
(improved) to match your TV’s display capabilities. This
up-converting can sometimes cause irregularities in the
image.
The image quality is not good.
• For the best image quality, view high-definition
programs using digital sources. Connect your devices
with HDMI cables.
• If you are using an antenna, the signal strength of the
channel may be low. Ensure your antenna is connected
securely to the TV and move the antenna around the
room or close to a window for the best signal.
• If you are using an antenna, the signal strength of the
channel may be low. Ensure your antenna is connected
securely to the TV and move the antenna around the
room or close to a window for the best signal.
The picture is distorted.
• Nearby electrical devices may be interfering with the
TV. Separate the TV from electrical appliances, cars, or
flourescent lights.
When I change input source, the volume changes.
• The TV remembers the volume level on each input
source. If the volume level on the new input source is
higher or lower than the level on the source you switch
from, the difference may be noticable.
• Ensure all cables are securely attached.
The display image does not cover the entire screen.
• If you are in RGB mode (computer), ensure that H-Size
and V-Position in the on-screen menu are set correctly.
• Use the Volume Up/Down buttons on the remote to
adjust the volume.
• If you are using TV, AV, or Component with 480i input,
press the WIDE button on the remote to change the
screen mode.
When I change input source, the display image changes size.
• The TV remembers the viewing mode on each input
source. If the viewing mode on the new input source
differs from the one on the input source you switch from,
the difference may be noticable.
The TV has pixels (dots) that are always dark or always lit.
• Your HDTV is precision-manufactured using an extremely
high level of technology. However, sometimes pixels may
not display correctly. These types of occurences are
inherent to this type of product and do not constitute a
defective product.
• See Changing the Screen Aspect Ratio on page 24.
47
B
Specifications
E240AR
E320AR
E420AR
E500AR
24” Class
32” Class
42” Class
50” Class
24.00”
31.50”
42.00”
50.00”
22.90 x 15.33 x 4.71”
22.90 x 14.31 x 2.13”
30.39 x 20.31 x 7.85”
30.39 x 18.88 x 3.86”
39.39 x 25.44 x 9.22”
39.39 x 24.01 x 3.80”
45.51 x 28.97 x 9.42”
45.51 x 27.62 x 3.90”
7.58 lbs
7.05 lbs
18.08 lbs
17.20 lbs
26.45 lbs
25.48 lbs
40.79 lbs
37.70 lbs
Edge-Lit LED
CCFL
CCFL
CCFL
60 Hz
60 Hz
60 Hz
60 Hz
1366 x 768
1366 x 768
1920 x 1080
1920 x 1080
.389 mm x .389 mm
.511 mm x .511 mm
.484 mm x .484 mm
.570 x .570
-
100,000:1
100,000:1
100,000:1
Response Time:
6.5 ms
8.5 ms
6.5 ms
8 ms
Brightness:
250 nits
350 nits
300 nits
350 nits
178° (H) / 178° (V)
176° (H) / 176° (V)
176° (H) / 176° (V)
176° (H) / 176° (V)
HDMI Inputs:
1
3
3
3
Component Video
Inputs:
1
1
1
1
1 (Shared w/Component)
1 (Shared w/Component)
1 (Shared w/Component)
Screen Size:
Viewable Area:
Dimensions w/ Stand:
w/o Stand:
Weight w/ Stand:
w/o Stand:
TV Type:
Refresh Rate:
Maximum Resolution:
Pixel Pitch:
Dynamic Contrast
Ratio:
Viewing Angle:
Composite Inputs: 1 (Shared w/Component)
RF Antenna Input:
1
1
1
1
USB 2.0 Ports:
1
1
1
1
RGB Inputs:
1
1
1
1
3.5mm Stereo
Optical Digital
3.5mm Stereo
Optical Digital
3.5mm Stereo
Optical Digital
3.5mm Stereo
Optical Digital
Audio Outputs:
48
B
E240AR
E320AR
E420AR
E500AR
English, Spanish, French
English, Spanish, French
English, Spanish, French
English, Spanish, French
No
Yes
Yes
Yes
XRT010
XRT010
XRT010
XRT010
Certifications:
UL, CUL, FCC Class B,
HDMI 1.4, Dolby Digital
UL, CUL, FCC Class B,
HDMI 1.4, Dolby Digital
UL, CUL, FCC Class B,
HDMI 1.4, Dolby Digital
UL, CUL, FCC Class B,
HDMI 1.4, Dolby Digital
Compliance:
Energy Star
Energy Star
Energy Star
Energy Star
100-130 VAC @ 50/60 Hz
100-130 VAC @ 50/60 Hz
100-130 VAC @ 50/60 Hz
100-130 VAC @ 50/60 Hz
26.30 W
51.25 W
69.16 W
89.34 W
Standby Power:
<1W
<1W
<1W
<1W
Zero Bright Pixel
Guarantee:
Yes
Yes
Yes
Yes
OSD Language:
Ambient Light Sensor:
Remote Control Model:
Voltage Range:
Power Consumption:
49
C
Limited Warranty
ON PARTS AND LABOR
Covers units purchased as new in United States and Puerto Rico Only.
VIZIO provides a warranty to the original purchaser of a new Product
against defects in materials and workmanship for a period of one (1)
year of non-commercial usage and ninety (90) days of commercial
use. If a Product covered by this warranty is determined to be defective
within the warranty period, VIZIO will either repair or replace the Product
at its sole option and discretion.
To obtain warranty service, contact VIZIO Technical Support via e-mail:
[email protected] or via phone at 877 MY VIZIO (877.698.4946)
from 6:00AM to 9:00PM Monday through Friday and 8:00AM to 4:00PM
Saturday and Sunday, Pacific Time, or visit www.VIZIO.com. PRE-AUTHORIZATION MUST BE OBTAINED BEFORE SENDING ANY PRODUCT TO A VIZIO
SERVICE CENTER. Proof of purchase in the form of a purchase receipt or
copy thereof is required to show that a Product is within the warranty
period.
Parts and Labor
There will be no charge for parts or labor during the warranty period.
Replacement parts and Products may be new or recertified at VIZIO’s
option and sole discretion. Replacement parts and Products are
warranted for the remaining portion of the original warranty or for ninety
(90) days from warranty service or replacement, whichever is greater.
Type of Service
Defective Products must be sent to a VIZIO service center to obtain
warranty service. VIZIO is not responsible for transportation costs to the
service center, but VIZIO will cover return shipping to the customer. PREAUTHORIZATION IS REQUIRED BEFORE SENDING ANY PRODUCT TO A VIZIO
SERVICE CENTER FOR WARRANTY SERVICE.
Product returns to VIZIO’s service centers must utilize either the original
carton box and shipping material or packaging that affords an equal
degree of protection. VIZIO Technical Support will provide instructions for
packing and shipping the covered Product to the VIZIO service center.
Limitations and Exclusions
VIZIO’s one-year limited warranty only covers defects in materials and
workmanship. This warranty does not cover, for example: cosmetic
damage, normal wear and tear, improper operation, improper voltage
supply or power surges, signal issues, damages from shipping, acts of
God, any type of customer misuse, modifications or adjustments, as well
as installation and set-up issues or any repairs attempted by anyone
50
other than by a VIZIO authorized service center. Products with unreadable
or removed serial numbers, or requiring routine maintenance are not
covered. This one year limited warranty does not cover Products sold
“AS IS”, “FACTORY RECERTIFIED”, or by a non-authorized reseller.
THERE ARE NO EXPRESS WARRANTIES OTHER THAN THOSE LISTED OR
DESCRIBED ABOVE. ANY IMPLIED WARRANTIES, INCLUDING ANY IMPLIED
WARRANTY OF MERCHANTABILITY AND FITNESS FOR A PARTICULAR
PURPOSE, SHALL BE LIMITED IN DURATION TO THE PERIOD OF TIME SET
FORTH ABOVE. VIZIO’S TOTAL LIABILITY FOR ANY AND ALL LOSSES AND
DAMAGES RESULTING FROM ANY CAUSE WHATSOEVER INCLUDING VIZIO’S
NEGLIGENCE, ALLEGED DAMAGE, OR DEFECTIVE GOODS, WHETHER SUCH
DEFECTS ARE DISCOVERABLE OR LATENT, SHALL IN NO EVENT EXCEED THE
PURCHASE PRICE OF THE PRODUCT. VIZIO SHALL NOT BE RESPONSIBLE FOR
LOSS OF USE, LOSS OF INFORMATION OR DATA, COMMERCIAL LOSS, LOST
REVENUE OR LOST PROFITS, OR OTHER INCIDENTAL OR CONSEQUENTIAL
DAMAGES. SOME STATES DO NOT ALLOW LIMITATIONS ON HOW LONG
AN IMPLIED WARRANTY LASTS OR THE EXCLUSION OF INCIDENTAL OR
CONSEQUENTIAL DAMAGES, SO THE ABOVE LIMITATIONS OR EXCLUSIONS
MAY NOT APPLY TO YOU. THIS WARRANTY GIVES YOU SPECIFIC LEGAL
RIGHTS, AND YOU MAY ALSO HAVE OTHER RIGHTS, WHICH VARY FROM
STATE TO STATE. THIS WARRANTY IS SUBJECT TO CHANGE WITHOUT NOTICE.
CHECK WWW.VIZIO.COM FOR THE MOST CURRENT VERSION.
Personal Data
If your VIZIO product is capable of storing personal data and other
information, ALL CONTENTS AND INFORMATION WILL BE DELETED IN THE
COURSE OF SOME IN-HOME AND ALL SHIP-IN WARANTY SERVICE. If this
occurs, your product will be restored to you configured as originally
purchased. You will be responsible for restoring all applicable data and
passwords. Recovery and reinstallation of user data is not covered under
this Limited Warranty. In order to protect your personal information, VIZIO
recommends that you always clear all personal information from the
unit before it is serviced, regardless of the servicer.
Zero Bright Pixel Defect Guarantee
This policy covers “zero bright pixel” defects for the duration of the limited
“ONE YEAR WARRANTY” on select new product purchases. To determine
if this guarantee applies to your product, refer to the “DETAILS” tab of
the model’s product information page (www.VIZIO.com) or look for the
“zero bright pixel” guarantee on the box.
D
Legal & Compliance
FCC Class B Radio Interference Statement
NOTE: This equipment has been tested and found to comply with the limits
for a Class B digital device, pursuant to Part 15 of the FCC Rules. These
limits are designed to provide reasonable protection against harmful
interference in a residential installation. This equipment generates, uses
and can radiate radio frequency energy, and if not installed and used in
accordance with the instructions, may cause harmful interference to radio
communications. However, there is no guarantee that interference will not
occur in a particular installation. If this equipment does cause harmful
interference to radio or television reception, which can be determined by
turning the equipment off and on, the user is encouraged to try to correct
the interference by one or more of the following measures:
1. Reorient or relocate the receiving antenna.
2. Increase the separation between the equipment and receiver.
3. Connect the equipment into an outlet on a circuit different from
that to which the receiver is connected.
4. Consult the dealer or an experienced radio/TV technician for
help.
This device complies with Part 15 of the FCC Rules. Operation is subject
to the following two conditions: (1) this device may not cause harmful
interference, and (2) this device must accept any interference received,
including interference that may cause undesired operation.
Notice
1. The changes or modifications not expressly approved by the party
responsible for compliance could void the user’s authority to
operate the equipment.
2. Shielded interface cables and AC power cord, if any, must be used
in order to comply with the emission limits.
3. The manufacturer is not responsible for any radio or TV
interference caused by unauthorized modification to this
equipment. It is the responsibilities of the user to correct such
interference.
FCC warning
Changes or modifications not expressly approved by the party responsible
for compliance with the FCC Rules could void the user’s authority to operate
this equipment.
51
MODELS
// E3D320VX
// E3D420VX
// E3D470VX
© 2012 VIZIO INC. All rights reserved.
120814OC-NC