1
How To Use
1. Place the unit on a stable surface.
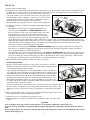
2. Determine the type of knife being sharpened and move the blade selector to the appropriate position (Fig. A). For thick knives move
the blade selector to the top position, for medium blades move the blade selector to the middle position, and for thin knives move
the blade selector to the bottom position. You will feel the stop points for
each position. When you move the blade selector lever, the orange adjustStage 1
Fig. A
Coarse grinding Blade
able blade guides in Stage 2 and Stage 3 will also move, so they are at the
selector
Stage 2
optimum sharpening angle for thick, medium, or thin blades. In Stage 1,
Precision grinding
the blade guides are in a fixed position (see step 4 below).
Stage 3
3. Turn the unit On by pressing the symbol “l” on the on/off switch (Fig. A).
Fine honing
4. Evaluate the condition of your blade to determine which sharpening stage
to start with:
• If the blade is very dull or if you are sharpening the knife for the
first time, begin with STAGE 1 – Coarse GRINDING. This is
the stage located to the left of the on/off switch. It is the coarsest and
On/Off
most aggressive stage, and it will remove more material from the
switch
knife blade than the other stages. Note that it is a fixed stage with no
adjustments, as it places the same angle on all blades in preparation
for the sharpening stations found in Stages 2 and 3. Unlike Stage 1, Stages 2 and 3 are adjustable stations. In these stations, the
sharpening angle is further refined so that when you are done, your knife is sharpened to the optimum angle dictated by the width
of the blade. Follow the sharpening procedure as described below, beginning with Stage 1 and followed by Stages 2 and 3.
(Note: Do not use Stage 1 when sharpening serrated blades.)
• If your knife is a bit dull, begin with STAGE 2 – Medium Grinding. This is the stage located directly to the right of the
blade selector; it continues the grinding by giving the blade a precision edge. Follow the sharpening procedure as described
below, beginning with Stage 2 and followed by Stage 3.
• If your knife just needs a little touch-up sharpening, begin with STAGE 3 – FINE HONING. This is the stage located on the far
right. This will be the stage most frequently used. It completes the knife sharpening process by honing and polishing the knife to
an exact razor-sharp edge. Follow the sharpening procedure as described below, using only the slots in Stage 3. Then complete
the honing process with one quick pass (approximately one second) through both slots of Stage 3.
5. Begin sharpening. The sharpening procedure is the same for each stage.
Sharpening Procedure:
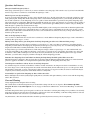
Begin by placing the knife in the left slot of the stage in use (Fig. B1), so the side of
Blade against outside
the blade rests against the outside face of the blade guide and the cutting edge makes
face of left slot
contact with the sharpening wheel (Fig. B2).
Using only light downward pressure, slowly pull the knife towards you through the
slot, making sure to keep the cutting edge parallel with the table or countertop except
when sharpening the tip of the blade. To sharpen the tip, lift up on the knife handle
slightly as the curved portion of the blade is drawn through the slots. Draw the knife
through the left and right slots three times, alternating passes between the two slots.
Fig. B1
When drawing the knife through the slots, allow approximately one second for each
two inches of blade. For example, if sharpening a knife with a 6-inch blade, you should take
Outside face Outside face of
approximately three seconds for each pass.
of left slot
right slot
Note: The greater the curve on the blade the more you will need to lift up on the handle; the less
the curve, the less you will need to lift up on the handle. Certain blades may not have a curve
and therefore it will not be necessary to lift up on the handle as you draw the tip through the
slots.
6. Before using the knife to slice food, always wipe the knife blade with a damp cloth to remove
metal filings that may have deposited during sharpening.
7. If knife does not slice food with ease, repeat Stages 2 and 3.
Fig. B2
8. When sharpening is completed, turn the unit off by pressing the symbol “ O” on the on/off
switch.
CAUTION:
Do not run fingers along edge of knife to check sharpness. To avoid injury, handle knives with extreme care.
Never insert the tip of the knife into the blade guide first and push through. This could damage the knife sharpener and your
knife.
Before using the knife to slice food, always wipe the knife blade with a damp cloth to remove any metal filings that may remain
from the sharpening process.
2