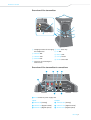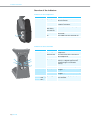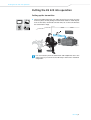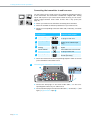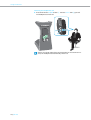
1
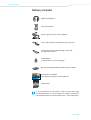
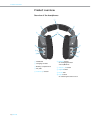
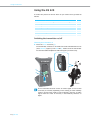
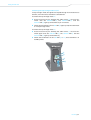
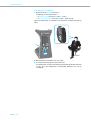
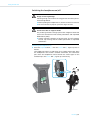
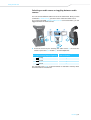
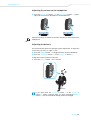
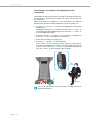
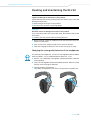
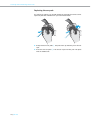
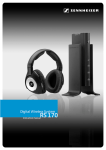
Contents
Contents
Important safety information ........................................................................... 2
The RS 220 digital RF headphone system ...................................................... 4
Delivery includes .................................................................................................. 5
Product overview .................................................................................................
Overview of the headphones ......................................................................
Overview of the transmitter ........................................................................
Overview of the transmitter’s connections ..............................................
Overview of the indicators ...........................................................................
6
6
7
7
8
Putting the RS 220 into operation ................................................................... 9
Setting up the transmitter ........................................................................... 9
Connecting the transmitter to audio sources ........................................ 10
Connecting the transmitter to the mains ............................................... 14
Charging the rechargeable batteries inside the headphones ............. 14
Adjusting the headband of the headphones ......................................... 15
Using the RS 220 ............................................................................................... 16
Switching the transmitter on/off ............................................................. 16
Switching the headphones on/off ........................................................... 19
Selecting an audio source or toggling between audio sources .......... 21
Adjusting the volume on the headphones ............................................. 23
Adjusting the balance ................................................................................. 23
Associating a second pair of headphones to the transmitter ............ 24
Cleaning and maintaining the RS 220 ........................................................... 25
Changing the rechargeable batteries of the headphones ................... 25
Replacing the ear pads ............................................................................... 26
If a problem occurs ... ........................................................................................ 27
Specifications ...................................................................................................... 29
Manufacturer declarations ............................................................................... 30
RS 220 | 1
Important safety information
Important safety information
왘 Please read this instruction manual carefully and completely before
using the product.
www
RS 220
Manual
www.sennheiser.com
왘 Make this instruction manual easily accessible to all users at all times.
Always include this instruction manual when passing the product on to
third parties.
왘 This instruction manual is also available on the Internet at
www.sennheiser.com.
Preventing health problems
왘 Before using the product, set the volume to a low level. To protect your
hearing, avoid listening at high volume levels for long periods of time.
왘 Do not use the product in situations which require special attention
(e.g. in traffic or when performing skilled jobs).
The product generates stronger permanent magnetic fields that could
cause interference with cardiac pacemakers and implanted defibrillators
(ICDs).
왘 Always maintain a distance of at least 3.94” (10 cm) between the ear
cup housing and the cardiac pacemaker or implanted defibrillator.
Preventing damage to the product
왘 Always keep the product dry and do not expose it to extreme temperatures (normal operating temperatures: 5°C/41°F to 40°C/104°F).
왘 Use the product with care and store it in a clean, dust-free environment. Varnish or furniture polish may degrade the feet of the transmitter, which could stain your furniture. You should therefore place the
transmitter on a non-slip pad to avoid potential staining of furniture.
왘 Switch the headphones off after use to conserve battery power.
Remove the batteries if the headphones will not be used for extended
periods of time.
Preventing damage to the power supply unit
왘 To reduce the risk of fire or electric shock, do not expose the product to
rain or moisture.
왘 Unplug the mains unit from the wall socket to completely disconnect
the product from the mains, during lightning storms or when unused
for long periods of time.
왘 Only operate the mains unit from the type of power source specified in
the chapter “Specifications”.
왘 To prevent heat accumulation, always ensure that the mains unit is in
a safe operating condition and easily accessible, properly plugged into
the wall socket and not covered or exposed to direct sunlight for longer
periods of time.
왘 Only use the power supply units, charging cables and accessories
recommended by Sennheiser. An overview can be found on
www.sennheiser.com.
2 | RS 220
Important safety information
Intended use
Intended use of the product includes
•
having read this instruction manual, especially the chapter “Important
safety information”,
•
using the product within the operating conditions and limitations
described in this instruction manual.
“Improper use” means using the product other than as described in this
instruction manual, or under operating conditions which differ from those
described herein.
Safety instructions for the NiMH rechargeable batteries
If abused or misused, the rechargeable batteries may leak. In extreme
cases, they may even present
•
•
•
•
a heat hazard,
a fire hazard,
an explosion hazard,
a smoke or gas hazard.
Please understand that Sennheiser does not accept liability for damage
arising from abuse or misuse.
Keep away from
children.
Only charge the rechargeable
batteries in the headphones
(see page 14).
Observe correct
polarity.
Pack/store charged batteries
so that the terminals cannot
contact each other – danger of
shorting out/fire hazard.
Do not expose to
moisture.
Switch rechargeable batterypowered products off after use.
Only charge rechargeable batteries at
ambient temperatures
between 10°C/50°F
and 40°C/104°F.
When not using rechargeable
batteries for extended periods
of time, charge them regularly
(about every 3 months).
Do not mutilate or
dismantle.
Do not heat above 70°C/158°F,
e.g. do not expose to sunlight
or throw into a fire.
Immediately remove
rechargeable batteries
from an obviously
defective product.
Do not continue to use defective rechargeable batteries.
Only use rechargeable
batteries specified by
Sennheiser.
Dispose of rechargeable batteries at special collection
points or return it to your
specialist dealer.
RS 220 | 3
The RS 220 digital RF headphone system
The RS 220 digital RF headphone system
Experience audiophile sound quality with the RS 220 digital wireless headphone system. Consisting of a transmitter and open, circum-aural headphones, the system offers uncompressed music enjoyment – just like
wired high-end headphones.
The rechargeable batteries can conveniently be recharged while in the
headphones. Enjoy total freedom of sound, stylish design and maximum
comfort.
Additional features of the RS 220 RF headphone system
•
Transmits uncompressed CD-quality audio over a robust 2.4 GHz digital
link, enabling you to enjoy your music without the hassles of cables.
•
Dynamic transducer systems with powerful neodymium magnets
deliver clear and detailed audio reproduction.
•
No set-up required – just plug and play. Simply connect the transmitter
to your personal audio/video player, put on the headphones and turn
it on.
•
TR 220 transmitter with multi-receiver capability, enabling up to
2 people to listen to the same audio source via an optional second pair
of headphones.
•
Signals can be looped through so that the transmitter can be integrated into an existing connection between 2 devices
•
Universal connections:
– 1 analog input and output
– 1 coaxial digital input and output
– 1 optical digital input and output
4 | RS 220
Delivery includes
Delivery includes
HDR 220 headphones
TR 220 transmitter
Power supply unit with country adapters
Stereo audio cable with dual RCA plugs on each end
Coaxial cable with a single RCA plug on each end –
for digital connections
Audio adapter
(2 RCA sockets to 3.5 mm jack plug)
BA 200 rechargeable batteries, HR03, AAA size, NiMH
RS 220
Digital wireless
system
Quick Guide
Quick Guide
Quick Guide
Quick Guide
Quick Guide
Quick Guide
Quick Guide
Quick Guide
Quick Guide
Quick Guide
Quick Guide
Quick Guide
Quick Guide
Quick Guide
Quick Guide
Quick Guide incl. CD ROM
with detailed instruction manual (PDF file)
RS 220
Digital wireless
system
Safety Guide
Safety Guide
Consignes de sécurité
Indicaciones de seguridad
Instruções de segurança
Sicherheitshinweise
Indicazioni di sicurezza
Instruções de segurança
Veiligheidsvoorschriften
A list of accessories can be found on the RS 220 product page
at www.sennheiser.com. For information on suppliers, contact your
local Sennheiser partner: www.sennheiser.com > “Service & Support“.
RS 220 | 5
Product overview
Product overview
Overview of the headphones
1
2
2
3
4
3
0
5
9
6
8
7
1 Headband
2 Charging contacts
3 Battery compartments
4 Ear pads
5 Volume +/L button
6 Balance button
for changing between
Volume/Balance
7 Volume –/R button
8 On/Off button
9 Power LED
0 Input button
for selecting the audio source
6 | RS 220
Product overview
Overview of the transmitter
A
I
COAXIAL
N
Pairing
OUT
OPTICAL
DIGITAL
-LEVEL
H
B
G
C
F
J
D
E
A Charging contacts for charging F
the headphones
G
B ANALOG LED
H
C COAXIAL LED
I
D OPTICAL LED
J
E Touch key for selecting the
audio source
Power touch key
ON LED
Battery LED
Pairing button
LEVEL control dial
Overview of the transmitter’s connections
쐇
쐄
쐋
쐂
쐃
IN
9V/1A
OUT
R
COAXIAL
IN
OUT
L
DC IN
Pairing
OPTICAL
ANALOG
DIGITAL
쐏
-LEVEL
쐆
쐃 DC IN socket for power supply unit
Inputs
Outputs
쐇 ANALOG IN (analog)
쐄 ANALOG OUT (analog)
쐋 COAXIAL IN (digital coaxial)
쐂 COAXIAL OUT (digital coaxial)
쐏 OPTICAL IN (digital optical)
쐆 OPTICAL OUT (digital optical)
RS 220 | 7
Product overview
Overview of the indicators
Indicators on the headphones
Indicator
Status
Meaning
Power LED 9
lights up blue
The headphones have found a suitable transmitter.
flashes blue
The headphones haven’t found a
suitable transmitter.
flashes
alternately
blue and red
The headphones are in pairing mode.
flashes red
The rechargeable batteries are
almost flat.
off
The headphones are switched off.
9
Indicators on the transmitter
H
B
G
C
Indicator
Status
ON LED G
lights up green The transmitter has found suitable
headphones.
D
Battery LED H
Meaning
flashes green
The transmitter hasn’t found suitable headphones.
lights up red
The transmitter is in loop through
mode (i.e. a digital signal can be
looped through to connected
devices).
off
The transmitter is in standby mode.
lights up red
The rechargeable batteries are being
charged.
off
The rechargeable batteries are fully
charged.
ANALOG LED B/ lights up green The corresponding input (“IN”) has
COAXIAL LED C/
been selected.
OPTICAL LED D
8 | RS 220
Putting the RS 220 into operation
Putting the RS 220 into operation
Setting up the transmitter
왘 Choose a suitable place near your audio source (e.g. TV, stereo or home
cinema system). Avoid placing the transmitter close to metal objects
such as shelf bars, reinforced concrete walls, etc. as this can decrease
the transmitter’s range.
It is not necessary that the transmitter and headphones are in the
same room, so you can move around freely in the home or outside in
the garden.
RS 220 | 9
Putting the RS 220 into operation
Connecting the transmitter to audio sources
You can connect up to 3 audio sources (e.g. CD player, DVD player and TV)
to the transmitter. The transmitter is fitted with 2 digital and 1 analog
inputs and outputs. If you connect several audio sources, you can conveniently toggle between these audio sources with a key press (see
page 21).
왘 Switch your audio source off before connecting the transmitter.
왘 Check the available connection possibilities of your audio source.
왘 Select the corresponding connection cable and, if necessary, a suitable
adapter.
Connection possibilities (output) of
the audio source
A RCA (analog)
L
R
Connection cable/adapter
Stereo audio cable with dual
RCA plugs on each end
B SCART (analog)
Stereo audio cable with audio
adapter (to be ordered separately)
C Headphone socket
Stereo audio cable with audio
adapter
D Coaxial (digital)
Coaxial cable with with a single
RCA plug on each end
E Optical (digital)
Optical digital cable (to be
ordered separately)
(analog)
왘 Follow the instructions in the corresponding chapter in order to connect
your transmitter to the audio source.
A
Connecting the transmitter to RCA sockets
쐇
OUT
R
IN
9V/1A
R
R
COAXIAL
IN
L
L
DC IN
L
OUT
Pairing
OUT
OPTICAL
ANALOG
DIGITAL
-LEVEL
K
왘 Connect the RCA plugs of the stereo audio cable K to the corresponding RCA sockets of your audio source.
왘 Connect the RCA plugs of the stereo audio cable K to the left (“L”) and
right (“R”) ANALOG IN input 쐇.
10 | RS 220
Putting the RS 220 into operation
B
Connecting the transmitter to a SCART socket
쐇
IN
9V/1A
OUT
R
R
COAXIAL
IN
L
L
DC IN
Pairing
OUT
OPTICAL
ANALOG
-LEVEL
DIGITAL
K
왘 Connect the RCA plugs of the stereo audio cable K to the corresponding RCA sockets of the SCART adapter.
왘 Connect the SCART adapter to the SCART socket of your audio source.
왘 Connect the RCA plugs of the stereo audio cable K to the left (“L”) and
right (“R”) ANALOG IN input 쐇.
A suitable SCART adapter is available from your specialist dealer.
C
Connecting the transmitter to a headphone socket
쐇
IN
9V/1A
OUT
R
R
COAXIAL
IN
L
L
DC IN
OUT
L
Pairing
OPTICAL
ANALOG
DIGITAL
-LEVEL
K
왘 Connect the RCA plugs of the stereo audio cable K to the corresponding RCA sockets of the audio adapter L.
왘 Connect the audio adapter L to the headphone socket of your audio
source.
왘 Connect the RCA plugs of the stereo audio cable K to the left (“L”) and
right (“R”) ANALOG IN input 쐇.
RS 220 | 11
Putting the RS 220 into operation
D
Connecting the transmitter to a coaxial digital output
쐋
IN
OUT
R
9V/1A
R
COAXIAL
L
DC IN
Pairing
OUT
IN
OPTICAL
ANALOG
DIGITAL
-LEVEL
M
왘 Connect the RCA plug of the coaxial cable M to the RCA socket (digital
output) of your audio source.
왘 Connect the RCA plug of the coaxial cable M to the COAXIAL IN input 쐋.
E
Connecting the transmitter to a coaxial digital output
IN
9V/1A
OUT
R
COAXIAL
IN
OUT
L
DC IN
Pairing
OPTICAL
ANALOG
DIGITAL
-LEVEL
N
쐏
왘 Connect the connector of the optical digital cable N to an optical digital
output of your audio source.
왘 Connect the connector of the optical digital cable N to the
OPTICAL IN input 쐏.
A suitable optical cable is available from your specialist dealer.
12 | RS 220
Putting the RS 220 into operation
Integrating the transmitter into an existing connection between devices
To integrate the transmitter into an existing connection between your
audio source and an additional device. By way of example of an amplifier
as an additional device, this chapter describes how to integrate the transmitter into an existing connection.
왘 Pull out the plug of the audio cable from the desired input (“IN”) on the
amplifier.
IN
5V/1A
OUT
R
COAXIAL
IN
Pairing
OUT
L
DC IN
OPTICAL
ANALOG
DIGITAL
-LEVEL
왘 Connect this plug to a suitable input (“IN”) on the transmitter (see
page 7).
IN
5V/1A
OUT
R
COAXIAL
IN
OUT
L
DC IN
Pairing
OPTICAL
ANALOG
DIGITAL
-LEVEL
왘 Connect an additional identical audio cable to the output (“OUT”) on
the transmitter and to the input (“IN”) on the amplifier.
IN
5V/1A
OUT
R
COAXIAL
IN
OUT
L
DC IN
Pairing
OPTICAL
ANALOG
DIGITAL
-LEVEL
To keep the digital connection up even when the transmitter is switched
off:
왘 Switch the loop through mode on (see page 17).
The analog connection (RCA/SCART/headphone socket) is kept up
when you disconnect the transmitter from the mains.
The digital connection (coaxial/optical) is interrupted in this case.
RS 220 | 13
Putting the RS 220 into operation
Connecting the transmitter to the mains
UK
AU/CN
P
EU
O
US
쐃
IN
9V/1A
OUT
R
COAXIAL
IN
OUT
L
DC IN
Pairing
P
OPTICAL
ANALOG
DIGITAL
-LEVEL
왘 Select a suitable country adapter O for your wall socket.
왘 Slide the country adapter O onto the power supply unit P until it locks
into place.
왘 Connect the connector of the power supply unit to the socket 쐃.
왘 Plug the power supply unit P into a wall socket.
The transmitter switches on. The ON LED G and the COAXIAL LED C
light up green.
Charging the rechargeable batteries inside the
headphones
Before using the headphones for the first time, remove the protection strip
from the rechargeable batteries and charge the rechargeable batteries for
optimum operation.
Removing the protection strip
왘 Tilt the ear cup slightly inwards.
왘 Open the battery compartment 3 on the ear cup using your finger nail.
왘 Pull the protection strip from the battery compartment.
3
14 | RS 220
Putting the RS 220 into operation
Charging the BA 200 rechargeable batteries inside the headphones
Charge the BA 200 rechargeable batteries for at least 16 hours prior to first
time use. The operating time is up to 8 hours.
16h
A
H
왘 Place the headphones on the charging contacts A of the transmitter.
The rechargeable batteries are being charged. The Battery LED H lights
up red.
When the rechargeable batteries are fully charged, the Battery LED H
goes off.
Always store the headphones on the headphone holder to ensure
that they are fully charged when they are needed. The intelligent
battery charging technology prevents over-charging.
Adjusting the headband of the headphones
For good sound quality and best possible comfort, the headband has to be
adjusted to properly fit your head. To do so, adjust the headband 1 via its
snap-in locking mechanism:
1
왘 Wear the headphones so that the headband 1 runs over the top of
your head.
왘 Adjust the length of the headband so that
– your ears are completely inside the earpads,
– you feel even, gentle pressure around your ears,
– a snug fit of the headband 1 on the head is ensured.
RS 220 | 15
Using the RS 220
Using the RS 220
To switch the product on and to listen to your audio source, proceed as
follows:
Sequence of steps
Page
1. Make sure that the rechargeable batteries are charged.
14
2. Switch your audio source on.
–
3. Switch your transmitter on.
16
4. Switch your headphones on.
19
5. Select the desired audio source.
21
6. Put on the headphones.
15
7. Adjust the desired volume on the headphones.
23
Switching the transmitter on/off
Switching the transmitter on
왘 Touch the Power touch key F.
The transmitter switches on. The LED of the last selected audio source
(here COAXIAL) lights up. The ON LED G flashes until the transmitter
has found suitable headphones and then lights up continuously.
ON
G
F
If the transmitter doesn’t receive an audio signal for more than
3 minutes, it switches, depending on the setting, to either standby
mode or loop through mode. If the transmitter receivers an audio
signal within the next 10 minutes, it automatically switches on
again.
16 | RS 220
Using the RS 220
Switching the loop through mode on/off
In loop through mode, the signals are looped through from one device to
another, even when the transmitter is switched off.
To switch the loop through mode on:
왘 Touch the touch key for selecting the audio source E on the transmitter until the ANALOG LED B, the COAXIAL LED C and the
OPTICAL LED D light up simultaneously for a moment.
왘 Switch the transmitter off. The ON LED G lights up red, the transmitter
is in loop through mode.
To switch the loop through mode on:
왘 Touch the touch key for selecting the audio source E on the transmitter again until the ANALOG LED B, the COAXIAL LED C and the
OPTICAL LED D light up simultaneously.
왘 Switch the transmitter off. The ON LED G is off, the transmitter is in
standby mode.
B
C
D
E
RS 220 | 17
Using the RS 220
Switching the transmitter off
왘 Briefly touch the Power touch key F.
All LEDs go off. The transmitter is
– in standby mode when the ON LED G is off or
– in loop through mode when the ON LED G lights up red.
When the transmitter is switched on the next time, it selects the last set
input.
ON
F
To disconnect the transmitter from the mains:
왘 Pull out the mains plug from the wall socket.
The transmitter is reset to the factory default settings. Please note that
In this case, the headphones’ rechargeable batteries will not be
recharged.
18 | RS 220
Using the RS 220
Switching the headphones on/off
WARNING
Danger of hearing damage!
Listening at high volume levels for long periods can lead to permanent hearing defects.
왘 Before putting the headphones on, set the volume to a low level.
왘 Do not continuously expose yourself to high volumes.
WARNING
Interferences due to magnetic fields!
The product generates stronger permanent magnetic fields that
could cause interference with cardiac pacemakers and implanted
defibrillators (ICDs).
왘 Always maintain a distance of at least 3.94” (10 cm) between
the ear cup housing and the cardiac pacemaker or implanted
defibrillator.
Switching the headphones on
왘 Press the On/Off button 8 until the Power LED 9 lights up blue or
flashes.
The headphones switch on and search for a suitable transmitter. Once
the headphones have found a suitable transmitter, the transmitter
pairs with the headphones and transmits the audio signal of the
selected input. The Power LED 9 lights up continuously.
ON
9
8
RS 220 | 19
Using the RS 220
Switching the headphones off
왘 Press and hold the On/Off button 8 until the Power LED 9 goes off.
The headphones switch off.
ON
9
8
If there is no audio signal from the transmitter for more than 10 minutes, the headphones automatically switch off.
20 | RS 220
Using the RS 220
Selecting an audio source or toggling between audio
sources
You can connect different audio sources to the transmitter. Once you have
connected an audio source, you then have to select the audio source.
If you have connected different audio sources to the transmitter, you can
toggle between the audio sources:
E
0
왘 Touch the touch key for selecting the audio source E on the transmitter or press the Input button 0 on the headphones.
Press the buttons repeatedly until
Selected input (“IN”)
one of the following displays lights up on the transmitter
Analog
ANALOG IN 쐇
Coaxial
COAXIAL IN 쐋
Optical
OPTICAL IN 쐏
The selected input (“IN”) on the transmitter is retained in memory when
the transmitter is switched off.
RS 220 | 21
Using the RS 220
Adjusting the signal of the audio source
The RS 220 digital RF headphone system deliberately does without an
automatic adjustment of the signal level so that you can hear pure and
unadulterated sound from your analog audio source.
The LEVEL control dial J allows you to individually adjust the transmitter
to your audio source in order to achieve optimum sound quality.
왘 Switch the transmitter and the headphones on (see page 16).
COAXIAL
Pairing
OUT
OPTICAL
ITAL
왘 Select the ANALOG IN input 쐇 (see page 21).
The ANALOG LED B lights up green.
-LEVEL
J
ON
E
B
0
왘 Set the headphones to a medium volume (see page 23).
왘 First turn the LEVEL control dial J in the + direction until the audio
signal is slightly distorted.
왘 Then minimally turn the LEVEL control dial J in the – direction until
you can clearly hear the audio signal.
왘 Use the Volume –/R button 7 on the headphones to set a medium
volume.
If you connect a different audio source to the ANALOG IN input 쐇,
you have to adjust the signal of the audio source again in order to
achieve optimum sound quality.
22 | RS 220
Using the RS 220
Adjusting the volume on the headphones
왘 Press the Volume –/R button 7 or the Volume +/L button 5 repeatedly until the volume is adjusted to a comfortable level.
7
Vol -
5
Vol +
Vol -
Vol +
When the minimum or maximum volume is reached, you hear a beep in the
headphones.
Adjusting the balance
The balance button allows for left/right volume adjustment. To adjust the
volume for your left (L) or right (R) ear:
왘 Press the Balance button 6 to toggle between Volume and Balance.
왘 Press the Volume +/L button 5 or the Volume –/R button 7.
To adjust the same volume for both ears:
왘 Press the Balance button 6 for 2 seconds.
5
6
7
If you don’t press the Volume +/L button 5 or the Volume –/R
button 7 within 5 seconds after you have pressed the Balance
button 6, the current balance setting remains unchanged.
RS 220 | 23
Using the RS 220
Associating a second pair of headphones to the
transmitter
The headphones and the transmitter are already associated upon delivery.
If you want to use a second pair of headphones, you have to associate it to
the transmitter.
When associating the headphones to the transmitter, the distance
between the transmitter and the headphones should not exceed 1 m.
왘 Press the On/Off button 8 on both pairs of headphones to switch the
headphones on.
The headphones search for a suitable transmitter. The Power LED 9 of
the already associated headphones lights up while the Power LED 9 of
the new headphones flashes.
왘 Press and hold the On/Off button 8 on the new pair of headphones
until the Power LED 9 alternately flashes blue/red.
왘 Switch the transmitter on (see page 16).
왘 Press the Pairing button 9 on the transmitter.
The ON LED G of the transmitter flashes green/red. After approx.
2 seconds, the headphones are paired with the transmitter and you can
hear your audio source. The Power LED 9 of the headphones lights up
blue, the ON LED G of the transmitter lights up green.
ON
9
8
IN
5V/1A
I
OUT
R
COAXIAL
IN
Pairing
OUT
L
DC IN
OPTICAL
ANALOG
DIGITAL
-LEVEL
The volume and the balance of the each pair of headphones can be
adjusted individually.
24 | RS 220
Cleaning and maintaining the RS 220
Cleaning and maintaining the RS 220
CAUTION
Liquids can damage the electronics of the product!
Liquids entering the housing of the product can cause a short-circuit and
damage the electronics.
왘 Keep all liquids far away from the product.
왘 Do not use any solvents or cleansing agents.
CAUTION
Microfiber cloths can damage the surface of the product!
If you clean the product with a microfiber cloth, dust particles can scratch
the surface.
왘 Carefully dust the product without exerting pressure.
왘 Before cleaning, switch the headphones off and disconnect the transmitter from the mains.
왘 Only use a lint-free, slightly humid cloth to clean the product.
왘 Clean the charging contacts from time to time using e.g. an eraser.
Changing the rechargeable batteries of the headphones
For powering the headphones, you can use rechargeable batteries (HR03,
AAA size, NiMH, 1.2 V) or standard batteries (AAA size, 1.5 V).
왘 Remove the depeleted rechargeable batteries/standard batteries
(where applies).
왘 Insert the rechargeable batteries/standard batteries. Observe correct
polarity when inserting the batteries.
왘 Close the battery compartment 3.
The battery compartment cover locks into place with an audible click.
3
3
RS 220 | 25
Cleaning and maintaining the RS 220
Replacing the ear pads
For reasons of hygiene, you should replace the ear pads from time to time.
Spare ear pads are available from your Sennheiser dealer.
4
4
왘 Grasp inside the ear pads 4 and pull them up and away from the ear
cups.
왘 Press the new ear pads 4 onto the ear cups until they lock into place
with an audible click.
26 | RS 220
If a problem occurs ...
If a problem occurs ...
Sound problems
Problem
Possible cause
Possible solutions Page
No sound
Transmitter is/headphones
are switched off
Switch the transmitter/headphones on
Plug is not properly
connected
Check the plug
connection
16/19
10
Audio source is switched off Switch the audio
source on
–
Audio source is not connected to the selected
connection
Select a different
audio source
21
Audio cable is defective
Replace the cable
or select a different connection
21
Occasional
sound
dropouts
Headphones are out of
range
Reduce the distance between
headphones and
transmitter
–
Sound is too
low
Signal of the audio source is Increase the
too weak
volume of the
audio source
–
LEVEL control dial J is
turned too far in the +
direction
22
Sound is too
distorted
Sound only
on one ear
Turn the LEVEL
control dial J in
the – direction
Signal of the audio source is Reduce the signal
too strong
strength by means
of the LEVEL
control dial J
22
LEVEL control dial J is
turned too far in the +
direction
Turn the LEVEL
control dial J in
the – direction
22
The balance is misadjusted
Adjust the balance
23
Audio cable is defective
Replace the cable
–
1 RCA plug of the audio con- Check the plug
nection cable is not properly connection
connected
10
RS 220 | 27
If a problem occurs ...
Other problems
Problem
Possible cause
Possible solution
The transmitter
cannot be
switched on
No mains connection
Check the connection of the power
supply unit to the
transmitter and to
the mains
–
Headphones
cannot be
switched on
Rechargeable batteries are
flat
Recharge the
rechargeable
batteries
14
Rechargeable batteries are
inserted the wrong way
round
Remove the
rechargeable batteries and observe
correct polarity
25
Headphones
and/or do
not react to
any key
press
Function is disturbed
Reset: Pull out the
mains plug from
the transmitter,
briefly remove the
rechargeable batteries from the
headphones
16
Headphones
cannot be
recharged
Headphones do not make
contact to the charging
contacts
Ensure that the
headphones are
properly seated on
the charging
contacts
14
Clean the charging
contacts
25
Batteries or rechargeable
Insert BA 200
batteries other than BA 200 rechargeable
rechargeable batteries are
batteries
inserted
Power LED 9 Headphones haven’t found
flashes
an unused frequency
continuously
Page
15
Place the transmitter in a different location
24
If necessary,
switch off a
product operating
on Bluetooth or
WLAN
–
If a problem occurs that is not listed in the above table or if the problem
cannot be solved with the proposed solutions, please contact your local
Sennheiser partner for assistance.
To find a Sennheiser partner in your country, search at
www.sennheiser.com.
28 | RS 220
Specifications
Specifications
RS 220 system
Modulation
digital, 16-bit, 48 kHz
Frequency range
2400 to 2483.5 MHz
Frequencies
2412 MHz; 2438 MHz; 2464 MHz
Number of radio channels
3
AF frequency response
16 Hz to 22 kHz
Signal-to-noise ratio
99 dB
Operating temperature range
0°C to 40°C
Storage temperature range
–10°C to +70°C
TR 220 transmitter
Radiated RF power
10 mW
Power supply
PSM11R-090 power supply unit
9 V , 1.1 A
Power consumption
standby mode: typ. 0.30 W
loop through mode: typ. 0.84 W
switched on: typ. 2.2 W
Signal-to-noise ratio
typ. 90 dB
Connections
analog: RCA
digital coaxial: RCA
digital optical: TORX/TOTX
Input sensitivity
(analog) of the sockets
0.6 Vrms to 5 Vrms
Weight
approx. 484 g
HDR 220 headphones
Transducer principle
dynamic, open
Max. SPL at 1 kHz
106 dB (1 kHz, 1 Vrms)
THD
typ. < 0.1% (1 kHz, 100 dB SPL)
Power supply
2 NiMH-rechargeable batteries
(BA 200, HR03, type AAA, 1,2 V,
930 mAh)
Charging time
approx. 16 hours
Operating time
approx. 6 to 8 hours
Weight incl. rechargeable batteries
approx. 329 g
PSM11R-090 power supply unit
Rated input
100 – 240 V~, 0.3 A, 50 – 60 Hz
Rated output
9V
Operating temperature range
0°C to +40°C
, 1.1 A
RS 220 | 29
Manufacturer declarations
Manufacturer declarations
Warranty
Sennheiser electronic GmbH & Co. KG gives a warranty of 24 months on this
product. For the current warranty conditions, please visit our website at
www.sennheiser.com or contact your Sennheiser partner.
In compliance with the following requirements
• RoHS Directive (2002/95/EC)
•
WEEE Directive (2002/96/EC)
•
Battery Directive (2006/66/EC)
CE Declaration of Conformity
•
R&TTE Directive (1999/5/EC)
•
EMC Directive (2004/108/EC)
•
Low Voltage Directive (2006/95/EC)
The declaration is available at www.sennheiser.com. Before putting the
product into operation, please observe the respective country-specific
regulations!
Rechargeable batteries
The supplied rechargeable batteries can be recycled. Please dispose of
them as special waste or return them to your specialist dealer. In order to
protect the environment, only dispose of exhausted batteries.
WEEE Declaration
Your Sennheiser product was developed and manufactured with highquality materials and components which can be recycled and/or reused.
This symbol indicates that electrical and electronic equipment must be disposed of separately from normal waste at the end of its operational lifetime.
Please dispose of this product by taking it to your local collection point or
recycling centre for such equipment. This will help to protect the environment in which we all live.
In compliance with:
USA
Canada
FCC ID: DMORS220T
FCC ID: DMORS220H
IC: 2099A-RS220T
IC: 2099A-RS220H
Europe
Australia/
New Zealand
Singapore
Korea
Certification Number: SE9- TR220
SC9 - MM550
사용자 정보 :
SE9- HDR220
1) 해당 무선설비는 운용 중 전파혼신 가능성이 있음
2) 해당 무선설비는 전파혼신 가능성이 있으므로 인명
안전과 관련된 서비스는 할 수 없음
經型式認證合格之低功率射頻電機,⾮經許可,公司、商號或使⽤者均
不得擅⾃變更頻率、加⼤功率或變更原設計之特性及功能。
30 | RS 220
低功率射頻電機之使⽤不得影響⾶航安全及⼲擾合法通信;經發現有⼲
擾現象時,應⽴即停⽤,並改善⾄無⼲擾時⽅得繼續使⽤。前項合法通
信,指依電信法規定作業之無線電通信。低功率射頻電機須忍受合法通
信或⼯業、科學及醫療⽤電波輻射性電機設備之⼲擾。
Manufacturer declarations
Statements regarding FCC and Industry Canada
FCC Declaration of Conformity (DoC)
SENNHEISER
Model No: RS 220
We,
Sennheiser Electronic Corporation
One Enterprise Drive • Old Lyme •
CT 06371 • USA
Tel: +1 (860) 434 9190, ext. 144
Fax: +1 (860) 434 1759
declare the above device comply with the requirements of Federal Communications Commission.
This device complies with Part 15 of the FCC rules. Operation is subjected to the following two conditions:
1) This device may not cause harmful interference, and
2) This device must accept any interference received, including interference that may cause undesired operation.
Responsible Party: John Falcone
This device complies with Part 15 of the FCC Rules and with RSS-210 of
Industry Canada. Operation is subject to the following two conditions:
(1) this device may not cause harmful interference, and (2) this device
must accept any interference received, including interference that may
cause undesired operation.
This equipment has been tested and found to comply with the limits for a
Class B digital device, pursuant to Part 15 of the FCC Rules. These limits are
designed to provide reasonable protection against harmful interference in
a residential installation. This equipment generates, uses and can radiate
radio frequency energy and, if not installed and used in accordance with
the instructions, may cause harmful interference to radio communications.
However, there is no guarantee that interference will not occur in a particular installation. If this equipment does cause harmful interference to
radio or television reception, which can be determined by turning the
equipment off and on, the user is encouraged to try to correct the interference by one or more of the following measures:
•
Reorient or relocate the receiving antenna.
•
Increase the separation between the equipment and receiver.
•
Connect the equipment into an outlet on a circuit different from that to
which the receiver is connected.
•
Consult the dealer or an experienced radio/TV technician for help.
This class B digital apparatus complies with the Canadian ICES-003.
Changes or modifications made to this equipment not expressly approved
by Sennheiser electronic Corp. may void the FCC authorization to operate
this equipment.
RF Radiation Exposure Information
Since the radiated output power of this device is far below the FCC radio
frequency exposure limits, it is not subjected to routine RF exposure evaluation as per Section 2.1093 of the FCC rules.
RS 220 | 31
Manufacturer declarations
32 | RS 220