1
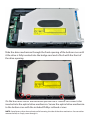
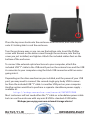
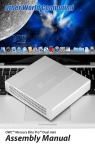
OWC SuperSlim External
Optical Enclosure
Assembly Guide
Thank you for purchasing your new OWC SuperSlim External
Optical Enclosure! This assembly guide will explain how to
install your own optical drive mechanism in just a few easy
steps.
Overview of included items:
• Enclosure (comprised of top case, bottom case, and bridge card)
• USB 2.0 “Y” cable
• 3 collared Phillips machine thread screw to attach the drive to the bottom
case
• 1 standard Phillips machine thread screw to attach the top case to the
bottom case
• 1 Rubber foot w/ adhesive
You will need to provide your own 9.5mm slimline optical drive, such as the
mechanism found in many Apple MacBook or MacBook Pro models.
Assembly Instructions:
Remove the top cover of the enclosure by sliding it towards the front- it will
unlock and lift off.
Slide the drive mechanism through the front opening of the bottom case until
it the drive is fully inserted into the bridge card and is flush with the front of
the drive opening.
On the back and side of the enclosure you will see 3 cutouts for screws to be
inserted into the optical drive mechanism. Secure the optical drive mechanism
to the bottom case with the included Phillips collared screws.
NOTE: Some factory drives have aluminum foil covering the side of the drive mechanism. You can either
remove the foil, or simply screw through it.
Place the top cover back onto the enclosure from the front, and slide it back
onto it’s locking tabs to seal the enclosure.
Turn the enclosure over so you can see the bottom side. Insert the Phillips
screw with threads on the entire screw through the enclosure, into the top
cover you just installed, and tighten. Attach the included rubber foot on the
bottom of the enclosure.
To connect the external optical enclosure to your computer, attach the
included USB “Y” cable to the USB mini B port on the external case and the USB
A connector to your computer using the black USB connector with two wires
going into it.
Depending on the drive mechanism you installed, and the power of your USB
port, you may need to connect the second single gray body USB A connector from the included USB “Y” cable to another USB port on your computer.
Another option would be to purchase a separate standalone power supply available at:
http://eshop.macsales.com/search/OWCMOTGPWR
Most customers will not need either the “Y” cable or a standalone power cable
but can use the enclosure with any mini B USB to standard A USB cable.
We hope you enjoy your new external storage device!
R6 7/21/11 JD
Copyright ®2011 Other World Computing All Rights Reserved.
OWCMANVLSSASY
OWC’s 1 year Limited Warranty is not transferable and subject to limitations.