1
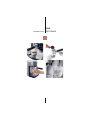
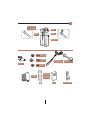
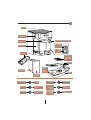
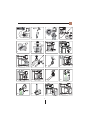
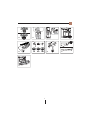
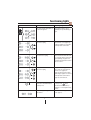
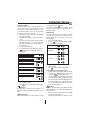
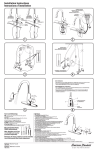
De’Longhi Appliances
via Seitz, 47
31100 Treviso Italia
571321574104.11
EC850
Instructions for use COFFEE MAKER
Milk frother lid with
froth regulator
CLEAN
button
Milk tube
Milk intake
tube
Milk container
Crema
filter 1 coffee
Crema filter
2 coffee
Filter-holder
cup
Power supply
cable (removable)
Measuring spoon /
tamper
Crema filter
ESE pods
Removable
water spout
Reactive strip
to detect water
hardness (Total
hardness test)
Descaler
2
Water softener filter
+*
*
*(-
+
!+(
')
-
%$%
&-+**
(
')
+*
!
*
.+
-,
')-
-1
*
'-
,
%$(
#
'
'#&
+*(+
+*/*+
%"0
$
%%&
(%&
)
$
%%&#&
+*(+
+*/*+
%"0
%$(+
)
0*+
%"0
3
$
#&
0,5 L
1
2
3
4
5
6
7
8
1
9
10
11
12
13
14
15
16
17
18
19
20
21
4
2
CLEAN
22
23
24
25
28
29
27
26
30
5
Functioning lights
Lights
Operation
en
Meaning of lights
Turn on from general ON/OFF switch, at
the back of the appliance.
The appliance performs a self-test,
signalled by the sequential flashing of
lights.
The appliance is on: no accessory is
connected to coupling.
The appliance is heating up to make
coffee: when the 1 or 2 cup lights stop
flashing, the appliance has reached the
ideal temperature to deliver coffee.
The appliance is on: the hot water spout
D7 is connected to coupling.
The appliance is heating up to make
coffee or to deliver hot water: when the
1 or 2 cup lights and the hot water spout
light stop flashing, the appliance has
reached the ideal temperature to deliver
coffee or hot water.
The appliance is on: the milk container is
connected to coupling.
The appliance is heating up to make
coffee, cappuccino or latte macchiato:
when the 1 or 2 cup lights, the
cappuccino and latte macchiato lights
stop flashing, the appliance has reached
ideal temperature to deliver coffee or
cappuccino or latte macchiato.
The appliance has been unused for 75
minutes for the ON/STAND-BY button
has been pressed.
The appliance is in STAND-BY: to switch it
back on, press the
button.
The time interval before stand-by is
adjustable: see section “Adjust Stand-by
interval”.
The tank is empty or the appliance
cannot deliver.
See section “ If something does not
work...” (page 13).
6
Safety warnings en
Symbols used in these instructions
The important recommendations have these symbols. These
warnings must be followed.
polystyrene) out of the reach of children.
Attention:
Do not allow the appliance to be used by persons (including
children) with reduced psycho-physical-sensorial capacities or
that have insufficient experience and knowledge, unless they
are carefully monitored and trained by a person responsible
for their safety. Watch children, do not let them play with the
appliance.
Danger!
Failure to comply can be or is the cause of injury due to lifethreatening electric shocks.
Attention!
Failure to comply can be or is cause of injury or damage to the
appliance.
Scalding hazard!
This appliance produces hot water and steam may form during
operation.
Pay attention not to come into contact with hot water sprays
or steam.
Do not touch the cup holder when the appliance is on because
it can get.
Scalding hazard!
Failure to comply can be or is the cause of scalding or burns.
Please note:
This symbol highlights recommendations and important
information for the user.
Fundamental warnings regarding safety
Complying with intended use
This appliance is manufactured for the preparation of coffee
and to heat beverages.
This appliance is intended exclusively for domestic use. It is not
intended for the use in:
t SPPNTVTFEBTLJUDIFOTGPSQFSTPOOFMJOTIPQTPóDFTBOE
other work areas
t GBSNIPMJEBZT
t IPUFMTNPUFMTBOEPUIFSSFDFQUJPOTUSVDUVSFT
t HVFTUIPVTFT
Any other use must be considered improper and therefore
dangerous. The manufacturer is not liable for damage deriving
from improper use of the appliance.
Danger!
As the appliance operates using electric current, electric shocks
can not be excluded.
Therefore, follow the safety recommendations given:
t %POPUUPVDIUIFBQQMJBODFXIFOZPVIBWFXFUIBOETPS
feet.
t %POPUUPVDIUIFQMVHXJUIXFUIBOET
t .BLF TVSF UIBU UIF TPDLFU VTFE DBO BMXBZT CF FBTJMZ
reached, so that the plug can be removed when required.
t 3FNPWFUIFQMVHGSPNUIFTPDLFUCZQVMMJOHEJSFDUMZPO
the plug itself. Do not pull the cable as damage could be
caused.
t 3FNPWF UIF QMVH GSPN UIF TPDLFU UP EJTDPOOFDU UIF
appliance completely.
t %P OPU BUUFNQU UP SFQBJS UIF BQQMJBODF JG JU TIPVME
breakdown.
Switch the appliance off, remove the plug from the socket
and contact the After-Sales Technical Assistance.
t *GUIFQMVHPSQPXFSTVQQMZDBCMFBSFEBNBHFEIBWFUIFN
replaced exclusively by the De’Longhi After-Sales Service,
in order to avoid risks
t %VSJOHDMFBOJOHOFWFSJNNFSTFUIFNBDIJOFJOXBUFSJU
is an electric appliance.
t #FGPSFQFSGPSNJOHBOZDMFBOJOHPQFSBUJPOTUPUIFFYUFSOBM
parts of the appliance, switch the machine off, remove the
plug from the socket and let the machine cool down.
Instructions for use
3FBEUIFTFJOTUSVDUJPOTDBSFGVMMZCFGPSFVTJOHUIFBQQMJBODFT
Failure to respect these instructions may result in personal
injury or damage to the appliance.
The manufacturer is not liable for damage as a result of failure
to comply with these user instructions.
Please note:
Keep these instructions carefully. If the appliance should
be transferred to other persons, these instructions must
accompany it.
Checking the appliance
After the packaging has been removed, check the integrity of
the appliance and the presence of all accessories. Do not use
the appliance if it is visibly damaged. Contact the Customer
Experience.
Attention:
Keep the packaging material (plastic bags, expanded
7
Instructions for use en
Installing the appliance
5IFöMUFSJTOPXBDUJWBUFEBOEUIFNBDIJOFDBOCFVTFE
Attention!
The following safety measures must be complied with when
installing the appliance:
t 5IFBQQMJBODFDPVMECFEBNBHFECZXBUFSJOöMUSBUJPO
Do not position the appliance near to water taps or sinks.
t 5IFBQQMJBODFDPVMECFEBNBHFEJGUIFXBUFSJUDPOUBJOT
freezes.
Do not install the appliance in a room where the
temperature can fall below freezing point.
t 1PTJUJPOUIFQPXFSTVQQMZDBCMFJOBXBZUIBUJUDBOOPUCF
damaged by sharp edges or by contact with hot surfaces
(e.g. electric plates).
Appliance first use
t 5VSOUIFBQQMJBODFPOCZQSFTTJOHUIF*0NBJOTXJUDIBU
rear in pos. I: the appliance performs a self-test, signalled
by the sequential flashing of the lights.
t 0ODF UIF TFMGUFTU JT DPNQMFUFE UIFiIPU XBUFS TQPVUw
light B8 flashes while the others turn-off: the appliance
TJHOBMTJUJTOFDFTTBSZUPJOTFSUUIFIPUXBUFSTQPVUöH
8).
t 1MBDF B DPOUBJOFS VOEFSOFBUI UIF TQPVU XJUI NJOJNVN
DBQBDJUZPGNMöH
t 1SFTTUIFiIPUXBUFSwCVUUPO
: delivery starts and
interrupts automatically.
t 5IF DPòFF BOE XBUFS TQPVU MJHIUT øBTI UP JOEJDBUF UIF
appliance is reaching temperature: when the lights stop
flashing and remain permanently on, the appliance is
ready for use.
Connecting the appliance
Attention!
.BLF TVSF UIBU UIF FMFDUSJD NBJOT WPMUBHF DPSSFTQPOET XJUI
that indicated on the data plate on the base of the appliance.
Insert the power supply cable connector in the socket on the
CBDLPGUIFBQQMJBODFöH
UIFOJOTFSUUIFQMVHJOUIFQPXFS
outlet.
Check that the mains power supply voltage corresponds to
the value indicated on the rating plate on the bottom of the
appliance.
If the power socket does not match the plug on the appliance,
IBWF UIF TPDLFU SFQMBDFE XJUI B TVJUBCMF UZQF CZ B RVBMJöFE
professional.
t
t
Please note: upon first use
*GMJHIUT
and
flash, press the
button
again.
6QPOöSTUVTFJUJTOFDFTTBSZUPNBLFDPòFFTPS
cappuccinos before the machine gives a satisfying result.
Settings of the programming menu
To access the menu, ensure the appliance is in stand-by,
and
until the ON/
simultaneously press buttons
Standby light flashes: the appliance is in programming mode.
4FUUIFNBDIJOFBTXBOUFEUPFYJUUIFQSPHSBNNJOHNFOV
press button
again.
Activation of the water filter and filling of the water
tank
t 3FNPWF UIF öMUFS GSPN UIF QBDLBHJOH BOE SJOTF JU XJUI
BCPVUMPGSVOOJOHXBUFSöH
t 5VSO UIF DBMFOEBS EJTD TFF öH VOUJM UIF GPMMPXJOH months of use are displayed.
Setting the temperature
If wanting to modify the water temperature with which coffee
is delivered, proceed as follows:
"DDFTTUIFQSPHSBNNJOHNFOV
pressed until the lights relative to the
2. Keep button
wanted temperature turn-on:
Please note
UIF öMUFS IBT B UXP NPOUI EVSBUJPO JG UIF BQQMJBODF JT VTFE
normally, whereas if the machine remains unused with the
öMUFSJOTUBMMFEJUIBTBNBYJNVNNPOUIEVSBUJPO
t 3FNPWFUIFXBUFSUBOLBOEöMMJUXJUIGSFTIXBUFSEPOPU
FYDFFEUIF."9MJOF
öH
t $PNQMFUFMZEJQUIFöMUFSJOUIFXBUFSUJMUJOHJUUPFOBCMF
BJSCVCCMFTUPDPNFPVUöH
t *OTFSUUIFöMUFSJOUIFBQQSPQSJBUFTFBUöH
QSFTTEPXO
and close the tank with the lid.
t 1MBDFUIFUBOLCBDLJOUPUIFNBDIJOF&OTVSFUIFXBUFS
MFWFMJTOPUPWFSUIF."9MJOF
öH
Low temperature:
.FEJVNUFNQFSBUVSF
High temperature:
3. When the lights relative to the desired selection turn-on,
release the button.
1SFTT
8
to turn the appliance off (stand-by).
Instructions for use en
Set the water hardness
The lights signalling the need to descale the appliance, after
a pre-set period of operation that depends on the hardness
of the water. It is possible to program the machine according
to the actual water hardness in use in the area, thus making
descaling less frequent. Proceed as follows:
3FNPWF UIF QSPWJEFE SFBDUJWF TUSJQ i505"- )"3%/&44
TEST” from its packaging.
2. Completely dip the strip into a glass of water for one
second.
3FNPWF UIF TUSJQ GSPN UIF XBUFS BOE TIBLF JU TMJHIUMZ
"GUFS BCPVU POF NJOVUF PS SFE TRVBSFT GPSN
EFQFOEJOHPOUIFIBSEOFTTPGUIFXBUFSSFETRVBSFT
very hard water).
"DDFTTUIFQSPHSBNNJOHNFOV
5. Once obtained the result of the strip, keep the “hot water”
button pressed until the lights turn-on, as in
following table:
button.
(stand-by) by pressing the
The appliance automatically turns off (stand-by) after 75
minutes of non-use: to change the non-use time, refer to
following paragraph.
Adjust Stand-by
The machine is pre-set to switch to stand-by after 75 minutes
PG OPOVTF 5IJT UJNF JOUFSWBM DBO CF NPEJöFE TP UIBU UIF
appliance switches off after 15 minutes or after 3 hours.
Proceed as follows:
"DDFTTUIFQSPHSBNNJOHNFOV
button pressed until the lights relative to
2. Keep the
the desired standby interval turn-on:
15 minutes:
75 minutes:
3 hours:
3. When the lights relative to the wanted selection turn-on,
release the button.
1SFTT
to turn the appliance off (stand-by).
How to prepare espresso using ground coffee
t *OTFSUUIFöMUFSGPSHSPVOEDPòFFJOUIFöMUFSIPMEFSöH
6TFUIFöMUFS
if wanting to make one coffee
PSUIFöMUFS
if wanting to make 2 coffees.
t 5PQSFQBSFPOFDPòFFöMMUIFöMUFSXJUIBMFWFMNFBTVSJOH
TQPPOPGHSPVOEDPòFFBCPVUHSöH
*GZPVXJTI
UPQSFQBSFUXPDVQTPGDPòFFöMMUIFöMUFSXJUIUXPMFTT
than-level measuring spoons of ground coffee (about
HS
'JMMUIFöMUFSXJUI TNBMM BNPVOUT BU BUJNF UP
prevent the coffee spilling out.
5. When the lights relative to the detected water hardness
turn-on, release the button.
6. Press
button to turn the appliance off (stand-by).
Attention:
'PS DPSSFDU VTF CFGPSF öMMJOH UIF öMUFS XJUI HSPVOE DPòFF
always make sure there is no residual coffee from the previous
JOGVTJPOJOUIFöMUFS
t %JTUSJCVUF UIF HSPVOE DPòFF FWFOMZ BOE QSFTT JU MJHIUMZ
VTJOHUIFDPòFFUBNQFSöH
Pressing the ground coffee is very important to obtain
Please note:
*G UIF XBUFS öMUFS JT DPSSFDUMZ VTFE TFU UIF NBDIJOF PO UP B
lower hardness level compared to that detected by the reactive
strip.
ON/OFF and stand-by
When the main switch is in pos. I, turn the appliance on and off
Instructions for use en
t
t
t
a good espresso. If excessively pressed, the coffee will
slowly leak and it will be stronger. Whereas, if slightly
pressed, the coffee will come out too quickly and will be
light.
3FNPWFBOZFYDFTTDPòFFGSPNUIFSJNPGUIFöMUFSIPMEFS
and attach it to the machine: for correct attachment, align
UIF öMUFSIPMEFS IBOEMF UP TZNCPM 01&/ öH BUUBDI UIF öMUFSIPMEFS BOE UVSO HSJQ UP UIF SJHIU VOUJM
aligned to position $-04&öH
1PTJUJPO UIF DVQ PS DVQT VOEFS UIF öMUFSIPMEFS TQPVUT
öH
*UJTBEWJTFEUPIFBUUIFDVQTCFGPSFNBLJOHUIF
coffee, rinsing them with hot water.
&OTVSF UIF MJHIUT SFMBUJWF UP UIF DPòFF CVUUPOT BSF PO
press the coffee buttons (
or
): the appliance
proceeds and interrupts automatically.
t
Scalding hazard!
5P BWPJE TQSBZT OFWFS SFMFBTF UIF öMUFSIPMEFS XIJMF UIF
machine is delivering and wait a few seconds after delivery.
Program the amount of coffee in the cup
The machine has been set by default to deliver standard
amounts. If wanting to amend these quantities, proceed as
follows:
1. Place a cup under the coffee spout.
2. Keep the button to be programmed (
or
)
pressed. The machine starts delivering coffee.
3. As soon as the wanted amount of coffee in cup is reached,
release the button: delivery stops.
The machine is now re-programmed according to the new
amount.
How to prepare espresso using pods
Please note:
use pods that comply with the ESE Standard: this will be
indicated on the packaging by the following mark.
How to prepare milk-based drinks
To avoid obtaining insufficiently frothed milk, or with large
bubbles, always clean the lid of the milk and the hot water nozzle
as described in the “cleaning the milk container” on page 12.
3FNPWFUIFMJEöH
2. Fill the milk container with sufficient amount of milk, not
FYDFFEJOHUIFNBYJNVNPGMöH
3FNFNCFSUIBU
every notch on the side of the container corresponds to
100 ml of milk.
The ESE Standard is a system accepted by
leading coffee pod manufacturers and allows
espresso coffee to be made simply and
without mess.
t
t
t
t
t
t
t
coffee button pressed (within 3 seconds) of delivery.
5VSOUIFHSJQGSPNSJHIUUPMFGUUPSFMFBTFUIFöMUFSIPMEFS
*OTFSUUIFöMUFSGPSQPETDPòFF
JOUIFöMUFSIPMEFS
öH
*OTFSUUIFQPEDFOUSJOHJUBTGBSBTQPTTJCMFPOUIFöMUFS
öH
"MXBZTGPMMPXUIFJOTUSVDUJPOTPGUIFQPEQBDL
GPSDPSSFDUQPTJUJPOJOHPGUIFQPEJOUIFöMUFS
"UUBDI UIF öMUFSIPMEFS UP UIF NBDIJOF GPS DPSSFDU
BUUBDINFOUBMJHOUIFöMUFSIPMEFSIBOEMFUPTZNCPM
01&/öH
BUUBDIUIFöMUFSIPMEFSBOEUVSOHSJQUPUIF
right, until aligned to position $-04&öH
1PTJUJPO UIF DVQ VOEFS UIF öMUFSIPMEFS TQPVUT *U JT
advised to heat the cup before making the coffee, rinsing
it with hot water.
&OTVSF UIF MJHIUT SFMBUJWF UP UIF DPòFF CVUUPOT BSF PO
press the coffee button
: the appliance proceeds
and interrupts automatically.
t
Please note!
'PSBNPSFEFOTFBOEIPNPHFOPVTGSPUIVTFTLJNNFE
or partially skimmed milk at refrigerator temperature
(about 5° C).
3. Ensure the milk intake tube is correctly inserted in
appropriate seat envisioned at bottom of the milk
DPOUBJOFSMJEöH
1MBDFUIFMJEPOUIFNJMLDPOUBJOFSBHBJO
3FNPWFUIFIPUXBUFSTQPVUGSPNUIFOP[[MF
"UUBDICZJOTFSUJOHUIFDPOUBJOFSUPUIFOP[[MFöH
7. Set-up the machine to make coffee (see par. “how to
prepare espresso”).
8. Place the cup for cappuccino or the glass for Latte
.BDDIJBUPVOEFSUIFDPòFFTQPVUBOEBSSBOHFUIFNJML
TQPVUöH
*GVTJOHUBMMDVQTPSHMBTTFTSFQPTJUJPOUIF
DVQIPMEFSBTTIPXOJOöH
7BSZ UIF GSPUI SFHVMBUPS EFQFOEJOH PO UIF BNPVOU PG
GSPUIXBOUFEBOEUZQFPGNJMLVTFEöH
Please note:
8IJMF UIF NBDIJOF JT QSFQBSJOH UIF DPòFF UIF DBO CF
stopped at any time by pressing the previously pressed
coffee button.
0ODF EFMJWFSZ JT DPNQMFUFE JG XBOUJOH UP JODSFBTF UIF
amount of coffee inside the cup, keep the previously pressed
10
Instructions for use en
To prepare the Cappuccino: press button
1SPHSBNUIFBNPVOUPGDPòFFJODVQBTGPSUIFBNPVOUPG
milk.
1SPHSBNNJOH JT DPOöSNFE CZ UIF MJHIUT øBTIJOH GPS seconds.
The machine is now re-programmed according to the new
amounts of milk and coffee.
.
.
To prepare the latte macchiato: press button
"GUFS IBWJOH EFMJWFSFE UIF GSPUIFE NJML UIF NBDIJOF
automatically prepares the coffee.
t
t
t
t
Please note!
'PSBIPUUFSDBQQVDDJOPJUJTBEWJTFEUPQSFTTUIF$-&"/
button to heat the ducts of the milk frother device (see
successive paragraph).
5P QSFQBSF UIF DBQQVDDJOP PS UIF MBUUF NBDDIJBUP UIF
BQQMJBODF QFSGPSNT EFMJWFSJFT öSTU UIF NJML BOE
subsequently the coffee. If wanting to interrupt the
delivery in progress, press the previously pressed button.
0ODF EFMJWFSZ JT DPNQMFUFE JG XBOUJOH UP JODSFBTF UIF
amount of milk or coffee inside the cup, keep the button
(within a few seconds) relative to the preparation in
progress pressed.
%POPUMFBWFUIFNJMLDPOUBJOFSPVUPGUIFSFGSJHFSBUPSGPS
too long: the higher the milk temperature (5°C is ideal),
the poorer is the quality of the froth
Preparing the hot water
Scalding hazard!
Do not leave the machine unattended when delivering hot
water. The spout heats up during delivery therefore, only the
black part must be held.
$IFDLUIFIPUXBUFSTQPVUJTDPSSFDUMZBUUBDIFEöH
2. Place a cup under the spout (as near as possible to avoid
sprays).
3. Press the
CVUUPO öH UIF SFMBUJWF MJHIU øBTIFT
and the appliance starts hot water delivery.
5IFNBDIJOFBVUPNBUJDBMMZTUPQTEFMJWFSZ
t
Cleaning the milk frother device using the CLEAN
button
After every use of the milk functions, perform cleaning to
eliminate the milk residues as follows:
1. Leave the milk container inserted in the machine (it is not
necessaryUPFNQUZUIFNJMLDPOUBJOFS
2. Place a cup or other container under the frothed milk
spout tube.
,FFQ UIFi$-&"/w CVUUPO öH QSFTTFE MJHIUT
and
flash. When the lights stop flashing and the
appliance goes back to ready for use, release the “CLEAN”
button: the steam cleans the circuits inside the milk
frother.
Please note!
5PNBOVBMMZJOUFSSVQUUIFIPUXBUFSEFMJWFSZQSFTT
button again.
Programming the amount of water automatically
delivered
If wanting to amend the set by default amount, proceed as
follows:
1. Place a cup under the spout.
2. Keep the
button pressed.
3. When the hot water in the cup reaches the required level,
SFMFBTF UIF CVUUPO 1SPHSBNNJOH JT DPOöSNFE CZ UIF
lights flashing for three seconds.
The machine is now re-programmed according to the new
amount.
Cleaning
Program the amount of coffee and milk in the cup for
cappuccino or milk
The machine has been set by default to deliver standard
amounts. If wanting to amend these quantities, proceed as
follows:
1. Place a cup under the spouts of the coffee spout and under
the milk spout tube.
2. Press the button relative to the preparation with milk to
be programmed and keep it pressed. After a few seconds,
the machine starts delivering the milk.
3. As soon as the wanted amount of milk in cup is reached,
release the button milk delivery stops.
t
t
t
11
Attention!
%P OPU VTF TPMWFOUT BCSBTJWF EFUFSHFOUT PS BMDPIPM UP
clean the machine.
0OMZ UIF NJML DPOUBJOFS %
DBO CF XBTIFE JO UIF EJTI
washer. No other part of the appliance can be washed in
the dishwasher.
%P OPU VTF NFUBM PCKFDUT UP SFNPWF DPòFF EFQPTJUT
or fouling as they might scratch the metal or plastic
surfaces.
Instructions for use en
Cleaning the drip tray
Descaling
flashes on the
Descale the machine when the light
control panel. Proceed as follows:
3FNPWFUIFXBUFSöMUFS'JMMUIFUBOLXJUIUIFEFTDBMJOH
solution obtained by diluting the descaler with water on
the basis of the indications given on the pack.
*OTFSUUIFIPUXBUFSTQPVUöH
3. Place one container under the boiler outlet and one under
UIFIPUXBUFSTQPVUöH
BOEFOTVSFUIFESJQUSBZJT
empty and correctly inserted.
and
buttons: light
4JNVMUBOFPVTMZQSFTTUIF
turns on (if the hot water spout has not been
inserted, the light flashes).
button. Descaling is signalled by the
5. Press the
LED that alternate in sequence. The descaling program
automatically performs a series of deliveries from the
boiler outlet and from the hot water spout at intervals, to
remove the lime scale from inside the coffee machine.
6. Once the descaling solution is terminated, the light
turns on to indicate rinsing is necessary.
7. To eliminate the solution and lime scale residues, rinse the
UBOLBOEöMMJUXJUIGSFTIXBUFSXJUIPVUEFTDBMFS
FNQUZ
the containers and place them under the boiler outlet and
hot water spout.
button: rinsing starts and all LEDs flash in
8. Press the
sequence.
3JOTJOHTUPQTXIFOUIFUBOLJTFNQUZSJOTFBOEUPQVQ
the tank.
10. Light
turns on: press the relative button: delivery
starts and interrupts automatically.
The appliance is now ready for use.
3FQBJSTUPUIFDPòFFNBDIJOFSFMBUJWFUPMJNFTDBMFQSPCMFNT
are not covered by the warranty if the descaling procedure
described above is not performed on a regular basis.
Attention!
The drip tray is equipped with a floating water level
JOEJDBUPSSFE
öH "T TPPO BT UIJT JOEJDBUPS TUBSUT
protruding from the cup tray, empty the tray and clean it,
otherwise the water may overflow and damage the machine,
and the surrounding work-top.
3FNPWFUIFESJQUSBZöH
3FNPWFUIFDVQUSBZEJTQPTFPGUIFXBUFSöH
BOE
clean the tray using a cloth: then re-assemble the drip
tray.
3FJOTFSUUIFESJQUSBZ
Cleaning the coffee filters
3FHVMBSMZDMFBOUIFDPòFFöMUFSTSJOTJOHUIFNVOEFSSVOOJOH
water. Check that the holes are not blocked. If they are, clean
UIFNVTJOHBQJOöH
Cleaning the boiler outlet
3JOTFUIFCPJMFSPVUMFUFWFSZDPòFFTEFMJWFSFECZEFMJWFSJOH
0.5l of water from the boiler outlet (place a cup under the
spouts and then press thebutton to deliver a coffee without
using coffee powder).
Cleaning the milk container
Clean the milk container after each milk preparation, as
described below:
1. Extract the lid.
3FNPWF UIF NJML TQPVU UVCF BOE UIF JOUBLF UVCF öH
28).
3FNPWFUIFGSPUISFHVMBUPSCZCZQVMMJOHJUPVUöH
$BSFGVMMZDMFBOBMMDPNQPOFOUTVTJOHIPUXBUFSBOEBNJME
detergent. All components can be washed in the
dishwasher by positioning them on the upper rack
of the dishwasher. Pay particular attention that milk
residues do not remain inside the holes and in the groove
on the narrow part of the froth regulator.
5. Also check that the intake tube and the spout tube are not
obstructed by milk residues.
3FBTTFNCMF UIF DVSTPS UIF TQPVU UVCF BOE UIF NJML
intake tube.
7. Place the lid on the milk container again.
Technical data
.BJOTWPMUBHF
7˜50/60Hz
"CTPSCFEQPXFS
8
Sizes LxHxD:
305x275x320 mm
Thermoblock:
Stainless steel/Aluminium
Pressure:
15 bar
Water tank capacity:
1L
Power supply cable length:
1.2 m
Weight:
7 kg
Replacing the filter
After two months of duration (see calendar), or if the appliance
JT OPU VTFE GPS XFFLT SFQMBDF UIF öMUFS BT EFTDSJCFE JO
QBSBHSBQIi"DUJWBUJPO PG UIF TPGUFOFS öMUFS BOE öMMJOH PG UIF
tank”.
12
Disposal
t
t
t
t
The appliance is in compliance with the following CE
Directives:
4UBOECZ%JSFDUJWF
-PX 7PMUBHF %JSFDUJWF $& BOE TVDDFTTJWF
BNFOENFOUT
&.$%JSFDUJWF$&BOETVDDFTTJWFBNFOENFOUT
5IFNBUFSJBMTBOEPCKFDUTEFTUJOFEUPDPNFJOUPDPOUBDU
with food stuffs are in compliance with the provisions of
UIF&VSPQFBO4UBOEBSE
Disposal
3FDPNNFOEBUJPOTGPSUIFDPSSFDUEJTQPTBMPGUIFQSPEVDU
JODPNQMJBODFXJUIUIF$&&VSPQFBO%JSFDUJWF
and Legislative Decree n. 151 dated 25 July 2005.
The product must not be disposed of as urban waste at the end
of its working life. It must be taken to appropriate local authority
separate waste collection centres or to dealers providing this
service. Disposing of a household appliance separately avoids
possible negative consequences for the environment and
health deriving from unsuitable disposal and allows to recover
UIFNBUFSJBMTPGXIJDIJUJTNBEFJOPSEFSUPNBLFTJHOJöDBOU
savings of energy and resources. The product has the crossedout wheeled bin mark as a reminder of the obligation to dispose
of household appliances separately. The illegal disposal of the
product by the user entails the application of administrative
sanctions envisioned by the Standard in force.
13
Troubleshooting en
Problem
Possible causes
Solution
The device will not switch on
The power supply cable is not inserted
correctly
Check that the power supply cable
connector is fully inserted in the
appropriate socket on the back of the
EFWJDFUIFODIFDLUIBUUIFQMVHJT
correctly connected to the power outlet
Espresso coffee does not flow out
No water in the tank
Fill the water tank
5IFIPMFTJOUIFöMUFSIPMEFSBSFCMPDLFE
$MFBOUIFIPMFTJOUIFöMUFSIPMEFSTQPVUT
The espresso boiler outlet is blocked
Clean as indicated in the “Cleaning”
paragraph
5IFöMUFSIPMEFSJTOPUDPSSFDUMZJOTFSUFE
or is dirty
"UUBDIUIFöMUFSIPMEFSDPSSFDUMZBOEUVSO
JUGVMMZIPNFöSNMZ
The espresso boiler gasket has lost
elasticity or it is dirty
3FQMBDFUIFFTQSFTTPCPJMFSHBTLFUBUBO
After-Sales Centre
5IFIPMFTJOUIFöMUFSIPMEFSTQPVUBSF
blocked
Clean the holes in the spouts.
5IFöMUFSIPMEFSEPFTOPUIPPLPOUPUIF
device
5PPNVDIDPòFFXBTQPVSFEJOUIFöMUFS
6TFUIFNFBTVSFQSPWJEFEBOENBLFTVSF
UPVTFUIFDPSSFDUöMUFSGPSUIFUZQFPG
preparation desired.
Loud pump noise
The water tank is empty
Fill the tank
The tank is inserted incorrectly and the
valve on the bottom is not open
Press the tank lightly to open the valve
on the bottom
The ground coffee has not been
sufficiently pressed
Increase pressing of the ground coffee
Not enough ground coffee
Increase the amount of ground coffee
5IFDPòFFJTOPUHSPVOEöOFMZFOPVHI
0OMZVTFDPòFFHSPVOETQFDJöDBMMZGPS
espresso coffee machines
Incorrect type of ground coffee
Change the quality of the ground coffee
Espresso coffee drips from the edges of
UIFöMUFSIPMEFSJOTUFBEPGUISPVHIUIF
holes
The coffee cream is clear (it flows quickly
from the spout)
"GUFS DPòFF EFMJWFSZ UIF öMUFS SFNBJOT
attached to the boiler outlet
*OTFSUUIFöMUFSIPMEFSBHBJOUIFO
remove it.
After the coffee has been prepared, the
pod or coffee powder remains attached to
the boiler outlet
3FJOTFSUUIFöMUFSIPMEFSEFMJWFSDPòFF
SFNPWFUIFöMUFSIPMEFS
Troubleshooting en
Problem
Possible causes
Solution
The coffee cream is dark (it flows slowly
from the spout)
The ground coffee is too tightly pressed
Press the coffee less
Large amount of ground coffee
Decrease the amount of ground coffee
The espresso boiler outlet is blocked
Perform cleaning as indicated in par.
“cleaning the boiler outlet”
5IFöMUFSJTCMPDLFE
Perform cleaning as indicated in par.
iDMFBOJOHUIFöMUFSw
5IFDPòFFJTUPPöOFMZHSPVOE
0OMZVTFDPòFFHSPVOETQFDJöDBMMZGPS
espresso coffee machines
5IFHSPVOEDPòFFJTUPPöOFPSJTEBNQ
0OMZVTFDPòFFHSPVOETQFDJöDBMMZGPS
espresso coffee machines and it must not
be too damp
Incorrect type of ground coffee
Change the quality of the ground coffee
powder
The milk is not cold enough
Always use milk at refrigerator
temperature
The cursor of the milk frother lid is not in
correct position
Ensure to have positioned the cursor in
froth position
The milk container lid is dirty
Clean the milk lid as described in par.
“Cleaning the milk container”.
No water in the tank
Fill the water tank
The tank is inserted incorrectly and the
valve on the bottom is not open
Press the tank lightly to open the valve
on the bottom
*ODPSSFDUMZJOTUBMMFEXBUFSöMUFS
"DUJWBUFUIFöMUFSCZGPMMPXJOHUIF
indicated procedure
The ground coffee is too tightly pressed
Press the coffee less
The espresso boiler outlet is blocked
Perform cleaning as indicated in par.
“cleaning the boiler outlet”
5IFöMUFSJTCMPDLFE
Perform cleaning as indicated in par.
iDMFBOJOHUIFöMUFSw
The milk does not froth when making a
cappuccino
The machine does not deliver any drink
and
flash for
and the lights
a few seconds.
The machine does not work and all lights
flash
Immediately disconnect the appliance
and contact an authorised after-sales
assistance centre
15