1
Memory Function
When being live again after a power failure of up to approx. 10 minutes, the program will
continue from the same point. However, if the power cut lasts for more than 10 minutes, the
actual baking program will not be continued.
Tip: However, after you have cancelled the baking process by pressing the START/STOP
button for 2 seconds, all previously entered settings will be lost. In this case, you must start the
baking process again (see: ›Tips for Best Results‹). Thus, for short interruptions (e.g. for adding
further ingredients) it is best to unplug the appliance.
Using the Timer
The timer function enables delayed baking. The selected time is the time of completion for the
currently active baking program. The maximum delay is 13 hours, indicated via 13:00. The
minimum delay is the processing time of the currently selected baking program.
Tip: Do not use the timer function when working with quickly spoiling ingredients such as
eggs, milk, cream or cheese. The quality of these ingredients will degrade, when not cooled.
1. At first, select the program (MENU), loaf size (LOAF), and degree of browning (COLOR).
See: Starting the Baking Process
2. Thereafter, use the TIME+ and TIME– buttons to set the delay time shown on the LCD screen.
Press TIME+ to increase the delay time at the increment of 10 minutes. TIME– decreases the set
time at the increment of 10 minutes.
Example: Now it is 8:30 p.m., and you would like your bread to be ready in the next morning
at 7 o’clock. For this set the timer to 10:30.
Tip: The delay time is including the baking time of the chosen program. Thus, after the delay
time elapsed, there is hot bread in the Bread Maker ready for being served after leaving it
cool down for some minutes.
Thus the shortest selectable time is the pre-set duration of the baking program.
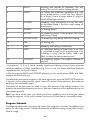
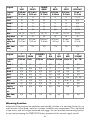
The programs 6, 7, 10, 11, 12, and 13 do not allow any timer operation.
NOTE: With the programs BAKE or YOGHURT, the buttons TIME+ and TIME– are used to set
up the processing time.
3. Press START/STOP to start the delay time.
The dots of the time display flash and the LCD screen will count down to show the remaining
time. You will get fresh bread at the desired time. (In this example: at 7:00 in the morning).
If you don’t wish to take out the bread immediately, the keeping warm time of 1 hour starts.
(See: ›Warming Function‹)
Tips for Best Results
For a successful baking process, please consider the following factors:
• Never use larger quantities than those specified in the recipes in this booklet. Do not fill in more than 750 g in total. Too much dough can rise out of
the bread pan and drop onto the hot heating elements, thus causing risk of
fire and electric shock.
• Take the bread pan out of the heating compartment, before filling in the ingredients. If ingredients reach the heating elements, a fire may be caused due to heating up on the heating
elements.
46