1
Instruction Manual
UPPER ARM
BLOOD PRESSURE MONITOR
● Do not wrap the cuff over jacket / sweater sleeve, or measurement cannot be done.
● Keep in mind that blood pressure naturally varies from time to time throughout the
day and is affected by lots of different factors such as smoking, alcohol
consumption, medication, and physical activities.
● Blood pressure measurements taken with the unit are equivalent to those obtained
by a trained observer using thecuff / stethoscope auscultation method and are
within the accuracy limits prescribed by the American National Standard for
Electronic or Automated Sphygmomanometers.
● Wait 30 ~ 45 minutes before measurement if you have just consumed caffeinated
beverages or smoked cigarettes.
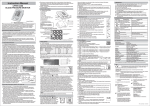
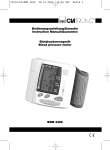
3. Device Description
3-1. Name of the parts
Model BPM701
Medical Disclaimer
This manual and product are not meant to be a substitute for advice provided by
your doctor or other medical professional. You are not to use the information
contained herein, or this product for diagnosing or treating a health problem or
prescribing any medication. If you have or suspect that you have a medical
problem, promptly consult your healthcare provider.
Blood Pressure Monitor Intended Use
The device is designed for non-invasive measurements and monitoring of adults’
arterial blood pressure. It measures human's systolic blood pressure, diastolic blood
pressure and heart rate on the arm by oscillometric measurement method.
The device is recommended for use by people over the age of 18 and is for home
use and not clinical use.
*Attention!
To operate the device properly and get the best result from it, please read the
Instruction Manual thoroughly before you begin measuring and keep it carefully
so that you can access and consult it at any time.
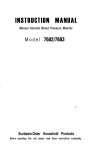
1. LCD DISPLAY
2. AIR PLUG
3. ARM CUFF
4. AIR JACK
5. CUFF TUBE
6. START/STOP BUTTON
7. RECALL MEMORY BUTTON
8. MODE BUTTON
9. SET BUTTON
10. UM-4(AA)1.5 V x 4
ALKALINE BATTERIES
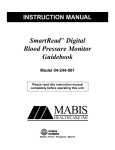
TIME
SYS. Hg
mm
DATE
DIA. Hg
mm
PULSEN.
/MI
M
* Figure No.3
3-2. Description of display symbols
1-1. What is blood pressure ?
Blood pressure is a measurement of the force of blood flowing against the walls of
the arteries. Arterial blood pressure is constantly changing during the course of the
cardiac cycle. The highest pressure in the cycle is called the systolic blood pressure
and the lowest is the diastolic blood pressure. Both of pressure readings, the systolic
and the diastolic, are necessary to enable a physician to evaluate the status of a
patient's blood pressure. Many factors such as physical activity, anxiety or the time of
day can influence your blood pressure. Blood pressure is typically low in the morning
and increases from the afternoon to the evening. It is lower in the summer and higher
in the winter.
1-2. Why is it useful to measure blood pressure at home?
Having one's blood pressure measured by a doctor in a hospital or a clinic, and a
group health checks, tends to stimulate nervousness in the subject and may even
create high blood pressure, blood pressure also varies in accordance with a variety of
conditions and so judgment is not possible on the basis of a single measurement.
The blood pressure measured first thing in the morning after getting up, before taking
any food and with the subject still, is known as the fundamental blood pressure. In
practice it is rather difficult to record the fundamental blood pressure, but to come as
near as possible to measuring the blood pressure in an environment that is close to
this is why it is useful to take the measurement at home.
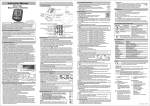
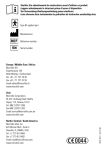
A. WHO blood pressure classifications
Standards for assessment of high or low
Severe hypertension
110
blood pressure without regard to age, have
Moderate hypertension
105
100
been established by the World Health
Mild hypertension
95
90
High normal
Organization (WHO), as shown in the chart.
85
Normal
80
Optimal
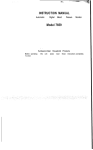
B. Variations in blood pressure
120 130 140 150 160 170 180
Individual blood pressures vary greatly
* Figure No.1
both on a daily and a seasonal basis.
These variations are even more pronounced in hypertense patients.
(Hypertense: means a person who has high blood pressure symptom.)
Normally the blood pressure rises while at work
and is at its lowest during sleeping period. The
graph below illustrated the variations in blood
pressure over a whole day with measurement
taken every five minutes. (The thick line
represents sleep. The rise in blood pressure at 4
PM <A in the graph> and 12 PM <B in the
* Figure No.2
graph> correspond to an attack of pain.)
2. Important information before use of the unit
● Please rest for at least 5 ~ 10 minutes before taking the measurement.
● To allow your blood vessels to return to the condition prior to taking the
measurement, please wait at least 3 ~ 5 minutes between measurements. You
may need to adjust the wait time according to your personal physiological situation.
● If you have one of the circulatory problems as arteriosclerosis, diabetes, liver
disease, kidney disease, severe hypertension, peripheral circulation......, please
consult your doctor or healthcare professional before using the devices.
● Blood pressure measurements should be interpreted by a physician or trained
health professional who is familiar with one's medical history. By using the unit
regularly and recording the results for the physician to interpret, one can keep
physician informed of the continuing trends in one's blood pressure.
● Wrap the cuff snugly around your arm, the cuff must be at the same level as your
heart.
● Do not move the unit during measurement, or accurate measurement can not be
achieved.
● Take measurement in a relaxed position without talking.
6-2. Setting Date and Time:
A. Press "MODE" button ("month" starts flashing). Press "SET" button to set the
current month.
B. Press "MODE" button ("date" starts flashing). Press "SET" button to set current
date.
C. Press "MODE" button ("hour" starts flashing). Press "SET" button to set current
hour.
D. Press "MODE" button ("minute" starts flashing). Press "SET" button to set current
minute.
E. Press "MODE" button to save the settings.
*Note!
When taking repeat measurements, make sure to select the same memory
zone so that the measurements are recorded in the appropriate memory.
C. After inflation of the cuff, the pressure will slowly decrease and when a pulse is
detected, the HEART RATE SYMBOL will start flashing.
MONTH/ DATE HOUR: MINUTE
*Note!
If the cuff does not stop inflating, remove the cuff at once.
SYSTOLIC PRESSURE
D. When the measurement is finished, the systolic pressure, diastolic pressure,
heart rate will be displayed for 1 minute.
E. The monitor will automatically shut off after 1 minute if without any operation.
BLOOD PRESSURE UNIT
1. About Blood Pressure
6-1. Insert batteries in position:
A. Open battery cover.
B. Refer to the picture in positioning batteries.
C. All segments will appear on the display in 3 seconds.
6-3. Steps to take blood pressure measurement:
A. Press "SET" button to select a particular memory zone (1,2, or 3).
B. Press "START/STOP" button to start
measurement.
The monitor will automatically inflate to
the level that is right for you.
10
*Caution!
Substitution of a component
different from that supplied
might result in measurement
error.
6. How to Measure
DIASTOLIC PRESSURE
LOW BATTERY
MEASURING ERROR SYMBOL
MEMORY NUMBER
HEART RATE
* Figure No.4
PULSE SYMBOL
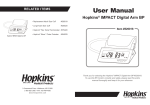
4. Inserting/ Changing Batteries
When the low battery symbol
appears on the display, please change the
batteries.
Replace all the batteries with new ones and do not mix new and old batteries.
Do not mix alkaline, standard
(carbon-zinc) or rechargeable
(cadmium) batteries either. It may
shorten the battery life or cause the
device to malfunction.
* Figure No.5
Remove the battery cover at the back
of the unit and insert 4 pieces AA alkaline batteries into battery compartment.
Make sure the polarities “+” and “–“ ends are properly positioned.
*Attention!
● Batteries are hazardous waste. Do not dispose them together with the
household garbage. Please take the used batteries to the recycling collection
point according to your local regulations.
● Keep the battery away from small children.
● To prolong the battery life and prevent damage caused by leakage, remove
the batteries from the device if the device is not to be used for a long period.
● Memories (if any) will not be deleted during battery replacement.
● After replacing the batteries, reset the date and time.
5. Attaching arm cuff
5-1. Press your brachial artery by two fingers approximately 1 inch
above the elbow on the inside of your left arm.
5-2. Determine where your strongest pulse is. Slide the end of arm
cuff furthest from the tube through the metal ring to a loop.
The smooth cloth should be on the inside of the cuff.
5-3. If the cuff is located correctly, the Velcro will be on the outside
of the cuff and metal ring will not touch your skin.
5-4. Put left arm through the cuff loop. The bottom of the cuff should
be approx. 0.5 inch above elbow. The cuff should lie over the
brachial artery on the inside of the arm.
5-5. Pull the cuff so that the top and bottom edges are tightened
around your arm.
5-6. When the cuff is positioned properly, press the Velcro firmly
against the pile side of the cuff.
5-7. Sit on a chair and place your arm on the table so that the cuff is
at the same level as your heart.
5-8. Relax your arm and turn your arm upward.
5-9. Make sure there are no kinks in the air tube.
Elbow
Pile Side
Material
Velcro
Smooth
Metal ring
Bottom Edge
1/2 Inch(1.5cm)
Cuff Tube
Cuff Tab
6-4. Storing, recalling and erasing measurement data:
A. Storing data:
After each measurement, the systolic and diastolic pressure, heart rate with the
time and date will be automatically stored. The monitor features a 3 zone memory
capability. Each memory zone holds the last 40 measurements, replacing the
oldest data with new one.
B. Recalling data:
a. Press "SET" button to select memory zone.
b. Press "MEMORY" button to enter Memory Mode. The average of last 3
measurement data will first appear on the display.
*Note!
● If there is no data in the selected memory zone, nothing (except month, date,
time and memory zone) will appear on the display.
● If there is 1 data in the selected memory zone , the measurement data will
appear on the display.
● If there are 2 data in the selected memory zone, the average of the 2 data will
appear on the display.
c. Press "MEMORY" button. The latest measurement data will appear with the
number as well as the recording date and time. Data are recalled from the
latest measurement to the oldest.
d. Press "MEMORY" button to read the next measurement data.
e. To stop reading stored data, press "START/STOP" button.
C. Erasing data:
a. Press "SET" button to select the memory zone (1, 2 or 3), then press
"MEMORY" button.
b. Press and hold "MODE" and "SET" buttons simultaneously, all stored data,
including the average reading, in the selected memory zone will be erased.
c. To confirm the data has been erased, press "MEMORY" button, no data
(except month, date, time and memory zone number) should appear.
8. Display Messages/Troubleshooting
Display mark
Condition/Cause
Pulse
Flashes on the LCD when pulse is
symbol
detected during measurement.
Measurements in progress.
Do not move or talk.
Battery symbol Appears when the battery voltage is
excessively low.
Replace all four batteries with new ones.
Insert the batteries in correct polarities.
Measuring
error symbol
Appears when the accurate blood
pressure could not be obtained.
Corrective action
Press "START/STOP" button again to re-measure.
Or check cuff if wrapped properly around the arm
and according to instructions. Check palm if exerting
effort. Check if there is movement during
measurement. Check if posture is correct.
9. Specifications
BPM701
Oscillometric
Pressure 0 ~ 300 mmHg
Pulse 40 ~ 199 beats/minute
Pressure +/- 3 mmHg
Accuracy
Pulse +/- 5% Max
Automatic inflation (Air Pump)
Inflation
Automatic exhaust valve
Exhaust
Liquid Crystal Display
Display
14.5 x 10.6 x 6.5 cm (L x W x H)
Dimension
Approx. 355 g with batteries
Unit Weight
3 databases of 40 memories each = total 120 sets
Sets of memory
Arm circumference approx. 23 ~ 33 cm/ 9 ~ 13 inch
Cuff size
+10 °C to + 40 °C, less than 85% R.H.
Operating Temperature
- 20 °C to + 70 °C, less than 85% R.H.
Storage Temperature
Power Supply
"AA" (1.5 V) Alkaline battery x 4
Battery Life
About 6 months when used once a day
Auto Power Off
Whenever not used for 1 minute
Accessories
4 pcs "AA" (1.5 V) battery, arm cuff with tube,
instruction manual, pouch.
These specifications are subject to change without notice for purpose of improvement.
Model Number
Method of Measurement
Range of measurement
Note
This blood pressure monitor complies with the EC Directive and bears the CE
“CE0197”. This blood pressure monitor also complies with mainly
0197 mark
following standards,(included but not limited)
Safety standard:
EN 60601-1 Medical electrical equipment part 1: General requirements for safety
EMC standard:
EN 60601-1-2 Medical electrical equipment part 1-2: General requirements for safety- Collateral
standard: Electromagnetic compatibility- Requirements and tests
Performance standards:
EN 1060-1 Non-invasive sphygmomanometers - General requirements
EN 1060-3 Non-invasive sphygmomanometers - Supplementary requirements for
electromechanical blood pressure measuring systems.
EN 1060-4 Non-invasive sphygmomanometers - Test procedures to determine the overall
system accuracy of automated non-invasive sphygmomanometers.
Important /Note! Read the operating
instructions.
Consult instructions thoroughly before
use.
Classification:
- Internally powered equipment
- BF type applied part
- IPX0
- Not suitable for use in presence of
flammable anaesthetic mixture with
air or with Oxygen or nitrous oxide
- Continuous operation with short-time
loading
To avoid inaccurate results caused by
electromagnetic interference between
electrical and electronic equipments, do
not use the device near a cell phone or
microwave oven.
Discard the used product to the recycling
collection point according to local
regulations.
Manufacturer:
HEALTH & LIFE Co., Ltd.
9F, No. 186, Jian Yi Road,
Chung Ho City 235, Taipei, Taiwan
Authorized Representative in the
European Community
EMERGO EUROPE
Molenstraat 15, 2513 BH,
The Hague, The Netherlands
TEL : +31-70-3458570
FAX : +31-70-3467299
Distributor:
Sabre Nederland b.v.
Ellermanstraat 23
1099 BX Amsterdam the Netherlands
● To ensure precise measurement
reading, recalibration of the device is
recommended after 2 years from the
date of purchase. Shipping plus
handling cost and recalibration service
fee shall be charged accordingly.
7. Maintenance
7-1. Clean the device body, case and the cuff carefully with a clean, soft and slightly
dampened cloth and then wipe them dry with another piece of dry cloth.
7-2. Do not use thinner, alcohol, petrol (gasoline) or any strong cleansers to clean.
7-3. Do not wash the cuff or make it wet, and never use chemical cleaner on it.
7-4. Do not in any way twist the cuff.
7-5. Make sure no water will enter the main unit.
7-6. When the unit is not to be used for a long time, remove the batteries. (Leaking of
battery liquid can cause damage.)
7-7. Do not attempt to disassemble or change any parts of the monitor, including cuff.
7-8. If any suggestion or service is requested please consult your service station.
7-9. Do not place the item directly under the sunlight, in high temperature, or humid and
dusty places.
7-10. Do not store in extremely low (less than – 20 °C) or high (more than 70 °C)
temperature.
7-11. To avoid accidental strangulation, keep this product away from children and do not
drape tube around neck.
P/N: 323101291
VER:001
GEBRUIKSAANWIJZING
AUTOMATISCHE BOVENARM
BLOEDDRUKMETER
● Breng de manchet niet aan over de mouw van een jas of trui want dan kan de
meting niet uitgevoerd worden.
● Denk eraan dat uw bloeddruk van nature in de loop van de dag kan variëren
en dat de waarden ook door een aantal andere factoren beïnvloed worden
zoals roken, alcoholverbruik, medicatie en fysieke activiteiten.
● De bloeddrukmetingen van dit apparaat zijn equivalent aan de waarden die
met de manchet/ stethoscoop methode door een geoefend persoon bekomen
worden en ze vallen binnen de normen vastgesteld door de Amerikaanse
Nationale Standaard voor Geautomatiseerde Bloeddrukmeters.
● Wacht 30 ~ 45 minuten alvorens een meting uit te voeren als u
cafeïnehoudende dranken hebt genuttigd of een sigaret gerookt heeft.
3. Beschrijving van de bloeddrukmeter
3-1. Benaming van de onderdelen
MODEL BPM701
MEDISCHE GEBRUIKSVOORWAARDEN
Deze gebruiksaanwijzing en dit product zijn niet bedoeld als vervanging voor het advies van uw arts
of van een professionele paramedicus. U mag dus dit product of de bijhorende informatie niet
aanwenden om een gezondheidsprobleem te diagnosticeren of te behandelen, of om enige vorm
van medicatie voor te schrijven. Als u een gezondheidsprobleem hebt, of vermoedt dat u er een hebt,
moet u onmiddellijk een medicus raadplegen.
Bloeddrukmeter met de volgende functies
Dit product is ontworpen voor niet-indringbare metingen op volwassenen van de
systolische en diastolische bloeddruk en het meten van de hartslag op de bovenarm
door middel van de oscillometrische methode.
Dit apparaat is bedoeld voor thuisgebruik (niet in ziekenhuizen) door mensen van
18 jaar en ouder.
1. LCD display
2. Luchtslang
3. Arm manchet
4. Luchtslang aansluiting
5. Manchet slang
6. START/STOP toets
7. GEHEUGEN OPROEP toets
8. MODE toets
9. SET toets
10. UM-4 (AA) 1,5V x 4
Alkaline batterijen
TIME
SYS. Hg
mm
DATE
DIA. Hg
mm
PULSEN.
/MI
M
10
* Waarschuwing
Vervanging van een onderdeel
anders dan de bijgeleverde
kan leiden tot meet fouten.
* Figuur no 3
Uren : minuten
* Attentie!
Lees deze gebruiksaanwijzing aandachtig door alvorens het apparaat in gebruik
te nemen en bewaar hem voor latere referentie.
Diastolische bloeddruk
1-1. Wat is bloeddruk?
Bloeddruk is de druk of kracht waarmee het bloed drukt of vloeit langs de wanden van
de aders. Die druk verandert voortdurend tijdens het pompen van het hart. De
systolische druk is de hoogste druk van de cyclus en de diastolische bloeddruk is de
laagste. Beide metingen, de systolische en de diastolische, vormen de essentiële
informatie die de dokter nodig heeft om de toestand van iemands bloeddruk te
beoordelen. Daarnaast kunnen heel wat andere factoren de bloeddruk beïnvloeden:
fysieke activiteit, stress, het tijdstip van de dag. De bloeddruk is ‘s morgens doorgaans
lager en wordt van de namiddag tot de avond hoger. ’s Zomers is de bloeddruk lager
dan ’s winters.
1-2. Waarom is het nuttig om uw bloeddruk thuis te meten ?
Wanneer iemand zijn bloeddruk door een dokter laat meten in het ziekenhuis is de
meting meestal hoger omdat de patiënt nerveuzer is en daardoor gaat de bloeddruk
stijgen. De bloeddruk verandert ook in functie van de omstandigheden. Een
beoordeling op basis van één enkele meting is dus niet betrouwbaar.
De bloeddruk die ’s morgens vroeg, na het opstaan en nog voor het ontbijt, gemeten
wordt, staat bekend als de fundamentele bloeddruk. Daarom is het nuttig de bloeddruk
thuis te meten.
A. WGO bloeddruk classificaties
Diastolisch
Ernstige hypertensie
110
Door de Wereld Gezondheids Organisatie
Gemiddelde hypertensie
105
100
(WGO) zijn normen voor hoge en lage
Milde hypertensie
95
90
bloeddruk vastgesteld, ongeacht de leeftijd,
Hoog normaal
85
Normaal
80
zoals in bijgaande grafiek te zien is:
Optimaal
120 130 140 150 160 170 180
Systolisch
B. Variaties in bloeddruk
Systolische bloeddruk
De bloeddruk van een individu varieert in
*Figuur no 1
hoge mate in de loop van een dag of
naargelang het seizoen. Die verschillen komen nog meer tot uiting bij patiënten die
aan hypertensie lijden. Normaal gezien is de bloeddruk het hoogst wanneer men
aan het werk is, en het laagst tijdens de slaap. (Hypertensie: betekent dat de
persoon lijdt aan de symptomen van een te hoge bloeddruk)
Deze grafiek illustreert de schommelingen in
bloeddruk over een volledige dag. De waarden
werden om de vijf minuten gemeten.
De dikke lijn vertegenwoordigt de slaapperiode.
De hogere waarden om 16u00 (punt A in de
grafiek) en om 24u00 (punt B in de grafiek)
komen overeen met een pijnaanval.
Systolische druk
* Figuur no 2
2. Belangrijke informatie voor het gebruik van dit apparaat
● Neem 5 ~ 10 minuten rust alvorens een meting uit te voeren.
● Om uw bloedvaten terug te laten keren naar de status vóór de meting, dient u een
pauze van 3 ~ 5 minuten tussen metingen aan te houden. Deze wachttijd kunt u
aanpassen al naar gelang uw fysieke conditie.
● Als u een van de volgende aandoeningen heeft: arteriosclerosis, diabetes, lever- of
nier klachten, ernstige hypertensie, of bloedsomloop problemen, dan dient u uw
huisarts of specialist te raadplegen alvorens de bloeddrukmeter te gebruiken.
● Bloeddrukmetingen moeten geïnterpreteerd worden door een dokter of door een
professionele paramedicus die vertrouwd is met het medisch verleden van de patiënt.
Door de bloeddruk¬meter regelmatig te gebruiken en de resultaten nauwkeurig bij te
houden, kunt u uw dokter op de hoogte houden van de evolutie van uw bloeddruk.
● Wikkel de manchet stevig, maar niet te strak, rond uw bovenarm. Bij het meten dient
de manchet op hart hoogte te worden gehouden.
● Beweeg niet tijdens de meting, want dan kan er geen exacte meting uitgevoerd
worden.
● Meet uw bloeddruk in een ontspannen houding en zonder te praten.
Diastolische druk
Lege batterij symbool
Meetfout symbool
Geheugen nummer
Hartslag
* Figuur no 4
Puls symbool
4. Plaatsen/Vervangen van de batterijen
Als het batterij symbool [
] oplicht dient u de batterijen te vervangen. Vervang alle
batterijen tegelijk en mix geen oude en nieuwe batterijen door elkaar. Mix ook geen alkaline,
standaard (carbon-zink) of oplaadbare batterijen (cadmium) door elkaar. Dit bekort de batterij
levensduur en kan schade veroorzaken aan het apparaat. Verwijder het afdekplaatje van het
batterijenvakje aan de achterkant van de
bloeddrukmeter en stop de 4 stuks AA
alkalinebatterijen in het vakje zoals
getoond op de afbeelding. Zorg ervoor
dat de polariteiten + en – van de batterijen
overeenstemmen met die van het apparaat.
* Figuur no 5
* Attentie !
● Lege batterijen horen niet in het milieu. Gooi ze niet weg, maar lever ze in bij
een KCA punt.
● Houd batterijen verwijderd van kleine kinderen.
● Om de levensduur van de batterijen te verlengen en schade door lekkage te
voorkomen, raden wij u aan de batterijen te verwijderen als u het apparaat
gedurende langere tijd niet gebruikt.
● Geheugens (indien aanwezig) worden niet gewist tijdens het verwisselen van
de batterijen.
● Nadat u de batterijen vervangen heeft, dient u de tijd en de datum opnieuw in
te stellen.
5. Aanbrengen van de arm manchet
5-1. Druk met 2 vingers uw slagader in op ongeveer 1.5cm boven de
elleboog aan de binnenkant van uw linkerarm
5-2. Stel vast waar uw puls het sterkst is. Schuif de manchet met het
gedeelte waar de luchtslang aan zit het verst van u verwijderd
door de metalen ring. Het gladde gedeelte van de manchet dient
aan de binnenkant te zitten.
5-3. Als de manchet correct geplaatst is, zit het Velcro gedeelte aan
de buitenkant en dient de metalen ring uw huid niet te raken.
5-4. Schuif de manchet over uw arm, de onderkant van de manchet
dient ongeveer 7cm boven de elleboog te zitten. De manchet
dient over de slagader aan de binnenkant van uw arm te liggen.
5-5. Trek aan de manchet zodat deze stevig (maar niet te strak) om
uw arm ligt.
5-6. Als de manchet correct geplaatst is, drukt u het Velcro gedeelte
stevig aan.
5-7. Ga op een stoel zitten en plaats uw arm op een tafel zodanig dat
de manchet zich op harthoogte bevindt.
5-8. Ontspan uw arm en draai hem naar boven.
5-9. Let erop dat er geen knik in de luchtslang zit.
* Opmerking!
● Als u een herhaal meting doet, dient u dezelfde geheugen zone te kiezen
voordat u op de "START/STOP" toets drukt, zodat de meting in diezelfde
zone wordt opgeslagen.
* Opmerking!
● Als de manchet niet stopt met het oppompen, dient u de manchet ogenblikkelijk te
verwijderen.
Bloeddruk eenheden
1. Over bloeddruk
6-1. Inbrengen van de alkaline batterijen:
A. Open het afdekklepje van het batterijenvak
B. Raadpleeg de illustratie om de juiste positie van de batterijen te
kennen (fig no 5)
C. Alle segmenten verschijnen na 3 seconden op de display.
6-2. Instellen van de datum en tijd:
A. Druk op de "MODE"-toets : de maand knippert. Druk op de "SET" toets om de
juiste maand in te stellen.
B. Druk nogmaals op de "MODE"-toets : de dag knippert. Druk op de "SET" toets
om de juiste dag in te stellen.
C. Druk nogmaals op de "MODE"-toets : de uren knipperen. Druk op de "SET"
toets om de juiste uren in te stellen.
D. Druk nogmaals op de "MODE"-toets : de minuten knipperen. Druk op de "SET"
toets om de juiste minuten in te stellen.
E. Druk een laatste maal op de "MODE"-toets om de instellingen op te slaan.
6-3. Stappen om de bloeddruk te meten:
A. Druk op de "SET" toets om een geheugen
zone te kiezen (1, 2 of 3)
B. Druk op de "START/STOP" toets om de
meting te starten. De lucht in de manchet
wordt automatisch op een voor u geschikt
niveau opgepompt.
C. Wanneer de manchet op druk gekomen is, zal de druk langzaam afnemen. Op het
ogenblik dat de hartslag gedetecteerd wordt, begint het hart-symbool
te knipperen.
3-2. Beschrijving van de symbolen op de display
Maand / dag
6. Het meten van de bloeddruk
Elbow
D. Na de meting van de bloeddruk verschijnen de systolische druk, de diastolische
druk en de hartslag gedurende 1 minuut op de display.
E. Het apparaat schakelt automatisch uit na 1 minuut als u geen toets indrukt.
6-4. Opslaan, oproepen en wissen van meetresultaten:
A. Opslaan van gegevens :
Na elke bloedddrukmeting worden de systolische druk, de diastolische druk, de
hartslag en de datum & uur automatisch opgeslagen. Het geheugen heeft 3 zones,
elke zone kan tot 40 metingen opslaan. Wanneer er nieuwe meetresultaten
bijkomen, worden de oudste gewist.
B. Oproepen van gegevens.:
a. Druk op de "SET" toets om de geheugen zone te kiezen.
b. Druk op de "MEMORY" toets om in de geheugen stand te komen. Het
gemiddelde van de laatste 3 metingen verschijnt eerst in de display.
* Opmerking!
● Als er nog geen meetresultaten zijn, wordt ook niets getoond. (behalve
maand, dag, tijd en geheugen zone)
● Als er een meetresultaat is, worden de meetresultaten getoond.
● Als er 2 meetgegevens in de gekozen geheugen zone zijn, wordt het
gemiddelde over die 2 metingen getoond.
c. Druk op de "MEMORY" toets, de gegevens van de laatste meting verschijnen
alsmede het geheugen nummer met de opgeslagen datum en tijd. De
metingen worden opgeroepen in volgorde van de nieuwste naar de oudste.
d. Druk op de "MEMORY" toets om de volgende opgeslagen gegevens te lezen.
Op de display ziet u ook het volg nummer van dat meetresultaat.
e. Om de uitlezing te stoppen, drukt u op de "START/STOP" toets.
C. Wissen van gegevens.
a. Druk op de "SET" toets om de geheugen zone (1, 2 of 3) te kiezen, druk dan
op de "MEMORY" toets.
b. Houdt de "MODE" en de "SET" toets tegelijkertijd ingedrukt, alle opgeslagen gegevens,
inclusief de gemiddelde meting in de gekozen geheugen zone zijn nu gewist.
c. Om te controleren of de resultaatgegevens gewist zijn, drukt u op de "MEMORY"
toets en dan mogen er geen gegevens (behalve tijd, maand, dag en geheugen
zone)op de display verschijnen.
7. Onderhoud
Pile Side
Material
Velcro
Smooth
Metal ring
Bottom Edge
1/2 Inch(1.5cm)
Cuff Tube
Cuff Tab
7-1. Gebruik een doek met water of een zachte zeep om de behuizing en de manchet te
reinigen en wrijf droog met een andere droge doek.
7-2. Gebruik geen benzine of andere sterke detergenten om uw bloeddrukmeter/ manchet te
reinigen.
7-3. Was de manchet nooit en maak hem niet nat, gebruik ook geen chemische
schoonmaakmiddelen.
7-4. Verdraai de manchet op geen enkele wijze.
7-5. Zorg ervoor dat er geen vocht in de behuizing komt.
7-6. Wanneer de bloeddrukmeter gedurende langere tijd niet gebruikt zal worden, kunt u er
best de batterijen uithalen. Het lekken van batterijen kan een defect veroorzaken.
7-7. Probeer niet de behuizing open te maken om delen te verwisselen, inclusief de manchet.
7-8. Indien service nodig is, dient u hem bij de zaak waar u hem gekocht heeft in te leveren.
7-9. Houd de bloeddrukmeter verwijderd van direct zonlicht, extreme temperaturen of hoge
luchtvochtigheid en stof.
7-10. Bewaar het apparaat niet bij extreem lage (onder -20°C) of hoge (boven 70°C)
temperaturen.
7-11. Om verstikkings gevaar te voorkomen, dient u het apparaat uit de buurt van kinderen
te houden en ervoor te zorgen dat ze de luchtslang niet om hun nek kunnen wikkelen.
8. Display symbolen en oplossen van storingen
Gebruikt symbool
Omstandigheid / oorzaak
Hartslag
Knippert op het LCD -scherm
symbool
wanneer een hartslag waargenomen
wordt tijdens de meting.
Lege batterijen Verschijnt wanneer het voltage van
de batterij uiterst laag is of de
symbool
batterijen verkeerd ingebracht zijn.
Meetfout
Verschijnt wanneer de
symbool
bloeddrukwaarden niet kunnen
gemeten worden
Te nemen maatregel
De meting is aan de gang.
Niet bewegen of praten.
Vervang de batterijen door nieuwe.
Breng de batterijen in volgens de aangegeven
polariteiten.
Druk nogmaals op de "START/STOP" knop en
begin de meting opnieuw. Controleer of de manchet
volgens de instructies aangebracht werd.
Controleer of de bovenarm positie correct is.
9. Specificaties
BPM701
Oscillometrisch
Druk: 0 ~ 300 mmHg
Hartslag 40 ~ 199 slagen per minuut
Bloeddruk: ± 3 mmHg
Precisie
Pols: ± 5 % max.
Automatisch (lucht pomp)
Oppompen
Automatische luchtaflaat
Aflaten
Liquid Crystal Display
Display
14.5 x 10.6 x 6.5 cm (L x W x H)
Afmetingen
Ong. 355 gram (inclusief batterijen)
Gewicht
3 databases van 40 geheugens = 120 geheugens
Geheugen
Voor armomtrek van ongeveer 23 ~ 33 cm
Afmeting manchet
+10°C tot + 40°C bij minder dan 85 % Relatieve Vochtigheid
Operationele temperatuur
-20°C tot + 70°C bij minder dan 85 % Relatieve Vochtigheid
Opbergtemperatuur
Voeding
Alkaline batterij: 4 x AA (1,5V)
Levensduur batterij
Ongeveer 6 maanden bij gebruik 1x per dag
Automatisch afslaan
Indien 1 minuut niet gebruikt
Accessoires
4 AA (1,5V) batterijen,handleiding, arm manchet met
luchtslang, opberg etui
Specificaties kunnen zonder voorafgaand bericht worden gewijzigd voor verbeterings doeleinden.
Model nummer
Meetmethode
Meetbereik
Nota
De bloeddrukmeter voldoet aan de Europese richtlijn en draagt de “CE0197”
Deze bloeddrukmeter voldoet tevens aan de volgende
0197 markering.
standaards (inclusief, maar niet begrensd)
Veiligheid standaards
EN60601-1: Medisch elektrische uitrusting deel 1. Algemene vereisten voor veiligheid
EMC standaards
EN60601-2: Medische elektrische uitrusting deel 1-2 Algemene vereisten voor veiligheid –
bijkomstige standaard: Elektro-magnetische comptabiliteit – Vereisten en tests
Prestatie standaards
EN 1060-1 Niet-indringbare sphygmomanometers – Algemene regelgeving
EN 1060-3 Niet-indringbare sphygmomanometers – Aanvullende regelgeving voor
electromechanische bloeddruk meet systemen
EN 1060-4 Niet-indringbare sphygmomanometers- Test procedures voor het vaststellen
van de algemene nauwkeurigheid van geautomatiseerde niet-indringbare
sphygmomanometers.
Belangrijk ! Lees de gebruiksaanwijzing
Lees de gebruiksaanwijzing aandachtig
door voor gebruik
Classificatie:
- intern gevoed apparaat
- BF type toegepast onderdeel
- IPX0
- Niet geschikt voor gebruik bij
ontvlambare anaestatische mix van
lucht met Oxygen of nitrous oxide
- Continue bediening met korte laadtijd
Om onnauwkeurige resultaten te
voorkomen veroorzaakt door
elektromagnetische storingen tussen
elektrische en elektronische apparaten
dient u het apparaat niet te gebruiken in
de nabijheid van een mobiele telefoon
of magnetron.
Lever een niet meer gebruikt apparaat in bij
een recycle station volgens plaatselijke
regelgeving.
Fabrikant:
HEALTH & LIFE Co., Ltd.
9F, No. 186, Jian Yi Road,
Chung Ho City 235, Taipei, Taiwan
Geautoriseerde vertegenwoordiger in
de Europese Unie:
EMERGO EUROPE
Molenstraat 15, 2513 BH,
The Hague, The Netherlands
TEL : +31-70-3458570
FAX : +31-70-3467299
Distributeur:
Sabre Nederland b.v.
Ellermanstraat 23
1099 BX Amsterdam the Netherlands
● Om verzekerd te zijn van een nauwkeurige
meting, raden wij aan het apparaat elke 2
jaar vanaf de aankoop te laten kalibreren.
Verzend/behandelings kosten alsmede
het kalibreren is voor rekening van de klant.
P/N: 323101291
VER:001