1
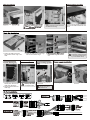
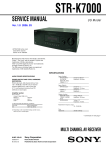
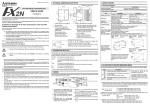
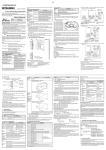
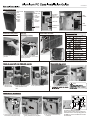
C50.K7000.00
Case component
Multi-media
port
Power LED
HDD LED
Power
switch
button
Reset
switch
button
Remove front panel
Pre-drilled
holes for
water-cooling
system tube
5.25”
mounting
bracket
3.5”
mounting
bracket
12cm fan
12cm fan
with filter
Ventilator for
PCI slot
Remove
mounting bracket
ODD
module
HDD
module
Removable fan filter
(12)
(3)
(1)
(6)
(22)
(31)
(1)
(6)
Pull the front panel toward
yourself.
(1)
Press the mounting bracket
(right & left sides) to remove the
mounting bracket.
(22)
Note:
1. Remove four
thumb screws.
2. Slide the side panel back
word backward of the
case.
3. Lift up the side panel.
1.
Motherboard
1. Loosing two thumb screws to
remove the motherboard tray
2. Slide the motherboard tray
gently towards the front panel
3. Lift up the motherboard tray
to remove
According to M/B specification,
select proper screws points, engage the
standoffs into the corresponding points of
the M/B tray, secure the M/B with screws
the standoffs.
ODD installation
Disassemble the ODD
ODD
ODD
ODD
1. Fasten the HDD screws with
anti-vibration rubber rings to the
HDD.
HDD cage can be
turned 180 degree.
1. Loosing all screws on the
bottom panel, then turn the
HDD cage 180 degree.
2. Secure all screws to fix the
HDD cage.
2. Place the HDD into the HDD cage
with the anti-vibration rings.
Cable management
M/B tray with cable
Note: management clips
Note:
Adding extra M3 screws to secure
the ODD for traveling.
Pull and hold the plastic handle first,
and push the ODD towards the front
panel.
anti-vibration rings fix into the
slot.
Adding another screws on
both sides of HDD brackets
Note: to prevent the HDD loosing
by an accidental bump.
Pre-drilled holes for
water-cooling system
tube
Using the tool to poke the
water holes
Please be careful while
handing to avoid an
incised wound.
1. Push in gently.
2. Fasten four thumb-screws
to secure.