1
Bedienungsanweisung
1
…touch the difference
Inhaltsverzeichnis
1. Einleitung und technische Parameter
2. Hardware-Installation
3. Software-Installation und Anwendung
• Microsoft Windows Mobile OS
• Google Android OS
• Symbian OS
• Windows XP mit IVT
• Windows XP mit Broadcom
• Linux OS
4. Kompatibilitäts-Liste der Tastatur
5. Produkt-Übersicht
6. Wartung und Pflege
1. Einleitung und technische Parameter
•
•
•
•
•
•
•
•
•
Extrem kleine, kabellose Kombination aus Super-MiniTastatur mit integriertem Touchpad und Fernbedienung mit
Laser-Pointer für Präsentationen
Weitreichende und zuverlässige Bluetooth Funkübertragung bis ca. 10 m Entfernung
Integriertes Touchpad mit 2 Mausfunktionstasten,
die Eingaberichtung kann um 90° gedreht werden
Modernes Design mit flachen Notebook-Tasten
8 Multimedia-Hotkeys für Hintergrundbeleuchtung,
Bildschirm-Druck, Stumm, Leiser, Lauter, Rückwärts,
Play/ Pause & Vorwärts
Status-LEDs für Transmitting, Akku laden, niedrige
Batteriekapazität & Pairing sowie Caps Lock
Plug & Play-Installation, kein Treiber notwendig
Inklusive Bluetooth-Adapter im Aufbewahrungsfach
Optimal zur Steuerung von Home-Entertainment-Anlagen
(HTPC), für mobile Anwendungen mit Smartphones,
zum Spielen mit der Sony Playstation3, NaviKonfigurationen, Schulungs-, Konferenz- und
Präsentationsräume
*PC / Endgeräte müssen Standard-Tastaturtreiber mit zugehöriger
Länderkennung einwandfrei unterstützen.
2
Bedienungsanweisung
Eigenschaften
Anzahl Tasten:
Bauart:
Zu erwartende Lebensdauer:
Betätigung:
Druckpunkt:
Übertragungsfrequenz:
Übertragungsprotokoll /
Übertragungsprofil:
Ausgangsleistung:
Effektive Funkreichweite:
Batterietyp:
Spannungsversorgung:
Stromaufnahme ca.:
Temperatur:
Lieferumfang:
Farbe:
Zertifiziert:
Kompatibilität:
70 + 2 Maustasten
SoftTouch-Membrantechnologie
ca. 5 Mio. Anschläge/ Taste
1,7 ±0,3 mm (Gesamtweg)
55 ±15 g
2,401 – 2,48 GHz ISM Band,
GFSK, 79 Kanäle Frequency
Hopping
Bluetooth V2.0 EDR / Human
Interface Device (HID)
0 dBm (Klasse 2)
bis max. 10 m
Eingebauter
Lithium-Ionen-Akku
Betrieb: 3,3 VDC
Aufladen: 4,2 V - 5,05 V
Betrieb: <80 mA
Aufladen: <300 mA
Betrieb und Lagerung:
-10 °C bis +55 °C
Tastatur, USB-Bluetooth
-Adapter, Mini-USB2.0Ladekabel, Bedienungsanleitung, InstallationsCD für Mobiltelefon-Software
Schwarz
CE, FCC, WEEE/RoHS,
REACH
PC: Windows 98, Me, 2000,
XP, Vista, Windows7, Linux,
Sony Playstation3
Mac: Mac OS 10.2.8 oder
neuer
Mobil: Google Android
System*, Microsoft Windows
Mobile 5.0* oder neuer,
Nokia Symbian S60 System*
*siehe Kompatibilitätsliste
3
…touch the difference
Systemvoraussetzungen für Mobiletelefone
•
•
Das Gerät muss mit einem Bluetooth-Modul ausgestattet
sein.
Das mobile Betriebssystem sollte eines der folgenden sein:
− Google Android System (nicht alle Smartphone-Typen)
− Microsoft Windows Mobile 5.0 oder neuer
− Nokia Symbian S60 System
Systemvoraussetzungen für PCs und Notebooks
z Bluetooth-fähiger PC unter Windows 98, Me, 2000, XP, Vista
oder Windows7 (integriertes BT-Modul oder USB- Adapter)
z Bluetooth-fähiger Macintosh unter Mac OS 10.2.8 oder
neuer
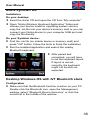
2. Hardware-Installation
Wichtig: Wenn Sie die Tastatur zum ersten Mal benutzen, ist
der enthaltene Akku wahrscheinlich leer, Sie sollten ihn für
20-30 Minuten aufladen.
Pairing Taste
EIN/AUS-Schalter
Buchse für USB
Lade-Kabel
Aufladen des Akkus
Verbinden Sie die Bluetooth-Tastatur mit dem beiliegende
USB-Ladekabel mit einer USB-Buchse ihres Computers (das
Kabel befindet sich in der Verpackung unten). Während des
Ladevorgangs leuchtet die zweite LED rot, ihr Licht verringert
sich mit Erhöhung des Ladezustands.
Installation:
1. Stecken Sie den beiliegenden Bluetooth-Adapter in eine
USB-Buchse Ihres Computers. In der Tray-Leiste rechts
unten wird das Bluetooth-Symbol erscheinen.
2. Klicken Sie doppelt auf das Bluetooth-Symbol. um den
Bluetooth-Assistenten zu starten.
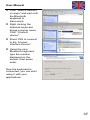
4
Bedienungsanweisung
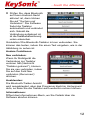
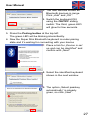
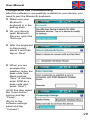
3. Im Fenster erscheinen alle
Bluetooth-Geräte in
Reichweite, klicken Sie auf
„Hinzufügen“ und „OK“.
4. Schalten Sie Ihre Tastatur am
EIN/AUS-Schiebeschalter ein.
Die dritte, grüne LED wird für
einige Sekunden
aufleuchten.
5. Drücken Sie die Pairing-Taste links oben: Die grüne LED
wird periodisch blinken.
6. Nun befindet sich die Super-Mini Bluetooth-Tastatur im
Pairing-Status und versucht sich mit Ihrem Gerät zu
verbinden.
7. Setzen Sie im
Bluetooth-Assistenten ein
Häkchen bei „Gerät ist
eingerichtet und kann
erkannt werden“ und
bestätigen Sie mit „Weiter“.
8. Wählen Sie die erkannte
Tastatur aus, die im nächsten
Fenster angezeigt wird.
9. Im nächsten Fenster lassen
Sie die Markierung bei
„Hauptschlüssel automatisch
auswählen“
und gehen „Weiter“.
5
…touch the difference
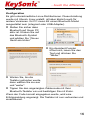
10. Tippen Sie nun den
vorgegebenen
Hauptschlüssel mit Ihrer
Bluetooth-Tastatur ein und
bestätigen mit „Enter“.
Beenden Sie anschließend
den Bluetooth-Assistenten
entsprechend der Abfrage.
Beenden Sie den Bluetooth-Assistenten mit einem
abschließenden Klick auf „Fertig stellen“. Die Bluetooth
Tastatur ist nun einsatzbereit und funktionstüchtig. Manchmal
dauert es eine Weile, bis der Pairing-Vorgang beendet ist.
Beim Schreiben mit der Tastatur bzw. bei der Nutzung des
Touchpads blinkt die erste, gelbe LED und zeigt damit die
Bluetooth-Übertragung zum Computer an.
3. Software-Installation und Anwendung
Microsoft Windows Mobile OS
Installation
Verbinden Sie Ihr Mobil-Gerät über den USB-Anschluss mit
Ihrem Computer.
Auf Ihrem Computer:
•
•
•
•
Legen Sie die Treiber-CD ein und öffnen Sie sie vom
“Arbeitsplatz”.
Suchen Sie den Ordner “Mobil” und darin die CAB-Datei
“windowsmobile.cab” (Bluetooth-Eingabe-Treiber).
Öffnen Sie ActiveSync auf dem Bildschirm und klicken Sie
auf Durchsuchen
Kopieren Sie die CAB-Datei auf Ihr Mobilgerät. Man kann
die Datei durch Drag & Drop vom Ordner des PCs in den
Ordner Eigene Dateien auf ihrem Mobilgerät ziehen.
Auf Ihrem Windows Mobile-Gerät:
•
•
Gehen Sie zu Start > Programme > Durchsuchen > Eigene
Dateien
Starten Sie die „windowsmobile.cab“ Datei (anklicken)
6
Bedienungsanweisung
•
Der Bluetooth Tastatur-Treiber wird nun auf Ihrem Gerät
installiert. Am Ende der Installation wird man Sie zu einem
Neustart auffordern.
Konfiguration und Fehlerbehebung
Nach erfolgreicher Installation der Software müssen Sie die
Bluetooth-Tastatur nun mit ihrem Gerät verbinden (Pairing).
• Prüfen Sie, dass sich
die Tastatur im
Pairing-Status
befindet.
• Öffnen Sie den
Ordner Bluetooth
Geräte auf Ihrem
Mobil-Gerät und
klicken Sie auf
“Neues Gerät
hinzufügen”.
• Nachdem die Tastatur
erkannt wurde,
wählen Sie sie aus
und klicken auf
“Weiter”.
• Wenn Sie
aufgefordert werden,
einen Zahlencode
einzutippen, lassen
Sie dieses Feld bitte
leer und klicken
“Weiter” (bei Fehlermeldung geben Sie
0000 mit der Tastatur
ein und drücken
“Weiter”).
• Wählen Sie
“Eingabegerät” als
Service aus und
klicken Sie auf Sie auf
„Beenden”.
7
…touch the difference
• Gehen Sie zum Menü Software-Einstellungen und klicken
Sie auf “Verbinden”.
Hier folgen einige Lösungen, wenn Fehlermeldungen
auftreten sollten:
"Die Software reagiert nicht. Sie müssen die Software neu
installieren."
Diese Fehler werden durch ein Kommunikationsproblem
zwischen den Software-Komponenten verursacht. Prüfen Sie,
ob Ihr Windows Mobile-Gerät mit der Software kompatibel ist
und versuchen Sie, die Software neu zu installieren.
„Bluetooth ist ausgeschaltet. Um die Software anzuwenden,
aktivieren Sie bitte Ihr Bluetooth-Modul!"
Prüfen Sie beim Anwenden der Software, ob Sie ein
Smartphone mit Windows Mobile (5.0 oder neuer) inkl.
Microsoft Bluetooth-Paket haben. Dann aktivieren Sie
Bluetooth bevor Sie die Software anwenden.
"Nicht aktiviertes Eingabegerät gefunden. Verbinden Sie
das Gerät über das Bluetooth-Menü."
Prüfen Sie, ob Ihre Bluetooth-Tastatur korrekt mit Ihrem
Smartphone verbunden ist. Falls der Fehler auftritt, wenn die
Tastatur bereits verbunden ist, wiederholen Sie den
Pairing-Vorgang.
Einstellungen
Um das Menü
“Einstellungen” zu öffnen,
gehen Sie auf Start->
Einstellungen->System
TAB, klicken Sie auf das
Symbol "Bluetooth
Eingabe Treiber".
Die “Einstellungen” zeigen mehrere Seiten für einen
besseren Zugriff auf die Software-Optionen:
8
Bedienungsanweisung
Tastaturen-Seite
Diese Seite bietet 2
Optionen: aktivieren /
deaktivieren der
Tastatur-Funktionalität
und des TastaturKlanges.
Status-Seite
Hier können Sie den Status
sehen und den Treiber auf
Autostart konfigurieren
(gleichzeitig mit dem Start
von Windows Mobile) sowie
das Symbol im Tray
aktivieren / deaktivieren.
Dieses Symbol erlaubt einen
schnellen Zugriff auf die
Einstellungen.
Informationen-Seite
Die “Informationen”
zeigen die SoftwareVersion und weitere
nützliche Informationen.
Google Android OS
Android ist ein Open Source Betriebssystem für mobile Geräte,
es ist frei und quelloffen. Damit kann jeder Hersteller von
Mobilgeräten die Software individuell anpassen und ändern.
Das führt unter Umständen zu Kompatibilitätsproblemen mit
anderen Geräten wie z. B. Ihrer Bluetooth-Tastatur.
Da ständig neue Smartphones auf den Markt gebracht werden,
können wir die Kompatibilität zur Tastatur nicht für alle Modelle
garantieren. Eine Auswahl finden Sie in der
Kompatibilitätsliste ab Seite 17.
9
…touch the difference
Der Treiber auf der beiliegenden CD ist nur für das
Google-G1 Smartphone notwendig und benutzbar. Bereits
ab Google G2 (Android 2.2 OS) ist der Treiber im
Betriebssystem enthalten und die Verbindung kann ohne
zusätzlichen Treiber aufgebaut werden. Auch Samsung
Galaxy-Telefone benötigen keinen extra Treiber. Mit einigen
HTC-Geräten ist leider gar keine Verbindung möglich, da HTC
ein geschlossenes Bluetooth-Profil benutzt. Keine BluetoothTastatur am Markt kann sich mit diesen HTC-Geräten
verbinden.
Installation des Treibers (nur für Google-G1)
Auf Ihrem Computer:
•
•
Legen Sie die Treiber-CD ein und öffnen Sie sie vom
“Arbeitsplatz”.
Öffnen Sie den “Android” Ordner und kopieren Sie die
Datei “android.apk” auf die Speicherkarte von Android.
Auf Ihrem Android-Gerät:
•
Öffnen Sie “Markt” und installieren Sie die “AppManager”
Software oder eine andere Android Manager-Software:
•
•
•
Öffnen Sie die
AppManager Software
und klicken Sie die
MENÜ Taste
Klicken Sie auf
Installieren von SD
Starten Sie die Datei
android.apk
Beim erstmaligen Installieren des Bluetooth-Tastatur-Treibers
auf Ihrem Android-Gerät werden Sie aufgefordert, die
Software zu aktivieren:
10
Bedienungsanweisung
Wenn Sie auf Abbrechen klicken oder kein Internet verfügbar
ist, ist keine Aktivierung möglich und Sie können die Software
nicht nutzen.
Stellen Sie sicher, dass Android mit dem Internet verbunden
ist und drücken Sie OK. Sie müssen das nach der Installation
nur einmal tun.
Installation mit vorhandenem Treiber
Nachdem der Bluetooth Tastaturtreiber erfolgreich installiert
wurde oder bereits vorhanden ist, müssen Sie die Tastatur mit
Ihrem Android-Gerät verbinden.
•
•
Prüfen Sie, dass sich die
Tastatur im Pairing-Status
befindet.
Schieben Sie den
Menüpfeil Ihres
Android-Gerätes, um das
Menü zu öffnen.
•
Suchen Sie das Bluetooth
Tastatur-Treiber-Symbol
und klicken sie es an.
11
…touch the difference
•
Prüfen Sie, dass Bluetooth
auf Ihrem Android-Gerät
aktiviert ist, dann klicken
Sie auf “Suchen und
Verbinden”. Die Software
findet die Tastatur
automatisch und verbindet
sich. Sobald die
Verbindung aufgebaut ist,
ist die Tastaturbezeichnung
unten erkennbar.
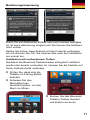
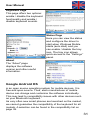
Gratulation! Die Bluetooth-Tastatur ist nun verbunden. Sie
können das testen, indem Sie einen Text eingeben, wie in der
Abbildung zu sehen ist.
Andere Funktionen
Neu verbinden:
Wenn Ihr Mobilgerät die
Verbindung zur Tastatur
verloren hat (Nachricht
“Tastatur getrennt”), können
Sie sie neu verbinden, indem
Sie auf das Feld Neu
verbinden (Reconnect)
drücken.
Ausblenden:
Die Bluetooth-Treiber-Ansicht
wird ausgeblendet, aber das Programm bleibt im Hintergrund
aktiv, so dass Sie die Tastatur auch weiterhin nutzen können.
Informationen:
Öffnet das Informationen-Menü, wo Sie Details über die
Software abrufen können.
12
Bedienungsanweisung
Nokia Symbian OS
Installation
Auf Ihrem Computer:
•
•
Legen Sie die Treiber- CD ein und öffnen Sie sie vom
“Arbeitsplatz”
Öffnen Sie den Ordner “Nokia Anwendungen für kabellose
Tastaturen”. Wählen Sie Ihr Modell oder Betriebssystem aus.
Kopieren Sie die .sis Datei auf die Speicherkarte Ihres
Mobiltelefons. Sie können die Datei auch direkt über das
USB-Kabel auf Ihr Mobiltelefon kopieren.
Auf Ihrem Symbian-Gerät:
•
•
Suchen Sie die .sis Datei (auf dem Mobilgerät oder dessen
Speicherkarte) und drücken Sie auf "OK", folgen Sie den
Bildschirmanweisungen, um die Installation zu beenden.
Starten Sie die installierte Anwendung und suchen Sie
nach Bluetooth-Tastaturen in Reichweite.
•
Nach dem PairingVorgang müssen Sie das
Tastatur-Layout für Ihr Land
festlegen. Wenn Sie die
falsche Einstellung wählen
kann es zu falschen
Tastenfunktionen kommen.
Windows OS für PC mit IVT Bluetooth Paket
Konfiguration
•
Stellen Sie sicher, dass Bluetooth auf Ihrem PC aktiv ist.
Durch Doppelklick auf das Bluetooth-Symbol öffnet sich ein
Fenster. Wählen Sie “Bluetooth-Geräte suchen” oder
klicken Sie auf den roten Ball in der Mitte des Fensters.
13
…touch the difference
•
•
Klicken Sie rechts auf
Bluetooth Tastatur
gefunden und wählen Sie
“Service aktualisieren”.
Klicken Sie nochmals
rechts auf die
Bluetooth-Tastatur und
wählen Sie “Verbinden mit
Bluetooth HID Service”.
•
Im Popup-Dialog werden
Sie einen Zahlencode
sehen. Tippen Sie ihn mit
Ihrer Bluetooth-Tastatur ein
und bestätigen mit OK.
Das System will den HID-Treiber für die Bluetooth-Tastatur
nun automatisch installieren.
Windows OS für PC mit Broadcom Bluetooth Paket
Konfiguration
•
Stellen Sie sicher,
dass auf Ihrem PC
Bluetooth aktiv ist.
Klicken Sie doppelt
auf das BluetoothSymbol, dann klicken
Sie auf “Geräte in Reichweite anzeigen”.
14
Bedienungsanweisung
•
•
Klicken Sie auf
“Geräte in Reichweite
suchen” und warten
Sie, bis die BluetoothTastatur gefunden
wurde.
Ein Rechtsklick auf die
erkannte Tastatur
erzeugt ein
Popup-Menü. Wählen
Sie “Gerät verbinden”.
•
•
Drücken Sie JA im
Fenster HID verbinden.
Tippen Sie den
angezeigten
Zahlencode mit Ihrer
Bluetooth-Tastatur ein
und bestätigen Sie mit
Enter.
Nun ist Ihre Tastatur
verbunden und
anwendungsbereit.
15
…touch the difference
Linux OS
Konfiguration
Es gibt unterschiedliche Linux-Distributionen. Diese Anleitung
wurde mit Ubuntu Linux erstellt, gilt aber ähnlich auch für
andere Versionen. Ihr PC muss mit einem Bluetooth-Modul
ausgestattet sein (integriert oder USB-Adapter).
•
Stellen Sie sicher dass
Bluetooth auf Ihrem PC
aktiv ist. Klicken Sie auf
das Bluetooth-Symbol
und wählen Sie “Neues
Gerät einrichten”
•
•
•
Ein Assistent-Fenster
öffnet sich, lesen Sie den
Text und drücken Sie
“Weiter”.
Warten Sie, bis die
Tastatur gefunden wurde,
dann wählen Sie sie aus
und “weiter”.
Tippen Sie den angezeigten Zahlencode mit Ihrer
Bluetooth-Tastatur ein und bestätigen Sie mit Enter.
Wenn der Code korrekt eingegeben wurde, wird eine
Erfolgsmeldung angezeigt. Die Tastatur ist nun verbunden und
einsatzbereit.
16
Bedienungsanweisung
4. Kompatibilitäts-Liste der Tastatur
Apple Mac und Sony Playstation3-System
Sie sind identisch mit dem Microsoft Windows XP
Betriebssystem.
Google Android OS
Google-G1 (mit
Treiber von CD)
Google-G2
Samsung Galaxy
P1000
Samsung Galaxy
i7500
Archos 7.0
Ebenfalls kompatibel mit einigen neueren Google Android
Smartphones.
17
…touch the difference
Nokia Symbian S60 OS
Nokia 3250
Nokia 5320XM
Nokia 5500
Nokia 5700
Nokia 6110N
Nokia 6120C
Nokia 6210N
Nokia 6220C
Nokia 6290
Nokia 6650F
Nokia E50
Nokia E51
Nokia E60
Nokia E61/E61i/E62
Nokia E63
Nokia E65
Nokia E66
Nokia E70
Nokia E71
Nokia E90
Nokia N71
Nokia N73
Nokia N76
Nokia N78
Nokia N79
Nokia N80
Nokia N81
Nokia N82
Nokia N85
Nokia N91
Nokia N93/N93i
Nokia N95/N95
8GB
Nokia N96
Samsung
G810/G818
Samsung i400/i408
Samsung
i450/i458
Samsung
i550/i558
Samsung i560/i568
Samsung i7110
Samsung i8510
Samsung
L870/L878
LG KT610
18
Bedienungsanweisung
Microsoft Windows Mobile6.0 OS
HTC P3470
HTC TyTN II
HTC P3350
HTC P4350
HTC 818Pro
HTC 838Pro
HTC C800
HTC D600
HTC D810
HTC D818C
HTC P3300
HTC P3400
HTC P3600i
HTC M700
HTC P3000
HTC C500
HTC C730
HTC S730
HTC S740
HTC S710
HTC Touch
Diamond2
HTC Touch
Diamond
HTC Touch
Cruise
HTC Touch HD
HTC Touch 3G
HTC Touch Viva
HTC Touch Pro
HTC Touch Dual
HTC Touch
Samsung i710
Samsung i780
Samsung i200
Samsung i900
Samsung i908E
SamsungSGH-i617
LenovoET600e
LenovoET880
Motorola Q8
Motorola Q9
ASUS P750
ASUS P526
HP518
LG KS20
ASUS P570
19
…touch the difference
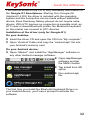
5. Produkt-Übersicht
Grundfunktionen
Erste Tastenfunktion
Die aufgedruckten Funktionen sind die Grundeinstellung bei
einmaligem Tastendruck.
Zweite Tastenfunktion
Durch gleichzeitiges Drücken von SHIFT (Hochstelltaste)
wird eine zweite Funktion erzeugt,
einschließlich: !,@,#,$,%,^,&,*,(,),~,|,",{,},?,_,+
Tasten mit dritter Funktion
Diese Tasten sind zur besseren Erkennung blau bedruckt.
Durch gleichzeitiges Drücken der Fn-Taste wird eine dritte
Funktion erzeugt.
Steuerung der Tastenbeleuchtung
und
kann die Tastenbeleuchtung ein- und
Mit
ausgeschaltet werden.
Touchpad
Die voreingestellte Bedien-Richtung wird hier gezeigt:
•
Gleiten Sie mit dem Finger sanft über die Oberfläche
des Touchpads, um den Cursor zu bewegen und tippen
Sie darauf, um zu „klicken“.
20
Bedienungsanweisung
•
Klick-, Doppelklick-, Markier- und Ziehfunktionen
können direkt durch das Tippen auf die Oberfläche des
Touchpads ausgeführt werden. Sie brauchen dabei
keine große Kraft auszuüben. Das beste
Ansprechverhalten erzielt man durch leichtes und
schnelles Klicken (wahlweise können Sie dafür natürlich
auch die Maus-Funktionstasten verwenden)
•
Um zu „ziehen“, zeichnen oder zu markieren, müssen
Sie einen Doppelklick auf das Touchpad ausüben,
wobei der Finger nach dem zweiten Klick auf dem
Touchpad verbleibt. Dann gleiten Sie mit dem Finger
über das Touchpad, um die Bewegung zu vollziehen.
Änderung der Bedien-Richtung des Touchpads:
Durch Drücken von
und
kann man die
Richtung auf „vertikal“ ändern wie im Bild gezeigt
,
das ist für eine einhändige Bedienung sinnvoll.
Laser Pointer
Schalten Sie die Tastatur EIN (es ist keine BluetoothVerbindung notwendig. Drücken Sie auf
, um einen
Laserstrahl zu erzeugen. Wenn Sie die Taste loslassen, geht
der Laser automatisch aus. Sie müssen also immer die
Laser-Taste gedrückt halten, solange Sie einen Laserstrahl
haben wollen.
6. Wartung und Pflege
Akkumulator (aufladbare Batterie)
•
•
Versuchen Sie nicht, die Tastatur auseinanderzubauen
und den Akku ohne Genehmigung auszutauschen, der
Hersteller wird dann keine Haftung übernehmen.
Die Aufladezeit des Akkus hängt von der noch
vorhandenen Kapazität und dem Typ des Akkus /
Ladegeräts ab. Der Akku kann hunderte Male geladen
und entladen werden, bis er eines Tages erschöpft ist.
Wenn die Betriebsdauer erheblich kürzer ist als normal,
sollten Sie den Akku austauschen lassen. Bitte
kontaktieren Sie Ihren Händler vor Ort.
21
…touch the difference
•
•
•
Ein geladener Akku, der über längere Zeit nicht genutzt
wird, wird sich selbst entladen.
Nutzen Sie das mitgelieferte Ladekabel. Wenn gerade
nicht aufgeladen wird, ziehen Sie das Ladekabel ab.
Laden Sie den Akku nicht länger als eine Woche, das
verkürzt seine Lebensdauer.
Lagern Sie die Tastatur nicht an zu heißen oder zu
kalten Orten, wie z.B. einem geschlossenen Auto im
Sommer oder Winter. Das verkürzt die Lebensdauer des
Akkus. Lagern Sie die Tastatur bei Zimmertemperatur.
Ein zu heißer oder zu kalter Akku kann temporär
ausfallen, auch wenn er voll aufgeladen ist.
Lithium-Ionen-Akkus sind besonders empfindlich
gegenüber Minustemperaturen.
Sorgfältige Pflege
•
•
•
•
•
•
•
Dieses Gerät wurde von exzellenten Designern
entworfen, bitte gehen Sie sorgsam damit um. Die
folgenden Empfehlungen helfen Ihnen, die
Garantiebedingungen zu erfüllen, so dass die Tastatur
für viele Jahre genutzt werden kann:
Legen Sie die Tastatur und alle ihre Teile an Plätze, die
Kinder nicht erreichen können.
Legen Sie die Tastatur nicht an staubige Plätze, sonst
könnten ihre beweglichen Teile beschädigt werden.
Das Touchpad ist das am meisten gefährdete Teil,
vermeiden Sie die Einwirkung durch andere Objekte
oder Kratzen.
Legen Sie die Tastatur nicht an heiße Orte, hohe
Temperaturen verkürzen die Lebensdauer von
elektronischen Geräten.
Legen Sie die Tastatur nicht an zu kalte Orte. Bei
steigenden Temperaturen (bis zur normalen Betriebstemperatur) bildet sich Wasserdampf, der die
elektronischen Schaltkreise beschädigen kann.
Bitte nicht fallen lassen, stoßen oder schütteln. Derart
heftige Aktionen schädigen die inneren Bauteile.
22
Bedienungsanweisung
•
•
•
Verwenden Sie keine starken Chemikalien, Lösungsbzw. Reinigungsmittel. Reiben Sie die Tastatur sanft mit
einem weichen, leicht feuchten Tuch und Seife sauber.
Malen Sie das Gerät nicht an. Farbe wird die aktiven
Teile des Gerätes verkleben und den normalen Betrieb
behindern.
Wenn die Tastatur, ihr Akku, Ladekabel oder sonstiges
Zubehör nicht ordnungsgemäß funktionieren, bringen
Sie es zum nächstgelegenen qualifizierten
Service-Center. Falls erforderlich, werden die
Mitarbeiter helfen Ihnen, eine Reparatur in die Wege zu
leiten.
Haftungsausschlusserklärung des Herstellers
Für Informationen in diesem Dokument behält sich der Hersteller
Änderungen ohne Mitteilung vor und geht keinerlei Verpflichtungen
ein. Durch dieses Dokument wird, weder ausgedrückt noch
angedeutet, keinerlei Garantie oder Erklärung in Bezug auf Qualität,
Genauigkeit oder Eignung für einen bestimmten Zweck übernommen.
Der Hersteller behält sich das Recht vor, jederzeit
Änderungen zum Inhalt dieses Dokumentes zu machen und/ oder die
dazugehörigen Produkte unverbindlich zu ändern ohne Verpflichtung,
Personen oder Organisationen über derartige
Änderungen in Kenntnis zu setzen. Unter keinen Umständen ist der
Hersteller haftbar für direkte, indirekte, spezielle, zufällige oder
Folgeschäden, die durch die Nutzung oder Unmöglichkeit
der Nutzung des Produktes oder der Dokumentation entstehen, selbst
wenn auf die Möglichkeit solcher Schäden hingewiesen wurde.
Dieses Dokument enthält Materialien, die durch Copyright
geschützt sind. Alle Rechte sind vorbehalten. Es ist untersagt, diese
Bedienungsanleitung oder Teile daraus ohne die schriftliche
Einwilligung der Autoren in irgendeiner Form zu vervielfältigen
oder zu verbreiten, in welcher Form, zu welchem Zweck und mit
welchen Mitteln auch immer. Produktnamen, die in diesem Dokument
erwähnt werden, dienen ausschließlich als
Verkaufsbezeichnung. Alle Handelsmarken, Produktnamen oder
Markennamen, die in diesem Dokument erwähnt werden, sind
eingetragenes Eigentum des jeweiligen Inhabers.
Irrtümer und Auslassungen vorbehalten
Version 1.1 (2011/05/04) ● © 2011 by MaxPoint Handelsges. mbH
23
…touch the difference
Table of content
1. Introduction and technical parameters
2. Hardware installation
3. Software installation and usage
• Microsoft Windows Mobile OS
• Google Android OS
• Symbian OS
• Windows XP with IVT stack
• Windows XP with Broadcom
• Linux OS
4. Keyboard compatibility list
5. Product overview
6. Maintenance
1. Introduction and technical parameters
•
•
•
•
•
•
•
•
•
Extremely small, wireless combo of super-mini keyboard
with touchpad and remote control with laser pointer for
presentations
Far-ranging and reliable Bluetooth transmission up to
approx. 10 m
Integrated touchpad with two mouse buttons, the input
direction can be rotated in 90 °
Modern design with flat notebook keys
8 multimedia hotkeys for Backlight, Print Screen, Mute,
Volume -/+, Last Track, Play/ Pause & Forward
Status LEDs for Transmitting, Charge Battery, Low Battery
& Pairing as well as Caps Lock
Plug & Play installation, no special driver necessary
Including Bluetooth adapter in practical compartment
Optimal for controlling home entertainment units (HTPC),
for mobile usage with smart phones, for gaming with Sony
Playstation3, Navi configurations as well as for training,
conference & presentation facilities
*PC / end devices have to support standard keyboard drivers with corresponding
country code faultlessly!
24
User Manual
Features
Key count:
Construction of keyboard:
Life expectancy:
Switch travel:
Pressure point:
Transmission frequency:
Transmission protocol:
Power output:
Operation distance:
Battery type:
Power supply:
Power consumption (avg.):
Temperature:
Content of delivery:
Colour:
Certified:
Compatibility:
70 + 2 mouse buttons
SoftTouch membrane technology
approx. 5 million strokes per key;
approx. 1 million for mouse
buttons
1.7 ±0.3 mm total run
55 ±15 g
2.401 – 2.48 GHz ISM band,
GFSK, 79 channels Frequency
Hopping
Bluetooth V2.0 EDR / Human
Interface Device (HID)
0 dBm (Class 2)
up to max. 10 m
Built-in Lithium-Ion rechargeable
battery
Operating: 3.3 VDC
Charging: 4.2 V - 5.05 V
Operating: <80 mA
Charging: <300 mA
Operating & storage: -10 °C up to
+55 °C
Keyboard, USB Bluetooth
Adapter, Micro USB2.0 charging
cable, User Manual, Installation
CD for Mobile Phone Software
Black
CE, FCC, WEEE/RoHS, REACH
PC: Windows 98, Me, 2000, XP,
Vista, Windows7, Linux, Sony
Playstation3
Mac: Mac OS 10.2.8 or later
Mobile: Google Android System*,
Microsoft Windows Mobile 5.0* or
later,
Nokia Symbian S60 System*
* see compatibility list
25
…touch the difference
Mobile system requirements
•
•
The device must be equipped with a the Bluetooth module
The mobile Operating System should be one of the
following:
− Google Android System
− Microsoft Windows Mobile 5.0 or newer
− Nokia Symbian S60 System
Desktop computer & laptop system requirements
z Bluetooth-enabled PC running Windows 98, Me, 2000, XP,
Vista or Windows7
z Bluetooth-enabled Macintosh running Mac OS 10.2.8 or
later
2. Hardware Installation
Note: If you use the keyboard for the first time it may be, that
the battery is empty, so you should recharge it for 20-30
minutes.
Pairing button
ON/OFF switch
Socket for USB
charging cable
Recharge the battery
Connect the Bluetooth keyboard to your computer’s USB port
using the power USB cable (you can find the cable in the retail
box). While charging, the second blue LED turns on and gets
dimmer as the battery charge increases.
Installation:
1. Put the included Bluetooth adapter into a free USB port of
your PC. In the system tray right down the Bluetooth icon
appears.
2. Double-click the Bluetooth icon to start the Bluetooth
wizard.
26
User Manual
3. The next window shows all
Bluetooth devices in range.
Click „Add“ and „OK“.
4. Switch the keyboard ON,
using the ON/OFF sliding
switch: The third, green LED
will glow for few seconds.
5. Press the Pairing button at the top left:
The green LED will be blinking intermittently.
6. Now the Super Mini Bluetooth keyboard is under pairing
state and it’s waiting for connecting with your device
7. Place a tick for „Device is set
up and can be identified“ and
confirm with „Next“.
8. Select the identified keyboard
shown in the next window.
9. The option „Select passkey
automatically“ is already
given, so click „Next“.
27
…touch the difference
10. Type the shown in the menu
pass key with the Bluetooth
keyboard and confirm with
„Enter“. After that, finish the
Bluetooth wizard
corresponding to the query.
Finish the Bluetooth assistant with a final click on „Finish“. The
Bluetooth keyboard is now ready for use and functional.
Sometimes you have to wait a while, until pairing is finished.
When writing with the keyboard or using the touchpad the first,
yellow LED will to show the Bluetooth transmission to the
computer.
3. Software installation and usage
Microsoft Windows Mobile OS
Installation
Connect your mobile device to your desktop computer using
the USB port.
On your desktop:
•
•
•
•
Insert the driver CD and open the CD from “My computer”.
Locate the “Mobile” folder and inside the
“windowsmobile.cab” (Bluetooth input driver) CAB file.
Open ActiveSync on your desktop and Click Explore
Copy the CAB file to your mobile device. You can do this by
dragging and dropping the file from the desktop folder to My
Documents folder on your device.
On your Windows Mobile device:
•
•
•
Go to Start > Programs > File Explorer > My Documents
Run the windowsmobile.cab file (tap on it)
The Bluetooth keyboard driver now will be installed on your
device. At the end of the installation, the setup will require
to reset.
28
User Manual
Configuration and Troubleshooting
After the software is successfully installed on your device, you
need to pair the Bluetooth keyboard.
•
•
•
•
Make sure your
Bluetooth
keyboard is in the
pairing state.
On your device,
open Bluetooth
Devices, and click
“Add new”
After the keyboard
is discovered,
select it and then
tap on “Next”
When you are
prompted for
passkey, leave the
pass code field
blank and tap
“Next” (if this fails,
enter 0000 as a
pass code and
press “Next”)
(A) At this step select
the “Input device”
service and tap
“Finish”.
(B) Go to the
software settings
panel and tap
“Connect”.
29
…touch the difference
Here are a few solutions for error messages that might
appear in the software:
"The software is not responding. You need to reinstall this
software."
This error is caused by a problem with the communication
between the software components. You need to check if your
Windows Mobile device is compatible with the software and to
try to reinstall the software.
"Bluetooth is turned off. To use the software, please enable
your Bluetooth module!"
Make sure you are using the software on a smart phone with
Windows Mobile (5.0 or newer) and the Microsoft Bluetooth
stack. Then enable Bluetooth before using the software.
"No active Input Device found. You need to pair a device,
using the Bluetooth control panel."
Make sure your Bluetooth keyboard is correctly paired to your
smart phone. If this error appears while your keyboard is
paired, redo the pairing.
Settings panel
To open the “Settings”
panel, go to
Start->Settings->System
TAB, and tap the icon
named "Bluetooth Input
Driver".
The “Settings” panel
displays several pages,
for better access to the
software options.
30
User Manual
Keyboard Page
This page offers two options:
enable / disable the keyboard
functionality and enable /
disable keyboard sounds.
Status Page
Here you can view the status
and configure the driver to
start when Windows Mobile
starts (auto start) and you
can enable / disable the tray
icon. The tray icon allows
quick access to the “Settings”
panel.
About
The “About” page
displays the software
version and other useful
information.
Google Android OS
is an open source operating system for mobile devices. It is
free and open source. Thus, each manufacturer of mobile
device can change and customize the software individually.
This may lead to compatibility issues with other devices such
as your Bluetooth keyboard.
As very often new smart phones are launched on the market,
we cannot guarantee the compatibility of the keyboard for all
models. A selection can be found in the compatibility list on
page 39.
31
…touch the difference
The Android driver on the CD is only necessary and usable for
the Google-G1 Smartphone. Starting from Google-G2
(Android 2.2 OS) the driver is included with the operating
system and the connection can be made without additional
drivers. Even Samsung Galaxy phones do not require extra
drivers. With HTC devices no connection is possible at all, as
HTC uses a closed-Bluetooth profile. No Bluetooth keyboard
on the market can connect to HTC devices.
Installation of the driver (only for Google-G1)
On your desktop:
•
•
Insert the driver CD and open the CD from “My computer”
Open “Android” folder and copy the “android.apk” file into
your Android’s memory card
On your Android device:
•
Open “Market”, and install the “AppManager” software or
any other Android manager software:
•
•
•
Open AppManager
software and tap
the MENU button
Tap Install from SD
option
Run android.apk
file.
The first time you install the Bluetooth Keyboard Driver on
your Android device, you’ll see a prompt to activate the
software:
32
User Manual
If you press “Cancel” or if the Internet is not available,
activation will fail and you won’t be able to use this software.
So please make sure that Android is connected to the internet
and press “OK”. You only need to do this once, after the
installation.
Installation with installed driver
After the Bluetooth keyboard driver is successfully installed
you need to pair the keyboard with the Android device.
•
•
Make sure your Bluetooth
keyboard is in the pairing
state.
Slide your Android
device’s menu arrow and
open the menu.
•
Locate the Bluetooth
Keyboard Driver icon and
tap on it.
33
…touch the difference
•
On your Android device
make sure Bluetooth is
turned on, then tap
“Search and Connect”.
The software automatically
finds the Bluetooth
keyboard and connects to
it. When connection is
done, you can find your
Bluetooth keyboard’s
name at the bottom:
Congratulations! The Bluetooth keyboard is now connected
and you can test it by entering a text in the test zone as shown
in the previous picture.
Other Functions
Reconnect:
If your device loses the
connection with the keyboard
(the message “keyboard
disconnected” is displayed
as in the picture below), you
can reconnect by pressing
the interface Reconnect
button.
Hide
Hides the Bluetooth driver interface, but keeps the program
alive in the background, so you can continue using the
keyboard.
Question mark (?)
Opens the About Dialog where you can see more details on
this software.
34
User Manual
Nokia Symbian OS
Installation
On your desktop:
•
•
Insert the driver CD and open the CD from “My computer”
Open “Nokia Wireless Keyboard Application” folder and
choose your device model or operating system version,
copy the .sis file into your device’s memory card or you can
connect your Nokia device to your computer USB port and
copy the file directly.
On your Symbian device:
•
•
Find the .sis file (on mobile device or memory card) and
press "OK" button, follow the hints to finish the installation
Run the installed application and search the nearby
Bluetooth keyboard.
•
After paired and
connected, you will have
to set the keyboard layout.
If layout is not set
correctly, the keyboard
might not function as
expected.
Desktop Windows OS with IVT Bluetooth stack
Configuration
•
Make sure that the Bluetooth function is active on your PC.
Double click the Bluetooth icon, open the Management
window, select “Bluetooth Device discovery” or click the
round ball in the middle of the window.
35
…touch the difference
•
•
Right click the Bluetooth
keyboard found and select
“Refresh Services”.
Right click the Bluetooth
Keyboard again and select
“Connect-Bluetooth Input
Service”.
•
On the popup dialog you’ll
see a code. Input the code
with your Bluetooth
keyboard and press “Enter”
or “OK”.
The system will auto install the HID drivers for the Bluetooth
keyboard.
Desktop Windows OS with Broadcom
Bluetooth stack
Configuration
•
Make sure that the
Bluetooth function is
active on your PC.
Double click the
Bluetooth icon, then
click “View devices in
range”.
36
User Manual
•
•
•
•
Click “Search devices
in range” and wait until
the Bluetooth
keyboard is
discovered.
Right clicking the
detected keyboard
brings a popup menu.
Click “Connect
device”.
Press YES to connect
to the “Human
Interface Device”.
Using the mini
Bluetooth keyboard,
type the number
displayed on the
screen, then press
enter:
Now the keyboard is
connected, you can start
using it with your
applications.
37
…touch the difference
Linux OS
Configuration
There are several Linux distributions available. This guide was
designed for Ubuntu Linux, but can be easily adapted for other
versions. Your desktop computer must be equipped with a
Bluetooth module (built in, or USB adapter).
•
Make sure that the
Bluetooth function is
active on your PC. Click
the Bluetooth icon and
select “Setup new device”
•
•
A wizard window opens,
read the text and press
“Forward”.
Wait until the keyboard is
discovered, then select it
and press “Forward”.
•
Type the code display on
the Bluetooth keyboard,
then press Enter.
If the code was correctly
entered, a confirmation
message is displayed. Now
you can start using your
Bluetooth keyboard.
38
User Manual
4. Keyboard compatibility list
Apple Mac and Sony Playstation3 system
They are same as the Microsoft Windows XP OS.
Google Android OS
Google-G1 (with
driver from CD)
Google-G2
Samsung Galaxy
P1000
Samsung Galaxy
i7500
Archos 7.0
Also compatible with few newer Google Android smart
phones.
39
…touch the difference
Nokia Symbian S60 OS
Nokia 3250
Nokia 5320XM
Nokia 5500
Nokia 5700
Nokia 6110N
Nokia 6120C
Nokia 6210N
Nokia 6220C
Nokia 6290
Nokia 6650F
Nokia E50
Nokia E51
Nokia E60
Nokia E61/E61i/E62
Nokia E63
Nokia E65
Nokia E66
Nokia E70
Nokia E71
Nokia E90
Nokia N71
Nokia N73
Nokia N76
Nokia N78
Nokia N79
Nokia N80
Nokia N81
Nokia N82
Nokia N85
Nokia N91
Nokia N93/N93i
Nokia N95/N95
8GB
Nokia N96
Samsung
G810/G818
Samsung i400/i408
Samsung
i450/i458
Samsung
i550/i558
Samsung i560/i568
Samsung i7110
Samsung i8510
Samsung
L870/L878
LG KT610
40
User Manual
Microsoft Windows Mobile6.0 OS
HTC P3470
HTC TyTN II
HTC P3350
HTC P4350
HTC 818Pro
HTC 838Pro
HTC C800
HTC D600
HTC D810
HTC D818C
HTC P3300
HTC P3400
HTC P3600i
HTC M700
HTC P3000
HTC C500
HTC C730
HTC S730
HTC S740
HTC S710
HTC Touch
Diamond2
HTC Touch
Diamond
HTC Touch
Cruise
HTC Touch HD
HTC Touch 3G
HTC Touch Viva
HTC Touch Pro
HTC Touch Dual
HTC Touch
Samsung i710
Samsung i780
Samsung i200
Samsung i900
Samsung i908E
SamsungSGH-i617
LenovoET600e
LenovoET880
Motorola Q8
Motorola Q9
ASUS P750
ASUS P526
HP518
LG KS20
ASUS P570
41
…touch the difference
5. Product overview
Basic functions
Primary key functions
The function printed on each key is defaulted by pressing the
button one time.
Second key function
Press the SHIFT key to create the second function,
including: !,@,#,$,%,^,&,*,(,),~,|,",{,},?,_,+
Keys with third function
All these keys were printed in blue for easy recognising.
Press the Fn key while using these keys to create the third
function.
Backlight control key
By pressing
and off.
and
the backlight can be switched on
Touchpad
The default operation direction is shown here:
•
•
.
Gently glide over the touchpad surface with your finger
in order to move the cursor, and tap on the surface in
order to "click".
Click, double-click, marking, and drag functions can be
performed directly by tapping on the surface of the
touchpad. You do not need to apply a lot of pressure for
42
User Manual
•
this. Actually, you will get the best reaction by clicking gently
and rapidly (alternatively you can use the mouse function
keys).
In order to "drag", to draw, or to mark, you must apply a
double-click on the touchpad making sure the fingers
remains on the touchpad after the second click. Then,
glide over the touchpad with your finger in order to
complete the movement.
Change operation direction of the touchpad: By pressing
you can change the direction of
and
the
touchpad to vertical as shown here
, suitable for
operating with one hand.
HH
Laser Pointer
Make the device at the ON position (no need to connect
Bluetooth receiver to USB interface). Press
the when
using. When you release the hand, the laser will automatically
shut down. So, if you want to point with the laser, you need
always to press the laser button.
6. Maintenance
Battery caution
•
•
•
•
Do not try to disassemble the machine or replace
rechargeable batteries without permission, otherwise
the resulting loss has nothing to do with the
manufacturer.
Battery charging time depends on the remaining battery
capacity and battery/ charger type. The battery can be
charged and discharged hundreds of times, but
eventually wear out. When the battery operating time
was significantly shorter than usual, it’s time to replace
the battery. Please contact your local dealer.
A charged battery without usage within a certain period
will be self-discharged.
Use the specified charger. When the charger is not in
use, please cut off the power, do not let the battery
connected to a charger more than a week,
over-charging will shorten battery life.
43
…touch the difference
•
Do not place the machine at too hot or too cold locations,
such as a closed car in summer or winter. This will
reduce the battery life. Try to keep the machine at room
temperature. Using a too hot or too cold battery, even if
the battery is fully charged, may cause a temporary
failure. Lithium-Ion batteries are particularly subject to
the impact of sub-zero temperatures.
Careful maintenance
•
•
•
•
•
•
•
•
•
•
This equipment is designed by excellent designers,
please use it carefully. The following recommendations
can help you to comply with warranty, so the machine
can be used for many years. When using this
equipment:
Put this device and all its parts and accessories at the
place where children can’t reach.
Do not place this equipment at dusty place, or its
moving parts will be damaged.
The touchpad is the most vulnerable part; strong impact
by other objects or scratching should be avoided.
Do not put it at hot places; high temperatures will
shorten the life of electronic devices.
Do not put it at too cold places. When the device
temperature rises (to its normal operating temperature),
water vapor will be generated inside the device, which
could damage the device's electronic circuit boards.
Do not drop, knock or shake the device. Violent action
would undermine the internal circuit boards.
Do not use rough chemicals, cleaning solvents or strong
cleaning agents for cleaning. Gently scrub with a soft
cloth soaked in soapy water to clean it.
Do not paint the device. Paint will stick to the active
parts of the device and impede the normal operation.
If this device, battery, charger or any accessories do not
work properly, take it to the nearest qualified service
center. If necessary, the staff will help you to arrange a
repair.
44
User Manual
Manufacturer's Disclaimer Statement
The information in this document is subject to change without notice and
does not represent a commitment on the part of the vendor. No warranty or
representation, either expressed or implied,
is made with respect to the quality, accuracy or fitness for any particular
purpose of this document. The manufacturer reserves the right to make
changes to the content of this document and/or the products associated
with it at any time without obligation to notify any person or organization of
such changes. In no event will the manufacturer be liable for direct, indirect,
special, incidental or consequential damages arising out of the use or
inability to use this product or documentation, even if advised of the
possibility of such damages. This document contains materials protected
by copyright. All rights are reserved. No part of this manual may be
reproduced or transmitted in any form, by any means or for any purpose
without expressed written consent of its authors. Product names appearing
in this document are mentioned for identification purchases only. All
trademarks, product names or brand names appearing in this document
are registered property of their respective owner.
Federal Communications Commission (FCC) Notice
This device complies with Part 15 of the FCC rules. Operation is subject to
the following two conditions
(1) This device may not cause harmful interference, and
(2) This device must accept any interference received, including
interference that may cause undesired operation.
This equipment has been tested and found to comply with the limits of a
Class B digital device, pursuant to part 15 of the FCC rules. These limits
are designed to provide reasonable protection against harmful interference
in a residential installation. This equipment generates, uses and can
radiate radio frequency energy and, if not installed and used in accordance
with the instructions, may cause harmful interference to radio communications. However, there is no guarantee that interference will not occur in
particular installations. If this equipment does cause harmful interference to
radio or television reception, which can be determined by turning the
equipment off and on, the user is encouraged to try to correct the
interference by one or more of the following measures:
1. Reorient / Relocate the receiving antenna.
2. Increase the distance between the mouse and receiver.
3. Connect the equipment into an outlet on a circuit different from that the
receiver is connected.
CAUTION:
Change or modifications not expressly approved by the manufacturer
responsible for compliance could void the user's authority to operate the
equipment.
Irrtümer und Auslassungen vorbehalten
Version 1.1 (2011/05/04) ● © 2011 by MaxPoint Handelsges. mbH
45


![Rii Mini [Bluetooth]](http://vs1.manualzilla.com/store/data/005730343_1-53cd9486bcc3b780c33a2a4f5175af21-150x150.png)