1
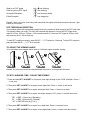
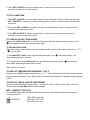
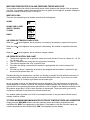
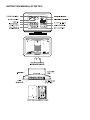
INSTRUCTION MANUAL OF WS 7019
ENVIRONMENTAL RECEPTION EFFECTS
Your radio controlled clock obtains the accurate time with wireless technology. Same as
All wireless devices, the receiving ability maybe affected by, but not limited to, the following
circumstances:
Long transmitting distance
Nearby mountains and valleys
Among tall buildings
Near railway, high voltage cable etc.
Near freeway, airport, etc
Near construction site
Inside concrete buildings
Near electrical appliances
Neat computers and TV’s
Inside moving vehicles
Near metallic structures
Place your clock at a location with optimal signal, i.e. close to a window and way from metal surfaces or
electrical appliances.
Step 1 Inset the stand to the bottom of your weather station.
Step 2 Slide open the battery cover at the back of your weather station, then insert 3 x AA alkaline
batteries into the battery compartment to the back of your weather station by observating the correct +/polarity signs inside the battery compartment. Replace the battery cover.
Step 3 Keep your Weather Station and wireless sensor next to each other. Slide open the battery
cover at the back of your wireless outdoor sensor, then insert 2 x AA alkaline batteries to the back of it.
Replace the battery cover. Your weather station will receive data signal from the outdoor sensor in few
seconds. Then place your outdoor sensor in a dry and shaded area outdoor.
Step 4 Peel off the protective label on the front. Your Weather Station is ready to work for you.
Step 5 After your weather station receives the outdoor temperature and humidity, it will start to search
for the DCF signal. This may take overnight. In case your weather station does not catch the DCF
signal during the day, set the clock manually.
Remarks:
1. Keep in mind that your outdoor sensor has a 100-feet open air transmission with no obstructions.
Actual transmission range will vary depending on what is in the path of the signal. Each obstruction
(roof, walls, floors, ceilings, thick trees, etc.) will effectively cut signal range in half.
2. During reception of the DCF time signal, all buttons do not function and your weather station does
not take temperature and humidity measurement. After first time installation, the temperature and
relative humidity readings will get stable and become more accurate in around 30 minutes.
3. The backlight of LCD is on when the user press the Snooze / Light button.
DCF SIGNAL RECEPTION AND SIGNAL INDICATOR
After your clock is powered up, it starts to receive DCF signal. The
icon flashes.
icon flashing)
Weak or no DCF signal
(only
Receiving strong DCF signal
(
icon flashing)
Successful Reception
(
icon becomes static)
Failed Reception
(
icon disappear)
Remark : when your clock is receiving radio controlled time signal, all buttons except the snooze / light
button do not function.
DCF TIME SIGNAL RECEPTION
Your weather station will automatically update itself to the exact time after receipt of the DCF time code.
This typically takes over night. The clock will automatically attempt to receive the DCF signal every
night at 1:00 am, 2:00 am, 3:00 am, 4: 00 am and onwards. If it receives DCF signal at 3:00 am it will
stop receiving until 1: 00 am next day.
To start DCF reception manually, press WAVE / - / °C/°F button for 2 seconds. To stop DCF reception,
press and hold WAVE / - / °C/°F for 2 seconds.
TO ADJUST THE VIEWING ANGLE
You could adjust your weather station clock to 3 different angles for better viewing.
Remark: Do not over push the top case backward with force or you may break the stand.
TO SET CALENDAR, TIME, 12/24 HR TIME FORMAT
1. Press and hold SET / ALM SET for 2 seconds, time digits change to year “2009” and flash. Press + /
- to set year.
2. Then press SET / ALM SET once again, month digits flash. Press +/- button to set month.
3. Then press SET / ALM SET once again, date digits flash. Press +/- button to set date.
4. Then press SET / ALM SET once again, time digits change to “00”, press +/- to select time zone: -
“00” = GMT +1 hour (e.g. Germany)
“01” = GMT +2 hours (e.g. Finland)
“-01” = GMT 00 hour (e.g. U.K.)
6. Then press SET / ALM SET once again, hour digits flash. Press+/- to set the hours.
7. Then press SET / ALM SET once again, minute digits flash. Press +/- button to set the minutes.
8. Press SET / ALM SET to return to normal mode, or it will return to normal mode in around 30
seconds if no press of any other buttons.
TO SET ALARM TIME
1. Press SET / ALM SET once, time digits change to alarm time digits “0:00 AL”. Then press and hold
SET / ALM SET for 2 seconds, the alarm hour digits flash. Press +/- to set the hours of your desired
alarm time.
2. Then press SET / ALM SET once again, the alarm minute digits flash. Press +/- button to set the
minutes of your desired alarm time.
3. Press SET / ALM SET to return to normal mode, or it will return to normal mode in around 10
seconds if no press of any other buttons.
TO TURN ON OR OFF YOUR ALARM
Simply press ALM On-Off to turn on or off the daily alarm. When the alarm function is turned on, the “
” icon appears between the hour and minute digits.
TO USE SNOOZE ALARM
When time reaches your set alarm time, your weather station will give beep sound to wake you up. The
“
” icon will flash.
1) Press SNOOZE / LIGHT once to stop the alarm temporarily, the “
alarm will beep again in 5 minutes.
” icon keeps flashing. The
2) To stop the alarm, press ALM On/Off once, the alarm beep will stop and the “
static, alarm will beep again same time next day.
” icon become
Alarm Duration: 2 minutes
TO DISPLAY TEMPERATURE IN DEGREE °C OR °F
Simply press – (°C/°F) to display temperature in °C or °F. When Fahrenheit is selected, the barometric air
pressure readout displays in inHg. When Celsius is selected, the barometric air pressure readout displays
in hPa.
TO DISPLAY TIME IN 12HR OR 24HR FORMAT
After you enter the set mode, simply press + / - to select in “12Hr” or “24Hr” format. When 12Hr time
format is selected, AM / PM indicator will be displayed.
WET / COMFORT / DRY ICON
Your weather station clock will indicate the comfort level only under below temperature and relative
humidity conditions:
(COMFORT)
68F to 82F, below 40%
68F to 82F, 40% - 70%
68F to 82F, over 70%
WEATHER FORECASTER ICON AND PRESSURE TREND INDICATOR
Your weather station has a built-in barometric sensor which measures the change of the air pressure
over time. Your weather station takes around 24 hours to gather and average air- pressure readings to
provide a weather forecast for next 12-24 hours.
WEATHER ICONS
There are four possible types of weather icons that will be displayed:
SUNNY
SUNNY AND CLOUDY
(PARTLY SUNNY)
CLOUDY
RAINY
AIR PRESSURE TENDENCY INDICATORS
arrow appears, the air pressure is increasing, the weather is expected to improve.
When the
When the
worse.
arrow appears, the air pressure is decreasing, the weather is expected to become
When the
arrow appears, the air pressure change is stable.
AIR PRESSURE HISTROY BAR CHART
1. The bar chart indicates the air pressure history trend over the last 12 hours in 6 steps: 0h, -1h, -2h,
-3h, -6h and -12h.
2. The “0h” represents the current full hour air pressure recording.
3. The columns represent the “hPa” at specific time.
4. If the bars are raising it means that the weather is getting better due to the increase of air
pressure.
5. If the bars go down, it means the air pressure has dropped and the weather is expected to get
worse from the present time “0h”.
Remarks: Moving your weather from one floor of a building to another floor will affect the accuracy of
your weather station, which should operate at the same altitude all the time. If you move it to a new
location, it will take 12-24 hours to get stable and accurate again.
As you go higher in the air, the atmospheric pressure decreases. The exact pressure at a particular
altitude depends of weather conditions, but a couple of approximations and a formula can give you a
general idea of how pressure decreases with altitude. A rule of thumb for the altimeter correction is that
the pressure drops about 1 hPa for each 8 meters of altitude gain. These rules work quite well for
elevations or altitudes of less than two or three thousand feet.
Our weather station provides next 12-24 hours weather forecast. It may not match with the current
weather condition outside.
TO READ MAXIMUM-MINUMUM INDOOR-OUTDOOR TEMPERATURES AND HUMIDITIES
Simply press the MAX-MIN button to view the maximum indoor and outdoor temperatures and
humidities with “MAX” icons appearing on the display. Press again to view the minimum indoor and
outdoor temperatures and humidities with “MIN” icons appearing on the display.
When the maximums or minimums are displayed, press and hold the MAX-MIN button to reset both
records and it will start to record the maximums and minimums again.
IF YOU LOSE THE OUTDOOR TEMPERATURE AND HUMIDITY
When the outdoor temperature and humidity digits show '---", the wireless transmission is either
interrupted or lost. Press and hold the MAX-MIN / OUT TEMP button on the clock once. If you continue
to lose the outdoor temperature display, try placing the transmitter in a different location until you have
smooth transmission of temperature data.
TROUBLESHOOTING
In case your weather station clock shows irrelevant information or digits, it maybe affected by
electrostatic discharge or interferences from other devices. Press the RESET button on the top right of
your unit. Your unit will be reset to default settings and it will start to receive outdoor temperature and
humidity and then DCF signal again.
Problem
LCD is blank
No Outdoor Temperature and
Humidity is displayed
Temperature, humidity, or air
pressure is incorrect
DCF time and date will not set
or update
Time is one or few hours off
Solution
1. Press RESET on the main unit.
2. Replace fresh alkaline batteries.
1. Press and hold MAX-MIN / OUT TEMP on the weather
station.
2. Press and hold MAX-MIN / OUT TEMP, then press RESET on
the outdoor sensor.
3. Observe if the Low Battery icon appears on the left of the
outdoor temperature. If yes, replace batteries in outdoor
sensor with fresh alkaline batteries.
4. No other interfering sources are being used (such as
computer monitors, TV sets, headphones, or speakers) in the
path of signal from the outdoor sensor. The signal travels in a
straight line, an electrical source near that “line” may cause
interference.
1. Press RESET on the main unit.
2. Make sure your main unit and the outdoor sensor is away
from sources of heat / cold / direct sunshine.
1. Wait until overnight for signal to be received.
2. Move your weather station away from sources of electricity.
1. Make sure you select the right time zone.
CARE OF YOUR WEATHER STATION CLOCK
1.
2.
3.
4.
Do not expose the unit to extreme temperature, water or direct sunlight.
Avoid contact with any corrosive materials.
Do not subject the unit to excessive force, dust or humidity.
Do not open the inner back case or tamper with any components of this unit.
SPECIFICATIONS:
Temperature Range
Indoor
+32F to +113F (0C to +50C) (display shows HH.H / LL.L if out of this range)
Outdoor
-4F to +158F (-20C to +70C) (display shows HH.H / LL.L if out of this range)
Humidity Range
Indoor
20% - 95%
Outdoor
20% - 95%
Temperature Resolution
RH% Resolution
Air Pressure Range
0.2F / 0.1C
1%
850 hPa to 1050 hPa
25.1 inHg to 31.01 inHg
Alarm Duration
Snooze Duration
2 minutes
5 minutes
Temperature Resolution
RH% Resolution
Air Pressure Range
0.2F / 0.1C
1%
850 hPa to 1050 hPa
25.1 inHg to 31.01 inHg
2 minutes
5 minutes
Alarm Duration
Snooze Duration
Legend
-
Air Pressure Trend Indicator
Barometric Air Pressure
Weather Forecast Icons
12-Hour Air Pressure History
Comfort Icon
DCF Reception Indicator
Indoor Temperature and Relative Humidity
Radio Controlled Time
Outdoor Temperature and Relative Humidity
Month / Date Display