1
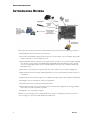
User’s Guide Version 6 www.TurtleBeach.com Notices Riviera User’s Guide Version 6 Software and documentation copyright © 2005 - 2009 Voyetra Turtle Beach, Inc. All rights reserved. No part of this publication may be reproduced or transmitted by any means or in any form without prior written consent from Voyetra Turtle Beach, Inc. (“VTB”). In no event will VTB be liable for direct, indirect, special, exemplary, incidental, or consequential damages resulting from any defect or omission in this manual, even if advised of the possibility of such damages. In the interest of continued product development, VTB reserves the right to make improvements to this manual and the products it describes at any time, without notices or obligation. Turtle Beach, the Turtle Beach Logo, Voyetra and Riviera are trademarks or registered of VTB. Microsoft and Windows are registered trademarks of Microsoft Corporation. Dolby and Dolby Pro Logic are registered trademarks of Dolby Laboratories, Inc. Pentium is a registered trademark of Intel Corporation. All other trademarks are the properties of their respective companies and are hereby acknowledged. Use of this software is subject to the terms and conditions of the End-User Software License Agreement. Riviera is a product of: Voyetra Turtle Beach, Inc. 150 Clearbrook Road, Ste 162, Elmsford NY 10523 USA Technical support Technical support Knowledge Base: Go to the Turtle Beach web site www.turtlebeach.com and click on Support > Sound Cards > PCI Sound Cards > Riviera. This will bring up the list of articles Driver Downloads: From the same support page, next to the 'Knowledge Base' button click on Downloads > Sound Cards > PCI Sound Cards >Riviera. This will bring up the list of Drivers and other support files E-mail Tech Support: [email protected] Please allow up to 3 business days for a response and be sure to include your name and the product name Fax Tech Support: 914-345-2266 Please allow up to 3 business days for a response and be sure to include your name, your fax number, email address and the product name User’s Guide ii WWW.TURTLEBEACH.COM Contents INTRODUCING RIVIERA ........................................1 RIVIERA CD ...............................................2 Riviera Program Suite 2 RIVIERA CONNECTORS .........................................3 System Requirements 4 INSTALLING THE RIVIERA SOUND CARD ............................5 Installing the Riviera 5 Installing the Drivers and Software 6 To uninstall Riviera 7 Optimizing Playback Performance in Windows 2000 and XP 7 CHECKING RIVIERA AFTER INSTALLATION ...........................8 Launching the Riviera Control Panel 8 Checking the Speaker Configuration 8 No Speaker Sound 9 USING THE RIVIERA..........................................9 Playing digital music with Windows Media Player 10 Listening to Digital Music 10 Using the Equalizer 10 Using Environment Effects 10 Listening to Stereo Music in Surround Sound 10 Speaker Positioning & Multi-Speaker settings under Vista/7 11 Listening to DVDs in Surround Sound 12 Listening with the Analog Audio Outputs 12 Listening with the Digital Audio Output 12 Using the Digital Output in Vista/7 12 USING EAR FORCE® SURROUND SOUND HEADPHONES ....................13 RIVIERA CONTROL PANEL .....................................14 Using the Control Panel Presets 15 Saving and Restoring Presets 15 Importing and Exporting Presets 15 SPEAKERS TAB.............................................16 Speaker Options Button (…) 16 Speaker Configurations 17 Testing the Speaker Configuration 18 Volume Section 19 Individual Speaker Volumes 19 Settings Summary 19 S/PDIF Settings 19 „Speaker Mix Tuned For‟ drop-down menu (Vista/7 only) 20 GRAPHIC EQUALIZER TAB .....................................21 Graphic Equalizer 21 User Defined Presets 21 Environments 21 MIXER TAB ...............................................22 Playback Settings 22 Selecting Record Source in Windows Vista/7 23 HARDWARE WARRANTY.........................................24 FCC Declaration of Conformity 24 iii Riviera WWW.TURTLEBEACH.COM INTRODUCING RIVIERA Riviera represents the latest generation in multi-channel PC audio and provides the following key features: DVD Playback with full 6-speaker surround sound. Surround sound available via digital audio connection to a home theater system or multiple analog audio outputs connected to a surround speaker system. Optical S/PDIF output for playback of pure digital audio at resolutions of up to 24 bits 48kHz sampling rates, allowing for pass-through of Dolby® Digital and DTS® multi-channel DVD sound to external A/V receivers and digital speaker systems. (NOTE: DTS Pass through is only available in Windows 2000/XP/Vista/7) Selectable 2, 4 or 6 analog line output channels with 16 bit resolution at up to 48 kHz sampling rate. Multi-channel format, for listening to MP3 digital music or movies with enhanced surround sound on 4 or 6 speakers. Supports Game Surround Sound APIs such as HRTF-based 3D positional audio and DirectSound 3D. Full-duplex codec for simultaneous analog record/playback. 32-bit PCI bus master for high-speed audio data transfers. Direct digital connections to the latest high-tech home entertainment equipment for the highest fidelity with lowest noise audio reproduction possible. Headphone, 2, 4, and 6-speaker support. Whether you‟re playing PC games, watching DVD movies, using voice applications, listening to music or even recording your own, the Turtle Beach Riviera handles it all. 1 Riviera RIVIERA CD The Riviera CD includes the following components: Riviera Drivers Audio drivers for XP, Vista and Win 7. Riviera Control Panel Software A convenient utility for controlling the Riviera audio features. Adobe® Acrobat® Reader PDF Reference Manuals A limited version for use with the reference manuals. PDF versions of software reference manuals that can be viewed and printed with the Adobe Acrobat program included on the CD. RIVIERA CONTROL PANEL Use the Control Panel to control the Riviera‟s functions, as described in this manual. Clicking the Turtle Beach icon in the System tray activates a menu from where you can launch the Control Panel. You can also launch the Control Panel by clicking Start All Programs Turtle Beach Riviera Run Riviera Control Panel. RIVIERA™ CONTROL PANEL User’s Guide For the latest updates, as well as user tips, Knowledge Base articles and information on other Turtle Beach and Voyetra products, please visit www.TurtleBeach.com and www.Voyetra.com . 2 WWW.TURTLEBEACH.COM RIVIERA CONNECTORS Connector Function VersaJack™ / Line-In L/R This multi-function jack operates in two modes which are selected on the Riviera Control Panel (described in the previous section): Center/Sub Speaker Output Mode: When using Riviera for 5.1 surround sound playback, this jack provides analog signals for the center and sub speaker outputs. Line input mode: When configured as an input, this jack lets you record from external line-level sources, such as CD players, cassette players, etc. Microphone Input (Monaural) For condenser or dynamic microphones. Low-noise preamplifier provides wide range input sensitivity (10mV – 200mV). Mic gain is normally +20dB. To activate an additional 20dB boost on the mic gain, access the Mixer tab in the Control Panel. Press the “…” button under the Mic volume slider and check the “Microphone Boost” option. Front Speakers channels 1 & 2 Front Speakers can drive headphones or powered speakers. Rear Speakers channels 3 & 4 Use Front and Rear channels for 4-channel playback. Use Front channel for stereo playback. Stereo or 4 channel setting is selected from the Riviera Control Panel. Digital Out Optical S/PDIF output for playback of pure digital audio at resolutions of up to 24 Bits at 44.1 kHz or 48 kHz sampling rates, allowing for pass-through of Dolby Digital and DTS multi-channel DVD sound to external A/V receivers. The digital output operates only when speaker mode in the Advanced Options dialog box is set to headphone or 2 speakers. 3 Joystick/ MIDI connector D-SUB 15 pin connector for external joystick and MIDI input/output when using earlier drivers for Windows 98/Me/2000. This connector is disabled when using the Windows XP, Vista and Win 7 drivers. CD L/R In 1 (Stereo) For internal analog CD audio. Pin configuration: Pin 1 - Left (white) Pin 2 - Ground (black) Pin 3 - Ground (black) Pin 4 - Right (red) CD L/R In 2 For internal analog CD audio. Pin configuration: Riviera (Stereo) Pin 1 - Ground (black) Pin 2 - Right (red) Pin 3 - Ground (black) Pin 4 - Left (white) Aux L/R In (Stereo) For internal analog audio from 2nd CD or DVD. Pin configuration: Pin 1 - Left (white) Pin 2 - Ground (black) Pin 3 - Ground (black) Pin 4 - Right (red) SYSTEM REQUIREMENTS PC RAM Hard Drive Display Operating Systems CD-ROM Drive Pentium 800 MHz or higher with one available PCI 2.1 compliant expansion slot 256 MB System RAM Approximately 50 MB free space is required during the driver / application installation process. 127x768 High Color (16-bit) Windows XP, Vista, Win7 (Mac OS not supported) Quad-Speed CD-ROM or DVD-ROM drive required for software installation. A DVD drive, a compatible software DVD player application, and a high quality 5.1 Surround speaker system (five powered speakers plus a powered subwoofer) are required for playing back Dolby® Digital (AC-3) audio from DVD movies with the Riviera. Speakers Riviera works with 2-speaker, 4-speaker, 6-speaker and 5.1 speaker setups, or with headphones. High quality sound system, powered speakers or headphones are recommended to properly hear the Riviera high-quality audio playback. User’s Guide 4 WWW.TURTLEBEACH.COM INSTALLING THE RIVIERA SOUND CARD If you’re replacing a sound card that’s already in your PC, or if your PC has a sound chip on the motherboard (i.e. if there are headphone and microphone jacks on the front or rear of your PC): Uninstall the drivers and associated software for the old sound card or sound chip on your motherboard before installing your Riviera sound card. This will help avoid any possible conflicts between the Riviera sound card drivers and the older drivers. Generally, drivers can be removed in the Add/Remove Programs option, located in the Windows Control Panel. However, you should consult the PC or motherboard manufacturer's documentation for complete instructions, as the uninstall procedure may differ with each manufacturer. Check the Turtle Beach Knowledge base, at www.turtlebeach.com for more information. IMPORTANT! Read the warranty information included with your PC before you open its case to remove the old sound card and/or install the Riviera. Turtle Beach cannot be held responsible for loss of warranty coverage or other damages incurred as a result of modifications to the computer system by unauthorized personnel. INSTALLING THE RIVIERA 1. Turn off your PC, unplug its power cord and disconnect any external peripherals. Remove your PC‟s cover. 2. If you’re replacing a sound card that’s already in your PC… unscrew its bracket and gently rock the card out of its PCI slot to remove it from your PC. 3. Consult your motherboard documentation to locate the unshared PCI expansion slots. Select one that is empty for installing the card. We recommend using a free PCI expansion slot that‟s furthest away from the video card and power supply. Remove the metal slot rear cover by unscrewing its securing screw. Save the screw to secure the sound card to the chassis later. 5 Motherboards with five or more PCI slots will have two or more slots that share the same IRQ (interrupt request line). Be sure to install the Riviera in a PCI slot that has its own, unshared IRQ. If you find that your computer locks up after you have installed the Riviera, reinstall the Riviera card to a different, unshared PCI slot. 4. Before removing the Riviera sound card from its protective bag, touch the PC chassis to discharge any static electricity build-up from your body. Hold the card by its edges to avoid touching the gold edge connectors or components 5. With a gentle back-and-forth rocking motion, press the gold-striped edge connector on the Riviera sound card firmly into the PCI slot until it snaps in place. Secure its rear metal bracket to the chassis with the screw you removed in the previous step. Riviera Remove the rear bracket 6. Gently install the sound card Replace the PC‟s cover, reconnect the power cord and peripherals. Connect your powered speakers, microphone, and any other audio peripherals to the appropriate inputs and outputs on the sound card. INSTALLING THE DRIVERS AND SOFTWARE After inserting Riviera into a free PCI slot, install the drivers and software by following these instructions: The Riviera CD will launch automatically only if the Auto-Insert Notification option is enabled for your CD-ROM drive. If the installation menu does not appear after inserting the CD into your CD ROM drive, browse to the drive letter that contains the CD, run „SETUP.EXE‟, then return to the installation instructions. 1. Connect your powered speakers, microphone, and any other audio peripherals to the appropriate inputs and outputs on the Riviera. 2. Turn on the PC. After Windows has booted, if the “Add New Hardware Wizard” is displayed, click on the Cancel button to end this process. 3. It is important that you click on Cancel at this screen to properly install your sound card drivers. Insert the Turtle Beach Installation CD into the CD ROM drive. If the installation menu does not appear within 30 seconds, click on the “My Computer” icon, double-click on the CD-ROM drive icon to open it, and run „SETUP.EXE‟. When the Riviera installation screen appears, click Next to proceed, then follow the on-screen instructions. User’s Guide If the following dialog box appears, explaining that the software has not passed Windows Logo testing or does not have a Digital Signature, click "Continue Anyway" or "Yes" (depending on the operating system). 6 WWW.TURTLEBEACH.COM 4. When prompted, reboot the system. While preparing for reboot, the PC may appear to be temporarily "frozen". Do not interrupt the computer at this time. Wait a few minutes for the installation to complete. The wait time will vary depending on the speed of your PC. Please wait for the system to reboot to properly complete the installation. TO UNINSTALL RIVIERA If you should ever need to uninstall your Riviera sound card, click Start > Programs > Turtle Beach > Riviera > Uninstall Turtle Beach Riviera, then follow the on screen prompts to complete uninstallation. After running the uninstall procedure, turn off the PC, remove the Riviera sound card, then reboot your PC. NOTE: On some Vista/7 systems, the Riviera driver may need to be removed manually from the Device Manager. To do this, click Start > Control Panel > System and Maintenance > Device Manager. In the Device Manager, under “Sound, video and game controllers”, locate “Turtle Beach Riviera Wave”, right-click on the driver and select uninstall. The Riviera drivers and software applications are installed separately. When removing the card, you should follow the same procedure as above to also remove the applications. Using the Uninstall link from the Turtle Beach Riviera program group will remove only the applications. OPTIMIZING PLAYBACK PERFORMANCE IN WINDOWS 2000 AND XP For optimum performance, adjust the System Hardware Acceleration and Sample Rate Conversion Quality to Full and Best in the Advanced Audio Properties Window by clicking Start Control Panel Sounds and Audio Devices Audio Tab Sound Playback Advanced Button Performance Tab. 7 Riviera CHECKING RIVIERA AFTER INSTALLATION LAUNCHING THE RIVIERA CONTROL PANEL After running the software installation procedure from the Riviera CD, the Turtle Beach palm tree icon should appear in the Windows Systray at the bottom right of your PC screen. Clicking on this icon will bring up a menu from where you can launch the Riviera Control Panel. You can also launch the Riviera Control Panel by clicking Start All Programs Turtle Beach Riviera Run Riviera Control Panel. Before continuing with this section, make sure your speakers are plugged into the Riviera outputs and are powered on. For details on how to connect the speakers, see the Control Panel Speakers Tab section later in this manual. CHECKING THE SPEAKER CONFIGURATION After your speakers are connected and powered on, check if they‟re set up properly as follows: 1. Launch the Control Panel either by clicking the Turtle Beach palm tree icon in the bottom right Start Menu or by selecting Start All Programs Turtle Beach Riviera Run Riviera Control Panel. 2. In the Control Panel Speakers Tab, click on the Speaker Configuration pull-down menu and select the type of speakers you‟re using. 3. Click on each speaker icon to play a test signal and make sure that the correct speaker is playing the test sound. For example, if you click the front left speaker icon, you should hear the test signal say “Front Left” in the front left speaker. 4. In Windows Vista/7, when changing the Speaker Configuration, a User Account Control window will appear asking for permission for the “Turtle Beach Audio Configuration Tool” – this is an operating system security feature that is new to Windows Vista/7. When Vista/7‟s User Account Control is enabled, in order for the Riviera Control Panel to make the Speaker Configuration change you desire, you have to click „Continue‟ on the User Account Control dialog that appears. Since the Riviera Control Panel is scheduled to run automatically following the installation of the driver, this prompt will be seen when the desktop is loading – „OK‟ must be clicked to allow the Riviera Control Panel to set the default 5.1 speaker configuration. User’s Guide 8 WWW.TURTLEBEACH.COM NO SPEAKER SOUND If you don‟t hear any sound, check the following: Check that the speakers are turned on. Make sure you‟re not using passive speakers that require an amplifier. The Riviera analog outputs can only drive powered speakers, not passive speakers. Check that the speakers are properly connected to the Riviera analog outputs. See the Control Panel Speakers Tab section in this manual for details. If the speakers have an integrated volume control or mute button, check that they are properly set. The Master Volume on the Speakers Tab should be at least half-way up and the Mute button should be off, so the sound is not muted. The individual speaker volumes to the right of the Master Volume should be set to about 75% towards the right. This can be easily done by pressing the Reset button at the bottom of the volume section. (Windows XP Only) The Wave Volume slider in the Mixer Tab should be turned up and the Mute button should be off, so the Wave sound is not muted. In Windows XP: Click Start Control Panel Sounds and Audio Devices Audio and check that the Sound Playback and Sound Recording devices are set to Turtle Beach Riviera Wave, as shown in the illustration. If not, select Riviera from the drop down menus and click Apply. If the Riviera does not appear in the list, the drivers were not installed properly from the CD, so try uninstalling and reinstalling from the CD. In Windows Vista/7: If you are using standard PC speaker or headphones, click Start > Control Panel > (Hardware and Sound in Win7) > Sound and check that “Speakers – Turtle Beach Riviera Wave” is set as the Default Playback Device, as shown in the illustration. If you are using a TOSLINK cable to connect Riviera to an external digital decoder (such as your home theater 5.1 receiver), then select “Digital Output – Audio Advantage Riviera Device” as the Default Playback Device. 9 Riviera USING THE RIVIERA PLAYING DIGITAL MUSIC WITH WINDOWS MEDIA PLAYER Once you‟ve confirmed that the speakers are operating properly, launch Windows Media Player and play some music files from your digital song library. If you don‟t hear any sound even though Media Player indicates the song is playing: Check that Media Player‟s volume control is turned up. In Windows 2000/XP, Check that Media Player is configured to play from the Riviera by clicking Tools on the Windows Media Player menu. Then select Options Devices Speakers Properties. The selection under “Audio device to use” should be set to DirectSound: Turtle Beach Riviera Wave. If it isn‟t, then select this option, then press Apply OK at the bottom of the window. Close the options window and try Media Player again to see if it corrects the problem. Set the Master Volume on the Speakers Tab to a comfortable level. If it seems like the volume is too low, click the Riviera Control Panel Mixer Tab and adjust the Wave volume in the Playback Mixer. LISTENING TO DIGITAL MUSIC Here are some interesting ways to enjoy your digital music library. To begin, launch Windows Media Player and play one of your favorite songs from your digital song library. From the Speakers Tab, select a Speaker Configuration to match the speakers or headphones you‟ve set up with the Riviera, then adjust the Master Volume and Wave volume (in 2000/XP, you can use the Mixer Tab) to a comfortable listening level. Now try the following: USING THE EQUALIZER Click on the Equalizer Tab, click the Enable EQ button, then click the Equalizer Presets to hear the effect of each one. When you‟re done, click the Flat setting or Enable EQ to restore an unaltered tone. USING ENVIRONMENT EFFECTS Click the Equalizer Tab. Click on the Environments Enable, then click on the pull-down menu and select Living Room from the list. Click the Large, Medium and Small Environment Size buttons to hear how it changes the intensity of the effect. Try some other environment settings from the pull-down menu to hear how they sound. LISTENING TO STEREO MUSIC IN SURROUND SOUND When listening to stereo in 4 and 5.1 speaker configurations, the stereo signal will be sent to the Front speakers and the Environment-processed sound will be sent to the Surround speakers. In these Speaker Configuration modes, the Stereo-to-Multi-speaker indicator in the Settings Summary will light up to indicate that stereo music is being sent to all speakers, not just the two front speakers. When listening to Stereo on multi-speakers, try this: Select the 4 or 5.1 speaker configuration that matches your speaker system. Turn on the Multichannel to Subwoofer option by clicking the “…” button next to the Speaker Configuration pull-down menu in the Speaker Tab. This will send the low-frequency portion of the stereo signal to the sub-woofer output so you can hear deeper bass and control the level with the subwoofer volume in the Speakers Tab. User’s Guide 10 WWW.TURTLEBEACH.COM Enable the Environments in the Equalizer Tab and select an Environment from the pull-down menu. This sends the stereo signal processed by reverb to the surround speakers. You can adjust the amount of this effect with the Surround speaker volume controls in the Speaker Tab. Use the Equalizer to alter the tone to suit the genre of music you‟re listening to. For different surround sound effects, try adjusting the balance of Front, Surround, Center and LFE speaker levels with the Volume Controls in the Speakers Tab. When you‟ve found some settings that you like, save them as Presets by clicking Preset Save at the top left of the Riviera Control Panel. You can then easily return to any setting by clicking on Preset and then the name under which it was saved. SPEAKER POSITIONING & MULTI-SPEAKER SETTINGS UNDER VISTA/7 Under Vista/7, the multi-speaker settings of the Riviera Control Panel function a little differently. For example, selecting “5.1 Speakers” on the Speakers tab enables all 6 analog speakers so that the audio from 6 channel sources can be heard in the proper output channels, but does not automatically mix stereo audio to all of the speakers (that is, a stereo file will only be heard from the Front Left and Right speakers). In order to mix and match the number of audio channels with the number of active speakers in Vista/7, use the drop-down menu under “Speaker Mix Tuned For” in the lower-left of the Speakers tab – this will allow you to “tune the speaker mix”. This is best explained with an example. If you wanted to listen to stereo MP3 files played through all speakers of a 5.1 speaker system, enable “5.1 Speakers” in the main speaker configuration drop-down menu, then choose “Stereo Sources” from the „Speaker Mix Tuned For‟ dropdown menu (shown below). Most simply put, when mismatching the values in the „Speaker Mix Tuned For‟ drop-down menu with the main speaker configuration drop-down menu, the main speaker configuration setting controls how many physical speaker channels are “open”, and the „Speaker Mix Tuned For‟ drop-down menu controls what the number of channels the source audio has. Whereas in 2000/XP, the Speakers tab‟s “Settings Summary” area always displays “Stereo-to-Multi Speaker” when Speaker Positioning is enabled, in Vista/7, the Setting Summary area will show the current setting from the „Speaker Mix Tuned For‟ drop-down menu: Stereo mix to analog speakers 6.1 Channel Mix to Analog Speakers This allows for large number of flexible settings (NOTE: The amount of speakers shown on the Speaker Positioning window will always show which value is greater – the number of “source” channels or the number of active physical speakers. Whenever the settings match, the LED will remain unlit). 11 The stereo-to-surround feature is more dramatic when using 5.1 surround headphones, such as the Turtle Beach Ear Force HPA2 surround sound headphones, available at www.TurtleBeach.com. Riviera LISTENING TO DVDS IN SURROUND SOUND Watching DVDs on your PC requires DVD software, such as Cyberlink PowerDVD or InterVideo WinDVD, that plays DVDs with 5.1 surround sound output. This software is usually included with the DVD player installed on your PC. Typically, these programs provide an audio option tab that lets you set the audio playback format. From this tab, you should set the audio playback format to 5.1 surround so that the DVD audio will play on all 6 channels of your multi-channel system. Multi-channel DVD audio is encoded in either Dolby Digital or DTS, both of which compress 5.1 channels of audio into a single digital audio stream. When using the analog outputs to play DVD multi-channel sound, the decoding of the Dolby Digital or DTS signal is accomplished with a software decoder that is included with your DVD software player. When using the S/PDIF digital output to play DVD multi-channel sound, the digital audio signal is split into 5.1 channels by a decoder chip inside the digital speaker system or A/V receiver in your home theater system. LISTENING WITH THE ANALOG AUDIO OUTPUTS To use analog 5.1 speakers for playing DVD audio, select 5.1 Speakers from the Speaker Configuration Tab and click the Reset button under the volume sliders to set the levels to about 75%. If the Settings Summary indicates that the Graphic Equalizer, Speaker Position, Environments, Key Shifter or Center Canceller are enabled, disable all of them. Once you hear the DVD in unaltered 5.1 surround sound, you can go back and use these enhancements to suit your taste. Adjust the individual 5.1 channel levels with the volume controls on the Speakers Tab. LISTENING WITH THE DIGITAL AUDIO OUTPUT To use the digital audio output for playing DVD audio, connect the S/PDIF Digital Output to your digital speakers or an A/V receiver using a TOSLINK optical cable (available at www.TurtleBeach.com). Note that the digital speaker system or A/V receiver must have an integrated Dolby Digital Decoder to process the digital 5.1 signal into 6 analog channels to drive the 5.1 speakers. Set the S/PDIF settings pull-down menu to S/PDIF Out 48kHz, to transmit the digital signal. Note that when the digital output is enabled, you can see a red light inside the digital optical output or at the end of the optical cable plugged into the digital output. USING THE DIGITAL OUTPUT IN VISTA/7 For proper Dolby Digital or DTS pass-thru to an external decoder (such as an A/V receiver), the S/PDIF setting on the „Speakers‟ tab of the Riviera Control Panel should be set to “48 kHz”; additionally, you must set the Digital Output as your default playback device in the Vista/7 Sound Control Panel. Click Start Control Panel (Hardware and Sound in Win7) Sound and select “Digital Output – Turtle Beach Riviera Wave” as the Default Playback Device. Note that the Digital Output will be automatically selected in the Vista/7 Media Center Setup Wizard if “TOSLINK” is selected as your speaker connection type. Also note that in this setting, the S/PDIF Output functions strictly as a pass-thru – Environment effects, EQ and Riviera Control Panel Volume Controls don‟t have any effect on the audio. User’s Guide 12 WWW.TURTLEBEACH.COM USING EAR FORCE SURROUND SOUND HEADSET ® Turtle Beach Ear Force headphones are a perfect add-on for the Riviera. Be sure to check them out at www.TurtleBeach.com. The optional Turtle Beach Ear Force HPA2 surround-sound headset lets you experience surround-sound without having to set-up a 5.1 speaker system. The Ear Force HPA2 includes an amplifier unit that boosts the output level of the 5.1 output signals to provide head-shaking bass and a removable microphone compatible with the Riviera microphone input. Ear Force HPA2 with Amplifier The headset includes four speakers in each ear cup for reproducing Front, Surround, Center and Sub audio signals from the Riviera 5.1 analog outputs, providing a realistic surround-sound experience without the need for a 5.1 speaker system. To connect the headset to the analog outputs, insert the colored jacks on the headphone cable into the matching plugs on the Riviera bracket (Green = Front, Black = Surround, Orange (blue on Riviera) = Center/Sub, Pink = Microphone). 13 When placing the headset over your ears, be sure to place the cable/mic side on the left ear so that the front and rear speakers will be correctly positioned. Riviera RIVIERA CONTROL PANEL The Control Panel lets you access all of the Riviera audio features. You can launch the control panel from the Turtle Beach palm tree icon located on the right side of the Windows Start menu or by clicking Start All Programs Turtle Beach Riviera Run Riviera Control Panel. The control panel includes a set of tabs which, when clicked, activate various controls for accessing Riviera‟s features. SPEAKERS TAB (VISTA/7 VERSION) SPEAKERS TAB (XP VERSION) This Tab is used for setting the speaker and S/PDIF configurations. MIXER TAB (VISTA/7 VERSION) MIXER TAB (XP VERSION) This Tab lets you set the volume for the playback and recording sources. EQUALIZER TAB (VISTA/7 & XP) This Tab lets you modify the frequency response (i.e. tone) of your PC audio system and enable Environments for concert hall effects. User’s Guide 14 WWW.TURTLEBEACH.COM USING THE CONTROL PANEL PRESETS SAVING AND RESTORING PRESETS The Control Panel lets you save the Tab settings as presets for easy recall. Once you‟ve set the controls for a particular configuration, click on the Preset button, then click Save to call up the Save Preset dialog. Select a category from the Preset Category menu, type in a name, then press OK. To restore a saved preset, click the Preset button and select the category name followed by the preset name. IMPORTING AND EXPORTING PRESETS You can also share presets with other users with the import/export feature. To Export a preset, click Preset Export, then enter a name in the Save As dialog box. To Import a preset, click Preset Import and select the preset from the Open dialog box that appears. 15 Whenever a preset has been changed, an asterisk will appear on the right side of the name displayed at the top of the Control Panel, indicating that the preset has been edited from the original version. Riviera SPEAKERS TAB The Speakers Tab is divided into the following sections: “Speaker Configuration” lets you test speaker operation and select speaker configuration modes. “Volume” sets the master volume and individual speaker volumes. “Settings Summary” indicates the status of important control panel settings. S/PDIF Settings sets the digital output configurations. “Speaker Mix Tuned For” (Vista/7 Only) allows for further multi-speaker configuration options available only in Windows Vista/7. When S/PDIF Out is enabled, the analog speaker outputs are disabled. SPEAKER OPTIONS BUTTON (…) The Speaker Options button, located to the right of the speaker configuration pull-down menu, will only appear in 4 and 5.1 channel speaker configurations. Clicking this button activates the Speaker Options dialog with the following settings: Multi-channel to Subwoofer: When this option is checked, a submix of all channels is sent to the Sub-woofer output. This feature should be enabled when listening to a stereo source with multispeakers so the bass signals from the stereo source will be routed to the LFE output. When playing a DVD with 5.1 channel output, this option should be disabled, since the DVD 5.1 signal includes a separate sub-woofer channel and a sub-mix is not necessary. Center/Bass Swap: When this option is checked, the Center and Bass output channels are swapped. This feature is useful when using 5.1 speaker systems with center/LFE stereo jacks that do not match the configuration of the Riviera‟s center/LFE output jack. User’s Guide 16 WWW.TURTLEBEACH.COM SPEAKER CONFIGURATIONS The Speaker Configuration pull-down menu sets the following speaker modes: Headphones (2-speakers) 2 Speakers (Stereo) 4 speakers (Quad) 5.1 Speakers (5.1 Surround) 17 Riviera 5.1 Headphones (5.1 Surround) TESTING THE SPEAKER CONFIGURATION After selecting the speaker configuration to match your speaker system, you can check if the speakers are properly connected by clicking on the speaker icon to play a test signal on that speaker. The buttons at the bottom of the speaker configuration illustration, labeled Test and Loop, operate as follows: Test: When this button is clicked, the test signal automatically advances to the next speaker so that all of the speakers in a configuration are played once. Loop: When this button is enabled, if the Test button is clicked, the test signal will continuously play in sequential order on all speakers until the Test button is turned off. If the Loop button is enabled with the Test button off, clicking a speaker will repetitively play the test signal on that speaker until the Loop button is turned off. User’s Guide 18 WWW.TURTLEBEACH.COM VOLUME SECTION Master Volume: Controls the volume of all speakers. Pan: Controls L/R balance. Mute: Mutes all outputs when lit. INDIVIDUAL SPEAKER VOLUMES The volume controls for each speaker in the selected configuration are located to the right of the Master Volume slider. The number of sliders will depend on the speaker configuration (2 sliders for stereo, 4 sliders for quad, etc.). Lock Button: Click the Lock button, located at the bottom of the section, to make the L/R slider pairs move together when adjusting the levels. Reset Button: Click the Reset button to return all of the speaker levels to their default settings. SETTINGS SUMMARY This section summarizes the major control panel settings into a convenient list.: Stereo to Multi-Speaker: Indicates that a stereo source will be routed to all of the speakers when the Speaker Configuration is set to either 4 or 5.1 speaker modes. This will occur whenever the Speaker Position or Environments in the Equalizer Tab are enabled. To listen to a stereo source with two speakers when using 4 or 5.1 speakers, set the Speaker Configuration to 2 Speaker. (For more information about this feature under Vista/7, please see the earlier section entitled “Listening to Stereo Music in Surround Sound”) Graphic Equalizer: Indicates that the Equalizer is enabled, therefore the speaker frequency response may be modified from its “flat” setting by the Equalizer. Environments: Indicates that the Environments in the Equalizer Tab are enabled, which adds a reverberation or “concert hall” effect to the sound. Line In Available indicator: Indicates that the VersaJack is available to be used as a Line Input (will be lit in 2 and 4 speaker modes only). S/PDIF SETTINGS The S/PDIF digital input and output connectors may be used to interface with external S/PDIF devices, such as digital speakers, A/V receivers, DVD players and other home theater and professional audio devices. The digital input and output signals are connected to external devices using fiber optic TOSLINK cables, available at the Turtle Beach web site (www.TurtleBeach.com) or at most consumer electronics retailers. The S/PDIF Digital Output may be used to connect a 5.1 / 7.1 digital speaker system or an A/V receiver with digital inputs. When using this mode, select one of the S/PDIF output modes in the pull-down menu, as described below. When the S/PDIF signal is active, you should see a red light inside the digital output connector or at the end of the TOSLINK cable inserted into the digital output connector. When using Dolby Digital Live, all of the PC‟s audio signals are transmitted in digital rather than analog format, providing the highest quality signal possible. This configuration may be used for listening to stereo, multi-channel 3-D games, multi-channel audio and playback of Dolby Digital 5.1 audio from DVDs. 19 Riviera The S/PDIF Pull-down menu lets you select the following S/PDIF output modes: S/PDIF Out Off: S/PDIF output is turned off, so there is no digital signal. Note that whenever S/PDIF is turned on, a red light will be emitted from the S/PDIF output on the rear bracket. S/PDIF Out 44.1kHz: Digital audio is transmitted in S/PDIF format at 44.1kHz sample rate. S/PDIF Out 48kHz: Digital audio is transmitted in S/PDIF format at 48kHz sample rate. ‘SPEAKER MIX TUNED FOR’ DROP-DOWN MENU (VISTA/7 ONLY) When Speaker Positioning is enabled in Vista/7, this menu allows you to “mix and match” the number of input and output channels. For more information about this, please refer to the “Speaker Positioning & Multi-Speaker settings under Vista/7” section of this manual. User’s Guide 20 WWW.TURTLEBEACH.COM GRAPHIC EQUALIZER TAB GRAPHIC EQUALIZER The Graphic Equalizer provides 10 frequency bands that can be boost or cut to tailor the system frequency response, or tone. Two rows of buttons at the top of the slider bank provides quick access to eight equalizer presets. The Flat setting returns the sliders to their zero (i.e unmodified) positions. USER DEFINED PRESETS Once you‟ve set your own arrangement of sliders, the setting can be saved as a User Defined Preset by clicking the Add button, entering a name for the preset then clicking OK. The name will then be added to the list in the pull-down menu. To retrieve a preset from the list, click the User Defined button, then select a preset from the pull-down menu. To delete a preset from the list: Select the preset from the list, press the Delete Button and you will be prompted whether or not you would like to delete the current preset. The selected preset will then be removed from the list. ENVIRONMENTS When the Environments Enable button is on, clicking on the pull-down menu lets you select from a list of reverberation settings. The Environment Size buttons set the depth of this effect. These settings can be very effective when listening to stereo music in multi-speaker mode by creating reverb in the surround channels. 21 Riviera MIXER TAB Mixer Tab in Windows 2000/XP Mixer Tab in Windows Vista/7 PLAYBACK SETTINGS The Playback mixer provides an array of volume, mute and pan controls for balancing the sound sources when listening with headphones or speakers. Each slider controls a specific source of sound on the PC, including: Wave (not available in Vista/7): Sets the playback level of the PC‟s digital audio sources, such as MP3 files, Windows sounds, etc. The combination of the WAVE slider setting and the Master Volume slider setting will determine the overall volume of these sounds. Use the Pan control to balance the left and right signals User’s Guide 22 WWW.TURTLEBEACH.COM SW Synth (Software MIDI Synthesizer) (not available in Vista/7): Sets the volume of the Windows MIDI software synthesizer. Use the Pan control to balance the left and right signals. Microphone: Sets the volume of the microphone input. Since the microphone is a mono input, it does not have a pan control. The Microphone Options Button, labeled “…”, activates a dialog box with an option to boost the microphone volume by +20dB. CD Player: Sets the volume for the CD ROM audio. Line In: Sets the volume of the signal plugged into the Line input jack. Use the Pan control to balance the left and right signals. Master Volume: Sets the volume of all playback sources. This slider, along with the associated Pan and Mute controls, is identical to the Master Volume in the Speakers Tab. SELECTING RECORD SOURCE IN WINDOWS VISTA/7 Due to changes in Windows Vista/7, the Riviera Control Panel‟s „Mixer‟ tab alone cannot select the recording source. In Vista/7, the “Record Source” slider instead is labeled “Record Level” because it can only control the recording input‟s level. An additional step must be taken to select the recording source in Windows Vista/7. To select the record source, right-click on the speaker icon in the Taskbar System Tray (in the lower right-hand corner of the screen) and select “Recording Devices”. When the Recording Devices dialog window appears, it will display the available recording sources for the Riviera. To choose a record source, simply click on the item in the list, and then click the „Set Default‟ button. 23 Riviera HARDWARE WARRANTY Voyetra Turtle Beach, Inc. ("VTB") warrants to the original end-user purchaser ("Purchaser") that the Turtle Beach Riviera ("Product") will be free of defects in materials and workmanship for a period of one (1) year from the date of purchase by Purchaser ("Warranty Period"). If a defect should occur during the Warranty Period, the Purchaser must obtain a Return Merchandise Authorization ("RMA") from VTB. Purchaser will be responsible for all costs incurred in returning the defective Product to and from an authorized VTB service center, or to the repair facility located at VTB's corporate headquarters. The Product must be returned in a static-proof bag, and in the original packaging. A copy of the dated proof of purchase must be included with the defective Product. The RMA number must be clearly indicated on the outside of the package. Packages without an RMA number will be returned to Sender. In the event of a defect, Purchaser's sole and exclusive remedy and VTB's sole liability are expressly limited to the correction of the defect by adjustment, repair, or replacement of the Product at VTB's sole option and expense. This warranty does not cover, and VTB is not responsible for, damage caused by misuse, neglect, fire, acts of God, or unauthorized modification of the Product or damage resulting from the use of the Product with hardware or software programs not provided or specifically recommended by VTB. Except as specifically provided herein, there are no other warranties expressed or implied, including, but not limited to, any implied warranties of merchantability or fitness for a particular purpose. In no event shall VTB be liable for indirect, incidental, consequential, or other damages including personal injury, lost profits and damages to property arising out of any breach of this warranty or otherwise. All software including operating systems or applications programs are provided on an "As Is" basis without warranty. Some states do not allow the exclusion or limitation of incidental or consequential damages, so the above exclusion or limitation may not apply to you. This warranty gives you specific legal rights. You may also have other rights, which vary from state to state. FCC DECLARATION OF CONFORMITY PRODUCT NAME Turtle Beach Riviera MODEL NUMBER TB400-3425-01 FCC RULES OPERATING ENVIRONMENT TESTED TO COMPLY WITH FCC PART 15, CLASS B FOR HOME OR OFFICE USE FCC COMPLIANCE STATEMENT: This device complies with part 15 of the FCC rules. Operation is subject to the following conditions. (1) This device may not cause harmful interference and (2)This device must accept any interference received including interference that may cause undesired operation. CAUTION Changes or modifications to this unit not expressly approved by the party responsible for compliance could void the user‟s authority to operate the equipment. PARTY RESPONSIBLE FOR PRODUCT COMPLIANCE Voyetra Turtle Beach, Inc., 150 Clearbrook Road, Ste. 162, Elmsford, NY 10523 INFORMATION TO USER: This equipment has been tested and found to comply with the limits for a Class B digital device, pursuant to Part 15 of FCC rules. These limits are designed to provide reasonable protection against harmful interference in a residential installation. This equipment generates, uses, and can radiate radio frequency energy and, if not installed and used in accordance with the instructions, may cause harmful interference to radio communications. However, there is no guarantee that interference will not occur in a particular installation. If this equipment does cause harmful interference to radio or television reception, which can be determined by turning the equipment off and on, the user is encouraged to try to correct the interference by one or more of the following measures: (1.) Reorient or relocate the receiving antenna. (2.) Increase the separation between the equipment and receiver. (3.) Connect the equipment into an outlet on a circuit different from that to which the receiver is connected. (4.) Consult the dealer or an experienced radio TV technician for help User’s Guide 24