1
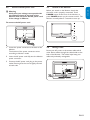
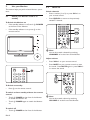
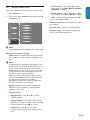
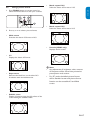
190TS2 220TS2 (Ref model: 190TS2LB) www.philips.com/welcome EN Important safety instructions User Manual Troubleshooting 4 7 26 ENGLISH Welcome FRANÇAISE Know these safety symbols CAUTION RISK OF ELECTRIC SHOCK DO NOT OPEN ESPAÑOL CAUTION: TO REDUCE THE RISK OF ELECTRIC SHOCK, DO NOT REMOVE COVER (OR BACK). NO USER-SERVICEABLE PARTS INSIDE. REFER SERVICING TO QUALIFIED SERVICE PERSONNEL. Congratulations on your purchase, and welcome to the “family!” Dear PHILIPS product owner: Thank you for your confidence in PHILIPS. You’ve selected one of the best-built, best-backed products available today. We’ll do everything in our power to keep you happy with your purchase for many years to come. This “bolt of lightning” indicates uninsulated material within your unit may cause an electrical shock. For the safety of everyone in your household, please do not remove product covering. The “exclamation point” calls attention to features for which you should read the enclosed literature closely to prevent operating and maintenance problems. WARNING: To reduce the risk of fire or electric shock, this apparatus should not be exposed to rain or moisture and objects filled with liquids, such as vases, should not be placed on this apparatus. CAUTION: To prevent electric shock, match wide blade of plug to wide slot, fully insert. For Customer Use Enter below the Serial No. which is located on the rear of the cabinet. Retain this information for future reference. Model No._______________________ Serial No. _______________________ Register your product and get support at www.philips.com/welcome EN-2 2. Important . . . . . . . . . . . . . . . . . . . . . . . . . 6 2.1 Product information. . . . . . . . . . . . . . . . . . . . . . . 6 2.2 Screen care. . . . . . . . . . . . . . . . . . . . . . . . . . . . . . 6 2.3 Environmental care. . . . . . . . . . . . . . . . . . . . . . . . 6 2.4 Regulatory notices . . . . . . . . . . . . . . . . . . . . . . . . 6 7. Connect devices . . . . . . . . . . . . . . . . . . . 20 7.1 Connection overview. . . . . . . . . . . . . . . . . . . . . 20 7.2 Select connection quality . . . . . . . . . . . . . . . . . . 21 7.3 Connect devices. . . . . . . . . . . . . . . . . . . . . . . . . 22 8. Pixel policy . . . . . . . . . . . . . . . . . . . . . . . 24 9. Glossary. . . . . . . . . . . . . . . . . . . . . . . . . . 25 FRANÇAISE 1. Important safety instructions . . . . . . . . . 4 ENGLISH Table of contents 3. Your Monitor. . . . . . . . . . . . . . . . . . . . . . . 7 Monitor overview . . . . . . . . . . . . . . . . . . . . . . . . 7 3.2 Remote control . . . . . . . . . . . . . . . . . . . . . . . . . . 7 10. Troubleshooting . . . . . . . . . . . . . . . . . . . 26 11. Index . . . . . . . . . . . . . . . . . . . . . . . . . . . . 27 4. Get started . . . . . . . . . . . . . . . . . . . . . . . . 8 4.1 Mounting the stand . . . . . . . . . . . . . . . . . . . . . . . 8 4.2 Position the Monitor . . . . . . . . . . . . . . . . . . . . . . 8 4.3 Wall mount the Monitor . . . . . . . . . . . . . . . . . . . 8 4.4 Install the remote control batteries . . . . . . . . . 10 4.5 Connect the PC, antenna or cable . . . . . . . . . . 10 4.6 Connect the AC power cord. . . . . . . . . . . . . . . 11 4.7 Switch on the Monitor. . . . . . . . . . . . . . . . . . . . 11 4.8 Manage cable . . . . . . . . . . . . . . . . . . . . . . . . . . . 11 5. Use your Monitor . . . . . . . . . . . . . . . . . . 12 5.1 Switch your Monitor on/off or to standby . . . . 12 5.2 Watch TV . . . . . . . . . . . . . . . . . . . . . . . . . . . . . . 12 5.3 Watch channels from a cable receiver box . . . . 13 5.4 Watch a DVD. . . . . . . . . . . . . . . . . . . . . . . . . . . 13 6. Use more of your Monitor. . . . . . . . . . . 13 6.1 Remote control overview . . . . . . . . . . . . . . . . . 13 6.2 Enter setup menu. . . . . . . . . . . . . . . . . . . . . . . . 14 6.3 Set the channel menu. . . . . . . . . . . . . . . . . . . . . 15 6.4 Adjust video settings . . . . . . . . . . . . . . . . . . . . . 16 6.5 Use preset picture mode . . . . . . . . . . . . . . . . . . 16 6.6 Change picture format . . . . . . . . . . . . . . . . . . . . 17 6.7 Adjust audio settings . . . . . . . . . . . . . . . . . . . . . 18 6.8 Use preset sound mode. . . . . . . . . . . . . . . . . . . 18 6.9 Set the feature menu . . . . . . . . . . . . . . . . . . . . . 18 6.10 Select your Monitor in PC mode . . . . . . . . . . . 19 EN-3 ESPAÑOL 3.1 ESPAÑOL FRANÇAISE ENGLISH 1. Important safety instructions Read before operating equipment 1. Read and keep these instructions. 2. Heed all warnings. 3. Follow all instructions. 4. Do not insert any strange object into the ventilation slots.This might lead to damage of the Monitor. 5. Do not use this apparatus near water. 6. Clean only with a dry cloth. 7. Do not block any of the ventilation openings. Install in accordance with the manufacturers instructions. 8. Do not install near any heat sources such as radiators, heat registers, stoves, or other apparatus (including amplifiers) that produce heat. 9. Do not defeat the safety purpose of the polarized or grounding-type plug. A polarized plug has two blades with one wider than the other. A grounding type plug has two blades and third grounding prong. The wide blade or third prong are provided for your safety. When the provided plug does not fit into your outlet, consult an electrician for replacement of the obsolete outlet. 10. Protect the power cord from being walked on or pinched particularly at plugs, convenience receptacles, and the point where they exit from the apparatus. 11. Only use attachments/accessories specified by the manufacturer. 12. Use only with a cart, stand, tripod, bracket, or table specified by the manufacturer, or sold with the apparatus. When a cart is used, use caution when moving the cart/apparatus combination to avoid injury from tip-over. 13. Unplug this apparatus during lightning storms or when unused for long periods of time. 14. Refer all servicing to qualified service personnel. Servicing is required when the apparatus has been damaged in any way, such as power-supply cord or plug is damaged, liquid has been spilled or objects have fallen into apparatus, the apparatus has been exposed to rain or moisture, does not operate normally, or has been dropped. 15. This product may contain lead or mercury. Disposal of these materials may be regulated due to environmental considerations. For disposal or recycling information, please contact your local authorities or the Electronic Industries Alliance: www.eiae.org. 16. Damage Requiring Service - The appliance should be serviced by qualified service personnel when: The power supply cord or the plug has been damaged; Objects have fallen, or liquid has been spilled into the appliance; The appliance has been exposed to rain; EN-4 The appliance does not appear to operate normally or exhibits a marked change in performance; The appliance has been dropped, or the enclosure damaged. 17. Tilt/Stability - All televisions must comply with recommended international global safety standards for tilt and stability properties of its cabinet design. Do not compromise these design standards by applying excessive pull force to the front, or top, of the cabinet which could ultimately overturn the product. Also, do not endanger yourself, or children, by placing electronic equipment/toys on the top of the cabinet. Such items could unsuspectingly fall from the top of the set and cause product damage and/ or personal injury. 18. Wall or Ceiling Mounting - The appliance should be mounted to a wall or ceiling only as recommended by the manufacturer. 19. Power Lines - An outdoor antenna should be located away from power lines. 20. Outdoor Antenna Grounding - If an outside antenna is connected to the receiver, be sure the antenna system is grounded so as to provide some protection against voltage surges and built up static charges. 21. Object and Liquid Entry - Care should be taken so that objects do not fall and liquids are not spilled into the enclosure through openings. 22. Battery Usage CAUTION - To prevent battery leakage that may result in bodily injury, property damage, or damage to the unit: Install all batteries correctly, with + and - aligned as marked on the unit. Do not mix batteries (old and new or carbon and alkaline, etc.). Remove batteries when the unit is not used for a long time. 23. For ventilation, leave at least 4” to 6” free all around the Monitor. Do not place the Monitor on a carpet. 24. The equipment shall not be exposed to dripping or splashing. 25. The equipment shall not be exposed to rain or moisture and objects filled with liquids, such as vases, shall be placed on the apparatus. 26. The apparatus must be connected to a mains socket outlet with a protected earthed connection. 27. The appliance coupler is used as the disconnect device of this apparatus, the disconnect device shall remain readily operable. 6SHFLÀFDWLRQVDUHVXEMHFWWRFKDQJH without notice. Philips reserves the right to change products at any time without being obliged to adjust earlier supplies accordingly. The material in this manual is believed adequate for the intended use of the system. If the product, or its individual modules or procedures, are used for SXUSRVHVRWKHUWKDQWKRVHVSHFLÀHG KHUHLQFRQÀUPDWLRQRIWKHLUYDOLGLW\ and suitability must be obtained. Philips warrants that the material itself does not infringe any United States patents. No further warranty is expressed or implied. ENGLISH CAUTION RISK OF ELECTRIC SHOCK DO NOT OPEN CAUTION: TO REDUCE THE RISK OF ELECTRIC SHOCK, DO NOT REMOVE COVER (OR BACK). NO USER-SERVICEABLE PARTS INSIDE. REFER SERVICING TO QUALIFIED SERVICE PERSONNEL. FRANÇAISE Philips and the Philips Shield Emblem are registered trademarks of Koninklijke Philips Electronics N.V. and are used under licence from Koninklijke Philips Electronics N.V. Safety symbols Know these safety symbols: This “bolt of lightning” indicates uninsulated material within your unit may cause an electrical shock. For the safety of everyone in your household, please do not remove product covering. The “exclamation point” calls attention to features for which you should read the enclosed literature closely to prevent operating and maintenance problems. ESPAÑOL 2010 © Koninklijke Philips Electronics N.V. All rights reserved. If the Monitor is mounted on a swivel base or swivel arm, ensure no strain is placed on the power cord when the Monitor is swivelled. Strain on the power cord can loosen connections. This may FDXVHDUFLQJDQGUHVXOWLQÀUH Philips can’t be held responsible neither for any errors in the content of this document nor for any problems as a result of the content in this document. Errors reported to Philips will be adapted and published on the Philips support website as soon as possible. Pixel characteristics The LCD panel has a high number of colour pixels. Although it has effective pixels of 99.999% or more. Black dots or bright points of light (red, green or blue) may appear constantly on the screen. This is a structural property of display (within common industrial standard ) and is not a malfunction. This does not affect the performance of the product. EN-5 Important 2.1 Product information The model and serial number are on the rear of the Monitor and on the packaging. FRANÇAISE ENGLISH 2. 2.3 Environmental care End of life directives - Recycling Philips has paid a lot of attention to producing an environmentally friendly product. Your new Monitor contains several materials that can be recycled for new uses. At the end of its life, specialized companies can dismantle and recycle this set. This will minimize the amount of materials being disposed of. Please be sure to dispose of this set in accordance with all state and local regulations. Recycling your packaging ESPAÑOL The packaging of this product is intended to be recycled. Contact your local authorities for information on how to recycle the packaging. Disposing used batteries This Monitor consumes minimal energy in standby mode to minimise environmental impact. The active power consumption is given on the type plate at the rear of the Monitor. The supplied batteries do not contain mercury or cadmium. Dispose supplied and all other used batteries according to your local regulations. Power consumption 2.2 Screen care The Monitor consumes minimal energy in standby mode to minimise environmental impact. Active power consumption is displayed at the back of the Monitor. 2.4 Regulatory notices B WARNING 7RUHGXFHWKHULVNRIÀUHRUHOHFWULFVKRFNWKLV apparatus should not be exposed to rain or PRLVWXUH2EMHFWVÀOOHGZLWKOLTXLGVVXFKDV vases, should not be placed on this apparatus. Turn off and unplug the AC power cord before cleaning the screen. Clean the screen with a soft, dry cloth. Do not use substances such as household cleaning agents as these may damage the screen. To avoid deformations or color fading, wipe off water droplets as soon as possible. Do not touch, push, rub or strike the screen with hard objects as this may damage the screen permanently. Where possible, avoid stationary images that remain on-screen for extended periods of time. If you must use stationary images, reduce the screen contrast and brightness to avoid screen damage. EN-6 This section gives you an overview of commonlyused Monitor controls and functions. 3.1 Monitor overview Front controls and indicators Use the Monitor rear connectors to connect to the antenna and permanent devices such as a highdefinition disc player or DVD player. D Note For more information about connections, see Section 7 Connect devices. 3.2 Remote control 5 2 1 4 3 ENGLISH Your Monitor FRANÇAISE 3. 4 ESPAÑOL 3 2 1 6 1. POWER / Power indicator 2. SOURCE 3. MENU 4. CHANNEL +/- 5. VOLUME +/- 6. Remote control sensor 5 6 7 8 9 10 Side connectors HDMI-1 VGA Y Pb Pr Video L R PC IN L AUDIO R ȍ$17 CV IN Video L R AV OUT AV IN -1 1. Standby / ON 2. Source selection 3. Channel selection Use the Monitor side connectors to connect to mobile devices such as a camera or game console. You can also connect to the headphone. 4. Volume selection 5. Zoom buttons Rear connectors 6. Picture button 7. OK button 8. Cursor button 9. Menu button HDMI-1 VGA Y Pb Pr Video L R PC IN L AUDIO R ȍ$17 CV IN AV IN -1 Video L R AV OUT Cable 10. Information button For more information about the remote control, See Remote control overview section. EN-7 Get started 4.2 Position the Monitor This section describes how to position and connect your Monitor, and how to perform your first-time installation. B WARNING 4.1 Large screen Monitors are heavy. Two people are required to carry and handle the Monitor. Wherever you decide to position your Monitor, ensure that you always have easy access to the AC power cord or plug to disconnect the Monitor from the power. If the Monitor is mounted on a swivel base or swivel arm, ensure no strain is placed on the AC power cord when the Monitor is swivelled. Strain on the AC power cord can loosen connections. This may cause arcing and result in fire. For ideal viewing conditions, position the Monitor where light does not fall directly on the screen. The ideal viewing distance for watching Monitor is three times its screen size. Mounting the stand 6WHS3ODFHRQDVRIWÁDWVXUIDFH ESPAÑOL FRANÇAISE ENGLISH 4. Do not insert the power plug into the wall socket before all the connections are done. Kensington security slot Step 2 Put the base on a table Your Monitor is equipped with a Kensington Security Slot at the back of the Monitor. If you connect an anti-theft Kensington lock (not supplied), position the Monitor within reach of a permanent object that can be attached to the lock. HDMI-1 VGA Y Pb Pr Video L R PC IN L AUDIO R ȍ$17 CV IN AV IN -1 Video L R AV OUT Step 3 Insert base into column 4.3 Wall mount the Monitor B Warning Wall mounting of the Monitor should only be SHUIRUPHGE\TXDOLÀHGLQVWDOOHUV.RQLQNOLMNH Philips Electronics N.V. bears no responsibility for improper mounting that results in accident or injury. EN-8 Using a cross-head (Phillips Screw) screwdriver (not supplied) to unscrew the four bolts that secure the Monitor stand. D Note These instructions are only applicable to Monitor with TV tuner models with mounted stands. If your Monitor stand is not mounted, skip to Step 3 Connect cables. 4. Firmly pull the stand from the bottom of the Monitor. Keep both the stand and bolts in a secure location for future reinstallation. 1. Step 3 Connect cables According to the size of your Monitor screen, purchase one of the following wall brackets: 75 x 75mm FRANÇAISE 19” / 22” Screw type Metric 4 x 10mm Step 2 Remove the Monitor stand Carefully place the Monitor face down on a flat, stable surface that is covered by soft cloth. The cloth should be thick enough to protect your screen. Connect the antenna cable, AC power cord, and all other devices to the back of the Monitor as described in the following sections and in Section 7 Connect devices. Step 4 Secure the VESA-compatible wall bracket to the Monitor B Warning 2QO\XVHWKHVSHFLÀHGEROWV0[PP to secure the VESA-compatible wall EUDFNHWWR\RXU0RQLWRU7KHVSHFLÀHG bolts are designed to match the weight of your Monitor. 2. Pull up the lid that cover the Monitor stand. D Note Depending on your VESA-compatible wall bracket, you may need to separate the mounting plate from the wall bracket for easier installation. Refer to your VESA-compatible wall bracket documentation for instructions. 75x75 mm EN-9 ESPAÑOL Monitor VESA-compatible screen size wall bracket type LQFKHV PLOOLPHWHUV ENGLISH 3. Step 1 Purchase a VESA-compatible wall bracket Install the remote control batteries ENGLISH 4.4 3. Connect the other end of the antenna cable to your antenna outlet, ensuring that the cable is tightly secured at both ends. Connect to a cable receiver box AAA x2 ESPAÑOL FRANÇAISE ANTENNA 1. Open the battery cover on the back of the remote control. 2. Insert the 2 batteries supplied. Make sure the + and - battery ends line up correctly (the polarity is marked inside the compartment). 3. HDMI-1 PC IN VGA Y Pb Pr Video L R AUDIO R L ȍ$17 CV IN Video L R AV OUT AV IN -1 Close the cover. 4.5 Cable Receiver Box Connect the PC, antenna or cable A cable receiver box can be connected to the Monitor through the following connections: ANTENNA (75) Connect to PC A A/V (Composite Video and Audio) S-Video and Audio B VGA HDMI-1 Y Pb Pr Video L R PC IN L AUDIO Connect a cable receiver box through component video input or HDMI R ȍ$17 CV IN Video L AV IN -1 ANTENNA Computer Y Pb Pr Video L R R L CV IN Video AV IN -1 Cable Receiver Box HDMI-1 Connect to an antenna HDMI-1 VGA Y Pb Pr Video L R PC IN L AUDIO R ȍ$17 CV IN AV IN -1 Video L R AV OUT 1. Locate the TV ANTENNA connector on the back of the Monitor. 2. Connect one end of an antenna cable (not supplied) to the TV ANTENNA connectors. Use an adaptor if the antenna cable does not fit. EN-10 PC IN VGA Y Pb Pr Video L R AUDIO R L ȍ$17 CV IN AV IN -1 Video L R AV OUT B Warning Verify that your voltage corresponds with the voltage printed at the back of the Monitor. Do not insert the AC power cord if the voltage is different. 4.7 Switch on the Monitor Before you switch on the Monitor, check that the mains cord is properly connected. Touch POWER button at the front of the Monitor, or press POWER button on the remote control. The Monitor normally takes 5-7 seconds to start up. ESPAÑOL To connect the AC power cord AC IN 1. Locate the power connector at the back of the Monitor. The location of the power connector varies according to Monitor model. 2. Insert the AC power cord fully into the Monitor power connector. 3. Connect the AC power cord plug to the power outlet. Ensuring that the cord is tightly secured at both ends. ENGLISH Connect the AC power cord FRANÇAISE 4.6 4.8 Manage cable Route your AC power cord, antenna cable and all other device cables through the cable holder at the back of the Monitor. The holder helps keep your cables tidy and easily manageable. HDMI-1 VGA Y Pb Pr Video L R PC IN L AUDIO R ȍ$17 CV IN AV IN -1 Video L R AV OUT EN-11 ENGLISH 5. Use your Monitor This section helps you perform basic Monitor operations. Switch your Monitor on/off or to standby Watch TV Switch channels Press a number (1 to 9) or press CH +/- on your remote control. Press PRE CH to return to the previously viewed TV channel. To Switch the Monitor on If the standby indicator is off, touch . POWER at the front of the Monitor. If the standby indicator is on, press . on the remote control. 1~9 ESPAÑOL FRANÇAISE 5.1 5.2 D Note You can also switch channels by touching CHANNEL +/- at the front of the Monitor. Adjust volume Press VOL+/- on your remote control. Press MUTE on your remote control to mute the sound. Press MUTE again or press VOL+/to restore the sound. To Switch to standby Press . on the remote control. To switch on from standby without the remote control. Touch . POWER at the front of the Monitor to switch the Monitor off. Touch . POWER again to switch the Monitor on. To switch off Touch . POWER at the front of the Monitor. EN-12 D Note You can also switch volume by touching VOLUME +/- at the front of the Monitor. 1. Switch on the cable receiver box. The picture from your cable receiver box might appear automatically on your screen. 2. Use the remote control of your cable receiver box to select channels. 6. Use more of your Monitor This section describes the advanced features of your Monitor. 6.1 Remote control overview If the picture does not appear 1. ENGLISH Watch channels from a cable receiver box 2 FRANÇAISE 5.3 1 Press SOURCE to select the correct source. 3 ESPAÑOL 4 5 7 6 8 10 12 9 11 13 TV 14 AV IN-1 15 16 AV IN-2 S-Video YPbPr HDMI-1 HDMI-2 VGA 2. Press OK and wait a few seconds for the picture to appear. 3. Use the remote control of your cable receiver box to select channels. 5.4 Watch a DVD 1. Insert a DVD disc in your player. 2. Press Play > on the remote control of your player. The picture from the player might appear automatically on your screen. If the picture does not appear 1. Press SOURCE to select the correct source. 2. Press OK and wait a few seconds for the picture to appear. 1. . POWER Switches the Monitor on from standby or back to standby. 2. SOURCE Selects connected devices. 3. NUMBER BUTTONS Selects a channel, page or setting. 4. PRE CH Returns to the previously-viewed channel. 5. MUTE Mutes or restores sound. 6. &+Ƌ9 Switches to the next or previous channel. 7. VOL +/Increases or decreases volume. EN-13 ENGLISH FRANÇAISE ESPAÑOL 8. ZOOM Selects a picture format. See Change Picture format section. 6.2 9. SLEEP Sets the Monitor to turn itself off within a certain time. 1. Enter setup menu This section describes how to enter the Setup menu. Press MENU on the remote control to display the Setup menu. 10. DUALI-II Selects Mono, Stereo, Dual I, Dual II, Nicam Mono, Nicam Stereo, Nicam Dual I, Nicam Dual II. D Note The sound mode selections depend on TV program and broadcast TV channel of that region. 11. PICTURE Selects a picture setting. 12. SOUND Adds greater depth and dimension to the TV sound. 13. OK Press to activate a setting. 14. CURSOR BUTTONS Î ï Í Æ To navigate through the menus. TV Video-1 Video-2 S-Video YPbPr HDMI-1 HDMI-2 PC Setup 15. MENU Toggles the menu on or off. 16. INFO Displays programme information, if available. EN-14 2. 3UHVVɼRUɾWRKLJKOLJKWWKHLWHP\RXZDQWWR DGMXVW3UHVVɽRUOK button to enter. 3. Press MENU to exit. This section describes how to set the channel menu. 1. Enter Setup menu. 2. Sound system - 3UHVVɿRUɽWRVHOHFW sound system from DK, I, BG, M, or Auto. 3UHVVɾWRVHOHFWChannelPHQXWKHQSUHVVɽ or OK to enter. Auto search AFC - $XWR)UHTXHQF\&RQWURO3UHVVɿRU ɽWRVHOHFWOn or Off. Channel lock: Selects the channels for setting lock function. Channel skip - Skips the selected channels. Program swap - Exchanges the appearing order of two selected channels. Video Update search Manual search Audio Channel lock ESPAÑOL Channel skip Feature Program swap Channel D Note The Channel menu is available for TV input only. Summary of channel settings Auto search - Automatically sets up the TV for the broadcast or cable channels available in your area. D Note Immediately after unpacking and plugging in your new monitor, run the auto search function to set up the TV for the broadcast or cable channels available in your area. If you do not run the auto search function to set up the channels, your TV programs may not operate properly. After you have run auto search, check out the results. Press &+Ƌ9 on the remote control and see which channels you can select. Remember, an antenna or cable TV signal must first be connected to your Monitor. Update search - Automatically updates the Monitor for the broadcast or cable channels available in your area. Manual search - ENGLISH Color system - 3UHVVɿRUɽWRVHOHFW color system from PAL, NTSC, SECAM, NTSC443, or Auto. Set the channel menu FRANÇAISE 6.3 Program No. -3UHVVɿRUɽWRVHOHFW channel number. Program Name - 3UHVVɼRUɾWRVHOHFW DOSKDEHWDQGQXPHULFQXPEHUV3UHVVɿRUɽ to move position. Press OK to confirm. Frequency - 3UHVVɿRUɽWRVHOHFW frequency. Also possible by pressing number keys. EN-15 Adjust video settings 6.5 Use preset picture mode This section describes how to adjust your video settings. 1. Press PICTURE on the remote control to set your Monitor to a pre-defined picture setting. 1. Enter Setup menu. 2. 2. 3UHVVɾWRVHOHFWVideoPHQXWKHQSUHVVɽRU OK to enter. Press PICTURE again to select one of the following settings: Personal - The customized settings you defined by using the Picture menu. Vivid - Vivid picture settings and clear sound for high action. Standard - For normal viewing. Movie - Brilliant picture settings for a cinematic experience. ECO mode - Economically and friendly settings for lower power consumption. FRANÇAISE ENGLISH 6.4 Preset Video Brightness Contrast Audio ESPAÑOL Color Sharpness Feature Noise reduction Color temp. Channel Size 3. 3UHVVɼRUɾWRVHOHFWWKHRQHRIWKHYLGHR VHWWLQJVDQGSUHVVɽRUOK to enter the setting. 4. 3UHVVɿRUɽWRDGMXVWWKHVHWWLQJDQGSUHVV OK to confirm the change. 5. Press MENU to exit. Summary of video settings The following picture settings can be configured. Depending on the format of the video source, some video settings might not be available. Preset - Changes the format of the picture. Brightness - Sets the brightness of the picture. Contrast - Sets the level of white in the picture. Color - Sets the level of saturation. Sharpness - Sets the sharpness of fine details. Noise reduction - Sets the noise removal mode. Color temp. - Sets the color temperature. Size - Sets the displaying size of the picture. D Note Any adjustment of brightness, color, contrast, or sharpness will be stored into Personal at preset picture mode section. EN-16 Movie expand 16:9 Scales the classic 4:3 format to 16:9. 8QVFDOH+'0,RQO\ Displays the full screen. ENGLISH Movie expand 14:9 Scales the classic 4:3 format to 14:9. Press ZOOM button on remote control to select the format best fit in with your contents. 2. Press Î or ï to select a picture format. Wide screen Stretches the classic 4:3 format to 16:9. FRANÇAISE 1. Change picture format ESPAÑOL 6.6 4:3 Displays the classic 4:3 format. D Note Super zoom Removes the black bars on the side of 4:3 broadcasts with minimal distortion. Any adjustment of brightness, color, contrast of sharpness will be stored into personal at preset picture mode section. For PC mode, the default picture format will be Standard screen and picture format function can be accessible 4:3 and Wide screen. Subtitle zoom Display 4:3 pictures using the full surface of the screen leaving the subtitles visible. EN-17 Adjust audio settings This section describes how to adjust audio settings. 1. Enter Setup menu. 2. 3UHVVɾWRVHOHFWAudioPHQXWKHQSUHVVɽRU OK to enter. FRANÇAISE ENGLISH 6.7 6.8 1. Press SOUND on the remote control to set your Monitor to a pre-defined audio setting. 2. Press SOUND again to select one of the following settings: Personal - Applies the settings that were customized in the Audio menu. Standard - Adjusts audio settings to suit most environments and types of audio. Music - Applies audio settings ideally suited for music. Preset Video Bass Treble Audio Use preset sound mode Balance ESPAÑOL MTS Feature Virtual surround AVL Channel 3. Press Î or ï to select one of the audio settings, DQGSUHVVɽRUOK to enter the setting. 4. 3UHVVɿRUɽWRDGMXVWWKHVHWWLQJDQGSUHVV OK to confirm the change. 5. 6.9 Set the feature menu This section describes how to set the feature menu. 1. Enter Setup menu. 2. 3UHVVɾWRVHOHFWFeaturePHQXWKHQSUHVVɽ or OK to enter. Menu language Video Menu timeout Press Menu to exit Sleep timer Audio Summary of audio settings Super contrast SmartContrast The following audio settings can be configured. Depending on the format of the input source, some audio settings might not be available. Preset - Changes the format of the audio. Bass - Adjust low frequency sound. Treble - Adjust high frequency sound. Feature SmartSticker Child lock Channel Reset all 3. 3UHVVɼRUɾWRVHOHFWWKHRQHRIWKHIHDWXUH PHQXVDQGSUHVVɽRUOK to enter the setting. Balance - Adjusts the sound between the left and right speakers. 4. 3UHVVɼRUɾWRDGMXVWWKHVHWWLQJDQGSUHVV OKWRFRQÀUPWKHFKDQJH MTS - Multichannel Television Sound. If the stereo or dual language broadcasts are transmitted, you can select the sound mode. 5. Press MENU to exit. Virtual surround - Allows you to select the modes for more spatial or surround sound reproduction dependent on the broadcasted signals or signals from external inputs received. AVL$XWRPDWLFYROXPHOHYHOLQJ Reduces sudden volume changes, for example, during commercials or when switching from one channel to another. EN-18 Menu language - Selects a language for your on-screen interface. Menu timeout - Sets the time before the Setup menu disappears. Sleep timer - Switches the Monitor to standby after a defined period of time. Super contrast - Further enhances the contrast of the Monitor picture. SmartContrast - Enhances the contrast of dynamic Monitor picture and give the picture more feel of layering. SmartSticker - For shop demo only. Child lock - Sets the selected TV channels from being watched by children. A four-digit password will be needed. Reset all - Resets all the video and audio settings to their default factory levels. ENGLISH 640 x 350 720 x 400 640 x 480 800 x 600 832 x 624 1024 x 768 1152 x 864 1152 x 870 1152 x 900 1280 x 720 1280 x 768 1280 x 800 1280 x 960 1280 x 1024 1360 x 768 1440 x 900 1680 x 1050 1920 x 1080 70Hz 70Hz 60Hz, 67Hz, 72Hz, 75Hz 56Hz, 60Hz, 72Hz, 75Hz 75Hz 60Hz, 70Hz, 75Hz 75Hz 75Hz 66Hz, 76Hz 60Hz, 75Hz 60Hz, 75Hz 60Hz, 75Hz 60Hz 60Hz, 66Hz, 75Hz, 76Hz 60Hz, 75Hz 60Hz, 75Hz 60Hz 60Hz FRANÇAISE The following feature menus can be configured. Depending on the format of the input source, some feature menus might not be available. Model: 220TS2 Resolution Refresh rate ESPAÑOL Summary of feature menu E 1920 x 1080 is recommended resolution. 6.10 Select your Monitor in PC mode 1. Press SOURCE on the remote control to enter the Source list. 2. Select VGA and press OK to confirm your choice. 3. B Caution Before you connect your PC, set the PC monitor refresh rate to 60Hz. If necessary, adjust the picture settings as described in Change picture settings section. 4. Press SOURCE to exit. 6.9.2. E Tip Set the picture format to wide screen or 4:3 in PC mode. 6.9.1. Use your Monitor as a PC monitor Using a VGA cable connects a PC to your Monitor as a PC monitor. Supported screen resolutions The following screen resolutions are supported in PC mode: Model: 190TS2 Resolution Refresh rate 640 x 350 720 x 400 640 x 480 800 x 600 832 x 624 1024 x 768 1280 x 720 1280 x 768 1280 x 800 1366 x 768 70Hz 70Hz 60Hz, 67Hz, 72Hz, 75Hz 56Hz, 60Hz, 72Hz, 75Hz 75Hz 60Hz, 70Hz, 75Hz 60Hz, 75Hz 60Hz, 75Hz 60Hz, 75Hz 60Hz E 1366 x 768 is recommended resolution. EN-19 ENGLISH 7. Connect devices This section presents a clear illustration about how to connect your Monitor with peripherals. Connection overview FRANÇAISE 7.1 1 2 HDMI-1 VGA PC IN 9 AUDIO R 4 5 Y ESPAÑOL 3 Pr Pb R L CV IN HDMI-1 VGA Y Pb Pr Video L R PC IN L AUDIO R ȍ$17 CV IN AV IN -1 Video L R Video L 10 L ȍ$17 Video L Video R AV OUT 11 R AV OUT AV IN -1 AV IN - 2 12 S-VIDEO 8 7 6 13 HDMI-2 Rear connectors Side connectors 1. HDMI-1 HDMI input connectors for DVD players, digital receivers, game consoles and other highdefinition devices. 9. Headphones Stereo mini jack for headphone. 2. 3&,19*$ VGA connector for PC. 10. $9,1$8',2/5 Audio L/R input connectors for composite and S-Video devices. 3. 3&,1$8',2 Audio connector for PC. 11. $9,19,'(2,1 Video input cinch connector for composite devices. 4. SERVICE PORT For service only. 12. S-VIDEO S-Video input connector for S-Video devices. 5. CV IN Component video input (Y Pb Pr) and Audio L/R connectors for DVD, digital receiver or game console, etc.. 13. HDMI-2 HDMI input connectors for DVD players, digital receivers, game consoles and other highdefinition devices. 6. TV ANTENNA $QWHQQDLQSXWƙ 7. AV OUT Video and audio output connectors for the AV source from AV IN-2 or TV ANTENNA input. 8. AV IN-1 Video and Audio L/R input connectors for composite devices. EN-20 This section describes how you can enhance your audio visual experience by connecting your devices with the best possible connectors. 7.2.1. HDMI - Highest quality S-Video - Good quality For analogue connection, the S-Video provides better picture quality than composite video does. When connecting your device with S-Video, plug the S-Video cable to the S-Video connector on the side of the Monitor. You must connect a separate Audio L/R cable from your device to the red and white Audio L/R connectors on the side of the Monitor. ESPAÑOL HDMI produces the best audio visual quality possible. Both audio and video signals are combined in one HDMI cable, providing an uncompressed, digital interface between your Monitor and HDMI devices. You must use HDMI to experience full high-definition video. 7.2.3. ENGLISH Select connection quality FRANÇAISE 7.2 S-Video E Tip If your device only equipped with a DVI connector, use a DVI-HDMI adaptor to connect to the HDMI connector at the back of the Monitor. 7.2.2. &RPSRQHQW<3E3U+LJKHUTXDOLW\ 7.2.4. Audio L/R cable -Red, White Composite - Basic quality Composite video provides basic analogue connectivity, usually combining a (yellow) video cinch cable with (red and white) Audio L/R cinch cable. Match the cable colors when connecting to the composite Video and Audio L/R input connectors on the side of the Monitor. Component (Y Pb Pr) video provides better picture quality than S-Video or composite video connection does. Though component video supports high-definition signals, picture quality is lower than HDMI and is analogue. Also, connect an Audio L/R cable to the red and white Audio L/R connectors at COMPONENT for audio input.. Composite audio/video cable -Yellow, Red, White Component video cable -Red, Green, Blue Audio L/R cable -Red, White EN-21 Connect a cable receiver box with Audio/Video output ENGLISH Connect devices This section describes how to connect a selection of devices with different connectors. Note that different types of connectors may be used to connect a device to your Monitor. The following sections describe examples only, other configurations are possible. FRANÇAISE 7.3 When connecting composite or component cables, match the cable colors to the connectors on the Monitor. C R L Video C Caution Disconnect the AC power cord before connecting devices. B ESPAÑOL S-VIDEO OUT VIDEO OUT S-VIDEO Cable Receiver Box A Cable TV signal D Note Different types of connectors may be used to connect a device to your Monitor depending on availability and your needs. Connect a cable receiver box with RF In/ Outputs antenna TV L AUDIO R CABLE IN AV IN - 2 HDMI-2 Connect VCR, DVD player, or other devices with RCA connectors B Y Pb Pr L R ȍ$17 CV IN R L Video AV IN - 2 OR A S-VIDEO B HDMI-2 CABLE IN TO TV L AUDIO R OUT VIDEO OUT Cable Receiver Box A Cable TV signal EN-22 S-VIDEO L AUDIO R OUT VIDEO OUT S-VIDEO AV Player with A/V Connectors ENGLISH Connect DVD player or other video devices with component video connectors A Y Pr Pb R L Y CV IN Pb FRANÇAISE HDMI-1 Pr L-AUDIO-R L Video Video R L AV IN -1 ESPAÑOL B Connect DVD player with an HDMI connector HDMI-1 Y Pb Pr Video L R R L ȍ$17 CV IN Video L R AV IN -1 DVD Player A &RQQHFW3&PRQLWRUZLWKD9*$FRQQHFWRU A B VGA HDMI-1 Y Pb Pr Video L R PC IN L AUDIO R ȍ$17 CV IN AV IN -1 Video L R AV OUT Computer EN-23 FRANÇAISE ENGLISH 8. Pixel policy BRIGHT DOT DEFECTS MODEL 190TS2 / 220TS2 1 lit subpixel 3 2 adjacent lit subpixels 1 3 adjacent lit subpixels (one white pixel) 0 Distance between two bright dot defects* Total bright dot defects of all types BLACK DOT DEFECTS ESPAÑOL ACCEPTABLE LEVEL MODEL >15mm 3 ACCEPTABLE LEVEL 190TS2 / 220TS2 1 dark subpixel 5 or fewer 2 adjacent dark subpixels 2 or fewer 3 adjacent dark subpixels 0 Distance between two black dot defects* Total black dot defects of all types TOTAL DOT DEFECTS MODEL Total bright or black dot defects of all types D Note 1 or 2 adjacent sub pixel defects = 1 dot defect EN-24 >15mm 5 or fewer ACCEPTABLE LEVEL 190TS2 / 220TS2 5 or fewer Audio Video (A/V) A term often used when discussing a channel on a TV receiver or on video equipment, which has been especially designed to accept VCR audio-video signals. This channel automatically activates special circuitry within the TV set to prevent picture distortion and skewing. It is also used for audio-video processors, which handle both types of signals. CVBS Composite Video Baseband Signal. In broadcast television this refers to the video signal, including the color information and syncs. Component Video Input (Y Pb Pr) Component Video Input is a type of connection that uses a cinch-type connector to allow cable receiver boxes or analog DVD players to connect a signal to the TV. By offering the cinch-type input (YPbPr) the primary colors, red, green and blue are connected from a cable receiver box directly into the TV allowing for the signal to display on the screen. HDTV The generally agreed upon definition of HDTV is approximately twice the vertical and horizontal picture resolution of today’s NTSC TV, which essentially makes the picture twice as sharp. HDTV also has a screen ratio of 16:9 as compared with most of today’s TV screens, which have a screen ratio of 4:3. HDTV offers reduced motion artifacts (i.e. ghosting, dot crawl), and offers 5.1 independent channels of CD-quality stereo surround sound, (also referred to as AC-3). Progressive Scan In Progressive Scanning all the horizontal scan lines are scanned on to the screen at one time. The Digital TV and HDTV Standards accept both Interlaced Scan and Progressive Scan broadcast and display methods. Resolution Resolution: A measurement of the finest (smallest) detail that is visible in a video image. TV Resolutions may be expressed as number of pixels in an image; or more commonly, as Total Number of (horizontally scanned) Lines used to create the image. Standard Digital TV Resolutions: SDTV: 576i - The picture is 704x576 pixels, 576p - The picture is 720x576 pixels. HDTV: 720p - The picture is 1280x720 pixels, 1080i - The picture is 1920x1080 pixels. 1080p - The picture is 1920 x 1080 pixles. EN-25 FRANÇAISE Aspect Ratio The ratio between the width and height of the TV picture on the screen. In a normal TV set the aspect ratio is 4 to 3 (4:3). The new aspect ratio in HDTV is 16:9 which resembles the aspect ratio in a movie theatre (Widescreen). New TV systems support both 4:3 and 16:9 aspect ratio and can automatically switch between them. ENGLISH Glossary ESPAÑOL 9. Troubleshooting Symptoms Possible cause No power or indicator light. The Monitor is not connected to the power. Blue screen with HDMI connection. HDCP authentication fail. No sound is detected from the PC. Audio cable is not connected. ESPAÑOL FRANÇAISE ENGLISH 10. Batteries are installed Monitor does not respond to incorrectly, or low battery the remote control. power. The picture is distorted. It is stretched out, has short, fat, Broadcast video format. black bars on the side or top. The picture is mostly red and green, or the picture is Insecure/incorrect missing red when the Monitor connection. is connected to an accessory device via component cables. Volume level is set to zero. Sound is muted. Headphones are connected. No sound on the Monitor loudspeaker. Audio cable is not connected. Accessory device audio output setting is incorrect. Bad picture quality with a coaxial connection. No picture or sound. EN-26 What should you do 1. Touch POWER at the front of the Monitor, or press . on the remote control. 2. Ensure the AC power cord is connected tightly to the Monitor power connector and to the power socket outlet. 3. Remove the AC power cord from the power socket outlet, wait 60 seconds and reconnect the AC power cord. 4. Connect the Monitor to a different power socket outlet. 1. Ensure that your HDMI cable is certified. 2. Press SOURCE button on the remote control to switch to another source and then switch back to the HDMI source. 3. Reset the accessory device and the Monitor. Turn on the Monitor Select the HDMI channel Turn on the accessory device 4. While the Monitor and the accessory device are powered on, unplug either end of the HDMI cable and then reinsert the cable. 1. Connect an audio cable to the PC AUDIO IN port on the Monitor. 2. Press SOURCE button on the remote control, and select the PC source. 1. Ensure the indicator light on the Monitor blinks when the remote control buttons are pressed. 2. Ensure that you are using the remote control supplied with the Monitor. 3. Ensure that the batteries of the remote control are inserted according to the illustration on the remote control and that the batteries do not need to be replaced. 4. Remove the AC power cord from the power socket outlet, wait 60 seconds and reconnect the AC power cord. 1. Press the ZOOM button on the remote control to select the best picture format. 2. For some accessory devices, the picture format has to be set in the accessory device. 1. Ensure all the connections are made according to the color code. 2. Push the component cables all the way into the YPbPr sockets on the Monitor. 1. Increase the volume. 2. Press MUTE button on the remote control. 3. Ensure the headphones are not plugged into the Monitor. 4. For AV connection, ensure that the Audio L/R cable is connected as described in Connect devices section. If you are using a component cable, ensure that you have not crossed the red audio cable with the red video cable. 5. For HDMI connections, some accessory devices have an HDMI audio output setting that must be turned on for HDMI to HDMI connections. Standard definition channels are not as clear as high 1. Connect the devices via component or HDMI cables. definition channels. Incorrect channel 1. Ensure you have selected the correct channel. 1. If the Monitor receives channels via an AV connection, set the Monitor to the correct source input. Incomplete channel installation. 2. If the Monitor is connected directly to the wall via a coaxial connection, perform the Auto search again. Index A S AC power cord 11 Screen resolutions 19 Antenna 10 Sharpness 16 ENGLISH 11. FRANÇAISE Side connectors 20 B Sleep timer 19 Batteries 10 Switch on the Monitor 11 Brightness 16 ESPAÑOL T C Technical specifications 26 Cable 10 Troubleshooting 25 Care Environment 6 V Screen 6 Volume 12 Channel Auto search 15 Color temp. 16 Contrast 16 W Wall mount 8 Watch TV 12 N Noise reduction 16 O Overview Connection 20 Remote control 13 Monitor 7 P PC mode 19 Picture format 17 Picture mode 16 Position the Monitor 8 R Rear connectors 20 Recycling 6 Remote control 7 EN-27 ESPAÑOL 2010 © Koninklijke Philips Electronics N.V. All rights reserved. Philips and the Philips Shield Emblem are registered trademarks of Koninklijke Philips Electronics N.V. and are used under license from Koninklijke Philips Electronics N.V. Specifications are subject to change without notice. Version: M20TSE2T