1
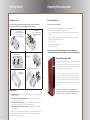
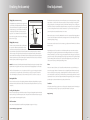
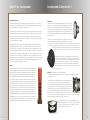
Finalizing the Assembly Final Adjustments Fitting Spikes (P-38F and P-37F only) The Palladium Series loudspeakers have a phenomenal frequency response and superb dynamics, so playing large orchestral or rock music will be an awesome experience, but may not necessarily be the best guide in setting up the speakers. Your listening tests should be performed with a wide range of music, including unaccompanied vocal and solo instrumental recordings with as little processing on the source as possible. A natural solo cello recording will reveal much about the bass characteristics of your room and positioning. The best position will yield smooth, extended bass without boom or smear. The loudspeakers are supplied with a set of long spikes and a set of short spikes. All are adjustable and fit in the same way. Spike seats with felt bases are supplied for use where spikes are inappropriate; e.g., on stone, hardwood or marble floors. The spikes may be fitted with sets of short spikes, sets of long spikes or as a combination of two short spikes at the front and two long spikes at the rear to assist with imaging, (Refer to the next page) Fitting Spikes (P-27C only) Collar Shaft Spike Spike Seat The P-27C also has spikes that should be used if the speaker is not placed on a dedicated speaker stand. There are two short front spikes with spike seats that should be installed in the same manner as described above for the P-38F and P-37F. There is a third spike seat for use with either of the two rear spikes. The long-barrel rear spike should be used in applications where the speaker needs to be positioned either flat or with a degree of downward tilt. The short-barrel rear spike should be used in applications where the speaker needs to be positioned with a degree of upward tilt. This will often be the case in installations where the speaker is placed below a large projection screen. Method: Run the textured collar halfway down the threaded shaft away from the spike point. Insert the shaft into the plinth and screw in tight. Now run the collar up to the plinth and lock it finger tight. Repeat for all four spikes. Hint: If you feel that you may have to move the speakers around a lot before you get them exactly right, it is advisable to start out with the spikes resting in their spike seats. This will allow you to easily slide the speakers on a hard floor surface After finalizing the speaker position, you can then mark the position of the feet and remove the spike seats. Dressing the Cables If there is more than one cable to each loudspeaker, gather them and lay them side by side. Make sure you have identification on all the cables. Ensure the cables are connected the same way all around with no loose or faulty connections. Leveling the Loudspeakers If the floor is not perfectly level, you will find that one spike is off the ground. Starting with this spike and with the help of a spirit level, you should now adjust the spikes so the speakers do not wobble and are not at an angle. Try to get the speakers to the same height, if at all possible. Stridency in the upper section caused by underdamped rooms can be compensated for by hanging drapes or pictures on the walls to dampen reverberant walls; increasing the amount of soft furnishings will also help to eliminate high frequency “ringing”. Room resonances are often structural. In such circumstances, good placement will minimize but not eliminate these resonances. Apparent height is critical. The speakers have controlled directivity. Phase response anomalies are kept to vanishingly low levels by reducing the distance between the midrange and tweeter horns to the absolute minimum; nevertheless, if you are in the wrong seat, it may happen that the sound stage is not perfectly integrated. One remedy is to tilt the speaker slightly (if necessary by using a combination of long and short spikes) to aim the midrange driver at the listener’s ear to yield best driver integration. Take your time with this—the effects on some music may be small and quite startling on others. Phase Phase is not a matter of preference. Out-of-phase effects manifest themselves as poorly defined bass, poor stereo with very vague localization of instruments and voice, and generally fuzzy, ill-defined sound. A singlewired out of phase system is easy to detect; a bi-amped system with one element connected out of phase can be nearly impossible to track down. If you find that there are problems with the system that no amount of experimentation can cure, check all the loudspeaker and amplifier wiring carefully. If you have connected your speakers strictly in accordance with this manual, no phase problems will arise. Conclusion All the advice above will help you get the most out of these superb loudspeakers, but in the final analysis you should do what your ears tell you is right—you are, after all, the final arbiter of your system. Happy listening! Final Connections Now, connect the loudspeakers to the amplifier/s using the diagrams on pages 8-11 to help you. You are now ready to enjoy your music! Page 12 Page 13