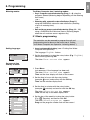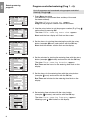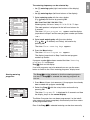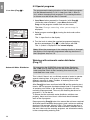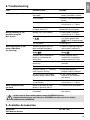
1
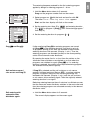
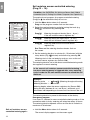
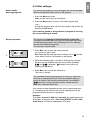
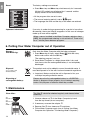
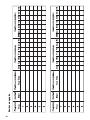
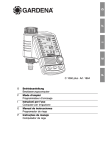
GB
®
DK
S
NL
F
GARDENA
Operating Instructions
Water Computer
F
Mode d’emploi
Programmateur d’arrosage
NL Instructies voor gebruik
Besproeiingscomputer
S
Bruksanvisning
Bevattningscomputer
DK Brugsanvisning
Vandingscomputer
RUS Инструкция по эксплуатации
Компьютер для полива
GB
RUS
C 1060 solar Art. 1866
GB
GARDENA Water Computer C 1060 solar
Welcome to the Garden of GARDENA...
Translation of the original instructions from German.
Please read these operating instructions carefully and observe
the notes given. Use these instructions to familiarise yourself with
the Water Computer and its proper use as well as the notes on
safety.
For safety reasons, children and young people under 16 as well
as anyone who is not familiar with these operating instructions
may not use the Water Computer.
v Please keep these operating instructions in a safe place.
Contents
1.
2.
3.
4.
5.
6.
7.
8.
9.
10.
11.
Where to Use Your GARDENA Water Computer . . . . . . . . . . . . . . 2
Safety Instructions . . . . . . . . . . . . . . . . . . . . . . . . . . . . . . . . . . . . . . . . . . . . . 2
Function . . . . . . . . . . . . . . . . . . . . . . . . . . . . . . . . . . . . . . . . . . . . . . . . . . . . . . . . 3
Putting Your Water Computer into Operation . . . . . . . . . . . . . . . . . . 5
Programming . . . . . . . . . . . . . . . . . . . . . . . . . . . . . . . . . . . . . . . . . . . . . . . . . . 7
5.1 Basic programming . . . . . . . . . . . . . . . . . . . . . . . . . . . . . . . . . . . . . . . . 7
5.2 Special programs . . . . . . . . . . . . . . . . . . . . . . . . . . . . . . . . . . . . . . . . 10
5.3 Other settings . . . . . . . . . . . . . . . . . . . . . . . . . . . . . . . . . . . . . . . . . . . . 13
Putting Your Water Computer out of Operation . . . . . . . . . . . . . . 14
Maintenance . . . . . . . . . . . . . . . . . . . . . . . . . . . . . . . . . . . . . . . . . . . . . . . . . . 14
Troubleshooting . . . . . . . . . . . . . . . . . . . . . . . . . . . . . . . . . . . . . . . . . . . . . . . 15
Available Accessories . . . . . . . . . . . . . . . . . . . . . . . . . . . . . . . . . . . . . . . . 15
Technical Data . . . . . . . . . . . . . . . . . . . . . . . . . . . . . . . . . . . . . . . . . . . . . . . . 16
Service / Warranty . . . . . . . . . . . . . . . . . . . . . . . . . . . . . . . . . . . . . . . . . . . . 16
1. Where to Use Your GARDENA Water Computer
Intended use :
Please note :
The GARDENA Water Computer is intended for private use in
domestic and hobby gardens, exclusively for outdoor use, to
control sprinklers and watering systems.
The Water Computer can be used for automatic watering during
holidays.
The GARDENA Water Computer must not be used for
industrial purposes or in conjunction with chemicals,
foodstuffs, easily flammable and explosive materials.
2. Safety Instructions
Rechargeable battery and solar cells
Danger of damaging the Water Computer !
The Water Computer must only be operated
using a rechargeable battery (1 x lithium-ion
7.4 V 0.68 Ah rechargeable batteries).
2
V Do not use alkali-manganese batteries.
Charging can cause them to leak out over
the solar cells.
v To retain the programs in the memory
during the winter, ensure that the solar
When the computer cools down the LCD
display illuminates again.
Setting up
v Only use clear fresh water.
Warning !
The Water Computer must not be used
indoors.
The minimum operating pressure is 0.5 bar,
the maximum operating pressure is 12 bar.
v Only use the Water Computer outdoors.
The Water Computer may only be set up
vertically with the sleeve nut to the top to
prevent water penetrating into the battery
compartment.
The minimum water output to ensure that
the Water Computer functions correctly is
20 - 30 l / h.
For example, at least 10 x 2-litre Drip Heads
are required to control the Micro-Drip-System.
At high temperatures (over 60 °C at the
display) the LCD display may extinguish.
This does not affect the program in any way.
GB
cells are not covered over and that the
Water Computer is not stored in a place
which is permanently dark.
The max. temperature for the water flow is 40 °C.
Avoid tensile strain.
v Do not pull the hose connected to the Water
Computer.
Programming
v Program the Water Computer with the tap
turned off.
In this way you can avoid getting wet when
trying out the manual On / Off function (man.
On / Off). You can remove the control unit from
the housing to program the Water Computer.
If the controller is removed when the valve
is open, the valve remains open until the
controller is fitted again.
3. Function
With the Water Computer, the garden can be watered fully automatically at any time of day
Sprinklers, a sprinkler system or a drip head watering system
can be used for watering.
The Water Computer carries out watering fully automatically
according to the set programs and can therefore also be used
during holidays. Evaporation is lowest in the early morning or
late evening.
The watering programs are easily entered using the controls.
Controls :
1
4 3 2
Display levels :
Control
Function
1
2
3
Rotary button
Menu button
OK button
4
Man. button
Changes the adjustable values.
Switches to the next display level.
Applies the values set with the rotary
button.
For switching the water throughput on or
off manually.
The 4 display levels,
• Level 1 :
Normal display
• Level 2 :
Current time and day of the week
• Level 3 :
Enter watering programs
• Level 4 :
Turning watering programs on and off
can be selected one after the other by pressing the Menu key.
3
GB
You can change the display level at any time, even during programming. All program data that has been changed up till now
and confirmed by pressing OK will be saved.
Display panel :
7
Display
Desscription
5
Ticker
Explanation of the program step /
Computer status.
6
Weekdays
(Mo), (Tu), ...
Current weekday or programmed
watering days.
Time
Flashes when entering the current data
(Time - hours, minutes, day of the week).
8
am / pm
Display for 12 hour clock (e. g. in USA,
Canada).
9
Prog
Program-controlled watering
(Prog 1 – 6 ) /
% (percentage change in run time)
(Prog 1 0 ) /
Watering with automatic water distributor
(Prog 1 1 ) /
Soil moisture sensor-controlled watering
(Prog 1 2 – 1 4 ) /
Watering program
on (ON ) / off (OF F ).
0
Start
Watering start time (flashes when in input
mode).
A
Run Time
Watering duration (flashes when in input
mode).
B
24h, 2nd, 3rd,
4th 5th, 6th, 7th
Watering cycle (with drop symbol
activated). Every 24 hours ;
every 2 / 3 / 4 / 5 / 6 / 7 days.
C
% (Run Time)
Budget function: Watering duration for all
watering programs can be set centrally in
10 % steps from 100% down to 10 %.
C
Sensor ON / OFF
Sensor ON (watering) /
Sensor OFF (watering is not carried out).
D
Battery
Indicates 5 battery levels :
3 bars :
Battery fully charged
2 bars :
Battery half full
1 bar :
Battery low
1 bar flashing : Battery almost flat
0 bar :
Battery flat
5 7
B
E
9
8
6
C
0 A D
If no bars are displayed, the valve is no longer opened. A valve
opened by the program will also close again if the battery is
flat. The battery display is reset when the battery is replaced for
< 10 seconds.
4
GB
2 Bars
1 Bar
1 Bar flashing
0 Bar
Battery half full
Battery low
Battery almost flat
Battery flat
Valve opens.
Valve opens.
Valve still opens.
Valve does not open.
The Water Computer
is guaranteed to
work for a minimum
of 4 more weeks.
The Water Computer
will continue to work
for no more than
4 weeks.
The Water Computer
stops working soon.
The Water Computer
stops working.
It is advisable to
charge the battery.
The battery must be
charged soon.
The battery must be
charged.
Charging the battery : Place Water Computer in the sun for 1 - 2 days.
4. Putting Your Water Computer into Operation
Insert battery :
A
Risk of damage to the Water Computer.
V Do not use alkali-manganese batteries.
Charging can cause them to leak out over the
solar cells.
1. Remove controller F from the
housing of the Water Computer.
F
2. Insert the supplied rechargeable
battery into the battery compartment
and insert the battery plug into the
battery connection socket G.
The display shows all LCD
symbols for 2 seconds and
then switches to language
selection . (see 5. Programming).
3. Install controller
G
F on the housing again.
4. Place the Water Computer in the sun for 1 - 2 days before
programming it.
This Water Computer can only be operated with an original
rechargeable battery from GARDENA.
Connect Water Computer :
H
I
The Water Computer is fitted with a sleeve nut I for taps with
(G 1" ) (33.3 mm) thread.
The adapter supplied H is used to connect the Water Computer
to the tap with 26.5 mm (G ³⁄₄" ) threads.
1. For 26.5 mm (G ³ ⁄₄" ) threads : Screw the adapter
tap by hand (do not use pliers).
H
to the
2. Screw sleeve nut I of the Water Computer on to the adaptor
thread by hand (do not use pliers).
J
3. Screw tap connector
J on to the Water Computer.
5
GB
Connect soil moisture
or rain sensor (optional) :
Apart from scheduled watering there is also the option of including
how damp the soil is or rainfall into the watering program.
If the soil is damp enough, the program will be stopped, or a
program will be prevented from starting. Manual operation via
Man. On / Off is unaffected by this.
The “Soil moisture sensor-controlled watering” mode can only
be selected when using a soil moisture sensor (see 5.2 Special
programs).
F
1. Remove controller
F from the housing of the Water Computer.
2. Place soil moisture sensor in the watered area
– or –
place rain sensor (with extension cable if necessary)
outside the watered area.
3. Insert the sensor in the sensor connection
Computer.
K of the Water
An adapter cable may be required to connect older sensors,
which can be purchased from GARDENA Service, GARDENA
Adapter cable Art. No. 1189-00.600.45.
K
Fit anti-theft device
(optional) :
To secure your Water Computer against theft, you can obtain the
GARDENA Anti-theft device Art. No. 1815-00.791.00 from
GARDENA Service.
L
1. Screw clamp
Computer.
2. Use clamp
L with screw M firmly to the back of the Water
L e.g. for fixing a chain.
It is no longer possible to remove the screw after it has been
screwed in.
M
Before you start entering the watering data in the computer
we recommend that you write the data on one of the watering
plans in the appendix to maintain more of an overview.
Compile watering plan :
Example :
Program
Start time
Wateringduration
Prog
Start
Run Time
1
7: 30
19 : 00
22 : 30
4 : 00
–
–
0 : 30
0 : 20
1 : 10
0 : 15
–
–
2
3
4
5
6
6
Watering days
Mo Tu We Th
X
Sa
So 24h 2nd 3rd 4th 5th 6th 7th
X
X
X
Fr
X
Watering cycles
X
X
X
X
GB
5. Programming
Watering modes :
The Water Computer has 3 watering modes :
• Begin Program-controlled watering (Prog 1 - 6) using the
programs entered (Watering begins depending on the watering
start times)
– or –
• Watering with automatic water distributor (Prog 11)
using the GARDENA automatic water distributor (watering
of up to 6 watering lines)
– or –
• Soil moisture sensor-controlled watering (Prog 12 - 14 )
using a GARDENA Soil Moisture Sensor (watering begins
when the soil moisture sensor registers dry).
5.1 Basic programming
The controller can be removed to program the unit and
programming can be done on the move (see 4. Putting
Your Water Computer into Operation “Inserting battery” ).
Setting language :
1. Insert rechargeable battery (see 4. Putting Your Water
Computer into Operation).
The language English flashes.
2. Set the language by turning the rotary button (E.g. English )
and confirm by pressing OK.
The ticker Enter current time appears.
Set current time
and day of week :
1.
2.
3.
1. Press Menu
(not necessary if the language has been set).
The ticker Enter current time appears.
Time and the hour display will flash on the screen.
2. Set the time in hours with the rotary button
(example: 9 hours) and confirm with the OK-key.
Time and the minutes display flash.
3. Set the time in minutes with the rotary button
(example: 30 minutes) and confirm with the OK-key.
The ticker Select current day appears.
Time and the day of the week display flash.
4. Set the day of the week by turning the rotary button
(E.g. Sa Saturday) and confirm with OK.
The ticker Select program no. appears.
Prog and the program number flash on the screen. |
4.
7
GB
Entering watering
program :
Program-controlled watering (Prog 1 - 6) :
Up to 6 programs can be entered using program-controlled
watering (Prog 1 to 6 ).
1.
1. Press Menu-key twice
(not necessary if the current time and day of the week
has been entered).
The ticker Select program no. appears.
Prog and the program number flash on the screen.
2. Use the rotary button to set the program number (E.g. Prog 3 )
and confirm by pressing OK.
The ticker Enter watering start time appears.
Start and the hour display will flash on the screen.
2.
3. Set the hours for starting the watering time with the rotary
button (example: 6 hours) and confirm with the OK-key.
Start and the minutes section flash on the display.
3.
4. Set the minutes for starting the watering time with the rotary
button (example: 20 minutes) and confirm with the OK-key.
The ticker Enter watering duration appears.
Run Time and the hours for the watering time flash on the
display.
4.
5. Set the hours for the watering time with the rotary button
(example: 0 hours) and confirm with the OK-key.
Run Time and minutes for the watering time flash on the
display.
5.
6. Set watering time minutes with the rotary button
(example: 1 0 minutes) and confirm with the OK-key.
The ticker Enter watering frequency appears.
Watering cycle
24h flashes on the display.
6.
8
GB
The watering frequency can be selected by :
• the (7.) watering cycle (right hand column of the display)
– or –
• the (8.) watering days (left hand column of the display).
7. Select watering cycle with the rotary button
(E.g.
2nd) and confirm by pressing OK.
24h / 2nd / 3rd / 4th / 5th / 6th / 7th :
Watering every 24 hours / every 2. / 3. / 4. / 5. / 6. / 7. days
The week preview is displayed in the left hand column for
2 seconds.
7.
The ticker Select program no. appears and the display
jumps back to Step 2 and the next program number up flashes.
– or –
8. Select each watering day with the rotary button
(E.g. Mo,
Fr Monday and Friday) and confirm by
pressing OK.
The ticker Enter watering days appears.
9. Press the Menu button
8.
The ticker Select Program no. appears.
The display jumps back to Step 2 and the next program
number up flashes.
If program number 6 has been created the ticker Watering
programs ON is displayed.
Prog ON flash on the display.
If not all 6 programs are to be entered you can use the menu
button to switch to the “Start watering programs” display level.
Starting watering
programs :
The Prog ON must be selected so that the watering programs
can start. If Prog O F F is selected the watering programs do
not run.
1. Press Menu 3 times (not necessary if the program has already
been created with program number 6 ).
2. Select the Prog ON with the rotary button and confirm by
pressing OK.
The ticker Programm OK is displayed for 2 seconds and then
the display jumps to the normal display.
2.
The Water Computer has now been programmed, i.e. the inbuilt
valve opens and closes completely automatically and thus waters
at the programmed times.
Even if the Prog O F F is selected watering can be done manually.
9
GB
5.2 Special programs
% run time (Prog 1 0 ) :
The programmed watering durations of the 6 watering programs
can be reduced centrally in 10 % steps from 100 % down to
10 % without changing the 6 programs. E.g. watering durations
in Autumn must be shorter than in Summer.
1. Keep Menu button pressed for 5 seconds. (with Prog 1 1
“Automatic water distributor”, press Menu button twice).
Prog and the program number flash on the screen.
The ticker Change watering time percentage is
displayed.
2. Select program number 1 0 by turning the knob and confirm
with OK.
2.
The % steps flash on the display.
3. Turn the knob to select the required programmed watering
duration percentages (E.g. 6 0 %) and confirm with OK.
The % symbol is displayed in the normal display.
Note : When the percentage of the watering duration is changed
the display of the originally programmed watering durations in
the 6 programs stays as it is.
3.
Watering with automatic water distributor
(Prog 11)
Automatic Water Distributor :
By connecting the GARDENA Automatic Water Distributor,
Art. 1198, up to 6 watering lines can be controlled with the
water computer. Each of the 6 watering lines can only be
controlled max. once a day.
This is ideal if there is not a sufficient amount of water to operate
several watering lines all at once or if individual plants require
different amounts of water. Enables all watering lines to be
operated one after the other.
After Prog 1 1 has been confirmed with OK and the watering start
time for the first program has been entered (see 5. Programming),
all watering start times of the following 5 programs are automatically preprogrammed. Thus only the watering durations for
programs 2 - 6 can be set.
To ensure that the automatic water distributor switches over
properly, there must be at least a 30 minute break between
each of the 6 programs.
Preprogramming Prog 1 1 takes into account the minimum required
30 minute breaks between the programs and a minimum watering
duration of 30 seconds (display 1 Min.). This watering duration is
necessary so that the automatic water distributor switches over to
the next outlet and the watering programs are allocated correctly
to the corresponding watering lines.
10
GB
The watering frequency entered for the first watering program
applies by design to watering programs 2 - 6 too.
1. Hold the Menu button down for 5 seconds.
Prog and the program number flash on the screen.
2.
2. Select program no. 1 1 with the knob and confirm with OK.
The ticker Enter watering start time appears.
Start and the hour display will flash on the screen.
3. Set the watering start time (E.g. 1 8 . 0 0 ) and watering duration.
(E.g. 0 : 1 0 ) for program 1 (Prog 1 ) (see “ Set watering program ”
from Step 3).
4. Set the watering duration for programs 2 - 6 .
3.
Prog OFF and Prog 1 1 :
If after confirming Prog 1 1 the watering programs are turned
off (Prog OF F ) or the watering duration (run time) is set to 0,
all programs starting at this time are reduced to the minimum
watering duration of 30 seconds. (Display : 1 min.). Thus the
watering programs are allocated correctly to the corresponding
outlet of the automatic water distributor.
By opening the water flow for a short time the outlets on the
automatic water distributor are switched on so that when the
programs are switched on again (Prog On ) or if a watering
duration is entered, the outlets to the required watering program
are allocated as they were originally.
Soil moisture sensor /
rain sensor and Prog 1 1 :
If Prog 1 1 is selected and the soil moisture or rain sensor
registers sufficient moisture (Sensor OFF), a running watering
program is stopped.The time of the following waterings are
reduced to 30 seconds. (Display : 1 min.) until the soil moisture
or rain sensor allows watering again. Then the originally entered
watering duration is run again.
Reducing watering because the soil moisture is sufficient ensures
that the automatic water distributor switches to the next outlet and
thus the watering programs are allocated correctly to the relevant
distributor outlet.
Exit watering with
automatic water
distributor again :
v Hold the Menu button down for 5 seconds.
The normal display appears on the screen again.
11
GB
Soil moisture sensor-controlled watering
(Prog 12 - 14) :
Condition : the GARDENA Soil Moisture Sensor Art. 1188 is
connected (see 4. Putting Your Water Computer into Operation).
The previously set programs for program-controlled watering
(Prog 1 to 6 are retained but they do not run.
1. Hold the Menu button down for 5 seconds.
Prog and the program number flash on the screen.
2. Select the required watering cycle by turning the knob (e.g.
Prog 1 2 ) and confirm by pressing OK.
2.
Prog 1 2
Watering throughout the day (6a.m - 8 p.m.)
if the soil moisture sensor registers dry.
Prog 1 3
Watering during the night (8 p.m. - 6 a.m.)
when the soil moisture sensor registers dry.
Prog 1 4
Watering when the soil moisture sensor
registers dry.
Run Time and the watering duration minutes flash on
the screen.
3. Set the watering duration in minutes (0 - 59 minutes) with the
rotary button (E.g. 40 minutes) and confirm by pressing OK.
Watering starts in the set watering cycle as soon as the soil
moisture sensor registers dry (Sensor ON).
The watering duration set in the sensor-controlled watering mode
also applies to manual watering.
3.
In the case of soil moisture sensor-controlled watering, a
two hour watering pause is triggered after every watering
cycle in order for the soil moisture sensor to record the soil
moisture.
Example :
Watering cycle
=
Prog 12 (Watering throughout the day)
Watering duration = 40 minutes.
Watering begins when the sensor registers dry (Sensor ON)
during the day (between 6 a.m. and 8 p.m.) and ends up to
40 minutes later depending on the amount of moisture in the soil.
The watering duration is preset to 30 minutes at the factory.
Emergency program :
If no sensor is inserted in sensor-controlled watering mode or if the
connection cable is faulty, watering will take place every 24 hours.
The watering duration depends on the run time but is limited to a
maximum of 30 minutes.
Exit soil moisture sensorcontrolled watering again :
12
v Hold the Menu button down for 5 seconds.
The normal display appears on the screen again.
GB
5.3 Other settings :
Read / modify
watering programs :
If a value in the program is to be changed, this can be changed
without changing the other values in the program.
1. Press the Menu key twice.
Start and the hours flash on the display.
2. Press the Menu button to jump to the next program level
– or –
change the program data with the rotary button and confirm by
pressing the OK button.
If the watering period is changed while a program is running ,
the current watering is ended.
Manual operation :
The valve can be opened or closed manually at any time.
A program-controlled open valve can also be closed early without changing the program data (Watering start time, watering
duration and watering frequency).
The controller must be fitted.
1. Press Man.-key to open the valve manually
(or to close an open valve).
1.
2.
Run Time and the watering time in minutes (set to 30 minutes
in the works) flash for 10 seconds on the display.
2. Whilst the watering time in minutes is flashing, the watering
duration can be modified with the rotary button (between
0 : 00 and 0 : 5 9 ) (example : 1 0 minutes) and confirm by
pressing the OK button.
3. Press Man.-key to close the valve early.
The valve is closed.
The amended manual opening period is stored, i.e. each time
the valve is opened manually in future the modified opening
period is preset. If the manual opening period is amended to
0 : 00 , the valve is closed and also remains closed after the
Man.-key is pressed (child lock).
If the valve has been opened manually and a programmed start
of a watering period overlaps the manual opening period, the
programmed starting time is suppressed.
Example :
The valve is opened at 9.00 a.m. manually, the opening period is
30 minutes. A program with a start time (START) between 9.00
and 9.30 a.m. will not be undertaken in this case.
13
GB
Reset :
The factory settings are restored.
v Press Man.-key and Menu-key simultaneously for 3 seconds.
All the LCD symbols are displayed for 2 seconds and the
display moves to the normal display.
• All the program data are set to zero.
• The manual watering period is set to 0 : 30 again.
• The language, the time and the day of the week are retained.
Important information :
If no entry is made during programming for a period of more than
60 seconds, the normal display reappears. In this case all changes
made up till now will be applied.
When a sensor installed in the Water Computer registers damp
(OFF), the programmed watering is not carried out. There must
be a 1 minute pause between programs.
6. Putting Your Water Computer out of Operation
Storage /
Overwintering :
Only store the Water Computer with the battery charged.
1. Press Menu-key 3 times, select Prog. O F F with the rotary
button and confirm with the OK-key.
The watering program is not run.
2. Store Water Computer in a bright place which is dry and
frost free so that the rechargeable battery is not completely
discharged.
Disposal :
(in accordance with
RL 2002 / 96 / EC)
The product must not be added to normal household waste. It
must be disposed of in line with local environmental regulations.
v Important : Make sure that the unit is disposed of via your
municipal recycling collection centre.
Disposing of
rechargeable battery :
Please return the flat rechargeable battery to a GARDENA
dealer or dispose of them properly at your nearest recycling
centre. Only dispose of batteries when they are flat.
7. Maintenance
Clean filter :
H
N
I
The filter N should be checked regularly and cleaned when
necessary.
1. Unscrew sleeve nut I of the Water Computer by hand
from the tap thread (do not use pliers).
H.
N from sleeve nut I and clean.
2. If necessary unscrew the adaptor
3. Remove filter
4. Fit the Water Computer again (see 4. Putting Your Water
Computer into Operation “Connecting Water Computer” ).
14
GB
8. Troubleshooting
Fault
Possible Cause
Remedy
No display appears
Rechargeable battery inserted
incorrectly.
v Insert battery plug into the
battery connection socket.
Faulty battery.
v Insert a new rechargeable
battery.
Rechargeable battery flat.
v Place Water Computer
in the sun for 1 - 2 days.
Temperature on the display
is higher than 60 °C.
Display appears after
temperature has dropped.
Battery flat (1 bar flashes).
v Place Water Computer
in the sun for 1 - 2 days.
Manual watering period is set
to 0 : 0 0 .
v Set manual watering period
to a figure greater than
0 : 0 0 (see 5. Programming).
Manual watering is not
possible using the
Man. button
Watering program is not
being undertaken
(no watering)
Tap turned off.
v Turn tap on.
Watering program has not
been entered completely.
v Read off watering program
and modify if necessary.
Programs deactivated
(Prog OF F ).
v Activate program
(Prog O N ).
Program entry / modification
during or just before the
start pulse.
v Make program entry /
modification outside the
programmed start times.
Valve was opened manually
previously.
v Avoid possible program
overlaps.
Tap turned off.
v Turn tap on.
(1st
Program overlap
watering
start time has priority).
v Enter new watering
program without overlaps.
Soil moisture or rain sensor
registers damp (sensor OFF).
v If dry, check setting /
location of soil moisture /
rain sensor.
Rechargeable battery flat.
(1 bar flashes).
v Place Water Computer
in the sun for 1 - 2 days.
Water Computer does
not close
Minimum quantity of water
drawn is less than 20 l / h.
v Connect more drip heads.
Display : Sensor fault
Sensor not correctly
connected.
v Check connection cable
and sensor.
A
In the event of other faults please contact GARDENA Service.
Repairs should only be carried out by GARDENA service centres or dealers
authorised by GARDENA.
9. Available Accessories
GARDENA
Soil Moisture Sensor
Art. No. 1188
15
GB
GARDENA
Rain Sensor electronic
Art. No. 1189
GARDENA
Anti-theft device
Art. No. 1815-00.791.00
From GARDENA Service
GARDENA
Adapter cable
(to connect older GARDENA
sensors)
Art. No. 1189-00.600.45
From GARDENA Service
GARDENA
Cable Adapter
For simultaneous connection of
rain and soil moisture sensor
Art. No. 1189-00.630.00
From GARDENA Service
GARDENA
Automatic Water Distributor
For fully controll of up to
6 watering lines
Art. No. 1198
10.Technical Data
Min. / max. operating pressure :
0.5 bar / 12 bar
Flow medium :
Clear fresh water
Max. liquid temperature :
40 °C
Number of program-controlled
watering cycles per day :
Up to 6
Watering duration per
program :
1 min. to 9 hours 59 min.
Rechargeable battery
to be used :
1 x lithium-ion 7.4 V ; 0.68 Ah rechargeable batteries
Service life of the
rechargeable battery :
If used correctly 5 - 7 years
11. Service / Warranty
GARDENA guarantees this product for 2 years (from date of
purchase). This guarantee covers all serious defects of the unit
that can be proved to be material or manufacturing faults.
Under warranty we will either replace the unit or repair it free of
charge if the following conditions apply:
• The unit must have been handled properly and in keeping with
the requirements of the operating instructions.
• Neither the purchaser or a non-authorised third party have
attempted to repair the unit.
• Damage caused by frost is not covered by the warranty.
This manufacturer’s guarantee does not affect the user’s existing
warranty claims against the dealer / seller.
If you have any problems with your Water Computer, please
contact our Customer Service or return the defective unit
together with a short description of the problem directly to one
of the GARDENA Service Centres listed on the back of this
leaflet.
16
G
Product Liability
We expressly point out that, in accordance with product liability law, we are
not liable for any damage caused by our units if it is due to improper repair
or if parts exchanged are not original GARDENA parts or parts approved
by us, and, if the repairs were not carried out by a GARDENA Service
Centre or an authorised specialist. The same applies to spare parts and
accessories.
F
Responsabilité
Nous vous signalons expressément que GARDENA n’est pas responsable des dommages causés par ses appareils, dans la mesure où ces
dommages seraient causés suite à une réparation non conforme, dans la
mesure où, lors d’un échange de pièces, les pièces d’origine GARDENA
n’auraient pas été utilisées, ou si la réparation n’a pas été effectuée par
le Service Après-Vente GARDENA ou l’un des Centres SAV agréés
GARDENA. Ceci est également valable pour tout ajout de pièces et d’accessoires autres que ceux préconisés par GARDENA.
N
Productaansprakelijkheid
Wij wijzen er nadrukkelijk op, dat wij op grond van de wet aansprakelijkheid voor producten niet aansprakelijk zijn voor schade ontstaan door onze
apparaten, indien deze door onvakkundige reparatie veroorzaakt zijn, of er
bij het uitwisselen van onderdelen geen gebruik gemaakt werd van onze
originele GARDENA onderdelen of door ons vrijgegeven onderdelen en de
reparatie niet door de GARDENA technische dienst of de bevoegde vakman uitgevoerd werd. Ditzelfde geldt voor extra-onderdelen en accessoires.
S
Produktansvar
Tillverkaren är inte ansvarig för skada som orsakats av produkten om
skadan beror på att produkten har reparerats felaktigt eller om, vid reparation eller utbyte, andra än Original GARDENA reservdelar har använts.
Samma sak gäller för kompletteringsdelar och tillbehör.
K
Produktansvar
Vi gør udtrykkeligt opmærksom på at i henhold til produktansvarsloven
er vi ikke ansvarlige for skader forårsaget af vores udstyr, hvis det skyldes
uautoriserede reparationer eller hvis dele er skiftet ud og der ikke er anvendt originale GARDENA dele eller dele godkendt af os, eller hvis reparationerne ikke er udført af GARDENA-service eller en autoriseret fagmand.
Det samme gælder for ekstra udstyr og tilbehør.
U
Ответственность
за продукцию
Мы однозначно заявляем, что согласно Закону об ответственности
за продукцию мы не несем ответственности за нанесенный нашим
устройством ущерб, если он обусловлен неквалифицированным
ремонтом или заменой деталей на запасные детали неоригинального
происхождения GARDENA или неразрешенные нами детали или, если
ремонт был произведен не службой сервиса GARDENA или неуполномоченным нами квалифицированным специалистом. Аналогичное
относится также к дополнительным деталям и принадлежностям.
94
G
EU Certificate of Conformity
F
Certificat de conformité aux directives européennes
The undersigned GARDENA International GmbH, Hans-Lorenser-Str. 40,
D-89079 Ulm, hereby certifies that, when leaving our factory, the units indicated
below are in accordance with the harmonised EU guidelines, EU standards
of safety and product specific standards. This certificate becomes void if the
units are modified without our approval.
Le constructeur, soussigné : GARDENA Manufacturing GmbH, Hans-LorenserStr. 40, D-89079 Ulm, déclare qu’à la sortie de ses usines le matériel neuf
désigné ci-dessous était conforme aux prescriptions des directives européennes énoncées ci-après et conforme aux règles de sécurité et autres règles
qui lui sont applicables dans le cadre de l’Union européenne. Toute modification portée sur ce produit sans l’accord express de GARDENA supprime la
validité de ce certificat.
N
EU-overeenstemmingsverklaring
Ondergetekende GARDENA Manufacturing GmbH, Hans-Lorenser-Str. 40,
D-89079 Ulm, bevestigt, dat het volgende genoemde apparaat in de door ons
in de handel gebrachte uitvoering voldoet aan de eis van, en in overeenstemming is met de EU-richtlijnen, de EU-veiligheidsstandaard en de voor het product specifieke standaard. Bij een niet met ons afgestemde verandering aan
het apparaat verliest deze verklaring haar geldigheid.
S
EU Tillverkarintyg
K
EU Overensstemmelse certificat
U
Свидетельство о соответствии ЕС
Undertecknad firma GARDENA International GmbH, Hans-Lorenser-Str. 40,
D-89079 Ulm, intygar härmed att nedan nämnda produkter överensstämmer
med EU:s direktiv, EU:s säkerhetsstandard och produktspecifikation. Detta
intyg upphör att gälla om produkten ändras utan vårt tillstånd.
Undertegnede GARDENA International GmbH, Hans-Lorenser-Str. 40,
D-89079 Ulm bekræfter hermed, at enheder listet herunder, ved afsendelse
fra fabrikken, er i overensstemmelse med harmoniserede EU retningslinier,
EU sikkerhedsstandarder og produktspecifikationsstandarder. Dette certifikat
træder ud af kraft hvis enhederne er ændret uden vor godkendelse.
Мы, нижеподписавшиеся GARDENA Manufacturing GmbH, Hans-Lorenser-Str.
40, D-89079 Ulm, настоящим подтверждаем, что нижеуказанное устройство,
отгруженное с нашего предприятия, имеет исполнение, соответствую-щее
требованиям согласованных директив ЕС, стандартам по технике
безопасности ЕС и производственным стандартам. При несогласованном
с нами изменении устройства настоящее свидетельство теряет силу.
Description of the unit :
Désignation du matériel :
Omschrijving van het apparaat :
Produktbeskrivning :
Beskrivelse af enhederne :
Название устройства :
Type :
Type :
Typ :
Typ :
Type :
Тип :
C 1060 solar
EU directives :
Directives
européennes :
EU-richtlijnen :
EU direktiv :
EU Retningslinier :
Директивы ЕС :
Water Computer
Programmateur d’arrosage
Besproeiingscomputer
Bevattningscomputer
Vandingscomputer
Компьютер для полива
Art. No.:
Référence :
Art. nr.:
Art. nr.:
Varenr. :
Арт. № :
2004 / 108 / EC
93 / 68 / EC
Year of CE marking :
Date d’apposition du marquage CE :
Installatiejaar van de CE-aanduiding :
CE-Märkningsår :
CE-Mærkningsår :
Год разрешения маркировки
значком CE :
Ulm, 01.08.2007
Fait à Ulm, le 01.08.2007
Ulm, 01-08-2007
Ulm, 2007.08.01.
Ulm, 01.08.2007
Ульм, 01.08.2007
1866
2007
Authorised representative
Représentant légal
Gemachtigde
Behörig Firmatecknare
Teknisk direktør
Уполномоченный
представитель
Peter Lameli
Vice President
95
96
Bewässerungsplan
Deutschland / Germany
GARDENA
Manufacturing GmbH
Service Center
Hans-Lorenser-Straße 40
D-89079 Ulm
Produktfragen:
(+ 49) 731 490 - 123
Reparaturen:
(+ 49) 731 490 - 290
[email protected]
Argentina
Argensem ® S.A.
Calle Colonia Japonesa s / n
(1625) Loma Verde
Escobar, Buenos Aires
Phone: (+ 54) 34 88 49 40 40
[email protected]
Australia
Nylex Consumer Products
50 -70 Stanley Drive
Somerton, Victoria, 3062
Phone: (+ 61) 1800 658 276
[email protected]
Austria / Österreich
GARDENA
Österreich Ges.m.b.H.
Stettnerweg 11-15
2100 Korneuburg
Tel. : (+ 43) 22 62 7 45 45 36
[email protected]
Belgium
GARDENA Belgium NV/ SA
Sterrebeekstraat 163
1930 Zaventem
Phone: (+ 32) 2 7 20 92 12
Mail: [email protected]
Brazil
Palash Comércio e
Importação Ltda.
Rua São João do Araguaia,
338 – Jardim Califórnia –
Barueri – SP - Brasil –
CEP 06409 - 060
Phone: (+ 55) 11 4198 - 9777
[email protected]
Bulgaria
Хускварна България ЕООД
1799 София
Бул. „Андрей Ляпчев” Nº 72
Тел.: 02 / 8755148, 9753076
www.husqvarna.bg
Canada
GARDENA Canada Ltd.
100 Summerlea Road
Brampton, Ontario L6T 4X3
Phone: (+1) 905 792 93 30
[email protected]
Chile
Antonio Martinic y Cia Ltda.
Cassillas 272
Centro de Cassillas
Santiago de Chile
Phone: (+ 56) 2 20 10 708
[email protected]
Costa Rica
Compania Exim
Euroiberoamericana S.A.
Los Colegios, Moravia,
200 metros al Sur del Colegio
Saint Francis - San José
Phone: (+ 506) 297 68 83
[email protected]
100
Croatia
KLIS d.o.o.
Stanciceva 79
10419 Vukovina
Phone: (+ 385) 1 622 777 0
[email protected]
Cyprus
FARMOKIPIKI LTD
P.O. Box 7098
74, Digeni Akrita Ave.
1641 Nicosia
Phone: (+ 357) 22 75 47 62
[email protected]
Czech Republic
GARDENA spol. s r.o.
Tuшanka 115
627 00 Brno
Phone: (+ 420) 800 100 425
[email protected]
Denmark
GARDENA Norden AB
Salgsafdeling Danmark
Box 9003
S-200 39 Malmö
[email protected]
Finland
Oy Husqvarna Ab
Lautatarhankatu 8b / PL 3
FI- 00581 HELSINKI
France
GARDENA
PARIS NORD 2
69, rue de la Belle Etoile
BP 57080
ROISSY EN FRANCE
95948 ROISSY CDG CEDEX
Tél. (+ 33) 0826 101 455
service.consommateurs@
gardena.fr
Great Britain
Husqvarna UK Ltd
Preston Road
Aycliffe Industrial Park
Newton Aycliffe
County Durham
DL5 6UP
[email protected]
Greece
Agrokip
Psomadopoulos S.A.
Ifaistou 33A
Industrial Area Koropi
194 00 Athens Greece
V.A.T. EL093474846
Phone: (+ 30) 210 66 20 225
[email protected]
Hungary
GARDENA
Magyarország Kft.
Késmárk utca 22
1158 Budapest
Phone: (+ 36) 80 20 40 33
[email protected]
Iceland
Ó. Johnson & Kaaber
Tunguhalsi 1
110 Reykjavik
[email protected]
Ireland
Michael McLoughlin & Sons
Hardware Limited
Long Mile Road
Dublin 12
Italy
GARDENA Italia S.p.A.
Via Donizetti 22
20020 Lainate (Mi)
Phone: (+ 39) 02.93.94.79.1
[email protected]
Japan
KAKUICHI Co. Ltd.
Sumitomo Realty &
Development Kojimachi
BLDG., 8F
5 -1 Nibanncyo, Chiyoda-ku
Tokyo 102-0084
Phone: (+ 81) 33 264 4721
[email protected]
Luxembourg
Magasins Jules Neuberg
39, rue Jacques Stas
Luxembourg-Gasperich 2549
Case Postale No. 12
Luxembourg 2010
Phone: (+ 352) 40 14 01
[email protected]
Netherlands
GARDENA Nederland B.V.
Postbus 50176
1305 AD ALMERE
Phone: (+ 31) 36 521 00 00
[email protected]
Neth. Antilles
Jonka Enterprises N.V.
Sta. Rosa Weg 196
P.O. Box 8200, Curaçao
Phone: (+ 599) 9 767 66 55
[email protected]
New Zealand
NYLEX New Zealand Limited
Building 2, 118 Savill Drive
Mangere, Auckland
Phone: (+ 64) 0800 22 00 88
[email protected]
Norway
GARDENA Norden AB
Salgskontor Norge
Kleverveien 6
1540 Vestby
[email protected]
Poland
GARDENA Polska Sp. z o.o.
Szymanów 9 d
05 - 532 Baniocha
Phone: (+ 48) 22 727 56 90
[email protected]
Portugal
GARDENA Portugal Lda.
Recta da Granja do Marquês
Edif. GARDENA Algueirão
2725-596 Mem Martins
Phone: (+ 351) 21 922 85 30
[email protected]
Romania
MADEX INTERNATIONAL SRL
Soseaua Odaii 117-123,
Sector 1,
Bucureєti, RO 013603
Phone: (+ 40) 21 352 76 03
[email protected]
Russia / Россия
ООО ГАРДЕНА РУС
123007, г. Москва
Хорошевское шоссе, д. 32А
Тел.: (+ 7) 495 540 99 57
[email protected]
Singapore
Hy - Ray PRIVATE LIMITED
40 Jalan Pemimpin
# 02-08 Tat Ann Building
Singapore 577185
Phone: (+ 65) 6253 2277
[email protected]
Slovak Republic
GARDENA Slovensko, s.r.o.
Panónska cesta 17
851 04 Bratislava
Phone: (+ 421) 263 453 722
[email protected]
Slovenia
GARDENA d.o.o.
Brodiљиe 15
1236 Trzin
Phone: (+ 386) 1 580 93 32
[email protected]
South Africa
GARDENA
South Africa (Pty.) Ltd.
P.O. Box 11534
Vorna Valley 1686
Phone: (+ 27) 11 315 02 23
[email protected]
Spain
GARDENA IBÉRICA S.L.U.
C / Basauri, nº 6
La Florida
28023 Madrid
Phone: (+ 34) 91 708 05 00
[email protected]
Sweden
GARDENA Norden AB
Försäljningskontor Sverige
Box 9003
200 39 Malmö
[email protected]
Switzerland / Schweiz
GARDENA (Schweiz) AG
Bitziberg 1
8184 Bachenbülach
Phone: (+ 41) 848 800 464
[email protected]
Turkey
GARDENA / Dost Diþ Ticaret
Mümessillik A.Þ. Sanayi
Çad. Adil Sokak No. 1
Kartal - Ýstanbul
Phone: (+ 90) 216 38 93 939
[email protected]
Ukraine / Украина
ALTSEST JSC
4 Petropavlivska Street
Petropavlivska
Borschahivka Town
Kyivo Svyatoshyn Region
08130, Ukraine
Phone: (+ 380) 44 459 57 03
[email protected]
USA
Melnor Inc.
3085 Shawnee Drive
Winchester, VA 22604
Phone: (+1) 540 722-9080
[email protected]
1866- 28.960.01 / 1207
© GARDENA
Manufacturing GmbH
D - 89070 Ulm
http: //www.gardena.com