1
NLS-PT800 Series
Portable Data Collection Terminal
User Manual
Pre-release version
请更换节标题
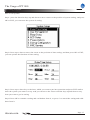
Content
Product Classification and Configuration .....................................................................1
Accessories and Options ................................................................................................2
Accessories...............................................................................................................................................2
Options ......................................................................................................................................................3
Warning!.........................................................................................................................5
Cautions ....................................................................................................................................................5
General Usage Tips ...................................................................................................................................6
Battery Usage & Cautions ........................................................................................................................7
Specifications .................................................................................................................8
Get familiar with PT800 ................................................................................................9
Front and side face of PT 800 ..................................................................................................................9
The back of PT800 ...................................................................................................................................9
The bottom of PT800 ...............................................................................................................................9
Power .............................................................................................................................10
Mount Battery ...........................................................................................................................................10
Adapter of external power ........................................................................................................................11
Wrist strap ......................................................................................................................12
Attach wrist strap ......................................................................................................................................12
Indicators and keyboard .................................................................................................13
The Usage of PT 800 .....................................................................................................14
Turn ON / OFF, Idle and Charge ..............................................................................................................14
The Interface of System Functions ...........................................................................................................15
The Setting of System ...............................................................................................................................16
Operation of Program ...............................................................................................................................26
Information of System ..............................................................................................................................27
Management of Document........................................................................................................................27
Identify barcode / RFID ............................................................................................................................28
Precautions to read barcode of PT850 ......................................................................................................29
Download of Program ...............................................................................................................................30
Common Malfunctions and Remove .............................................................................31
Appendix ........................................................................................................................32
Sample Codes ...........................................................................................................................................32
Programming Codes of PT850 .................................................................................................................34
Tables of Prefix, Suffix1, Suffix2 ............................................................................................................46
nlscan.com
Page II
Product Classification and Configuration
PT850, with Laser sensor, can read all 1D barcodes of ISO standard.
PT810, with RFID sensor, RFID reading modules can be configured to meet different uses.
Model
PT850
PT810
Laser
RG
√
RC
√
RW
MI
√
√
TI
EI
MI
MIRG
TI
TIRG
EI
EIRG
√
√
RFID
GPRS
CDMA
WiFi
√
√
√
√
√
√
√
√
√
√
√
√
√
√
√
Note: “MI”means that the module of RFID is Mifare13.56MHz.“EI”means that the module of
RFID is EM 125KHz.“TI”means that the module of RFID is TI 13.56MHz.
nlscan.com
Page 1
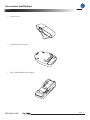
Accessories and Options
Accessories
» NLS-PT800 Portable Data Collector
» Lithium Battery
» Belt
nlscan.com
Page 2
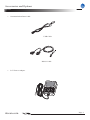
Accessories and Options
Options
» Communication Data Cable
USB Cable
RS232 Cable
» 5.6V Power Adapter
nlscan.com
Page 3
Accessories and Options
Options
» Leather Case
» Lithium Battery Charger
» NLS-CD800 Multi-function Base
nlscan.com
Page 4
Warning!
Cautions
» Disassemble and Refit
Unauthorized disassemble and refit will avoid the limited warranty
» Power Adapter
Only manufacturer original power adapter should be applied. Improper adapter causes permanent
damage and avoids the limited warranty
» Phenomenon & Safety
Avoid using in extreme atmosphere, for example near a flame or fire. Pull out off the mains
immediately when the device emitting peculiar heat, smell or smoke.
» Drop
Deadly dropping causes permanent damage. Switch power off immediately and contact your
supplier.
» LCD Touch Screen
Avoid deadly pressure or impact on LCD.
Prohibited touching the exudation liquid if LCD is broke. The liquid is biological highly
hazardous.
» Stack Limit
Do not stack heavy object onto the device (package).
» Environment
Use, place, restore the device in a careful and steady manner. Do not leave it on an uneven
surface. Avoid damp or dusty environment. It may cause electric shock, breakdown or fire. Avoid
prolonged exposure to the sun.
» Radiation Safety
Prohibit use in radiation restricted area, such as on the plane, in the gas station or in the hospital.
Prohibit battery charging and communication (wire & wireless) in explosive environment.
nlscan.com
Page 5
Warning!
General Usage Tips
» When system halt, press “Reset” button using the stylus pen.
» Crash, throw, impact and fold will cause permanent LCD damage, system halt and irreversible
data loss.
» Use brush and soft cloth to keep the scan window clean is the only work needs to do. Improper
maintenance will avoid limited warranty.
» Do not use sharp object to operate keyboard and the touch screen.
» Only use dry and soft cloth to clean the device. Any liquid cleanser may cause housing distortion and aging.
» Do not leave the device face down.
» Do not remove battery when the device is power on. It will cause data loss.
» Sudden temperature change will cause dew. It may disturb normal performance. Avoid sudden
temperature change. Do not use the device until dew naturally dried.
nlscan.com
Page 6
Warning!
Battery Usage & Cautions
» Flame or fire the battery will cause explosion!
» To reach the best capacity, battery should be charged and discharged thoroughly for 2~3 times.
» Average life-span is 500 times charge and discharge, each. Please order new batteries when the endurance becomes shorter significantly.
» Only manufacturer approved battery and adapter should be applied.
» Disconnect the adapter from the mains when it is not charging. Prolonged charging (for one week)
will shorten battery life-span. Full charged battery will naturally discharge if leave unused.
» Exhaust the battery before charge by leaving the device power on. Do not discharge by other means.
» Do not use invalid battery and adapter. 。
» Please recycle the battery cautiously. Do not process it with municipal solid waste.
nlscan.com
Page 7
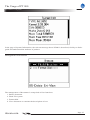
Specifications
Specification
NLS-PT850
NLS-PT810
CPU
ARM7, 32 bit RISC, 74 MHz
SDRAM: 8 MB
Memory
NAND Flash: 32MB, expandable to 128MB
Display
4 level gray LCD, 160*128 resolution
Keyboard
23 keys
5000 hours
MTBF
Interface
RS232
9.6~115.2kbps
USB
Slave1.1
GPRS
GSM 900 / 1800 MHz, 85.4Kbps(Max)
CDMA
800 MHz, 153.6Kbps (Max)
WiFi
IEEE 802.11g, 2.4GHz, DSSS,14dBm, WEP 64/128
Laser
Code128,EAN-13,EAN8,Code39,UPC-A,UPC-E,
Codabar, Interleaved 2 of
5,China post 25,ISBN/
ISSN,Code93, etc.
≥6 mi
Reading Modes
Symbologies
Precision
Power
Environment
Battery
Standby Time
Scan Time
Adapter
RFID
Mifare( ISO 14443A )
TI( ISO 15693)
EM(125K)
3.6 V Li-battery, 1000 mAH
≧240 hours
>5000 times
Output: DC 5.6 V, 1.5 A;
Input: AC100~240V, 50~60HZ
Power Consumption
3.5 W (Max)
Operate Temperature
-5 ℃ ~ + 45 ℃
Storage Temperature
-20 ℃ ~ + 55 ℃
Operate Humidity
5% - 90% (no condensation)
Storage Humidity
5% - 95% (no condensation)
Drop
1.2 m drops to concrete
Weight
300 g
Dimensions
200 mm(L) * 72 (W)mm * 34 (H) mm
Operating System
uBase III
Certificates
CE EMC Class B, CCC
nlscan.com
Page 8
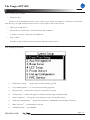
Get familiar with PT800
Front and side face of PT 800
3
1. Eye of Laser
1
4
2. Wrist Strap Hook
3. An antenna (there is an antenna if to
5
purchase a scanner with GPRS module)
4. Indicator Lights
6
5. LCD Screen
6. Stroke Keys
2
The back of PT800
1. Warning Mark
2. Product Model
3. *USB Interface
4. Product ID
5. Reset
6. Lock of battery compartment
7. Buzzer speaker
8. Bolt
9. Tab/slot of battery compartment
10. Charger/AC terminal
The bottom of PT800
1
nlscan.com
2
1. Serial Port Aegis Rubber
2. Infrared Port
Page 9
Power
Mount Battery
Unlock Mark
Battery Cover
Lock
Step 1:
Push the cover lock of battery compartment
toward the unlock mark.
Lock Mark
Step2:
Lift the slot to open the battery compartment cover, and remove the cover.
Slot to open the cover
Step 3:
Slide in the direction of arrowhead, and
get the lithium battery out.
Lithium battery
nlscan.com
Page 10
Power
Adapter of external power
Step 1:
Open the aegis rubber of the serial port.
Serial Port Aegis Rubber
Step 2:
Connect the communication cable line
shown in the picture to the joint of PT800
serial port.
Step 3:
Connect the PT800 communication cable
line shown in the picture to the joint of
5.6V power adapter.
Step 4:
Connect 5.6V power adapter to a socket
of AC power with a rated voltage, with an
external power to PT800 and/or recharge
the lithium battery at the same time.
nlscan.com
Page 11
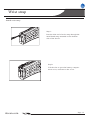
Wrist strap
Attach wrist strap
Step 1:
Pass the thin end of wrist strap through the
metal hand strap mounted on the bottom
side of the device.
Step2:
Lift the slot to open the battery compartment cover, and remove the cover.
nlscan.com
Page 12
Indicators and keyboard
1、Indicators
1
The light on right indicates power recharge.
The bright red means that the recharge starts;
if you did not connect the male and female
of charging terminals properly, or the battery
system is not completely charged, the light is
glimmering.
The light on left means the charge is done
and ready for a user.
2、Trigger key
Trigger a bar code reading operation.
3、Commit key, cancel key
C: Cancels input
OK: Registers input
4、 Keys of Direction
OK
2
3
4
5、Composite keys
The keys of compounded-usage for digit,
alpha, symbol with a switch key to transport
from one to another.
6、Enter key
5
Optional entry to which the cursor is
pointed.
7、Function keys
E NT
6
7
Function: able to be set as a shortcut key
for a certain function.
Backspace: delete a former character of
current cursor in the text entry.
8、Power key
8
nlscan.com
To control the keys of turn-on, turn-off, and
dormancy.
Page 13
The Usage of PT 800
Turn ON / OFF, Idle and Charge
» Turn ON
Touch the turn-on key of PT800, it will enter the system of operation in about 3-5 seconds.
» Idle
After turn on, gently touch the key of turn-on; PT800 will enter into the state of idle immediately
(in the instance the function of Idle is turned ON).
Timing in the system is also able to be set for the state of Idle automatically.
Press any key to withdraw from the state of Idle.
» Turn OFF
Press the power key of PT800 without a stop,
System hints: “POWER DOWN....”, which means the data is storing,
System hints: the storage of data is done! Please remove the continuous press on the power key.”
It means the storage of data has already done, and the press to the key of power can be stopped, then
the system of
PT800 turn off the power automatically.
*In the state of down, press power key of PT800 for 10 seconds, the system will be turned off
automatically.
» Charge
Able for PT800 to connect external power communication cable to 5.6V power with the adapter
to operate charge.
Also able to make use of multi-function base to charge.
A time needed to charge is 3 hours. When the indicator red light goes out, it means the task of
charge is done.
*Notice: It is perfect to use the adapter along with the device of PT800, please do not make use of
any other adapter unless certificated to do charge by the manufacturer.
nlscan.com
Page 14
The Usage of PT 800
The Interface of System Functions
1. System Setup:
Setting the parameter of system just as the interface for a PC. If it is black on the screen that
means the cursor of the system is right on the running program.
2. Application:
Performing the applied process it set.
3. System Info:
Describe the basic information of the system.
4. File Browse:
It functions as a file of documents in a PC.
5. Scan Barcode/RFID:
This is an applied program to identify bar code or RFID.
6. Download:
To download document and software for NLS-PT800.
7. Indicate quantity of electric charge inside the battery/batteries, the maximum volume is 5.
8. Display of the program system:
It displays the description and information of a program.
9. Clock / Timer
*Notice: the system of NLS-PT800 is capable of programming; the final function and its interface
on the screen will be different from the description in this hand manual.
nlscan.com
Page 15
The Usage of PT 800
The Interface of System Functions
How to make use of menu
» Direction key:
The keys of up and down mean to move cursor up or down according to a function in the menu.
And the keys of right and left mean to move cursor right or left in the screen.
» The keys of OK and C:
OK means to commit the current function and withdraw.
C means to cancel a function and withdraw.
» Key of ENT
It means to put a function into operation with the cursor shows.
The Setting of System
1、“Date/Time Setup” : set the time for the running system.
2、“App Management”: to set current operating program
3、“Beep Setup”: turn on the sound for a turned off system
4、“LCD Setup”: Adjust the light of contrast and the light of background
5、“Power Options”: Set up the auto function to turn off and dormancy.
6、“Dial-up Configuration”: Input the parameter of MODEM, and GPRS for dial-up.
7、“RPC Service” : communicate with PC
8、“OEMID Setup”: Set OEMID
nlscan.com
Page 16
The Usage of PT 800
The Setting of System
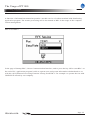
How to set up time
Step1. press the direction keys up and down to move cursor to the position of system setting, and press
OK or ENT, you can enter the system of setting
Step2. Press up or down to move the cursor to the position of time setting, and then press OK or ENT,
you can operate the function of time setting.
Step3. Press up or down key to the item, which you want to put into operation and press ENT until to
enter the system you want to set up. And you can move the cursor with the keys up and down to any
item you want to get its setting.
Step4. Press OK to commit a setting and a withdraw from it, or press C to cancel the setting and withdraw from it.
nlscan.com
Page 17
The Usage of PT 800
The Setting of System
How to run an applied program
Step1. Enter the management of program in the page of system setting.
Step2. Press ENT to enter the item, which was pulled down. Press the key of OK to commit the option
or press the key of C to cancel the choice.
Step3. Press key of OK to commit the function and withdraw while press the key of C to cancel the
work and withdraw.
Step4. In the system running page, the machine will performs the function if you set the item of running program.
nlscan.com
Page 18
The Usage of PT 800
The Setting of System
How to get rid of voice
At the page to set up the voice you can turn on the system of voice or turn off the voice.
How to adjust the contrast on LCD screen? Manage to set the background light in order to make full
use of the power for the running system?
The contrast display on LCD screen is very different from the temperature.
At the page of screen setting, you can move the cursor right or left so that to a best contrast you need.
You can also adjust the auto timer for background light. If you do not operate the keyboard, the system
will turn off the background light automatically. And you can also turn off the backlight to save the
power.
nlscan.com
Page 19
The Usage of PT 800
The Setting of System
How to enter the style of idle or turn off the machine automatically in order to save more power
At the page about power management, you can set the timer auto turn-off. It will function in a few
minutes after setting. While if to set the timer at auto idle, your system will enter the idle condition in
a while. All these are just in order to save the power for your machine.
How to connect MODEM / GPRS?
The type of PT800 provides you an easy way to connect with Internet with four different methods:
» Dial-up with the input module of GPRS / CDMA modem;
» Dial-up with the modem of telephone line;
» Dial-up with COM1 met to an outset of GPRS / CDMA modem or GPRS / CDMA via a mobile
telephone;
» Surf the Internet from Null Modem Serial Cable with a dial-up to the service PPP of Windows2000, which can set up a port with Internet of TCP/IP, then to share the software from the Internet
via the service of Windows2000.
nlscan.com
Page 20
The Usage of PT 800
The Setting of System
How to set OEMID to make the application programs you develop for PT800 safer?
OEMID is a figure composed of the digit from 1 to 9. If OEMID is configured in applications, it
only can run in PT800 which configures the same OEMID. The configuration of OEMID is in <uTools 2
User’s Manual>.
Configure connecting information
1. Connect directly with cable
This kind of connecting method can make you able to dial up to any Windows 2000 PC for the PT800,
forming a net of TCP/IP between PT800 and Windows2000, which needs a setting to Windows 2000 at first.
But this is not a direct method to connect with Internet unless to fix Windows 2000 a proper software to share
with Internet, which can combine PT800 with Windows 2000 via Internet.
2. Dial-up with an outside GPRS / CDMA
If you have an outside GPRS / CDMA modem, or a cellular phone with GPRS function fixed to the
port of PT800, it is able for you to connect PT800 communication to Internet with the outside GPRS /
CDMA modem or GPRS / CDMA cellular phone.
3. Dial-up to an output modem
This connecting method requires you an output modem of telephone line, the modem we use to dial
up for a PC, to link with modem of the port of PT800, then PT800 combine the output modem to the
Internet system.
4. Dial-up with the usage of input GPRS / CDMA
This connecting method makes use of an input GPRS / CDMA modem to Internet. If a PT800 is of
input GPRS / CDMA modem you can run the machine with this method.
nlscan.com
Page 21
The Usage of PT 800
The Setting of System
At the page for “Config dial-up connections”, you can press the keys of up and down to choose combination, and then tick the indicators at the bottom of screen to select the function you want. We offer
four different kinds of function we could at present:
“Dial up”: to dial up with the current method.
*After success of dial-up, the PT800 will get an address of IP, which will be shown at the end of message came from it. From then on, we can dial up to make use of the applied programs.
“EDIT”: this operation offers you a permission to revise your connecting attribute, and fit the
requirement of modem. An attribute connection usually includes: the number of modem port, the baud
rate of modem for its negotiation, user name and its password, etc., which are needed to be offered
when a dial-up is required. It is a certain different attribute with the usage of different kinds of modem,
such as APN (Access Point Name) is the special configure for GPRS modem while telephone number
is the special configure for its own modem.
“Set to default”: set the current combination as the acquiescence connection, and mark a star * in
front of the connecting method.
“Copy”: set a duplicate for the setting of connection chosen. After this operation the system will
bring out a new page, and ask you to give a name for the new duplicate, as well as to compile a new
name for its attribute. After that, there will appear one more connecting item in the page of information
compilation, such as showed in the picture bellow. The newly added input connection of GPRS is the
name you just gave to the duplicate added.
nlscan.com
Page 22
The Usage of PT 800
The Setting of System
Connecting Network of default configure
If a certain connecting configure is often in use, you can set it in the page “configuration of connecting information” you mentioned
Disconnect current link
When you do not need to use the network any more, must make use of this choice function to cut the
link to network. In the instance not yet to disconnect network, the internet service provider (ISP) probably continues the charge to your linking network.
It is necessary to make sure whether the SIM card is already plugged well at first before the usage
of inserted GPRS / CDMA modem to dial. And please pay attention to the card mark on where for
SIM card to insert, in order to avoid an error operation. It is by all means to cut in SIM card when the
device is under the condition of turn-off.
nlscan.com
Page 23
The Usage of PT 800
The Setting of System
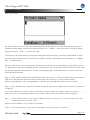
How to use entry
We make a demo of entry in the item of Network Name at the page of Network Setting. Enter the page of
Network Setting. Make a selection for Network Type to be “GPRS”, move the cursor to Network Name,
and press the key “ENT” to choose the item.
At this time to press Switch key to bring the editing bar. Press Switch key to choose capitalization or small
for Letter. Press Function key to switch Letter, Symbol, Chinese, and Number. An entry demo of “ABS!@
新5” is shown below:
When to enter Letter, a key corresponds to multi-letter, the first press corresponding to the first letter, and so
on. And when to enter the corresponding letter with the same key, reenter the next letter after the former letter
has already appeared in the entry bar. To enter corresponding letter with different key, it is able to enter the
next letter after the entry.
Step 1:Press Switch, in the state of capitalization letter. Press key 7, to enter A with an entry, and to enter B
with twice entry after the A has been shown in the entry bar. Press key 1 to enter S with an entry.
When to input Symbol, a key corresponding to a symbol, press up and down keys to turn over pages.
Step 2:Press function key to input in the status of Symbol, press key3 to input! press key down, and press 2
to input @.
As to enter Chinese, the order for the related key is same to that of a Chinese pinyin. Press key “。”,
and to press the corresponding number key for this Chinese, then the Chinese entered appears.
Step 3:Press Function key, in the state of Chinese to enter, press key 2, 9, and 5 in order. Press key
“。”, and press the key 0 to enter“新”.
When to enter Number, a key related to a number.
Step 4:Press Function key, in the state of Number to enter, press key 5 to enter 5.
nlscan.com
Page 24
The Usage of PT 800
The Setting of System
What is RPC?
A function of information transaction permits a useable service of callout terminal with distributing
application program. The remote processing call is also named as RPC in the usage of the computer
remote management.
How to use RPC?
In the page of Startup RPC, choose Communication Interface, and to press the key OK to start RPC. At
the end of PC, application program is able to operate text and system information obtained and so on
with the call of Remote Processing Function Library, RAPI.DLL. For example: to operate the text with
USERVICE offered by our company.
nlscan.com
Page 25
The Usage of PT 800
The Setting of System
How to choose serial ports?
Infrared Port: communicated through Infrared Port
COM1: communicated through RS232
*USB: communicated through USB
COM1[u]: communicated through ueasyfile protocol of COM1
Infrared Port[u]: communicated through ueasyfile protocol of Infrared Port
Note: PC should be installed USB driver.
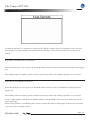
Operation of Program
Refer to How to Operate an Application Program in the Section of The Setting of System
nlscan.com
Page 26
The Usage of PT 800
Information of System
In the page of System Information, the relevant message about PT800 is described, facility to distinguish and understand the attribute of product.
Management of Document
The management of Document is comprised of four functions:
1. Delete document.
2. Flush File system.
3. Format disk.
4. View document or examine the description of text.
nlscan.com
Page 27
The Usage of PT 800
Identify barcode / RFID
To identify barcode is a program to read barcode / RFID, which is able to read data of bar code and
byte number. For the Sample Code and Parameter Setting Code in detail, please refer to the list attached.
Approach to read barcode (for PT850)
Press the [PW] key to turn power on. Hold the Data Collector close to the barcode and press the trigger
key.
The reading indicator light is green and the beeper beeps when the reading operation is successful.
Approach to read RFID (for PT810)
Press the [PW] key to turn power on. Hold the Data Collector close to the RFID card and press the
trigger key.
The reading indicator light is green and the beeper beeps when the reading operation is successful.
Notice: When PT810 with different RFID modules reading RFID cards, they have differences in distance and angel.
When using PT810 to read RFID cards, it has to adjust the distance and angel of the device and cards
to get the perfect reading results.
nlscan.com
Page 28
The Usage of PT 800
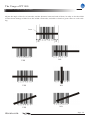
Precautions to read barcode of PT850
Adjust the angle of device to barcode, and the distance between both of them, in order to let the width
of laser beam enlarge a little bit to the width of barcode, and able to obtain a great effect to code reading.
Laser
YES
nlscan.com
NO
YES
NO
YES
NO
Page 29
The Usage of PT 800
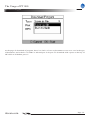
Download of Program
At the page of download of program, there is a choice of save as document or save as a core in the type
of document, and a choice of COM1 or infrared port in its port. To download with a press on the key of
OK while to withdraw press C.
nlscan.com
Page 30
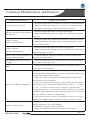
Common Malfunctions and Remove
Malfunction Description
LCD screen does not work
Simple way to remove
1. Examine whether power is turned on or enter the state of dormancy
2. Examine whether the battery is out of power or a badness contact.
3. The application program loaded crashes in the system.
1. Examine whether the battery is charged full enough.
The time of usage is not long after a
2. Examine whether the battery is invalid. If invalid, please exchange
full charged.
a new one.
Unable to operate
RS232 Communication
1. Examine whether the communication interface is inserted correctly
2. Examine baud rate setting are same for both communication interfaces of PT800 and PC.
Unable to operate
Infrared Communication
1. Examine whether the multi-function base is powered.
2. Examine whether the infrared interface of PT800 aims at the one to
multi-function base correctly.
Receive error code for the RS232 or
Examine baud rate setting are the same for both communication
Infrared Communication
interfaces of PT800 and PC.
The indicator light is not on when
to charge
Examine whether the power line to PT800 or to the multi-function
base is inserted correctly or not.
Death
Please press the RESET button at the back of the device with a
paper clip or other thin object.
Dial-up of GPRS and CDMA fail
1. Please examine the current electric quantity in battery is enough if
embedded GPRS/CDMA modem in use, or it will fail the operation for
the embedded GPRS/CDMA modem.
2. Make sure whether the function of GPRS/CDMA in SIM card is
paid enough or lack of payment.
3. Please pay attention to the message of information intensity shown
in screen the process of dial up of GPRS/CDMA, such as: “+CSQ:
27,99”, of which, 27 is the value to reflect the signal intensity,
arranging between 8~31; the signal in wireless network is too weak if
less than 8, while cannot accept any network signal if it is 0 or 99, both
make you unable to connect to GPRS/CDMA.
4. if the wireless network is busy, it is probably to put you out of the
connection to GPRS/CDMA for the time being, you may try it later.
Unable to read bar code
1. the way to read code is wrong. Please refer to the correct way in the
Section of Reading Code in this manual.
2. Whether the setting of code is readable.
3. maybe it is unable for the device to read the code of type
nlscan.com
Page 31
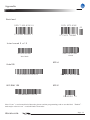
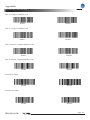
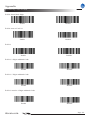
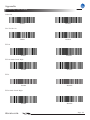
Appendix
Sample Codes
CODE39
*CODE39*
*CODE39W*
NO Check
Check
Full ASCII 39
*Full397*
*Full39*
Check
NO Check
EAN-13
45
1 234567 890128
2 345678 901234
56789
3 456789 012340
EAN-8
1234 5670
nlscan.com
CODABAR
A 1234567890B
Page 32
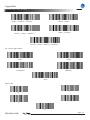
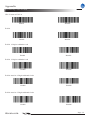
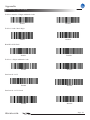
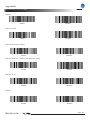
Appendix
Sample Codes
Bookland
ISSN 1673-6362
ISBN 7-302-03343-9
02
9 787302 033431
9 771673 636063
Interleaved 2 of 5
0001234567890
001234567890
Check
NO Check
UPC-A
Code128
8 76543 21098
Code128Auto12345678
UCC/EAN 128
(94)B08D0251(30)10
1
UPC-E
0 543210 9
Note: If can’t read some kind of barcode, please read the programming code to set this kind “Enable”.
And maybe a device can’t read all kinds of barcodes.
nlscan.com
Page 33
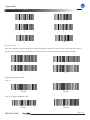
Appendix
Programming Codes of PT850
Load all parameters factory defaults
Enable/Disable Programming Codes
Disable
Enable
Laser’s Duration of Time
If need to set the laser’s duration of time as 3 seconds, follow the steps below:
1. Read the programming code below.
2. Read digit “3”and “0”
Set Prefix and Suffix
1. Read the barcode you want to program.
2. Refer to the “Table 1”to get the ASCII value.( A: 1065)
3. Read the 4 digits you get.
Prefix
Suffix1
Data Format Cancel
Suffix2
Set Data Format
<Data> <Suffix1>
Data as is
<Data> <Suffix2>
nlscan.com
Page 34
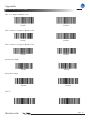
Appendix
Programming Codes of PT850
<Prefix><Data>
<Data> <Suffix1> <Suffix2>
<Data> <Suffix2>
<Prefix> <Data> <Suffix1>
<Prefix> <Data> <Suffix1> <Suffix2>
Set Laser Trigger Mode
Level
Pulse
Continuous
Blinking
Host
Digit Code
1
0
3
2
4
nlscan.com
Page 35
Appendix
Programming Codes of PT850
5
6
7
8
9
Cancel
Security Level
The value indicates the decoding times before defining the barcode correctly read. The higher the value is,
the lower the speed and the possibility of mistake will be. If the opposite, the speed will be higher.
1
2
3
4
Programming of Barcodes
UPC-A
Enable
Disable
UPC-A 2 Digits Addenda Code
Enable
nlscan.com
Disable
Page 36
Appendix
Programming Codes of PT850
UPC-A 5 Digits Addenda Code
Enable
Disable
UPC-A must be 2 Digits Addenda Code
Enable
Disable
UPC-A must be 5 Digits Addenda Code
Enable
Disable
Enable
Disable
Send System Digit
Send Check Digit
Enable
Disable
UPC-E
nlscan.com
Page 37
Appendix
Programming Codes of PT850
UPC-E 2 Digits Addenda Code
Enable
Disable
UPC-E 5 Digits Addenda Code
Enable
Disable
UPC-E must be 2 Digits Addenda Code
Enable
Disable
UPC-E must be 5 Digits Addenda Code
Enable
Disable
Enable
Disable
Enable
Disable
Send Check Digit
Send System Digit
nlscan.com
Page 38
Appendix
Programming Codes of PT850
UPC-E trans to UPC-A
Enable
Disable
Enable
Disable
EAN-8
EAN-8 2 Digits Addenda Code
Enable
Disable
EAN-8 5 Digits Addenda Code
Enable
Disable
EAN-8 must be 2 Digits Addenda Code
Enable
Disable
EAN-8 must be 5 Digits Addenda Code
Enable
nlscan.com
Disable
Page 39
Appendix
Programming Codes of PT850
EAN-8 Send Check Digit
Enable
Disable
EAN-8 trans to EAN-13
Enable
Disable
EAN-13
Enable
Disable
EAN-13 2 Digits Addenda Code
Enable
Disable
EAN-13 5 Digits Addenda Code
Enable
Disable
EAN-13 must be 2 Digits Addenda Code
Enable
nlscan.com
Disable
Page 40
Appendix
Programming Codes of PT850
EAN-13 must be 5 Digits Addenda Code
Enable
Disable
EAN-13 Send Check Digit
Enable
Disable
BOOKLAND EAN
Enable
Disable
EAN-13 2 Digits Addenda Code
Enable
Disable
Enable
Disable
Interleaved 2 of 5
Interleaved 2 of 5 Check
Enable
nlscan.com
Disable
Page 41
Appendix
Programming Codes of PT850
Code 128
Enable
Disable
Enable
Disable
UCC/EAN-128
ITF 14
Enable
Disable
ITF 14 Send Check Digit
Enable
Disable
Enable
Disable
ITF 6
ITF 6 Send Check Digit
Enable
nlscan.com
Disable
Page 42
Appendix
Programming Codes of PT850
Code 39
Enable
Disable
Enable
Disable
Code 39 Check
Code 39 Send Check Digit
Enable
Disable
Code 39 Send two * Before and After the String
Enable
Disable
Enable
Disable
Enable
Disable
Full ASCII 39
Code 93
nlscan.com
Page 43
Appendix
Programming Codes of PT850
Codabar
Enable
Disable
Codabar Delete the Beginning and Ending Digits
Enable
Disable
Codabar Use ABCD/ABCD as
Beginning and Ending Digits
Codabar Use ABCD/TN*E as
Beginning and Ending Digits
Codabar Use abcd/abcd as
Beginning and Ending Digits
Codabar Use abcd/tn*e as
Beginning and Ending Digits
Matrix 25 (China Post)
Enable
Disable
Enable
Disable
2 Out of 5
nlscan.com
Page 44
Appendix
Programming Codes of PT850
ISBT 128
Enable
Disable
Enable
Disable
MSI Plesey
nlscan.com
Page 45
Appendix
Tables of Prefix, Suffix1, Suffix2
Note: S means Scan Value
H means Hex Value
F means Full ASCII Code
K means Keystroke
S
1000
1001
1002
1003
1004
1005
1006
1007
1008
1009
1010
1011
1012
1013
1014
1015
1016
1017
1018
1019
1020
1021
1022
1023
1024
1025
1026
1027
1028
1029
1030
1031
1032
1033
1034
1035
1036
1037
1038
1039
1040
nlscan.com
H
00h
01h
02h
03h
04h
05h
06h
07h
08h
09h
0Ah
0Bh
0Ch
0Dh
0Eh
0Fh
10h
11h
12h
13h
14h
15h
16h
17h
18h
19h
1Ah
1Bh
1Ch
1Dh
1Eh
1Fh
20h
21h
22h
23h
24h
25h
26h
27h
28h
F
%U
$A
$B
$C
$D
$E
$F
$G
$H
$I
$J
$K
$L
$M
$N
$O
$P
$Q
$R
$S
$T
$U
$V
$W
$X
$Y
$Z
%A
%B
%C
%D
%E
SPACE
/A
/B
/C
/D
/E
/F
/G
/H
K
CTRL
CTRL
CTRL
CTRL
CTRL
CTRL
CTRL
CTRL
CTRL
CTRL
CTRL
CTRL
CTRL
CTRL
CTRL
CTRL
CTRL
CTRL
CTRL
CTRL
CTRL
CTRL
CTRL
CTRL
CTRL
CTRL
CTRL
CTRL
CTRL
CTRL
CTRL
CTRL
SPACE
!
`
#
$
%
&
‘
(
Page 46
Appendix
Tables of Prefix, Suffix1, Suffix2
S
1041
1042
1043
1044
1045
1046
1047
1048
1049
1050
1051
1052
1053
1054
1055
1056
1057
1058
1059
1060
1061
1062
1063
1064
1065
1066
1067
1068
1069
1070
1071
1072
1073
1074
1075
1076
1077
1078
1079
1080
1081
1082
1083
1084
1085
1086
1087
1088
1107
nlscan.com
H
29h
2Ah
2Bh
2Ch
2Dh
2Eh
2Fh
30h
31h
32h
33h
34h
35h
36h
37h
38h
39h
3Ah
3Bh
3Ch
3Dh
3Eh
3Fh
40h
41h
42h
43h
44h
45h
46h
47h
48h
49h
4Ah
4Bh
4Ch
4Dh
4Eh
4Fh
50h
51h
52h
53h
54h
55h
56h
57h
58h
6Bh
F
/I
/J
/K
/L
.
/
0
1
2
3
4
5
6
7
8
9
/Z
%F
%G
%H
%I
%J
%V
A
B
C
D
E
F
G
H
I
J
K
L
M
N
O
P
Q
R
S
T
U
V
W
X
+K
K
)
*
+
‘
.
/
0
1
2
3
4
5
6
7
8
9
:
;
<
=
>
?
@
A
B
C
D
E
F
G
H
I
J
K
L
M
N
O
P
Q
R
S
T
U
V
W
X
k
Page 47
Appendix
Tables of Prefix, Suffix1, Suffix2
S
1108
1109
1110
1111
1112
1113
1114
1115
1116
1117
1118
1119
1120
1121
1122
1123
1124
1125
1126
1127
nlscan.com
H
6Ch
6Dh
6Eh
6Fh
70h
71h
72h
73h
74h
75h
76h
77h
78h
79h
7Ah
7Bh
7Ch
7Dh
7Eh
7Fh
F
+L
+M
+N
+O
+P
+Q
+R
+S
+T
+U
+V
+W
+X
+Y
+Z
%P
%Q
%R
%S
Undefined
K
l
m
n
o
p
q
r
s
t
u
v
w
x
y
z
{
|
}
NULL
Undefined
Page 48