1
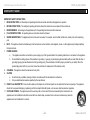
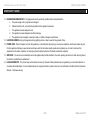
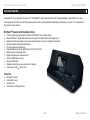
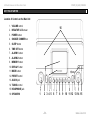
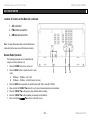
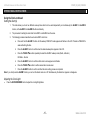
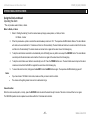
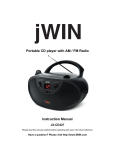
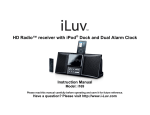
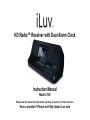
HD Radio™ Receiver with Dual Alarm Clock
Instruction Manual
Model: i168
Please read this manual carefully before operating and save it for future reference.
Have a question? Please visit http://www.i-Luv.com
HD Radio Receiver with Dual Alarm Clock
V10M10_IM_EN_03182008
USER SAFETY GUIDE
INSTRUCTIONS ON ENVIRONMENT PROTECTION
Do not dispose of this product in the usual household garbage at the end of its life cycle; bring it to a collection point for the recycling of
electrical and electronic appliances. This symbol on the product means the instructions for use or the packing will inform about the methods
for disposal. The materials are recyclable as mentioned in its marking. By recycling, material recycling, or other forms of re-utilization of old
appliances, you make an important contribution to protect the environment. Please inquire at your local community administration for the
authorized disposal location.
IMPORTANT SAFETY WARNINGS
1.
FCC regulations state that any change or modification to the equipment, not expressly approved by maker or its authorized parties, could void the
user’s authority to operate this equipment.
2.
To prevent fire or electric shock, do not expose the unit to rain or moisture.
3.
Never attempt to open the cabinet. Always refer servicing to a qualified technician.
Cautions
• If you experience a ringing sound in your ear, lower the volume or discontinue the
use of this product. Excessive sound pressure from earphones and headphone can
cause hearing loss.
• Do not use the headphones while driving or cycling. Because this product reduces
the external noises, you might not be able to hear the warning sounds, such as an
automobile horn, and might result in a traffic accident. Additionally, listening to
headphones while driving is illegal in many places
• The lightning flash with arrowhead symbol, within an equilateral triangle, is intended to alert the user to the presence of uninsulated “dangerous voltage”
within the product’s enclosure that may be of sufficient magnitude to constitute a risk of electric shock to persons.
• The exclamation point within an equilateral triangle is intended to alert the user to the presence of important operating and maintenance (servicing)
instructions in the literature accompanying the appliance.
Caution Marking and rating plate were located at bottom enclosure of the apparatus.
-1-
www.i-Luv.com
HD Radio Receiver with Dual Alarm Clock
V10M10_IM_EN_03182008
USER SAFETY GUIDE
IMPORTANT SAFETY INSTRUCTIONS
1.
READ INSTRUCTIONS - All the safety and operating instructions should be read before the appliance is operated.
2.
RETAIN INSTRUCTIONS - The safety and operating instructions should be retained in a secure place for future reference.
3.
HEED WARNINGS - All warnings on the appliance and in the operating instructions should be observed.
4.
FOLLOW INSTRUCTIONS - All operating and use instructions should be followed.
5.
WATER AND MOISTURE - The appliance should not be used near water. For example: near a bathtub, kitchen sink, laundry tub, and/or swimming
pool.
6.
HEAT - The appliance should be situated away from heat sources such as radiators, heat registers, stoves, or other appliances (including amplifiers)
that produce heat.
7.
POWER SOURCES
a.
The appliance should be connected to a power supply only of the type described in the operating instructions or as marked on the appliance.
b.
Do not defeat the safety purpose of the polarized or grounding – type plug. A polarized plug has two blades with one wider than the other. A
grounding type plug has two blades and a third grounding prong. The wide blade or the third prong is provided for your safety. When the
provided plug does not fit into your outlet, consult an electrician for replacement of the obsolete outlet.
8.
CLEANING - The appliance should be cleaned with a dry cloth.
9.
CAUTION
a.
Do not block any ventilation openings. Install in accordance with the manufacturer’s instructions.
b.
Only use attachment/accessories specified by the manufacturer.
10. OBJECT and LIQUID ENTRY - Care should be taken so that objects do not fall and liquids are not spilled into the device’s openings. The apparatus
should not be exposed to dripping or splashing and that no objects filled with liquids, such as vases, shall be placed on apparatus.
11. CARTS AND STANDS - The appliance should be used only with a cart or stand that is recommended by the manufacturer. An
appliance and cart combination should be moved with care. Quick stops, excessive force, and uneven surfaces may cause the
appliance and cart combination to overturn.
-2-
www.i-Luv.com
HD Radio Receiver with Dual Alarm Clock
V10M10_IM_EN_03182008
USER SAFETY GUIDE
12. DAMAGE REQUIRING SERVICE - The appliance should be serviced by qualified service professional when:
a.
The power-supply cord or plug has been damaged.
b.
Objects have fallen into, or liquid has been spilled into the appliance’s apertures.
c.
The appliance has been exposed to rain.
d.
The appliance has been dropped and suffered damage.
e.
The appliance does not appear to operate normally, or exhibits a change in performance.
13. LIGHTNING WARNING - Unplug this apparatus during lightning storms or when unused for long periods of time.
14. POWER CORD - Protect the power cord from being walked on or pinched particularly at plugs, convenience receptacles, and the point where they exit
from the apparatus. Main plug is used as disconnect device and it should remain readily operate during intended use. In order to disconnect the
apparatus from the mains completely, the mains plug should be disconnected from the mains socket outlet completely.
15. SERVICING - The user should not attempt to service the appliance beyond that described in the user's operating instructions. All other servicing should
be referred to qualified service professional.
16. LEAD AND MERCURY - This product may contain lead and/or mercury. Disposal of these materials may be regulated by your local authorities due to
environmental considerations. For more detailed disposal or recycling information, please contact your local authorities or the EIA (Electronic Industries
Alliance) – http://www.eiae.org
-3-
www.i-Luv.com
HD Radio Receiver with Dual Alarm Clock
V10M10_IM_EN_03182008
USER SAFETY GUIDE
FOR USERS IN THE USA
As specified in Part 15 of the FCC Rules, this equipment complies within the limits of a Class B digital device. These restrictions provide sufficient protection
against radio and TV interference in residential areas. However, even during normal operation, this device may cause TV or radio interference. In attempting
to eliminate some or all interference, you should try one or more of the following corrective measures:
1.
Increase the distance between the device and the radio and/or TV
2.
Try a different outlet on various electrical circuits for the device, the radio and/or TV.
3.
Reposition the receiving antenna
Do not attempt to fix technical problems yourself if they continue to still exist. Refer servicing only to a qualified technical professional. Interfering or
modifying with your product’s internal components may cause a malfunction and an invalidation of the system’s warranty. This tampering can also void the
FCC authorization to operate it.
This device complies with Part 15 of the FCC Rules. Operation is subject to the condition that this device does not cause harmful interference.
IMPORTANT NOTES
Since digital circuitry may cause interference to other radio or television tuners nearby, switch this unit off when not in use or move it away from the affected
radio/television tuner.
-4-
www.i-Luv.com
HD Radio Receiver with Dual Alarm Clock
V10M10_IM_EN_03182008
USER SAFETY GUIDE
FOR USERS IN CANADA
This digital apparatus does not exceed the Class B limits for radio noise emissions from digital apparatus as set out in the Radio Interference Regulations of
Industry Canada. These limits are designed to provide reasonable protection against harmful interference in a residential installation. This equipment
generates, uses, and can radiate radio frequency energy and, if not installed and used in accordance with the instructions, may cause harmful interference
to radio communications. However, there is no guarantee that interference will not occur in a particular installation. If this equipment does cause harmful
interference to radio or television operation (which can be determined by turning the equipment off), the user is encouraged to try to correct the interference
by one or more of the following measures:
•
•
•
•
Reorient or relocate the receiving antenna.
Increase the separation between the equipment and receiver.
Connect the equipment into an outlet on a circuit different from that to which the receiver is connected.
Consult the dealer or an experienced radio / TV technician for help.
-5-
www.i-Luv.com
HD Radio Receiver with Dual Alarm Clock
V10M10_IM_EN_03182008
USER SAFETY GUIDE
About Electromagnetic Interference (EMI)
This device is designed and manufactured not to exceed the exposure limit for radio frequency energy, which is set by the Federal Communications
Commission of the U.S government.
The term “EMI” is short for the electromagnetic interference caused by the electromagnetic field generated by electronic devices. In fact, most electrical
appliances and devices emit electric and magnetic fields, and most of modern electronic devices are susceptible to the EMI if they are inadequately shielded
or designed.
•
If you use any personal medical device, such as a pacemaker, please consult the manufacture of your medical device to determine if it is adequately
shielded from EMI. Your physician might assist you in obtaining this information.
•
Please turn off this device if you are instructed to do so, especially on an airplane or in a hospital.
•
Please keep away from medical instruments in a hospital or medical unit while using this device.
IMPORTANT NOTES ON HEARING
Your hearing is very important to you and to us. We strongly recommend you to follow the guideline below in order to prevent possible damage to or loss of
hearing. Hearing experts caution that listening to loud sounds can damage hearing over time. With continuous listening to loud sounds, hearing adapts and
will give the impression that volume has reduced. What seems normal may, in fact, be harmful. To guard against this before hearing adapts, set the volume
at a low level and slowly increase the volume level until sound can be heard comfortably and clearly without distortion. Damage to hearing is cumulative and
irreversible. Ringing or discomfort in the ears indicates that the volume is too loud. Once a comfortable listening level has been established, do not increase
the volume level further.
-6-
www.i-Luv.com
HD Radio Receiver with Dual Alarm Clock
V10M10_IM_EN_03182008
TABLE OF CONTENTS
Getting Started
HD Radio™ Receiver with Dual Alarm Clock……………………………………………………………………………………………………………...…
8
In the box……...………….……………………………………………………………..………………………………………………………..……………...
8
Location of Controls on the Main Unit.……………………….………………………………………………………………………………………………..
9
General Radio Operation…………….…………...…………………………………………………………………………………………………………….
10
Operational Instructions
Listening to the Radio …………………………………………………………………………………………………………………………………………..
11
Using the Preset Channels…….……………………………………………………………………………………………………………………………….
11
To receive Preset Stations…..………………………………………………………………………………………………………………………………….
12
HD Radio™ Multicast Channels……………………………………………………………………………………………………………………………….
12
Delay in the HD Radio™ System……………...……...……………………………………………………………………………………………………….
12
To Display Text Information………………………………………………………………………………………………………………..…………………..
13
RBDS …………………………………………………………………………………………………………………………………………………………….
13
AUX Operation…………………………………………………………………………………………………………………………………………………...
13
Using Headphones………………..…………………………………………………………………………………………………………………………….
14
Using the Clock……………...……...…………………………………………………………………………………………………………………………...
14
Setting the Time………………………………………………………………………………………………………………..……………………….….
14
Setting the Alarm(s)…………………………………………………………………………………………………………………………………….….
15
Adjusting the Clock Light……………………………………………………………………………………………………………………………….….
15
Operating the Alarm………………………………………………………………………………………………………………………………………..
16
Maintenance ……………………………………………………………………………………………………………………………………………………..
17
Troubleshooting And Specifications……………………………………………………………………………………………..………………………………
18
-7-
www.i-Luv.com
HD Radio Receiver with Dual Alarm Clock
V10M10_IM_EN_03182008
GETTING STARTED
TM
Congratulations on your purchase of the new iLuv™ i168 HD Radio receiver with dual alarm clock. Targeted specifically to work with iPod, iLuv stereo
audio system with the built-in universal dock provides advanced audio and radio performance that brings out the best in your music. Do not forget to keep
this manual for future reference.
HD Radio™ Receiver with Dual Alarm Clock
•
•
•
•
•
•
•
•
•
•
•
•
Provides crystal clear, digital stereo for FM and AM HD Radio™ and multicast stations
Receive HD Radio™ signals that increases the clarity of your FM radio stations to CD-quality sound
Displays information like station and song name, band, frequency and more if available from the station
Receives standard analog AM and FM stereo
PLL tuning digital tuning technology
Programmable presets for 30 radio stations (10 for AM / 20 for FM)
Negative liquid crystal display (LCD)
Digital clock display with dual alarm clock
Wake to AM/FM radio or buzzer
Sleep to AM/FM radio
Auxiliary line input for any audio devices with 3.5mm jack
Audio output: 2 x 3WRMS with 1% THD
In the box
•
•
•
•
HD Radio™ receiver
Instructional manual
Warranty card
FM antenna and AM loop antenna
-8-
www.i-Luv.com
HD Radio Receiver with Dual Alarm Clock
V10M10_IM_EN_03182008
GETTING STARTED
Location of Controls on the Main Unit
1.
2.
3.
4.
5.
6.
7.
8.
9.
10.
11.
12.
13.
14.
15.
16.
VOLUME control
NEGATIVE LCD screen
POWER button
SNOOZE / DIMMER bar
SLEEP button
TIME SET button
ALARM 1 button
ALARM 2 button
MEMORY button
DISPLAY button
MODE button
PRESET control
AUX IN jack
TUNING control
HEADPHONE jack
SPEAKERS
16
1
2 3 4 5
-9-
6
7
8
9
10 11 12 13 14 15
www.i-Luv.com
HD Radio Receiver with Dual Alarm Clock
V10M10_IM_EN_03182008
GETTING STARTED
Location of Controls on the Main Unit- continued
1. AC connection
2. FM antenna connection
3. AM antenna connectors
Note : To make AM reception best, insert the AM antenna
cable each into the same colored AM antenna connector.
General Radio Operation
The following procedures can be accomplished by
using the controls of the main unit.
1.
Press the POWER button to turn on the unit.
2.
Press the MODE button to operate the unit in radio
1
mode.
A.
B.
3.
4.
2
3
FM Stereo FM Mono AM AUX
FM Stereo FM Mono AM (AUX Jack is not input)
Press the MODE button repeatedly to switch the band (AM / FM) or mode (ST / MONO).
Press and hold the TUNING T/S button for one (1) second to automatically scan radio stations.
5.
Press the TUNING T/S button again to stop automatic station scanning.
6.
Press the TUNING T/S button repeatedly to manually tune the stations.
7.
Press and hold the VOLUME T/S button to control the volume.
- 10 -
www.i-Luv.com
HD Radio Receiver with Dual Alarm Clock
V10M10_IM_EN_03182008
OPERATIONAL INSTRUCTIONS
Listening to the Radio
1.
When listening to an FM station, fully extend the antenna to insure maximum tuner sensitivity.
2.
Automatic tuning depends on the signal strength of the broadcasting station, so weak stations are sometimes skipped. Tune manually to find the
weak stations. With stronger stations, the tuner may stop before it reaches optimum setting for that station. Adjust manually for the best reception
if needed.
3.
For FM reception, the unit provides FM STEREO/MONO selection. In stereo mode, the unit will automatically switch to stereo when a strong FM
stereo broadcast is received and will indicate “ST” in the LCD.
4.
To receive a weaker (noisy) FM station, press the MODE button to switch to MONO mode. The reception may improve, but the sound heard is
MONO.
Using the Preset Channels
This radio is equipped with 10 preset memories for AM and 20 preset memories for FM. Once they are preset, they can be instantly accessed by keying in
the preset channel using the PRESET T/S button.
1.
Press the POWER button to turn on the unit.
2.
Press the Button to switch the unit into radio mode and to select band as desired.
3.
Tune to a desired station.
4.
Press the MEMORY button. PRESET Indicator appears. Channel Indicator “01” appears and blinks.
5.
While the Channel Indicator is blinking, press the PRESET T/S button to select the desired preset channel.
6.
Press the MEMORY button again to confirm when the desired preset channel appears in the LCD.
7.
Tune to another station and repeat steps 4 to 6 to store a new station in another preset channel.
- 11 -
www.i-Luv.com
HD Radio Receiver with Dual Alarm Clock
V10M10_IM_EN_03182008
OPERATIONAL INSTRUCTIONS
To receive Preset Stations
1.
Press the POWER button to turn on the unit.
2.
3.
Press the MODE button to select the AM or FM band as desired.
Press the PRESET T/S button to select the preset channels.
HD Radio™ Multicast Channels (FM Only)
•
Together with digital sound quality, HD Radio™ technology gives broadcasters the opportunity to offer more than one programming channel
simultaneously using their existing frequency on the radio tuning buttons.
•
If the HD Radio™ Receiver recognizes an HD Radio™ channel, the HD logo appears on the upper left corner of LCD. After the HD Radio™
Receiver is tuned to an HD channel, multicast number, located on the right of the tuned frequency, will indicate the existence of multicast services.
Use the TUNING ▼/▲ button to select another multicast channels.
Delay in the HD Radio™ System
Digital systems inherently produce a delay in audio. To overcome such delay, HD Radio™ broadcasting uses a station’s current analog signal to ensure fast
tuning of an AM or FM station. After an estimated 5 seconds, the audio will change from analog to digital HD Radio™ broadcasting.
If the change is smooth, the radio station will implement the HD Radio™ broadcast correctly. But if the station has no smooth change, you will experience a
jump in content of an estimated 5 seconds. The HD Radio™ Receiver is not a problem. It is an HD Radio™ broadcaster’s implementation problem which
could be corrected by the station through time.
•
Today’s analog is only preset on the main channel. If you tune directly to a station’s multicast channel (Not the first multicast), there will have a
delay of about 5 seconds before audio or content is heard. This operation is normal.
- 12 -
www.i-Luv.com
HD Radio Receiver with Dual Alarm Clock
V10M10_IM_EN_03182008
OPERATIONAL INSTRUCTIONS
To Display Text Information
If digital HD Radio™ broadcasting or analog broadcasting having RBDS is tuned on, you can change the currently serving text data, by pressing the
DISPLAY button. It has several modes as follows.
STATION ARTIST TITLE COMMENT PTy (Program Type)
RBDS
This radio supports RBDS, Program Identification, Radio Text, Program Service and Program Type. By pressing the DISPLAY button, you can change the
showing text data on the LCD. Each data corresponds to Station, Artist, Title, and PTy (Program Type).
AUX Operation
You can play other music sources (MP3, CD or other digital audio player) through the speakers of this unit by connecting the AUX IN Jack to your external
player's audio out jack or headphone jack.
1. Set up the unit and your external player as described in the section AUX IN Connection.
2. Power up the unit and the external player.
3. Press the MODE button to operate the unit in AUX mode.
4. Start playing your MP3, CD or other digital audio player.
5. Press the VOLUME T/S button to obtain the desired sound level.
- 13 -
www.i-Luv.com
HD Radio Receiver with Dual Alarm Clock
V10M10_IM_EN_03182008
OPERATIONAL INSTRUCTIONS
Using Headphones (not included)
To listen to music in private, insert the plug of your headphones (not included) into the Headphone jack. When using headphones, the speakers will be
automatically disconnected.
NOTE: READ THIS IMPORTANT INFORMATION BEFORE USING YOUR HEADPHONES
1.
Avoid extended play at very high volume as it may impair your hearing.
2.
If you experience ringing in your ears, reduce the volume or shut off your unit.
3.
Keep the volume at a reasonable level even if your headset is an open-air type designed to allow you to hear outside sounds. Please note that
excessively high volume may still block outside sounds.
Using the Clock
Setting the Time
1.
Press and hold the TIME SET button and the Hour digits of the clock will flash.
2.
Press the TUNING T/S button until the correct Hour digits appear in the LCD.
3.
Press the TIME SET button to confirm. Minute digits will appear and flash in the LCD.
4.
Press the TUNING T/S button to set the Minute digits.
5.
Press the TIME SET button again to exit and activate the new clock time to operate.
Note : If you don’t press any button during TIME SET mode for 10 seconds, it ends.
- 14 -
www.i-Luv.com
HD Radio Receiver with Dual Alarm Clock
V10M10_IM_EN_03182008
OPERATIONAL INSTRUCTIONS
Using the Clock-continued
Setting the Alarm(s)
1.
This radio allows you to set two different wake-up times which can be used independently or simultaneously the ALARM 1 or ALARM 2
2.
The procedure for setting the alarm time for ALARM 1 and ALARM 2 are the same.
3.
The following procedure describes how to set ALARM 1 alarm time:
buttons, or the ALARM 1 and ALARM 2 buttons individually.
a.
Press and hold the ALARM 1 button until the wakeup TIME SET mode appears and flashes in the LCD. Procedure TIME SET is
same with setting the time
b.
Press the ALARM 1 button to confirm when the desired wakeup time appears in the LCD.
c.
Press the TUNING T/S button repeatedly to select the ALARM 1 wakeup mode (Radio, or Buzzer).
HD Radio Buzzer
d.
Press the ALARM 1 button to confirm and the alarm volume appears and flashes
e.
Press the TUNING T/S button to set the desired alarm volume level
f.
Press the ALARM 1 Button to confirm and then the alarm setting process is completed.
Note: If you short press the ALARM 1 button, you can turn the Alarm mode on or off. Simultaneously the Alarm Icon appears or disappears.
Adjusting the Clock Light
•
Press the SNOOZE/DIMMER button to adjust the clock light brightness
- 15 -
www.i-Luv.com
HD Radio Receiver with Dual Alarm Clock
V10M10_IM_EN_03182008
OPERATIONAL INSTRUCTIONS
Using the Clock-continued
Operating the Alarm
* This unit provides wake to Radio, or Alarm.
Wake to Radio, or Alarm.
1.
Refer to “Setting the Alarm(s)” to set the desired wake up time(s), wakeup mode, i.e. Radio, or Alarm.
HD Radio Buzzer
2.
When the preset wake up time is reached the selected wakeup mode turns “On”. The respective ALARM indicator flashes. The alarm Buzzer
will continue to sound and last for 10 minutes and then turn off automatically. The alarm Radio will continue to sound and last for 60 minutes
and then turn off automatically. The alarm remains set and will turn on again at the same time on the following day.
3.
To stop the alarm Buzzer sound before it automatically turns off. Briefly press any button once except the SNOOZE button. The alarm Buzzer
sound stops but the alarm remains set and will turn the buzzer on again at the same time on the following day.
4.
To stop the alarm Radio sound before it automatically turns off. Press the POWER button once. The alarm Radio sound stops but the alarm
remains set and will turn the RADIO on again at the same time on the following day.
5.
To cancel the alarm function, briefly press the ALARM 1 and/or ALARM 2 buttons again. The respective ALARM indicator(s) goes off.
•
If you have chosen “HD Radio” alarm mode, make sure that you have turned to a station.
•
The volume will be getting louder more and more while alarm rings.
Notes:
Snooze Function
When the alarm sounds (alarm, or radio), press the SNOOZE button to extend the alarm time by 9 minutes. The alarm or radio will then turn on again.
The SNOOZE operation can be repeated several times within the 10 minutes alarm duration.
- 16 -
www.i-Luv.com
HD Radio Receiver with Dual Alarm Clock
V10M10_IM_EN_03182008
OPERATIONAL INSTRUCTIONS
Using the Clock-continued
Operating the Alarm-continued
Sleep Function
Use the SLEEP Timer to fall asleep to radio for a maximum duration of 120 minutes.
1.
In Power On mode, operate the radio as usual.
2.
Press the SLEEP button. The Sleep Indicator “SLEEP” appears in upper of the LCD. The LCD will show “SLEEP 120” of playing time. If you press
it repeatedly, playing time will change as follows.
120 90 60 30 15 Sleep mode off (The Sleep Indicator also disappears.)
3.
The unit will automatically turn off after the selected minutes has elapsed. The Sleep Indicator “SLEEP” will disappear in the LCD.
Notes:
•
The default SLEEP duration is 120 minutes.
•
If you don’t’ press the SLEEP button again during sleep mode, it ends after 4 seconds.
•
If you press the SLEEP button when the Sleep Indicator appears on the LCD, you can know the remaining time till the unit falls asleep.
•
When the unit is turned off by pressing the POWER button, the Sleep mode is also off.
Maintenance
•
•
Place the unit on a level surface away from sources of direct sunlight or excessive heat.
Protect your furniture when placing your unit on a natural wood and lacquered finish. A cloth or other protective material should be placed between it
and the furniture.
•
Clean your unit with a soft cloth moistened only with mild soap and water. Stronger cleaning agents, such as Benzine, thinner or similar materials can
damage the surface of the unit.
- 17 -
www.i-Luv.com
HD Radio Receiver with Dual Alarm Clock
V10M10_IM_EN_03182008
TROUBLESHOOTING AND SPECIFICATIONS
•
•
The i168 does not turn on.
o
The AC plug may not be connected properly. Check the connection.
o
The wall outlet may not function. Try another outlet.
AM band is noisy
o
Reception at the set location is poor. Rotate or relocate the unit for better reception.
Specifications
•
•
•
•
•
•
•
Radio frequency
AM: 530kHz – 1710kHz
FM: 87.7MHz – 107.9MHz
Audio output: 3WRMS(L) + 3WRMS(R)
Total: 6WRMS / 12WPEAK / 120WPMPO
Connectivity
3.5mm stereo headphone jack
3.5mm aux. in jack
FM antenna
AM antenna
Power Requirement
AC120V 60Hz
Power consumption: ≤ 22W
Dimensions (W x H x D):
11.7” x 4.3” x 7.2” (298mm x 109mm x 182mm)
Unit weight:
4.43lbs ( 2.0kg)
- 18 -
www.i-Luv.com
TEL: 516-626-7188
FAX: 516-626-7105
website: www.i-Luv.com
e-mail: [email protected]
iLuv is a trademark of jWIN Electronics Corp. HD Radio™ Technology manufactured under license from iBiquity Digital Corp. U.S. and foreign patents. HD
Radio™ and the HD Radio logo are proprietary trademarks of iBiquity Digital Corp. Features and specifications are subject to change without prior
notification.
© 2008 jWIN Electronics Corp. All rights reserved. No portion of this printed material or product enclosed herewith including design, shape or graphics, may
be reproduced or transmitted in any form without the expressed written consent of jWIN Electronics Corp. by any means, electronic or mechanical, including
photocopying, recording or use of an information storage and retrieval system. Any unauthorized distribution or reproduction of this printed material or
product, or any portion thereof, will be prosecuted to the fullest possible extent of the law.
Printed in China