Transcript
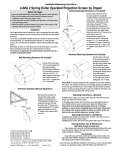
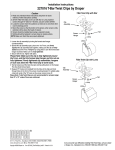
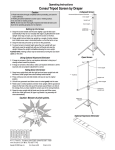
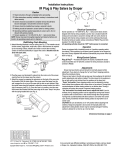
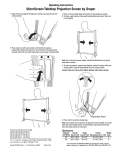
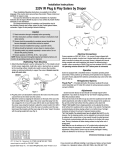
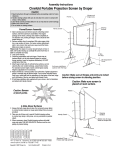
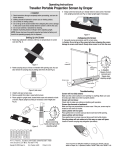
Installation Instructions
Salara/Series M by Draper
Caution
➀ Read and understand these instructions; keep them for future reference.
Follow instructions carefully.
➁ Care in both mounting and correct operation will mean long and satisfactory service from your Draper screen.
➂ Locate the screen where the audience can best see it, and where other
room furnishings permit.
➃ Mount the screen so that the bottom of the picture, when screen is fully
extended, will be above the heads of viewers.
➄ When raising screen, pull down and, while holding, allow for slow
retraction into the case to reduce risk of injury from falling screen.
➅ Screen should be installed level (using a carpenter’s level).
➆ Nothing should be fastened to screen dowel or viewing surface.
NOTE: Screen has been thoroughly inspected and tested at factory and
found to be operating prior to shipment.
Extrusions along
back of case
Figure 2
Wall/Ceiling Flush Mounting
➀ Attach Mounting Brackets to wall or ceiling (see Fig. 1). The installer should
furnish screws, toggle bolts, molly bolts, nylon or lead anchors as required
by the mounting surface. Installer also needs to ensure the mounting
surface is reinforced sufficiently to support the screen. Brackets must be
level with each other.
Mounting
Bracket
2
1
3
Ceiling
Figure 3
Mounting
Bracket
Operating Instructions—Standard
Wall
11/2"
11/2"
To lower picture surface, pull screen down. Hesitate—then allow screen to
retract very slowly until it locks in place.
To raise picture surface, pull screen down and, while holding, allow for slow
retraction into the case to reduce risk of injury from falling screen.
Figure 1
➁ Attach the screen by snapping the extrusions on the back of the case onto
the brackets. With the lower edge of the screen case tilted away from the
wall, engage the rib on top of the case with the slot on each bracket. Slide
the screen case along the brackets to adjust the screen location from left to
right if necessary (see Fig. 2). Once the case is in position, pivot the case
back toward the brackets until the lower edge of the case "snaps" into place
with the spring-loaded latch (see Fig. 3).
Operating Instructions—AutoReturn
To lower picture surface, pull screen down. Hesitate—then allow screen to
retract very slowly until it locks in place.
To raise picture surface, pull screen down gently until it stops, then release.
Dimensions
Floating Mounting Brackets
5/16"
Case Length
31/8"
13/8"
37/16"
313/16"
51/16"
3/8"
311/16"
Viewing Surface
5/16"
57/16"
Viewing Surface Care & Maintenance
Matt White & High Contrast Grey
Clean surface with a solution of mild dishwashing liquid diluted with warm
water. Sponge the surface, rinse with clear water and blot dry. Do not use
cleaning solvents or abrasives.
Glass Beaded
Clean with a very soft brush or cloth and carefully dust the surface. DO
NOT USE SOAP, WATER, SOLVENTS OR ABRASIVES. These substances
will damage a glass beaded viewing surface.
®
Copyright ©2008 Draper Inc.
Form SalaraM_Inst08
Printed in U.S.A.
If you encounter any difficulty installing or servicing your Salara, call your dealer
or Draper, Inc., Spiceland, Indiana, (765) 987-7999; or fax (765) 987-7142.