1
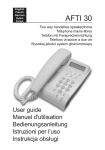
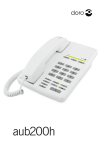
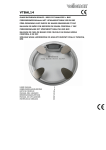
English
French
Polish
CONGRESS 100
Business Telephone
Téléphone Professionnel
Rozbudowany aparat biznesowy
User guide
Manuel d'utilisation
Instrukcja obsługi
English (see page 4-9)
1
Hook switch
7
Hold button and LED
2
Volume control for
handset/headset
8
Headset button and LED
9
Store/Mute button and LED
3
Redial button
10 Number keys 0-9, *, #
4
Recall button
11 Ring/Message Wait Indicator
5
Pause button
6
Memory button
Français (voir page 10-14)
1
Pédale de raccroché
7
Touche et LED de mise en garde
2
Réglage du volume combiné/
casque
8
Touche et LED casque
9
3
Touche Bis
Touche Programmation et secret
+ LED
4
Touche R
10 Touches numérotées 0-9, *, #
5
Touche Pause
11 Témoin lumineux de sonnerie
6
Touche de sélection directe
Polski (zobacz strony 16-20)
1
Miejsce na słuchawkę
7
Przycisk i kontrolka zawieszenia
2
Regulator głośności słuchawki/
zest. nagłownego
8
Przycisk i kontrolka zestawu
nagłownego
3
Przycisk powtórnego wybierania
9
4
Przycisk „Recall”
Przycisk i kontrolka zapisu/
wyciszania
5
Przycisk pauzy
10 Klawisze z cyframi 0-9, *, #
6
Przycisk skróconego wybierania
11 Sygnalizator dzwonienia
www.doro.com
3
English
English
Installation
Operation
Connection
Mute button
1. Connect the curly cord to the handset and the socket marked HANDSET
underneath the telephone.
2. Connect the telephone cord to the socket marked LINE underneath the
telephone, and then to the telephone network socket.
3. A click will be heard when the modular plug is correctly in place.
4. Lift the handset and listen for the dial tone. Your telephone is now
operational.
The handset/headset microphone can be muted during a call by pressing the
mute button z . Press the mute button again to activate the microphone. The
LED next to the button flashes when the microphone is muted.
Making a call with the headset
Hearing Aid compatible
1. Press the headset button = . A dialling tone will be heard in the headset and
the LED next to the headset button will illuminate.
2. DIAL the NUMBER required.
3. Press the headset button again to terminate the call.
This telephone is hearing aid compatible. Select T mode on the hearing aid to
enable coupling.
Redial button
Connection of headset
The socket underneath the telephone marked HEADSET is used for the
connection of a headset. The headset button = is for connecting/disconnecting
a telephone call (equivalent to lifting and putting down the handset) when a
headset is connected.
Please note!
DORO original headsets are tested and adapted to DORO Congress 100. Other types
and makes of headsets may be used, though the function and sound quality can not be
guaranteed.
Any damage occurring due to incompatible or non Doro headsets being installed, will not
be covered under the telephones guarantee.
If the number dialled is engaged or if the last number dialled is to be redialled,
lift the receiver or press the headset button = .
Press the redial button r.
On Hold
Press the hold button h to place a call on hold. The LED next to the button
will illuminate. The call can be resumed by pressing the hold button again or
from another telephone connected to the same line.
When a call is connected.
Press the button h to hold the telephone call. The LED above the button
will illuminate.
To resume the telephone call, lift any receiver.
Connection of additional equipment
On the left side of the telephone there is a socket marked TERMINAL. This is
used for connecting additional telephone equipment to the same telephone line,
e.g. a wireless telephone, modem, etc.
4
www.doro.com
Recall
Press the recall button R followed by the extension number to transfer calls
when connected to a PBX.
Access to additional network services can be gained by using the recall button R ,
* and # keys. Contact your network operator for more information.
www.doro.com
5
English
English
Settings
Settings
Memory
Volume control
This telephone has 10 indirect memories (0-9).
When a number is stored in a memory location, you need to press only two
buttons to make the call.
The volume level in the earpiece can be increased or decreased using the volume
buttons during a call (5 steps). Use the volume up button $ to increase the
volume and the volume down button £ to decrease the volume.
Storing numbers
1. Lift the receiver and press store button P (ignore the dialling tone).
2. Press memory button m.
3. Select memory location by pressing one of the number keys 0 - 9 .
4. Enter the phone number (max 21 digits).
5. Press store button P and replace the receiver. The number is now stored.
Ringer
Calling using memory locations
1. Lift the receiver (or press the headset button) and wait for a dialling tone.
2. Press memory button m.
3. Select memory location by pressing any of the number keys 0 - 9 .
A pause may be inserted into the telephone number by pressing P.
Enter the name of the call receiver on the memory card, if desired. In case of a number change,
replace the old number with the new.
1. Lift the receiver (ignore the dialling tone) and press the store button P
and # .
2. Select ring signal by pressing the number keys 0 - 9 in accordance with the
table below.
3. Press store button P and replace the receiver. The ring signal is now set.
Key/setting
Melody type
Ringer level
1.......................................... Melody A........................ Low
2.......................................... Melody A........................ Normal
3.......................................... Melody A........................ High
4.......................................... Melody B........................ Low
5.......................................... Melody B........................ Normal
6 (factory setting)................ Melody B........................ High
7.......................................... Melody C ....................... Low
8.......................................... Melody C ....................... Normal
9.......................................... Melody C ....................... High
0.......................................... Off * ............................... -
* If the key 0 is selected, the ring signal will be turned off until the next time the receiver is
lifted. After that, the ring signal will revert to the previous setting.
6
www.doro.com
www.doro.com
7
English
English
Technical Support
Other
Technical information
UK
Four selector switches are located in a compartment on the underside of the telephone.
These switches control technical parameters for connection to PBX equipment.
You remove the lid by pressing a small screwdriver (max. Ø 2,5mm) or similar in the hole to
the right of the lid.
If you cannot resolve the fault using the faultfinder section, technical support is
available on the Premium Rate Number: 0906 302 0114.
Calls cost 50 pence per minute (prices correct at the time of going to
press), and is operational between 9AM - 5PM Monday-Friday excluding Bank
Holidays. Alternatively,
You can contact us in writing: Consumer Support Group, Doro UK Ltd.,
22 Walkers Road, North Moons Moat, Redditch, Worcestershire, B98 9HE,
(regarding any Spares or Technical query), or
Telephoning Spares: 01527 584377
E-mail on: [email protected]
Web site: www.doro-uk.com
IMPORTANT NOTE: These switches should only be adjusted by qualified personnel.
Recall time
Selection of 100/270/600ms timed loop break for recall functionality.
Tone/Pulse (T P)
Selection of either dialling method depending on PBX.
Recall (UK only)
Selection of either earth or timed loop break recall method.
Message waiting
Selection of three types of message waiting signal, UK: NEON/LED+/LED-,
AU/NZ 80-100V/12VLR/48VLR.
REN (RN for New Zealand)
Australia and New Zealand
The REN (Ringer Equivalence Number) or (RN) is of significance only if you wish to connect
more than 1 telephone to your telephone line. A standard telephone line has a maximum REN
capacity of 3 (RN of 5). It is possible to connect 3 devices with a REN of 1 (RN of 1) with no
degradation to the product’s performance. Exceeding this limit may cause the volume of the ringer
in any phone to decrease or not ring at all.
AUSTRALIA
DORO Australia Pty Ltd
PO Box 6760
Baulkham Hills BC NSW 2153
Australia
NEW ZEALAND
Atlas Gentech (NZ) Limited
Private Bag 14927,
Panmure
Auckland
Helpline
Ph: (02) 8853 8444
Fax: (02) 8853-8489
Email: [email protected]
Consumer Support
Ph: 0900 50-025 (Toll Call)
Fax: (09) 574-2722
Email: [email protected]
Message Waiting Indicator
Some company switchboards incorporate a Message Waiting function. The telephone indicates if
a message is waiting by flashing the ring signal indicator when in idle mode. This function varies
depending on the type of switchboard. For further information, contact your system supervisor.
Troubleshooting
Check that the telephone cord is undamaged and properly plugged in. Disconnect any
additional equipment that may be connected. If the problem is resolved the fault is with
the other equipment.
Test the equipment on a known working line, if the product works then the fault is
with the line.
If you are still experiencing difficulties, contact the place of purchase.
Notes for operation in New Zealand
Guarantee
This product is guaranteed for a period of 12 months from the date of purchase. Proof of purchase
is required for any service or support required during the guarantee period.
This guarantee shall not apply to a fault caused by an accident or a similar incident or damage,
liquid ingress, negligence, abnormal usage or any other circumstances on the purchaser’s part.
Furthermore, this guarantee shall not apply to a fault caused by a thunderstorm or any other
voltage fluctuations.
This guarantee does not in any way affect your statutory rights. (As a matter of precaution, we
recommend disconnecting the telephone during a thunderstorm.)
8
Accessories
Headsets are available for this product, please contact Sales Department
Ph: (02) 8853-8488
Fax: (02) 8853-8489
Email: [email protected]
www.doro.com
The grant of a Telepermit for any item of terminal equipment indicates only that Telecom has
accepted that the item complies with the minimum conditions for connection to its network. It
indicates no endorsement of the product by Telecom, nor does it provide any sort of warranty.
Above all, it provides no assurance that any item will work correctly in all respects with another
item of Telepermitted equipment of a different make or model, nor does it imply that any product is
compatible with all of Telecom’s network services.
This equipment shall not be set to make automatic calls to the Telecom “111” Emergency Service.
This equipment may not provide for the effective hand-over of a call to another device connected
to the same line.
www.doro.com
9
Français
Français
Installation
Utilisation
Raccordement
Touche secret
1. Reliez le câble téléphonique fourni à la prise de téléphone et à la fiche située
au dos du téléphone marquée LINE.
2. Reliez le câble flexible spiralé à la prise du combiné et dans la fiche située au
dos du téléphone marquée HANDSET.
3. Un déclic indique que la prise est branchée correctement.
4. Prenez le combiné: vous devez entendre la tonalité.
Le micro peut être coupé en cours de communication en pressant la touche
secret z . Appuyez à nouveau sur la touche secret pour ré-activer le micro. La
LED en regard de la touche indique si le micro est coupé.
Amplificateur
Un amplificateur est intégré au combiné à l’attention des personnes portant une
prothèse auditive. Mettez la prothèse auditive sur le mode T pour connecter
l’amplificateur téléphonique de la prothèse auditive.
Raccordement du casque
La fiche située au dos du téléphone marquée HEADSET permet de raccorder le
casque. Lorsque le casque est branché, la touche casque = permet de connecter/
déconnecter la ligne téléphonique (ce qui revient à prendre et à reposer le
combiné).
10
Appel téléphonique avec casque
1. Appuyez sur la touche casque = . Vous entendez la tonalité d’appel dans le
casque et la LED en regard de la touche casque s’allume.
2. Composez le numéro de téléphone souhaité.
3. Pour mettre fi n à la communication, appuyez à nouveau sur la touche casque.
Touche Bis
Lorsque la ligne de votre correspondant est occupée ou si vous désirez rappeler
le dernier numéro composé, prenez le combiné ou appuyez sur la touche casque
=.
Appuyez ensuite sur la touche bis r.
Mise en garde
Remarque!
Utilisez la touche h pour mettre un appel en garde. Vous pouvez reprendre
l’appel téléphonique sur un autre téléphone (branché sur la même ligne).
Le casque DORO d’origine est testé et adapté au Congress 100 de DORO. Vous pouvez
utiliser d’autres types ou marques de casques; dans ce cas nous ne pourrons pas garantir leur
qualité sonore et leur bon fonctionnement.
Dans le pire des cas, le casque et le téléphone seront endommagés. La garantie du téléphone
ne couvre pas ce type de dommage.
Ainsi, en cours d’appel, appuyez sur la touche h pour mettre l’appel en garde,
et raccrochez le combiné.
Pour reprendre l’appel téléphonique, décrochez le combiné d’un des téléphones
branché sur la même ligne.
Raccordement d’un autre appareil
Autocommutateurs / Opérateurs
Une fiche marquée TERMINAL est située sur la gauche du téléphone. Elle
permet de brancher un appareil supplémentaire (téléphone sans fi l, modem, etc.)
sur la même ligne téléphonique.
Cet appareil peut être installé derrière la plupart des autocommutateurs. Il
peut également vous donner accès à des services additionnels proposés par des
opérateurs de réseau. Les touches *, # et R vous permettront d’accéder à ces
fonctions ou services complémentaires.
Pour toute information, adressez-vous directement au fabricant du PABX ou à
votre opérateur de réseau.
www.doro.com
www.doro.com
11
Français
Français
Réglages
Réglages
Mémoires
Réglage du volume
Ce téléphone possède 10 numéros enregistrés en mémoires abrégées.
Une fois un numéro de téléphone enregistré sur une de ces plages, vous le
composez en pressant simplement deux touches. Les plages en mémoire abrégée
sont numérotées de 0 à 9.
Utilisez la touche de réglage du volume pour ajuster le volume du combiné
casque pendant une communication. Appuyez sur la touche $ pour augmenter
le volume et sur la touche £ pour le réduire.
Enregistrement de numéros en mémoire abrégée
1. Prenez le combiné et appuyez sur la touche P (ne tenez pas compte de
la tonalité).
2. Appuyez sur la touche m.
3. Sélectionnez ensuite la plage de mémoire souhaitée 0 - 9 .
4. Composez le numéro de téléphone souhaité. (21 chiffres max.).
5. Appuyez sur la touche P et reposez le combiné. Le numéro est alors
enregistré.
Composer un numéro enregistré en mémoire abrégée
1. Prenez le combiné (ou appuyez sur la touche casque) et attendez la tonalité.
2. Appuyez sur la touche m.
3. Sélectionnez le numéro de mémoire abrégée en appuyant sur une des touches
numérotées 0 - 9 . Le numéro est composé automatiquement.
Insérez une pause en appuyant sur P.
Au besoin, mettez le nom du correspondant dans la liste en mémoire. En cas de changement de
numéro, remplacez l’ancien par le nouveau.
12
www.doro.com
Réglage de la sonnerie
1. Prenez le combiné (ne tenez pas compte de la tonalité) et appuyez sur la
touche P et sur # .
2. Sélectionnez une des sonneries en appuyant sur une des touches numérotées
0 - 9 qui correspondent au tableau suivant.
3. Appuyez sur la touche P et reposez le combiné. La sonnerie est alors réglée.
Touche/réglage
Mélodie
Niveau sonore
1.......................................... Mélodie A....................... Faible
2.......................................... Mélodie A....................... Normal
3.......................................... Mélodie A....................... Fort
4.......................................... Mélodie B....................... Faible
5.......................................... Mélodie B....................... Normal
6 (réglage d’usine) .............. Mélodie B....................... Fort
7.......................................... Mélodie C ...................... Faible
8.......................................... Mélodie C ...................... Normal
9.......................................... Mélodie C ...................... Fort
0.......................................... Coupée *........................ -
* Quand la touche 0 est sélectionnée, la sonnerie reste coupée tant que le combiné n’est pas
décroché. Après utilisation du combiné, le réglage antérieur de la sonnerie est rétabli.
www.doro.com
13
Français
Français
Autres
Autres
Fonctions avancées
CONSEILS ET SECURITE
Vous pouvez régler les paramètres techniques pour la connexion de
l’appareil derrière un PABX,
etc … grâce aux 3 curseurs situés dans le compartiment sous l’appareil.
Pour enlever la trappe du compartiment, appuyez avec un petit tournevis (max.
2.5mm) ou outil similaire dans le trou situé à droite du compartiment.
IMPORTANT: Ces réglages doivent être effectués par une personne qualifiée.
Cet appareil doit être utilisé à une température comprise entre 5°C et 45°C.
Ne pas installer l’appareil dans une pièce humide, salle de bains, buanderie, ni
dans une cuisine à moins de 1,50m de l’évier.
Dans les zones à risques d’orages fréquents, protégez l’appareil avec un
dispositif de protection* contre les surtensions électriques et vérifiez que votre
assurance couvre ce type de dégâts.
Attention : la garantie constructeur ne s’applique pas en cas de dégâts occasionnés par effet de
la foudre ou de toute autre source de surtension (voir chapitre “Garantie”)
* Obligatoire dans certains départements.
Touche «R»
Sélectionnez le réglage souhaité en positionnant le curseur sur 100 / 270 ou
600ms (le réglage par défaut est 270 ms)
GARANTIE et S.A.V.
Numérotation Fréquences Vocales ou Décimales
Sélectionnez le réglage souhaité en positionnant le curseur sur
T (Fréquences vocales) ou
P (numérotation Décimale) (le réglage par défaut est T)
Lampe message
Sélectionnez le réglage de la lampe message en positionnant le curseur sur:
Surtension de ligne (Neon), Inversion de polarité (LED+ / LED-) (le réglage
par défaut est NEON)
Témoin lumineux de Message en attente
Certains standards téléphoniques ont une fonction de Message en attente. Quand
un message est en attente et que le poste est libre, le témoin lumineux de
sonnerie du téléphone clignote. Cette fonction varie selon le type de standard.
Pour toute information, adressez-vous au responsable de votre système.
Cet appareil est garanti un an à partir de sa date d’achat, la facture faisant
foi. La réparation dans le cadre de cette garantie sera effectuée gratuitement,
pièces et main d’oeuvre.
La garantie est valable pour un usage normal de l’appareil tel qu’il est
défi ni dans la notice d’utilisation.
Les fournitures utilisées avec l’appareil ne sont pas couvertes par la
garantie.
Sont exclues de cette garantie les détériorations dues à une cause étrangère
à l’appareil.
En particulier la garantie ne s’appliquera pas si l’appareil a été endommagé
à la suite d’un choc ou d’une chute, d’une fausse manoeuvre, d’un
branchement non conforme aux instructions mentionnées dans la notice ou
aux prescriptions de l’ART (-Autorité de Régulation des Télécommunications),
de l’effet de la foudre, de surtensions électriques ou électrostatiques, d’une
protection insuffisante contre l’humidité, la chaleur ou le gel.
En tout état de cause, la garantie légale pour vices cachés s’appliquera
conformément aux articles 1641 et suivants du Code Civil.
En cas de panne, adressez-vous au S.A.V. de votre revendeur ou installateur.
Si vous avez des soucis d’utilisation, contactez notre Service d’Assistance
Téléphonique au 08 92 68 90 18 ( N° Audiotel - 2,21F / mn ).
ENTRETIEN
· Nettoyez votre appareil avec un chiffon doux qui ne peluche pas.
· Nettoyez les plots de charge avec un chiffon imbibé d’alcool.
· N’utilisez ni solvant, ni produit ménager.
14
www.doro.com
www.doro.com
15
Polski
Polski
Obsługa
Instalacja
Podłączanie
Przycisk wyciszania
1. Podłącz przewód telefoniczny do gniazdka telefonicznego i do gniazdka
oznaczonego LINE, które znajduje się na spodzie telefonu.
2. Podłącz dostarczony w zestawie przewód spiralny do gniazdka w słuchawce
i do gniazdka oznaczonego HANDSET, które znajduje się na spodzie
telefonu.
3. Po poprawnym włożeniu wtyczki modularnej do gniazdka powinno być
słyszalne kliknięcie.
4. Podnieś słuchawkę i sprawdź, czy słychać ciągły sygnał wybierania. Telefon
jest teraz gotów do użytku.
Podczas rozmowy można odłączyć mikrofon, naciskając przycisk wyciszania
z . Ponowne naciśnięcie tego przycisku aktywuje mikrofon. Świecąca kontrolka
obok przycisku informuje o odłączeniu mikrofonu.
Telefonowanie przy użyciu zestawu nagłownego
1. Naciśnij przycisk zestawu nagłownego = . W słuchawkach będzie słychać
sygnał wybierania, a kontrolka obok przycisku zestawu nagłownego zaświeci
się.
2. WYBIERZ żądany NUMER.
3. Ponownie naciśnij przycisk zestawu nagłownego, aby zakończyć połączenie.
Podłączanie aparatu słuchowego
Słuchawka jest wyposażona w cewkę przeznaczoną dla osób korzystających
z aparatu słuchowego. Przed podłączeniem aparatu słuchowego do telefonu
należy przełączyć go w tryb „T".
Podłączanie zestawu nagłownego
Gniazdko oznaczone HEADSET, umieszczone u dołu telefonu, służy do
podłączania zestawu nagłownego. Przycisk zestawu nagłownego = służy do
podłączania/odłączania linii telefonicznej (jego naciśnięcie jest równoważne
podniesieniu lub odłożeniu słuchawki), gdy zestaw jest podłączony.
Uwaga!
Oryginalny zestaw nagłowny firmy DORO został przetestowany i dostosowany do telefonu
DORO Congress 100. Wprawdzie możliwe jest stosowanie także innych typów i marek
zestawów nagłownych, w takim prz ypadku nie ma gwarancji co do działania ani jakości
dźwięku.
W skrajnym prz ypadku może nastąpić uszkodzenie zarówno telefonu, jak i zestawu
nagłownego. Gwarancja na telefon nie obejmuje tego rodzaju uszkodzeń.
Przycisk ponownego wybierania
Jeśli wybrany numer jest zajęty, lub jeśli zachodzi potrzeba ponownego
wybrania tego samego numeru, podnieś słuchawkę lub naciśnij przycisk zestawu
nagłownego = .
Naciśnij przycisk ponownego wybierania r.
Zawieszenie
Przycisk h służy do zawieszenia połączenia telefonicznego. To samo
połączenie można następnie wznowić z innego aparatu telefonicznego
(podłączonego do tej samej linii).
Gdy trwa połączenie.
Naciśnij przycisk h, aby zawiesić połączenie. Odłóż słuchawkę (jeśli jest
używana).
Aby wznowić połączenie, podnieś słuchawkę dowolnego aparatu.
Usługi dodatkowe
Podłączanie urządzeń dodatkowych
Po lewej stronie telefonu znajduje się gniazdko oznaczone TERMINAL. Służy
ono do podłączania innych urządzeń - np. telefonu bezprzewodowego, modemu
itd. - do tej samej linii telefonicznej.
16
www.doro.com
Przyciski R, * i # dają dostęp do usług dodatkowych, realizowanych przez
centralę lokalnego operatora telekomunikacyjnego.
Aby uzyskać więcej informacji na temat usług dodatkowych, należy
skontaktować się z operatorem telekomunikacyjnym. Odpowiednie informacje
można także znaleźć w książce telefonicznej.
www.doro.com
17
Polski
Polski
Ustawienia
Ustawienia
Pamięć
Regulacja głośności
Telefon może zapamiętać 10 numerów wybieranych w sposób skrócony.
Aby wybrać zapamiętany numer wystarczy nacisnąć dwa przyciski. Zapamiętane
numery są oznaczone cyframi od 0-9.
Regulator głośności służy do zmiany głośności w słuchawce w trakcie
połączenia. Naciśnięcie przycisku $ powoduje zwiększenie głośności, a
przycisku £ - zmniejszenie.
Zapamiętywanie numerów
1. Podnieś słuchawkę i naciśnij przycisk P (zignoruj sygnał wybierania).
2. Naciśnij przycisk m.
3. Wybierz cyfrę, pod którą ma być zapamiętany numer, naciskając jeden z
przycisków 0 - 9 .
4. Wybierz numer (maksymalnie 21 cyfr).
5. Naciśnij przycisk P i odłóż słuchawkę. Numer został zapamiętany.
Regulowany sygnał dzwonka
Szybkie wybieranie zapamiętanych numerów
1. Podnieś słuchawkę (lub naciśnij przycisk zestawu nagłownego) i poczekaj na
sygnał wybierania.
2. Naciśnij przycisk m.
3. Wybierz jeden z zapamiętanych numerów, naciskając przycisk z cyfrą 0 - 9 .
Przerwę międz y cyframi numeru można wprowadzić, naciskając prz ycisk P.
W razie potrzeby można zapisać w pamięci numer abonenta odbierającego połączenie. W
prz ypadku zmiany numeru można zastąpić stary numer nowym.
1. Podnieś słuchawkę (zignoruj sygnał wybierania) i naciśnij przyciski P oraz
#.
2. Wybierz sygnał dzwonka naciskając przyciski 0 - 9 , zgodnie z tabelą
zamieszczoną poniżej.
3. Naciśnij przycisk P i odłóż słuchawkę. Sygnał dzwonka został ustawiony.
Przycisk/ustawienie
Typ melodii
Głośność dzwonka
1.......................................... Melodia A....................... Niska
2.......................................... Melodia A....................... Normalna
3.......................................... Melodia A....................... Wysoka
4.......................................... Melodia B....................... Niska
5.......................................... Melodia B....................... Normalna
6 (ust. fabryczne)................ Melodia B....................... Wysoka
7.......................................... Melodia C ...................... Niska
8.......................................... Melodia C ...................... Normalna
9.......................................... Melodia C ...................... Wysoka
0.......................................... Brak *............................. -
* Po wybraniu prz ycisku 0 sygnał dzwonka będzie wyłączony, aż do następnego podniesienia
słuchawki. Po podniesieniu słuchawki prz ywrócone zostanie ostatnio wybrane ustawienie
dzwonka.
18
www.doro.com
www.doro.com
19
Polski
Polski
Inne
Sygnalizacja wiadomości oczekującej
Niektóre centrale abonenckie oferują funkcję „Wiadomość oczekująca”. Telefon
sygnalizuje obecność oczekującej wiadomości pulsowaniem wskaźnika dzwonka
w trybie gotowości. Działanie tej funkcji zależy od typu centrali. Więcej
informacji można uzyskać od osoby nadzorującej system.
Uszkodzenia aparatu
Należy sprawdzić, czy przewód telefoniczny nie jest uszkodzony i czy jest
prawidłowo podłączony. Należy odłączyć wszelkie dodatkowe urządzenia,
przedłużacze i telefony. Jeśli po wykonaniu tych czynności aparat działa,
uszkodzenie występuje w innym urządzeniu.
Aparat należy przetestować z inną linią (np. u sąsiada). Jeśli aparat działa z
inną linią, to prawdopodobnie uszkodzona jest linia telefoniczna użytkownika.
Uszkodzenie należy zgłosić operatorowi.
Jeśli żaden z powyższych środków nie przynosi rezultatu, należy zwrócić się do
najbliższego serwisu lub do sprzedawcy, u którego aparat został zakupiony.
Gwarancja
Aparat jest objęty standardową roczną gwarancją. W przypadku reklamacji
proszę skontaktować się z najbliższym serwisem lub ze sprzedawcą. Serwis
gwarancyjny jest dostępny wyłącznie po przedstawieniu ważnego dowodu
zakupu/faktury.
Gwarancja nie obejmuje uszkodzeń powstałych w wyniku wypadku lub
podobnych zniszczeń, uszkodzeń spowodowanych zalaniem aparatu płynem,
niedbałością, niewłaściwym użytkowaniem lub innymi przyczynami leżącymi po
stronie nabywcy. Ponadto gwarancja nie obejmuje uszkodzeń spowodowanych
przez burze i inne skoki napięcia.
Gwarancja w żaden sposób nie wpływa na ustawowe uprawnienia nabywcy. (Ze
względów bezpieczeństwa zaleca się odłączanie telefonu podczas burzy.)
20
www.doro.com
www.doro.com
21
22
www.doro.com
www.doro.com
23
www.doro.com