1
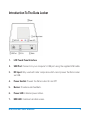
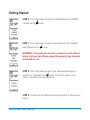
Pro AES & Enterprise
User Manual
Contents
Chapter Name
Page
Introduction To The Data Locker
3
Getting Started
4
Changing The Encryption Key
7
Initialising & Formatting Data Locker
9
Windows XP & Vista Users
9
Mac OS Users
12
User Options
13
Special Features
15
Contact Details
16
Data Locker User Manual
2
Introduction To The Data Locker
1.
LCD Touch Panel Interface
2.
USB Port: Connects to your computer’s USB port using the supplied USB cable.
3.
DC Input: Only used with older computers which cannot power the Data Locker
via USB.
4.
Power Switch: Powers the Data Locker On and Off.
5.
Buzzer: Provides audio feedback.
6.
Power LED: Indicates power status.
7.
HDD LED: Indicates hard disk access.
Data Locker User Manual
3
Getting Started
The Data Locker requires 5 Volts and 500mA of current from a USB port. Some older
computers and USB hubs may not provide sufficient power to operate any type of
external hard drive. Please check with your PC maker to ensure that your USB port is
adequately powered. If your computer can not deliver adequate power, you may be
required to use both USB connectors of the included “Y” cable. If your computer has a
non-powered USB port, please contact us about purchasing an optional AC Adaptor.
Mac Users: The Data Locker is shipped preformatted using the NTFS file system.
Please visit our web site for instructions on reformatting the Data Locker to FAT32 if
your Mac configuration does not support NTFS formatted drives.
STEP 1: Connect the included USB Cable to the Data Locker as illustrated. Ensure that
the black DATA AND POWER connector of the “Y” cable is plugged into the computer.
The second red connector is for additional power and may or may not be required
depending on the power output of your USB port.
Data Locker User Manual
4
Getting Started
STEP 2: Turn the Data Locker’s power switch On.
STEP 3: Enter the default password “000000” and press the
button.
STEP 4: Immediately press the “Setup” option on the touch screen.
If “Setup” is not selected within 5 seconds the Data Locker will
automatically connect to the computer.
STEP 5: Press “Change Password” on the touch screen.
Data Locker User Manual
5
Getting Started
STEP 6: Touch the screen and enter the default password “000000”
followed by the
button.
STEP 7: Touch the screen and enter a new password 6 to 18 digits
long followed by the
WARNING: Your password cannot be recovered or reset without
losing all of your data. Please ensure the password you choose is
memorable to you.
STEP 8: Touch the screen and enter your new password again to
reconfirm it, followed by the
button. Your Data Locker is now
ready to use with your new password.
STEP 9: To disconnect the Data Locker simply press the “Disconnect”
button.
button.
Data Locker User Manual
6
Changing The Encryption Key
If you wish to quickly erase all the data stored on the Data Locker and make it available
for another person to use you can follow the steps below to “Change The Encryption
Key”.
STEP 1: Turn on the Data Locker and enter the default password
“000000” or your user defined password followed by the
STEP 2: Immediately press the “Setup” option on the touch screen.
If “Setup” is not selected within 5 seconds the Data Locker will
automatically connect to the computer.
STEP 3: Press “Change Encryption Key” on the touch screen.
Data Locker User Manual
button.
7
Changing The Encryption Key
STEP 4: Press “Continue” if you are 100% certain you want to delete
all data on the Data Locker and generate a new encryption key.
STEP 5: Confirm that you wish to continue by pressing “Yes”.
WARNING: You will lose all data on the Data Locker if you
continue, and once deleted it cannot be recovered.
STEP 6: Press the touch screen 8 times randomly to generate your
new AES encryption key.
ENTERPRISE EDITION: The encryption key can only be changed
using the Administrator PIN to access the unit.
STEP 7: You must now re-initalise and format the Data Locker, please
see the section titled “Initialising & Formatting” in this manual.
Data Locker User Manual
8
Initialising & Formatting Data Locker
After changing the encryption key you must reinitialise and the format the hard drive
inside the Data Locker using the tools provided with your operating system.
Windows XP & Vista Users:
STEP 1: Connect the Data Locker and enter your password, press “Connect”.
STEP 2: Open “Disk Management” on your computer by clicking “Start”, right clicking
on “My Computer” and select “Manage” from the popup menu. Once “Computer
Management” loads select “Disk Management” from the tree on the left.
STEP 3: Normally Windows XP & Vista detect the uninitialised drive inside the Data
Locker automatically and launches the “Initialise and Convert Wizard”. Follow the
wizard on the screen to initialise the drive (see figure 1).
Figure 1
Data Locker User Manual
9
Initialising & Formatting Data Locker
STEP 4: If Windows does not automatically detect the drive and launch the wizard you
can manually initialise the drive by right clicking the disk in “Disk Management” with
the red circle on it and selecting “Initialise Disk”(see figure 2).
Figure 2
STEP 5: Once you have initialised the Data Locker right click on the black bar next to
the drive and select “New Partition”.
STEP 6: On the “New Partition Wizard” welcome screen click “Next”.
STEP 7: Select “Primary Partition” and click “Next”.
STEP 8: Specify the partition size that you want, for most users this can be left at the
default which is the maximum size of the drive, and click “Next”.
Data Locker User Manual
10
Initialising & Formatting Data Locker
STEP 9: If you want to assign a specific drive letter to your Data Locker, select the
letter you want from the drop down menu, otherwise accept the default provided
automatically provided by Windows and click “Next”.
STEP 10: Select “Format This Partition With The Following Settings” and ensure that
the “File System” type is set to NTFS in the drop down menu (as per figure 3) and click
on “Next”.
Figure 3
STEP 11: Check the settings and click “Finish” to begin formatting the Data Locker.
STEP 12: When the formatting has finished your Data Locker should now be labelled
“New Volume” with its new drive letter. Your Data Locker is now ready to be used.
Data Locker User Manual
11
Initialising & Formatting Data Locker
Mac OS Users:
In order to use the Data Locker on your Mac computer the drive must be initialised
and formatted using a file system type that the Mac OS can access, as Mac OS cannot
currently access NTFS (the default for Data Locker) file systems fully.
To initialise and format the Data Locker using a Mac supported file system you will
need to use the Disk Utility application supplied with Mac OS to format the Data Locker
with either the MS-DOS or a native Mac OS file system.
Using the MS-DOS file system will allow you to use the Data Locker on both PCs and
Macs, where as the native Mac OS file system types will only allow you to use the
Data Locker on Macs.
You can find detailed instructions on how to format the Data Locker for use with a Mac
on our web site in the Support FAQs section.
Data Locker User Manual
12
User Options
The Data Locker Pro AES and Enterprise editions has two user configurable options in
the “Setup” menu of the Data Locker.
These options are:
Self Destruct Mode: This option is a security measure that when enabled will delete
all the data and the encryption key on the Data Locker if the password is entered
unsuccessfully 9 times. On the 9th unsuccessful attempt your data will be permanently
deleted and is irreversible, this feature helps protect your data from attempts to gain
access to the Data Locker by guessing your password.
Key Tone: Enables or disables the key tone sound.
To enable or disable these options follow the steps below:
STEP 1: Turn on the Data Locker and enter the default password
“000000” or your user defined password followed by the
STEP 2: Immediately press the “Setup” option on the touch screen.
If “Setup” is not selected within 5 seconds the Data Locker will
automatically connect to the computer.
Data Locker User Manual
button.
13
User Options
STEP 3: Press the “Other” button on the touch screen.
STEP 4: Enable or disable the Self Destruct Mode and/or Key Tones
on this screen and use the back arrow in the top left of the touch
screen to return to the “Connect” menu.
Data Locker User Manual
14
Special Features
USB Malware Detection
If the Data Locker detects any USB malware or virus attempting to alter the drives file
system or partition the following warning screen will be displayed:
Should this message be displayed unexpectedly immediately press
“No” and disconnect your Data Locker from your computer and scan
your system for viruses.
NOTE: This warning message is displayed during the AES Encryption
Key Generation process and the drive initialisation/formatting process.
If you are performing either of these operations then you must select
“Yes” on the touch screen for them to complete.
Auto Secure Function
If you are performing a lengthy disk operation, i.e. a large file transfer or backup
operation, and would like to automatically disconnect and secure your Data Locker
when it has completed simply press the “Disconnect” button once the operation
begins and the Data Locker will secure itself once the operation completes.
Data Locker User Manual
15
Contact Details
Our web site is a great source for further product information and our support section
contains FAQs, drivers and user manuals for download to help you.
Visit: http://www.datalockerdrive.eu
If you cannot find the answer to your question on our web site, you can contact us via
e-mail, phone and post using the details below:
E-Mail:
[email protected]
Phone:
+44 (0)870 288 6868
Post:
Origin Storage Limited
2-4 The Rutherford Centre
Rutherford Road
Basingstoke
Hampshire
RG24 8PB
UK
Data Locker User Manual
16