1
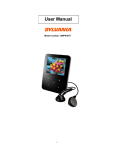
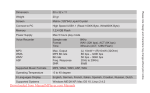
User Manual
Model number: Xemio 756/766
For information and support, www.lenco.eu
-1-
Table of Content
Content …………………………………………………………………………….
2
Unique Features……………………………………………………………………...3
Battery indicator…………………………………………………………………… 4
Locating the Controls……………………………………………………………… 4
Basic Operation…………………………………………………………………….
5
Play Music …………………………………………………………………………. 6
Movie mode…………...……………………………………………………………… 7
Voice Recording………………………………………………………………………8
Playback Files ……………………………………………………………….............8
FM mode……………………………………….…………………………………….. 9
E-Book Function ……………………………………………………………………..9
Photo Browse …………………………………………………………………………10
Game…………………………………………………………………………………..10
System Setting ……………………………………………………………………..….11
Hold mode……………………………………………………………………………..13
Use USB Disk …………………………………………………………………………14
Firmware Upgrade …………………………………………………….………….…14
Others setting…………………….…………………………………………………...15
AMV Convert Tool operation introduce……………………………………..……..18
Trouble Shooting …………………………………………………………………………… 19
Specification …………………………………………………………………………………. 19
Checking accessories:
-
Earphones
USB cable
Instruction manual & software CD
x1
x1
x1
-2-
The MP3 player is a brand-new generation of digital portable device, supporting MP3/WAV music
format ,voice recorder AMV format play ,JPEG photograph browse and E-book text reading .Its perfect
sound quality, great reliability and exquisite appearance make it a masterpiece. Devoutly hope to bring
you great enjoyment in this digital era.
Unique Features
● Exquisite Appearance
Unique appearance designed and comfortable for handling
● Multi-Codec Player
e.g.: MP1, MP2, MP3, WMA, WMV, ASF and WAV Music format
● Firmware Upgrade
Providing the latest updated features via firmware upgrade from the website
● Drive Free U Disk
You may manage your files directly through “Portable Disk” in “My Computer” on Winows2000
Operating System or above without driver.
● “Private Space” Disk Mode
The flash memory can be divided into two parts by using the accessory tools and one is encrypted to
hide the contents saved inaccessible by others. Keep Your Secret!
● Record/ Replay
The player supports recording through built-in microphone and saves as WAV and ACT formats.
Meanwhile it supports real digital A-B replay or comparison replay.
● 7 Preset EQ
Normal, Rock, Pop, Classic, Soft, Jazz and DBB
● Multi-play Mode
Normal, Repeat One, Folder, Repeat Folder, Repeat All, Random, Intro.
● Power Off
You may set Sleep Timer or Off Time mode in your own convenience.
Declaration
Thank you for your purchase.
Please read this manual carefully before using your new player.
Contents in this manual may change possibly for better service.
We have the right to make changes to this manual without notice.
-3-
If the actual operations of your player are not the same as the instruction in this manual, please
visit for latest product information.
Battery Inducator
Indicates that battery is charging.
Indicates low battery power, the battery should be recharged.
Note: When the battery is fully charged the battery indicator will be completely yellow
Recharge the battery:
Connect the player via USB cable with the computer, battery will be automatically charged as shown as
below pictures:
1. Locating the Controls
Appearance & Keys
-4-
S/N Description
S/N
Description
1
Menu / Return Button
6
Power switch
2
Vol / Hold key(Lock)
7
LCD display
3
Play/Pause/Enter/Stop
8
USB Socket
4
Previou track/Rewind()/VOL-
9
Earphone Jack
5
Next track/Forward()/VOL+
LCD Window
Basic Operation
Power On/Off
1
Turn ON / OFF by Power switch
Push the Power switch ( OFF→ON) , the player turn on automatically
When the player is in ON mode:
Push the power switch (ON → OFF) and the player will turn OFF automatically or press the
play button.
When connecting the USB plug to PC, the player turns on automatically and will enter USB
mode
2
Turn ON/Off by Play button (power switch in ON Mode)
♦
To turn ON / OFF the player hold the play button for 3 seconds.
♦
When connecting the USB plug to the PC, the player will enter USB mode automatically
Entering Different Modes
These modes can be entered from the main menu.
-5-
Main menu:
(press the PLAY
button to enter )
Movie mode:
FM mode:
Music mode:
E-Book:
Record mode:
Voice mode:
Photo Browse
System setting
GAME
Remark:
Press M button for 3 seconds to return to the main menu at the modes. When connecting the USB
cable the player will enter USB mode automatically.
Volume Control
Adjust the volume when entered Music / Voice / Movie Mode
Press VOL button to enter the volume control, press the / button to adjust volume.
Note:
During playback in Movie mode the player will not display the volume adjustment bar
Play Music
Basic Operation
1. Connect the earphone to the player
2.Turn on the player
3. select by using < / > button music mode 4.press play button to enter the Music mode:
-6-
5. Press the PLAY button to play music
EQUALIZER Mode
1.When playing music
6. Choose music
< button to choose previous track.
> button to choose next track.
2.Press the M button to enter Play Submenu
3.select the ‘Equalizer’ and press PLAY button
to confirm.
4.choose the preferred EQ and press play
button to confirm.
Lyric Display
This player supports “*.LRC” lyric files, and lyrics may be synchronous displayed while playing music.
How to use lyric files?
Save the lyric file with the same name as that of the corresponding music file.
For example.: Music file name: GiGi-Sky.mp3
Lyric file name: GiGi-Sky.mp3.
How to know whether the lyrics exist?
If the current song has matching lyric files, the lyric sign
will be display at the top of music mode.
Movie mode
Basic Operation
1. select by using < / > button “MOVIE” mode.
2. Press the PLAY button to enter movie mode.
3. press the PLAY button to start playing AMV files 4. Choose movie
< button to choose previous file.
> button to choose next file.
-7-
Voice Recording
Before recording make sure, the battery is fully charged to guarantee the quality of the recording.
Record Mode
1. select by using < / > button record mode 2. Press PLAY button to enter Record mode
3. Press Play button to start recording.
4. Press Play button again to pause
recording.
5.Press Play button to continue recording.
6. Press Play button for 3 seconds to save
the recording.
Select REC type
1. At the record mode stop interface (stop the 2. Press M button to enter record submenu
recording)
3. Use < / > button to select “rec type”
4. Press PLAY button enter this option
REC type
5. Use < / > button to select desired recording Fine REC – WAV format
type
Long REC – ACT format
6. Press PLAY to confirm the type selected
7. Press PLAY button to start recording
Playback Files
1. select by using < / > button voice mode
-8-
2.Press PLAY button to enter Voice mode
4.
3. Press PLAY button to start playing.
Choose record
< button to choose previous record file
> button to choose next record file.
FM Mode
1. Select FM mode by using < / > button 2. Press PLAY buttons to enter the “FM mode”
3. Press < / > to tune
:
Long press < / > to search the FM station automatically, when a station is found the search will stop and the
player will start to play the FM radio automatically.
Press < / > one time to adjust the frequency by 0.1MHZ
Press the PLAY key to enter the sub-menu of FM. You can set the following function:
1. Search mode: press PLAY key to enter,
a) Frequency (Freq) mode: press < / > key to search the radio station manual
b) Search station: press < / > key to select the radio station which you have stored.
c) Auto search: press PLAY key to search and store all the station automatically.
2. Search level: when a higher level is set the player will only plays the radio channels with very good
reception. Note: this will influence the number of channels that will be displayed.
3. Save: when you want to save the FM frequency, which you are playing, just press PLAY key to save.
4. Delete: To delete station
5. Select band:
a) Normal band: FM frequency band (87-108MHZ)
b) Japan band: Japan frequency band (76-90MHZ)
6.
Record FM: long press M to save files.
7.
EXIT
E-Book function
This function supports all TXT file.
1. Use < / > button to select e-book mode 2. Press play button to enter e-book mode
3. Use < / > button to select desired text 4.Press < / > button to turn the pages in
file, and press Play button to open the sequence.
file
(Only suitable for ”Manual play”)
-9-
In E-book function mode, press MENU key to enter sub-menu of text mode:
1. Local folder: to find your folder
2. Play set:
a) manual play: manual select previous next page by press the < / > key.
b) auto play: play automatically at preset space time
3. delete file: press < / > key to select the file that you want to delete, press PLAY key to confirm delete.
4. delete all: press PLAY key to confirm delete all the text files.
5. Exit: press Play key to exit the sub-menu of text.
Photo Browse (photo viewer)
1 select by using < / > button photo browse mode
2 press “PLAY” button to enter photo browse mode
3 Use < / > button to select the desired photo
4 Press play button to vieuw the photo
5 Use < / > button to flip the photo
Set auto play mode:
Set this mode and the player will automatically show all pictures that are inside the selected folder.
1.
2.
3.
4.
5.
6.
7.
8.
Enter photo browse mode.
Press M button to open the sub-menu.
Use < / > buttons to select play set
Press play button to enter play set
Use < / > buttons to select auto play
Press play button to confirm
Use < / > buttons to adjust the flip time
Press play button to confirm
To turn back to manual play repeat above step 1 till 5, only select manual play instead of auto play and
confirm by pressing the play button.
Game
1. Use < / > button to select game mode.
- 10 -
2. press PLAY button to enter game mode.
3. There are 3 games available, use < /> to select the game, press PLAY to confirm
Game 1: RusBlock
- Press PLAY to start
- V is down block
- M is change direction
- Press M for 3 seconds return to main menu
- Play button is Pause
- < is left
- > is right
Game 2: Puzzle
- Press PLAY to start
- Play is down
- V is up
- M is return to main menu
- < is left
- > is right
Game 3: Sudoku
- Press PLAY to start
- V is up and down; Play button is numbering; long press M return to main menu
- < is left; > is right
System Setting
System parameters can be set here and every option varies according to firmware upgrading
Use < / > button to select system mode.
Press PLAY button to System Setting interface is as follows:
Parameters Introduction
Clock
LCD set
Language
Power off
Replay mode
Online Mode
Memory info.
Firmware Version
Firmware
Upgrade
set the date and time
Display settings
Set language
Set a fixed time after which the player may turn power off automatically or
set sleeptimer
Set on Replay mode
an option specially designed for “Private Space” function
Show memory capacity and percentage that has been used
show firmware version
special for firmware upgrading
- 11 -
Exit
Exit system mode
Instruction
○ “Clock” setting
1.Use < / > button to select clock
2. Press PLAY to enter clock.
4. Push < / > button to adjust numbers
3. Press V to flip between
“YY-MM-DD” & “HH-MM-SS”
5. Press M to confirm and exit.
○ “LCD set” setting
Operating steps is as follows:
1. Use < / > button to select LCD set. 2. Press PLAY button to enter “LCD set”
submenu:
3. Press PLAY button to choose ‘Black’ 5. Press < / > button to adjust brightness and
press PLAY to confirm and exit.
Black screen mode
Can be set as above, if “0” is selected the functions are valid.
○
“Language” setting
1. Use < / > button to select language.
2. Press PLAY button to enter “Language”
setting
3. Press < / > button to select desired
language.
4. Press PLAY to confirm to exit.
Language lists:
English
French
German
Italian
Spanish
Portuguese
Dutch
Turkish
○ Power saving
For operating steps refer to Language setting.
Off Time when this mode is set the player will turn off automatically after the set period in seconds if no
buttons have been touched. If “0” is selected, power saving function is invalid.
Sleep Time When this mode is set, the player will turn off automatically after the set period in minutes.
- 12 -
Note: Setting of Sleep Timer is valid only once, the set time will be cleared after power off. The time
needs to be set again next time.
○ Replay Mode
Manual Replay means that at A-B Replay Mode the endpoint B can be set manually only.
Auto Replay means that at A-B Replay Mode the endpoint B can be set automatically.
(Especially for English Reading files without music)
○ Online Mode
Operating steps refers to Equalizer setting.
Some operating systems (under Windows 2000 SP4) can not support two driver letters in one
USB disk. Thus, if “Private Space” function is on, choose which disk you are going to use, i.e.,
“single ordinary disk” or “single encrypted disk”, in order for correct display of selected disk after
connecting to PC.
○ Memory Info.
This function describes the total memory capacity and the percentage of the total capacity that is
used.
○ Firmware Version
Shows the firmware Version information the that has been installed on the player.
○ Firmware Upgrade
It is specially designed for Firmware Upgrade.
HOLD Mode
1. Press “V” button for 3 seconds to lock the operating keys (see the picture 1)
2. Press “V” button key to open the lock. (see the picture 2)
(1)
(2)
- 13 -
Use USB Disk
The player supports standard USB disk function with operating system of Windows98 (driver needed),
Windows 2000 and XP/Vista (driver free)
Connect to PC:
Use the USB cable to connect the player with the PC. If connected correctly below picture will appear on the
LCD display of the player.
○Created new folder
The player can identify the 99 folders set
up in the U-disk.
Firmware Upgrade
The player supports firmware upgrading or maintenance through installing special tools on PC.
1. Enter the main menu.
2. Press > button to select “System Setting”
3. Press PLAY button to enter System Setting
4. Press > button to choose “Firmware upgrade” option
5. Press PLAY button to enter “firmware upgrade” interface:
6. Connect the player to PC
7. Run the “MP3 Player Update” program in upgrading tools on PC, then click “Select new firmware
file” button. The UI is as follows:
8 Choose new firmware program (You may find it in accessory CD or download form our website.
- 14 -
9 Click “Start” button, the system starts
10 upgrading.
11 If upgrading successfully, the player reset.
Notice:
Firmware upgrade is an operation to promote and optimize the performance of the player. Even if the
firmware works without upgrading, there is no any influence on the normal operation of the player.
Incorrect operation of firmware upgrading may cause the player working abnormally. Please read the
manual carefully before operation and the people should operate firmware upgrading with basic knowledge
in computer operation.
The upgrading firmware is specially programmed for this player only and not suitable for other serial
players, and other firmware is not suitable for this player as well.
Others setting
Select Folders (At Stop Submenu)
Files can be saved in different folders (folders should be created on PC in advance. The player
supports identification of 8 level subdirectories.
1. Go to music / voice mode and if the player is playing files pause or stop them.
2. Press M to enter Pause / Stop Submenu.
3. Use < / > button to select local folder.
4. Press PLAY to enter Local Folder mode.
5. Use < / > button to select folders at root directory.
6. Press PLAY button to confirm and return the stop interface, or short press M button to enter next select directories
as following view.
- 15 -
7.
Use < / > button to select folders at this directories.
8. Press PLAY button to confirm and return the stop interface, or short press M button to enter next select subdirectories
as following view.
9. Select and confirm folder \ to go back to the previous folder.
Note: Independent folders can be set at corresponding mode as Music mode, Record mode and Voice mode, i.e.,
three modes are not bound to correspond with the same folder.
Delete File
Files can be deleted at corresponding modes as Music Mode, Voice Mode.
1. Go to music / voice mode and if the player is playing files pause or stop them.
2. Press M button to enter submenu
3. Use < / > buttons to choose “Delete / Delete All” option.
4. Press PLAY button to enter Delete file folder
5. Press PLAY button to enter Delete file folder submenu
6. Use < / > button to select song / folder
7. Press play to confirm selection
8. confirm or cancel deleteing by pressing Yes / No by using the < / > buttons and press play button to
confirm.
Remark: “Delete All” means to delete all the relevant files at current mode in current folder. (For example,
at Music Mode executing “Delete All”, all the music files in current files may be deleted, while recorded files
without change.)
Note: When deleting files on PC, please take care to eject the player safely before pulling out USB cable,
otherwise files may not be deleted.
Repeat mode
When playing music and recorded files, different play modes can be selected.
Enter play/stop submenu to enter
The first option in Play Submenu is Play Mode. The player will play files according to the mode
selected.
Tempo Rate (Play Submenu)
When playing music(Only for MP3 formats) or recorded files, different tempo rate can be set (faster or
slower) without changing the tone and sound. Files.
1. When playing music
2. Press M button to enter Play Submenu
3. Use < / > button to choose Tempo Rate
- 16 -
4. Press PLAY button to enter Tempo Rate
5. Press > button to quicken tempo rate and press < button to slow down tempo rate.
Replay Mode
○ A-B Replay
1. Go to Music Mode or Voice Mode
2. Press M (during playback) to enter Play Submenu.
3. Use < / > to select “Replay”.
4. Press PLAY to enter Replay.
“A” flickers in Replay Mode icon
and start point is to be set.
5. Press > to set “A”.
6. After “A” set, “B” flickers in icon
, and endpoint B needs to be set.
7. Press > to set “B”.
Replay icon
is set and A-B segment replay begins. When replay times count up to times set in
advance, the player will quit from Replay Mode. At Replay Mode, pressing < can set “A and B” again
to select another segment.
Replay Times (Play Submenu)
Replay times is the number of times the A-B sigment repeats itself before exit replay mode.
Set replay times:
1. go to music or voice mode
2. Press M (during playback) to enter the play sub-menu
3. Use < / > buttons to select replay times and confirm by pressing the play button.
4. Use < / > buttons to adjust the number of replay times and confirm by pressing the play button.
Replay Gap
Replay gap means the break period between different playing times (in: seconds).
1.
2.
3.
4.
Set replay gap:
go to music or voice mode
Press M (during playback) to enter the play sub-menu
Use < / > buttons to select replay gap and confirm by pressing the play button.
Use < / > buttons to adjust the gap period in seconds and confirm by pressing the play button.
- 17 -
AMV Convert Tool operation introduce
This tool can be used to transform media files into AMV files
a)
1)
Click “convert tools” in provided CD
2)
Select “Setup” to install the program, the software will automatically installed.
3)
Open AMV converter tool on the PC
The following interface would be shown in your computer:
b) click
c)
click
, select the file that you want to transform into AMV files
to select the AMV file storage folder. In case the files will not be stored directly on the
player, the converted files should be copied into player later
d)
Then, right click the bottom blank area, choose “setting” to set the parameters (160x120) of the AMV
file, the interface as following:
- 18 -
Please note that the screen width and height should be 160*120, this is also the maximum format the player supports.
i.
2
Click OK and click directly
button to start the transformation.
After convert completes, the AMV Player will play AMV file automatically.
Trouble Shooting
Check whether Volume is set “0” and connect the headphone plugs
firmly.
No sound is heard from
headphone.
Check whether the headphone plug is dirty.
Corrupted MP3 may make a static noise and the sound may cut off.
Make sure that the music files are not corrupted.
Characters in LCD are
corrupted
Download of music files
fails.
Check whether the right language has been selected.
Check whether USB cable is damaged and is connected properly.
Check whether driver is installed correctly.
Check whether the player’s memory is full.
Specifications
Dimension
70*52*8mm
Weight
48g
LCD Window
1.8”
PC connection
Flash memory
Battery
Record
USB2.0(FS)
Read: 1000K Byte, Write: 1000-900K Byte
1GB – 8GB
230 mAh
Max Play time: 6-7 hours
Sample rate
8KHz
Recording format
ACT, WAV
Recording time
35hours ACT 128M Flash
Max
output
headphone
MP3 WMA ASF
of
150 mV 32 Ohm
MP3 bit rate
8K bps – 320K bps
WMA WMV bit rate
5K bps – 384K bps
Frequency response
20Hz to 20KHz
SNR
65 dB
Music format
MP1 MP2 MP3 WMA
Working temperature
-5 to 40
Operating System
Windows98/SE/ME/2000/XP/Vista
- 19 -
- 20 -