1
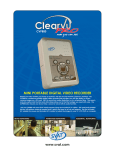
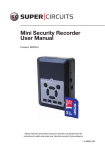
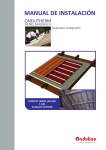
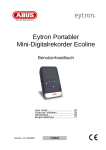
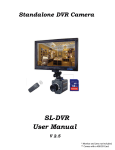
CVP800 MINI PORTABLE DIGITAL VIDEO RECORDER Mini Magnétoscope Portatif De Digital User's Manual Manuel de l'utilisateur www.svat.com TABLE OF CONTENTS •Table of Contents . . . . . . . . . . . . . . . . . . . . . . . . .pg 2 •Safety Precautions . . . . . . . . . . . . . . . . . . . . . . . pg 3 •Features & What Is Included . . . . . . . . . . . . . . . . pg 4 •Name & Function of Each Part . . . . . . . . . . . . . pg 5 Front View . . . . . . . . . . . . . . . . . . . . . . . . . . . . . . pg 5 Side View . . . . . . . . . . . . . . . . . . . . . . . . . . . . . . . pg 6 •Basic Configuration . . . . . . . . . . . . . . . . . . . . . . . pg 7 •Operation . . . . . . . . . . . . . . . . . . . . . . . . . . . . . . . pg 8 6.1 Power On . . . . . . . . . . . . . . . . . . . . . . . . . . . . pg 8 6.2 Live Mode . . . . . . . . . . . . . . . . . . . . . . . . . . . pg 8 6.3 Record Mode . . . . . . . . . . . . . . . . . . . . . . . . pg 9 6.4 Playback Mode . . . . . . . . . . . . . . . . . . . . . . pg 10 6.5 PC Playback . . . . . . . . . . . . . . . . . . . . . . . . . pg 11 6.6 SD Card Maintenance . . . . . . . . . . . . . . . . pg 12 6.7 How To Download The Updated Software pg 12 •Menu Setup . . . . . . . . . . . . . . . . . . . . . . . . . . . . . pg 12 7.1 Main Menu . . . . . . . . . . . . . . . . . . . . . . . . . . pg 12 7.2 Date/Time . . . . . . . . . . . . . . . . . . . . . . . . . . . pg 13 7.3 Motion Detection . . . . . . . . . . . . . . . . . . . . pg 13 7.4 Manual Record & Schedule Record . . . . . pg 14 7.5 SD Card Options . . . . . . . . . . . . . . . . . . . . . pg 15 7.6 System Status . . . . . . . . . . . . . . . . . . . . . . . . pg 16 7.7 Factory Default . . . . . . . . . . . . . . . . . . . . . . pg 16 •Specifications . . . . . . . . . . . . . . . . . . . . . . . . . . . pg 17 •Product Warranty . . . . . . . . . . . . . . . . . . . . . . .pg 18,19 w w w . s v a t . c o m page 2 IMPORTANT SAFETY PRECAUTIONS PLEASE READ BEFORE INSTALLING Congratulations on your purchase of the Mini Portable Digital Video Recorder. Please read these safety and operating instructions carefully before installing and using this system. • Keep the DVR and AC/DC adapter cords out of reach of children. • Do not place the DVR or AC/DC adapter cords in a crib or playpen. • Do not use the DVR near water or in damp and wet environments, such as a bathtub, laundry tub, kitchen sink or wet basements. • Locate the DVR or AC/DC adapter where there is adequate ventilation. Do not locate the DVR in direct sunlight. • Do not locate the DVR and AC/DC adapter near heat sources such as heat registers, radiators, ovens, furnaces or other appliances with high operating temperatures. • Do not use with extension cords. Use only the AC/DC adapter provided with this system. ***Note: Use of other adapters may damage the units and void your warranty. • Only plug components into standard household voltage outlets (110V - 240V AC, 50Hz or 60Hz). • Do not place cords from the AC/DC adapter where they can be pinched or stepped on. Protect the cord by keeping them out of the way of children, pets and routine household traffic. Do not place heavy objects on power cords or cover cords with rugs or carpet. • When cleaning, use a DRY, lint-free cloth. Unplug the camera, monitor and AC/DC adapter before cleaning. NEVER immerse any components in water and do not spray cleaners or solvents on the units. Doing so may damage the units or cause electrical shock. • Unplug the AC/DC adapter from the wall outlet when the system is not in use. • Mishandling, alterations or modifications not approved by the manufacturer will void the warranty. CAUTION! • Connect this unit ONLY to other compatible units. Do not connect it to any other type of alarm or auxiliary device. Connecting anything else to this unit may damage it or prevent it from operating properly. • Do not paint over the DVR unit. IMPORTANT! ACCESSORIES- Do not place product on an unstable cart, stand or table. The CVP800 may fall causing serious injury to a child or adult and serious damage to the equipment. Wall or shelf mounting should follow the manufacturer's instruction and should use a mounting kit approved by the manufacturer. VENTILATION- Slots and openings in the cabinet and the back or bottom are provided for ventilation and to ensure reliable operation of the video monitor or equipment and to protect them from overheating. These openings must not be blocked or covered. The openings should never be blocked by placing the video monitor on a bed, sofa, rug, or other similar surface. Video monitor or equipment receiver should never be placed near or over a radiator or heat register. Video monitor or equipment receiver should not be placed in a built-in installation such as a bookcase unless proper ventilation is provided. w w w . s v a t . c o m page 3 FEATURES & WHAT IS INCLUDED The DVR supports NTSC or PAL video systems and auto detects video loss. The DVR is built-in with MPEG4-SP video and G.726 audio codec. It supports 1 channel video and 1 channel audio recording and playback operation. Audio/Video data is recorded directly on the SD card with FAT13/32 file system and ASF file format. Simple data backup method to a PC. Audio/Video data is recorded directly as ASF file format. You can view the data straight from your PC and playback the ASF files with popular media players. For 1 GB SD Card, the record time is about 5 hours at Standard Quality for NTSC: 30fps @ 352x240 and PAL: 25 fps @ 352x280 The DVR supports: manual, motion detection and schedule recording mode with independent video size, quality, and frame rate set up. For motion detection, multiple detection blocks and appropriate motion trigger level can be set up. Support key lock function. Use anywhere, the device supports both AC power adapter or nickel metal hydride (NiMH), alkaline batteries. WHAT IS INCLUDED One Mini Portable Digital Video Recorder Two RCA Audio/Video Cables One AC Power Adapter *Not Shown: Instruction Manual, One Year Warranty and Toll Free Tech Support* w w w . s v a t . c o m page 4 NAME & FUNCTION OF EACH PART, FRONT VIEW FRONT VIEW 1) 2) 3) 4) Power LED . . . . . . . . . . . . . . .Power Indicator Play LED . . . . . . . . . . . . . . . . .Play Indicator Menu/Lock LED . . . . . . . . . .Menu/Key Lock Indicator Rec LED . . . . . . . . . . . . . . . . .When SD card is writing data during recording, record indicator . . . . . . . . . . . . . . . . . . . . . . . .will flash slowly. When SD card is “read only” recording function . . . . . . . . . . . . . . . . . . . . . . . .is disabled and the record indicator will flash quickly. Warning on Unusual Operation . . . . . . . . . . . . . . . . . . . . . . . .Record function is invalid when SD card is not inserted, full, . . . . . . . . . . . . . . . . . . . . . . . .damaged or setup to “read only” and (2)(3)(4) LED indicators . . . . . . . . . . . . . . . . . . . . . . . .will flash quickly; press Enter « button to release warning. 5) Stop/Exit Button . . . . . . .Stop Record or Play/Exit Menu 6) Rec Button . . . . . . . . . . .Manual Record Button 7,8) S Up Button . . . . . . . . . . . . .Cursor Movement Up/Down to select item in the Setup Menu T Down Button 9,10) W/ – Left Button . . . . . . . . . . .Playback - Press Fast Forward or Fast Rewind X/ +Right Button . . . . . . . . .Step Playback - Press to Step Playback . . . . . . . . . . . . . . . . . . . . . . . .Menu - Press to Increase/Decrease Setup Value 11) « Enter Button . . . . . . . . .Sub-Menu - Press to enter Sub-Menu /Unlock Switch . . . . . . . .Monitoring/Playback - Simultaneously pressing Enter « frist and . . . . . . . . . . . . . . . . . . . . . . . .then Menu button to switch the Key Lock Function ON/OFF 12) Display Button . . . . . . . .Status Line ON/OFF switch 13) Play Button . . . . . . . . . .Monitoring - Press Playback Pause Button . . . . . . . . .Playback - Playback - Press to Pause 14) Menu Button . . . . . . . . .Press to enter Menu Setup w w w . s v a t . c o m page 5 NAME & FUNCTION OF EACH PART, SIDE VIEW SIDE VIEW 15) AV/IN: Audio/Video Input V ideo In (yellow ) A V In Audio In (w hite) Audio/Video IN: 3.5 mm jack for audio/video line in. 16) AV OUT: Audio/Video Output V ideo Out (yellow ) A V Out A udio O ut (white) Audio/Video OUT: 3.5 mm jack for audio/video line out 17) 18) 19) 20) POWER: AC/Battery Power Switch AC 5V IN: 5V/1A Power Input SD Card Slot Battery Compartment Cover w w w . s v a t . c o m page 6 BASIC CONFIGURATION 1. Power: Use the power adapter supplied, nickel metal hydride (NiMH) or alkaline batteries. 2. Video System: Connect the camera, the device auto detects NTSC/PAL video system (the output video system will be setup the same as its input video system). Without connecting the camera, the video system setup will be the same as its previous setup. 3. Power Switch: Switch to DC when using the supplied power adapter or switch to BATT when using batteries. IMPORTANT ***Please use appropriate SD Memory Card (256MB or above), otherwise the recording data will present intermittent conditions. ***Withdraw SD card only when the device is switched off or currently under main menu display, otherwise system may be unstable or data stored in the SD card may be damaged. w w w . s v a t . c o m page 7 OPERATION POWER ON 1. The power switch is situated on the right side of the device, switch to DC when using the supplied power adapter or switch to BATT when using the batteries. *NOTE: Each time after power-on, the system auto-detects its peripherals. When the REC LED flashes, this indicates that the SD card is testing(complete boot time is several seconds). When an image file error has been detected, they system will initiate auto repairing.* 2. After power on, the system automatically enters live monitoring. When the system is currently under schedule recording, it auto enters record mode. 3. icon shown on the status line, indicates that the SD card is operating normally. 4. When the SD card is not inserted or a problem occurs with the SD card, Play, Menu, and Rec indicators will flash quickly. Please re-format before proceeding. 5. You can playback while the SD card is “read only”, but you cannot record; Play, Menu and Rec indicator will flash quickly. 6. When the SD card is writing data during recording, the record indicator will flash slowly. 7. Simultaneously press the “Enter” and “Menu” buttons to switch the Key Lock function ON/OFF. When the function key is locked, the key lock indicator will be lit. 8. After power-loss the system automatically returns to the previous recording mode. IMPORTANT Do not withdraw the SD card while booting. It may destroy the data stored within the SD card. LIVE MODE Live mode is the default setup after system start-up Monitoring Display: Press the Display button to switch between LCD display mode and OSD info. (1) 2 0 0 4 / 0 2 / 0 1 0 8 : 1 0 : 0 3 (2) (3) (1) Time Display: System Date and Time (2) Record Status Display: Manual Record Parameter Record Resolution, please refer to Record Setup for Video Size setup Record Quality, please refer to Record Setup for Video Quality setup Audio Off Record, please refer to Record Setup for Audio Record setup w w w . s v a t . c o m page 8 OPERATION CONTINUED (3) SD Card Status: SD Card has not been inserted or is malfunctioning SD Card is proceeding file testing SD Card is functioning normally C Disk full and overwrite record IMPORTANT When SD card is not inserted, record and playback function is inapplicable, but monitoring is applicable. RECORD MODE 1. START RECORD: 3 types of recording mode Manual Record: Suitable to record anytime. Press Rec Button, to enter manual record ing status (start recording). For more information, please refer to Record Setup. Motion Detection Record: Suitable to record, when there are severe image changes. Motion detection triggers schedule recording, but it will only start recording when the variation exceeds the alarm limitation value. For more information refer to Record setup. Continuous Record: Suitable on few constant frame recording or on long-term continuous recording. For more information, please refer to Record Setup. 2. STOP RECORD Pressing the Stop button stops the manual recording only. By Entering Play or Menu schedule recording (Motion Detection and Continuous Record), every type of recording will be stopped. To continue recording, please follow the methods below to restart recording. Manual Record Repress REC button Schedule Record After exit playback or menu mode, whether the setup has been changed or not, the system will automatically re-check the record schedule setup again. Motion Detection 3. RECORD DISPLAY: Indicates recording is in progress 2 0 0 4 / 0 2 / 0 1 0 8 : 1 0 : 0 3 Manual Record Schedule Record Motion Detection Record w w w . s v a t . c o m page 9 OPERATION CONTINUED 4. The event status is determined by the system recording, and according to the order of priority. 5. The order of priority: Manual Record, Motion Detection and then Schedule Record. 6. Different recording modes may have different kinds of setups. Basic setup: video size, recording frames, video quality, and audio recording. When different recording modes are triggered, they system starts recording according to the different setup. This kind of design provides flexibility to ensure efficient recording time and quality. Example: Work hour from 8:00 am to 6:00pm, setup schedule record to low video quality with less recording frames to extend the recording time. And off work hour, setup Motion Detection Record to enable high video quality with the highest recording frames, when an event occurs. 7. Video or audio may be recorded in the SD card (SD card not included). When the video has been stored, the record LED flashes indicates that the system is currently loading the file into the SD card. IMPORTANT Do not withdraw the SD card while recording. It may destroy the data stored within the SD Card. Power loss during recording results incomplete video or errors. Video loss during recording, the system stops recording, backups the files, and when the videos are normal again, the system will continue recording. Playback Mode Selectable Playback format: Continuous Playback and Searching Playback 1. NORMAL PLAYBACK: Press Play and Pausebuttons to playback according to the SD card file order recorded. 2 Fast Rewind and Fast Forward (Speed: x2/x4/x8/x16/x32) Press Play Pause button to return to normal speed playback. During playback, press PlayPausebutton to pause playback and press it twice to return to playback status. Display 0 4 / 0 2 / 0 1 0 8 : 1 0 : 0 3 Normal speed playback 0 During pause, press buttons to step back one frame or to step forward one frame and press Play/Pause buttons to return to normal speed playback. Switch to Hide Status Info, Hide LCD Monitor and Display LCD Monitor and Status Info. Press Stop button to stop playback function and to return to live status. w w w . s v a t . c o m page 10 OPERATION CONTINUED 2. SEARCH AND PLAYBACK: Enter MENU and select SEARCH AND PLAY S E Z A R C H A N D L A Y F I 2 0 0 3 / 1 2 / 2 5 2 0 0 3 / 1 2 / 2 6 2 0 0 3 / 1 2 / 2 7 2 2 0 0 3 / 1 2 / 2 8 3 2 0 0 3 / 1 2 / 2 9 P A G E T I M E : 0 9 : L ¡½ ¡½ E D A T E 3 4 P D A T E S 5 1 5 1 7 : 1 / 3 2 0 3 8 5 F I L E : 1 8 : 0 9 (1) File directory shows dates and the amount of contents under the directory. The user may pressor buttons to move the cursor up or down. (2) Current location page. (3) Each colour distinguishes different recording events, the user may press / + or - / buttons to move the cursor left or right and immediately shows the first image of the highlighted event on the screen display background. (4) Displays the time highlighted by the event bar. (5) Blue: Manual Record/ Red: Motion Detection Record/ White: Schedule Record. (6) Press STOP button to stop playback and the system will return to SEARCH and PLAY which enables the user to select the preferred input source. The device supports playback only images recorded by this device, other ASF video files are not guaranteed. PC PLAYBACK 1. The device uses the SD card as its main storage. User may read the data stored in the SD card from the computer that supports SD card reader devices. 2. All files (under DVMPG4 folder) have an approximate size of 1 MB and file names are ordered according to recorded times(sequence). File Playback: User may use Microsoft, Microsoft Media Player or DivX, DivX Player (http://www.divx.com/) to playback video files. Backup Playback: User may playback backup files from the computer (copy files to the SD card under /DVMPG4 folder). IMPORTANT When using Media Player for the first time to playback, it requires the most updated decoder from the Microsoft software website. w w w . s v a t . c o m page 11 OPERATION CONTINUED & MENU SETUP SD CARD MAINTENANCE 1. The device supports only FAT 16/32 file system; therefore it is unable to determine other file systems. Please format the SD card (Enter MENU/SD CARD OPTIONS and select “Format”). 2. The system supports only partial SD card file system repair. The system is unable to detect any file system damage, therefore please format the SD card (Enter MENU/SD CARD OPTIONS and select “Format”). HOW TO DOWNLOAD THE UPDATED SOFTWARE 1. Use the SD card to update your system firmware. 2. Please follow the steps below to update the software: (1) Copy the new system firmware into the new directory of the SD card from your computer. (2) Insert the SD card; switch off the main power and then restart. (3) Wait for 5 to 6 seconds, the system update will be completed and return back to live mode. IMPORTANT Do not withdraw the SD card while booting, when power-loss occurs while proceeding step (3), please repeat step (2) and (3). MAIN MENU 1 M A Z I N M E N U S E A R C H D A T E / S E T M O T O N I T P L A Y > D E T E C T > R E C O R D > S C H E D U L E R E C O R D > C A R D F A C T O R Y O P T I O N 2 > I M E M A N U A L S Y S T E M (3) A N D S E T S D (1) (2) ¡½ S > D E F A U L T > S T A T U S 3 > Main Menu: Item subject. Menu Layer Indication: The device consists of three menu layers. ¡½ First Menu Layer (Main Menu) ¡½¡½ Second Menu Layer ¡½¡½¡½ Third Menu Layer Menu Content: Basic Menu Operations. Press or button, to move the highlight bar and the cursor Z Press MENU/ENTER button, to enter the sub menu. Press STOP button. Under second or third menu layer, the system will return to the previous menu layer (second layer to first layer or third layer to second layer). Under main menu (first menu layer), the system will enter live mode. Press or button, to increase or decrease the setting values that has been highlighted. w w w . s v a t . c o m page 12 MENU SETUP CONTINUED DATE/TIME Z (1) Date Format: Y/M/D, M/D/Y, D/M/Y D A T E D A T E / T I M E ¡½ ¡½ F O R M A T S E T D A T S E T T I E : M E : 2 0 : Y / M / D 0 4 / 0 1 / 0 1 0 0 : 0 0 : 0 0 1 2 (2) Date/Time Adjustment: Year settings are from 2000 to 2099 MOTION DETECTION 1. Window Setup: M D A R E A M O D E : C E ¡½ ¡½ ¡½ L L E D I 4 T 3 1 2 M O D E (1) (2) (3) (4) : P L A Y Detection Cell: Whole screen is divided into 22x15 square cells. Detection Block: Two or more cells form a block. Cursor: Press PLAY button to switch to Select/Edit mode. Detection Block. 2. Cursor Movement: Press PLAY button, switch cursor to setup mode (cursor color is black). Press / buttons to move the cursor freely. 3. Detection Area Setup: (1) Press PLAY button FUNCTION CELL EDIT DEL BLOCK DEL ALL ADD BLOCK ADD ALL to select edit detection block function. DESCRIPTION Single detection cell setup (detection/non-detection) Disable a block Disable all cells Enable a block Enable all cells (2) Press PLAY button, switch cursor to edit mode (cursor color is pink). Press buttons, follow step (1) to change the size of the detection block. (3) Detection area is displayed by the colour red and non-detection area is represented by the colour blue. Press ENTER to enable/disable the detection area. (4) When a detected object is moving in the detection area, detection area turns from red to transparent (this indicates moving status). w w w . s v a t . c o m / page 13 MENU SETUP CONTINUED (5) Video Detection Block Sensitivity Setup: Changing the alert value setup may effect the recording sensitivity of the Motion Detection. M D S E N S I T I V I T Y ¡½ ¡½ ¡½ Sensitivity Bar: Colour black indicates image variable value & colour red indicates the MD threshold. ENERGY THRESHOLD MD Energy: Current image variation value. 1 M D E N E M D T H R E R G Y : S H O L D 2 3 0 % : 1 0 % R : MD Threshold: Press / buttons, to change the motion detection threshold value. Live Video T H R E S H O L D L : ¬ ® MANUAL RECORD & SCHEDULE RECORD Selectable manual or schedule recording, basic setups are shown below: 1. MANUAL RECORD: Press REC button to start recording. M A N U A L Z (1) V I F R A M E D E O Q U A L I A U D O I R E S I C O R D Z E : 7 0 4 X 2 R A T E : 1 2 F P S : M E D I U M : O N T Y 0 1 2 3 352x240 30 fps 352x280 25 fps 704x240 24 fps 704x280 20 fps 704x480 12 fps 704x560 10 fps Image Quality: HIGH QUALITY HQ MEDIUM QUALITY MQ LOW QUALITY LQ (3) 4 Video Size/Frame Rate: NTSC FRAME RATE (MAX) PAL FRAME RATE (MAX) (2) ¡½ ¡½ Using high recording quality (more SD card storage capacity will be required) Using medium recording quality Using low recording quality (less SD card storage capacity will be required) Audio Record: Enable or disable audio recording. w w w . s v a t . c o m page 14 MENU SETUP CONTINUED 2. SCHEDULE RECORD (Continuous/Motion Detection): Schedule Record: Records only within the setup time range. S C H E D U L E : O N 1 8 R E C O R D : 0 0 - 7 0 4 X 2 4 0 : O N 1 5 0 8 M O T I ¡½ ¡½ Z : 3 0 1 2 F P S : 0 0 - 7 0 4 X 4 8 0 1 7 O N R E C O R D R E C O R D : O N S C H E D U L E : 1 8 : 0 0 : 3 0 D U R A T 3 F P S I O N - C O N T I ¡½ ¡½ ¡½ Z O N C O N T I N U E R E C O R D > V I D E O R E C O R D > F R A M E Q U A L I A U D I RECORD SCHEDULE S I R E C O R D : O N S C H E D U L E : 0 8 : 3 0 1 5 : 0 0 - ¡½ ¡½ ¡½ 1 7 : 3 0 : 5 S E C V M O T I N U E R E C O R D Z E : R A T E : T Y O 7 0 4 X 2 4 0 1 2 F P S : M I D I U M I D E O F R A M E Q U A L I A U D I O S I Z E : R A T E : T Y 7 0 4 X 2 4 0 1 2 F P S : M I D I U M : O N : O N Enable or disable schedule recording (ON/OFF) ab:cd - ab:cd = 24 hour recording and 00:00 - 00:01= Recording of one minute image from 00:00 to 00:01 Motion Detection Recording DURATION TIME Setup: DURATION Duration time when motion detection has been triggered (5 SEC /10 SEC/ 15 SEC/20 SEC/30 SEC) SD CARD OPTIONS Z S D C A R D T A L R E M A I S D U L F O T F N O R M A T L O P T I O N S 2 8 M B 5 0 M B S P A C E : S P A C E : : > L O O P 12 1 ¡½ ¡½ 1 2 SD Card Full: LOOP C (continuous recording)/STOP (stop recording). Preset Record = Stop Record: When SD card storage capacity is full, it will stop recording. Preset Record = Continuous Record: When SD card storage capacity is full, it will start overwriting information from the earliest videos (auto repeating continuous recording). SD Card Format: It will delete all data stored in the SD card and will create a new directory DVMPG4 under root directory. NOTE: Proceeding continuous recording, old videos can be deleted and overwritten. Please confirm before setup. Recording time depends on the SD card capacity, different recording modes and degree of video variation. w w w . s v a t . c o m page 15 MENU SETUP CONTINUED SYSTEM STATUS S Y S T E M S Y S T E M : 7 0 : O N 7 : 0 0 F U T U S ¡½ ¡½ V E R : V 1 . 4 X 2 1 2 F P S 1 8 : 4 X 2 4 0 1 5 : 4 X 4 8 0 L L : L O O P 12 O N 7 S D S T A 4 0 0 0 0 0 0 - 0 8 : 1 2 F P S - 3 1 7 P 3 3 F P S 0 0 0 Press any button to return to the Main Menu. FACTORY DEFAULT F A C T O R Y D E F A U L T R E C A L L D E F A U L T N O W ? N O : E X I T Y E S : N T E R E ¡½ ¡½ Press Enter « button, this returns all settings to the factory default value. Press Stop button, this exits the current screen display and returns to the main menu. NOTE: Returning to factory default will erase all configuration values and return to the Factory Default values except Date & Time setup. Be sure to confirm before proceeding. w w w . s v a t . c o m page 16 SPECIFICATIONS System . . . . . . . . . . . . . . . . . . NTSC/PAL Video System & Video Loss Auto Detection Video Codec . . . . . . . . . . . . MPEG4-SP ASF FIle Format Video Record Frame rate . 1,2... , Maximum fps selectable . . . . . . . . . . . . . . . . . . . . . . . . Maximum NTSC fps 30fps@352x240/24fps@704x240/12fps@704x480 Video Record Quality . . . . . Low/Medium/High Recording Date/Time . . . . . Overlay with video images in ASF file Video Input . . . . . . . . . . . . . 1 CH composite video line in Video Output . . . . . . . . . . . . 1 CH composite video line out Audio Sampling Rate . . . . . 44.1 KHz Audio Codec . . . . . . . . . . . . G.726/32kbps Audio Input . . . . . . . . . . . . . 1 CH audio line in Audio Output . . . . . . . . . . . . 1CH audio line out Storage Media . . . . . . . . . . SD Card (FAT16/32) Recording Mode . . . . . . . . . Manual/Schedule Motion Detection/Schedule Continue Motion Detection Setting . . Multiple Blocks and adjustable sensitivity Event Search Function . . . . Property & first image of selected file is displayed Playback Function . . . . . . . Play/Fast Forward/Fast Rewind/Pause/Step Forward . . . . . . . . . . . . . . . . . . . . . . . . /Step Backward Playback Speed . . . . . . . . . x1/x2/x4/x8/x16/x32 Power Supply . . . . . . . . . . . . DC 5V 10% 1A/2 AA (Batteries Battery Life . . . . . . . . . . . . . . 2 AA Alkaline: 100min Operating Environment . . . 30%~80% RH, 5o~45o C or 41o~113o F Storage Environment . . . . . 30%~90% RH, 0o~50o C or 32o~122o F Product Weight . . . . . . . . . . 89 g (without Battery/SD card) Dimensions . . . . . . . . . . . . . . 2.5(W) x 3.5(H) x 1.1(D) inches Video Record Time . . . . . . . Low: 400 mins. 30fps@352x240, 240 mins. 24fps@704x240,240 mins. 12fps@704x480 Med: 300 mins. 30fps@352x240, 150 mins. 24fps@704x240,150 mins. 12fps@704x480 High: 150 mins. 30fps@352x240, 75 mins. 24 fps@704x240, 75 mins. 12fps@704x48 NOTES ____________________________________________________________________________________________________ ____________________________________________________________________________________________________ ____________________________________________________________________________________________________ ____________________________________________________________________________________________________ ____________________________________________________________________________________________________ ____________________________________________________________________________________________________ ____________________________________________________________________________________________________ ____________________________________________________________________________________________________ ____________________________________________________________________________________________________ ____________________________________________________________________________________________________ ____________________________________________________________________________________________________ ____________________________________________________________________________________________________ w w w . s v a t . c o m page 17 PRODUCT WARRANTY We take quality very seriously. This is why all of our products come with a one year warranty from the original purchase date against defects in workmanship and materials. If you have warranty or support issues please contact us using any of the following methods: SVAT Electronics USA 2315 Whirlpool St., Unit 333 NIagara Falls, New York USA 14305 SVAT Electronics Canada 4080 Montrose Road Niagara Falls, ON Canada L2H 1J9 Phone: 866.946.7828 Fax: 888.771.1701 Email: [email protected] Website: www.svat.com Warranty Terms 1. SVAT products are guaranteed for a period of one year from the date of purchase against defects in workmanship and materials. This warranty is limited to the repair, replacement or refund of the purchase price at SVAT's option. 2. When service is required, the warranty is validated by the submission of a fully completed warranty card. 3. This warranty becomes void if the product shows evidence of having been misused, mishandled or tampered with contrary to the applicable instruction manual. 4. Routine cleaning, normal cosmetic and mechanical wear and tear are not covered under the terms of this warranty. 5. The warranty expressly provided for herein is the sole warranty provided in connection with the product itself and no other warranty, expressed or implied is provided. SVAT assumes no responsibilities for any other claims not specifically mentioned in this warranty. 6. This warranty does not cover the shipping cost, insurance or any other incidental charges. 7. You MUST call SVAT before sending any product back for repair. You will be given a Return Authorization number. When returning the product for warranty service, please pack it carefully in the original box with all supplied accessories, and enclose your original receipt or copy, and a brief explanation of the problem (include RA #). 8. This warranty is valid only in Canada and the U.S.A. 9. This warranty card cannot be re-issued. CAUTION RISK OF ELECTRIC SHOCK, DO NOT OPEN TO REDUCE THE RISK OF ELECTRIC SHOCK, DO NOT REMOVE THE COVER (BACK). NO USER SERVICEABLE PARTS INSIDE. REFER SERVICING TO QUALIFIED SERVICE PERSONNEL. Graphic Symbol Explanation: The lightning flash with arrowhead symbol, within an equilateral triangle, is intended to alert the user to the presence of uninsulated “dangerous voltage” within the product’s enclosure that may be of sufficient magnitude to constitute a risk of electric shock to persons. The exclamation point within an equilateral triangle is intended to alert the user to the presence of important operating maintenance (servicing) instructions in the literature accompanying the appliance. WARNING: TO PREVENT FIRE OR SHOCK HAZARDS, DO NOT EXPOSE THIS UNIT TO RAIN OR MOISTURE Disclaimer: SVAT does not endorse of any of SVAT products for any illegal activities. SVAT is not responsible or liable in any way shape or form for any damage, vandalism, theft or any other action that may occur while a SVAT product is in use by the purchaser. w w w . s v a t . c o m page 18 GARANTIE DE PRODUIT Nous prenons la qualité très sérieusement. C'est pourquoi tous nos produits viennent avec une garantie d'un an de la date originale d'achat contre des défauts en exécution et matériaux. Si vous avez les issues de garantie ou de soutien satisfont nous contactent employant n'importe laquelle des méthodes suivantes : SVAT Electronics USA 2315 Whirlpool St., Unit 333 NIagara Falls, New York USA 14305 SVAT Electronics Canada 4080 Montrose Road Niagara Falls, ON Canada L2H 1J9 Phone: 866.946.7828 Fax: 888.771.1701 Email: [email protected] Website: www.svat.com Limites De Garantie 1. Les produits de SVAT sont garantis pour une période d'une année de la date d'achat contre défectuosités l'exécution et défectuosité des matériels. Cette garantie est limitée à la réparation, le remplacement ou le remboursement du prix d'achat à l'option de SVAT. 2. Quand le service est exigé, la garantie est validée par la soumission d'une carte de garantie entièrement complétée. 3. Cette garantie devient vide si le produit montre l'évidence d'ayant été employé improprement, malmené ou a altéré contraire au manuel d'instruction applicable. 4. Le nettoyage de routine, l'usure normale normal, cosmétique et mécanique n'est pas couverte sous les ter mes de cette garantie. 5. La garantie a pourvu expressément à en ceci est la garantie seule fournie à propos du produit lui-même e aucune autre garantie, exprimée ou suggérée est fournie. SVAT ne suppose pas de responsabilités pour les autres réclamations pas en particulier mention né dans cette garantie. 6. Cette garantie ne couvre pas le coût expédiant, l'assurance ou les autres charges accessoires. 7. En retournant le produit pour le service de garantie, s'il vous plaît l'emballer soigneusement dans la boîte originale avec tous accessoires fournis, et enclore votre carte de garantie, le reçu original ou la copie, et une explication brève du problème. 8. Cette garantie est valide seulement dans le Canada et les ETATS-UNIS. 9. Cette carte de garantie ne peut pas être la réédition. ATTENTION LE RISQUE DE DÉCHARGE ÉLECTRIQUE, NE S'OUVRENT PAS POUR RÉDUIRE LE RISQUE DE DÉCHARGE ÉLECTRIQUE, N'ENLEVEZ PAS LA COUVERTURE (ARRIÈRE). AUCUNES PIÈCES DE L'UTILISATEUR SERVICEABLE À L'INTÉRIEUR. RÉFÉREZ-VOUS L'ENTRETIEN AU PERSONNEL DE SERVICE QUALIFIÉ. Explication Graphique De Symbole : Le flash de foudre avec le symbole de pointe de flèche, dans une triangle equilateral, est prévu pour alerter l'utilisateur à la présence "de la tension dangereuse" non isolée dans la clôture du produit qui peut être de la grandeur suffisante pour constituer un risque de décharge électrique aux personnes. Le point d'exclamation dans une triangle equilateral est prévu pour alerter l'utilisateur à la présence des instructions de fonctionnement importantes d'entretien (entretien) dans la littérature accompagnant l'appareil. AVERTISSEMENT : POUR EMPÊCHER DES RISQUES DU FEU OU DE CHOC, N'EXPOSEZ PAS CETTE UNITÉ À LA PLUIE OU À L'HUMIDITÉ Déni : SVAT n'approuve d'aucun de produits de SVAT pour aucun activities illégal. SVAT n'est pas responsable ou responsable de quelque façon forme ou forme d'aucun dommage, de vandalisme, de vol ou d'aucune autre action qui peuvent se produire tandis qu'un produit de SVAT est en service par l'acheteur. w w w . s v a t . c o m page 19 If you require more information on this product or other SVAT products visit Si vous exigez plus d'information sur ce produit ou ces autres produits de SVAT visite www.svat.com