1
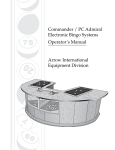
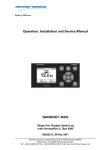
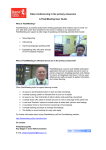
Symbio Microscope
L1500 Series
Biological Upright Compound Microscopes
Operating Manual
1
Symbio, Unit 8, Coopers Place, Combe Lane, Wormley, Surrey. GU8 5SZ
Tel: 44 (0) 1428 685762 Fax 44 (0) 1428 685702 www.symbio.co.uk [email protected]
The GXM L1500 Series of biological microscopes are high quality instruments equipped with high grade,
glass objectives in steel barrels which can be achromatic (model GXML1500A) or economic plan
achromatic (model GXML1500B) and wide field eyepieces. They can be supplied with monocular,
binocular or trinocular heads providing the observer with a bright, clear image and a wide field of view.
These highly robust microscopes are suitable for scientific research, routine work in hospitals and
government agencies and are especially popular as teaching tools in universities and colleges.
SPECIFICATIONS
.
1 Eyepieces
Type
Magnification
Focus(mm)
Field(mm)
Wide field eyepiece
10X
25
φ18
Plan eyepiece
16X
15.6
φ11
Remark
Optional
.
2 Objectives
Type
W.D(mm)
Achromatic
or Semi- Plan Achromatic
Magnification
N.A
4X
10X
40X
( )
100X oil
Achromatic
Semi-Plan
0.1
0.25
0.65
37.4
6.6
0.64
23.1
4.1
0.6
1.25
0.19
0.38
.
3 Total Magnification
Objectives
Total
Magnification
4X
10X
40X
100X
10X
40X
100X
400X
1000X
16X
64X
160X
640X
1600X
Eyepieces
4. Condenser numerical aperture: 1.25
;
;
5. Stage cross travel range: longitudinal 35mm traverse 75mm
6. Fine focusing knob: minimum division 0.002mm
;
;
7. Interpupillary-distance adjustment range: from 53mm to 75mm
8. Light sources: using a 6V 20W-halogen or LED lamp brightness adjustment
9. Power supply: can be operated on AC 220V 50HZ or AC 110V 60HZ.
;
2
Symbio, Unit 8, Coopers Place, Combe Lane, Wormley, Surrey. GU8 5SZ
Tel: 44 (0) 1428 685762 Fax 44 (0) 1428 685702 www.symbio.co.uk [email protected]
COMPONENTS
3
Symbio, Unit 8, Coopers Place, Combe Lane, Wormley, Surrey. GU8 5SZ
Tel: 44 (0) 1428 685762 Fax 44 (0) 1428 685702 www.symbio.co.uk [email protected]
Fig.1
Fig.2
4
Symbio, Unit 8, Coopers Place, Combe Lane, Wormley, Surrey. GU8 5SZ
Tel: 44 (0) 1428 685762 Fax 44 (0) 1428 685702 www.symbio.co.uk [email protected]
INSTALLATION
Fig.3
MAKING OBSERVATIONS
1. Press the power switch on the side “I”. Place a specimen on the stage
2. Select the 10X objective into position by turning the nosepiece, then focus the specimen which is
on the stage
;
;
3. Adjust interpupillary distance and diopter whilst observing through the binocular eyepieces
4. Adjust the up & down position of the condenser, light control and aperture diaphragm in order to
obtain the optimal illumination effect. Select the 4X or 10X objective, bring down the condenser using
the condenser’s rack and pinion knob to obtain symmetrical light
;
5. When selecting other objectives turn the nosepiece and refocus slightly with the fine focusing
knob. When use the 100X objective, make be sure to put a drop of cedar wood oil between the
objective and the specimen.
5
Symbio, Unit 8, Coopers Place, Combe Lane, Wormley, Surrey. GU8 5SZ
Tel: 44 (0) 1428 685762 Fax 44 (0) 1428 685702 www.symbio.co.uk [email protected]
COMPONENT FUNCTIONS
1. Adjust of interpupillary distance
Put the specimen on the stage and ring the specimen into
exact focus. Adjust the interpupillary distance of binocular
until the right-left field of view can be composed one. (Fig.4)
Fig.4
2. Adjustment of diopter
Put the specimen on the stage. Turn the 40X objective to working
position. Firstly, observe at right column with right eye, adjust
coarse-fine focusing knob to image clearly. Secondly, observe at
left column with left eye, adjust the diopter control
clearly. ( Fig.5)
① to image
Fig.5
3. Coarse/Fine focusing
The instrument used coaxial coarse/fine focusing mechanism.
The adjustable tensional knob
④
used for adjusting the
③ to prevent the stage
from naturally sliding down. The limit knob ① prevents
accidental specimen/objective contact. ② is fine focusing
tension of the coarse focusing knob
knob.( Fig.6)
Fig.6
6
Symbio, Unit 8, Coopers Place, Combe Lane, Wormley, Surrey. GU8 5SZ
Tel: 44 (0) 1428 685762 Fax 44 (0) 1428 685702 www.symbio.co.uk [email protected]
4. Stage
① on stage is used for holding
slide glass ②, lengthwise knob③/cross knob ④ are coaxial, the
The convenient specimen holder
stage move expediently.( Fig.7)
Fig.7
5. Moving the condenser
The condenser is moved up or down via turning up-down knob
①. The condenser can be taken down easily if unscrews the condenser
holding screw②, filter plate places on the filter seat ④. (Fig.8)
Fig.8
6. Power switch and adjustable brightness
Turn on the power switch
⑥; adjust the light control ⑤ until image can be observed comfortably.
(Fig.8) Note: Do not let the light control stay at the highest intensity position or it will reduce the
life-span of the lamp.
7. Aperture diaphragm
Switch on the power, put the specimen on the stage, then turn the 10X
objective into the working position, observe with 10X eyepieces. Turning the
up/sown condenser knob and reach the image of field diaphragm. Then
concenter field diaphragm and optical axis with adjusting screw
Fig.9
the ring
②. Turn
① of field diaphragm when the field diaphragm more than the
field of eyepiece. Using 4X objective, the adjust method as so. (Fig.9)
7
Symbio, Unit 8, Coopers Place, Combe Lane, Wormley, Surrey. GU8 5SZ
Tel: 44 (0) 1428 685762 Fax 44 (0) 1428 685702 www.symbio.co.uk [email protected]
(Fig.10)
8. CHANGING THE LAMP (NOT NECESSARY FOR LED MODELS) AND FUSE
1. Switch off the power supply and pull out the plug of electrical
wire.
2. Incline the microscope, loose the screw
base boards
② of fixing lamp
③ on the middle part of bottom, and removes
lamp baseboard from bottom.
④
3. Pull out the old lamp from lamp base .
Fig.10
4. Insert the new lamp into lamp base. Check it is properly connected.
5. Clean the new lamp with methanol.
6. Reinstall lamp base board on the bottom with the screw.
7. To check the positioning of the lamp, plug in the cable, turn on the power supply, select a low
power objective, adjust condenser, and make the light enter the field of view. If the light is offset from
the center of the field of view, loosen the screw and slightly and move the lamp base to make the lamp
centered, then tighten the screw.
8. Unplug from the mains. Loosen the screw of fuse, remove the bad fuse, mount the new fuse, and
tighten the screw.
The specification of fuse
:φ5,0.5A
MAINTENANCE
1. Cleaning the optics
Clean the optics using lens tissue or soft fabric immersed in methanol. Clean off excess immersion oil
from the 100X objective after every use.
.
2 Cleaning the painted parts
The dust on the painted parts can be removed by a lint free cloth or blower brush, for the grease spots,
the gauze immersed slightly with methanol is recommended.
3. Avoid disassembling the microscope
Being a precise instrument, do not disassemble the microscope casually that may cause serious
damage to its performance.
4. Being not used
Cover the microscope with a dust cover and store in dry place. We recommend that storage all
objectives and eyepieces should be in closed container with drying agent.
8
Symbio, Unit 8, Coopers Place, Combe Lane, Wormley, Surrey. GU8 5SZ
Tel: 44 (0) 1428 685762 Fax 44 (0) 1428 685702 www.symbio.co.uk [email protected]
SYMBIO MICROSCOPES
SLIDER PHASE CONTRAST KITS
USER MANUAL
Example Phase Objectives
Slider-Type Phase contrast condensers with inserts
9
Symbio, Unit 8, Coopers Place, Combe Lane, Wormley, Surrey. GU8 5SZ
Tel: 44 (0) 1428 685762 Fax 44 (0) 1428 685702 www.symbio.co.uk [email protected]
Introduction
The Symbio microscope is supplied with a flashboard phase contrast set containing x10 and x40 phase
flashboards. When viewing with phase contrast, the flashboard corresponding to the lens
magnification should be inserted into the slot in the condenser (see flashboard phase contrast set
picture above).
The microscope condenser has been set up and aligned at the factory and should not need any
significant user adjustments. The Centering Telescope can be used to check the alignment of the
flashboards in the condenser (see diag. 1.). If the flashboards are out of alignment, they can be
centered using the condenser adjustment screws (see Fig. 1. In the Operating Manual)
When you wish to make observations using phase contrast phase contrast you need to select a phase
contrast objective and ensure that the phase contrast condenser is mounted with the corresponding
phase contrast plate inserted which must have the same magnification indicated on it as the objective
currently selected. See below example:
Operating Procedure
1. Select a phase contrast objective, insert the corresponding phase contrast plate in position,
adjust the condenser knob to move the condenser into the optimum position.
2. Place a specimen slide on the stage, and focus onto the specimen.
3. Remove one eyepiece and insert the centering telescope 2 , as in diag 1-a
4. Look through the phase telescope and observe the dark ring 3 and bright ring 4, as in diag 1c
5. If the ring edges are not clear enough, adjust the phase telescope extension ring 1 to bring it
into focus.
6. Phase contrast observation requires that the center of dark and bright rings are perfectly
concentric. If they are not concentric (non-concentricity is shown in diag 1-c), adjust the
centering screws of the phase plate 5 as shown in diag 1b, the correct observed setting should
be as shown in diag 1-d
7. When you have completed the phase ring alignment remove the centering telescope and insert
the eyepiece.
Please Note: When you change to a different power objective, the phase system will require
re-adjustment to ensure optimum phase contrast performance.
10
Symbio, Unit 8, Coopers Place, Combe Lane, Wormley, Surrey. GU8 5SZ
Tel: 44 (0) 1428 685762 Fax 44 (0) 1428 685702 www.symbio.co.uk [email protected]
3
1
4
2
c
a
b
5
d
Diag 1.
11
Symbio, Unit 8, Coopers Place, Combe Lane, Wormley, Surrey. GU8 5SZ
Tel: 44 (0) 1428 685762 Fax 44 (0) 1428 685702 www.symbio.co.uk [email protected]