1
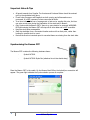
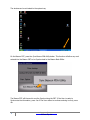
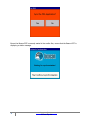
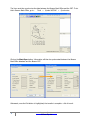
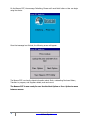
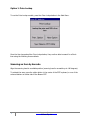
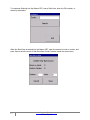
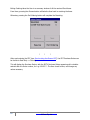
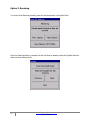
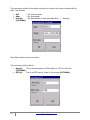
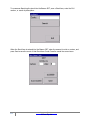
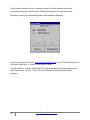
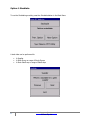
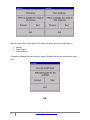
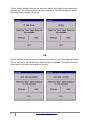
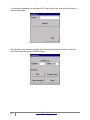
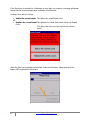
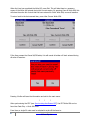
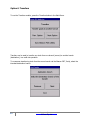
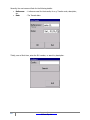
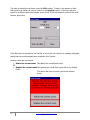
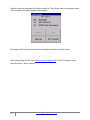
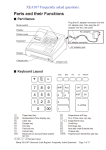
 Support Note
#120011
Symbol MC3000 Operating Instructions
Introduction
Important Notes & Tips
Synchronising the Beacon
PDT
Option 1. Price Lookup
Option 2. Ordering
Option 3. Receiving
Option 4. Stocktake
Option 5. Write Off
Option 6. Transfers
Important Notes
Introduction
The Symbol MC3000 is a portable hand held device or Portable Data Terminal (PDT), which
enables the operator to capture data Entry and load that information into the Beacon Back
Office software.
This Beacon PDT has the following modules:
Available:
1.
2.
3.
4.
5.
6.
Price lookup
Ordering
Receiving
Stock take
Write Off
Transfers
The steps required to communicate between the Beacon Back Office PC and the Beacon PDT
are:
1. Install Microsoft ActiveSync – A once off task. See Support Note on Installing ActiveSync
(Support Note #120010 – ‘Connecting the Symbol MC3000’)
2. Install an ODBC link to the Beacon database – A once off task. See support note on
creating an ODBC connection
3. Create a connection to the Beacon PDT – A once off task.
From that point on each time the Beacon PDT is placed in its cradle, the computer and the
Beacon PDT will Synchronise the communications between them automatically.
1
www.beaconsoftware.com.au
© Pixen Pty Ltd
Important Notes & Tips
•
•
•
•
•
•
•
All goods inwards from Supplier Tax Invoices and Purchase Orders should be entered
prior to the stocktake being done.
Check Inbox Processor and Megalink are both running and all transactions are
processed. It is NOT necessary to have reconciled all shifts.
If an item is found that has no average cost or last cost or supplier list price, the User
can enter a cost price during the finalization of the stock take in Beacon.
Only Synchronise the Beacon PDT if there is no more data to be scanned. WARNING:
RE-Synchronising the Beacon PDT will wipe off all other data and is NOT reversible.
Keep the stock takes manageable
Start the stocktake from a convenient location and work from that point, rather than
looking for specific stock to count.
Review the stock not counted report to see what items are missing from the stock take.
Synchronising the Beacon PDT
The Beacon PDT contains the following hardware items:
‐
Symbol MC3000
‐
Symbol MC3000 Stylus Pen (attached to unit via elastic strap)
Place the Beacon PDT in the cradle. On the Beacon Back Office, the ActiveSync connection will
appear. The green light indicates the Synchronisation process is complete.
2
www.beaconsoftware.com.au
© Pixen Pty Ltd
The window can be minimized to the system tray.
On the Beacon PDT, press the Sync Beacon PDA Utility button. This function will allow any work
entered into the Beacon PDT to be Synchronised to the Beacon Back Office.
The Beacon PDT will then ask to confirm Synchronising the PDT. If the User is ready to
Synchronise the information, press Yes. If the User wishes to continue entering in work, press
No.
3
www.beaconsoftware.com.au
© Pixen Pty Ltd
Ensure the Beacon PDT is securely seated in the cradle. Also, ensure that the Beacon PDT is
displaying a similar message.
4
www.beaconsoftware.com.au
© Pixen Pty Ltd
The User must then synchronise the data between the Beacon Back Office and the PDT. To do
Tools > Symbol MC3000 > Synchronise
this in Beacon Back Office, go to:
Click on the Start Sync button. Information will then be synchronised between the Beacon
Back Office database and the Beacon PDT.
Afterwards, once the Exit button is highlighted, the transfer is complete – click it to exit.
5
www.beaconsoftware.com.au
© Pixen Pty Ltd
On the Beacon PDT, the message ‘Initialising, Please wait’ must finish before a User can begin
using the device.
Once that message has finished, the following screen will appear.
The Beacon PDT now has the latest information about Stock, outstanding Purchase Orders,
Transfers in progress, and Suppliers details, and much more.
The Beacon PDT in now ready for use. Use the Next Option or Prev. Option to move
between menus.
6
www.beaconsoftware.com.au
© Pixen Pty Ltd
Option 1. Price Lookup
To use the Price Lookup module, press the Price Lookup button in the Main Menu.
Once the User has pushed the Price Lookup button, they are then able to search for a Stock
item using the following three methods.
Scanning an item by barcode
Align the scanning head to a suitable position (scanning head is moveable up to 180 degrees).
To activate the scan, press the yellow button in the center of the PDT keyboard, or one of the
coloured buttons on either side of the Beacon PDT.
7
www.beaconsoftware.com.au
© Pixen Pty Ltd
Finding an item by PLU
If the barcode cannot be used on the Beacon PDT, the user can enter the PLU number and
search for the item.
To find an item by its PLU, type in the PLU number and press the Search button.
If the desired item is displayed, press the button displaying the PLU or Search Again if needed.
Finding an item by description
If the barcode or PLU cannot be found on the Beacon PDT, the User can enter a description or
any part of the description and search for the item.
If the desired item is displayed, press the button displaying the PLU or Search Again if needed.
8
www.beaconsoftware.com.au
© Pixen Pty Ltd
Should a barcode shelf label be requires, simply press the Request Label button and a label will
be requested and available from Beacon Back Office, under Label Printing Queue, when the
user next Synchronise to the computer.
Pressing the Exit button will complete the Price Lookup.
*
*
*
After synchronising the PDT (see Synchronising the Beacon PDT), any requested Labels can be
found via Stock > Label Printing Queue.
For more information on Beacon’s Label Printing Queue, please see Support Note #30010 -
Stock Label Printing Queue
9
www.beaconsoftware.com.au
© Pixen Pty Ltd
Option 2. Ordering
To use the Purchase Ordering module, press the Ordering button in the Main Menu.
Once the Ordering button is pushed, the User will then be asked to select the Supplier that the
stock is being ordered from.
Purchase Order for a single Supplier:
Use the Next or Previous button to navigate forward or backward, respectively, through the list.
Also, by activating the Alpha button on the PDT, the user can search by typing in the name of
the supplier.
Purchase Orders for multiple Suppliers:
Select Any Supplier to allow a selection from any supplier in the Beacon system.
10
www.beaconsoftware.com.au
© Pixen Pty Ltd
To commence Ordering into the Beacon PDT; scan a Stock item, enter the PLU number, or
search by description.
When the Stock item is entered into the Beacon PDT, enter the amount in units or cartons, and
press Save to save the count of that Stock item. Press Cancel to cancel the current scan.
11
www.beaconsoftware.com.au
© Pixen Pty Ltd
Exiting Ordering takes the User to a summary window of all the received Stock items.
From there, pressing the Resume button will take the User back to receiving the items.
Otherwise, pressing the Exit Ordering button will complete the Receiving.
*
*
*
After synchronising the PDT (see Synchronising the Beacon PDT), the PDT Purchase Orders can
be found via Data Entry > Ordering.
This will display the Purchase Orders, with the PDT’s Purchase Orders appearing with a doubleasterisk after the Order number, for e.g. 000123**. The User should review, and change any
values necessary.
12
www.beaconsoftware.com.au
© Pixen Pty Ltd
Option 3. Receiving
To use the Stock Receiving module, press the Receiving button in the Main Menu.
Once the Receiving button is pushed, the User will then be asked to select the Supplier that the
stock has been received from.
13
www.beaconsoftware.com.au
© Pixen Pty Ltd
The next screen will ask for the details, which can be found on the Invoice received with the
stock. This includes:
•
•
•
Ref:
- The Invoice number.
Date:
- The Invoice date.
Ord. No:
- The Order Number, found under Data Entry > Ordering.
(OPTIONAL)
Press OK to continue to the next screen.
The next screen will then ask for:
•
•
14
Amt ($):
This is the total amount of Dollars paid (inc. GST) for the stock.
(OPTIONAL)
GST ($):
This is the GST amount, found on the Invoice. (OPTIONAL)
www.beaconsoftware.com.au
© Pixen Pty Ltd
To commence Receiving the stock into the Beacon PDT; scan a Stock item, enter the PLU
number, or search by description.
When the Stock item is entered into the Beacon PDT, enter the amount in units or cartons, and
press Save to save the count of that Stock item. Press Cancel to cancel the current scan.
15
www.beaconsoftware.com.au
© Pixen Pty Ltd
Exiting Receiving takes the User to a summary window of all the received Stock items.
From there, pressing the Resume button will take the User back to receiving the items.
Otherwise, pressing the Exit Receiving button will complete the Receiving.
*
*
*
After synchronising the PDT (see Synchronising the Beacon PDT), the PDT Purchase Orders can
be found via Data Entry > Supplier Tax Invoices / Credits.
This will display the Invoices, with the PDT’s Invoices appearing with a double-asterisk before
the Invoice number, for e.g. **123A. The User should review, and change any values
necessary.
16
www.beaconsoftware.com.au
© Pixen Pty Ltd
Option 4. Stocktake
To use the Stocktaking module, press the Stocktake button in the Main Menu.
A stock take can be performed for
•
•
•
17
A Supplier
A Stock Group or range of Stock Groups
A Stock SubGroup or range of SubGroups
www.beaconsoftware.com.au
© Pixen Pty Ltd
Select the option that is best suited. Each option will require the User to select either a
•
•
•
Supplier
Stock Group or
Stock SubGroup.
If Supplier is selected, the User must then select a Supplier that they are receiving the items
from.
OR
18
www.beaconsoftware.com.au
© Pixen Pty Ltd
If Stock Group is selected, then the User must then select a ‘from’ Stock Group to begin with,
as well as a ‘to’ Stock Group to define the search parameters. This allows the User to choose
which Group/s are required in the search.
OR
If Stock SubGroup is selected, then the User must then select a ‘from’ Stock SubGroup to begin
with, as well as a ‘to’ Stock SubGroup to define the search parameters. This allows the User to
choose which SubGroup/s are required in the search.
19
www.beaconsoftware.com.au
© Pixen Pty Ltd
To commence Stocktaking into the Beacon PDT; scan a Stock item, enter the PLU number, or
search by description.
When the Stock item has been scanned, enter the quantity counted in cartons or units and
press Save to save the count of that Stock item.
20
www.beaconsoftware.com.au
© Pixen Pty Ltd
If the Stock item is entered into a Stocktake on more than one occasion, a message will appear
saying that the item has already been included in this Stocktake.
However, there are two choices:
• Add to the current count This adds to the overall Stock count.
OR
• Replace the current count This replaces the overall Stock count with a new Overall
Count.
(This allows the User to correct a previously entered
count)
When the User has completed the Stocktake, Press the Exit button. Please wait while the
Beacon PDT completes the Stock take.
21
www.beaconsoftware.com.au
© Pixen Pty Ltd
A summary of the Stocktake will be displayed for review. To view what has been entered, the
User can press the Previous and Next buttons, respectively. Pressing the Exit Stocktake button
will exit to the main menu.
*
*
*
After synchronising the PDT (see Synchronising the Beacon PDT), the PDT stocktake can be
found via Tools > Symbol MC3000 > Stocktake
This will display the items entered in the PDT stocktake. The User should review, and change
any values necessary. The PDT stocktake will allow for items sold during the stock take.
22
www.beaconsoftware.com.au
© Pixen Pty Ltd
When multiple locations of stock are found the screen will display those counts and times.
A stock take variance can be printed at any time until the stock take is finalised.
23
www.beaconsoftware.com.au
© Pixen Pty Ltd
To finalise the stock take Select the UPDATE button
24
www.beaconsoftware.com.au
© Pixen Pty Ltd
Option 5. Write Off
To use the Write Off module, press the Write Off button in the Main Menu.
Write Off can be used to write-off any stock that may be out-of-code.
To commence writing off the stock into the Beacon PDT; scan a Stock item, enter the PLU
number, or search by description.
25
www.beaconsoftware.com.au
© Pixen Pty Ltd
The stock-on-hand figure is shown under the SOH: section. To enter in the amount of stock
that needs to be written off, enter a number in the Qty: section. A reason for the write off must
also be selected, by clicking on the drop-down Reason: section.
If the User wishes to search for a different stock item instead, press Cancel. If the User wishes
to write off this stock amount, press Save.
If the User wishes to add more quantity for the same item later, scan the stock item, and
correct the quantity to the correct amount.
26
www.beaconsoftware.com.au
© Pixen Pty Ltd
When the User has completed the Write Off, press Exit. This will take them to a summary
screen of the Write offs entered during this current session. By pressing View All Write Offs, this
will show the entire list of stock that has been entered for Stock Write Offs, across all sessions.
To return back to the last scanned item, press View Current Write Offs.
If the User presses the Cancel W/Off button, this will cancel all written off stock entered during
all write off sessions.
Pressing Confirm will save the information and exit to the main menu.
*
*
*
After synchronising the PDT (see Synchronising the Beacon PDT), the PDT Write Offs can be
found via Data Entry > Write Off Stock.
From there, a single GL code must be selected to write off the items to.
www.beaconsoftware.com.au
27
© Pixen Pty Ltd
28
www.beaconsoftware.com.au
© Pixen Pty Ltd
Option 6. Transfers
To use the Transfers module, press the Transfers button in the Main Menu.
Transfers can be used to transfer any stock from one branch (source) to another branch
(destination), in a multi-site operation.
To commence transferring stock from the source branch via the Beacon PDT, firstly, select the
intended destination branch.
29
www.beaconsoftware.com.au
© Pixen Pty Ltd
Secondly, the next screen will ask for the following details:
•
•
Reference:
etc.
Date:
- A reference used for the transfer, for e.g. Transfer code, description,
- The Transfer date.
Thirdly, scan a Stock item, enter the PLU number, or search by description.
30
www.beaconsoftware.com.au
© Pixen Pty Ltd
The stock-on-hand figure is shown under the SOH: section. To enter in the amount of stock
that needs to be written off, enter a number in the Quantity: section. If the User wishes to
search for a different stock item instead, press Cancel. If the User wishes to write off this stock
amount, press Save.
If the Stock item is entered into the Transfer on more than one occasion, a message will appear
saying that the item has already been included in this Transfer.
However, there are two choices:
• Add to the current count This adds to the overall Stock count.
OR
• Replace the current count This replaces the overall Stock count with a new Overall
Count.
(This allows the User to correct a previously entered
count)
31
www.beaconsoftware.com.au
© Pixen Pty Ltd
When the User has completed the Transfer, press Exit. This will take them to a summary screen
of the Transfers entered during this current session.
By pressing Exit Transfer, this will save the information and exit to the main menu.
*
*
*
After synchronising the PDT (see Synchronising the Beacon PDT), the PDT Transfers can be
found via Stock > Stock Transfers.
32
www.beaconsoftware.com.au
© Pixen Pty Ltd