1
GoldMine Premium Edition
Installation Guide
Version 8.0
4/07
GMSMN0043
ii Notices
Copyright © 2007 FrontRange Solutions USA Inc. All Rights Reserved.
Microsoft® SQL Server™ is Copyright © 2002, Microsoft Corporation. All rights reserved.
This software includes software developed by the Apache Software Foundation (http://
www.apache.org/).
This program includes Firebird SQL Database Engine v1.5. Firebird SQL Database Engine v1.5 was
developed by Inprise Corporation, now called Borland Software Corporation Copyright © 2001-2005.
All Rights Reserved. The Firebird SQL Database is distributed on an "AS IS" basis, WITHOUT
WARRANTY OF ANY KIND, either express or implied.
• You may obtain the source code for Firebird by going to the downloads page at http://
www.ibphoenix.com/main.nfs?a=ibphoenix&s=1112825832:328167&
page=ibp_download_15, according to the terms of the Initial Developer's Public License Version
1.0. Upon install, the license files can be found in the Program Files\Firebird\Firebird_1_5 folder.
You may obtain a copy of this source code license from the Firebird Project website, at http://
www.firebirdsql.org/index.php?op=doc&id=idpl.
• The executable version of the Firebird SQL Database Engine v 1.5 which is distributed in conjunction with GoldMine software by FrontRange Solution is made available according to the terms of
the FrontRange license agreement located in the GoldMine installer and in the product documentation. This license and its obligations are only offered by FrontRange and not by Inprise Corporation, Borland Software Corporation or any other contributor to the source code of Firebird SQL
Database Engine v 1.5.
For FBExport see http://fbexport.sf.net.
The Sentry Spelling-Checker Engine Copyright © 1999 Wintertree Software Inc.
USE OF THIS SOFTWARE AND ITS RELATED USER DOCUMENTATION IS SUBJECT TO THE
TERMS AND CONDITIONS OF THE APPLICABLE END-USER LICENSE AGREEMENT (EULA), A
COPY OF WHICH IS FOUND IN THE USER DOCUMENTATION. YOU MUST AGREE TO THE
TERMS AND CONDITIONS OF THE EULA IN ORDER TO USE THIS SOFTWARE. IF YOU DO
NOT AGREE TO THE TERMS AND CONDITIONS OF THE EULA, PROMPTLY RETURN THE
UNUSED SOFTWARE IN ITS UNOPENED CD PACKAGE TO THE PLACE FROM WHICH YOU
OBTAINED IT FOR A REFUND.
WARNING: The software described in this manual and its related user documentation are protected
by copyright law. In no event, shall any part of the related user documentation be copied, reproduced, distributed, transmitted, stored in a retrieval system, or translated into any language, without
the express written permission of FrontRange Solutions USA Inc.
Contact FrontRange Solutions USA Inc. at our Web site: www.frontrange.com
(Apr 2007)(GM 8.0)
GoldMine Installation Guide
Notices
iii
Trademark Notices
FrontRange Trademark Information
The following are trademarks of FrontRange Solutions USA Inc. and/or its affiliates in the
United States and/or other countries:
FrontRange Solutions®, GoldMine®, GoldSync®, GoldMine® Answer Wizard™, GoldMine®
Management Intelligence™, GoldMine® Manager’s Console™, iGoldMine™, HEAT®, HEAT®
Service & Support™, HEAT® PowerDesk™, iHEAT™, HEAT® Self Service™, HEAT®
Manager’s Console™, HEAT® Answer Wizard™, HEAT® Quick Start Wizard™, InfoCenter®,
Automated Processes™, First Level Support®, GoldMine® CustomerIQ®, HEAT®
CustomerIQ®, CustomerIQ® and other FrontRange products and brands.
Other Trademark Information
The following are trademarks of their respective owners or companies:
TRADEMARK OR REGISTERED TRADEMARK
COMPANY
ACT!®
CRM Division of Best Software Inc.
Adobe®, Acrobat®, Reader®
Adobe Systems Inc.
Apple®, Mac® OS, Macintosh®
Apple Computer, Inc.
Avaya®
Avaya, Inc.
Beyond
Gold™
Computerese
®
Borland Interbase
®
Borland International Inc.
Calyx®
Calyx Software
Cisco®
Cisco Technology, Inc.
Citrix®
Citrix Systems, Inc.
Corel®
Corel Corporation
Crystal Reports®
Business Objects S.A.
dBASE®
dBASE Inc.
dbCams+™
Financial Computer Support, Inc.
Fast™, Folio®, NXT®, LivePublish®, GetSmart™
Fast Search and Transfer SAS
FirebirdSQL Foundation Incorporated
(Australia)
Genesys Telecommunications
Laboratories, Inc.
Genesis 2000, Inc.
Firebird®
Genesys®
Genesis 2000®
GlobalCall®
GoldBox©
GraphOn®, GO-Global®
IDT Corporation
copyright of Redstone Softbase Company
GraphOn Corporation
Great Plains®
Great Plains Software Inc.
Hewlett
Packard®
®
®
Hewlett Packard Company
®
IBM , Lotus , Lotus Organizer
™
™
InaPlex , Inaport
IBM Corporation
Inaplex Limited
iv Notices
TRADEMARK OR REGISTERED TRADEMARK
®
®
Intel , Pentium , Dialogic
®
COMPANY
Intel Corporation
Intuit®, QuickBooks®, QuickBooks Pro®
Intuit Inc.
ITIL®
The Office of Government Commerce
KNOWLIX™
Peregrine Systems Inc.
LANDesk®
LANDesk Group Ltd.
Linux®
Linus Torvalds
Maximizer Enterprise™
Multiactive Software
Microsoft®, Active Directory®, Microsoft® SQL Server™,
ActiveX®, Outlook®, Windows®, Windows NT®, .NET™, Visual
FoxPro®, Microsoft Exchange Server®, Microsoft®.NET™
Microsoft Corporation
Netcensus®
Tally Systems Corporation
Netilla®
Netilla Networks, Inc.
Netscape®, Netscape Navigator®
Netscape Communications Corp.
Novell®, Netware®, Groupwise®
OmniRush
™
Novell, Inc.
®
Z-Firm LLC
(formerly FaxRush )
Oracle®
Palm®,
MyPalm™,
Oracle Corporation
Palm
Powered™,
Palm.Net®,
PalmPak®
Pink Elephant™
Red
Hat®
PalmOS®,
Palm, Inc.
Pink Elephant Inc.
Red Hat, Inc.
RightFax®
Captaris, Inc.
Rolodex®
Rolodex Corp.
Sage Line™
The Sage Group plc
SaleMaker®
SaleMaker Corp.
SAP®
SAP Aktiengesellschaft Corporation
Scansoft®, SpeechPearl®
Scansoft, Inc.
SPARC®
SPARC International Inc.
Sun®, Java™, Solaris®
Sun Microsystems, Inc.
Sybase®
Sybase, Inc.
Symantec®, pcAnywhere®, WinFax®
Symantec Corporation
UNIX®
UNIX System Laboratories, Inc.
VNC™
AT&T Laboratories Cambridge
Voxpoint®
Cayo Communications, Inc.
Visor®
Handspring, Inc.
Zetafax®
Equisys PLC Company
Other products and brands are registered trademarks or trademarks of their respective
owners/companies.
End-User License Agreement (EULA)
v
FrontRange Solutions Software Product: GoldMine® Integration Services
(Rev. Oct. 2005v2)
END-USER LICENSE AGREEMENT (“EULA”)
IMPORTANT – READ CAREFULLY
THIS EULA IS A LEGAL AGREEMENT BETWEEN YOU ("YOU" OR "LICENSEE") AND FRONTRANGE
SOLUTIONS USA INC., A COLORADO CORPORATION ("FRONTRANGE SOLUTIONS"), FOR
FRONTRANGE SOLUTIONS SOFTWARE PRODUCT, WHICH INCLUDES COMPUTER SOFTWARE AND
ASSOCIATED MEDIA AND DOCUMENTATION (COLLECTIVELY "LICENSED SOFTWARE"). BY OPENING
THE SOFTWARE PACKAGING, COMPLETING THE ACTIVATION PROCESS, OR DOWNLOADING,
INSTALLING, ACCESSING OR UTILIZING THE LICENSED SOFTWARE OR CLICKING THE "I ACCEPT"
BUTTON, YOU AGREE TO BE BOUND BY THE TERMS OF THIS EULA. IF YOU DO NOT AGREE WITH THE
TERMS OF THIS EULA, PROMPTLY RETURN THE UNUSED LICENSED SOFTWARE TO THE PLACE FROM
WHICH YOU OBTAINED IT FOR A REFUND.
1. Protection/Ownership. The Licensed Software may include software owned by third-parties (collectively
"Third-Party Owners"). The Third-Party Owners are third-party beneficiaries of this EULA and You agree to
be bound to them under all the terms and conditions of this EULA, unless and to the extent that a separate
license agreement for such software governs. The Licensed Software is protected by copyright and other
intellectual property laws. FrontRange Solutions or a Third Party Owner retain ownership of the Licensed
Software and the copies of the Licensed Software provided herewith. The Licensed Software is licensed to
Licensee for use subject to the terms set forth in this EULA. You agree that this is a license only and that no
title passes to You. You agree not to challenge FrontRange Solutions' rights in or otherwise attempt to
assert any rights in the Licensed Software, except those provided under this EULA.
2. Grant and Scope of License. Subject to the terms and conditions of this EULA, FrontRange Solutions
hereby grants to Licensee, and Licensee fully accepts upon delivery, a nonexclusive, nontransferable and
perpetual (unless earlier terminated as provided below) right to use only the executable version (not source
code) of the Licensed Software for its own internal business purposes. Your right to use the Licensed
Software is limited to only the licensing limits (such as users, assets, modules, technology foundation,
databases and other features and benefits) that You have ordered and paid for in accordance with the
applicable purchase order or other order documentation. You may use the Licensed Software only as
expressly permitted under this EULA and in accordance with the accompanying Documentation and any
other written instructions provided by FrontRange Solutions. Certain Licensed Software modules may
require that You have a valid license for a specific version (such as the last corresponding version) of a
corresponding FrontRange Solutions module, technology foundation product or other application, or
product of a third party, and may terminate upon termination of such other product license.
3. Restrictions. You agree not to copy the Licensed Software, unless and except as expressly permitted in
the accompanying Documentation. If You make such permitted copies of the Licensed Software, the
original copy of the Licensed Software and all copies that You make may not leave your control, and title to
all copies remain with FrontRange Solutions and/or a Third Party Owner. You agree not to modify,
decompile, translate, disassemble or reverse engineer the Licensed Software or otherwise attempt to
discover any source code or underlying confidential or proprietary information. You agree not to distribute,
rent or lease any portion of the Licensed Software (including any feature enabled by the Licensed
Software). You agree not to use any portion of the Licensed Software (including any feature enabled by
the Licensed Software) in a commercial hosting, application service provider environment, service bureau
or managed service or otherwise commercially exploit the Licensed Software. You may not create any
derivative works to the Licensed Software except to facilitate Your permitted use of the Licensed Software,
provided that Your use of such limited derivative works is subject to the same restrictions as described in
this EULA (including the restrictions on distribution, rental, hosting or other commercial exploitation of such
limited derivative works). You acknowledge that the Licensed Software contains information deemed
confidential or otherwise proprietary to FrontRange Solutions or a Third Party Owner, and You agree to
handle the Licensed Software with at least the same degree of care employed with respect to Your own
vi End-User License Agreement (EULA)
confidential or proprietary information.
4. License Limits. As mentioned above, Your use of the Licensed Software is limited to certain features and
benefits based upon the specific license limits that You have ordered and paid for. License limits on the
Licensed Software may include one or more of the following: technology foundation; named user:
concurrent user: server: database and/or asset. The definition and applicability of any of these license
limits are defined by the order and pricing document, the Documentation and other written agreement
between You and FrontRange Solutions related to the specific version of the Licensed Software at the time
You license the Licensed Software. For any additional or future acquisitions of the Licensed Software or
any other FrontRange Solutions product, FrontRange Solutions may at any time change the definition or
applicability of these license limits or any other features, benefits, products or pricing at any time without
notice.
Should You exceed any of Your license limits, then You agree to pay the then applicable full list price for
the excess usage in accordance with FrontRange Solutions pricing program, as well as the full
Maintenance and Support Fee related to these additional products. Different modules of the Licensed
Software may install separately within the Licensed Software package, however, all the software enabled
and/or installed are subject to the terms and conditions of this EULA.
5. Installation and Verification. The installation and verification of the Licensed Software may entail
completion of a serialization and/or license file deployment procedure in which You will be required to enter
serialization code(s) and/or install license file(s) ("Activation Keys") provided to You as a part of the
Licensed Software. You agree not to share the Activation Keys provided to You to any third party other
than an authorized FrontRange Solutions reseller ("Reseller") with which You have engaged. The
Activation Keys indicate to the loaded Licensed Software the software features and/or modules enabled
with licensed configuration limits as applicable, including (i) number of authorized concurrent users, named
users and/or assets covered by the license; (ii) server restrictions; (iii) database restrictions; and (iv)
technology foundation restrictions. You may be required to electronically register the Licensed Software to
one application server machine or other physical device by connecting to FrontRange Solutions' activation
or registration servers (or website). Further, the Activation Keys system may disable Your use of the
Licensed Software in the event You attempt to exceed or otherwise violate the terms of this EULA.
6. Privacy. The installation process may require you to register the Licensed Software with user information
and the Licensed Software may contain an automated audit tool whereby FrontRange Solutions will
receive notification of Your licensed limits and user information. Any personal information collected (1) will
be used solely for registration and license limit auditing purposes for the Licensed Software and to provide
You with important information about the Licensed Software, (2) will be stored in computer servers with
limited access that are located in controlled facilities and/or under SSL protocol, (3) may be stored and
processed in the United States or any other country in which FrontRange or its affiliates, subsidiaries or
agents maintain facilities and by using this Licensed Software, you consent to any such transfer of
information outside of your country, (4) may be stored indefinitely, (5) will not be shared with any
government agency, private organization, or the public, except with Licensee's name as a reference
company in the context of sales presentations and marketing activities.
7. Ongoing Audit. Certain Licensed Software require that FrontRange Solutions periodically audit Your use
of the Licensed Software to verify Your compliance with Your license limits, and in most instances, such
audits will be performed remotely through electronic access to the Licensed Software. You agree to permit
FrontRange Solutions (or its agent) to electronically monitor and/or audit Your use of the Licensed
Software for the sole purpose of verifying Your compliance with the terms of Your license.
8. Updates. If the Licensed Software is an Update (defined as an upgrade, modified version, updates,
addition, and copies of the Licensed Software, if any, made generally available by FrontRange Solutions as
an "Update" to the Licensed Software to those customers with a valid and current maintenance agreement
with FrontRange Solutions) to a previous version of the Licensed Software, you must possess a valid
license to such previous version in order to use such Update. All Updates are provided to You on a license
exchange basis. You agree that by using an Update You voluntarily terminate Your right to use any
previous version of the Licensed Software; provided, however, that you may continue to use previous
End-User License Agreement (EULA)
vii
versions of the Licensed Software solely to assist You in the transition to the Update.
9. Transfer. To the maximum extent permitted by applicable law, Licensee may not resell or otherwise
transfer for value the Licensed Software. Notwithstanding the foregoing, Licensee may assign all of its
licensed rights and duties under this EULA to a third-party that: (a) directly or indirectly controls Licensee;
(b) is controlled by or under common control with Licensee; or (c) purchases all or substantially all of
Licensee's assets; provided, however, that (i) Licensee gives written notice to FrontRange Solutions of the
transfer or assignment; (ii) the permitted third-party assignee agrees to be bound by all the terms herein
and completes and returns a registration card or other requested transfer documentation to FrontRange
Solutions; and (iii) in no circumstance shall any transfer or assignment, unless specifically agreed upon in
writing, (y) release Licensee from any prior outstanding obligation under this EULA, or (z) allow Licensee or
Licensee's transferee or assignee, collectively, to utilize more software features, users and/or modules
than authorized under this EULA and Your order documentation. If You transfer the Licensed Software,
You must simultaneously transfer possession of all associated media and documentation, and remove all
Licensed Software from Your computers.
10. Links to Other Software. Use of the Licensed Software may provide links, integrations or "publishing"
access to separate third-party software. FrontRange Solutions provides such links, integrations or
"publishing" access as a benefit only and such access does not change the license rights of the separate
third-party software. You must determine if Your use of the separate third-party software as accessed
through the Licensed Software is in compliance with the respective third-party software end-user license
agreement.
11. Links to Third-Party Sites. You may link to third-party sites through the use of the Licensed Software.
FrontRange Solutions is providing such links to you as a convenience only. FrontRange Solutions does
not generate or control the content of the third-party sites and is not responsible for and does not endorse
the policies, practices or contents of any third-party sites.
12. Warranty/Remedy/Limitation of Liability. TO THE MAXIMUM EXTENT PERMITTED BY APPLICABLE
LAW, THE WARRANTY AND REMEDY SET FORTH BELOW ARE EXCLUSIVE AND IN LIEU OF ALL
OTHER WARRANTIES AND REMEDIES, ORAL OR WRITTEN, EXPRESSED OR IMPLIED. Except as
provided for in this EULA, no FrontRange Solutions reseller, partner, dealer, agent or employee is
authorized to modify or add to the following warranties and remedies.
FrontRange Solutions warrants that for a period of ninety (90) days following delivery of the Licensed
Software (i) the media on which the Licensed Software is furnished shall be free from defects in materials
and workmanship under normal use; and (ii) the Licensed Software will perform substantially in accordance
with FrontRange Solutions' user documentation accompanying the Licensed Software. FRONTRANGE
SOLUTIONS DOES NOT WARRANT THAT THE LICENSED SOFTWARE WILL MEET YOUR
REQUIREMENTS OR THAT THE OPERATION OF THE LICENSED SOFTWARE WILL BE
UNINTERRUPTED OR ERROR FREE OR THAT ALL DEFECTS WILL BE CORRECTED. THIS LIMITED
WARRANTY IS VOID IF FAILURE OF THE LICENSED SOFTWARE HAS RESULTED FROM
ACCIDENT, ABUSE, MODIFICATION, OR MISAPPLICATION OF THE LICENSED SOFTWARE.
If You believe there is a defect in the Licensed Software such that it does not meet the Limited Warranty
provided above, You must notify FrontRange Solutions in writing within the 90-day warranty period.
FrontRange Solutions' entire liability and Your exclusive remedy with regard to the Limited Warranty, shall
be, at FrontRange Solutions' sole discretion, either repair or replacement of the Licensed Software or a
refund of the amount paid to FrontRange for the Licensed Software (provided in that case that You also
return the Licensed Software). Any repaired or replacement Licensed Software shall be warranted for the
remainder of the original warranty period.
To the maximum extent permitted by applicable law, except as provided above, FRONTRANGE
SOLUTIONS MAKES NO WARRANTY OR REPRESENTATION, EITHER EXPRESSED OR IMPLIED
WITH RESPECT TO THE LICENSED SOFTWARE, ITS QUALITY, PERFORMANCE, NONINFRINGEMENT, MERCHANTABILITY, OR FITNESS FOR A PARTICULAR PURPOSE.
viii End-User License Agreement (EULA)
UNLESS BOTH EXPRESSLY REPRESENTED AND AGREED IN WRITING, THE LICENSED
SOFTWARE IS NOT DESIGNED, OR INTENDED FOR USE IN ANY MEDICAL, LIFE SAVING OR LIFE
SUSTAINING SYSTEMS, TRANSPORTATION SYSTEMS, NUCLEAR SYSTEMS, OR FOR ANY OTHER
MISSION CRITICAL APPLICATION IN WHICH THE FAILURE OF THE LICENSED SOFTWARE COULD
CREATE A SITUATION WHERE SUBSTANTIAL PROPERTY DAMAGE OR PERSONAL INJURY OR
DEATH MAY OCCUR. FRONTRANGE SOLUTIONS AND ANY THIRD-PARTY OWNERS RECOMMEND
AGAINST, AND DISCLAIM ANY LIABILITY FOR, USE OF THE LICENSED SOFTWARE IN ANY SUCH
APPLICATION.
You understand and acknowledge that FrontRange Solutions will not be liable for network-related problems
attributable to the operation of the Licensed Software and that network configuration changes may affect
the system's performance.
TO THE MAXIMUM EXTENT PERMITTED BY APPLICABLE LAW, AND EXCEPT FOR LIABILITY
ARISING UNDER THE INDEMNIFICATION PROVIDED BELOW, FRONTRANGE SOLUTIONS' ENTIRE
LIABILITY UNDER THIS EULA SHALL BE LIMITED TO THE AMOUNT PAID BY YOU TO FRONTRANGE
FOR THE LICENSED SOFTWARE.
IN NO EVENT WILL FRONTRANGE SOLUTIONS BE LIABLE FOR INDIRECT, SPECIAL, INCIDENTAL
OR CONSEQUENTIAL DAMAGES ARISING OUT OF THE USE OR INABILITY TO USE THE LICENSED
SOFTWARE, even if advised of the possibility of such damages. In particular, and without limitation,
FrontRange Solutions shall have no liability for any data stored or processed with the Licensed Software,
including the costs of recovering such data.
13. Indemnification. FrontRange Solutions will defend, indemnify and hold Licensee harmless from any third
party claim that the Licensed Software infringes any copyright, trademark or trade secret owned or
controlled by the third party; provided, however, that (i) FrontRange Solutions shall be notified promptly in
writing by Licensee of any such claim; (ii) FrontRange Solutions shall have sole control of the defense of
any action on such claim and all negotiations for its settlement or compromise; (iii) Licensee shall
cooperate with FrontRange Solutions, at FrontRange Solutions' expense, in a reasonable way to facilitate
the settlement or defense of such claim; (iv) such claim does not arise from Licensee's modifications not
authorized by FrontRange Solutions; and (v) should the Licensed Software become, or in FrontRange
Solutions' opinion likely to become, subject to such claim of infringement, then Licensee shall permit
FrontRange Solutions, at FrontRange Solutions' option and expense, either (a) to procure for Licensee the
right to continue using the Licensed Software, or (b) to replace or modify the Licensed Software so that it
becomes noninfringing and performs in a substantially similar manner to the original product, or (c) upon
failure of (a) or (b), despite the reasonable efforts of FrontRange Solutions, to terminate this EULA and
return the license fee paid by Licensee for the Licensed Software pro-rated over a four (4) year life span.
THE FOREGOING INDEMNIFICATION IS LICENSEE'S SOLE AND EXCLUSIVE REMEDY AND
FRONTRANGE SOLUTIONS' SOLE AND EXCLUSIVE OBLIGATION WITH RESPECT TO THE
INFRINGEMENT OF INTELLECTUAL PROPERTY RIGHTS.
14. Maintenance and Support. FrontRange Solutions provides maintenance and/or technical support
(including upgrades and enhancements) for the Licensed Software only through separate agreements.
Please contact FrontRange Solutions or the place from which You obtained the Licensed Software if You
wish to obtain maintenance and/or technical support through the execution of such an agreement.
15. Compliance; Export Control; Privacy. You must comply with all applicable laws and regulations in Your use
of the Licensed Software. You may not export, ship, transmit, or re-export the Licensed Software in
violation of any applicable law or regulation, including, without limitation, the Export Administration
Regulations issued by the United States Department of Commerce, or any such similar law or regulation
issued by such other governmental entity which may have jurisdiction over such export. Further, You agree
to abide by all applicable data protection, SPAM, privacy, communication and similar rules, directives and
other laws in Your use of the Licensed Software.
16. United States Government Restricted Rights. THIS SECTION APPLIES ONLY TO LICENSING OR USE
End-User License Agreement (EULA)
ix
BY THE FEDERAL GOVERNMENT OF THE UNITED STATES. The Licensed Software is provided with
RESTRICTED RIGHTS. Use, duplication, or disclosure by the federal government is subject to restricted
rights as set forth in subparagraph (c) of The Rights in Technical Data and Computer Software clause at
252.227-7014 for DOD contracts and at FAR (48 CFR 52.227-19) for civilian agency contracts or other
comparable agency clauses.
17. Termination. Your right to use the Licensed Software continues until this EULA is terminated. You may
terminate this EULA at any time by destroying all of Your copies of the Licensed Software. This EULA will
automatically terminate if You fail to comply with the material terms of this EULA. Your right to use the
Licensed Software may also be limited by another agreement to which You are subject, and such other
agreement may cause an earlier termination of the rights granted under this EULA (for example, in the
case the Licensed Software is provided under a separate agreement on a time limited or evaluation basis).
Upon any termination, You agree to remove all Licensed Software from Your computers, destroy all copies
of the Licensed Software, and, upon request from FrontRange Solutions, certify in writing Your compliance
herewith.
18. Severability. If any of the terms, or portions thereof, of this EULA are invalid or unenforceable under any
applicable statute or rule of law, the court shall reform the contract to include an enforceable term as close
to the intent of the original term as possible; all other terms shall remain unchanged.
19. Whole Agreement. This EULA and any applicable FrontRange Solutions order form or maintenance and
support agreement or like document constitutes the entire agreement between You and FrontRange
Solutions relating to the license rights for the Licensed Software, and any additions to, or modifications of,
this EULA shall be binding upon the parties only if the same shall be in writing and duly executed by You
and by a duly authorized officer of FrontRange Solutions. THE TERMS AND CONDITIONS OF ANY
CORRESPONDING PURCHASE ORDER OR OTHER ORDER CONFIRMATION FORM RELATING TO
THE LICENSED SOFTWARE ARE ONLY BINDING ON FRONTRANGE SOLUTIONS IF SUCH TERMS
AND CONDITIONS ARE AGREED TO IN WRITING IN ACCORDANCE WITH THE PRIOR SENTENCE
AND IN A DOCUMENT OTHER THAN THE PURCHASE ORDER OR OTHER ORDER CONFIRMATION
FORM.
20. Waiver. The waiver or failure of either party to exercise in any respect any right provided for in this EULA
shall not be deemed a waiver of any further or future right under this EULA.
21. Assignability. This EULA shall inure to the benefit of, and is freely assignable to, FrontRange Solutions'
successors and assignees of rights in the Licensed Software.
22. Resellers. If Licensee acquired the Licensed Software through a Reseller, Licensee acknowledges that (i)
payment and delivery terms for the Licensed Software must be established separately and independently
between the Licensee and the Reseller; (ii) this EULA constitutes the entire agreement between the
Licensee and FrontRange Solutions regarding the license rights for the Licensed Software as described
above and is controlling; (iii) the terms and conditions of any purchase order or any other agreement
between the Licensee and the Reseller are not binding on FrontRange Solutions; (iv) the Reseller is not
FrontRange Solutions' agent and is not authorized to alter, amend or modify the terms of this EULA or to
otherwise grant any license or other rights relating in any way to the Licensed Software; and (v) Licensee's
nonpayment of any amount due to a Reseller or any other relevant third party relating to its licensed rights
under this EULA shall constitute a basis for FrontRange Solutions' termination of this EULA. Licensee
further acknowledges that FrontRange Solutions makes no representation or warranty with regard to any
services provided by any Reseller, or any actions or failures to act by any Reseller.
If Reseller received the Licensed Software as Not-For-Resale (or 'NFR') software in connection with a
FrontRange Solutions reseller or other channel program, then this Licensed Software may only be used by
Reseller, Reseller's right to use the Licensed Software shall be subject to the terms of such program and
applicable reseller agreement, and will terminate upon Reseller's termination from such program or such
earlier time as set forth in applicable reseller agreement.
x End-User License Agreement (EULA)
23. Contact. All questions concerning this EULA shall be directed to:
FrontRange Solutions USA Inc.
4120 Dublin Blvd., Suite 200
Dublin, CA 94568
Attention: General Counsel
Phone: 925.404.1800
Facsimile: 719.799.1042
Email: [email protected]
24. Payments; Additional Licenses. Except where the Licensed Software is acquired through a Reseller
(described above), the licenses granted herein are subject to and Licensee agrees to make payments to
FrontRange no later than thirty (30) days from invoice, unless otherwise agreed to in writing by
FrontRange. If You wish to expand the number of the seats, users, modules, technology foundation and/or
any other FrontRange Solutions product, You may be able to license such items from FrontRange
Solutions or a Reseller. You agree that the license of such additional items shall be under the same terms
and conditions as contained in this EULA. You agree that the parties do not have to execute (whether
electronically, by paper or other written form) another copy of this EULA or any other license agreement, or
that the electronic signature process may be bypassed, with respect to any additional items licensed from
FrontRange Solutions.
Table of
Contents
Introduction
Welcome to GoldMine . . . . . . . . . . . . . . . . . . . . . . . . . . . . . . . . . . . . . . . xv
About this Guide . . . . . . . . . . . . . . . . . . . . . . . . . . . . . . . . . . . . . . . . . . . xvi
Audience and Expertise . . . . . . . . . . . . . . . . . . . . . . . . . . . . . . . . . . xvi
Document Conventions . . . . . . . . . . . . . . . . . . . . . . . . . . . . . . . . . . . . . . xvi
Contact Us . . . . . . . . . . . . . . . . . . . . . . . . . . . . . . . . . . . . . . . . . . . . . . . . xvii
System Requirements
Overview . . . . . . . . . . . . . . . . . . . . . . . . . . . . . . . . . . . . . . . . . . . . . . . . . . 1-1
Level of Windows Security . . . . . . . . . . . . . . . . . . . . . . . . . . . . . . . . . . . 1-2
Environments . . . . . . . . . . . . . . . . . . . . . . . . . . . . . . . . . . . . . . . . . . . . . . 1-2
Host Requirements . . . . . . . . . . . . . . . . . . . . . . . . . . . . . . . . . . . . . . . . . . 1-3
Server Requirements . . . . . . . . . . . . . . . . . . . . . . . . . . . . . . . . . . . . . 1-3
Undocked/Single-user Requirements . . . . . . . . . . . . . . . . . . . . . . 1-5
Software Requirements . . . . . . . . . . . . . . . . . . . . . . . . . . . . . . . . . . . . . . 1-8
Ancillary Requirements . . . . . . . . . . . . . . . . . . . . . . . . . . . . . . . . . . . . . . 1-8
GoldSync Requirements . . . . . . . . . . . . . . . . . . . . . . . . . . . . . . . . . . . . . 1-9
Installing Premium Edition
Overview . . . . . . . . . . . . . . . . . . . . . . . . . . . . . . . . . . . . . . . . . . . . . . . . . . 2-1
Planning for Installation . . . . . . . . . . . . . . . . . . . . . . . . . . . . . . . . . . . . . 2-2
Installing GoldMine on Windows XP . . . . . . . . . . . . . . . . . . . . . . . . . . 2-2
Changes to System Files . . . . . . . . . . . . . . . . . . . . . . . . . . . . . . . . . . . . . 2-3
Installation Checklists . . . . . . . . . . . . . . . . . . . . . . . . . . . . . . . . . . . . . . . 2-4
Server Installation Checklist . . . . . . . . . . . . . . . . . . . . . . . . . . . . . . 2-5
Shared Workstation Installation Checklist . . . . . . . . . . . . . . . . . . 2-6
Undocked Computer Installation Checklist . . . . . . . . . . . . . . . . . 2-6
Installing on a Server (SQL Database) . . . . . . . . . . . . . . . . . . . . . . . . . . 2-7
xii
Contents
Installing on a Server (Firebird Database) . . . . . . . . . . . . . . . . . . . . . 2-15
Running a Workstation Installation . . . . . . . . . . . . . . . . . . . . . . . . . . 2-23
Sharing the GoldMine Folder on the Server . . . . . . . . . . . . . . . . 2-23
Mapping a Drive on the Workstations . . . . . . . . . . . . . . . . . . . . . 2-24
Installing on a Workstation . . . . . . . . . . . . . . . . . . . . . . . . . . . . . . 2-24
Running an Undocked Computer Installation . . . . . . . . . . . . . . . . . 2-28
Upgrade Considerations . . . . . . . . . . . . . . . . . . . . . . . . . . . . . . . . . . . . 2-35
Upgrading a Server (SQL Database) . . . . . . . . . . . . . . . . . . . . . . . . . . 2-36
Upgrading Remote Systems . . . . . . . . . . . . . . . . . . . . . . . . . . . . . . . . . 2-37
Licensing and Registration
Overview . . . . . . . . . . . . . . . . . . . . . . . . . . . . . . . . . . . . . . . . . . . . . . . . . . 3-1
General Licensing Information . . . . . . . . . . . . . . . . . . . . . . . . . . . . . . . 3-2
License Types . . . . . . . . . . . . . . . . . . . . . . . . . . . . . . . . . . . . . . . . . . . 3-2
License Serial Number . . . . . . . . . . . . . . . . . . . . . . . . . . . . . . . . . . . 3-4
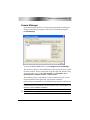
License Manager . . . . . . . . . . . . . . . . . . . . . . . . . . . . . . . . . . . . . . . . 3-5
Licensing with a Master License . . . . . . . . . . . . . . . . . . . . . . . . . . . 3-6
Licensing Following Installation . . . . . . . . . . . . . . . . . . . . . . . . . . . . . . 3-7
Creating Sub-licenses . . . . . . . . . . . . . . . . . . . . . . . . . . . . . . . . . . . . . . . 3-11
Creating Sub-licenses for Remote Offices . . . . . . . . . . . . . . . . . . 3-11
Creating Sub-licenses for Undocked Users . . . . . . . . . . . . . . . . . 3-13
Licensing with Sub-licenses . . . . . . . . . . . . . . . . . . . . . . . . . . . . . . . . . 3-15
Site License . . . . . . . . . . . . . . . . . . . . . . . . . . . . . . . . . . . . . . . . . . . . 3-15
Undocked License . . . . . . . . . . . . . . . . . . . . . . . . . . . . . . . . . . . . . . . . . 3-15
Configuring
Overview . . . . . . . . . . . . . . . . . . . . . . . . . . . . . . . . . . . . . . . . . . . . . . . . . . 4-1
Configuration Considerations . . . . . . . . . . . . . . . . . . . . . . . . . . . . . . . . 4-2
Placing a Custom Image in the Logon Window . . . . . . . . . . . . . . . . . 4-3
Granting Access Privileges in Windows XP
Overview . . . . . . . . . . . . . . . . . . . . . . . . . . . . . . . . . . . . . . . . . . . . . . . . . A-1
Changing GoldMine Ownership in Windows XP . . . . . . . . . . . . . . . A-2
Granting Permission to Use GoldMine in Windows XP . . . . . . . . . A-3
Firebird Information
GoldMine
Contents
xiii
Overview . . . . . . . . . . . . . . . . . . . . . . . . . . . . . . . . . . . . . . . . . . . . . . . . . .B-1
Minimum Firebird 1.5 Client Install . . . . . . . . . . . . . . . . . . . . . . . . . . .B-2
Delphi, IbObjects . . . . . . . . . . . . . . . . . . . . . . . . . . . . . . . . . . . . . . . .B-3
Using Firebird With The Windows XP SP2 Firewall . . . . . . . . . . . . .B-3
Installing Microsoft
SQL Server 2005
Overview . . . . . . . . . . . . . . . . . . . . . . . . . . . . . . . . . . . . . . . . . . . . . . . . . C-1
Installing Microsoft SQL Server 2005 . . . . . . . . . . . . . . . . . . . . . . . . . C-1
Troubleshooting SQL Errors when
Installing GoldMine . . . . . . . . . . . . . . . . . . . . . . . . . . . . . . . . . . . . . . . C-14
Installing Management Intelligence
Overview . . . . . . . . . . . . . . . . . . . . . . . . . . . . . . . . . . . . . . . . . . . . . . . . . D-1
Installing Management Intelligence . . . . . . . . . . . . . . . . . . . . . . . . . . D-2
Initial Setup . . . . . . . . . . . . . . . . . . . . . . . . . . . . . . . . . . . . . . . . . . . . . . . D-5
Establishing the ODBC . . . . . . . . . . . . . . . . . . . . . . . . . . . . . . . . . . D-5
Verifying the SQL Login . . . . . . . . . . . . . . . . . . . . . . . . . . . . . . . . D-13
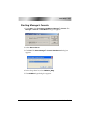
Starting Manager’s Console . . . . . . . . . . . . . . . . . . . . . . . . . . . . . D-15
Migrating Large Databases
Overview . . . . . . . . . . . . . . . . . . . . . . . . . . . . . . . . . . . . . . . . . . . . . . . . . .E-1
Database Preparation . . . . . . . . . . . . . . . . . . . . . . . . . . . . . . . . . . . . . . . .E-2
Executing the Upgrade Process . . . . . . . . . . . . . . . . . . . . . . . . . . . . . . .E-2
Failure During Upgrade . . . . . . . . . . . . . . . . . . . . . . . . . . . . . . . . . . . . .E-4
Index
Installation Guide
xiv
Contents
GoldMine
Introduction
Welcome to GoldMine
GoldMine provides your organization with a powerful, comprehensive,
integrated, automated solution to managing customer relationships. It offers
effective tools to develop contacts, conduct activities, and track progress. With
GoldMine’s synchronization features, users working remotely can stay current
with the main company database.
xvi
Introduction
About this Guide
The GoldMine Installation Guide describes the basic components and steps
for installing GoldMine on your server, client workstations, and
undocked computers.
The appendixes help you integrate GoldMine smoothly with your other
technology tools.
Please see the online Help for additional information.
Audience and Expertise
The information in this manual is written for GoldMine users and system
administrators performing installations. It describes the system
requirements, step-by-step installation instructions, and tips for server
setup, workstation setup, and undocked user installations.
This material assumes the user has an understanding of the Microsoft
Windows operating system.
Document Conventions
Example
Description
File>>Print
Menu bar commands (in this example, select
File on the menu bar, then select Print in the
drop-down menu)
The Select a Data Source
dialog box appears.
Dialog boxes and menu items in bold
OK
Button names
Note
Additional information
CAUTION/WARNING
Critical information to prevent functionality or
data loss
Reference to another topic or resource
GoldMine
Contact Us xvii
Contact Us
Support Site
FrontRange Solutions can answer your technical support questions about
HEAT, GoldMine, and FrontRange product families. Visit:
support.frontrange.com
Contact Information
FrontRange Solutions Worldwide Headquarters
4120 Dublin Boulevard, Suite #200
Dublin, CA 94568 USA
TEL: 800.776.7889
Offices are also located in Colorado, United Kingdom, Germany, South
Africa, Australia, Singapore and China. For international locale
information, refer to the Global Sites area of the FrontRange Solutions
Web site.
Installation Guide
xviii
Introduction
GoldMine
1
System Requirements
Overview
Before you begin a network server, client workstation, or undocked/single-user
GoldMine installation, make sure your system meets the system requirements for
the environment.
1-2
System Requirements
Level of Windows Security
Members of the Power Users group can create user accounts, but can
modify and delete only those accounts they create. They can create local
groups and remove users from those local groups and can also remove
users from the Power Users, Users, and Guests groups.
Power Users group members cannot modify the Administrators or
Backup Operators groups, nor can they take ownership of files, back up
or restore directories, load or unload device drivers, or manage the
security and auditing logs.
CAUTION: If you are running Windows XP, Windows 2000 Professional,
Windows 2000 Server, or Windows 2003 Server, you must be logged on
as a Power User or local administrator or be part of a Power User or
administrator group.
Consult Microsoft Windows online help for further information.
Environments
Pay particular attention to the system requirements that apply to your
environment and license type.
GoldMine can be installed and run in various environments. For
example, you can install GoldMine on a Server, or select a regular
computer to host a server installation. Environment is influenced by
database size and capabilities, performance considerations, number of
shared/undocked users, and so on.
GoldMine Premium Edition uses either the Microsoft SQL Server or
Firebird database.
GoldMine
Host Requirements 1-3
Host Requirements
Requirements are listed for the following:
• Server
• Shared Workstation
• Undocked/Single-user
Note: If using GoldMine with Microsoft SQL Server, use Recommended
instead of Minimum requirements.
Server Requirements
Network Operating Systems
FrontRange Solutions supports these network operating systems:
• Microsoft Windows 2000 Server/Advanced Server.
• Microsoft Windows 2003 Server.
Notes:
• Microsoft Windows XP is supported but not recommended as a server.
See support.frontrange.com.
• FrontRange Solutions does not provide assistance for the installation and
setup of Microsoft Small Business Server (SBS). If you are using SBS, it
must be installed and working prior to installing GoldMine. Ensure that
SBS service packs are current and applied.
Network Protocols
• TCP/IP (recommended)
Installation Guide
1-4
System Requirements
Server System Requirements
• Microsoft Windows 2000 Server/Advanced Server; Windows 2003
Server.
• Microsoft Data Access Components (MDAC) 2.6 or higher. MDAC is
installed automatically with SQL Server, but must be manually
installed if you are using a Firebird database.
• SCSI or Ultra DMA Enhanced IDE hard drives: RAID Array or
mirrored (recommended).
• 1GB/100 MBps network connection (recommended).
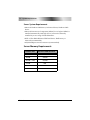
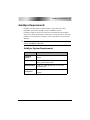
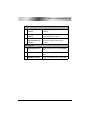
Server Memory Requirements
Database Size
GoldMine
Minimum RAM Allocation
50 MB
128 MB
100 MB
256 MB
500 MB < 2 GB
512 MB
2–5 GB
1 GB
5–12 GB
2 GB
12+ GB
3 GB
Host Requirements 1-5
Performance Considerations
Server RAM and CPU requirements vary depending upon your database
and these factors:
• Number of items in the database:
– Contact Records (1 KB each)
– Detail Records (2 KB each)
– History Records (1 KB each)
– User-defined fields
• Number of simultaneous users on the network.
• Database size.
Operating Systems
FrontRange Solutions supports these operating systems:
• Microsoft Windows Vista.
• Microsoft Windows XP (Home/Professional).
• Microsoft Windows 2003 Server.
Note: FrontRange Solutions neither supports nor recommends using
Windows emulators on Macintosh, Linux, or other operating systems.
Workstation System Requirements
Microsoft Data Access Components (MDAC) 2.6 or higher must be
installed on the server and any shared or undocked workstation to enable
database functionality. MDAC is installed automatically with SQL
Server, but must be manually installed if you are using a Firebird
database.
Undocked/Single-user Requirements
These recommendations are made for computers working disconnected
from a GoldMine server.
Installation Guide
1-6
System Requirements
CAUTION: If you are running Windows XP, Windows 2000 Professional,
or Windows 2000 Server, you must have Admin or Power User rights in
order to install GoldMine.
Operating Systems
FrontRange Solutions supports:
• Microsoft Windows Vista.
• Microsoft Windows XP (Home/Professional).
• Microsoft Windows 2003 Server.
Note: FrontRange Solutions Technical Support neither supports nor
recommends using Windows emulators on Macintosh, Linux, or other
operating systems.
Undocked System Requirements
Microsoft Data Access Components (MDAC) 2.6 or higher must be
installed on the server and any shared or undocked workstation to enable
database functionary. MDAC is installed automatically with SQL Server,
but must be manually installed if you are using a Firebird database.
GoldMine
Host Requirements 1-7
Performance Considerations
Your RAM and CPU requirements vary depending upon your database
and these factors:
• Number of items in the database:
– Contact Records (1K each)
– Detail Records (2K each)
– History Records (1K each)
– User-defined field
• Number of simultaneous users on the network
• Database size
Installation Guide
1-8
System Requirements
Software Requirements
Use Microsoft Internet Explorer 7.0 with GoldMine.
Ancillary Requirements
• Microsoft SQL Server 2000 (SP6) or Microsoft SQL Server 2005 must
be installed and configured if you are using a SQL database.
• Microsoft SQL Server 2000/2005 Reporting Services must be installed
and configured to use the Scheduled Reports feature.
• Microsoft SQL Server 2000/2005 Client Tools must be installed prior to
initiating the GoldMine installation process if you intend to perform a
Server installation to share your database.
• Microsoft .NET Framework 1.1 must be installed and configured to use
the Scheduled Reports feature.
• Microsoft Visual Studio 2003 .NET must be installed and configured to
create reports for the Scheduled Reports feature. End users do not
require this application.
• When you select a Firebird database during installation of GoldMine
Premium Edition, a working copy of Firebird 1.5 is installed. To change
the default password, Firebird comes with an ISQL command line tool.
See the GoldMine online Help for instructions.
There are also free tools to help you administrate Firebird, such as those
available from FlameRobin, FeniSQL, and IBExpert. The Firebird 1.5
Quick Start Guide provides essential details and is available online,
including from www.firebird.sourceforge.net. To take advantage of
other Firebird features, see www.ibphoenix.com and
www.firebirdsql.org for additional information.
Note: FrontRange Solutions does not support these third-party tools.
GoldMine
GoldSync Requirements 1-9
GoldSync Requirements
GoldSync automated the synchronization of data between a host
GoldMine system and multiple remote GoldMine systems.
GoldSync supports multi-user/multi-site environments and includes
support for many simultaneous connections. As the amount of data and
number of users increase, GoldSync scales as needed for the work load
demand.
For details on GoldSync implementation and functionality, see the GoldSync
section of GoldMine online Help.
GoldSync System Requirements
Item
Recommended
Operating
System
Microsoft Windows 2003 Server – Advanced
Server.
Disk Subsystem
RAID Array or mirrored (for larger databases or
heavy synchronization load)
RAM Allocation
1 GB (for < 2 GB database with 10 concurrent
sync sessions)
Network
Connection
100 Base-TX
TCP/IP
Installation Guide
1-10
System Requirements
GoldMine
2
Installing Premium Edition
Overview
GoldMine provides various types of installations, whether from NetUpdate or
CD, a new or upgrade, on a server or workstation, in network or remote. Please
review the planning items and considerations, determine the type of installation
you are running, and use the associated checklist to ensure a successful
installation.
2-2
Installing Premium Edition
Planning for Installation
When planning a GoldMine installation consider:
1. Who will be the designated GoldMine administrator? The GoldMine
administrator should have access to network and office resources and
be able to address the business-related implementation issues
regarding configuration and customization.
2. Do you have the proper license and registration information for the
version of GoldMine you are installing? For detailed information on
licensing, see Chapter 3, "Licensing and Registration."
GoldMine Solutions Partners are GoldMine Certified in installation and
setup. To locate a partner in your area, go to www.frontrange.com and
use the Partner Locator.
3. Are you going to import data? Verify you can import the source data
into GoldMine.
4. Does the system administrator have full administrative rights? To
install GoldMine on a network, the GoldMine administrator must
have full administrative rights on the network.
5. Are your service packs compatible and current? Check the version
and service pack number for your Microsoft Windows operating
system. Verify no issues exist with your current service pack on the
Web site at support.frontrange.com.
6. Have you reviewed the network structure?
• Are there multiple domains? Do the users have the correct rights on
the GoldMine domain to access GoldMine?
• Is the server outside the regular network? There may be connectivity
issues the network administrator needs to address.
7. What type of database are you using? Decide whether to use a
Microsoft SQL Server database or a Firebird database. Ask your Sales
representative for information.
Installing GoldMine on Windows XP
Windows XP is not a recommended platform for a server.
GoldMine
Changes to System Files 2-3
• Some users may encounter issues with the auto-run installation.
• For users of GoldMine 5.0-5.7 who back up GoldMine by copying the
GoldMine folder at C:\Program Files, this means they are not copying
their data files and must browse to Documents and Settings\All
Users\Application Data\GoldMine to find their data folders.
• Customers using a Windows XP system as a server may have problems
with the client workstations accessing the data on the network due to
the “split.” Users may encounter license errors when performing
NetUpdates.
Changes to System Files
Located in the GoldMine folder, these store user and licensing
information. System files typically take a BIN or XML format, whether
you use Firebird or SQL as your database system.
• DataDict.xml: Includes database and field definitions and is required
for creation of required databases and maintenance operations.
• Flags.bin: Controls the number of users logged on to GoldMine.
• License.bin: The system's license control table that stores License
Manager information and validates incoming sync connections.
• Users: Formerly Users.dbf, this is now a table. It is rehosted to the SQL
Server starting with version 7.0. It collects the user's information such
as user login and permission information.
• User_info.bin: Stores SQL login information.
• GM.ini: Controls how GoldMine launches.
• DBAlias.ini: Stores the database username and password.
• GoldMine.fdb: Default database name when Firebird is selected during
installation.
• Firebird ODBC driver: Made up of the IscDbc.dll, OdbcJdbc.dll, and
OdbcJdbcSetup.dll files.
Installation Guide
2-4
Installing Premium Edition
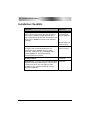
Installation Checklists
If you are:
Then run:
Shared Workstation: An individual in an organization
with a multi-user environment who must connect to a
shared copy of GoldMine. Installs shortcuts to the
Full Setup,
connected to an
existing database
client workstation so the end user can connect to the
server copy of GoldMine from his or her individual
computer.
or
Minimal Setup (not
recommended)
Undocked: An individual who often works remotely on
a computer with an Undocked sublicense, who
synchronizes with a GoldMine server to update
information. Install a full copy of GoldMine with a
Full Setup
(with U-License)
Firebird database on a computer working
disconnected from a network.
Gold Sync Server
Full Setup
Shared Server: A company that must support multiple
GoldMine users using a shared system. Users can then
connect to the server copy from their local client
workstations using shortcuts installed by running a
Workstation installation.
Full Setup
GoldMine
Installation Checklists 2-5
Server Installation Checklist
Back up your database and folders: (Upgrading customers only) If you
are upgrading, back up your GoldMine database. We also recommend
backing up your GoldMine folder and any other folders containing
files linked to GoldMine before beginning any installation. This
prevents the loss of valuable contact information.
Confirm all GoldMine users are logged out of the system: (Upgrading
customers only).
Uninstall linked and integrated programs: (upgrading customers
only) Uninstall GoldMine Link for Word, GoldMine Plus Microsoft
Office, GISME, GISMO.
Exit all running system programs and stop services: Includes thirdparty utilities that integrate with GoldMine, other GoldMine add-on
products (such as GoldSync), the Microsoft Office Shortcut bar. Stop
all services that integrate with GoldMine.
Install ancillary programs: Install necessary programs on the
computer serving as the GoldMine server or on another computer on
your network. See "Ancillary Requirements" on page 1-8.
Install GoldMine: Install on the computer serving as your GoldMine
server. Select the Server Setup installation and follow the directions in
this manual.
License the server copy of GoldMine: Licensing registers the shared
server copy of GoldMine with the appropriate license. See Chapter 3,
"Licensing and Registration."
Verify you can launch GoldMine: Ensure the server installation is
functioning properly before installing any workstations.
Share the GoldMine folder: In order for the client workstations to
connect to the shared copy of GoldMine, you must first share the
folder in which GoldMine is installed.
Installation Guide
2-6
Installing Premium Edition
Shared Workstation Installation Checklist
Uninstall linked and integrated programs: (Upgrading customers only)
Uninstall GoldMine Link for Word, GoldMine Plus Microsoft Office,
GISME, GISMO.
Exit all running system programs and stop services: Includes thirdparty utilities that integrate with GoldMine, other GoldMine add-on
products (such as GoldSync), the Microsoft Office Shortcut bar. Stop
all services that integrate with GoldMine.
Create a mapped drive to the shared GoldMine folder: See "Sharing
the GoldMine Folder on the Server" on page 2-23.
Install GoldMine on the Client Workstation: See "Running a
Workstation Installation" on page 2-23.
Verify you can launch GoldMine: Ensure the workstation installation
is functioning properly.
Undocked Computer Installation Checklist
Create an Undocked license: (undocked license users only) See
Chapter 3, "Licensing and Registration."
Uninstall linked and integrated programs: (Upgrading customers only)
Uninstall GoldMine Link for Word, GoldMine Plus Microsoft Office,
GISME, GISMO.
Exit all running system programs and stop services: Includes thirdparty utilities that integrate with GoldMine, other GoldMine add-on
products (such as GoldSync), the Microsoft Office Shortcut bar. Stop
all services that integrate with GoldMine.
Disconnect the laptop from the network: Disconnect to ensure
GoldMine configures the laptop to connect only with the database on
the local computer and not with the network.
Install GoldMine to the undocked computer: See "Running an
Undocked Computer Installation" on page 2-28.
License GoldMine: Use the appropriate U-license information. See
Chapter 3, "Licensing and Registration."
Verify you can launch GoldMine: Ensure the undocked installation is
functioning properly.
GoldMine
Installing on a Server (SQL Database) 2-7
Installing on a Server (SQL Database)
A Full Setup installs GoldMine to a common location—usually a shared
network drive. Workstation-based users can connect to the server copy
from their local computers (after running a Shared Workstation
installation).
IMPORTANT: The following steps are for a New Install. If you have had a
previous version installed, remove the existing version, folders, and
databases before proceeding. If upgrading, use the steps in "Upgrading a
Server (SQL Database)" on page 2-36.
1. Log directly into the server as a local administrator.
2. The installation CD is set up to autorun when inserted into your CDROM drive or run the gmsetup.exe downloaded to your server
installation of GoldMine during the Net-Update process.
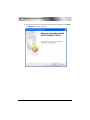
The Welcome to the GoldMine Installation Wizard dialog box appears.
3. Click Next.
Installation Guide
2-8
Installing Premium Edition
The Readme dialog box appears. Close this dialog box to proceed with
the installation.
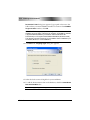
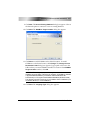
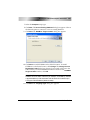
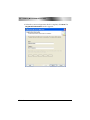
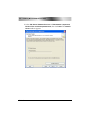
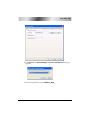
4. The License Agreement dialog box appears.
GoldMine
Installing on a Server (SQL Database) 2-9
Installation Guide
2-10
Installing Premium Edition
5. Review the licensing information carefully; if you agree to the terms,
select I accept the terms In the license agreement.
Note: If you do not agree to the terms of the license agreement, select I
do not accept the terms in the license agreement. Click Cancel to
terminate the installation.
6. Accepting the terms of the agreement activates the subsequent check
boxes. You must select both check boxes to continue with the
installation.
IMPORTANT: Select I am an authorized agent and/or representative of
the customer/end-user and I have read the terms and conditions
stated above to continue.
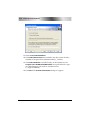
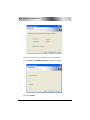
7. Click Next. The Setup Type dialog box appears.
8. Choose Complete Setup or Minimal Setup.
GoldMine
Installing on a Server (SQL Database) 2-11
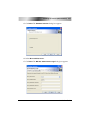
9. Click Next. The New or Existing Database dialog box appears. Choose
the desired option to connect to a new or existing database.
10. Click Next. The GoldMine Target Location dialog box appears.
11. Click Next to install GoldMine in the default location. To install
GoldMine to a different location, click Change. The Change Current
Installation Guide
2-12
Installing Premium Edition
Destination Folder dialog box appears. Type a path or browse to the
folder where you want GoldMine installed. To return to the GoldMine
Target Location window, click OK.
IMPORTANT: Sharing may expose other applications, so do not install
GoldMine as a root folder of the drive (for example, C:\GoldMine). Install to
c:\apps\GoldMine\GoldMine (on Windows 2003 and Windows XP
Professional) or C:\Program Files\GoldMine\GoldMine (Windows 2000)
This directory should be used only for a GoldMine Server installation (not
Undocked, Minimal, or Local installation)
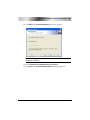
12. Click Next. The Language Type dialog box appears.
13. Select the local version of English for your installation.
14. To add the demonstration data to the database, check the Install Demo
Data with GoldMine box.
Note: When upgrading, this dialog box does not appear.
GoldMine
Installing on a Server (SQL Database) 2-13
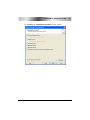
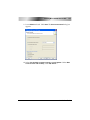
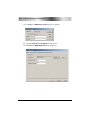
15. Click Next. The Database Selection dialog box appears.
16. Select Microsoft SQL Server.
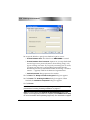
17. Click Next. The MS SQL Administrator Login dialog box appears.
Installation Guide
2-14
Installing Premium Edition
• MS SQL Server Name: Type or select the name of the computer on
your network where SQL Server is installed.
• MS SQL Database Name: GoldMine creates and installs the demo
data in a SQL database called GoldMine. If you want your database
to have a different name, type it in the text box.
• MS SQL Administrative Username: The default login is sa. If your
SQL Server user name is different, your SQL administrator must
provide the information.
• MS SQL Administrative Password: Enter the SQL Server
administrator password.
• MS SQL Database Owner: Enter the name of the SQL Server
database owner.
Note: If you click Next without typing a user name and password, the
Insufficient Input dialog box appears. Click Back. If you type incorrect
information and click Next, the MS SQL Login Failed dialog box
appears. Review the troubleshooting tips, then click Back.
18. Click Next. The Ready to Install the Program dialog box appears.
19. Click Install to begin installing GoldMine.
20. The Installing GoldMine dialog box appears.
When finished, the Installation Completed dialog box appears.
GoldMine
Installing on a Server (Firebird Database) 2-15
21. Click Finish.
IMPORTANT: The Welcome to GoldMine dialog box appears to begin the
licensing process. See "Licensing Following Installation" on page 3-7.
Installing on a Server (Firebird Database)
IMPORTANT: Using the Firebird database on a server installation is not
recommended.
When you select a Firebird database during installation, a working copy
of the Firebird database is installed.
This shared Server setup installs a full copy of GoldMine to a common
location—usually a shared network drive. Workstation-based users can
connect to the server copy from their local computers (after running a
Shared Workstation installation).
IMPORTANT: The following steps are for a New Install. If you have had a
previous version installed, remove the existing version, folders, and
databases before proceeding. If upgrading, use the steps in "Upgrading a
Server (SQL Database)" on page 2-36.
1. Log directly into the server as a local administrator.
Installation Guide
2-16
Installing Premium Edition
2. The installation CD is set up to autorun when inserted into your CDROM drive or run the gmsetup.exe downloaded to your server
installation of GoldMine during the Net-Update process. The
Welcome to the GoldMine Installation Wizard dialog box appears.
3. Click Next. The Readme dialog box appears.
4. Click Next. The License Agreement dialog box appears.
5. Review the licensing information carefully; if you agree to the terms,
select I accept the terms In the license agreement.
Note: If you do not agree to the terms of the license agreement, select I
do not accept the terms in the license agreement. Click Cancel to
terminate the installation.
6. Accepting the terms of the agreement activates the subsequent check
boxes. You must select both check boxes to continue with the
installation.
IMPORTANT: Select I am an authorized agent and/or representative of
the customer/end-user and I have read the terms and conditions
stated above to continue.
7. Click Next. The Setup Type dialog box appears.
8. Choose Complete Setup or Minimal Setup.
GoldMine
Installing on a Server (Firebird Database) 2-17
9. Click Next. The New or Existing Database dialog box appears. Choose
the desired option to connect to a new or existing database.
10. Click Next. The GoldMine Target Location dialog box appears.
11. Click Next to install GoldMine in the default location. To install
GoldMine to a different location, click Change. The Change Current
Destination Folder dialog box appears. Type a path or browse to the
folder where you want GoldMine installed. To return to the GoldMine
Target Location window, click OK.
IMPORTANT: Sharing may expose other applications, so do not install
GoldMine as a root folder of the drive (for example, C:\GoldMine). Install to
c:\apps\GoldMine\GoldMine (on Windows 2003 and Windows XP
Professional) or C:\Program Files\GoldMine\GoldMine (Windows 2000)
This directory should be used only for a GoldMine Server installation (not
Undocked, Minimal, or Local installation)
12. Click Next. The Language Type dialog box appears.
Installation Guide
2-18
Installing Premium Edition
13. Select the local version of English for your installation.
14. Click Next. The Database Selection dialog box appears.
15. Select Firebird.
GoldMine
Installing on a Server (Firebird Database) 2-19
16. Click Next. The Firebird Installation dialog box appears.
Note: This dialog will not appear if either the Firebird Server or Client have
already been installed.
17. Select Install Firebird Database Server and Client.
18. Click Next. The Firebird Database Server dialog box appears.
Installation Guide
2-20
Installing Premium Edition
19. Select Local Firebird Database.
20. The Firebird Server/Client are installed to the drive where the OS is
installed (in Program Files\Firebird\firebird_1_5 folder).
21. The Firebird database is installed locally on the Firebird server to
Program Files\ GoldMine\GoldMine\Data. Accept the default or type
an valid alternative path (such as <Firebird server>
C:\Apps\GoldMine).
22. Click Next. The Firebird Administrator dialog box appears.
GoldMine
Installing on a Server (Firebird Database) 2-21
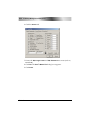
23. Accept the default or specify the appropriate information:
• Firebird Server Name: Name of remote server.
• Firebird Database Name: Name of new Firebird database (with FDB
extension).
• Firebird Administrator Username: username.
• Firebird Administrator Password: password.
Note: For a local database these are pre-set initial values. For a remote
database, enter the username and password to that database. To
maintain security, you must change the user name and password after the
installation is complete. See online Help for instructions.
24. Click Next. The Firebird GoldMine Database Administrator dialog box
appears.
Installation Guide
2-22
Installing Premium Edition
25. Accept the default or specify new database login for owner:
• Firebird Database User: The default user GMSYSDBA is created.
• Firebird Database User Password: Options are a) accept the default
user and type a new password (write it down during setup), or b)
type an existing user name. If you specify an existing user as owner,
you must type that user’s corresponding password before the
installation proceeds (if authentication fails, the message “Unable to
connect....” appears). Field has 8-character recognition limit.
• Confirm Password: Retype password to confirm.
26. Click Next. The Ready to Install the Program dialog box appears.
27. Click Install. The Installing GoldMine dialog box appears. When
finished, the Installation Completed dialog box appears.
28. Click Finish.
Note: The Welcome to GoldMine dialog box appears to begin the licensing
process. See "Licensing Following Installation" on page 3-7.
GoldMine
Running a Workstation Installation 2-23
Running a Workstation Installation
A shared workstation setup installs shortcuts on the workstation
enabling workstation users to connect to the shared server copy of
GoldMine from their individual computers. Choose one of the following
configurations:
• Run the minimal installation. This option makes more GoldMine
capabilities available to the workstation and is required when using
Firebird.
• Share the GoldMine folder on the server, then map the same drive on
each workstation to the shared GoldMine folder on the server (not
recommended if using SoftPhone, Management Intelligence, or a
Firebird database).
IMPORTANT: Running GoldMine using a shortcut to a networked drive
without a minimal install is not recommended.
Sharing the GoldMine Folder on the Server
To run the shared folder installation, after installing the GoldMine Server
setup, share the GoldMine root directory so the workstations function
properly. All GoldMine users must have rights to read, write, modify,
and delete files for GoldMine to function on the workstations.
IMPORTANT: Sharing may expose other applications. Do not install
GoldMine as a root folder of the drive, rather, install to c:\apps\GoldMine (on
Windows 2003 and Windows XP Professional) or C:\Program Files\GoldMine\
(Windows 2000) and install the server copy of GoldMine to this folder.
1. Navigate to and select the GoldMine folder on the server (for example,
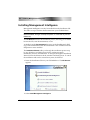
C:\Program Files\GoldMine\GoldMine).
2. Right-click for a menu and select Sharing and Security. The GoldMine
Properties dialog box appears.
3. Click the Sharing tab.
4. Select the Share this folder option.
5. Name the shared folder GoldMine.
6. Set the User Limit to Maximum Allowed.
Installation Guide
2-24
Installing Premium Edition
7. Click Permissions. The Permissions for GoldMine dialog box appears.
8. From the Group or User Names list, select the workstation’s user.
9. In the Permissions for area, select the Full Control check box.
10. Click OK. The GoldMine Properties dialog box reappears.
11. Click OK.
Note: If you are using a different Windows operating system, your steps may
vary.
Mapping a Drive on the Workstations
To enable sharing the GoldMine folder on the server, we recommend all
workstations accessing the shared GoldMine folder be mapped to the
same network drive letter (for example, G:\) to facilitate GoldMine
administration and operations related to linked documents and
synchronization.
1. On the workstation computer, start Windows Explorer and select
Tools>>Map Network Drive.
2. From the Drive list box, select the designated drive letter for mapping
to the GoldMine folder on the server.
3. From the Folder list box, Browse to the shared GoldMine folder, for
example, \\GoldMine Server\ GoldMine.
4. Select the Reconnect at Logon check box.
5. Click OK.
6. Click Finish.
7. Repeat this procedure on each client workstation computer.
Installing on a Workstation
The Minimal setup installs as a process that creates a shortcut to the
server copy of GoldMine. The administrator must copy the setup
executable to a location available to workstations.
GoldMine
Running a Workstation Installation 2-25
1. From the workstation computer, locate the gmsetup.exe file. Doubleclick to run the executable. The Welcome to the GoldMine Installation
Wizard dialog box appears.
2. Click Next. The Readme dialog box appears. Close this dialog box to
proceed with the installation.
3. Click Next. The License Agreement dialog box appears.
4. Review the licensing information carefully; if you agree to the terms,
select I accept the terms In the license agreement.
Note: If you do not agree to the terms of the license agreement, select I
do not accept the terms in the license agreement. Click Cancel to
terminate the installation.
5. Accepting the terms of the agreement activates the subsequent check
boxes. You must select both check boxes to continue with the
installation.
IMPORTANT: Select I am an authorized agent and/or representative of
the customer/end-user and I have read the terms and conditions
stated above to continue.
Installation Guide
2-26
Installing Premium Edition
6. Click Next. The Setup Type dialog box appears.
7. If you have installed a GoldMine Server Setup on a host computer,
select GoldMine Minimal Setup.
8. Click Next. The GoldMine Server Location dialog box appears.
GoldMine
Running a Workstation Installation 2-27
9. In the Server Location text box, click Change and browse the network
for your shared GoldMine server.
10. The Change Current Destination Folder dialog box appears. Type the
UNC or network path for the shared GoldMine server installation on
your network. To return to the GoldMine Server Location dialog box,
click OK.
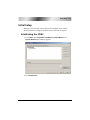
11. Click Next. The GoldMine Local Files dialog box appears.
In the Local Files Location text box, click Change and browse your
hard drive for your preferred folder. To return to the Workstation
Local Files dialog box, click OK.
12. Click Next. The Local Install Option dialog box appears.
A normal workstation installation does not install the GoldMine
executable file on your local computer. Any network failure will
terminate the connection of your local computer to the executable file
on the server, and GoldMine will be silently terminated. This may
result in system unreliability and the loss of data.
The Local Install option greatly improves system performance for
workstation installations by adding more executable and .dll and files
to your local computer. We highly recommend that you select the
Local Install option for workstation installations.
To complete your local installation, select File>>Configure>>License
Manager and click the Install Locally tab after you have completed the
installation wizard.
13. Click Next. The Ready to Install dialog box appears.
14. Click Install. The network shortcuts are installed on your workstation
computer.
15. When finished, the Installation Completed dialog box appears.
Repeat steps 1-16 for each workstation accessing GoldMine.
Installation Guide
2-28
Installing Premium Edition
Running an Undocked Computer Installation
An Undocked setup is the same as a full setup, with the only difference
being the license number.
If the undocked computer you are upgrading or installing works remotely, see
"Upgrade Considerations" on page 2-35.
Notes:
• If installing an Undocked version of GoldMine while it is in your office,
disconnect the laptop from the network so you install a completely
independent copy on the computer.
• An Undocked user install is intended for purpose of synchronization. While
the following instructions creates the installation, these instructions do not
address GoldSync setup. Refer to online Help for instructions on setting up
GoldSync.
1. On the undocked computer, navigate to the gmsetup.exe file. Doubleclick to run the executable. The Welcome to the GoldMine Installation
Wizard dialog box appears.
2. Click Next. The Readme dialog box appears.
3. Click Next. The License Agreement dialog box appears.
4. Review the licensing information carefully; if you agree to the terms,
select I accept the terms In the license agreement.
Note: If you do not agree to the terms of the license agreement, select I
do not accept the terms in the license agreement. Click Cancel to
terminate the installation.
5. Accepting the terms of the agreement activates the subsequent check
boxes. You must select both check boxes to continue with the
installation.
IMPORTANT: Select I am an authorized agent and/or representative of
the customer/end-user and I have read the terms and conditions
stated above to continue.
6. Click Next. The Setup Type dialog box appears.
GoldMine
Running an Undocked Computer Installation 2-29
7. Select the Complete setup type:
8. Click Next. The New or Existing Database dialog box appears. Choose
the desired option to connect to a new or existing database.
9. Click Next. The GoldMine Target Location dialog box appears.
10. Click Next to install GoldMine in the default location. To install
GoldMine to a different location, click Change. The Change Current
Destination Folder dialog box appears. Type a path or browse to the
folder where you want GoldMine installed. To return to the GoldMine
Target Location window, click OK.
IMPORTANT: Sharing may expose other applications, so do not install
GoldMine as a root folder of the drive (for example, C:\GoldMine). Install to
c:\apps\GoldMine (on Windows 2003 and Windows XP Professional) or
C:\Program Files\GoldMine\ (Windows 2000).
11. Click Next. The Language Type dialog box appears.
Installation Guide
2-30
Installing Premium Edition
12. Select the local version of English for your installation.
13. Click Next. The Database Selection dialog box appears.
14. Select Firebird.
GoldMine
Running an Undocked Computer Installation 2-31
15. Click Next. The Firebird Installation dialog box appears.
Note: This dialog will not appear if either the Firebird Server or Client have
already been installed.
16. Select Install Firebird Database Server and Client.
17. Click Next. The Firebird Database Server dialog box appears.
Installation Guide
2-32
Installing Premium Edition
18. Select Local Firebird Database.
19. The Firebird Server/Client are installed to the drive where the OS is
installed (in Program Files\Firebird\firebird_1_5 folder).
20. The Firebird database is installed locally on the Firebird server to
Program Files\ GoldMine\GoldMine\Data. Accept the default or type
an valid alternative path (such as <Firebird server>
C:\Apps\GoldMine).
21. Click Next. The Firebird Administrator dialog box appears.
GoldMine
Running an Undocked Computer Installation 2-33
22. Accept the default or specify the appropriate information:
• Firebird Server Name: Name of remote server.
• Firebird Database Name: Name of new Firebird database (with FDB
extension).
• Firebird Administrator Username: username.
• Firebird Administrator Password: password.
Note: For a local database these are pre-set initial values. For a remote
database, enter the username and password to that database. To
maintain security, you must change the user name and password after the
installation is complete. See online Help for instructions.
23. Click Next. The Firebird GoldMine Database Administrator dialog box
appears.
Installation Guide
2-34
Installing Premium Edition
24. Accept the default or specify new database login for owner:
• Firebird Database User: The default user GMSYSDBA is created.
• Firebird Database User Password: Options are a) accept the default
user and type a new password (write it down during setup), or b)
type an existing user name. If you specify an existing user as owner,
you must type that user’s corresponding password before the
installation proceeds (if authentication fails, the message “Unable to
connect....” appears). Field has 8-character recognition limit.
• Confirm Password: Retype password to confirm.
25. Click Next. The Ready to Install the Program dialog box appears.
26. Click Install. The Installing GoldMine dialog box appears. When
finished, the Installation Completed dialog box appears.
27. Click Finish.
Note: The Welcome to GoldMine dialog box appears to begin the licensing
process. See "Licensing Following Installation" on page 3-7.
Note: On most systems, the Optimize OrgChart Wizard dialog box will
appear once the upgrade procedure is complete (see GoldMine Online Help
for more information about Optimizing OrgCharts). The wizard will not appear
GoldMine
Upgrade Considerations 2-35
if the index that it creates already exists in the upgraded system’s program
files.
Upgrade Considerations
Use this upgrade process with GoldMine 5.0 or higher. If you are
upgrading a prior version, you must upgrade to 5.x before upgrading to
8.0. If you are running 4.0 or earlier, please contact Customer Care at
800.776.7889 (Option 3).
CAUTION: Back up your existing GoldMine database and system before
beginning the upgrade.
• In addition to the 65 MB of disk space required for installation, ensure
you have at least 2½ times the size of your largest table in additional
free space on your hard disk.
Example: If your largest table is Conthist, which has an 85 MB .dbf and a
15 MB .dbt for 100 MB total, you should have 250 MB free disk space
before continuing (2½ x 100 MB).
• A database conversion may be required when upgrading from earlier
versions of GoldMine. This conversion occurs automatically when
GoldMine is installed into the path of the existing gmw5.exe or
gmw6.exe.
CAUTION: If you are upgrading a large Microsoft SQL Server
database (5GB of data or more), see Appendix E before proceeding
with the upgrade. Certain computers (limited computing power) require
manual steps to upgrade the database successfully.
• Undocked users should be on the same version of GoldMine as the site
with which they sync. If you are upgrading the server but are not
upgrading undocked computers until a later time, disable their sync
sites in the GoldSync Administration Center on the server. Reactivate
their site when the undocked computer is upgraded and is running the
same version of GoldMine as the server.
• If you have a previous version of the GoldMine Link to Word or
GoldMine Plus Microsoft Office, uninstall this version prior to
Installation Guide
2-36
Installing Premium Edition
upgrading. The upgrade installs the new GoldMine Plus Microsoft
Office installer file that is compatible with GoldMine 8.0.
• If you have a previous version of GoldMine Integration Services for
Microsoft Outlook, uninstall this version prior to upgrading.
Upgrading a Server (SQL Database)
Be sure to review the "Installing GoldMine on Windows XP" on page 2-2.
CAUTION: If you are upgrading from a previous version of GoldMine,
back up your existing GoldMine database and system before beginning
the upgrade.
1. Log directly into the server as a local administrator.
2. The installation CD is set up to autorun when inserted into your
CD-ROM drive or run the gmsetup.exe downloaded to your server
installation of GoldMine during the Net-Update process. The
Welcome to the GoldMine Installation Wizard dialog box appears.
3. Click Next. The Readme dialog box appears.
4. Click Next. The License Agreement dialog box appears.
5. Review the licensing information carefully; if you agree to the terms,
select I accept the terms In the license agreement.
Note: If you do not agree to the terms of the license agreement, select I
do not accept the terms in the license agreement. Click Cancel to
terminate the installation.
6. Accepting the terms of the agreement activates the subsequent check
boxes. You must select both check boxes to continue with the
installation.
IMPORTANT: Select I am an authorized agent and/or representative of
the customer/end-user and I have read the terms and conditions
stated above to continue.
GoldMine
Upgrading Remote Systems 2-37
7. Click Next. The Installation Type dialog box appears.
Upgrading Remote Systems
This type of upgrade is for computers working disconnected from a
GoldMine server but synchronizing with the main GoldMine server to
update information—a remote Site or an Undocked computer.
If you are upgrading a Site, the Master installation provides the site
administrator with the gmsetup.exe.
See "Installing on a Server (SQL Database)" on page 2-7.
If updating an undocked computer, the Master installation provides the
undocked computer user with the gmsetup.exe.
See "Running an Undocked Computer Installation" on page 2-28.
IMPORTANT: If you are upgrading the server but are not upgrading a remote
system until a later date, disable the site in the GoldSync Administration
Center until it is running the same version of GoldMine as the server.
1. Upgrade the Master GoldMine site.
2. After upgrading the Master site, you can upgrade remote computers
by sending them a gmsetup.exe installation file using one of these
methods:
• One-button Synchronization
• CD-ROM
• FTP site
• E-mail
• Accessible network drive
3. Remote users should run the installation CD or the gmsetup.exe on
their computer following these upgrade instructions.
4. After remote users upgrade to the same version of GoldMine as the
server, they can begin synchronizing again.
Installation Guide
2-38
Installing Premium Edition
GoldMine
3
Licensing and Registration
Overview
GoldMine has a fully scalable licensing structure to meet the needs of individuals
and organizations. As your business matures and GoldMine expands, your
organization can change the licensing configurations.
3-2
Licensing and Registration
General Licensing Information
The single, distributed Master License serves as the authentication
mechanism for secure synchronization across the entire organization, and
the License Manager keeps track of your licensing configurations.
Most organizations generally buy one license—a Master License with x
number of seats. These seats can then be parsed to users in various
combinations of sub-licenses. For example, an organization can create Site
sub-licenses for their remote office(s) and Undocked sub-licenses for
individual remote (mobile) users. One seat should always be set aside for
administrators.
License Types
• Master License: This is the primary license. It determines what
database types are supported by the master site as well as its
synchronization capabilities. It is a precursor to executing any sublicenses which stem from it.
GoldSync and Outlook Integration licenses are included in E licenses.
The licensing serial number schema for Master licenses was changed
for the 7.0 release, but remains the same for sub-licenses. See "License
Serial Number" on page 3-4.
• Sub-licenses: To issue, install GoldMine with a Master License on your
organization’s primary network. This ensures all sub-licenses maintain
security and are authenticated properly during synchronization.
The Undocked license (a special sub-license) is for remote users and can
only be licensed for a single user. It can be sub-licensed from the main
GoldMine system or from a Site sub-license.
• Increases: Previous increases for Corporate Edition, Standard Edition,
and GoldSync (J, R, and N), are now facilitated by obtaining a new E or
G license (which account for the increase and the Master license count).
GoldMine
General Licensing Information 3-3
.
Master License
E
Premium Edition
License
Supports SQL databases and includes
GoldSync
G
GoldSync Master
License
GoldSync seats purchased separately and
can be added to E-Licenses
O
GoldMine Outlook
Integration Services
License
Outlook integration purchased separately
to increase number of users with ELicense
Sub-licenses
U
Undocked License
Single sub-license for a remote GoldMine
user
S
Site License
Multiple-user sub-license for a remote
office
Y
GoldSync License
GoldSync sub-license for a remote office
Installation Guide
3-4
Licensing and Registration
License Serial Number
The schema for the serial number has changed. Because of the new
licensing schema, the GoldMine installer will not upgrade your license.
This example illustrates what a GoldMine license serial number looks
like:
• License type: Alpha-prefix denotes the type of Master license.
• Number of users: First 4 numbers indicate the license count or seats
available in the license. The license count determines the number of
users who can log on to GoldMine at one time but does not limit the
total number of named users.
• Version: A 2-digit version number.
• HDA number: Your 6-digit HDA number.
• Serial number: 15-character (alphanumeric) serial number uniquely
identifying the license for an organization. It is used for registration and
support and identifies all sub-licenses as part of the same organization.
Collected in 3 groups of 5 characters during licensing.
• Key code: 15-character (alphanumeric) key code is a computergenerated check used by GoldMine to verify the license’s validity.
Collected in 3 groups of 5 characters during licensing.
Note: The license is required for the product to run. Keep the license number
and key code in a safe place in the event it becomes necessary to reinstall
the software.
GoldMine
General Licensing Information 3-5
License Manager
Initial licensing information is collected during installation. Subsequent
changes and related management functions are handled through the
License Manager.
From the GoldMine Tools menu, select Configure>>License Manager.
The central text box lists all installed licenses and any sub-licenses created
from this location. Status is displayed along the right side. Buttons along
the bottom allow you to add a New License, add a New Site, add an
Undocked User, Remove License, or View License.
The database support of the Master License is inherited by the site sublicenses distributed throughout the organization. GoldSync
Synchronization capabilities can be distributed separately to sub-licenses.
IMPORTANT: Licensing information is stored in the license file, License.bin,
created at the time you register. This file must exist only in the GoldMine root
directory of each GoldMine installation.
Additional License Manager information is provided in the online Help.
Installation Guide
3-6
Licensing and Registration
Licensing with a Master License
A GoldMine Premium Edition Master License begins with the alphaprefix E (Example: E-005070-111111...).
The E-license is usually a multi-user license for a server installation of
GoldMine but may be a single-user license for a stand-alone computer.
An E-license includes a GoldSync license for each purchased GoldMine
seat.
Remote site sub-licenses (S- and Y-licenses) and Undocked sub-licenses
(U-licenses) are created from the E-license.
Type the E-license number and key code you received when you
purchased the software.
IMPORTANT: If you type an E-license serial number into the text boxes, the
GoldSync text box area remains unavailable because GoldSync is included.
GoldMine
Licensing Following Installation 3-7
Licensing Following Installation
1. After the installation completes, Click Finish. The licensing wizard
launches.
IMPORTANT: If you do not complete the license and registration
information after installation, the licensing wizard launches prior to first use
of GoldMine.
2. The Enter License Information dialog box appears.
3. Provide your contact information in the designated text boxes to
continue. All fields are required.
4. Select the check box to receive future product information. Clear the
check box if you do not.
5. Click Next. The Enter License Information dialog box appears.
Installation Guide
3-8
Licensing and Registration
6. Complete the purchase information. These fields are optional.
7. Click Next. The Enter GoldMine Serial Number dialog box appears.
8. Type your GoldMine serial number and key code. Options appearing
in this dialog box depend on type of license purchased.
9. Click Next. The Import NT Server User Accounts dialog box appears.
GoldMine
Licensing Following Installation 3-9
10. Select each user account you want to import into GoldMine. If
appropriate, type an optional password for imported names.
IMPORTANT: Imported users do not have “master” rights.
11. Click Next. The Enter Your Username dialog box appears.
12. Type a user name (eight characters or fewer). The password is
optional. GoldMine requests these at log in. This user has Master
Rights in GoldMine.
Installation Guide
3-10
Licensing and Registration
13. Click Finish. The GoldMine Logon dialog box appears.
14. Type the user name and password.
15. Click OK to launch GoldMine.
GoldMine
Creating Sub-licenses 3-11
Creating Sub-licenses
After GoldMine is installed and licensed, you can parse seats to your end
users with sub-licenses using the License Manager. You must have a
Master License to create sub-licenses.
CAUTION: Plan before creating sub-licenses, keeping in mind each sublicense transfers seat availability which affects how many users can log in
on the network system. For example, on the License tab of the License
Manager, if the Total users/dist: shows a total number of seats and the
total number of sub-licenses as “50\20,” only 30 seats are available to
users. At a minimum, one seat should always be set aside for
administrators only.
Creating Sub-licenses for Remote Offices
From a Master License, you can create sub-licenses for remote offices.
Remote office sub-licenses can be a Site License (S-license) and/or a
GoldSync License (Y-license).
Each “S” and/or “Y” sub-license transfers seat availability from nonremote users. A minimum of one seat must remain available to nonremote users. For example, you must have at least 5 seats to make
GoldMine available to 4 remote offices. Headquarters retains the fifth
seat.
Note: When creating any sub-license, note the entire license number created
by GoldMine. The sub-license includes the key code and additional
information needed when licensing the remote computer. The information
only displays in its entirety during the creation process.
Installation Guide
3-12
Licensing and Registration
1. From the GoldMine menu, select Tools>>Configure>>License
Manager. The License Manager appears.
2. Click the Licenses tab.
3. Click New Site. The Create a Site Sub-License dialog box appears.
4. In the Distributed License Type area, select the site license you want to
create—GoldMine Site License (S-License) for the number of seats the
site needs or GoldSync Site License (Y-License) for the number of
users who are synchronizing, including at least one for the site.
Tip: Write the sub-license number down or copy it to Windows Notepad.
The sub-license number is needed for each remote computer installation.
Send the remote site license number to the remote user who can type the
license number during the GoldMine installation.
5. In the Site Sub-License area, type the site name and number of users.
6. Click Create Site Sub-License. The Site-License for Remote Site
dialog box appears.
7. Review the information about the sub-license and click I Agree. The
sub-license number for the site appears in the Sub-license for Remote
Site [Name of Site] dialog box.
8. If you created a Site license, repeat the above process to create the
necessary GoldSync license and select GoldSync Site License.
Note: GoldMine adds the sub-license to the list of licences on the
Licenses tab of the License Manager.
GoldMine
Creating Sub-licenses 3-13
Creating Sub-licenses for Undocked Users
GoldMine has a sub-license for an individual user called an Undocked
License (U-License). This license type is created for users who work
primarily with GoldMine at a remote location on a laptop, notebook, or
home office computer but who may also need to log on to the network
occasionally. Consider:
• Creating an undocked user decreases the available users of the network
site (Master License or Site License) by one; however, when an
undocked user logs on to the site from which they were sub-licensed,
they do not take up an additional seat.
• Every user supported by the GoldMine license can have an Undocked
license to work on a remote computer. For example, on a 5-user
GoldMine system, 5 Undocked licenses can be created. This is in
contrast to creating an “S” sub-license which requires one seat to
remain available from the Master License.
• All undocked users, as well as the total number of users that make up
the difference in the total number allowed by the Master License can
log on to GoldMine. For example, on a 5-user GoldMine system with 3
undocked users, 3 undocked users plus 2 other users can log on to
GoldMine.
WARNING: If you undock all users, only those users will be able to log
in. If you have not assigned master rights to any of those undocked
users, GoldMine administration cannot take place.
• When used in combination with GoldSync, administrators can
synchronize security settings to undocked users including new
passwords, menu items, and preferences in addition to data.
• To work on an undocked basis, users must have an Undocked license
on their laptop. Create an Undocked license from the Master License or
a Site license.
Installation Guide
3-14
Licensing and Registration
1. From the GoldMine main menu, select Tools>> Configure>>License
Manager. The License Manager appears.
2. Click the Licenses tab and Undock Users. The Create Undocked User
Licenses dialog box appears.
3. Select the check box next to the user you want to create a sub-license
for, and click Create Undocked License. The Sub-Licenses dialog box
appears.
4. Review the information and click I Agree. The sub-license number for
a remote user or an undocked user appears in the Sub-license for
Remote Site [Name of Site] dialog box.
Tip: Write the sub-license number down or copy it to Windows Notepad.
The sub-license number is needed for each remote computer installation.
Send the remote site license number to the remote user who can type the
license number during the GoldMine installation.
GoldMine
Licensing with Sub-licenses 3-15
Licensing with Sub-licenses
Site License
A Site License is a multiple-user sub-license for a remote office and is
designated with the alpha-prefix “S.” You should have an S-license for
each user at the remote site.
A GoldSync License (Y-license) is required only if you are using an
S-license and want to synchronize using GoldSync. You should have
one Y-license to synchronize with the Master License and additional
Y-licenses for Undocked users synchronizing with your site.
Note: Y licenses are not entered in the Enter GoldMine Serial Number dialog
box. Only S licenses are entered during registration (the GoldSync Section
remains disabled). Clicking Next displays an ALERT: Suggested Action(s)!
if you try to enter Y licenses in the Enter GoldMine Serial Number dialog box.
If this installation of GoldMine includes its own GoldSync sites, you may
enter the applicable Y-type sub-licenses to properly configure
synchronization for this system.
1. To configure applicable sub-license sites, select Tools>>Configure>>
License Manager to enter your Y-type license.
2. In the GoldMine Serial Number text boxes, type the S-license, Key
Code, and Site Code you created in the License Manager of the main
GoldMine system.
3. In the GoldSync Serial Number text boxes, type the Y-license, Key
Code, and Site Code you created in the License Manager.
Undocked License
Undocked licenses are sub-licenses created from a Master License or a
Site license and are designated by the letter “U.” This license type is
created for users who work with GoldMine at another location, on a
laptop, or on a workstation disconnected from the server copy of
GoldMine.
Type the U-license, Key Code, and Site Code created in the License
Manager.
For more on licensing, see GoldMine online Help.
Installation Guide
3-16
Licensing and Registration
GoldMine
4
Configuring
Overview
After installation, system administrators must configure GoldMine to meet the
needs of the organization. Some preliminary setup is presented in this chapter.
Additional configuration steps are presented in the online Help.
4-2
Configuring
Configuration Considerations
In developing a GoldMine deployment strategy, the GoldMine
administrator must carefully plan how the GoldMine database should
run and determine who is going to use it.
• Creating users, user groups, security rights, and preferences including
menu rights
• Changing field labels
• Creating user-defined fields and tabs
• Setting up expanded details
• Generating and modifying F2 Lookup lists
To enhance GoldMine, configure other areas:
• Automated Processes
• Reports
To import existing databases into GoldMine, plan the migration by
asking yourself:
• Is it essential to keep all existing data?
• How out of date is the data?
• Are all fields in the existing database required in GoldMine?
For details on the procedures in these configuration points, see the
Administration item in the GoldMine online Help Table of Contents, accessed
by selecting Help>>Help Topics on the GoldMine menu bar.
GoldMine
Placing a Custom Image in the Logon Window 4-3
Placing a Custom Image in the Logon Window
To display your organization’s logo or other graphic on GoldMine’s
logon screen correctly, the file must be a bitmap within a size limit of 150
x 250 pixels. The bitmap cannot exceed 150x250 pixels or 150x177 pixels
when using a D-license with a G-License.
Note: GM.ini is a special initialization file that stores settings that apply
globally to all users running the same installation of GoldMine.
Place the bitmap file in the root GoldMine directory. Using a text editor
such as Windows Notepad, open GM.ini. Under the [GoldMine] section,
add this line:
UserLogo=<path\filename>
For example, if you place the graphics file MyLogo.bmp in your
GoldMine directory, type this statement:
UserLogo=C:\GoldMine\MyLogo.bmp
Save GM.ini, then exit the text editor. Open GoldMine to display the
changed login screen.
Installation Guide
4-4
Configuring
GoldMine
A
Granting Access Privileges in
Windows XP
Overview
Microsoft Windows XP Professional has enhanced system security restricting
access to applications to all users except the installing user. Having a Windows
XP logon does not grant access to an application.
Access privileges must be granted to any additional users who want to use an
application on the system. To do this, you must:
• Change GoldMine ownership
• Grant permission to use GoldMine
Note: If upgrading from GoldMine 5.7 (Business Contact Manager) installed on
Windows XP Professional, consult your GoldMine 5.7 documentation regarding the
“realini” setting in the GM.ini file.
A-2
Granting Access Privileges in Windows XP
Changing GoldMine Ownership in Windows XP
Windows XP (Professional version) enhances system security by granting
access to installed applications only to the installing user.
If GoldMine was installed on your system using a different Windows XP
logon user name and password and you do not know the Windows XP
logon that was used, you can change the permission settings with an
administrator-level account.
CAUTION: If running Window XP, Windows 2000 Professional, Windows
2000 Server, or Windows 2003 Server, you must be logged on as a
Power User or local administrator or be part of a Power User or
administrator group. Consult Microsoft Windows online Help.
1. Log on as an administrator or as a user with equivalent rights.
2. Navigate to Program Files\ GoldMine. Right-click to display the local
menu, then select Properties.
3. Click the Security tab.
4. Click the Advanced button.
5. Click the Owner tab.
6. In the Change Owner To area, select the user you want to make the
owner.
7. Select Replace owner on subcontainers and objects.
8. Click OK.
9. On the GoldMine Properties dialog box, click OK to save and close.
GoldMine
Granting Permission to Use GoldMine in Windows XP
A-3
Granting Permission to Use GoldMine in
Windows XP
Windows XP’s enhanced security requires the administrator to grant
privileges to each additional user who wants to use an application on the
system.
CAUTION: If running Window XP, Windows 2000 Professional, Windows
2000 Server, or Windows 2003 Server, you must be logged on as a
Power User or part of a Power User group. Consult Microsoft Windows
online Help.
1. Navigate to Program Files\ GoldMine. Right-click to display the local
menu, then select Properties.
2. Click the Sharing tab.
3. Select Share this folder.
4. Click Permissions.
5. On the Share Permissions tab, select Add.
6. Select the user or user group to grant access to.
7. Click OK to return to the Share Permissions window.
8. Select the data access permissions you want to allow or deny to the
selected users or user groups. GoldMine users must have full control.
Click OK.
9. Click the Security tab.
10. In the Group or user names area, select the users you want to define
access privileges for.
11. Select the GoldMine application permissions you want to allow or
deny to the user or user group. GoldMine users must have full control.
12. Click OK.
Installation Guide
A-4
Granting Access Privileges in Windows XP
GoldMine
B
Firebird Information
Overview
Firebird is an open-source SQL solution. When you select a Firebird database
during installation of GoldMine 8.0, a working copy of Firebird 1.5 is installed.
See "Installing on a Server (Firebird Database)" on page 2-15.
Obtain the source code and documentation for Firebird from the downloads page at
http://www.ibphoenix.com.
After GoldMine installation, the license files can be found in the Program
Files\Firebird\Firebird_1_5 folder.
Obtain a copy of this source code license from the Firebird Project Web site at: http://
www.firebirdsql.org/index.php?op=doc&id=idpl.
B-2
Firebird Information
Minimum Firebird 1.5 Client Install
This appendix describes how to run Firebird 1.5-based applications with
the minimum client installation required.
DLL Sharing and Access
• fbclient.dll: Give your application access to the Firebird client library,
fbclient.dll by placing the fbclient.dll in the same directory as your
application's .exe file.
• msvcp60.dll and msvcrt.dll: Give fbclient.dll access to these dll’s. Both
are delivered with the Windows installation of Firebird; if you have a
Firebird server installed on your development computer, find these
dll’s in the bin directory of your Firebird installation.
– msvcp60.dll can remain in your application directory.
– msvcrt.dll (Microsoft Visual C/C++ RunTime) is a part of Windows
and resides in the Windows\System directory on Win9x computers
and in Windows\System32 on NT-based computers (NT4, W2K, XP,
2003).
Note: For Workstation installations with Firebird, use Option 2 (see "Running
a Workstation Installation" on page 2-23).
GoldMine
Using Firebird With The Windows XP SP2 Firewall
B-3
Delphi, IbObjects
A “normal” InterBase access library uses gds32.dll as the client library.
Firebird's client library is named fbclient.dll. When you use IbObjects
(www.ibobjects.com), you can set another client library name.
• Include IB_Constants.pas as the first unit in your USES clause
• Place the following line in the INITIALIZATION part of your Unit:
IB_Constants.IB_GDS32 := 'fbclient.dll';
This line must be executed before the first database connect is
performed.
Using Firebird With The Windows XP SP2
Firewall
The firewall included with Windows XP SP2 blocks port 3050, which the
Firebird databases use. If you use a Firebird database and cannot access
GoldMine from a workstation, either disable the Windows firewall or
adjust your security settings to enable port 3050. You can adjust your
Windows Firewall settings from the Security Center on the Control Panel.
Installation Guide
B-4
Firebird Information
GoldMine
C
Installing Microsoft
SQL Server 2005
Overview
The GoldMine Server Setup requires you to install Microsoft SQL 2005 before
installing GoldMine.
The Microsoft SQL Server CD included with your GoldMine Corporate Edition package
provides complete installation instructions in the Microsoft online Help.
The following instructions include installation procedures and settings pertinent
to GoldMine but should not be considered a SQL Server administrator’s guide.
Only experienced SQL administrators should configure SQL Server with
anything other than the settings described in these instructions.
Installing Microsoft SQL Server 2005
The server on which you are installing Microsoft SQL Server 2005 must have one
of the following operating systems: Microsoft Windows 2000 Server with SP4 or
later; Windows 2000 Professional Edition with SP4 or later; Windows XP with SP2
or later; Windows Server 2003 Enterprise Edition, Standard Edition, or Datacenter
Edition with SP1 or later; Windows Small Business Server 2003 with SP 1 or later.
1. Insert the Microsoft SQL Server 2005 Installation CD into the CD/DVD drive
of the computer on which you are installing SQL.
C-2
Installing Microsoft SQL Server 2005
Note: The SQL Server 2005 Installation CD is set up to autorun when
inserted into your CD/DVD drive. If autorun is not enabled, select Run from
the Start button on the Windows taskbar, and then type x:\autorun.exe
(where “x” is the letter of the CD/DVD drive).
The main window appears.
2. Select SQL Server 2005 Components.... The End User License
Agreement window appears. To install SQL Server 2005, you must
accept the terms of the End User License Agreement.
GoldMine
Installing Microsoft SQL Server 2005
C-3
3. When you have reviewed and accepted the terms, click Next. The
Installing Prerequisites window appears.
Installation Guide
C-4
Installing Microsoft SQL Server 2005
4. Click Install. After the software prerequisites are installed, click Next.
The Welcome window appears.
GoldMine
Installing Microsoft SQL Server 2005
C-5
5. Click Next. The System Configuration Check window appears.
Installation Guide
C-6
Installing Microsoft SQL Server 2005
6. When the system configuration check is complete, click Next. The
Registration Information window appears.
GoldMine
Installing Microsoft SQL Server 2005
C-7
7. Click Next. The Components to Install window appears.
Installation Guide
C-8
Installing Microsoft SQL Server 2005
8. Select SQL Server Database Services and Workstation components,
Books online and developmental tools, then click Next. The Instance
Name window appears.
GoldMine
Installing Microsoft SQL Server 2005
C-9
9. Leave Default selected. Click Next. The Service Accounts dialog box
appears.
10. Select Use the built-in sytem account >> Local System. Under Start
services at the end of setup, check SQL Server.
Installation Guide
C-10
Installing Microsoft SQL Server 2005
11. Click Next. The Authentication Mode dialog box appears.
12. Select Mixed Mode and enter an sa logon password. Click Next. The
Collation Settings window appears.
GoldMine
Installing Microsoft SQL Server 2005
C-11
13. From the SQL collations, choose the default. The Error and Usage
Report Settings window appears.
14. If you wish MSSQL Server 2005 to automatically send your error
messages and usage reports to Microsoft, check the appropriate box.
Otherwise, leave them blank. Click Next. The Ready to Install window
appears.
Installation Guide
C-12
Installing Microsoft SQL Server 2005
15. Click Next to proceed with the installation. The Setup Progress
window appears.
16. When the installer completes the setup process, click Next. The
Completing Microsoft SQL Server 2005 Setup window appears.
17. Click Finish to exit the installation wizard.
GoldMine
Installing Microsoft SQL Server 2005
C-13
18. Select Start>>All Programs>> Microsoft SQL Server
2005>>Configuration Tools>>SQL Server Configuration Manager.
The SQL Server Configuration Manager launches.
19. On the left pane, expand the SQL Server 2005 Network Configuration
section, and select Protocols for MSSQLSERVER.
20. On the right pane, locate and select the protocol name Named Pipes.
21. Right-click on Named Pipes and select Enable. The following warning
message appears:
Any changes made will be saved, they will not take effect until the service is
stopped and restarted.
Select OK.
22. Exit the SQL Server Configuration Manager.
23. In Windows, go to Start>>Control Panel>>Administrative
Tools>>Computer Management.
24. Expand Services and Applications and select Services.
25. Stop and restart the service SQL Server (MSSQLSERVER).
Note: You may need to explicitly configure the TCP transport as part of the
installation process.
Installation Guide
C-14
Installing Microsoft SQL Server 2005
Troubleshooting SQL Errors when
Installing GoldMine
If you receive an error message such as MSSQL Login Failed during the
installation of GoldMine, check the following:
• Is the SQL server running? If not, start SQL Server.
Open the MSSQL Enterprise Manager and find SQL Server Enterprise
Manager. Expand the servers until you see your server name. Rightclick your server name and select Start in the local menu.
• Is the SQL administrative name and password you typed when
installing GoldMine different from the name and password in SQL?
Are you using sa with no password, or did you change it in SQL?
Open the SQL Server Enterprise Manager. Expand Microsoft SQL
Server and then expand SQL Server Groups. Right-click your server
name and select Edit SQL Server Registration properties. Verify the
login name and password.
• When you installed SQL, did you select Mixed Mode for the
authentication mode?
If you do not know, go to the server name in the MSSQL Enterprise
Manager. Expand Microsoft SQL Server and then expand SQL Server
Groups. Right-click your server name and select Properties. Select the
Security tab. Select SQL Server and Windows. Stop and restart SQL
Server. The installation continues.
GoldMine
D
Installing Management
Intelligence
Overview
Whether you work in support, sales, or marketing, Manager’s Console and
Answer Wizard take all the information collected from front line contacts—
including call histories, open support tickets, and forecasts—and deliver that
information to the rest of the organization. These tools track and disseminate
information, they actually transform the information in your company into an
asset.
• Manager’s Console: Manager’s Console provides at-a-glance summaries of the
overall status of a Support Center or sales department. It allows managers to
proactively review and manage critical business issues and facilitate future
responses to recurring problems.
• Answer Wizard: Answer Wizard is a management-reporting tool for a
supervisor or manager. Answer Wizard not only provides immediate answers
to the questions managers are asking, but also coaches them to understand the
additional questions they should ask.
D-2
Installing Management Intelligence
Installing Management Intelligence
Management Intelligence can only be installed from the Installation CD.
This CD is set up to autorun when inserted into your CD-ROM drive.
Note: If autorun is not enabled, select Run from the Start button on the
Windows taskbar, and type: x\:setup.exe (where “x” is the letter of your CDROM drive).
The CD Browser initiates the installation process, allowing you to install,
browse the CD, view Documentation, or exit.
Available from the Documentation browser are the ReadMe and a PDF
copy of this Installation Guide. Documentation is also available from the
Help menu in most modules.
The Installation Wizard walks you through the installation process step
by step. Windows and dialog boxes clearly outline important
information, features, and directions. To navigate through the Installation
Wizard, follow the directions in the windows and dialog boxes. To cancel
the installation and exit the wizard at any time, click Cancel.
1. Insert the Installation CD into your CD-ROM drive. The CD Browser
appears.
2. Select Install Management Intelligence.
GoldMine
Installing Management Intelligence D-3
The Management Intelligence Installation Wizard appears.
3. Click Next. The Readme dialog box appears.
4. Click Next. The License Agreement dialog box appears.
5. Review the licensing information carefully; if you agree to the terms,
select I accept the terms In the license agreement.
Note: If you do not agree to the terms of the license agreement, select I
do not accept the terms in the license agreement. Click Cancel to
terminate the installation.
6. Accepting the terms of the agreement activates the subsequent check
boxes. You must select both check boxes to continue with the
installation.
IMPORTANT: Select I am an authorized agent and/or representative of
the customer/end-user and I have read the terms and conditions
stated above to continue.
Installation Guide
D-4
Installing Management Intelligence
7. Click Next. The Setup Type dialog box appears.
8. Select Complete.
9. Click Next. The Ready to Install the Program dialog box appears.
10. Click Install. The Installing GoldMine dialog box appears. When
finished, the Installation Completed dialog box appears.
11. Click Finish.
GoldMine
Initial Setup D-5
Initial Setup
Manager’s Console and Answer Wizard are installed. Next, launch
Answer Wizard to configure the data sources and load the reports.
Establishing the ODBC
1. From Start, select Programs>>GoldMine>>Answer Wizard. The
Answer Wizard main window appears.
2. Click Preferences.
Installation Guide
D-6
Installing Management Intelligence
The User Preferences dialog box appears.
3. Use the Options tab to set the paths to the data file and reports. Click
Add. The Answer Wizard Data File dialog box appears.
GoldMine
Initial Setup D-7
4. Navigate to the AnsWizgm.dat file, located in the
GoldMine\Management Intelligence\Answer Wizard Reports folder.
5. Click Open. The Browse for Folder dialog box appears.
6. Verify the path is correct and click OK. The User Preferences dialog
box reappears with paths defined.
Installation Guide
D-8
Installing Management Intelligence
7. Click the Manager’s Console Data Source tab.
GoldMine
Initial Setup D-9
8. Click Select. The Select Manager’s Console Data Source dialog box
appears.
9. In the drop-down list, select GMSales_Mktg.
Installation Guide
D-10
Installing Management Intelligence
10. Click OK. The SQL Server Login dialog box appears.
11. Type the Login ID and Password for SQL Server.
12. Click OK. The HEAT Data Source tab reappears.
GoldMine
Initial Setup D-11
13. Click the Manager’s Console tab.
14. Click Select. The Select Manager’s Console Data Source dialog box
appears.
15. In the drop-down list, select ManCon Metric Log.
Installation Guide
D-12
Installing Management Intelligence
16. Click OK. The Manager’s Console Data Source tab reappears.
17. Click OK. The Answer Wizard main window reappears. Notice the
GoldMine reports now appear in the tree.
18. Click Exit.
GoldMine
Initial Setup D-13
Verifying the SQL Login
1. From Start, select Programs>>GoldMine>>GoldMine. The GoldMine
Login appears.
2. Log into GoldMine as the local administrator.
3. From the main menu, select Tools>>User’s Settings. The User’s
Master File dialog box appears.
4. Select the local administrator user.
5. Click Properties. The Properties dialog box appears.
Installation Guide
D-14
Installing Management Intelligence
6. Click the Access tab.
7. Ensure the SQL Logon name and SQL Password are correct (such as,
sa and sa).
8. Click OK. The User’s Master File dialog box reappears.
9. Click Close.
GoldMine
Initial Setup D-15
Starting Manager’s Console
1. From Start, select Programs>>GoldMine>>Manager’s Console. The
Manager’s Console — Start Mode dialog box appears.
2. Select Start as Server.
3. Click OK. The Select Manager’s Console Data Source dialog box
appears.
4. In the drop-down list, select GMSales_Mktg.
5. The GoldMine login dialog box appears.
Installation Guide
D-16
Installing Management Intelligence
6. Type the GoldMine Login ID and Password.
7. Click OK. The Manager’s Console Server opens.
GoldMine
Initial Setup D-17
See the online Help in both applications for information on using these tools.
Installation Guide
D-18
Installing Management Intelligence
GoldMine
E
Migrating Large Databases
Overview
If you are upgrading from a previous version of GoldMine to 7.0 and have a
large Microsoft SQL Server database (5GB of data or more), we recommend you
consider the following steps before proceeding with the upgrade. Certain
computers (limited computing power) require manual steps to upgrade the
database successfully.
Note: These steps do not apply to Firebird databases.
IMPORTANT: If your upgrade has already failed, see "Failure During Upgrade" on
page E-4.
E-2
Migrating Large Databases
Database Preparation
1. BACKUP YOUR DATABASE. This is especially important prior to
migration. Also, a power failure or any unpredicted interruption may
corrupt data. Invaluable data can be restored from the backup.
2. Truncate the transaction log.
• From Start, select Microsoft SQL Server>>Query Analyzer.
• Run:
backup database_name with truncate_only
3. Purge the syslog table from GoldMine 6.7 (or your current version).
Ensure you have backed up your database prior to purging.
• To purge logs, select View>> GoldMine Logs. The System Logs
dialog box appears. Select either Process Monitor Logs,
Maintenance Logs, or Error Logs. Right-click for a menu. Select
Purge Logs.
• Select the check boxes for Process Monitor, Maintenance, and Error
logs. Accept the default date (1 month) or adjust to extend. If you
require more logs, revise according to the GoldMine online Help or
the Administrator Guide.
Executing the Upgrade Process
With databases of nominal size, the install routine changes the tables
listed below. Only use steps 8-14 as a guide to change the table structure
as indicated below if the row size is exceptionally large (such as >500K
rows):
a. CAL's Number2 field changed from INT to FLOAT.
b. OPMGR's F3 field changed to size 20.
c. SITEID from SYSLOG changed to 40.
d. SITEID from GSSITES changed to 40.
e. CONTHIST Units field from size 8 to 20.
GoldMine
Executing the Upgrade Process E-3
Note: If any unpredictable event such as power failure, system crash
occurs, you could potentially lose data or data corruption can occur. A
backup allows you to ensure a smooth transition. You may want to restore
the back up and restart the steps.
1. From Start, select Microsoft SQL Server>>Enterprise Manager. The
Enterprise Manager appears.
2. In the Console Root tree, expand Microsoft SQL Servers.
3. Expand SQL Server Group.
4. Expand local (or server name).
5. Expand Databases.
6. Expand the GoldMine database.
7. Select Tables.
8. Select CONTHIST.
9. Right-click for a menu and select Design Table.
10. Under Column Name, navigate to the Units field.
11. In the Length column, change the number from 8 to 20.
12. Close the Design Table dialog box. The message Do you want to save
changes to table CONTHIST appears.
13. Click Yes to save changes. The hourglass appears.
14. Wait for the changes to update the database structure. This may take
some time.
15. When complete, close Enterprise Manager.
16. Start the GoldMine 7.0 Installer to upgrade the process.
Installation Guide
E-4
Migrating Large Databases
Failure During Upgrade
Take the following steps if, during migration, you received an error such
as:
• Unit Conversion in CONTHIST
• Unit Conversion in CAL
• Unit Conversion in CONTSUPP
Note: This error may prevent you from logging in to GoldMine or immediately
after logging into the application, the GoldMine application disappears.
1. In your Web browser, open: http://support.frontrange.com
2. Select Maintenance Customer Support>>Online Support.
3. Log into the support site.
4. Select Drivers and Downloads.
5. From the drop-down list, select GoldMine Corporate Edition.
6. Locate and download “Unit Conversion Error During GoldMine 7.0
Upgrade.”
7. Execute the patch in the DOS prompt by passing the right parameters:
GM70Update SERVER_NAME DATABASE_NAME USERID PASSWORD
8. Log into GoldMine 7.0 application
Note: Contact FrontRange Solutions’ Customer Support for more information.
GoldMine
Index
.NET Framework 1.1, 1-8
A
Access
Firebird client library, B-2
privileges in XP, A-1
Ancillary requirements, 1-8
Audience and Expertise, xvi
C
Changing
ownership in Windows XP, 2-1, A2
Checklist
installation, 2-4
server, 2-5
undocked, 2-6
workstation, 2-6
Client install
minimum Firebird, B-2
Client tools, 1-8
Configuring, 4-1
considerations, 4-2
Contacting
FrontRange Solutions, xvii
Creating
sub-licenses
for remote offices, 3-11
for undocked users, 3-13
Custom Image in GoldMine Logon
Window, 4-3
D
Database
backing up your, 2-35, 2-36
conversion, 2-35
Firebird, 1-8
selecting, 2-2
SQL Server, 1-8
DataDict.xml, 2-3
DBAlias.ini, 2-3
Demo data, 2-12, 2-14
Deploying
GoldMine, 4-1
DLL sharing
Firebird install, B-2
Document conventions, xvi
E
E-License, 3-3, 3-6
Emulators, 1-5, 1-6
End-User License Agreement
about, 2-8, 2-16, 2-25, 2-28, 2-36, D3
I-2
Index
Error
Unit Conversion in CAL, E-4
Unit Conversion in CONTHIST, E4
Unit Conversion in CONTSUPP,
E-4
F
FDB file, 2-3
Firebird
.fdb, 2-3
administrator, 2-20, 2-32
database, 2-20, 2-32
DLL sharing and access, B-2
FeniSQL
FeniSQL, 1-8
FlameRobin, 1-8
IBExpert
IBExpert, 1-8
information, B-1
Installation, 2-19, 2-31
minimum 1.5 client install, B-2
Quick Start Guide, 1-8
v1.5, 1-8
Firebird, using with XP firewall, B-3
Flags.bin, 2-3
FlameRobin, 1-8
FrontRange Solutions
contacting, xvii
G
G-License, 3-3
GM.ini, 2-3, A-1
gm7setup.exe, 2-7, 2-16, 2-25, 2-28, 236, 2-37
GoldMine
.fdb, 2-3
configuring, 4-1
GISMO, 2-36
licensing, 3-7
Link to Word, 2-35
Outlook, 2-36
Plus Microsoft Office, 2-35
v4.0, 2-35
v5.x, 2-3, 2-35
GoldSync
setup on undocked computer, 2-28
system requirements, 1-9
GoldSync License (Y-License)
about, 3-11
creating, 3-11
Granting access on Windows XP, A-1
H
HDA number, 3-4
I
Import NT Server User Accounts, 3-8
Increases, 3-2
Installation
checklist for shared server, 2-5
checklist for shared workstation, 26
checklist for single-user, 2-6
types, 2-4
wizard, 2-4
Installing
Firebird, 2-19, 2-31
information, B-1
on a client workstation, 2-2
on a server (Firebird Database), 215
on a server (SQL database), 2-7
on a single-user license computer,
2-28
on a workstation, 2-23
on an undocked computer, 2-28
on Windows XP, 2-2
planning for, 2-2
Insufficient input, 2-14
Index I-3
Internet Explorer 6.0, 1-8
M
K
Mapping a drive, 2-24
Master
license, 3-2
about, 3-2
licensing with, 3-6
rights, 3-9
site, 2-37
MDAC, 1-4, 1-5, 1-6
Memory requirements
servers, 1-4
single-user license computer, 1-5
Microsoft
.NET Framework 1.1, 1-8
Internet Explorer 6.0, 1-8
Small Business Server, 1-5
support, 1-3
SQL Server, 1-3, 1-8
registering, C-14
troubleshooting, C-14
SQL Server 2000 Client Tools, 1-8
SQL Server 2000 Reporting
Services, 1-8
Visual Studio 2003 .NET, 1-8
Windows 2000, 1-6
Windows 2000 Server, 1-3, 1-5
Windows 2003 Server, 1-3, 1-6
Windows XP, 1-5, 1-6
changing ownership, 2-1
Key code, 3-4, 3-11, 3-15
L
License file, 3-5
License Manager, 3-2, 3-11, 3-12
about, 3-5
License types
about, 3-2
increases, 3-2
master license, 3-2
sub-licenses, 3-2
License.bin, 2-3, 3-5
Licenses
about, 3-2
creating, 3-5
GoldSync (Y), 3-3
license types, 3-2
managing, 3-5
Master license, 3-2, 3-3
master license, 3-6
Site (S), 3-3
sub-licenses, 3-2, 3-3
types of, 3-3
Undocked (U), 3-3, 3-15
Licensing
after installing, 2-15, 2-22, 2-34
GoldMine, 3-7
serial number, 3-4
with a Master License, 3-6
with a Site license, 3-15
with an Undocked license, 3-15
wizard, 3-7
Local administrator, 1-2, 2-7, 2-15, 2-36,
A-2
Ownership
changing in XP, A-2
granting permission, A-3
support, 1-3
MS SQL login failed, 2-14
N
Network operating systems
server requirements, 1-3
Network protocols
I-4
Index
server requirements, 1-3
O
O-License, 3-3
Operating system requirements
servers, 1-3
service packs, 2-2
shared workstation, 1-6
single-user license computer, 1-6
undocked computers, 1-6
Ownership
changing in XP, 2-1
P
Performance considerations
servers, 1-5
single-user license computer, 1-7
undocked computers, 1-7
Permission, A-3
Power user, 1-2, 1-6, A-2, A-3
Q
Quick Start Guide
Firebird, 1-8
R
Registration
GoldMine, 3-7
SQL Server, C-14
Remote offices
creating sub-licenses for, 3-11
Remote systems
upgrading, 2-37
Reporting services, 1-8
S
Schema
licensing, 3-4
Security, 1-2, A-3
tab, A-2
Serial number, 3-8
Server requirements
environments, 1-2
memory, 1-4
network protocols, 1-3
operating systems, 1-3
security, 1-2
Service packs
SBS, 1-3
Shared
server installations checklist, 2-5
workstation installations
checklist, 2-6
running, 2-24
workstation requirements
operating systems, 1-5, 1-6
Sharing
DLL, B-2
tab, A-3
Single-user installations
checklist, 2-6
running, 2-28
Single-user requirements
about, 1-5
CPU, 1-5
memory, 1-5
performance considerations, 1-5
Site
master, 2-37
Site License (S-License)
about, 3-11
creating, 3-11
licensing with, 3-15
S-License, 3-3, 3-11, 3-15
Software requirements, 1-8
Sub, 3-2
Sub-license, 3-2, 3-6
creating, 3-11, 3-12
for remote offices, 3-11
Index I-5
for undocked users, 3-13
System files, 2-3
System requirements
ancillary, 1-8
GoldSync, 1-9
server requirements, 1-2
single-user requirements, 1-5
W
U
Y
U-License, 3-13
Undocked, 2-37
GoldSync setup, 2-28
installation, 2-28
users
creating sub-licenses for, 3-13
licenses, 3-13
warning, 3-13
Undocked License (U-License)
about, 3-13
creating, 3-13
licensing with, 3-15
Unit Conversion in CAL, E-4
Unit Conversion in CONTHIST, E-4
Unit Conversion in CONTSUPP, E-4
Upgrading
considerations, 2-2
failure, E-1
large SQL Server databases, 2-35,
E-1
licensing schema, 3-4
on Windows XP, A-1
remote systems, 2-37
User accounts, 3-8
User_info.bin, 2-3
Users
table, 2-3
users.dbf, 2-3
Y-License, 3-3, 3-11, 3-15
V
Visual Studio 2003 .NET, 1-8
Workstation
installing option 1, 2-23
installing option 2, 2-23, 2-24
Local Install Option, 2-27
mapping a drive, 2-24
I-6
Index