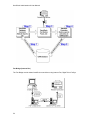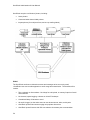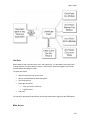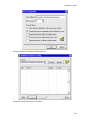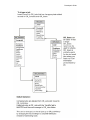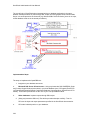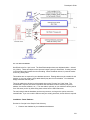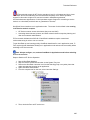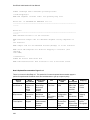
1
OmniRush Printed Documentation Note: This PDF manual is an automated conversion of the OmniRush help file. Some formatting has been lost. The on-line help file at www.zfirm.com is updated regularly, and offers correct hyperlinks and cross references. At www.zfirm.com, the help file is also full text searchable. This PDF is offered for convenience only. It may contain errors and omissions as a result of the conversion process. Pop-up explanations and hyperlinks do not translate well to the printed page. At over 400 pages, it cannot be manually verified against the on line help file document. The on-line document is the authoritative OmniRush documentation source. Use this PDF at your own risk. Z-Firm is not responsible for omissions and inaccuracies in this PDF document. Thank you for understanding. Table Of Contents Other Resources:............................................................................................................................. 1 News:............................................................................................................................................... 1 Quick Start Guide ............................................................................................................................ 3 Administrator's Guide ...................................................................................................................... 5 Introduction -- Formalities ............................................................................................................ 5 System Requirements .............................................................................................................. 5 OmniRush License ................................................................................................................... 7 Acknowledgements, Credits, & Disclaimers ......................................................................... 7 How OmniRush is Licensed.................................................................................................. 8 Legal Version ........................................................................................................................ 9 Introduction -- Product & Concepts............................................................................................ 14 Greetings ................................................................................................................................ 14 Why OmniRush ...................................................................................................................... 14 OmniRush Product History..................................................................................................... 15 Concepts ................................................................................................................................ 16 System Components .......................................................................................................... 16 Server Overview ................................................................................................................. 16 Server Modules................................................................................................................... 17 Users & Groups .................................................................................................................. 18 Tracks ................................................................................................................................. 18 Merge Documents .............................................................................................................. 21 Document Management ..................................................................................................... 22 CRM Integration.................................................................................................................. 26 Understanding Shipping ..................................................................................................... 26 Understanding Email .......................................................................................................... 33 Direct Inward Dial (DID)...................................................................................................... 37 OmniRush Server Clustering .............................................................................................. 37 How OmniRush is Licensed................................................................................................ 38 How OmniRush Compares to FaxRush v4......................................................................... 39 Components............................................................................................................................... 44 Server Modules ...................................................................................................................... 44 CRM Integration.................................................................................................................. 44 Document Merging ............................................................................................................. 51 Faxing ................................................................................................................................. 51 Fax Bridge (Internet Fax).................................................................................................... 52 Shipping .............................................................................................................................. 53 Commerce .......................................................................................................................... 54 Print..................................................................................................................................... 55 E-Mail.................................................................................................................................. 56 Client Applications .................................................................................................................. 57 Administrator....................................................................................................................... 57 Print-to-Fax and Email ........................................................................................................ 58 Fax Viewer .......................................................................................................................... 59 Other Utilities ...................................................................................................................... 59 Installation .................................................................................................................................. 60 Installation Walk Through....................................................................................................... 60 Installation Quick Start Guide................................................................................................. 60 Before Installation................................................................................................................... 62 Planning an Upgrade from FaxRush .................................................................................. 62 Checking Your System ....................................................................................................... 63 Install OmniRush .................................................................................................................... 69 Server Installation ............................................................................................................... 69 Client Utilities Installation.................................................................................................... 71 iii OmniRush Administration & User Manual Updating/Upgrading OmniRush ............................................................................................. 71 Updating/Upgrading the OmniRush Program Files ............................................................ 71 Configure OmniRush ................................................................................................................. 74 New Installation: Initial Configuration & Testing..................................................................... 74 Installation: Initial Fax Server Setup ................................................................................... 74 Installation: Initial E-Mail Server Setup............................................................................... 76 Installation: Initial Shipping Server Setup ........................................................................... 77 Installation: Initial Print Merge Server Setup ...................................................................... 78 Configuration Quick Start Guide ............................................................................................ 79 Global Settings ....................................................................................................................... 79 Module Configuration ............................................................................................................. 81 Using Administrator to Create Modules .............................................................................. 81 Database Connectors ......................................................................................................... 83 Fax Server Module ........................................................................................................... 103 Print Module...................................................................................................................... 112 Fax Bridge Module............................................................................................................ 117 E-Mail Server .................................................................................................................... 120 Shipping Modules ............................................................................................................. 123 Commerce Module ........................................................................................................... 125 Launcher Module .............................................................................................................. 127 Track Configuration .............................................................................................................. 127 The Role of Tracks ........................................................................................................... 127 Creating a New Track ....................................................................................................... 128 Universal Track Options ................................................................................................... 128 Configuring Fax Tracks..................................................................................................... 130 Configuring Print Tracks ................................................................................................... 131 Configuring FedEx Shipping Tracks ................................................................................. 132 Configuring UPS Shipping Tracks .................................................................................... 135 Configuring DHL Shipping ................................................................................................ 137 Configuring E-Mail Tracks: Message Properties .............................................................. 139 Configuring Commerce Tracks ......................................................................................... 140 Advanced Track Options .................................................................................................. 140 Users & Groups .................................................................................................................... 142 User Creation & Management .......................................................................................... 142 User Rights for Universal Client ....................................................................................... 143 Groups .............................................................................................................................. 144 Fax Receiving ................................................................................................................... 144 CRM Client Utilities .............................................................................................................. 145 Viewer and Print to Fax Client .......................................................................................... 145 Client for SalesLogix Support Client ................................................................................. 145 OmniRush Toolbar............................................................................................................ 145 Advanced Configuration Topics ........................................................................................... 147 Advanced Configuration ................................................................................................... 147 Schedules ......................................................................................................................... 148 User's Guide ................................................................................................................................ 151 Using the Administrator............................................................................................................ 151 The Administrator User Interface ......................................................................................... 151 Starting and Stopping Modules ............................................................................................ 151 Track Management .............................................................................................................. 152 ODMS: Rights Management Concepts ................................................................................ 153 Administrator Settings .......................................................................................................... 154 OmniRush-Managed Documents......................................................................................... 155 Drag & Drop with Administrator ........................................................................................ 155 Document Packages......................................................................................................... 156 Finding Files...................................................................................................................... 157 Documents to Send ................................................................................................................. 158 iv Table Of Contents Supported File Types ........................................................................................................... 158 “Resize”............................................................................................................................. 159 Page Oriented vs. HTML Merge Forms ............................................................................... 160 Merge Documents for Fax, Email, and Print ........................................................................ 162 Merge Documents (Page Oriented).................................................................................. 162 Creating A New Merge Document (MS Word) ................................................................. 162 Crystal RPT Files .............................................................................................................. 163 OmniRush Example Merge Forms ................................................................................... 167 Merge Forms Best Practices ............................................................................................ 167 Label Printing .................................................................................................................... 168 Microsoft Word Tricks ....................................................................................................... 169 HTML Merge Email .............................................................................................................. 170 HTML Email Support ........................................................................................................ 170 HTML: Planning the Content ............................................................................................ 171 HTML: Importing into ODMS ............................................................................................ 171 HTML: Database Merge Codes ........................................................................................ 171 HTML: Tutorial With FrontPage ........................................................................................ 175 HTML: Merge Email FAQ ................................................................................................. 177 HTML: Merging into Links and Tags................................................................................. 178 HTML: Advanced Topics .................................................................................................. 179 Merge Codes ........................................................................................................................ 181 Anatomy of a Merge Code................................................................................................ 181 Types of Merge Codes ..................................................................................................... 182 Macro Merge Codes ......................................................................................................... 182 Job Detail Merge Codes ................................................................................................... 184 GoldMine dBase Codes.................................................................................................... 184 GoldMine SQL Codes....................................................................................................... 185 SalesLogix Codes ............................................................................................................. 187 Formatting Codes ............................................................................................................. 188 Creating Custom Merge Aliases........................................................................................... 190 A Job Centric View of Data Merging................................................................................. 190 Anatomy of a Custom Merge Aliases ............................................................................... 191 Creating Custom Merge Aliases ....................................................................................... 194 Custom Merge Code Examples........................................................................................ 195 Advanced Merge Options..................................................................................................... 203 Advanced Merge Options ................................................................................................. 203 Calling Stored Procedures from a Merge Alias ................................................................ 204 Merging Signature Graphics ............................................................................................. 206 Merging External Data ...................................................................................................... 208 Data Driven Compound Documents................................................................................. 209 Run Time VBA Processing ............................................................................................... 210 Adding Bar Codes to Merge Documents .......................................................................... 210 Notes On Oracle Merge Codes ........................................................................................ 211 Optimizing Merge Codes .................................................................................................. 211 Currency Display .............................................................................................................. 212 Merge: GoldMine User Vars ............................................................................................. 212 Other Document and File Types .......................................................................................... 217 Excel Files......................................................................................................................... 217 Document Management........................................................................................................... 218 Document Management Options.......................................................................................... 218 Internal or External ............................................................................................................... 219 ODMS: Check In and Check Out ......................................................................................... 220 ODMS: Rights Management Concepts ................................................................................ 221 Driving Jobs from the CRM System......................................................................................... 222 Driving Jobs from CRM: Introduction ................................................................................... 222 Referencing Job Documents ................................................................................................ 222 v OmniRush Administration & User Manual Using Override Codes .......................................................................................................... 223 Scheduling Jobs in GoldMine............................................................................................... 223 Scheduling from GoldMine - Introduction ......................................................................... 223 GoldMine........................................................................................................................... 224 Scheduling to GoldMine Groups....................................................................................... 225 Scheduling Jobs in SalesLogix ............................................................................................ 226 Scheduling from SalesLogix - Introduction ....................................................................... 226 Scheduling from SalesLogix - Discussion ........................................................................ 227 Scheduling to SalesLogix Groups .................................................................................... 229 Shipping Jobs ....................................................................................................................... 230 Shipping - Introduction...................................................................................................... 230 Shipping Templates - In Depth ......................................................................................... 234 Shipping Overrides ........................................................................................................... 235 Administrative Functions................................................................................................... 236 Shipping - Some Examples .............................................................................................. 237 Shipping - Canada Origination.......................................................................................... 237 Shipping - Virtual Tracks................................................................................................... 238 Commerce Jobs ................................................................................................................... 243 Commerce Jobs................................................................................................................ 243 Driving Jobs from Processes................................................................................................ 246 Driving OmniRush from Sales Processes ........................................................................ 246 Driving OmniRush from GoldMine Automated Processes ............................................... 247 Driving Jobs from Thin Clients ............................................................................................. 249 GoldMine Everywhere Server........................................................................................... 249 Driving OmniRush from the Web Client............................................................................ 249 CRM Tips and Tricks............................................................................................................ 250 GoldMine Tips and Tricks ................................................................................................. 250 Print to Fax/Email Client .......................................................................................................... 250 Introduction........................................................................................................................... 250 Job Flow ............................................................................................................................... 251 Main Screen ......................................................................................................................... 251 Options Screen..................................................................................................................... 252 Rasterizing Files ................................................................................................................... 253 Client from the SalesLogix Support Client ........................................................................... 254 Fax Viewer ............................................................................................................................... 254 Introduction........................................................................................................................... 254 Incoming Fax Flow ............................................................................................................... 255 Viewer Main Screen ............................................................................................................. 256 Viewing Faxes ...................................................................................................................... 256 Annotating Faxes ................................................................................................................. 257 Organizing Faxes ................................................................................................................. 258 Acting on Faxes.................................................................................................................... 258 Linking Faxes to Contacts .................................................................................................... 258 Forward Fax to User............................................................................................................. 259 Emailing Faxes Out .............................................................................................................. 259 Viewer Preferences .............................................................................................................. 259 Integrating with your CRM System....................................................................................... 260 SalesLogix ........................................................................................................................ 260 GoldMine........................................................................................................................... 260 Viewing OmniRush Files ...................................................................................................... 261 Monitoring OmniRush .............................................................................................................. 261 Monitor Fax Ports ................................................................................................................. 261 Reporting on OmniRush Jobs .............................................................................................. 261 Reporting on Jobs............................................................................................................. 261 GoldMine Reporting.......................................................................................................... 262 Developer's Guide ....................................................................................................................... 267 vi Table Of Contents Introduction .............................................................................................................................. 267 VBA Document Processing...................................................................................................... 267 Introduction........................................................................................................................... 267 VBA Getting Started ............................................................................................................. 268 VBA Example Code.............................................................................................................. 271 VBA Best Practices .............................................................................................................. 272 Integrating via CRM ................................................................................................................. 272 Introduction........................................................................................................................... 272 The Activity Record .............................................................................................................. 273 List of Overrides and Special Options.................................................................................. 274 SalesLogix ............................................................................................................................ 280 Driving OmniRush from Sales Processes ........................................................................ 280 Driving OmniRush Programmatically from SalesLogix..................................................... 281 GoldMine .............................................................................................................................. 284 Driving OmniRush Programatically from GoldMine .......................................................... 284 Driving OmniRush from GoldMine Automated Processes ............................................... 288 Using Expressions in Automated Processes.................................................................... 289 Integrating via OmniRush ActiveX ........................................................................................... 294 Introduction........................................................................................................................... 294 ActiveX Reference................................................................................................................ 294 ActiveX Reference ............................................................................................................ 294 OmniRush" ActiveX Application Programming Interface.................................................. 294 Introduction ....................................................................................................................... 296 Compatibility ..................................................................................................................... 296 Getting started .................................................................................................................. 296 Samples ............................................................................................................................ 296 A simple tutorial ................................................................................................................ 297 Component class reference.............................................................................................. 299 Integrating Custom Fax Bridging ............................................................................................. 312 Introduction to Custom Fax Bridging.................................................................................... 312 Getting Started with Bridging................................................................................................ 314 Configuring Fax Module for Bridging.................................................................................... 314 How Fax Bridging Works...................................................................................................... 316 How Fax Bridging Works -- Receiving ................................................................................. 319 Integrating via SQL Databases ................................................................................................ 320 SQL: Introduction ................................................................................................................. 320 OmniRush® Open Database Connector Stored Procedures specification.......................... 327 SQL: Stored Procedures ...................................................................................................... 327 SQL: Pass Thru SQL via ADO ............................................................................................. 329 Overview ........................................................................................................................... 330 Introduction ....................................................................................................................... 330 Fieldname cast example................................................................................................... 334 SQL: Creating the Database Connector .............................................................................. 334 SQL: Oracle Details.............................................................................................................. 335 SQL: Microsoft SQL Details ................................................................................................. 336 SQL: Pass Through Details.................................................................................................. 336 SQL: MSDE and OmniRush................................................................................................. 336 Technical Reference.................................................................................................................... 339 CRM Technical Discussions .................................................................................................... 339 Backing Up CRM Systems ................................................................................................... 339 GoldMine Discussions.......................................................................................................... 340 SQL Technical Discussion - GoldMine ............................................................................. 340 dBase Shutdown Considerations ..................................................................................... 341 Example GM.INI For GoldMine SQL ................................................................................ 342 Single Contact Directory ................................................................................................... 342 SalesLogix Discussions........................................................................................................ 343 vii OmniRush Administration & User Manual API DLL Versioning .......................................................................................................... 343 FaxRush Bundle for SalesLogix ....................................................................................... 344 SalesLogix Database Drivers ........................................................................................... 344 SalesLogix Sync Troubleshooting .................................................................................... 345 SalesLogix: Sync to All Users Option ............................................................................... 345 Extended Hardware Discussions ............................................................................................. 346 Memory Requirements ......................................................................................................... 346 An Inexpensive OmniRush Server PC ................................................................................. 347 Brooktrout Discussions......................................................................................................... 347 Brooktrout: Supported Models .......................................................................................... 347 Brooktrout Board Discussion ............................................................................................ 349 TR114 5-Volt PCI boards & Compaq ProLiant servers -.................................................. 349 DID: Overview................................................................................................................... 349 DID: Ordering the DID Phone Line for Analog DID .......................................................... 352 Analog DID: Brooktrout and Line Setup ........................................................................... 354 DID: Testing the Brooktrout Hardware & OmniRush Setup ............................................. 354 DID: OmniRush Logic ....................................................................................................... 355 Eltron Label Printers............................................................................................................. 357 Eltron / Zebra Printers: What it Is and Why to Use One ................................................... 357 Eltron: Setting Up On The Network .................................................................................. 358 Eltron / Zebra Thermal Printers: Using with a Serial Port................................................. 358 FAQs ........................................................................................................................................ 359 Administrator FAQ ................................................................................................................ 359 Server FAQ........................................................................................................................... 359 E-Mail Module FAQ .............................................................................................................. 359 FAQ: OmniRush General FAQ............................................................................................. 359 Misc. Discussions..................................................................................................................... 361 FaxRush v4.x to OmniRush Upgrade Checklist................................................................... 361 Example FaxRush v4.x to OmniRush Upgrade ................................................................... 362 Supported File Types ........................................................................................................... 363 “Resize”............................................................................................................................. 364 Legal Size Forms ................................................................................................................. 364 Dialing Configuration File (predial.ini) .................................................................................. 365 OCR on Received Faxes...................................................................................................... 368 How To Send Screen Shots ................................................................................................. 368 Microsoft Word Tricks........................................................................................................... 369 OmniRush System Maintenance ............................................................................................. 370 Backing Up OmniRush ......................................................................................................... 370 OmniRush Database Maintenance ...................................................................................... 373 Watching Free Disk Space................................................................................................... 373 NT Account for Service Login............................................................................................... 373 Stopping & Starting OmniRush from a Batch File ................................................................ 374 Monitoring for Errors............................................................................................................. 375 Restoring an OmniRush System .......................................................................................... 375 Starting and Stopping OmniRush DBIO for SQL Backup .................................................... 378 Performance Discussions ........................................................................................................ 378 Server Scaling ...................................................................................................................... 378 Fax Performance & Throughput (aka Speed) ...................................................................... 379 Shipping Server Throughput ................................................................................................ 381 Email Merge Throughput Tuning.......................................................................................... 384 Troubleshooting ....................................................................................................................... 385 Troubleshooting Resources ................................................................................................. 385 Troubleshooting Steps ......................................................................................................... 386 Troubleshooting Brooktrout Cards ....................................................................................... 386 First, is it Hardware or Software ....................................................................................... 386 Port Detection in the Fax Module ..................................................................................... 387 viii Table Of Contents Troubleshooting Brooktrout Cards.................................................................................... 387 Troubleshooting the Administrator ....................................................................................... 391 Module Gears Have Question Marks ............................................................................... 391 Troubleshooting Modules ..................................................................................................... 391 Fax Module Troubleshooting ............................................................................................ 391 OmniRush Server Error on NT: Event Log Full ................................................................ 396 Troubleshooting Database Connectors................................................................................ 396 Troubleshooting SQL Connectors (incl. SalesLogix & GoldMine).................................... 396 Software, Network, and Environment Discussion.................................................................... 397 Networking Discussions ....................................................................................................... 397 Networking Details ............................................................................................................ 397 Wide Area Networks and OmniRush................................................................................ 397 Internet Connectivity ......................................................................................................... 398 Internet Connectivity: Firewalls & Proxy Servers.............................................................. 399 Printing to IP Printers: Explanation ................................................................................... 400 Printing to IP Printers: How To ......................................................................................... 401 Backing Up CRM Systems ............................................................................................... 402 NT Services, Errata & Discussions ...................................................................................... 403 Drive Letters and Services................................................................................................ 403 NT User Account for OmniRush Services ........................................................................ 404 Running OmniRush Server as an NT Service .................................................................. 404 Software Coexistence .......................................................................................................... 406 Windows Version Support Matrix ......................................................................................... 407 Printing Labels with CoStar or Thermal Printer.................................................................... 407 Printing Labels on Impact Printer ......................................................................................... 408 Printing Multiple Paper Sizes or Forms................................................................................ 408 OmniRush Internals ................................................................................................................. 409 OmniRush File Types........................................................................................................... 409 Manually Uninstall OmniRush .............................................................................................. 410 Uninstall OmniRush from the Installer.................................................................................. 411 Renaming the OmniRush Server ......................................................................................... 411 How OmniRush Finds Job Files ........................................................................................... 412 OmniRush Log Files ............................................................................................................. 414 Extracting the Installer.......................................................................................................... 415 OmniRush Versions ............................................................................................................. 415 OmniRush v6 .................................................................................................................... 415 What is New in OmniRush v5.1 ........................................................................................ 429 What is New in OmniRush v5.5 ........................................................................................ 437 Internet Fax Details .............................................................................................................. 445 Internet Fax Throughput Tuning ....................................................................................... 445 Internet Fax Network Requirements................................................................................. 446 Module Technical Reference................................................................................................ 446 TECH REF: UPS Shipping Module .................................................................................. 446 TECH REF: Email Server ................................................................................................. 452 Z-Firm DBEngine.................................................................................................................. 454 Z-Firm DBEngine: Introduction ......................................................................................... 454 Connect.ini ........................................................................................................................ 454 Glossary....................................................................................................................................... 457 Index ............................................................................................................................................ 461 ix Welcome! EmailRush, FaxRush, ShipRush Server, PrintRush and CashRush are part of the OmniRush® family. All these products are installed by a single installer and managed via a single console (the OmniRush Administrator). Getting Started: Installation Walk Through for new users Quick Start Guide for experienced installers Other Resources: The OmniRush Knowledge Base, to look up errors and issues. The OmniRush Video Library for installation and configuration walkthroughs. OmniRush Community Forums for discussions, troubleshooting, and more! PDF version of this Help File News: What is new in OmniRush v9! New & updated documentation pages for OmniRush v9 Feedback on the documentation is welcome. Please address documentation feedback to: [email protected] Help file version: $Change: 22053 $, for OmniRush v9 1 Quick Start Guide If you are already familiar with the components of OmniRush, here are the steps to get running quickly. (If you are new to OmniRush, take some time to read the Administration section of this help file, it will save you a lot of time later.) 1. Install Brooktrout fax board (if setting up hardware fax) 2. Install the OmniRush Server Software 3. Install your OmniRush license (or run in Demo mode) 4. Configure a Database Connector module and other needed modules (like Fax or Shipping) 5. Configure one or more tracks to feed jobs to the modules 6. Copy your documents for printing, faxing & emailing into the import folder 7. Configure the CRM system for the Track users/codes 8. Schedule jobs in the CRM system for processing by OmniRush! The full step-by-step installation walk through is available via this link. The OmniRush Video Library has installation demonstrations. Detailed Quick Start Guides and Overviews: System Requirements Server Overview Installation Quick Start Guide Configuration Quick Start Guide 3 Administrator's Guide Introduction -- Formalities System Requirements EmailRush, FaxRush, ShipRush Server, PrintRush and CashRush are part of the OmniRush® family. All these products are installed by a single installer and managed via a single console (the OmniRush Administrator). For a friendly discussion of a good starter OmniRush Server PC, see the discussion. Minimum Required Hardware (for a basic, low volume system) OmniRush Server PC* Client PC's (for OmniRush Client Utilities)* CPU Pentium II, III, IV (or Pentium III 600 or higher* equivalent) 900 mhz or higher* RAM 256MB** Windows 2000 / XP: 196MB** Disk Space 1 GB Free Space minimum 75 MB Free space, 60MB of (program occupies approx which for program, balance 175MB, free space required for temporary work files* for data)* Operating System* Windows 2000 (any Windows 2000 (any (see the Windows Version flavor, e.g. Professional, flavor) Support Matrix for full Server, Advanced Server, Windows XP details.) etc.) Windows 2003 WindowsXP Server. Windows 2003 Server Windows 2000 Terminal Server Windows 2003 Terminal Server If Installing the FaxRush for Brooktrout TruFax or TR1034 No hardware required on Hardware Fax board workstations Other Modules Microsoft Word (version 2000, XP, or 2003) is required if OmniRush is used for merge-fax, print, and mergeto-pdf-and-email Most modules have no hardware requirements. Check module documentation for specifics * The actual minimum depends on the CRM system in use. First refer to the recommended (not minimum) hardware for the target CRM system. If the CRM system requires more advanced hardware than OmniRush, follow the CRM system recommendation. ** These are minimums for a basic, one or two port OmniRush server used for faxing and for no software other than OmniRush. Note that when OmniRush is used with a CRM system (e.g. ACT!, GoldMine, SalesLogix, etc.) the OmniRush Server PC must meet at least the minimum requirements of the CRM software, which may require faster hardware than listed above. Note 5 OmniRush Administration & User Manual that heavy workloads, more than three modules, or more than two fax lines may require faster hardware. Recommended Minimum Server: 1.1 ghz or higher, 512 MB RAM, 20 GB Free disk space, supported operating system Brooktrout TruFax or TR1034 interface for hardware based faxing (Be sure to see the list of supported models) For a friendly discussion of a good starter OmniRush Server PC, see the discussion. In many cases, a dedicated PC is not required to run OmniRush. Powerful server PC's can run other applications in addition to OmniRush. See the Software Coexistence matrix for more information. Recommended Minimum Server for Heavy Fax Loads: 2 ghz or higher CPU, 1GB RAM, 40 GB Free disk space, supported operating system Appropriate Brooktrout fax board or internet fax account System is dedicated to FaxRush Other Requirements: TCPIP must be installed on the Server PC. (See section on networking for details.) Internet connectivity from the OmniRush Server PC is required. (See discussion in Internet Connectivity.) Modules may have specific hardware and software requirements. See the section on the module for specific requirements. The OmniRush Server Installer requires that a local C: drive exist on the OmniRush server, and that this drive is available for read and write. The PC Name length is limited to 18 characters. If the PC name is longer than this, shorten the name and reboot before installing OmniRush. Related Software: Required: IE5 or higher must be installed Office2000, Office XP or Office 2003 is required for merge fax, merge print, some merge email functions (only the Microsoft Word portion of Office is needed) Optional: ACT!2006 (aka v8), 2007 (aka v9) or 2008 (v10) Standard or Workgroup (using either MSDE or SQL Server) GoldMine v5.x or v6.x dBase or SQL (click here for SQL details) (aka GoldMine Front Office, GoldMine Sales & Marketing, GoldMine Business Contact Manager or similar) GoldMine v7.x and GoldMine v8 (aka GoldMine Premium Edition) on SQL Server (click here for SQL details) 6 Administrator's Guide SalesLogix v4 (SalesLogix2000) or v5.x (SalesLogix.net), v6.x, v7.x Microsoft Dynamics CRM v3 Oracle, Microsoft SQL Server, Pervasive or other SQL database for Open DBIO integration (custom programming and integration is the responsibility of the customer, not Z-Firm) If OmniRush is going to integrate with ACT!, GoldMine or SalesLogix, then the contact manager must be installed on the OmniRush Server PC, with all required database drivers and client configuration to attach to the production database. Always install the CRM client software and test for proper operation before installing OmniRush. OmniRush licensing controls what systems OmniRush can work with, and more. OmniRush License Acknowledgements, Credits, & Disclaimers Disclaimers: Z-Firm LLC hopes that you find OmniRush a valuable tool for automating your business, and that it makes your CRM investment even more useful. However, neither Z-Firm, nor anyone else, promise that it will work for you. If OmniRush does not work, or leads to emotional, physical, material, ephemeral, real, imagined, regular or intermittent problems, losses, damages, delays, congestions, reactions, interactions or crises, your only remedy is a refund according to the current Z-Firm return policy, which in no case will exceed the published retail price of the software. Likewise, if OmniRush helps make your business more efficient, effective, or enjoyable, Z-Firm does not expect a larger chunk of your revenue than the price list calls for. Trademarks: OmniRush, ShipRush, FaxRush, CashRush, and StripMine are registered trademarks of Z-Firm LLC EmailRush, PrintRush & VoiceRush are trademarks of Z-Firm LLC SalesLogix is a trademark of Interact Commerce Corp. GoldMine is a trademark of FrontRange Solutions, Inc. Other marks belong to their respective holders. Acknowledgements & Technologies: Portions of OmniRush are used under license. These include but are not limited to: This product includes Adobe Acrobat PDF Library Technology Portions contain an implementation of the LZW algorithm licensed under U.S. Patent 4,558,302 Portions Copyright Federal Express Corporation Portions Copyright United Parcel Service Portions Copyright Atomic Software Portions Copyright Lead Technologies Portions Copyright Brooktrout Inc. Portions Copyright Interact Software Corp. Portions © 1984 – 2002 Birdstep Technology, Incorporated. With thanks to Gustavo Huffenbacher Daud for excellent tools 7 OmniRush Administration & User Manual How OmniRush is Licensed OmniRush is licensed based on: --Features licensed (e.g. number of fax lines, number of shipper accounts, PDF features, etc.) --Type of database being serviced (CRM System type, CRM user count, SQL system type, etc.) --Number of databases being serviced --Number of Server Cluster Members --Optional features OmniRush is licensed by function: 8 FaxRush is the full featured fax server for CRM and SQL systems. The base FaxRush system includes: Support for up to two hardware fax ports (two phone lines) Internet fax support RightFax bridge support Three fax tracks One database connector The OmniRush Universal Client for print-to-fax One print track for auto-printing received faxes One email track for emailing out received faxes ShipRush Server is the shipping server for CRM and SQL systems. The base ShipRush Server license includes: Supports one shipper account on one carrier (additional carriers/accounts are add ons to the base system) One email track for emailing out shipment notifications One database connector The OmniRush Universal Client for a simple shipping GUI Notes: ShipRush Server is for USA users only ShipRush Server is licensed on an annual subscription basis. EmailRush is the most powerful email merge server for CRM and SQL systems. The base EmailRush license includes: Three email tracks One database connector The OmniRush Universal Client for print-to-email CashRush is the credit card processing system for CRM and SQL systems. The base CashRush license includes: One email track for emailing out receipts One database connector One credit card processing track The OmniRush Universal Client for a simple credit card GUI Notes: CashRush is for USA users only CashRush is licensed on an annual subscription basis. PrintRush is the server based merge printing system for CRM and SQL systems. The base PrintRush license includes: Five print tracks One database connector Administrator's Guide Each model allows connection to one database of the type specified at time of purchase. Additional features, database connectors, etc. can be licensed at the time of purchase or later. Popular options include the PDF module, additional database connectors, and additional tracks. Each model includes a given number of tracks for each job type. If you have any questions on what is included, please refer to the price list or contact Z-Firm Sales. OmniRush detects the CRM system in use and must be licensed for the CRM system type and the CRM system user count: ACT!: In Help | About, go into the Database Info area to see how many users the ACT! system is licensed for. GoldMine: Go into Help | About and check the GoldMine serial number. This shows the number of users in the second or third section. SalesLogix: OmniRush is licensed based on the total number of configured, active login ID's in SalesLogix. (Note that this will include SalesLogix users of both types "per configured" and "concurrent") Microsoft CRM: OmniRush is licensed based on the total number of configured, active login ID's in MSCRM. Many OmniRush licenses are subscription based. This allows for all updates and upgrades to OmniRush at no extra charge during the subscription period. Contact your reseller or Z-Firm sales at (206) 812-7874 for licensing details. Legal Version This copy of the license is for your convenience only. The contractual license between you and Z-Firm is made when you install Z-Firm's software, and the license shown during installation is the license that applies to you. Z-FIRM LLC SOFTWARE LICENSE AGREEMENT for OmniRush version 8 OmniRush is the collective term for any and all of the following brands/products: FaxRush, CashRush, EmailRush, PrintRush, ShipRush Server, VoiceRush, OmniRush THIS AGREEMENT HAS TWO PARTS -- SCROLL DOWN TO SEE ALL PARTS ** PART ONE ** The following software license terms are qualified by those additional or different terms, if any, contained in any signed license agreement between you and Z-Firm LLC. IMPORTANT-READ CAREFULLY: This Software License Agreement (the "Agreement") is a legal agreement between you ("Customer" or "you") and Z-Firm LLC (Z-Firm LLC or Z-Firm) for the software product identified above (the "Software"), which includes computer software and associated media and printed materials (the printed materials are hereafter referred to as the "Documentation"). By downloading, installing, copying or otherwise using the Software, you agree to be bound by the terms of this Agreement. If you do not agree to the terms of this Agreement, promptly return the unused Software to the place from which you obtained it for a full refund, or if downloaded, destroy any downloaded copies. The Software is the property of Z-Firm LLC and is protected by copyright law and international treaties. While Z-Firm LLC continues to own the Software, you will have certain rights to use the Software after your acceptance of this 9 OmniRush Administration & User Manual Agreement. Except as may be modified by a license addendum which accompanies this Agreement, your rights and obligations with respect to the use of this Software are as follows: 1. VALID REGISTRATION & IDENTIFING INFORMATION. Installing this software will AUTOMATICALLY register you and your PC with Z-Firm over the Internet. Further, usage metrics from this software may be uploaded automatically to Z-Firm to assist with product quality and planning. In no cases will this data be shared with any third party. 1.1 Accurate Registration Information. You must complete information forms accurately, with complete and correct information, including but not limited to: Company name, administrator's name, phone, fax, email address, mailing address, etc. Incomplete or inaccurate information is a violation of this agreement and voids all warrantees, return policies, and grants of license. 1.2 Computer Identification Marks. This software will automatically gather identification information from the PC it is installed on. Information is gathered to identify the PC, not to gather personal or private information. By accepting this agreement, you give Z-Firm LLC permission to gather this information, transmit it to Z-Firm, and store it at Z-Firm. Z-Firm will not share this information with any third party EXCEPT when a violation of this license is being investigated. 1.3 Internet Connection Required. This software requires a connection to the internet in order to maintain its license and in order to operate. While many features of this software are internetrelated, and require an internet connection to operate, the core OmniRush engine requires a connection in order to run even if no internet-related features are used. 1.4 Section 1 applies to all licenses, whether paid or free of charge, including demonstration versions. 2. GRANT OF LICENSE. Z-Firm LLC grants to Customer, and by downloading, installing, copying or otherwise using the Software, Customer accepts, a non-exclusive, non-transferable license to use the Software and the Documentation on the terms described in this Agreement. 2.1. OmniRush Primary Server. Customer will be granted: (i) OmniRush Server to run on a single PC, unless explicitly stated otherwise in the Z-Firm invoice to the Customer. 2.2. OmniRush Server Modules. Customer will be granted the features according to the module purchased. Each module must be licensed. Licenses are issued by Z-Firm in the form of named license files and/or Z-Firm invoice naming modules licensed. 2.3. OmniRush Client Software. Customer will be granted the right to install OmniRush Client software on the number of computers specified in the Z-Firm invoice, or as specified in section 3 below. 2.4 Timed License (sometimes referred to as 'Leased' or 'Subscription' license). The Grant of License may be for a specified period of time (for example, from issuance through a given date). Such licenses will automatically cease operation on the expiration date. Renewal or extension of the license period will be at the discretion of Z-Firm LLC and usually requires payment of a renewal fee. 3. SOFTWARE USE AND RESTRICTIONS. All licenses granted Customer under this Agreement are non-exclusive and non-transferable. Customer may install and use one copy of the Software on a single primary OmniRush server. Customer may make one copy of the Software solely for back up and one additional copy of the Software solely for testing purposes. The Software may be used in accordance with the limitations defined below. If Customer has been granted a(n): 3.1. CRM System Connector. 10 Administrator's Guide 3.1.1. The CRM Connector may be installed on a single Server PC and configured with a CRM system of the type and user count licensed. Client utilities may be installed on as many PC's as the CRM Connector license allows. 3.2 SQL Database Connector. 3.2.1 The SQL Database Connector may be installed on a single Server PC and configured for the type of SQL database licensed. Client utilities may be installed on up to 10 PC's for administration. 3.3 Other Modules (fax, shipping, email, etc.) 3.3.1. These modules are licensed according to the Z-Firm price list in effect at the time of license purchase. Refer to the price list in effect and your purchase invoice for details. 3.3.2 Where Software is used to allow the use of a "Third Party Service" (such as a shipping carrier, internet fax or voice service, etc.), Customer understands and accepts all restrictions and license terms of the Third Party Service, and is solely responsible for upholding obligations to the Third Party. Customer indemnifies Z-Firm LLC from any and all claims that arise from use of a Third Party Service. It is the Customer's responsibility to learn and adhere to the requirements of any Third Party Service used or accessed by the Software. 3.3.3 As a result of using a Third Party Service, the customer may be required to upgrade the Software or data files used by the Software from time to time, and Customer agrees to pay the fees in force at the time of such upgrade. 3.3.4 Third Party Termination. Third Party Services are accessible via the Software to the degree that such Third Parties license Z-Firm LLC to include such features. In the event that a Third Party Service terminates its agreement with Z-Firm LLC, for any reason, Z-Firm LLC may, at its discretion, terminate the license of Customer to use either Software or the Third Party Service feature(s) of Software. Such termination incurs no obligation on Z-Firm to compensate Customer in any way. Customer assumes the risk of potential Third Party Termination, and indemnifies Z-Firm LLC from any and all claims that may arise from either Third Party Termination or a termination by Z-Firm of the license to use Software that arises from such Third Party Termination. 3.4. Additional Restrictions. Upon paying for the Software, Customer will receive a set of "Keys" consisting of license numbers, license key files, and media which, when installed, will allow access to the Software by the number of named or concurrent Users permitted by the specific licenses granted. Customer agrees not to disclose these Keys or share the media with third parties or attempt to make any use of the Keys to expand the number of Users who may access the Software in excess of the licenses granted. If Customer wishes to expand the number of Users or features, Customer may purchase additional licenses from Z-Firm LLC or an authorized reseller. Additional License(s) will take the form of additional Keys provided to Customer by ZFirm LLC or authorized reseller. 4. CONFIDENTIALITY OF SOFTWARE. Customer acknowledges that the Software is proprietary to and a valuable trade secret of Z-Firm LLC. The Software, Documentation and related formulas, methods, know-how, processes, designs, new products, marketing requirements, marketing plans, are all confidential and proprietary to Z-Firm LLC. Customer may not: (i) use, copy, or transfer copies of the Software except as provided for in this Agreement; (ii) reverse engineer, modify, decompile or disassemble the Software; or (iii) rent, lease, sublicense or assign the Software or any copy thereof, including any related Documentation, except only to the extent expressly permitted by law. 11 OmniRush Administration & User Manual 5. LIMITED WARRANTY. Z-Firm LLC warrants that it has the right to grant the license set forth herein and that the media, if any, on which the Software is furnished to be free from defects in material and workmanship under normal use for a period of 90 days from the date of delivery of the Software to Customer. Any replacement Software will be warranted for the remainder of the original warranty period or 90 days, whichever is longer. EXCEPT FOR THE LIMITED WARRANTY DESCRIBED ABOVE, THE SOFTWARE IS PROVIDED "AS IS" WITHOUT WARRANTIES OR IMPLIED TERMS OF ANY KIND, EXPRESS, IMPLIED OR STATUTORY, INCLUDING WITHOUT LIMITATION ANY WARRANTY OF MERCHANTABILITY, THE CONDITION OF THE SOFTWARE, OR FITNESS FOR A PARTICULAR PURPOSE. THE ENTIRE RISK ARISING OUT OF THE USE OR PERFORMANCE OF THE SOFTWARE AND DOCUMENTATION REMAINS WITH CUSTOMER. Z-Firm LLC does not warrant the functions contained in the Software will meet Customer's requirements or that operation of the Software will be uninterrupted or error free. 6. INFRINGEMENT INDEMNITY. If, in Z-Firm LLC's opinion, the Software is likely to become or does become the subject of a claim of infringement or misappropriation of a U.S. patent, copyright, trade secret or other proprietary right, Z-Firm LLC at its election, may either: (i) promptly replace the Software with a substantially compatible and functionally equivalent noninfringing software product, (ii) promptly modify the Software to make it non-infringing and substantially compatible and functionally equivalent, (iii) promptly procure the right of Customer to continue using the Software; or (iv) if none of the first three options is commercially feasible, at ZFirm's sole discretion, may terminate the license for such Software without refund or payment of any kind. Customer shall promptly notify Z-Firm LLC of any claims concerning its use of the Software, and shall not independently defend or respond to any such claim. Customer shall cooperate with Z-Firm LLC in the defense of any such claims, at Z-Firm LLC's expense, as reasonably requested by Z-Firm LLC. Customer's failure to implement an enhancement, upgrade, or modification requested or required by Z-Firm LLC shall void the indemnification provided in this Section 6. THE REMEDIES SET FORTH IN THIS SECTION SHALL BE CUSTOMER'S SOLE REMEDIES IN THE EVENT OF AN INFRINGEMENT CLAIM RELATING TO THE SOFTWARE. 6.1 You represent and warrant that you (a) have the rights and appropriate licensing to your CRM or SQL database system authorizing you to install and execute the Z-Firm software that integrates with your CRM or SQL database system and (b) have the rights and appropriate licenses allowing you to install and execute the Z-Firm software on the host system of the CRM or SQL database system. You will indemnify and defend Z-Firm from any and all claims, demands and liabilities arising out of your failure to have all, or any portion of, such rights and licenses. 7. LIMITATIONS OF REMEDIES. Z-Firm LLC's entire liability and Customer's exclusive remedy shall be replacement of any media not meeting the Limited Warranty described herein if the media is promptly returned to Z-Firm LLC. TO THE MAXIMUM EXTENT PERMITTED BY APPLICABLE LAW, IN NO EVENT SHALL Z-FIRM LLC OR ITS SUPPLIERS BE LIABLE TO CUSTOMER FOR ANY CONSEQUENTIAL, INCIDENTAL, DIRECT, INDIRECT, SPECIAL, PUNITIVE, OR OTHER DAMAGES OF ANY KIND (INCLUDING, WITHOUT LIMITATION, DAMAGES FOR LOSS OF BUSINESS PROFITS, BUSINESS INTERRUPTION, LOSS OF BUSINESS INFORMATION, OR OTHER PECUNIARY LOSS) ARISING OUT OF THIS AGREEMENT OR THE USE OF OR INABILITY TO USE THE SOFTWARE, EVEN IF Z-FIRM LLC HAD BEEN ADVISED OF THE POSSIBILITY OF SUCH DAMAGES. 8. SOFTWARE MAINTENANCE AND TECHNICAL SUPPORT. Certain OmniRush licenses require the purchase of software maintenance and/or technical support. Refer to the price list effective at the time of purchase for specifics. In those cases where maintenance or technical support is required, Customer agrees to pay an additional software maintenance fee and an additional technical support fee for the as specified in the price list. 12 Administrator's Guide 9. EXPORT CONTROL. Customer shall not export, ship, transmit, re-export or otherwise transfer the Software or Documentation in violation of any applicable law or regulation including, without limitation, the Export Administration Regulations issued by the United States Department of Commerce. 10. UNITED STATES GOVERNMENT RESTRICTED RIGHTS. If Customer purchases the Software for use by the United States government or any of its agencies, Customer needs to enter into a separate restricted rights agreement with Z-Firm LLC. 11. GENERAL PROVISIONS. 11.1. Termination. Customer may terminate Customer's license at any time by destroying all of Customer's copies of the Software. Z-Firm LLC or its authorized distributor may terminate Customer's license if Customer fails to comply with the terms and conditions of this Agreement. Upon such termination, Customer agrees to destroy all of Customer's copies of the Software. 11.2. Governing Law. The validity, construction and performance of this Agreement shall be governed and construed in accordance with the laws of the State of California, United States of America, excluding that body of law applicable to conflicts of law. The U.N. Convention on the International Sale of Goods is expressly excluded. 11.2.1. No Waiver. Any waiver of the provisions of this Agreement or of a party's rights or remedies under this Agreement must be in writing to be effective. The failure of either party to exercise any right under this Agreement or the waiver by either party of any breach hereunder will not prevent a subsequent exercise of such right or be deemed a waiver of any subsequent breach of the same or of any other term of the Agreement. 11.3. Partial Invalidity. Should any provision of this Agreement be held to be void, invalid, inoperative, unlawful or unenforceable to any extent, the parties will negotiate, in good faith, amendments to this Agreement to reflect the original intent of the parties as closely as possible. Such invalid provision or portion thereof will be severed from the remaining provisions, which will continue to be valid and enforceable to the fullest extent permitted by law. 11.4. Order of Precedence. In the event of any conflict between this Agreement and any amendments, modifications, attachments, or other written agreements between the parties, the order of precedence followed in resolving such conflicts will be as follows: (i) signed amendments to this Agreement; (ii) attachments, schedules or exhibits attached hereto and incorporated herein; (iii) the Agreement; (iv) other written agreements between the parties related hereto. The parties agree that any purchase order placed by Customer to Z-Firm LLC will not contain any additional terms or conditions, and if there are any such additional terms or conditions they shall not become part of the agreement between the parties. 11.5. Assignment. Customer may not assign this Agreement without the prior written consent of Z-Firm LLC, not to be unreasonably withheld. 11.6. Contact Information. Should you have any questions concerning this Agreement or need to provide notice to Z-Firm LLC, write to Z-Firm LLC, 120 Lakeside Ave, Suite 101, Seattle, Washington 98122, U.S.A. 11.7 Feedback. Any comments or materials sent to Z-Firm LLC including, without limitation, feedback data, such as questions, comments, suggestions, or the like regarding the Software (collectively "Feedback"), shall be deemed to be non-confidential and non-proprietary. Z-Firm shall have no obligation of any kind with respect to such Feedback and shall be free to reproduce, use, disclose, exhibit, display, transform, create derivative works and distribute the Feedback to others without limitation. Further, Z-Firm shall be free to use any ideas, concepts, know-how or techniques contained in such Feedback for any purpose whatsoever, including but not limited to 13 OmniRush Administration & User Manual developing, manufacturing and marketing products incorporating such Feedback. Upon transmission of Feedback to Z-Firm, whether verbally, by telephone, email, newsgroup post, or via any other medum, Customer explicitly transfers all intellectual property rights related to such Feedback to Z-Firm. ** PART TWO ** PROHIBITED USES OF SOFTWARE AND SERVICES: 'Service' and 'Services' mean internet fax service providers, voice messaging providers, and other parties that may act as ASP's or delivery agents for Software. The Software and related Services (internet fax, voice, etc.) may only be used for lawful purposes. Customer is expressly prohibited from using the Software or related Services to transmit any unlawful, harmful, threatening, abusive, libelous, vulgar, obscene, profane, hateful, or otherwise objectionable information of any kind, including, but not limited to, encouraging conduct that would constitute a criminal offense, infringe third party rights, give rise to civil liability or otherwise violate any local, state, national or other law. Customer may not use the Software or related Services to upload, post, reproduce or distribute, in any way, any information, software or other material protected by copyright or any other intellectual property right without first obtaining the permission of such right holder. Customer will comply with all applicable laws, regulations or conventions, including, without limitation, the provisions of the Telephone Consumer Protection Act, those related to data privacy, international communications and exportation of technical or personal data. THIRD PARTY TECHNOLOGY USED UNDER LICENSE: Certain components of this Software are provided to you under license. Copyrights and acknowledgements are found in the Software help file. { $Revision: #8 $ } { $Date: 2006/04/11 $ } { $Archive: /OmniRush V1/Documentation/EU Documents/license/license.txt $ } Introduction -- Product & Concepts Greetings Thank you for choosing OmniRush -- Z-Firm's premier automation server. OmniRush is designed to automate your office and business operations in new ways. Z-Firm's goal is simple: Make the computer do the work. We hope you have as much fun using OmniRush as we did making it, and we look forward to working with you. The Z-Firm Team Why OmniRush Office Automation: The Old (bad) Way In the old days, your fax, mail merge, shipping, and email applications stood alone. Some limited integration was available, but few if any of the applications really worked together to make using a 14 Administrator's Guide computer fun or easy. Too often, we find ourselves cutting and pasting, and referring to multiple applications to deal with a single customer or transaction. Multiple applications, little or poor integration. What a drag! The OmniRush Way: OmniRush sees things differently. First, OmniRush puts the functionality on a server PC, so your workstation does not have to do all the work. This lets you stick to your job, while a PC in the corner does all the crunching. It also means that OmniRush services can be rolled out to the entire network without installing software on every PC. Second, OmniRush puts your database or CRM solution in the center of your computing universe for everything you do. Easily trigger the things you need done inside your database or CRM system, and keep track of everything from the CRM system. You get more done each day, and the whole team using the database/CRM system knows what was done, when, etc. Third, OmniRush gives you a single platform to automate your business. Shipping, faxing, printing, and advanced capabilities are all there, in one easy-to-administer system. Fourth, OmniRush is easy to customize, using Z-Firm's unique, template-driven approach to automating your office. Fifth, you can drive OmniRush from your in house, custom applications. Your custom applications can drive OmniRush using the OmniRush Open Database Connector, ActiveX control, or other API technologies. Automating your business is ours. Ergo, OmniRush. OmniRush Product History OmniRush is the result of many man-years of software development, and is best understood in the context of the products OmniRush evolved from. (FaxRush users can cut directly to the chase by reviewing the 'How OmniRush Compares to FaxRush' section.) In 1995 Z-Firm shipped the WhiteGold product. This client-side product offered unprecedented power to merge GoldMine data from all GoldMine tables into MS Word and WordPerfect templates. The templates were easy to make and customize in the word processor, and offered extensive formatting options. In 1996, FaxRush 1.0 shipped. While named FaxRush, it could fax and print. FaxRush took the WhiteGold merging capabilities and moved them to a server PC; allowing workgroup use, hardware scaling, and ease of use. FaxRush evolved over four years, adding features such as: Support for SalesLogix, GoldMine on MSSQL and Oracle, and other database platforms Internet Fax RightFAX Connector Multi-printer, network print merge Mailing label merge to impact, thermal, and laser printers FedEx shipping server module 15 OmniRush Administration & User Manual Advanced integration with CRM applications to leverage processes In addition to this, Z-Firm introduced the CashRush product in 1999, offering credit card processing and order entry. A new architecture was needed to pull all these services under one open architecture that could grow into new services, CRM systems, and databases. Further, FaxRush had outgrown the 'Fax' part of its name early on, being used heavily as a print merge server. OmniRush is the culmination of many man-years of work to offer a single, integrated, server platform for office automation. Concepts System Components The OmniRush Server is actually comprised of several components: The OmniRush Server OmniRush Client Utilities, such as the OmniRush Administrator (installation optional) CRM Software (optional, not included) that OmniRush integrates with Installing the OmniRush Server installs the Administrator automatically, so a single installation on the PC may be all a site needs. The Administrator can optionally be installed on other PC's to remotely administer the OmniRush Server. The Client Utilities includes the Print to Job Client, and the Fax Viewer. These applications are for supported CRM system users only (GoldMine & SalesLogix). Server Overview The OmniRush Server runs on a single PC and handles job processing. The server is actually made of several components: Z-Firm Database Engine. This client/server database is the core of the OmniRush server. An OmniRush installation will only have a single Database Engine, even if the OmniRush Server is clustered across several PC's. Running as an NT Service, the Database Engine should never be stopped while modules are running. OmniRush Launcher Module. This is the master coordinator and dispatcher for the OmniRush Server. Running as an NT Service, the Launcher should always be running, even if all modules are shut down. In an OmniRush Cluster, each cluster member PC will have its own launcher. Modules. Each OmniRush service (e.g. hardware fax, email merge, printing, etc.) and connector (e.g. connector for SalesLogix) is a Module, and runs as its own application process or NT Service. The OmniRush Administrator application handles all service creation, configuration, monitoring, and management. The OmniRush Administrator can run on the OmniRush Server PC, or on a network client PC that has the OmniRush Client Utilities installed. 16 Administrator's Guide Server Modules The OmniRush Server is composed of several Modules. Each major service (e.g. connecting to a CRM system, the fax server module, etc.) is a Module in OmniRush-speak. Most OmniRush servers have multiple modules (three to ten Modules is average). Modules run as invisible applications or as NT services on the OmniRush server. These services are started and stopped using the OmniRush Administrator. (In some cases, it may be necessary to run OmniRush as an Application.) Each module has different hardware and supporting software requirements. For example, a GoldMine connector module requires that GoldMine be installed and operational on the OmniRush Server PC. The Internet Fax Module requires internet connectivity. Other than the hardware fax and UPS shipping Modules, most modules have no hardware requirements, but always check this documentation before installing a new module. 17 OmniRush Administration & User Manual Users & Groups Note: OmniRush users and groups are maintained automatically by OmniRush. Manual administration is optional. OmniRush has a built in users and groups administration system. This system is to allow document management rights. The OmniRush internal document store can be set up to restrict access to documents and folders by user or by group. For example, documents in the Sales folder might be accessible to all users to send, but can only be edited by an administrative user. This allows central control of the document library. Tracks Tracks define the behavior of a job. A job is submitted to a track, the track then feeds the job to the appropriate module. Tracks have several attributes, for example: Track Host Reference (how the job is tagged in SQL or CRM database to identify it as an OmniRush job) Track Type (print, fax, email, etc.) Specific Settings. E.g. for a print job, the track defines the printer the job will be printed on. For a fax job, the track defines what fax hardware will be used for the job (e.g. a specific Brooktrout port, internet fax, etc.). Jobs are submitted to tracks, and are managed via the track administration screen (not the module). Several tracks may feed a single Server Module, or only a single track may feed a given Server Module. A module must have a track in order to feed it jobs. In the context of CRM integration, the track's role can be pictured as follows: 18 Administrator's Guide Track Host Reference The Host Reference refers to how records in the CRM system are identified as OmniRush jobs. Every track has a Host Reference setting: In SalesLogix, the Activity.Category field maps to the host reference, as shown in this screen shot: 19 OmniRush Administration & User Manual In GoldMine, the Host Reference maps to the GoldMine Cal.Userid field. To schedule jobs in GoldMine, GoldMine must have additional 'users' configured. (Note that GoldMine uses concurrent usage licensing, so there is no adverse effect of adding users.) 20 Administrator's Guide Merge Documents Word Documents A powerful feature of OmniRush is to allow Microsoft Word documents to be merged server side, and then printed, faxed, or emailed. A single document library can then be used for all forms of communication, simplifying content management. Important features of OmniRush merging: 1. 2. 3. 4. 5. 6. 7. 8. 9. 10. Merge any data in the database Merge based on custom SQL queries Merge based on custom stored procedures One-to-many merging Multi-row merging Merge multiple queries/stored procedures into a single document Dynamically merge graphics (signature graphics, photos, product graphics, etc.) Dynamically merge multiple documents into one based on database fields Dynamically build compound documents from OLE datasources driven by database fields VBA document processing prior to document delivery Merged documents can then be: 1. Faxed 2. Printed to any network printer 21 OmniRush Administration & User Manual 3. Sent as an email attachment 4. Converted to PDF and sent as an email attachment 5. Saved to disk Merge document templates made in Word are the only 'single source' document template type available. A single library of merge templates made in Word can be used for fax, print, and email. HTML Documents OmniRush provides powerful HTML merging for email communication. OmniRush allows any HTML authoring tool (e.g. FrontPage, DreamWeaver, etc.) to be used, and includes support for advanced features like SSI (Server Side Includes). HTML documents can merge data from the database, including: 1. 2. 3. 4. 5. 6. 7. Merge any data in the database Merge based on custom SQL queries Merge based on custom stored procedures One-to-many merging Multi-row merging Merge multiple queries/stored procedures into a single document Dynamically link to graphics based on database fields (e.g. signature graphics, photos, product graphics, etc.) 8. Dynamically merge multiple documents into one based on database fields using SSI 9. Merge database fields into HTML links and tags, for dynamic REMOVE links and more. HTML merge documents are useful only for OmniRush email messages. OmniRush can put the merged HTML into the email body, or attach the merged html as a file attachment on the email. PDF Support OmniRush has an optional PDF module, which enables several features (depending on which 'Rush is in use): 1. FaxRush: Use PDF files in the FaxRush fax library. FaxRush automatically converts the PDF format for faxing. 2. FaxRush: Save received faxes as PDF 3. FaxRush: Email received faxes as PDF attachments 4. EmailRush: Merge Word documents, convert to PDF, then email the PDF as an email attached file 5. EmailRush: Print-to-email is sent as PDF (using the Universal Client, without the PDF module they are sent as TIF) 6. ShipRush Server: Shipping label conversion to PDF Document Management Document Management OmniRush has an advanced document management system, ODMS (OmniRush Document Management System). Before we describe the system further, it is important to note that use of the OmniRush document management system is optional. 22 Administrator's Guide The sections that follow explain how ODMS evolved, what the advantages are of ODMS, and how to use ODMS. Why Manage Documents Document management is a key piece of CRM. The point of CRM is to centralize and standardize the information maintained on customers and prospects. CRM also tracks communication and contact with customers. However, what is sent out to prospects and customers is just as crucial. Allowing each user to have his own set of merge documents on a local hard drive does not let a company give a standard presentation to the customer. A core principle of OmniRush is that documents should be managed by a 'document manager.' This role is responsible for maintaining the library of documents available to CRM users. While this role can be delegated to multiple people, it is a crucial concept for OmniRush. In many cases, the document manager is simply receiving material (PDF files, Word files, etc.) from others, and putting it into the OmniRush system. In other cases, the document manager is converting static Word files into OmniRush merge files, adding merge codes, etc. and then adding to OmniRush. In any event, be clear how your company will manage the OmniRush document library. With the OmniRush Universal Client, users can print-to-fax and print-to-email from any application. So ad-hoc documents are fully supported. OmniRush supports any mix of centralized vs. ad hoc operation. (Some sites are only central, some are only ad hoc, and many are a mix of each.) History of Z-Firm Document Management To best understand ODMS, a quick overview of FaxRush v4 document handling is appropriate. In FaxRush v4, all files were kept on the file system, typically in the \outfax\ directory. A file would be scheduled in one of the following ways: Document scheduled to FaxRush file.rtf or file.tif (no path, just a file name) \\server\share\dir\file.rtf (full path specified) Action taken by FaxRush FaxRush would look in the user's private directory, then in \outfax\. If not found in either place, the job will fail because document cannot be found. FaxRush tries to get \\server\share\dir\file.rtf If it succeeds, the job goes, if the file does not exist or cannot be accessed, the job fails. This system has the benefit of being simple, easy to understand, and easy to use. However, over time, the \outfax\ directory gets extremely cluttered. Also, while it is easy to centralize document administration, it is not easy to distribute document administration across several people without required heavy use of FRP files. The system described here is still supported by OmniRush. Files in the file system are referred to as external files (internal files are those managed by ODMS). The \outfax\ directory is now referred to as the Default Document Import Folder. (In other words, \outfax\ is the default place to look for files when no path is specified, and the document has not been tagged as an internal file [to specify an internal file, use a leading '/' e.g. '/test.tif']) OmniRush does not automatically create the Document Import Folder (FaxRush did). The OmniRush installer prompts for this directory, and it can be set to any valid folder at installation time. It can be changed later if needed. 23 OmniRush Administration & User Manual Document Management Options OmniRush users have three options for the document library: Use External Documents. What this really means is that the master copies of documents (e.g. the files you edit and change) will be on the file system, not in ODMS. Compatible with FaxRush v4, simply set the Document Import folder to the FaxRush \outfax\ directory (or any valid directory, local or network). Files scheduled without paths will be pulled from the Document Import Folder. Files with paths specified will be accessed from that path. (Note, if drive letters are used in the paths, please see the technical document on the subject.) Use Internal Documents. This means that the master copies of documents (the files you edit and change) will be in ODMS. External files can be imported (automatically or manually) into ODMS. When files are imported into ODMS, the external file is flagged read-only by OmniRush to prevent them from being accidentally edited (with the resulting confusion that would lead to, when the internal, unedited, document is then sent by OmniRush). Documents need to be imported into the ODMS to be scheduled. Documents can be imported manually (with the Import option in the Administrator, or by dragging into Administrator from Explorer). Documents can also be automatically imported by putting them into the Document Import Folder. When a document is scheduled without a directory (e.g. just a file name), OmniRush first tries to find the document internally. If not found, OmniRush will check the Document Import Folder, and will automatically import the document if it is found there. The external file will be marked read-only to prevent accidental editing. Use Both Internal and External. This requires a good awareness of how OmniRush handles documents, but can be done by an experienced administrator. Benefit of External Documents: Easy to use Reduced need to use the OmniRush Administrator Use file system (network) rights to control who can edit documents Use FRP/ZPK files to build kits of documents. Benefits of Internal Documents: 24 Central repository for OmniRush documents Easier to organize documents into a document tree (a document can be deep in the tree, but scheduled just by file name without path) Folders can be moved or renamed, and documents will still be accessible by document name Can reference files by their ID, which allows documents to be renamed, moved, etc. and the reference does not change Integrated rights administration, no need to be a network administrator Ability to make document links, so that a single file can appear in multiple folders Ability to schedule entire folders of files Integrated check-out/check-in functions Integrated document viewing and editing. Administrator's Guide What is Managed Many types of job, e.g. print, fax, email, etc. involve the use of documents. These documents may be static documents (no data is merged), or merge documents created in Microsoft Word. OmniRush offers a tree view mechanism that allows documents to be centrally stored in an organized, hierarchical way. User rights can be assigned to allow certain users to edit documents, and others only to view, or only to use the documents. Further, ODMS provides for check-out/check-in to control editing documents, and allow users to view the latest versions of documents if another user is editing. Other job types, e.g. FedEx and UPS shipping, require template files. Templates can also be stored in ODMS. ODMS: Rights Management Concepts The OmniRush Document Management System has integrated security. This allows document administration tasks to be delegated and controlled, and allows portions of the document library to be restricted to specific users. To administer rights, navigate to a branch in the Documents tree, right-click, and select Manage Rights. The screen below appears. On the left, select the Group that will have rights granted or revoked. On the right, select the document folder being managed Check or uncheck the Rights check boxes. 25 OmniRush Administration & User Manual Users must have Read rights to a folder to see that the folder exists, and to schedule documents from the folder. The Update right allows users to edit and rename files. The Insert right allows users to add documents to the folder. The Delete right allows users to remove documents from the folder. CRM Integration Integration with Customer Relationship Management (CRM) systems is built in to OmniRush. There are two sides to the CRM integration picture: Server Side Integration (SSI): SSI is implemented in the form of a database connector module. This allows CRM users to trigger OmniRush jobs inside the CRM system. Client Side Integration (CSI): CSI is implemented in one or more client utilities that are installed on user PC's. These utilities, which are optional, allow users to manage received faxes, do printto-fax, and other functions. OmniRush' CSI utilities integrate with the CRM software that runs on the user PC. The current CSI utilities are: Viewer. Manages received faxes Print-to-Fax Client. For print-to-fax and print-to-email Understanding Shipping Shipping with OmniRush Quick Links: How Shipping is Really Done with OmniRush Shipping Reference DHL Shipping Requirements & Details FedEx Shipping Requirements & Details UPS Shipping Requirements & Details OmniRush is a very powerful shipping server for DHL®, FedEx®, and UPS® shipping. It is easy to set up, and allows shipping to be completely integrated into supported CRM systems (GoldMine, SalesLogix, Microsoft CRM), or most any SQL database (including Microsoft SQL Server, Oracle, MySQL, Pervasive, etc.) database. OmniRush uses a unique template approach to shipping. A template (extension ZPK or FRP) contains the description of the shipment (e.g. shipping service, package weight, declared value, etc.). To ship, you simply trigger the template. OmniRush does the rest, and puts the tracking number and other details in your CRM or SQL database for easy reference later. OmniRush can also automatically send the shipment details to the recipient, via email, fax, or even by voice call using text to speech. 26 Administrator's Guide Each shipment can have reference text that prints on the shipping label. This might be an order/invoice number, or instructions to the shipping room (e.g. PSU # 343, or Widget Demo Kit B). Since this prints on the label, the shipping staff know what to send. Shipping with OmniRush is easy, integrated, and fun. But remember, this is template-driven shipping. While it is easy to set things like package weight and insurance value job by job, make sure that the template approach is right for you. If you need a full shipping GUI, ShipRush® may be what you need. (More information about ShipRush is at www.zfirm.com) Note: This table refers to the end-user (pre-integrated) versions of ShipRush. The ShipRush SDK is a set of shipping tools for developers, and offers a large range of developer-oriented features that are beyond the scope of this documentation. The differences between the OmniRush (server) and ShipRush (desktop) approaches to shipping: Function or Feature Process simple one-piece shipments to individual recipients ShipRush Server Approach (OmniRush) Can be onebutton easy within CRM or custom app. Can be 'schedule action' easy within CRM or custom app Can be driven by Processes or triggers in CRM or custom app. Works with GUI and browser based apps ShipRush Desktop Approach (interactive ShipRush) ShipRush UI is invoked for each shipment. Notes User clicks through the ShipRush UI for each shipment All shipment settings can be tweaked shipment-byshipment. ShipRush must be installed at each desktop that will ship. Most shipment settings are held in shipping template. Simple one-piece shipments to masses of No shipping software needed on user desktops--just the CRM or custom app. A perfect fit. Can run batches of any size without user Requires user interaction, shipment by shipment. This need is served either by ShipRush Server or the 27 OmniRush Administration & User Manual recipients Process MultiPiece-Shipments interaction. Appropriate only for FedEx Express and DHL MPS shipments. International shipping Out of Box Integrations For MPS using UPS, use the ShipRush SDK. FedEx shipping to, from, and within Canada ShipRush Server is available with ready-to-go integrations for popular CRM systems. Open SQL version can be used by developers to integrate with database centric applications based on Microsoft SQL Server, Oracle, Pervasive, MySQL and other platforms. ShipRush SDK (requires custom code on the part of the user). Full MPS support for UPS shipping FedEx MPS pending in next version of ShipRush for FedEx Full international support for UPS shipping ShipRush Desktop is available with ready-to-go integrations for a number of CRM, accounting, and POS applications. The ShipRush SDK can be used to integrate ShipRush into most desktop and server applications. The Indicators of Ad Hoc Shipping (e.g. a candidate for ShipRush desktop): Easy install required, no planning resources available or Full shipping GUI required, shipment by shipment or Deployment required at the workgroup or desktop level. No IT or central resources available for a ShipRush Server installation. The Symptoms of Template Driven Shipping (e.g. a candidate for ShipRush Server): 28 Between 15 and 1000 shipments a week (or more) Shipping identical shipments to entire groups of contacts in the CRM system One click shipping is desired Automated process/Workflow or Trigger based shipping is desired Remote users using Citrix, Web or PDA clients need to ship Toolbar/macro button user Administrator's Guide Custom SQL application in use If you have any questions on this, please contact Z-Firm sales, or Z-Firm advanced consulting. Z-Firm can solve nearly any shipping need. Next, how shipping is really done with OmniRush. Shipping - Introduction Quick Links: Understanding Shipping with OmniRush -- The Big Picture Contents: Creating the Shipment What OmniRush Does Tracking and Managing the Shipment Creating the Shipment It is easy to ship using a CRM system or SQL database. The job could be as simple as this: Track: UPS Reference: UGN.ZPK WGT:5 VAL:1000 // Sample Widget Kit This example will use the UGN.ZPK template (what we did here was take the UPS_GND_BOX_1LB.ZPK template that comes with OmniRush and rename it to UGN.ZPK to make it short). The shipment weight is set to 5 pounds and the declared value is $1000. These two values are overriding the weight and value set in the template. The shipment reference is 'Sample Widget Kit.' This reference will print on the shipping label, and will also be in the shipment history record. The shipment reference will be the billing reference for FedEx shipments, and prints on the label on all carriers. This shipment can be easily triggered from a macro button, toolbar, Automated Process, or DDE/DLL/VBA code that interfaces with the contact manager. The examples below show how to schedule this shipment interactively, but note that the CAL/ACTIVITY record is what is important. It is not important how that record is created. The scheduling dialogs below are for illustrative purposes. In GoldMine, that might look like this: 29 OmniRush Administration & User Manual In SalesLogix, it could look like this: 30 Administrator's Guide In Microsoft CRM v1.x, it could look like this: 31 OmniRush Administration & User Manual From an Open SQL System, creating a shipment looks like this: exec zfCreateJob '12', 'C1', '/ground_box.zpk WGT:23 VAL:200 // sample widget', 'ADMIN', 'UPS', '' This creates a record in the OR_Jobs table that will trigger a UPS shipment. The stored procedure 'zfCreateJob' is part of the sample Microsoft SQL database, and it simply creates a record in OR_Jobs with these values: OR_Jobs column JobID Value from the example Explanation 12 ContactID C1 Reference /ground_box.zpk WGT:23 VAL:200 // sample widget UserLastBy ADMIN In the simple example database, the OR_Jobs.JobID is not a unique counter or value, so it is the responsibility of the programmer to insert a unique ID to the job. This is the ContactID of a recipient contact in the OR_Contacts table This is the shipping template, with flags to set the the shipment weight, declared value, and shipment reference This is the 'from' information for 32 Administrator's Guide TrackRef UPS the job. Not really relevant for a shipment job. This sets the OmniRush track that will service the job. What OmniRush Does OmniRush takes the template, applies the overrides (in this case, weight and value), and merges in the contact data from the database. It then: Prints the bar coded shipping label Optionally sends a notification to the recipient that a shipment is on the way, including the tracking number (if the shipping track is configured to do so) Logs the shipment to history (see below) Tracking and Managing the Shipment The history record has the complete details of the shipment. Here is a typical history record notes block: --== OMNIRUSH RESULT ==-Reference : Client: CSC/Peak Sales TruFax PCI (/ugn.zpk WGT:2) To track your UPS shipment, please browse to the following URL: http://wwwapps.ups.com/etracking/tracking.cgi?tracknum=1Z999999034 1000670 Ship UPS Ground Tracking #: 1Z9999990341000670 Courtesy estimate of charges: $4.09 UPS transaction successful, label printed on LPT1 --===== USER NOTES =====-This allows easy tracking of the shipment. The ShipRush UPS module also prints a shipping manifest each day with a list of all the shipments for the day. (This list is also saved to a txt file.). Reporting can be done by running a report on the CRM/SQL database. The shipping communication sent to the recipient is configured in the shipping track. The message is completely customizable, and can include the shipment tracking number and tracking URL. The communication can be sent by email, fax, or even text to speech voice. On Open SQL systems, the tracking number and charges are posted to discrete history columns in the history table. Hint: Most templates can operate as COD templates just by using the COD override tag. In most cases, the template does not need to be created initially as a COD template. Next, the shipping feature matrix. Understanding Email EmailRush The best way to understand EmailRush may be to compare it with other ways of sending email. 33 OmniRush Administration & User Manual For starters, remember that EmailRush is a database-driven system. The way to send an email is to create a 'job' record in the CRM / SQL database (e.g. a CAL record in GoldMine, and Activity record in MSCRM and SalesLogix, an OR_Jobs record in open SQL). Create one job record per email. To send 10,000 emails, create 10,000 records. Note that EmailRush is not meant to replace existing mail systems. In all events, existing systems for mail receiving are not affected by EmailRush, as EmailRush is for outbound email only. EmailRush acts as a complement to existing mail systems. Feature Built in relay server reduces bounced emails 50-70% Most bad email addresses result in the email job failing right on the CRM / SQL record, making database maintenance and reporting quick and easy. No impact on existing SMPT relay servers. Avoid swamping existing Exchange servers by sending mail directly to recipients. Merge any data into HTML, PDF and text bodies based on powerful custom merge features. Merge multirow lists, even multiple multirow lists from anywhere in the CRM / SQL database Use any HTML creator or editor to author HTML 34 EmailRush Outlook GoldMine Email Yes No No Other Mail Systems No Yes No No No Yes No No No Yes No No No Yes No No No Yes No No Varies Administrator's Guide email Auto-extract text from email so that text-only mail readers receive useable message when the email has an HTML body Merge templates made in Microsoft Word, convert to PDF and email merged PDF Use single template library made in Microsoft Word for mergeemail, mergeprint and merge-fax 100% Server side processing. Client workstation can be turned off or used for other things while mail is going out. Actual email send status visible in CRM / SQL system. When it says 'sent' it is really already 'received' One-button email merge Flexible document packages (multiple attachments and email body as a single kit) Yes No No Varies Yes (requires PDF option) No No Unknown Yes No No No Yes No No No Yes No No No Yes (best with OmniRush Toolbar, included with EmailRush) Yes No No No No No No 35 OmniRush Administration & User Manual Server-SideInclude like feature for sophisticated HTML formatting and management Secure Signature on sent email Merge custom, conditional text based on data in the database (e.g. "Thank you for being an active customer!" vs "We look forward to doing business with you soon." Yes No No No Yes Yes Yes Varies Yes No No No The OmniRush email server can either pass email to another SMTP relay to forward mail, or it can act as an SMTP relay server itself. When acting as an SMTP relay, OmniRush will detect and fail most email messages that would normally fail downstream and 'bounce.' When OmniRush detects the failure, the email job fails, and you can then take action on the bad email address in a mass or automated way. Email Body Options OmniRush can put one or more of three things into the body of the email: a) Job notes (text) b) Text files (.txt) that are sent as job documents c) HTML that is scheduled as a job document (.htm). HTML email can merge database fields into the body of the email. d) Multi-part email bodies that have both a text and html section. The text section can be autoderived from the HTML or set explicitly as a .txt file. Any of the above formats can include merged data. Text bodies can be merged using the OmniRush Extended Package feature. HTML can be merged with or without the use of Extended Packages, and is particularly powerful. HTML merging in OmniRush offers completely customizable database merging, including one-to-many, and can merge multiple database queries and stored procedures into the body of a single email message. OmniRush can combine HTML and job notes into an HTML body as well. Email Attachment Options 36 Administrator's Guide Virtually any file sent as a job document can be emailed as an email attachment. Some file types can have special treatment: RTF files made with MS Word can have database information merged into them, and then be emailed as attachments. If OmniRush is equipped with the optional PDF module, RTF and TIF attachments can be automatically converted to PDF and then sent as attached documents. This is particularly powerful with RTF merge forms, as they are: 1. Merged 2. Converted to PDF 3. Emailed as an attachment All other file types are attached without modification by OmniRush. See also: RTF to PDF Merging PDF Conversion Options PDF Support Page Oriented vs. HTML Merge Forms Merge Documents Print-to-Email The OmniRush Universal Client allows print-to-fax and print-to-email from any Windows application. Print-to-email sends a picture of the print out to the recipient. The picture is a TIF file that is attached to the email message. If OmniRush is equipped with the optional PDF module, this TIF attachment can be automatically converted to PDF by OmniRush. So the recipient receives a PDF file attachment. Print-to-email is particularly useful for accounting applications (to email invoices and statements), and to send a picture of a document (e.g. a proposal or quote) as it stands now. The document can then be edited and sent again. Direct Inward Dial (DID) DID lets you assign each user an individual fax number. Faxes sent to this number are emailed or forwarded directly to the user. Each individual fax number can be handled differently. For example, some numbers could be forwarded by email to a user, and another number could autoprint on a laser printer. See the reference document on DID for more information. OmniRush Server Clustering OmniRush is often used in high-volume marketing situations. To allow performance to scale, OmniRush takes advantage of the following performance techniques: 37 OmniRush Administration & User Manual Multi-Threaded Architecture. OmniRush is multi-threaded, and benefits from multiple CPU's and additional RAM on a single PC. Clustering. OmniRush allows multiple PC's to work together as a server cluster. A cluster of PC's can spread the work load across multiple PC's to increase throughput. In todays era of low cost PC's, three or four low-cost systems with 128 or 256MB or RAM each can deliver incredible throughput at a very low cost. Whenever a new OmniRush Module is created, you are prompted which OmniRush Server PC you want to install on. In a single Server PC installation, only one PC will be listed. Clustering requires an appropriate cluster license from Z-Firm. How OmniRush is Licensed OmniRush is licensed based on: --Features licensed (e.g. number of fax lines, number of shipper accounts, PDF features, etc.) --Type of database being serviced (CRM System type, CRM user count, SQL system type, etc.) --Number of databases being serviced --Number of Server Cluster Members --Optional features OmniRush is licensed by function: 38 FaxRush is the full featured fax server for CRM and SQL systems. The base FaxRush system includes: Support for up to two hardware fax ports (two phone lines) Internet fax support RightFax bridge support Three fax tracks One database connector The OmniRush Universal Client for print-to-fax One print track for auto-printing received faxes One email track for emailing out received faxes ShipRush Server is the shipping server for CRM and SQL systems. The base ShipRush Server license includes: Supports one shipper account on one carrier (additional carriers/accounts are add ons to the base system) One email track for emailing out shipment notifications One database connector The OmniRush Universal Client for a simple shipping GUI Notes: ShipRush Server is for USA users only ShipRush Server is licensed on an annual subscription basis. EmailRush is the most powerful email merge server for CRM and SQL systems. The base EmailRush license includes: Three email tracks One database connector The OmniRush Universal Client for print-to-email CashRush is the credit card processing system for CRM and SQL systems. The base CashRush license includes: Administrator's Guide One email track for emailing out receipts One database connector One credit card processing track The OmniRush Universal Client for a simple credit card GUI Notes: CashRush is for USA users only CashRush is licensed on an annual subscription basis. PrintRush is the server based merge printing system for CRM and SQL systems. The base PrintRush license includes: Five print tracks One database connector Each model allows connection to one database of the type specified at time of purchase. Additional features, database connectors, etc. can be licensed at the time of purchase or later. Popular options include the PDF module, additional database connectors, and additional tracks. Each model includes a given number of tracks for each job type. If you have any questions on what is included, please refer to the price list or contact Z-Firm Sales. OmniRush detects the CRM system in use and must be licensed for the CRM system type and the CRM system user count: ACT!: In Help | About, go into the Database Info area to see how many users the ACT! system is licensed for. GoldMine: Go into Help | About and check the GoldMine serial number. This shows the number of users in the second or third section. SalesLogix: OmniRush is licensed based on the total number of configured, active login ID's in SalesLogix. (Note that this will include SalesLogix users of both types "per configured" and "concurrent") Microsoft CRM: OmniRush is licensed based on the total number of configured, active login ID's in MSCRM. Many OmniRush licenses are subscription based. This allows for all updates and upgrades to OmniRush at no extra charge during the subscription period. Contact your reseller or Z-Firm sales at (206) 812-7874 for licensing details. How OmniRush Compares to FaxRush v4 What is 'Old' in OmniRush A long-time FaxRush v4 user, seeing FaxRush v7 for the first time, said 'Looks complex!' Compared to version 4, FaxRush v8 is more complex--it also has hundreds of additional features. Many sites refer to FaxRush v4 as a member of their team. Version 8 is meant to double your team. If you just want the latest version of your Good Old FaxRush, version 7 can do that. Here is a partial list of 'what is old' in FaxRush v8. Just schedule fax and print jobs in GoldMine or SalesLogix. Even use the same merge files you used with version 4! 39 OmniRush Administration & User Manual The whole FaxRush 'virtual secretary' model is kept and is consistent. SQL Users: Import custom merge aliases from the version 4 FRQALIAS.DBF into version 8. Configure version 8 to use your existing \outfax\ directory, including all the files there. Use the new OmniRush Print-to-Fax Client that is integrated with GoldMine (and now SalesLogix too!) View and link inbound faxes electronically to GoldMine contacts (and now for SalesLogix too!) How OmniRush Compares to FaxRush v4 This is a partial list that focuses on highlights and 'big' changes.. The full list of new features and enhancements runs to hundreds of items. OmniRush Server runs on Win2k, Server and Professional editions, WindowsXP, and Windows 2003. The OmniRush Client & Viewer are supported on Win2K/Terminal Server/XP/2003. OmniRush Server can as an NT Service, (and can also run as an application). Critical server errors are logged to the OmniRush log and to the NT Event Log (in the Application section). OmniRush supports Brooktrout hardware and Internet fax, including the latest PCI products from Brooktrout. Server can now be configured and managed (stopped, started, queried, etc.) from any PC on the network. Complete support for SalesLogix, including print-to-fax client, and inbound Viewer/Linker Server now can maintain the \outfax\ files in an \outfax\ directory or internally, in OmniRush' own document database (ODMS, the OmniRush Document Management System) Internet fax now can schedule back failed jobs, and is configurable for the same user experience as hardware fax (the default configuration is that hardware and internet jobs schedule back fails and complete successes) Tons of new PDF features. OmniRush Server can now support 40 Multiple GoldMine or SalesLogix systems from a single server (requires additional software license) Multiple GoldMine dBase contact databases (requires additional software license) Concurrent service of Goldmine and SalesLogix (requires additional software license) All-new Print-to-Fax and Viewer client applications Administrator's Guide Print to Fax for GoldMine & SalesLogix Print-to-Email for GoldMine & SalesLogix New Viewer offers Folder Management Client allows navigating to a contact other than the current contact New print-to-TIF rasterizer Print to file on file system Print to folder in ODMS The FaxRush configuration files: FAXRUSH.INI, FRPRIVAT.INI, F4INBND.DBF, FRQALIAS.DBF, F4DEVICE.DBF, ZADMIN.EXE have moved into a centrally manageable configuration center (the OmniRush Administrator), and are now held in the Z-Firm DBEngine (part of OmniRush). FRQALIAS files can be easily imported into OmniRush. There is a new, easy to use, maintenance utility for the OmniRush database. Word2000, WordXP and Word2003 are supported on the OmniRush Server. GoldMine no longer runs as a DDE Server on the OmniRush Server. Updated Z-Firm Driver for Brooktrout Support for new Brooktrout boards including the new PCI TruFax card.(see section on Supported Brooktrout hardware) Some Override Codes have changed, see special section on the topic. Expanded, electronic documentation, available as a help file with the product, and on line at www.zfirm.com. OmniRush should maintain organized and centralized documentation as the product (and documentation) grows. Existing 'old' FaxRush modules are greatly expanded in OmniRush. For example, the hardware fax module can send network alerts to multiple users on received faxes, and can even forward received faxes via email. Many, many new features and modules Backward Compatibility In GoldMine and SalesLogix environments, the FaxRush v4 Server can stay in service and run concurrently with OmniRush if OmniRush is installed onto its own PC (discussion here). OmniRush is compatible with FaxRush v4: RTF merge forms. TIF files. v4 Print to Fax Client for GoldMine v4 Rasterizer utility Remote Sync utility (mscheduler) \outfax\ directory and logic FRP files OmniRush installs with the same extended merge aliases as v4. Documents built with stock FaxRush v4 merge macros and aliases should run unmodified with OmniRush. 41 OmniRush Administration & User Manual Custom merge aliases made in v4 can be brought into OmniRush either by manually cutting and pasting in the SQL or with a one time alias import via the OmniRush Admin application. OmniRush is compatible with all Brooktrout models supported by FaxRush v4.x GoldMine and SalesLogix Processes configured for FaxRush can also work with OmniRush SalesMagic and other toolbar systems made to drive FaxRush can also drive OmniRush Incompatibilities OmniRush includes a completely re-written Viewer. The FaxRush v4 Viewer is not aware of, and cannot manage, the OmniRush received fax queue. The v4 Viewer can be preserved, and remain associated with TIF files if desired, or the Wang (Kodak in Windows2000) Imaging (part of Windows) can be associated with TIF files, or the new OmniRush Viewer can be associated with TIF files. The Release 1 OmniRush Print-to-Fax Client for GoldMine does not integrate with the GoldMine Fax Button or Merge Template FaxRush option. The PDF support in Release 1 of OmniRush does not support PostScript files. Fax modems are not supported in OmniRush v5, Release 1. (The new, lower-cost TruFax offers more reliable faxing than any faxmodem can.) The OmniRush Server cannot run on Win9x. FedEx Module for FaxRush v4 FRP files are not compatible with OmniRush. New FRP files are installed when OmniRush is installed. ShipRush v1.0-generated FRP files for FedEx shipping cannot be used by OmniRush. A new utility (included with OmniRush) is used to create FedEx FRP templates for OmniRush. There are several new implications of OmniRush in relation to FaxRush v4.x: 42 The OmniRush Server now has its own built-in, client/server database engine. The OmniRush Server will maintain data (files, templates, and the internal OmniRush database) locally on the OmniRush Server PC. This means that the OmniRush Server PC will need consideration for backup, and will also need free disk space (which it will consume gradually as it is used, so disk space should be monitored periodically). Installing OmniRush on a FaxRush v4 PC will disable FaxRush v4. FaxRush v4 will not be supported by Z-Firm if OmniRush has been installed on the system, even if OmniRush has been removed (using a tool like Ghost to make a restorable image of the v4 system before installing OmniRush is strongly recommended). OmniRush has a new feature: An internal document store. Understanding how this works in relation to the FaxRush v4 \outfax\ directory is crucial. OmniRush can automatically import documents from \outfax\ to the internal document store, but once imported, OmniRush must decide: Which copy will be the master copy (e.g. where will Administrator's Guide document editing be done, from within the OmniRush document store, or in \outfax\?). There is a setting on the Database Connector configuration screen to tell OmniRush where the master files are kept. If the \outfax\ file is set as the master, the automatic import will import the file into the document store, but the document store file will be in a checked out state, and will not allow editing. The \outfax\ file will be checked on every job to detect if it has been updated, and if this is the case, the file will be automatically re-imported to the document store. If the document store is set as the master, the \outfax\ file is pulled into the document store the first time it is used, and the \outfax\ file is flagged as read only on the file system. Changed Override Codes CRM users of FaxRush v4 are accustomed to using override codes on the reference line of the job. These codes can control the behaviors of specific jobs. Some override codes have changed in OmniRush. You can decide either to modify your processes and other tools that drive OmniRush to use the new codes, or you can set OmniRush to use the old codes. The FCC/FRR set of codes has not changed. The codes that have changed are: Old Code FRU: (override FROM user) FRBU: (override schedule back user) New Code OWN: FWD: These codes are viewed and changed in the Module settings for the Database Connector, as shown below: 43 OmniRush Administration & User Manual Components Server Modules CRM Integration CRM Integration Overview The Goal of OmniRush CRM integration is to allow CRM users to create and manage OmniRush jobs from within the CRM system. CRM users use the features built in to the CRM software to create and manage OmniRush jobs. OmniRush connects to the CRM system using a Database Connector module. The Database Connector is configured to log in to the CRM system, and handles all jobs coming from the CRM system and being logged back into the CRM system. Each Database Connector can only connect to a single CRM database. An OmniRush server can have multiple CRM modules to connect to multiple CRM databases concurrently (may require additional OmniRush licenses). The exact method for doing this varies from one CRM system to another. In most cases, OmniRush works as a virtual secretary. Consider how a typical CRM system allows you to delegate an activity to another member of your sales team: a. Go to the customer record. b. Schedule an activity (e.g. Schedule | To Do Item). c. On the activity screen: 1. Describe the action to do, e.g. Send Intro Literature Pack 2. Assign the user who is to do the action, e.g. Jim Johnson, Admin Assistant 44 Administrator's Guide 3. Set the date and time for the action to happen on (usually now, but it could be for a day or time in the future) 4. Optionally, type some cover note text on the activity notes field. 5. Done, the task is now on Jim Johnson's list of things to do. OmniRush allows users to take the same steps, but the task (email, print job, mailing label, shipment, fax merge, etc.) is done by the OmniRush server. The OmniRush server will do the job, and record into the CRM system what it did. For example: a. Go to the customer record. b. Schedule an activity (e.g. Schedule | To Do Item). c. On the activity screen: 1. Describe the action to do, e.g. "Lit Pack.frp" (that is a package of documents, such as Word merge documents and PDF files) 2. FAX Assign how the job is to be done by OmniRush. e.g. OR-EMAIL, or OR- 3. Set the date and time for the action to happen on (usually now, but it could be for a day or time in the future) 4. Optionally, type some cover note text on the activity notes field. 5. Done, OmniRush will merge the contact data onto the documents in "Lit Pack.frp" and send the kit via the transmission method selected in step #2. OmniRush will then record the results of what it did into the CRM database. This is an example of task delegation to a virtual secretary. OmniRush is the 'secretary' who does what you tell it to. You can direct activities to OmniRush from within your CRM system, without using any other software. Additional software can be used to 'drive,' or delegate to, OmniRush, but is not required for most tasks. SalesLogix OmniRush integrates with SalesLogix in the following ways: Server Side Integration: 'Traditional' interactive use of OmniRush is done by scheduling activities in SalesLogix. OmniRush works as a 'virtual secretary' in SalesLogix, and you schedule jobs to OmniRush just as you would to another SalesLogix user. The key to understanding this part of OmniRush is to remember that the SalesLogix Activity table drives OmniRush. A single record can trigger a simple job, or complex job, to any OmniRush module. OmniRush does not care how these Activity records are created. You can use VBA, Remote Sync, Sales Processes, or any other mechanism that will create the appropriate Activity record. Your job is to create the Activity record. OmniRush does everything from there on. For example, to send the document package 'widget_promo.frp' to Jim Berghold via email, the following might be scheduled in SalesLogix: 45 OmniRush Administration & User Manual OmniRush logs all jobs into SalesLogix history, so the whole workgroup knows what was done, by who, and when. Further, the SalesLogix VBA, DLL, and other api's can be used to drive OmniRush jobs. The SalesLogix Web Client and other thin client tools can also trigger OmniRush jobs. Client Side Integration: All OmniRush client applications (print to fax and viewer) offer their full feature set to SalesLogix network users. GoldMine OmniRush integrates with GoldMine in the following ways: 46 Administrator's Guide Server Side Integration: 'Traditional' interactive use of OmniRush is done by scheduling activities in GoldMine. OmniRush works as a 'virtual secretary' in GoldMine, and you schedule jobs to OmniRush just as you would to another GoldMine user. The key to understanding this part of OmniRush is to remember that the GoldMine CAL table drives OmniRush. A single record can trigger a simple job, or complex job, to any OmniRush module. OmniRush does not care how these CAL records are created. You can use GoldMine's DDE, DLL, Stored Procedures, Remote Sync, Automated Processes, or any other mechanism that will create the appropriate CAL record. Your job is to create the CAL record. OmniRush does everything from there on. For example, to send the document package 'widget_promo.frp' to Sam Jones via email, the following might be scheduled in GoldMine: OmniRush logs all jobs into GoldMine history, so the whole workgroup knows what was done, by who, and when. 47 OmniRush Administration & User Manual Additionally, all OmniRush job types can be submitted by GoldMine network users, remote users who sync, thin client users, Automated Processes, and GoldMine DDE/DLL/COM/Stored Proc api code. Client Side Integration: All OmniRush client applications (print to fax and viewer) offer their full feature set to GoldMine network users. See the User Guide in this help file for details. Microsoft CRM v1.x OmniRush integrates with Microsoft CRM in the following ways: Server Side Integration: OmniRush works as a virtual secretary in MSCRM. Schedule an activity, OmniRush does its job. This can be triggered via Workflow, interactively, or via the MSCRM API. There are two ways to interactively 'drive' OmniRush in MSCRM: OmniRush Custom UI for MSCRM The Custom UI is a set of Z-Firm provided forms that plug into the MSCRM Web Client. The forms are easy to use, and allow jobs to be sent to one or more contacts at a time. Selecting the OmniRush option in MSCRM: The Email form looks like this, allowing the user to easily select stock literature, and send out: 48 Administrator's Guide Using Built-In MSCRM Forms OmniRush can also be 'driven' from the built in Action | Add Activity | Fax dialog. In fact, all OmniRush job types (fax, email, print, shipping, etc.) can be created from the 'out of box' fax form. For example to send an email package of documents, including merged-html in the message body, the following could be scheduled in MSCRM: 49 OmniRush Administration & User Manual OmniRush logs all jobs into Microsoft CRM history, so the whole workgroup knows what was done, by who, and when. 50 Administrator's Guide Additionally, all OmniRush job types can be submitted by Microsoft CRM network users, remote users who sync, Web Client users, Workflow, Biztalk, and the MSCRM API. Document Merging Document merging is one of the most powerful features of OmniRush. OmniRush allows merge templates to be created in Microsoft Word, and then merged for print, email, and fax use. These documents can merge data from all tables in the CRM system, as well as data from custom applications and SQL tables. Data can be merged as single fields, or multiple rows of data can be merged in as a table. Further, the data can be pulled from the database using any SELECT statement or stored procedure. Z-Firm's merging architecture is super powerful, and is fully customizeable. Document merging is performed by the Database Connector module. Merging happens automatically whenever the Database Connector processes a job that has merge documents. See the section on merging for the complete story. Faxing The Hardware Fax module services faxing hardware that is located physically on the same PC as the Fax Module (usually on the OmniRush Server PC itself). Brooktrout fax boards are used to send and receive faxes. 51 OmniRush Administration & User Manual Fax Bridge (Internet Fax) The Fax Bridge module allows OmniRush to send faxes using Internet Fax, RightFAX or FacSys. 52 Administrator's Guide Internet Fax with OmniRush Use of Internet fax, RightFAX and FacSys are very similar. In all scenarios, OmniRush sends the job to an external server (FacSys, RightFAX or the internet fax service provider, IFSP), and that external server handles the actual transmission. The Fax Bridge module does not enable receiving. For receiving faxes, either use OmniRush with a Brooktrout fax board, or ask Z-Firm about a fax-to-email account. You must open an account with the IFSP before setting it up in OmniRush. To use Internet Fax, the steps are: 1. Open an account with Easylink - click here for the Easylink application. The account information will be emailed to you, generally within one business day. Then follow these steps in the OmniRush Administrator: 1. In the Server Modules branch, right click on your OmniRush Server, select New Module 2. Select Module Type: Fax Server (Internet Fax) 3. Select the appropriate Fax Service Provider 4. Enter your username and password 5. Save the module, right click on it, select Start 6. Open or create a fax Track that will be used to feed the module 7. In the Fax Settings tab of the Track, be sure to select the appropriate Bridge Type (to match your internet fax account) 8. Save and close the Track" Shipping Shipping Automation lets you create DHL, FedEx and UPS shipments using OmniRush. OmniRush will: Print the bar coded shipping label Log the tracking number into the job and CRM history record The Shipping Module is perfect for organizations that: Ship orders as part of their line of business Need to ship to groups of contacts in a single pass Drive shipping from custom plugins and CRM workflow Must ship and track urgent correspondence Need shipping integrated with other business processes Wish to centralize information about shipments The OmniRush shipping module is fully self contained, and relies on no other shipping software. All shipping modules use the Internet to communicate with the carriers (e.g. to upload data to FedEx, DHL and UPS). See the reference grid for full details. 53 OmniRush Administration & User Manual Commerce The OmniRush Commerce module can run credit card charges and log the results in your CRM system or SQL database. The basic flow is: 54 Administrator's Guide What is the Commerce module for? The Commerce module lets you trigger credit card charges from database records. For example, you might have a sales process (e.g. GoldMine Automated Process) that triggers a periodic credit card charge. Or you might have an order entry system, or web site, and use the database to drive OmniRush to run the credit card charge. Since the charge is triggered by a record in the database, anything that can create the record can trigger the charge: Processes Interactive User Network, web, thin, and wireless clients Custom code that uses the CRM API's SalesLogix custom user interfaces etc. Print OmniRush can concurrently service multiple network printers for print merge. OmniRush can merge print: Letters Order forms Complex forms Envelopes Mailing labels Mailing labels with enclosure codes Anything else you might need print merged. 55 OmniRush Administration & User Manual OmniRush can print to all kinds of printers, including: Laser printers Costar and other thermal label printers Impact printers (for multi-part forms, and one-up mailing labels) E-Mail The OmniRush email server allows documents and messages to be sent out by email. OmniRush uses a server-side approach to email merge and transmission. The benefits of this include: 56 Zero overhead on client stations. No delays for mail upload, or memory footprint of email client software. No cluttered, space-hogging, outboxes on client PC desktops. Centralized library of literature to send. All email is logged, so the entire team can see what was sent, when, and by who. OmniRush' powerful document merging can populate documents. OmniRush' powerful server side VBA can enhance documents prior to transmission Administrator's Guide Email jobs are just like fax and print jobs, and can include any number of attachment files. Attachments can be merge RTF documents, or static documents. Client Applications Administrator The OmniRush Administrator application is used by admins to install and configure OmniRush, and can also be used by users to manage the document library and check job status. It is intended that any users who need will use the Administrator. User rights can be used to restrict access to just what is required. The Administrator is used to perform the following tasks: Module configuration and management 57 OmniRush Administration & User Manual Track configuration and management Document management User management If OmniRush is being driven by CRM users, or programatically via one of the OmniRush API's, it is possible that only the system administrator will need the Administrator. CRM users may drive OmniRush completely via the CRM system. How OmniRush is used at your site determines who needs the Administrator. See the complete section on the Administrator in the User Guide section of this help file. Here is the Administrator user interface. Click on each area to see a description. Print-to-Fax and Email The Print to Fax application is actually a Print to Job application. Integrated with GoldMine & SalesLogix CRM systems, the Print to Job client can take printed output from any Windows application and submit it to be faxed or emailed. Since it is completely integrated with the CRM system, the CRM database acts as the phone book, and all jobs are logged in the CRM contact history. Note that installation and use of the Print to Fax client is optional. CRM users only need the Print to Job Client if they will be initiating ad hoc jobs from Windows applications such as MS Word. If all jobs will be triggered from within the CRM system, or from one of the OmniRush 58 Administrator's Guide API's, the Client may not be needed. For complete documentation on the Client, see the section in the User's Guide. The Print to Fax + Email Client for CRM systems Fax Viewer The Fax Viewer is for managing received faxes. The Viewer allows several forms of management: View and Organize received faxes Annotate faxes Attach faxes to GoldMine and SalesLogix CRM contact records as attached documents Email received faxes to members of your team or to external contacts The Viewer is easy to use, and allows received faxes to integrate with the organization's main CRM database, keeping data organized and at hand. Click here for the User's Guide section on the Viewer. Other Utilities These tools are for system administrators, and include: zfCheckShell.exe: This is a PC test utility to test the PC for stability, and to validate the subsystems on the PC, such as the internet connection, BDE, MS Word, etc. FR5DBUtils.exe: This utility is to back up and restore the OmniRush database. All data is pulled from the OmniRush database server and is stored in DBF files. FR5Maintain.exe: This utility is for maintenance of the OmniRush database server: 59 OmniRush Administration & User Manual Check the database for errors Rebuild the database Rebuild the indexes Backup the database interactively Installation Installation Walk Through This section is a hub to walk you through installing and testing OmniRush. It also links to common problems on new installation. 1. 2. 3. 4. 5. 6. 7. 8. 9. 10. 11. Understand OmniRush Concepts & Components. Check your system meets requirements. Perform pre-flight check & installation Create a database connector Module to connect OmniRush to your database: Connect to ACT! Connect to SalesLogix Connect to GoldMine Connect to Oracle/MS SQL Server Connect to Microsoft CRM Perform initial configuration: Fax Server Setup Email Server Setup Print Merge Server Setup Shipping Server Setup Start modules using OmniRush Adminstrator Run test jobs Fax jobs Email jobs Print jobs Shipping jobs Common initial installation problems with: Fax jobs Email jobs Print jobs Shipping jobs View a complete, configured system for fax, shipping, email and more. If using ACT!, configure the ACT! Plugin. If any other problems are encountered, consult the OmniRush Knowledge Base at www.zfirm.com Installation Quick Start Guide For the most reliable satisfaction, install OmniRush Server to a clean installation of Windows NT/2000. Pre-Flight Check (before running the OmniRush installer): 1. Check that required components are present. 60 Administrator's Guide OmniRush Server Setup System hardware meets the minimum System Requirements Check the Software Coexistence chart. TCPIP Networking (required) Internet connectivity (test that Internet Explorer can browse the internet) (required) Microsoft Word 2000, Word XP, or Word 2003 installed and operational (required for fax merge, print merge, and email merge-to-pdf) CRM Client installed & operational (required for ACT!, GoldMine & SalesLogix installations) SQL Database Client installed & operational (required for MS CRM & SQL based installations) Brooktrout card physically installed, (but NO drivers!) (optional--for hardware faxing) Printers installed for merge printing and shipping label printer. At least one printer must be installed. Account numbers handy for shipping carriers, internet fax, etc. 2. Gather required information: 1. CRM administrative login ID and password 2. SQL Server login id and password 2. Install OmniRush Server 1. Set configuration options during installation. 2. Reboot OmniRush Server (the installer will prompt you) 3. After system reboots, install Brooktrout drivers (if setting up hardware fax) 4. Check that the OmniRush Administrator can log in to the OmniRush Server. Log in as user ADMIN with no password. 5. Click here to return to the Installation Walk Through. Client Installation Quick Start 1. Client Installation: Check prerequisites before installing: OmniRush Clients TCPIP Networking (required) OmniRush Server is up and running (required) CRM Client installed and operational (required for CRM based installations) 7. Install OmniRush Client components on PC's that need either the OmniRush Administrator or the OmniRush Client Utilities. Note: Users who will drive OmniRush from either their CRM system or SQL database do not need the OmniRush Client components. 61 OmniRush Administration & User Manual Before Installation Planning an Upgrade from FaxRush Planning an Upgrade from FaxRush® Z-Firm recommends that the OmniRush PC have a clean installation of Windows, Word, and the CRM system. Check the Software Coexistence Chart Plan to run FaxRush v4 and OmniRush concurrently (on separate PC's) until the transition to OmniRush is complete. Then decommission FaxRush v4. This is discussed in detail below. In all cases, back up \outfax\ directory before installing OmniRush . If upgrading the FaxRush v4 PC for OmniRush, take these steps: Use Ghost or similar technology to clone the hard drive to another hard drive, so the system can be reverted to its original state in the event of a problem with the upgrade. Z-Firm Recommends: Alternate Plan: Reformat the hard drive, reinstall Windows, IE v5 (or higher), MS Office 2000, and the database and/or CRM Client software (if applicable) Uninstall FaxRush via control panel Delete the c:\fr32\ directory Delete FaxRush and other unneeded printers from printers folder Reboot system Install OmniRush Production environments should make a copy of their production GoldMine/SalesLogix to a test environment and install OmniRush into that test environment to validate the operations and features of OmniRush. Sites with Netware servers should read the technical article in this help file. Sites that use FRP files or make heavy use of AP tracks should read the section on drive letter references. Recommended Transition Plan for Upgrading Recommended Transition Plan for FaxRush v4 Sites that are Upgrading 1. Install OmniRush to a new PC. If Brooktrout Hardware is in use in the FaxRush v4 Server, set up an Internet Fax account for the OmniRush server, for at least temporary use during the transition. 2. Create new GoldMine User ID's (SalesLogix Category Codes) for use with OmniRush. For example, create new IDs FAX5 LASER5 etc. (Note, when ready to cut all the 62 Administrator's Guide way to v4, the existing userid's can be configured in the OmniRush server, so automated processes do not need modification.) 3. Configure the OmniRush Server to perform parallel tasks (printing, faxing, etc.) 4. If you have custom merge aliases in the FaxRush v4 Server, pull them into the OmniRush system. 5. Test your template library via the OmniRush server. Try several RTF merge forms, especially complex templates. Test them to print and fax. 6. Instruct interactive users to schedule to the new userid's during the transition. 7. Install the new client utilities, test and train users on them. 8. When OmniRush meets your required comfort level (which may be after a day of use, or a few weeks, depending on the installation), shut down the FaxRush v4 server. 9. Migrate Brooktrout hardware to the OmniRush server. 10. Configure the OmniRush server for the older userid's 11. You are now converted to OmniRush. 12. Test needed functions, ask users to report any anomalies immediately. 13. Keep the v4 server intact for some days or weeks until your comfort level with OmniRush has been achieved. 14. Transition complete! Upgrade Check List Use this Check List to Plan Your Upgrade. Topic Completed FaxRush v4 Internet Fax: Userid:____________ Password:______________________ FaxRush \outfax\ directory shared if on NT. If on Netware, read the technical article. Check FRP files for drive letters in paths to files. Check Automated Processes for drive letters in paths to files. Check Tool Bars, VBA, other CRM user interface enhancements for use of drive letters in paths to files. Write down parallel operation plan to run OmniRush side by side with FaxRush during transition. FAXRUSH CRM ID's:______________________________ OmniRush ID's__________________________________ Write down features that need to be signed off on to turn off FaxRush (e.g. broadcasts need to run cleanly for a week, or received fax viewing & linking needs to be running cleanly, etc.) Checking Your System 63 OmniRush Administration & User Manual System Requirements EmailRush, FaxRush, ShipRush Server, PrintRush and CashRush are part of the OmniRush® family. All these products are installed by a single installer and managed via a single console (the OmniRush Administrator). For a friendly discussion of a good starter OmniRush Server PC, see the discussion. Minimum Required Hardware (for a basic, low volume system) OmniRush Server PC* Client PC's (for OmniRush Client Utilities)* CPU Pentium II, III, IV (or Pentium III 600 or higher* equivalent) 900 mhz or higher* RAM 256MB** Windows 2000 / XP: 196MB** Disk Space 1 GB Free Space minimum 75 MB Free space, 60MB of (program occupies approx which for program, balance 175MB, free space required for temporary work files* for data)* Operating System* Windows 2000 (any Windows 2000 (any (see the Windows Version flavor, e.g. Professional, flavor) Support Matrix for full Server, Advanced Server, Windows XP details.) etc.) Windows 2003 WindowsXP Server. Windows 2003 Server Windows 2000 Terminal Server Windows 2003 Terminal Server If Installing the FaxRush for Brooktrout TruFax or TR1034 No hardware required on Hardware Fax board workstations Other Modules Microsoft Word (version 2000, XP, or 2003) is required if OmniRush is used for merge-fax, print, and mergeto-pdf-and-email Most modules have no hardware requirements. Check module documentation for specifics * The actual minimum depends on the CRM system in use. First refer to the recommended (not minimum) hardware for the target CRM system. If the CRM system requires more advanced hardware than OmniRush, follow the CRM system recommendation. ** These are minimums for a basic, one or two port OmniRush server used for faxing and for no software other than OmniRush. Note that when OmniRush is used with a CRM system (e.g. ACT!, GoldMine, SalesLogix, etc.) the OmniRush Server PC must meet at least the minimum requirements of the CRM software, which may require faster hardware than listed above. Note that heavy workloads, more than three modules, or more than two fax lines may require faster hardware. Recommended Minimum Server: 64 Administrator's Guide 1.1 ghz or higher, 512 MB RAM, 20 GB Free disk space, supported operating system Brooktrout TruFax or TR1034 interface for hardware based faxing (Be sure to see the list of supported models) For a friendly discussion of a good starter OmniRush Server PC, see the discussion. In many cases, a dedicated PC is not required to run OmniRush. Powerful server PC's can run other applications in addition to OmniRush. See the Software Coexistence matrix for more information. Recommended Minimum Server for Heavy Fax Loads: 2 ghz or higher CPU, 1GB RAM, 40 GB Free disk space, supported operating system Appropriate Brooktrout fax board or internet fax account System is dedicated to FaxRush Other Requirements: TCPIP must be installed on the Server PC. (See section on networking for details.) Internet connectivity from the OmniRush Server PC is required. (See discussion in Internet Connectivity.) Modules may have specific hardware and software requirements. See the section on the module for specific requirements. The OmniRush Server Installer requires that a local C: drive exist on the OmniRush server, and that this drive is available for read and write. The PC Name length is limited to 18 characters. If the PC name is longer than this, shorten the name and reboot before installing OmniRush. Related Software: Required: IE5 or higher must be installed Office2000, Office XP or Office 2003 is required for merge fax, merge print, some merge email functions (only the Microsoft Word portion of Office is needed) Optional: ACT!2006 (aka v8), 2007 (aka v9) or 2008 (v10) Standard or Workgroup (using either MSDE or SQL Server) GoldMine v5.x or v6.x dBase or SQL (click here for SQL details) (aka GoldMine Front Office, GoldMine Sales & Marketing, GoldMine Business Contact Manager or similar) GoldMine v7.x and GoldMine v8 (aka GoldMine Premium Edition) on SQL Server (click here for SQL details) SalesLogix v4 (SalesLogix2000) or v5.x (SalesLogix.net), v6.x, v7.x Microsoft Dynamics CRM v3 Oracle, Microsoft SQL Server, Pervasive or other SQL database for Open DBIO integration (custom programming and integration is the responsibility of the customer, not Z-Firm) 65 OmniRush Administration & User Manual If OmniRush is going to integrate with ACT!, GoldMine or SalesLogix, then the contact manager must be installed on the OmniRush Server PC, with all required database drivers and client configuration to attach to the production database. Always install the CRM client software and test for proper operation before installing OmniRush. OmniRush licensing controls what systems OmniRush can work with, and more. Network Requirements TCPIP LAN (See full discussion for details) Internet Connection (See discussion on Firewalls & Proxy Servers) NT User Account for the OmniRush NT Services to use If GoldMine or any other resource (such as a printer) accessed by OmniRush resides on a Netware server, please see the Netware discussion. Environment Setup CRM Application Installed & Operational In a CRM setting, the CRM application must be installed and running trouble-free from the OmniRush Server PC. The CRM client will not actually be used by OmniRush, but this step is critical to ensure that OmniRush can access the CRM system. CRM Configuration OmniRush integrates with the CRM system via database tables in the CRM system. Since OmniRush works as a virtual secretary, this is done via the Schedule feature of GoldMine and SalesLogix. Before installing OmniRush, it is wise to properly configure the CRM system for the OmniRush job types your installation will use. Here is a chart that lists suggested entries to add to the CRM system for SalesLogix and GoldMine. Note that entries may be a maximum of seven characters long. SalesLogix In SalesLogix, add entries to the To-Do Category field. Log into the SalesLogix sales client as an administrative user, and select Tools | Manage | Pick Lists. On the screen below, select Edit 66 Administrator's Guide In the Edit List dialog, add your Category Codes: GoldMine In GoldMine, log in as a Master user, and select File | Configure GoldMine | Users Settings, and add users that will be associated to OmniRush tracks. Note that this does not affect your GoldMine license (GoldMine is licensed based on the number of users logged in, not on the number configured). It is adviseable for these entries to be grouped at the bottom or the top of the list. This can be done by pre-pending either a # sign or an underscore (_) to the name. The # will force entries to the top of the list, the _ will push entries to the bottom of the list. Note that entries may be a maximum of seven characters long. 67 OmniRush Administration & User Manual Brooktrout Hardware Installed Before running the OmniRush installer, make sure that your Brooktrout hardware is installed. Use any free PCI slot. If you have multiple Brooktrout boards in one system, please see the Brooktrout discussion on the subject. The Brooktrout driver installer is an option at the end of the OmniRush installer. No Brooktrout drivers should be present on the system when the OmniRush installer is started. DID Setup If configuring OmniRush hardware fax for an analog DID line, the following steps can be taken before or after installing OmniRush. Install Brooktrout DID board in the OmniRush PC DID phone line is installed and live OmniRush Brooktrout drivers are installed. If you are using a "combo" DID + Loop start board, make sure the DID lines coming from the phone company are plugged into the correct DID ports on the Brooktrout board. For DTMF DID the steps are: 68 Install Brooktrout board in the OmniRush PC Connect the Brooktrout to POTS ports on the PBX Administrator's Guide Configure PBX to route calls to the OmniRush-connected ports Configure PBX to allow OmniRush to make outbound calls on those ports (test using a test telephone, OmniRush!) confirm ability to make local and long distance calls before using OmniRush Brooktrout drivers are installed. Set up the OmniRush Fax Module For all hardware configurations: Ensure that users have a DIDs identifcation number in their OmniRush user profile. This may not be the entire phone number, but may be only the last x number of digits. Check with the phone company to determine how many digits they are sending (usually either 2, 4, or 7). In most cases, they send 4 digits. Edit the faxinit.cfg file in the \bfax folder to show the correct number of digits and reboot the PC. See the technical reference section on DID for full details. Z-Firm Environment Test Utility The Z-Firm environment checker is installed into the \Utilities\ directory on the OmniRush Server PC. It can be useful to test internet connectivity, BDE and other system components. Install OmniRush Server Installation Starting the Installer On the CDROM, launch the installer from the CD Splash screen. If Downloaded, double click the downloaded file to start the installer. Note that the installer must be run at the system console, not via remote desktop. Remote desktop does not allow proper print driver installation. Remote access to the actual console session (using VNC or a similar tool) is acceptable. If Terminal Server is present (or there is a doubt and perhaps Terminal Server is present) be sure to use the 'change user' command before starting the OmniRush installer: change user /install This command must be issued before starting the OmniRush installer. Installer Screens The initial screens are standard licensing and directory location screens. 69 OmniRush Administration & User Manual Where to install OmniRush: OmniRush keeps its programs and datastore in a single directory structure. During installation, you are prompted to set to the root of this structure (which defaults to c:\program files\Z-Firm LLC\OmniRush\). This should be placed on a local hard drive that has plenty of free space (500 MB free space is the recommended minimum amount of free space), as the OmniRush data store will grow over time. Parts of this directory structure should also be backed up regularly. The only other installation screens of note are: OmniRush Configuration screen Install Optional Modules screen OmniRush Configuration Screen Click on an area below for more information. Installing Server Cluster Member If you are installing a server Cluster Member, be sure that: 70 The primary OmniRush server is on line You have already installed a Cluster-enabled license on the main OmniRush server. Administrator's Guide The primary OmniRush server and the Cluster Member can ping each other by machine name. Steps: 1. Install requisite software (e.g. if the Cluster Member will run the Print/Raster module, MS Word should be installed) 2. Run the OmniRush installer on the Cluster Member PC 3. At the end of the installation, it will prompt for the name or address of the primary server. 4. Leave the username/password fields at default After reboot, you will be able to create and manage modules on the Cluster Member PC from the OmniRush Administrator. Client Utilities Installation Starting the Installer Terminal Server users, click here. On the CDROM, launch the installer from the CD Splash screen. If Downloaded, double click the downloaded file to start the installer. Installer Screens The basic installer screens prompt you with the OmniRush license, and request a directory to install to. They are self explanatory. Database Connection Screen On this screen, enter the PC name or IP address of the OmniRush server (the main server in a clustered environment). This server must be reachable via TCPIP. If you enter the system name, you must be able to ping the machine by name from a command line. (See the TCPIP technical discussion if you have any questions here.) Note that the User Name and Password should be left at default. Unless the Z-Firm DB Engine login information has been changed, be sure to leave these at default. Updating/Upgrading OmniRush Updating/Upgrading the OmniRush Program Files Quick Links: Upgrading OmniRush (version upgrade) 71 OmniRush Administration & User Manual Updating OmniRush (maintenance update within the same major version) Running the Client Update Silently Upgrade FAQs Version 8 Readme Upgrading OmniRush (version upgrade) OmniRush v8 requires a v8 OmniRush license. Installing the OmniRush v8 upgrade onto a system that is not appropriately licensed will disable the OmniRush Server. It is crucial that v6.x and v7.x client software not run against the version 8 server. In some cases this can cause data corruption. The steps to upgrade OmniRush are: a) All production systems should make an off-line backup of the OmniRush server hard drive using Ghost, Acronis or similar technology. b) Shut down all OmniRush modules, including launcher and the Z-Firm DBEngine Service and make a copy of the entire OmniRush \data\ directory to a backup location. Download the Update installer for OmniRush c) Start the Z-Firm DBEngine service, open Administrator, install your version 8 license (in Administrator, go to File | Licensing | Load License File). d) Exit Administrator, run the v8 upgrade installer on the server e) After upgrading, run the Administrator on the OmniRush Server PC, check that modules will start properly. Confirm that existing configuration moved smoothly into v8. f) For safety, stop all OmniRush server modules including launcher, and stop the Z-Firm DBEngine service. This is done so that a v6/v7 client is not allowed to run against the v8 database. g) Run the upgrade installer on any (and ALL) PC's that have the OmniRush client installed. It is critical that the same build of OmniRush run on the Server and Client stations. Always update all of them together. h) On the OmniRush server PC, start the Z-Firm DBEngine service, launcher and server modules. i) Verify proper operation. Run some test jobs. Done! 72 Administrator's Guide Updating OmniRush (maintenance update within the same major version) To update your system to a newer version of OmniRush, first check the following: a) Check with your reseller or Z-Firm if a license update is necessary to run the new version. b) Check that the Update file is a higher version than the OmniRush version already running. The important part of the version is the build number. To find the version of OmniRush you are running, go to Help | About in the OmniRush Administrator. For example, an OmniRush version might be: 11.0.0.1022 The build number in this case is 1022. The OmniRush Update installer is named along these lines: OmniRush_v11_UPDATE_Build_1022.exe In this example, the build is 1022. You can see that this is the update installer because it says UPDATE in the file name. Note that you should only put a newer (higher) build onto on OmniRush Server. Never attempt to downgrade an OmniRush build with the UPDATE installer. c) Completely shut down OmniRush before running the installer. Stop all OmniRush modules. Exit all OmniRush client applications on workstations and stop the OmniRush Launcher service. d) Run the update installer on the OmniRush Server and on client stations. It is critical that the same build of OmniRush run on the Server and Client stations. Always update all of them together. Client systems can be updated 'silently' for prompt-free updating. Use two command line switches on the single file updater: -a /A Example: OmniRush_v6_UPDATE_Build_400.exe -a /A On the Updater setup.exe, use just the /A command line switch to trigger a silent installation. Example syntax: \\server\share\software\OmniRush\new_version\setup.exe /A (If the single-file updater was installed, the setup program can be extracted with these steps.) Troubleshooting an Update The Server updater will require that all connections to the ZFirm DBEngine be closed. The Updater displays the connections so that users can be asked to exit the OmniRush applications. As server modules and client applications exit OmniRush, they will automatically disappear from the list. You cannot proceed with the update until all connections have closed. Note that all Server modules must be stopped, and the Launcher completely shut down. If you have shut down all clients, and modules, and have shut down the launcher, and a connection is still listed, there is a 'hung' connection. The resolution at this point is: 1. Cancel and exit the Updater. 73 OmniRush Administration & User Manual 2. Cycle the ZFirm DBEngine service. This can be done from the service manager, or from a command prompt (at the OmniRush Server). Exit the updater, and from a command prompt execute these commands: net stop "zfirm dbengine" after a few seconds: net start "zfirm dbengine" 3. Now re-run the Updater. Upgrade FAQ Should the Brooktrout driver be upgraded? Generally no. If the OmniRush system is running properly with the Brooktrout board, no change to the driver is needed. Do my templates need to be updated? No. Existing OmniRush templates will work without changes. However, if OmniRush is used for UPS shipping, the new v7 UPS shipping templates must be used. What about Terminal Server? Be sure to read about the new support for Terminal Server in v7. Systems upgrading from OmniRush v5/v6 can install v7 and get to work right away. Configure OmniRush New Installation: Initial Configuration & Testing Installation: Initial Fax Server Setup Setup A typical OmniRush Fax Server requires these components: Modules: Database Connector Module One Print/Raster Module with default settings (do not modify printer or other settings) Fax Server Module (either Internet Fax, Hardware Fax, or both) Tracks: One or more fax tracks that is configured for the appropriate module. At least for initial setup, set the track alarm options. 74 Administrator's Guide Test Jobs Start all modules. Wait until all modules go solid green in Administrator. Now, start the CRM or SQL system. Some CRM systems (like GoldMine) require that you now create GoldMine users that have the same host reference as the OmniRush tracks. If you created the tracks shown above, you would now create two GoldMine users (via the GoldMine File | Configure | Users Settings) named FAX and INETFAX. Put random passwords on these users so no one accidentally logs into GoldMine as these users. Now schedule the first test job. Go to a contact in the CRM system that has your own fax number on it. Click for example screen shots: ACT! GoldMine Microsoft CRM SalesLogix As a second test job, schedule a merged cover page. Click for example screen shots: ACT! GoldMine Microsoft CRM SalesLogix You are now faxing with OmniRush! See the User's Guide in this help file for more information on managing your document library and setting up your system for easiest possible use. Fax Server Possible Problems TEST.TIF Job stays in Pending, and never goes to ~FAX (the tilde tells you the job is in progress) Check that the FAX track is set to use hardware fax or internet fax (appropriate to the fax module you have running). Check that the clock on the OmniRush PC has the correct date and time (if it has a date or time in the past, the job can sit and not get picked up by OmniRush). Check that the OmniRush database connector is configured for the correct database. GoldMine dBase systems: Check your environment for duplicate cal.dbf files. Check the OmniRush Database Connector Log File (View | Module Logs in the OmniRush Administrator) for errors. TEST.TIF goes to tilde and never gets sent. Stays as ~FAX in the Pending/Activities tab forever. Check that the fax module is active. If using hardware fax, make sure one or more fax ports is configured for outbound faxing. Note that OmniRush may have tried to send the fax, but either misdialed the number, or dialed and found a busy signal, or the fax number is bad. In these cases, OmniRush may be waiting some minutes to retry the fax before failing it. After waiting 10 minutes or more, the job fails with an error that it cannot dial the fax number, but the number displayed in the error is incorrect (e.g. should be dialed as a local call, but is being dialed long distance, or should be long distance but is not being dialed with a 1, etc.). See the section on dialing configuration TEST.TIF works fine, but the cover page fails. 75 OmniRush Administration & User Manual Try scheduling /letter1.rtf to try another merge template Check that a default cover page has been set on the database connector module Check that the print/raster module is running. Check that the Norton Antivirus add in for MS Word has been removed. Check that there are no startup macros in MS Word. To be sure, shut down the print raster module, locate normal.dot, and rename it to normal.old. Then restart the print raster module and try again. Check that there are no MS Word add ins on the system. If there are, shut down the print raster module, move the add ins to another directory, and rename it to normal.old. Then restart the print raster module and try again. Installation: Initial E-Mail Server Setup Setup A typical OmniRush Email Merge Server requires these components: Modules: Database Connector Module Optional: If you will send merged attachments as PDF or TIF: One Print/Raster Module with default settings (do not modify printer or other settings). (Note that PDF functionality requires purchase of the PDF Option for OmniRush) One Email Server Module (Note that only one email module is needed, no matter how many tracks!) Tracks: One or more email tracks configured to taste. At least for initial setup, set the track alarm options. Test Jobs Start all modules. Wait until all modules go solid green in Administrator. Now, start the CRM or SQL system. Some CRM systems (like GoldMine) require that you now create GoldMine users that have the same host reference as the OmniRush tracks. If you created the track shown above, you would now create one GoldMine user (via the GoldMine File | Configure | Users Settings) named EMAIL. Put a random password on this user so no one accidentally logs into GoldMine as this user. Now schedule a test job. Go to a contact in the CRM system that has your own email address on it. Click for example screen shots: 76 Administrator's Guide ACT! GoldMine Microsoft CRM SalesLogix You are now emailing with OmniRush! See the User's Guide in this help file for more information on managing your document library and setting up your system for easiest possible use. Possible Problems Email fails to get sent. Job is scheduled back to you in the database. Check that a default return address is set on the OmniRush email module. If the OmniRush email module is running in external SMTP relay mode, try changing it to internal SMTP relay mode. If the email module is running in internal SMTP relay mode, try changing it to point to your existing, 'external' SMTP relay. Check that the contact you are scheduling to has a valid email address. Installation: Initial Shipping Server Setup Setup Before configuration, review the OmniRush Shipping Services Reference and the sections on the DHL, FedEx, and UPS shipping server modules. A typical OmniRush Shipping Server requires these components: Modules: Database Connector Module Optional: If OmniRush will send email shipment confirmations to the recipients, you will need an email module. ShipRush installed for all needed carriers (be sure to complete the ShipRush setup wizard and run a test shipment for each carrier!) One Shipping Module for each carrier (e.g. if you will use DHL, FedEx and UPS you will configure three shipping modules, one for each carrier. Note that no matter how many shipping accounts will be serviced, there will be only one module per shipping carrier.) FedEx and UPS with GoldMine FedEx and UPS with any Microsoft SQL Server database Tracks: One or more shipping tracks need to be configured, one for each shipping account that will be serviced. See the appropriate pages for DHL, FedEx, and UPS tracks. (Note that 77 OmniRush Administration & User Manual the OmniRush Commerce Kit includes support for shipper account with each carrier, if more are needed, contact your reseller or Z-Firm Sales.). Test Jobs Start all modules. Wait until all modules go solid green in Administrator. Now, start the CRM or SQL system. Some CRM systems (like GoldMine) require that you now create GoldMine users that have the same host reference as the OmniRush tracks. If you created the track shown above, you would now create two GoldMine users (via the GoldMine File | Configure | Users Settings) named UPS and FEDEX. Put a random password on these users so no one accidentally logs into GoldMine as these users. Now schedule a test job. You will need a shipping template, so navigate to the /Documents/General/Shared/Samples folder in the OmniRush Administrator to find the folders of sample UPS and FedEx shipping templates. Go to a contact in the CRM system that has your own address on it. Click for example screen shots: ACT! DHL ACT! FedEx ACT! UPS GoldMine FedEx GoldMine UPS Microsoft CRM FedEx Microsoft CRM UPS SalesLogix FedEx SalesLogix UPS You are now shipping with OmniRush! See the Understanding Shipping with OmniRush section for information on how to get the most out of OmniRush. Installation: Initial Print Merge Server Setup Setup A typical OmniRush Print Server requires these components: Modules: Database Connector Module One Print/Raster Module with default settings (do not modify printer or other settings) Tracks: One or more print tracks configured. At least for initial setup, set the track alarm options. Test Jobs Start all modules. Wait until all modules go solid green in Administrator. Now, start the CRM or SQL system. 78 Administrator's Guide Some CRM systems (like GoldMine) require that you now create GoldMine users that have the same host reference as the OmniRush tracks. If you created the tracks shown above, you would now create a GoldMine user (via the GoldMine File | Configure | Users Settings) named LASER. Put a random password on this user so no one accidentally logs into GoldMine as this user. Now schedule the first test job. Go to a contact in the CRM system that has your own contact information on it. Click for example screen shots: ACT! GoldMine Microsoft CRM SalesLogix As a second test job, schedule a merge form. Click for example screen shots: ACT! GoldMine Microsoft CRM SalesLogix What should happen: The job should print on the printer configured on the track, and the job record should move to the History tab in the CRM system. You are now printing with OmniRush! See the User's Guide in this help file for more information on managing your document library and setting up your system for easiest possible use. Possible Problems Job stays In Pending, user stays at LASER Check that modules are running (green, turning gears in Administrator), and that the LASER track is active and set to a printer. Job stays in Pending, is rescheduled to the creating user. The job failed. Look at the notes on the job record to see the error message. Job goes to History, but does not print. Check that you can print from the OmniRush Server PC to the printer in question (use Notepad or Write). Check the network print spooler for the printer, the job may be spooled behind other print jobs. Configuration Quick Start Guide 1. Create and configure needed Modules. 2. Create and configure needed Tracks 3. Activate Modules one at a time, make sure they come up and stay up. 4. Run test.tif through the system to a printer and to fax to test the system. 5. Test other jobs 6. OmniRush is ready to use. Global Settings 79 OmniRush Administration & User Manual Global settings are accessible from the Administrator. Right click on Server Modules and select General Server Settings as shown: These settings are: General Tab: Document Repository Path. Never change this unless directed by Z-Firm technical support. Default Import Folder: This is the ODMS folder where external documents are imported TO by the Database Connector Module Everyone Group: This is the group that users are automatically added to as they create jobs Import Documents From: This is the Default Document Import Folder, this is where documents are imported FROM by the Database Connector Module. Extended Tab: Allow Nesting: If an OmniRush folder is scheduled (.ZDF), and this option is turned on, all subfolders will also be sent. Turn this option off for the most control, using document links to put all desired files into the folder. RTF File Size: Excessively large RTF files can severely limit OmniRush job thoughput. This setting will cause OmniRush to process jobs with a warning if they are larger than the Warning threshold, and to fail jobs with RTF files larger than the Error threshold. Note, newly discovered techniques can dramatically reduce RTF file size, preserving graphics and other elements. Clients Tab: Global Root Path: This is where link files will be created by the Viewer and the Database Connector. This must be a network path, that is shared to all users, and users need at least CREATE | MODIFY | READ rights to this directory. For example, in a SalesLogix environment, it might be: \\server\share\slsync\orlinkfiles\omnirush-link-files\ In a GoldMine environment, it might be: \\server\share\goldmine-system-directory\omnirush-link-files\ Explanation: The OmniRush client utilities (Print-to-job and Viewer) need to create files on the file system during certain operations (listed below). These files need to be in a central directory that all 80 Administrator's Guide CRM/OmniRush users can access. This directory setting in OmniRush is the Client Global Root Path. This directory should always be set as UNC The following operations require access to this directory: Print-to-Fax/Email: If Delete File is unchecked, and External File is checked, the TIF is stored in the Global Root. If External is not checked, the ZID link file is created in the Global Root Viewer: If the link is internal, the ZID is put in the Global Root, if an external TIF (which is the default for SalesLogix) is linked, the TIF is put in the Global root. Module Configuration Using Administrator to Create Modules The Administrator is used to create, configure, monitor, start, and stop modules. While each module has its own configuration screen, the basic steps for creating a module are always the same: Right-Click on the OmniRush Server PC and select New Module: Select Next on the Wizard: 81 OmniRush Administration & User Manual Select the type of module being created and press Next: Name the Module and press Finish: 82 Administrator's Guide At this point, complete the required configuration for the module, and your module is ready! Database Connectors Database Connectors Database Connector modules tie your SQL database or CRM system to OmniRush. The Database Connectors implement the Server Side Integration side of the OmniRush-CRM equation. The main prerequisite is to install the CRM client software on the OmniRush Server PC before creating the Database Connector module. Database Connectors are completely CRM Sync-Aware, and are the result of years of integration work. They are highly compatible with the CRM system. 83 OmniRush Administration & User Manual Database Connector: General Settings Set up the following parameters on this tab: Host Type: This is the CRM or database system the dbio will connect to. (Note, you can only run the types of connectors that you are licensed for.) Cover Page: Either navigate to an internal cover page using the down arrow to navigate the OmniRush document store, or import an external rtf cover page by first setting the internal location for the file with the button and then click the browse button to find the file externally. Note that OmniRush installs with a sample cover page in the /samples/.../generic/ folder. You can always edit this cover page to meet your needs. For fast setup, navigate to this sample cover page, and customize it later after the system is running. Internal or External master document source. New users should keep the default of external. See the section in Concepts for a full discussion. Scheduling of External Files is: This is a security setting that can be used to restrict users to scheduling documents in the internal document store. Full explanation. Advanced Job Notes Processing: Enables processing of OXP files and advanced notes processing, including XML. The story. Convert HTML Notes to Text: Some systems (e.g. GoldMine v6.x, some open SQL systems) store the text in job notes as HTML. This option causes OmniRush to extract the text from the notes block. 84 Administrator's Guide Internal Merge Codes: Used for highly advanced passing of parameters from the CRM/SQL database to OmniRush tracks and modules. The story. Edit Merge Codes: This button offers access to the Merge Code Configuration screen (also available from the File | Merge Codes menu in Administrator). See the section on Merge Codes. Database Connector: Extended Settings For Advanced Users: (These settings are almost never changed) Settings are: Delay between polls: Controls how often the database is polled for new jobs. Defaults to 4 seconds. If there are more than five tracks defined, or database impact needs to be minimized, consider setting this to 20 or 30 seconds. Scan host DB for aborts: This setting defaults to True and allows OmniRush to scan the host database for changed or deleted records that should trigger OmniRush to abort jobs in progress. This is option is high overhead, and should be turned off whenever performance is being optimized. Delete old file if there is a collision: This setting defaults to False. This setting is for sites that use primarily (or exclusively) External Files. This option allows OmniRush to always pull in external files and overwrite internal files that they colide with. DB Owner: This is a required field for GoldMine MS SQL databases. Set appropriately. (On GoldMine, 'dbo' is usually correct.). Leave this setting blank on SalesLogix systems. SalesLogix Related Settings: Quote Char: In most cases this can be left at default. However, if the SQL Server "Quoted Identifier" setting is On, then this setting must be set to Single. History Record Type: This sets the Record Type for the history record created by OmniRush. GoldMine Related Settings: Host Alias Override for Tracks: This is primarily for setting up OmniRush to support multiple GoldMine databases that share a single CAL table. See the discussion for details. Database Connector: Aliases Advanced topic! Not needed for single-database OmniRush installations. Aliases are only needed when there are multiple database connectors, and even then, only if they are appropriate. If you run multiple GoldMine contact files from a single GoldMine installation, see the appropriate page in this document. If you run multiple GoldMine systems, SalesLogix databases, SQL databases, or any combination, read on. 85 OmniRush Administration & User Manual When OmniRush is configured to service multiple databases, you may desire to configure specific tracks to be used by each database. For example, you may have three databases, and you want faxes sent by OmniRush to reflect the database they were sent from. So you configure three fax tracks, each with its own fax banner. Say these fax tracks are: FAXA, FAXB, FAXC one for each database (which we will refer to as A, B, C) Additionally, you might have three UPS accounts, and you configure three UPS tracks, one for each account. The tracks are UPSA, UPSB, UPSC. However, you want each database just to schedule to FAX or UPS. In this case, you use Aliases. In the 'A' database connector, create two aliases: UPS that points to UPSA, and FAX that points to FAXA. Continue in this way for the other database connectors. Then, in database 'A' schedule jobs to FAXA and UPSA, and in database 'B' schedule to FAXB and UPSB, etcetera. This allows specific configurations to be set up for each database. Database Connector: Override Codes For Advanced Users: (These settings are almost never changed) Override codes allow you to control job behavior job-by-job. The uses of override codes are many, but here are some common examples: For general faxing, the fax track is set to schedule-back failed faxes, but on broadcasts, all fails should go to history. For DHL, FedEx or UPS shipping, you need to control the COD amount or parcel weight job by job. Overrides allow you to do this, and much more. The codes have mouse-over help text that explains what each code does. You can keep the default codes, or change them to the tags you prefer. It is strongly advised that new tags have the same number of digits as the defaults. See the section in the User's Guide on how to use Override Codes. Database Connector: Result Codes For Advanced Users: (These settings are almost never changed) For advanced users, here is the explanation: Result codes are the values that OmniRush puts on the completed (history) records in the CRM system or database. This allows reports to be run, or conditional logic to fire (such as a sales process, or a database trigger) based on the results of the OmniRush job. The codes have mouse-over help text that explains what each code does. You can keep the default codes, or change them to the tags you prefer. Database Connector for GoldMine 86 Administrator's Guide Operating Environment for GoldMine The Connector for GoldMine requires that GoldMine be installed and operational on the OmniRush PC. OmniRush connects to the GoldMine database directly, via low level BDE calls, and is completely compatible with GoldMine v5.x dBase and SQL (Front Office). Generally, running OmniRush and GoldMine Sync Server/Automated Processes on the same PC is workable, however it depends on the workload on these components. It is possible to overload the BDE, which will cause all BDE applications on the PC to hang. (Increasing the memory settings in BDE can help prevent this, but if the load is high enough, or if enough BDE applications are running, the limits of BDE may be reached.) There are a number of options on how GoldMine can be configured, so here are the details. Environment Item GoldMine installed locally on OmniRush PC, or centrally on a network. BDE, shared or local Discussion OmniRush will work both ways. Install GoldMine as you prefer, just make it sure that the NT user you choose during OmniRush installation can access the GoldMine file system resources (SYSDIR in all cases, other directories vary based on overall configuration). Z-Firm recommends a shared, network installation of GoldMine for easiest maintenance and to keep the build consistent across the network. Z-Firm requires that BDE be installed locally on the OmniRush Server PC. Check the registry HKEY_LOCAL_MACHINE\SOFTWARE\Borland\Database Engine\ setting to confirm that BDE is being pulled from a local path (see the DLLPATH and CONFIGFILE01 keys). BDE Settings GM.INI file SQL Specific In many cases it is advisable to increase BDE memory settings. See the technical discussion for details. Check that all values are correct. In many cases GoldMine will run even if the GM.INI has invalid settings in it. Z-Firm recommends that the GM.INI have at least the following tags: SYSDIR, GOLDDIR, COMMONDIR. Click here to see an example GM.INI file. Check that the database owner is dbo. For a detailed list of SQL environment issues, see the GoldMine SQL technical discussion. GoldMine Connector -- Creating the Module The GoldMine Connector works with GoldMine v5.x and v6.x on dBase and MS SQL platforms (OmniRush must be licensed for the appropriate GoldMine platform). The following should be done before configuring a GoldMine Connector in OmniRush: Check your GoldMine operating environment. Install the GoldMine Workgroup Client on the OmniRush PC Check that you can log into GoldMine and that it works correctly If GoldSync, or any other application will run on the OmniRush Server PC, Increase BDE Memory as described here. 87 OmniRush Administration & User Manual When these steps have been done, you are ready to create the GoldMine DBIO Module. 1. Right-Click on the OmniRush Server PC and Select New 2. Select Database Connector 3. Continue through Connector configuration Database Connector for GoldMine Here, configure the database connector with the parameters to use to connect to GoldMine. Set the App Folder, GM User, and SQL User first, then hit the Contact DB browse button to select the Contact database to use. SQL User: Note this user must be a dbo or have the dbo role in the database. Create Simple History Records: If the track setting does not require that history records be linked to the job document(s), checking this option will cause history records to be created as Other Actions, not as Email. This has the benefits of being easier to report on, and taking less disk space. Unified SQL database. Uncheck this if running GoldMine SQL and the GOLDDIR and CONTACTDIR are in separate SQL databases. (When unchecked, an additional selector to set the BDE alias for the GOLDDIR will appear.) Note: In GoldMine v7 and v8, OmniRush requires a unified GoldMine database (e.g. GOLDDIR and CONTACTDIR in a single SQL database). Multiple Contact Directories OmniRush supports the following GoldMine configurations: a. Single CAL table supporting multiple GoldMine Contact directories (dBase & SQL). 88 Administrator's Guide b. Multiple GoldMine installations, each with its own CAL table. Note that each installation must be homogeneous (e.g. all dBase or all SQL) (For more information on this type of installation, see the general Aliases document.) Note that 'a' may affect custom merge codes and alias-based merge codes when used with SQL installations. FrontRange does not support GoldMine SQL with multiple contact databases. A number of GoldMine features seriously degrade when multiple SQL contact databases are used. Note that both Front Range (publishers of GoldMine) and Z-Firm strongly recommend a single contact file for all GoldMine users (dBase and SQL). Note that OmniRush is licensed based on the number of databases that will be serviced concurrently. Each GoldMine contact directory is a database. Contact Z-Firm sales for more information. Background: GoldMine allows multiple contact databases to be used, but several issues arise when this is done (both internally for GoldMine, and for other applications like OmniRush). When GoldMine dBase systems share one GOLDDIR and also have multiple contact directories, OmniRush can service multiple contact databases with multiple database connectors. When a GoldMine SQL system is 'split' so that the GOLDDIR is in its own SQL database (separate from the SQL database where the contact database resides), there is a problem for OmniRush. Also see 'split' GoldMine SQL system. Database Connector: GoldMine Aliases The purpose of Track Aliases is to support multiple GoldMine contact files. For example, if there are two GoldMine contact files, and two OmniRush connectors servicing the database, a user might schedule to FAX from both databases. The two database connectors would then both try to import the job, when clearly only one (the correct!) connector should handle it. So the flow is this: Users in contact file 'A' would schedule to FAXA Users in contact file 'B' would schedule to FAXB On the 'A' connector, you would alias the FAX track to FAXA, and on the 'B' connector, alias the FAX track to FAXB. Database Connector: GoldMine Multi-DBIO These settings are only applicable if your OmniRush Server will connect to multiple GoldMine databases concurrently. 89 OmniRush Administration & User Manual Import Documents From: Adds an additional directory to search for files in addition to the global Document Import Directory. Allows each database connector to have its own external file library. Default Import Folder: Imported files will go into the specified folder instead of the globally defined document import folder. Internet Fax Account: Allows jobs from this database connector to be billed to a specific internet fax account. Use Import User Suffix: For multi-connector installs only: Each connector should have a unique 4 digit, alpha-numeric code assigned to it by the system administrator. Database Connector for SalesLogix Operating Environment - SalesLogix The Connector for SalesLogix requires that SalesLogix be installed and operational on the OmniRush PC. When run with SalesLogix v4-5, OmniRush connects to the SalesLogix database directly, via low level BDE calls. OmniRush is compatible with SalesLogix v4.x and v5.x (SalesLogix2000 and SalesLogix.NET). It is your responsibility to install the correct slgxapi.dll on the system. When run with SalesLogix v6, OmniRush makes two connections to the SalesLogix system: One via the SalesLogix data provider and one via a regular SQL Server OLE DB provider. Note that running SalesLogix on the OmniRush Server PC can overload BDE and cause all BDE applications on the PC to hang. This will then require restarting the SalesLogix connector, OmniRush Administrator, and any other BDE applications on the PC. For best results, increase the global memory settings in BDE Admin. There are a number of options on how SalesLogix can be configured, so here are the details. Environment Item Running a supported SQL Server If running the Support Client 90 Discussion OmniRush supports SalesLogix running on the following database servers: Microsoft SQL Server (v7 and 2000) Oracle (all SalesLogix-supported versions of Oracle) Note that Interbase is not supported by OmniRush and will not work. SalesLogix is phasing out Interbase. OmniRush only integrates with the SalesLogix v5.x and higher support client. The integration has these limits: Print to fax only. The OmniRush Viewer does not integrate with the Support client. No ability to do a client-side link of the faxed file (e.g. create a SalesLogix file attachment to the fax) The contact name must be selected in the client. The current contact cannot be automatically selected. The Support client has only been tested with Microsoft SQL Server at this time. Contact Z-Firm technical support if Oracle is required. Only a single SalesLogix DB Connector can exist in Administrator's Guide SLGXAPI.DLL (SalesLogix v4-5 only) SalesLogix Sync Server or other modules running on the OmniRush Server PC BDE, shared or local OmniRush. Multi-DBIO is not currently supported. These limits are due to the incomplete nature of the SalesLogix API's in the Support client. It is the installer's responsibility to maintain the correct version of this dll in the OmniRush Server directory (by default: c:\program files\Z-Firm LLC\OmniRush\Server\v5\ ) Whenever SalesLogix is updated, this dll should also be updated. Not all combinations are supported on a single PC. See the technical discussion on software coexistence. Z-Firm requires that BDE be installed locally on the OmniRush Server PC. Check the registry HKEY_LOCAL_MACHINE\SOFTWARE\Borland\Database Engine\ setting to confirm that BDE is being pulled from a local path (see the DLLPATH and CONFIGFILE01 keys). BDE Settings Attachments Directory-access Attachments Directory-location In many cases it is advisable to increase BDE memory settings. See the technical discussion for details. In many cases, OmniRush will need read/write/create access to the attachments directory. Make sure that the NT userid selected during OmniRush installation can access this directory. OmniRush attempts programatically to determine the attachments directory. If it makes the wrong decision, or you just want to be extra sure, set it manually in the SalesLogix Connector module. SalesLogix Connector--Creating the Module The SalesLogix Connector works with SalesLogix v4-6 on MS SQL, and Oracle platforms. The following should be done before configuring a SalesLogix Connector in OmniRush: Check your SalesLogix operating environment. Install the SalesLogix Workgroup Client on the OmniRush PC Check that you can log into SalesLogix and that it works correctly SalesLogix v4-v5: Increase BDE Memory as described here. SalesLogix v4-v5: Check the SalesLogix DLL Version on your system When these steps have been done, you are ready to create the SalesLogix DBIO Module. 1. Right-Click on the OmniRush Server PC and Select New 2. Select Database Connector 3. Continue through Connector configuration Database Connector for SalesLogix v4-v5 91 OmniRush Administration & User Manual Looking for SalesLogix v6.x? Click here. Click each area below for more information. Required Fields: Database Alias (select from list) SalesLogix Login/password (id Admin is a good choice) SQL Login/password (always use SYSDBA, as this must be a dbo or have the dbo role in the SalesLogix database) DB Owner (in the Extended Settings tab) Synchronize to all users: This option should not be used unless you want OmniRush related activity and history table records to sync to all remotes. By default, these records will only sync to the remotes that subscribe to the affected account records. Click here for detailed discussion. All other fields are optional, and rarely needed. Leave alone for now. Key File: Only for SalesLogix v2 and 3. Set here ONLY if needed, which is almost never. By default, the correct key file will be used in nearly all cases. Root Dir: By default, OmniRush will detect the directory that SalesLogix uses for saving attachment documents that will synchronize. In the extremely rare case that OmniRush Server Module stores these files in the wrong place, you can set the directory to use here. When done, select Insert. Then Close this screen and start the module by right clicking on it and selecting Start. Database Connector for SalesLogix v6.x Looking for SalesLogix v4-v5 setup? Click here. 92 Administrator's Guide Click each area below for more information. Required Fields: Main connection string (use the SalesLogix OLE DB provider) Merge codes connection string (use the Microsoft-provided SQL Server OLE DB Provider) Note: The SQL user set in the connection string must either be the dbo of the target database or have the dbo role assigned. All other fields are optional, and rarely needed. Leave alone for now. When done, select Insert. Then Close this screen and start the module by right clicking on it and selecting Start. Database Connector: SalesLogix Aliases Track aliases are not generally needed with SalesLogix. However, you may direct the OmniRush connector to service tables other than ACTIVITY and HISTORY. This is useful if custom user interfaces have been configured to feed different tables than the default. Note that the structures of the alternate tables should have the same fields as ACTIVITY and HISTORY (more fields are OK, but not less). 93 OmniRush Administration & User Manual Database Connector: SalesLogix Multi-DBIO These settings are only applicable if your OmniRush Server will connect to multiple SalesLogix databases concurrently. Import Documents From: Adds an additional directory to search for files in addition to the global Document Import Directory. Allows each database connector to have its own external file library. Default Import Folder: Imported files will go into the specified folder instead of the globally defined document import folder. Internet Fax Account: Allows jobs from this database connector to be billed to a specific internet fax account. Use Import User Suffix: For multi-connector installs only: Each connector should have a unique 4 digit, alpha-numeric code assigned to it by the system administrator. Database Connector for Microsoft CRM Operating Environment - Microsoft CRM v1.x Note that MS CRM v1.x support is deprecated in OmniRush v9.0 and up. Click here for Microsoft Dynamics CRM v3. The Connector for Microsoft CRM (MS CRM) requires that the MS CRM system be installed, configured, and operational before installing OmniRush. There are a number of options on how OmniRush can be configured, so here are the details. Environment Item Where to install OmniRush OmniRush Server Side Support Only Fax Receiving with OmniRush & MSCRM OmniRush UI Required Credentials 94 Discussion OmniRush can be installed onto any Windows2000 PC (Pro, Server, etc.) that resides in the same Active Directory domain as MSCRM. In nearly all cases, OmniRush should not be installed on the MSCRM server. See the software coexistence matrix for information on what can coexist with OmniRush. The OmniRush Viewer, Toolbar and Universal Client do not integrate with MSCRM at this time. MSCRM support is from the OmniRush Server, which provides all job types from the built-in MSCRM Fax UI, from the OmniRush UI plugin, and from MSCRM Workflow. OmniRush can be used for receiving faxes with MSCRM when OmniRush is set to forward all faxes as email. This can be set up with or without DID hardware. In this scenario, the OmniRush viewer is probably not used, rather all inbound faxes are handled using the email system (e.g. Outlook). Installing the OmniRush UI will require administrative access to the MS CRM Server(s). See the detailed installation instructions. You will need two kits of credentials to set up OmniRush: Administrator's Guide MSCRM credentials: This should be an Active Directory user who is configured as an MSCRM Administrator. A dedicated userid is not required for this purpose, however some installations may have audit requirements that demand a dedicated userid (and ergo, MSCRM license) for OmniRush. Note, MSCRM user licenses are not included with OmniRush. Contact your MSCRM reseller for appropriate MSCRM licensing. SQL Server credentials. This should be either an Active Directory or SQL Server userid that has dbo role in the MSCRM database. Note: After OmniRush is configured, changing the passwords on either of these accounts will cause OmniRush to shut down. Make sure to either plan to update OmniRush when passwords change, or disable periodic password expiration on the accounts used by OmniRush. MS CRM v1.x Connector -- Creating the Module Note that MS CRM v1.x support is deprecated in OmniRush v9.0 and up. The following should be done before configuring a MS CRM Connector in OmniRush: Check your MS CRM operating environment. Log into the MS CRM Web Client from the OmniRush Server PC to confirm connectivity. Using Microsoft Query Analyzer, log into the SQL Server database used by MS CRM to confirm connectivity. When these steps have been done, you are ready to create the MS CRM DBIO Module. 1. Right-Click on the OmniRush Server PC and Select New 2. Select Database Connector 3. Continue through Connector configuration Database Connector for Microsoft CRM v1.x Note that MS CRM v1.x support is deprecated in OmniRush v9.0 and up. Here, configure the database connector with the parameters to use to connect to MS CRM. 95 OmniRush Administration & User Manual ADO connect string: Press the Create button to bring up the ADO connection string wizard. Be sure to use the OLE DB Provider for SQL Server provider. Be sure to save the password with the connection string. Server: This is the name of the MS CRM Server. For example: acme-mscrm.acme.com or in a flat domain environment just acme-mscrm Domain\Username: This is an Active Directory user ID that is also a licensed MS CRM user. This user should be of type Administrator in the MS CRM Deployment Manager. Password: The password of the username above. URL Override: [optional setting, not needed in most situations] If MS CRM Web Services were not installed into the default virtual directory, use this setting to specify the location. By default, OmniRush uses the MS CRM default virtual directory of "mscrmservices." MS CRM v1.x: Installing the OmniRush UI Note that MS CRM v1.x support is deprecated in OmniRush v9.0 and up. OmniRush for MSCRM consists of following installation steps 1. 2. 3. 4. 5. 6. Copy files into MSCRM server Turn ON integration option in MSCRM configuration file (web.config) Add hooks to OmniRush in MSCRM user interface Modify direct access SQL connection string (for contact/account lookups) Create new index in MSCRM database Start the MSCRM Web Client and check for the OmniRush menu item. Check that it works properly! 7. Configure track and document lists 96 Administrator's Guide Other Quick Links: Complete List of Files To Install Complete List of Files To Be Modified Using MSCRM Workflow Utilities Advanced configuration options Copy the OmniRush Files to the MSCRM Server(s) On the MSCRM Server, MSCRM itself is normally installed in the c:\inetpub\wwwroot\ directory. The OmniRush UI should be copied into these directories: c:\inetpub\wwwroot\activities\omnirush\ c:\intetpub\wwwroot\bin\ (you create this directory) The OmniRush UI files are installed to the OmniRush Server, in the "C:\Program Files\ZFirm LLC\OmniRush\Examples\Sample Code\Microsoft CRM\" directory. The basic steps are: Copy the DLL from "C:\Program Files\Z-Firm LLC\OmniRush\Examples\Sample Code\Microsoft CRM\redist\bin\" to the c:\intetpub\wwwroot\bin\ on the MSCRM server. Copy the files from "C:\Program Files\Z-Firm LLC\OmniRush\Examples\Sample Code\Microsoft CRM\redist\" to the c:\inetpub\wwwroot\activities\omnirush\ directory. Turn ON integration option in MSCRM configuration file Edit c:\intetpub\wwwroot\web.config Change: <add key="ISVIntegration" value="Off"/> to <add key="ISVIntegration" value="On"/> This option allows adding custom integration hooks into MSCRM web client. Add hooks to OmniRush in MSCRM user interface The MSCRM integration configuration file is located at "c:\inetpub\wwwroot\_resource\isv.config" This file controls all UI add ins to MSCRM. If OmniRush is the first or only custom integration form to installed in MSCRM, then you can simply copy isv.omnirush from OmniRush to c:\inetpub\wwwroot\_resource\isv.config. Note, this requires copying in the file and renaming it to isv.config. In all other cases (e.g. where isv.config is not stock, but has already been modified by other customizations to MSCRM), merge the OmniRush-supplied isv.omnirush file with the existing "c:\inetpub\wwwroot\_resource\isv.config file. (See the MSCRM SDK help file http://msdn.microsoft.com/library/default.asp?url=/library/enus/crmsdk/htm/addingcustommenusandbuttons.asp). 97 OmniRush Administration & User Manual The OmniRush Root integration block is following: <Menu Title="OmniRush"> <MenuItem Title="Fax" Url="/activities/omnirush/or_fax.aspx" WinParams="toolbar=0,status=1"/> <MenuItem Title="Email" Url="/activities/omnirush/or_email.aspx" WinParams="toolbar=0,status=1"/> <MenuItem Title="Shipment" Url="/activities/omnirush/or_ship.aspx" WinParams="toolbar=0,status=1"/> <MenuItem Title="Voice" Url="/activities/omnirush/or_voice.aspx" WinParams="toolbar=0,status=1"/> <MenuItem Title="Credit card" Url="/activities/omnirush/or_creditcard.aspx" WinParams="toolbar=0,status=1"/> <MenuItem Title="Print" Url="/activities/omnirush/or_print.aspx" WinParams="toolbar=0,status=1"/> </Menu> The OmniRush Contact/Account integration block is following: <Menu Title="OmniRush" ValidForCreate="0" ValidForUpdate="1"> <MenuItem Title="Fax" Url="/activities/omnirush/or_fax.aspx" PassParams="1" WinParams="toolbar=0,status=1"/> <MenuItem Title="Email" Url="/activities/omnirush/or_email.aspx" PassParams="1" WinParams="toolbar=0,status=1"/> <MenuItem Title="Shipment" Url="/activities/omnirush/or_ship.aspx" PassParams="1" WinParams="toolbar=0,status=1"/> <MenuItem Title="Voice" Url="/activities/omnirush/or_voice.aspx" PassParams="1" WinParams="toolbar=0,status=1"/> <MenuItem Title="Credit card" Url="/activities/omnirush/or_creditcard.aspx" PassParams="1" WinParams="toolbar=0,status=1"/> <MenuItem Title="Print" Url="/activities/omnirush/or_print.aspx" PassParams="1" WinParams="toolbar=0,status=1"/> </Menu> These blocks need to be merged into the isvconfig.cfg file. Modify direct access SQL connection string OmniRush uses direct database access for certain operations (in an MSCRM supported fashion). It is required to set the ConnectionString key in \activities\omnirush\web.config to a valid ADO connection string (including password) so that the OmniRush UI can connect to the SQL Server. Note: Z-Firm advises that SQL Server be set to allow SQL Server & Windows authentication. This can make managing the connection easier. Click here for the steps to check or change this setting. Click here to see the web.config that is installed with OmniRush. The part of this that must be modified is: 98 Administrator's Guide <add key="ConnectionString" value='<ADO Connection String>'/> This section must be modified with an actual connection string. The information needed to create this string is: SQL Server name or IP address SQL Server database name where your CRM system resides. 'sa' user password The ADO connection string in the example web.config is: 'data source=192.168.97.19;initial catalog=Adventure_Works_Cycle_MSCRM; password="";persist security info=True;user id=sa;workstation id=OmniRush; packet size=4096' This is edited in this fashion: 'data source=<SQL Server name or IP address>; initial catalog=<SQL Server database name>; password="<sa password, in double quotes>"; persist security info=True;user id=sa;workstation id=OmniRush; packet size=4096' Create new index in MSCRM database Z-Firm advises that a new index be added to the Microsoft CRM database. Use SQL Server Query Analyzer, log into the MSCRM database, and execute the syntax below to create the recommended index: create index zfirm_omnirush_performance on activitybase (category, scheduledstart) At this point, you should cycle IIS and log in to the MS CRM Web Client to check that the OmniRush menu option is present and working. Configure Track and Document Lists Each OmniRush UI form has two configurable lookup lists: Track list Document list These lists are simple text files, editable in Notepad. They can be edited any time, and changes take effect immediately. The Track list is per-OmniRush-form, and the Document list is per track (one list per track option). For example, the you may want the OmniRush Fax form to offer two OmniRush Fax tracks: FAX and INETFAX, and a list of 20 standard documents that are installed into the OmniRush 99 OmniRush Administration & User Manual document library. In this case, the or_fax_tracks.txt would be set to list FAX and INETFAX, and two text files, FAX.TXT and INETFAX.TXT would each list the 20 standard documents. Track List Files (copied into the c:\inetpub\wwwroot\activities\omnirush\ directory during the first setup stage, above): Filename or_fax_tracks.txt Description List of available FAX tracks or_email_tracks.txt or_voice_tracks.txt or_creditcard_tracks.txt List of available EMAIL tracks List of available VOICE tracks List of available CREDIT CARD tracks List of available SHIPPING tracks List of available PRINT tracks or_ship_tracks.txt or_print_tracks.txt Default values FAX, INETFAX, RIGHTFAX, FACSYS EMAIL VOICE COMRCE UPS, FEDEX, AIRBORN LASER1, LASER2, LASER3 For each track specified in any of or_???_tracks.txt file there must be corresponding %TRACKNAME%.TXT file with list of available documents. Sample file content (or_fax_tracks.txt) FAX INETFAX RIGHTFAX FACSYS Sample file content (inetfax.txt) /test.tif /pricelist.pdf Using MSCRM Workflow Setting up a simple Workflow to trigger an OmniRush job: - Go to the Workflow Manager Select File | New Enter a Rule Name and Description, for example: OmniRush test 1 for Contact Create events. Select Insert Action | Post URL Specify the post URL as http://localhost/activities/omnirush/or_workflow.aspx Add OmniRush parameters to the post URL (see below) Add ContactID or AccountID parameter to the list of selected parameters Parameters you can use to specify job details Parameter name category Opt./Req. Example OmniRush track reference category=INETFAX location Override for fax/phone/email location=3205609876 reference Reference line (subject) reference=Hello notes Notes block notes=test%20notes addtime Send in the future time in HHMM format addtime=0100 (schedule the job for 1 hour in the future) adddays 100 required Description Send in the future days in DDD format adddays=15 (schedule the job for 15 days in the future) Administrator's Guide Sample: http://localhost/activities/omnirush/or_workflow.aspx?category=INETFAX& reference=%2fpricelst01.tif¬es=welcome%20here&addDays=1&addTime=0100 Remember that special characters are not allowed in the parameter list. Substitute all nonalpha/numeric characters with their codes Character Substitue <space> %20 / %2F \ %5C : %3A Exapmple test notes test%20notes /pricelist.pdf %2Fpricelist.pdf For more codes refer to http://www.asciitable.com/ All errors (if any) during processing workflow rules will be posted to Windows2000 EventLog in the Application section. Keeping an eye on the Event Log of the MSCRM server during workflow development (with frequent use of the F5 key to refresh) is crucual to debug Workflow. Q: Why is using Workflow this complicated? From an MSCRM perspective, this is the normal way to interact with custom applications from Workflow. MSCRM Workflow is very rigid, and does not allow access to many of the Activity fields from the Workflow UI. MSCRM field Recipient Location Subject Category Notes Due SubCategory Optional/Required for OmniRush job required required required OmniRush field Contact Fax/Email override Reference line Track reference Notes Send On Result code From the Workflow manager new activity screen there is no way to specify a Category field, which is required for OmniRush. The Post URL action gives access to Z-Firm custom code to drive Workflow, and offers additional features not available from MSCRM Workflow (like inadvance scheduling). Advanced configuration options Advanced configuration options are located in the <OmniRush> section of the c:\inetpub\wwwroot\activities\omnirush\web.config Configuration key TraceMode Default value 0 Description Set to 1 if to prevent OmniRush from masking the MSCRM error. When set to "1" the default MSCRM error screen will be used. It has more information but looks ugly and requires configuration in wwwroot\web.cofig: <add key="DevErrors" value="On"/> 101 OmniRush Administration & User Manual UserName Password Domain RefLineSeparator <empty> <empty> <empty> <//> Workflow username Workflow password Workflow domain Reference line separator for shipping/commerce jobs The keys for UserName/Password/Domain are required in order to use MSCRM Workflow with OmniRush. A simpler configuration is to set the Microsoft CRM Workflow service to log on under a named account. (This also precludes the issue of the password being stored in a text file) By default, the MSCRM Workflow service does not know what CRM user to impersonate, so OmniRush can use the userID/PW set in the web.config file. An alternate system is to go into the Windows2000 Service Manager, and set the logon user for the MSCRM Workflow Service to an Active Directory user that is set as a CRM System Administrator in CRM Deployment Manager. Default OmniRush section in the application web.config: <OmniRush> <add key="ConnectionString" value='data source=192.168.97.19;initial catalog=Adventure_Works_Cycle_MSCRM;password="";persist security info=True;user id=sa;workstation id=ALEX2K;packet size=4096' /> <add key="TraceMode" value="0" /> <add key="UserName" value="" /> <add key="Password" value="" /> <add key="Domain" value="" /> </OmniRush> Complete list of files to install c:\inetpub\wwwroot\activities\omnirush SelectDocument.aspx SelectDate.aspx ScheduleResult.aspx SelectContactAccount.aspx or_voice.aspx or_creditcard.aspx or_email.aspx or_fax.aspx or_print.aspx or_ship.aspx or_workflow.aspx or_fax_tracks.txt or_email_tracks.txt or_voice_tracks.txt or_creditcard_tracks.txt or_ship_tracks.txt or_print_tracks.txt web.config 102 Administrator's Guide or_error.gif template.css Complete list of files that must be modified c:\inetpub\wwwroot\web.config c:\inetpub\wwwroot\_resources\isv.config c:\inetpub\wwwroot\activities\omnirush\web.config Turn on ISV Integration Merge in OmniRush values Set SQL Connection String Utilities The following BAT-file might be useful during testing and development. If any changes are made to config or aspx pages, cycle IIS immediately (note, this will impact other logged in users). This batch file should not be needed in production. _restart_iis.bat net stop w3svc net start w3svc Database Connector: MS CRM Aliases Track aliases are not generally needed with MS CRM. Database Connector: MS CRM Multi-DBIO These settings are only needed when one OmniRush Server is servicing multiple MS CRM databases. Import Documents From: Adds an additional directory to search for files in addition to the global Document Import Directory. Allows each database connector to have its own external file library. Default Import Folder: Imported files will go into the specified folder instead of the globally defined document import folder. Internet Fax Account: Allows jobs from this database connector to be billed to a specific internet fax account. Use Import User Suffix: For multi-connector installs only: Each connector should have a unique 4 digit, alpha-numeric code assigned to it by the system administrator. Fax Server Module Module Requirements The hardware fax module requires faxing hardware. The primary supported hardware is Brooktrout interfaces. Supported Brooktrout boards include: 103 OmniRush Administration & User Manual TruFax PCI TR114 PCI Analog Boards TR114 PCI Analog DID Boards TR114 PCI Digital Boards (most models) See the Technical Reference for more information. Note that FaxRush v4 Brooktrout drivers should be completely removed before installing OmniRush. Brooktrout Driver Installation Before the FaxRush Hardware Fax Module can be used with Brooktrout boards, the driver must be installed. Note: Only the OmniRush driver kit may be used with OmniRush. No other Brooktrout drivers should be present on the OmniRush Server PC. Never use any driver installer other than the OmniRush driver installer. Never use a Brooktrout driver kit from Brooktrout or any other source. It will not work, and will make a mess that must be resolved before the correct drivers can be installed. If such drivers are on the system, remove them according to the corresponding documentation. Then reboot the system, and continue with these installation steps. Have a TruFax? How to Tell if it is an "Old Style" or "New Style" TruFax Brooktrout Installation for "Old Style" TruFax and TR114 Hardware Brooktrout Installation for "New Style" TruFax and TR1034 Hardware Create Fax Module Steps: 1. Purchase a supported board 2. Install board and load Brooktrout drivers 3. Create and configure the module: Highlight your computer in the Administrator, right click, and select New, as shown below: 104 Administrator's Guide Select Fax Module below Select the hardware type (Brooktrout), and press Detect, as shown below: 105 OmniRush Administration & User Manual You are now ready to configure ports. If ports do not detect, see the troubleshooting section. Configure Ports (Modules | Hardware Fax Module | Fax Lines tab) There are several configuration options for each port. Outbound/Inbound: Each port can be set for send only, receive only, or send & receive. From: This is the CSID (Calling Station Identifier) that will appear on the receiving fax system. Each port can have its own CSID. Forwarding: This option is for received faxes only. See Advanced Options for details. Save As: Received files can be saved as ordinary TIF files to a directory, to allow you to manage them directly. The Save As option enables this. DTMF DID: If OmniRush is behind a PBX that will push DID digits as DTMF signalling, select this option. The DTMF timeout sets the maximum wait for digits. A setting of 3000-7000 (2-5 seconds) is normal here. Note: Internet fax configurations (using Easylink) set the sending station ID (CSID) in the fax Track (in the Fax Settings tab). 106 Administrator's Guide After configuring ports, start the module. Next: Configure Fax Tracks Module Options The General tab has settings for: Maximum Attempts per fax. How many times the transmission should be attempted. Delay Between Attempts: How long to wait between each attempt. Page Transmission Timeout: If a page takes too long to send, it indicates a severe problem, and the job should fail. Wait for Dial Tone: This should always be checked. Instructs the module to wait for dial tone before dialing the number. This is only unchecked on specific T1 configurations. On Hook Dwell Time: This setting controls how long OmniRush stays 'on hook' between calls. In many cases, the phone line does not behave properly if this is less than 1 or 2 seconds. Increase to 5000 (5 seconds) if there are problems getting calls to go through. Create a Track Now create a fax track. The most important setting is to direct the track to send the jobs to the new module. Failure to do this will result in jobs sitting, waiting to be sent. Setting the Track to use Brooktrout Hardware 107 OmniRush Administration & User Manual Other Track settings to be aware of: Basic Settings Tab: The Host Reference is the setting that matters in this tab: this is the CATEGORY (SalesLogix)/USERID (GoldMine) that will feed jobs to the track. Extended Settings Tab: In the example below, we have changed the default so that all failures will be alarmed to the user in the CRM system. Fax Receiving Set Up Receiving The steps to set up receiving are as follows: 1. Install Brooktrout hardware and OmniRush Brooktrout Drivers 108 Administrator's Guide 2. Configure OmniRush Fax Module 3. Set one or more ports to receive by checking the Enable Inbound check box on the port 4. Activate the module 5. Send a test fax to the fax line that is on the receiving port. (Note that the ports on the Brooktrout board are numbered from 0 up, but in OmniRush they are numbered from 1 up.) Newly received faxes can be seen in the Administrator Documents\Inbound folder and in the OmniRush Viewer. Fax Receive Advanced Options FaxRush supports the following options for fax receiving: Forward faxes to a specified user's Private folder in ODMS Save files as multi-page TIF files to a directory on the file system to be managed by your own tools Popup notification on newly received faxes Auto-forward received faxes by user based on DID Use the FaxRush Viewer to link received faxes to CRM contact records When faxes are auto-forwarded, this is a 'user-centric' approach, where it is desired to get received faxes to the right user. When faxes are linked using the FaxRush Viewer, this is a CRMcontact-record-centric approach, where it is most desired to get received faxes linked to the correct contact. (If the CRM system supports it, they can then be forwarded around within the CRM system.) The Forward option allows for: Automatic printing of received faxes Automatic emailing of received faxes Both of the above 109 OmniRush Administration & User Manual The OmniRush design allows for great flexibility, as these options are set by fax port. If multiple ports are used for receiving, each port can forward to a different email address, or print to a different printer. These options are set up as follows: 1. Decide if the jobs will be sent to a real user, or to general email account, or to a general device. If a general account or device, create a dummy 'device' user in OmniRush (e.g. PRINTER) to hold the printer or email address configuration. 2. If received faxes will be forwarded to an email address, make sure there is a running OmniRush Email Module and track that feeds the module. 3. If received faxes will be printed, make sure there is a running Print Module, and a track that is configured for the desired printer. 4. Open the Fax Server module. On the receiving fax port, set the Forward To to the desired OmniRush user (either a real user name if forwarding email to a real user, or to the dummy 'device' user created above) 5. Save the Fax Server settings and restart the fax module. 6. Open the user or Dummy user. Go to the On Inbound tab, and set one or both Track settings to taste (e.g. to email, print, etc.). 110 Administrator's Guide 7. If one of the tracks is of type email, set the Fwd Subject and Fwd Message to taste. Make sure there is an email address set on the user. This is the email address things will be forwarded to. 8. Save the settings 9. Send a test fax into the port to check for correct operation. Receiving: Popup Notifications Each port has a setting for the user or machine name where receive notifications should be sent. The alerts are sent as network popup messages. This feature lets users know immediately when a new fax has been received. Popup notifications can be sent to: A static user (like a receptionist or office administrator) Multiple users The machine that maps via DID to the user for whom the fax was received For any port configured to receive, press the navigation button next to "Inbound fax alarm recipients" to get the setting screen: Multiple PC names can be set here. If set to DID user, then the alert will go to the username that maps to the DID value. For example, if DID value 222 is set on OmniRush user JOHNS, the popup message will be sent to JOHNS. About Popup Messages 111 OmniRush Administration & User Manual Windows NT4, Windows2000, and WindowsXP systems will receive these messages with no client side software or configuration required. Windows98 requires that the Winpopup application be running to receive the messages. Winpopup can be started by selecting Start | Run | winpopup <enter> It is advised to make an icon for c:\windows\winpopup.exe in the startup group so it is always running. For more information, see these resources on the web: support.microsoft.com: Articles: Q173494, search for winpopup www.winpopup.com alternative to winpopup Popup Notification Troubleshooting The popup communication can be tested with the net send command on NT/Win2k. For example, if a user was configured (e.g. JANE) to receive popup notifications, but is not receiving them, use the net send command from a command prompt at the OmniRush PC: net send jane "this is a test message" If this does not work, there are other steps that can help resolve the problem: If user Jane logs into a PC called SLS1, try sending the message to the PC name, e.g. net send SLS1 "this is a test message" If this works, the PC name can be configured in OmniRush for alerts. Try to ping the PC where Jane sits from a command prompt at the OmniRush PC, e.g. ping sls1 If this fails, name resolution may be causing network messages to fail. Contact the network administrator to implement name resolution for workstations on the network. Note: Z-Firm technical support cannot assist with making the NET SEND command work. This is a network configuration and administration issue that is beyond the scope of Z-Firm technical support. Please refer to the Microsoft knowledge base to diagnose and rectify NET SEND issues. Recent Microsoft Service Packs may turn off the Messenger service. This service is required on the OmniRush Server to send notifications, and on receiving systems to receive the notifications. Print Module Print Module The Print / Raster Module is required printing and outbound faxing. It is also used for email attachments that are converted to PDF. There are no required settings to change in this module. If this module is stopped, print and fax merge jobs will be paused until the module resumes. In nearly all cases, the only time the Print Module requires configuration is to set up OmniRush RTF-to-PDF conversion options, or if PDF's are faxed out. A discussion of features is below. 112 Administrator's Guide Click on the screens for details. The Text to Raster tab: If scheduling .txt files to OmniRush to print, some settings in the Text to Raster tab may need adjustment: a) Margins: It typically works best to set them all to 200. b) Page Size: Set explicitly to 1728x3150 at 196 dpi PDF Conversion Options Note: The PDF features require the OmniRush PDF Module and may also require that PDF technology from third parties be licensed. Note: The overhead of native PDF conversion is significant. Minimum hardware will probably not be sufficient. A minimum for production environments would be a 1.2 GhZ system with at least 256MB RAM. PDF Settings Adj Contrast: This setting controls PDF files that are scheduled to fax or print. PDF files with photos are background shades may take several minutes per page to transmit. Turning up the contrast will reduce transmission time, and in many cases improve legibility of text on background colors. Range: -100 to 100. Default: 0. Recommended setting for PDF's with photos or background shades: 75 or 100. Note, if this setting is changed the PDF cache must be reset. External Server: This is for conversion of RTF merge forms to PDF for outbound email. See configuration steps below. PostScript Printer: This is for conversion of RTF merge forms to PDF for outbound email. See configuration steps below. Merge-to-PDF-and-Email Background: 113 OmniRush Administration & User Manual The email features in OmniRush allow merged forms to be merged, then converted to PDF format and sent out as email attachments. In all cases, regular OmniRush RTF merge templates are used. OmniRush offers two ways to convert these merged documents: OmniRush Native: This method creates all PDF files as 200 dpi, black and white, PDF files. The file size is small, and this method offers the highest throughput (fastest processing per job). These PDF files are nearly impossible to edit, and security options can be set on the PDF files themselves using OmniRush email Track options. Even if a method was discovered to edit these PDF files, the edits would probably stand out visually. PDF Native: This method can create color or black and white PDF files. File size is small to medium. These PDF files are normal, native PDF files, with text as text. These files can be edited if the recipient has the full (paid) version of Acrobat, or other PDF tools. These files are true, native, vector based PDF files. 114 Administrator's Guide Setup Overview Setting up OmniRush for OmniRush Native mode requires no setup other than to configure the email Track to convert attachments to PDF. To set up PDF Native, a few steps are involved (full details are below, this is a high level overview): a) An appropriate PostScript print driver must be installed and configured on the OmniRush Server PC. b) PostScript-to-PDF conversion software must be installed and set up on the OmniRush Server PC. Examples of this software are GhostScript (www.ghostscript.com) and Adobe Acrobat Distiller. [Not included with OmniRush, up to the user to license properly from the software publisher.] c) The OmniRush Print Module must be appropriately configured. d) The OmniRush Email Track(s) must be set to convert attachments to PDF. Setup Detail The main thing to remember is that there is a fair amount of logic going on outside OmniRush, so there are several steps needed to set this up. In actuality, it will probably take relatively little time. Take these steps (on the OmniRush Server PC): 1. 2. 3. 4. 5. 6. 7. 8. 9. Stop the OmniRush Print Module In OmniRush Administrator, go to Modules | Print Module | PDF Set Convert to PDF as External Server Open the Windows Printers folder and install a PostScript Print Driver, on LPT1. (See below for discussion on specific driver to install.) Return to the Print Module in the OmniRush Administrator Go to the PDF tab Select the PostScript printer installed above in step 4 from the list and press Configure Accept the prompts OmniRush will rename the printer to "OmniRush PostScript" The PDF tab should now look like this: 115 OmniRush Administration & User Manual You are now ready to set up the converter options. This depends on the converter in use. GhostScript: NOTE: Proper licensing of GhostScript is your responsibility. No license is provided as part of OmniRush. Information and download of GhostScript can be found at www.ghostscript.com These notes are based on GhostScript v7.xx (note, the exe version of GhostScript should be downloaded, not the .zip version, e.g. gs704w32.exe or gs800w32.exe). 1. 2. 3. 4. Install GhostScript to default directories (usually c:\gs\ ) Copy the four dll and exe files from C:\gs\gs7.04\bin\ to C:\gs\gs7.04\lib\ Open Control Panel, System | Environment and add C:\gs\gs7.04\lib\ to the search path In OmniRush Administrator | Modules | Print Module | PDF set the Execute to C:\gs\gs7.04\lib\ps2pdf14.bat as shown here: (note that the input/output dir settings are left blank) 5. Save the settings, and start the Print module 6. Schedule some multi-page RTF files to confirm proper conversion Note that two GhostScript directories usually need to be added to the system Path. These directories are: <GhostScript install directory>\gs\gs8.51\bin and <GhostScript install directory>\gs\gs8.51\lib After adding these directories to the path, reboot the system and check from a command prompt that ps2pdf14.bat is found and runs. Next: Advanced Options & PDF Passwords Adobe Acrobat Distiller NOTE: ***Proper licensing of Acrobat is your responsibility***. No license is provided by ZFirm, even if the OmniRush PDF module has been licensed. NOTE: Some users run Distiller over the network. Z-Firm only supports Distiller running on the OmniRush Server PC. Install the Acrobat Distiller 1. Set a watched folder, e.g. c:\temp\omnirushps\ Set it to watch every second, and to delete the PS files 2. Distiller will create two directories: c:\temp\omnirushps\in\ and c:\temp\omnirushps\out\ 3. In OmniRush Administrator | Modules | Print Module | PDF set the Input Dir to c:\temp\omnirushps\in\ and the Output dir to c:\temp\omnirushps\out\ as shown here: 116 Administrator's Guide (note that Execute is left blank, as Distiller will automatically 'see' new input files and convert them. 4. It is important that the Acrobat Distiller be running at all times to process jobs 5. Save the settings, and start the Print module 6. Schedule some multi-page RTF files to confirm proper conversion PostScript Printer Notes There are some attributes of PostScript printers that you should be aware of: Many print drivers are monochrome, so all PDF's will be converted to monochrome. Be sure to use a color print driver if you want color. Some printer drivers create their output in reverse order, so the pages are back to front in the PDF. This can be resolved with a print driver setting. Z-Firm has advises to use the following print drivers: Tektronix Phaser 300i (requires pages reversed, see below) Alternates: LaserWriter 16/600 PS Tektronix Phaser860DX Reversing pages: Some PostScript printers output in reverse-page-order. To resolve this, take these steps: 1. 2. 3. 4. 5. 6. 7. Stop the OmniRush Print Module (wait for it to completely stop) Open the printer folder Open Properties of the OmniRush PostScript printer Go to the Advanced tab, press Printing Defaults Set Page Order to Back to Front Save the settings Restart the OmniRush Print Module Fax Bridge Module Internet Fax Server With internet fax, OmniRush does all its processing of the faxes, but hands the fax off to another fax server for final delivery. The fax server might be on your LAN/WAN (in the case of a RightFAX server), or on the internet in the case of an IFSP such as Easylink. Internet Fax Internet fax allows OmniRush to process jobs and submit them to an Internet Fax Service Provider (IFSP) for final delivery. OmniRush has extensive integration to allow the true final 117 OmniRush Administration & User Manual status as reported by the IFSP to be logged in the CRM system. Click here for a diagram that shows the process. To use Internet Fax, the steps are: 1. Open an account with Venali (formerly VisionLab) or Easylink a. For a Venali account, contact your OmniRush reseller or Z-Firm sales (206-8127874). Venali accounts can be activated immediately. b. For an Easylink account, click here for the Easylink application form. 2. When your account is open (Venali accounts can be opened instantly, Easylink accounts are emailed you, generally within one business day) take these steps in the OmniRush Administrator: 1. In the Server Modules branch, right click on your OmniRush Server, select New Module 2. Select Module Type: Fax Server (Internet Fax) 3. Select the appropriate Fax Service Provider 4. Enter your username and password 5. Save the module, right click on it, select Start 6. Open or create a fax Track that will be used to feed the module 7. In the Fax Settings tab of the Track, be sure to select the appropriate Bridge Type (to match your internet fax account) 8. Save and close the Track You are now ready to fax. See the Fax Test Jobs page for steps on how to submit test jobs into the new Internet Fax module. Module Settings: Max # of Attempts Per Fax Normal Setting: 3 This controls how many times OmniRush will attempt to upload a job to the Internet Fax Service Provider (IFSP) before giving up and failing the job as unable to upload. Once uploaded, the IFSP will retry the fax 2 or 3 times (depending on IFSP) before giving up and failing the job. Delay Between Attempts Normal Setting: 00:04 This sets the delay between upload attempts. Sleep Between Passes Normal Setting: 00:10 For super heavy broadcasting, set to 1 or 2 Packaged Upload (available with Venali only) Normal Setting: Unchecked. For heavy broadcasting of identical TIF or PDF files, check this option. Increases throughput and reduces internet bandwidth use, but only if files sent are static document. Has no effect when merge documents are used. For example, if the internet connection is overloaded or unreliable, a setting of 3 attempts 10 minutes apart would cause OmniRush to attempt the upload three times over a 20 minute period before giving up with an upload failure. 118 Administrator's Guide RightFAX (Applies to OmniRush v5.1 and higher) The The OmniRush Bridge to RightFAX® allows OmniRush to do all its powerful database integration, and then use an existing RightFAX server to actually send the fax. True fax status is tracked in the CRM or database. Requirements: RightFax versions 6 through 9.x TCPIP communication between the OmniRush Server and the RightFAX PC If the RightFax MS Word integration is in use, OmniRush must be on a separate PC. Notes: The RightFAX connector is a send-only solution. To pipe received faxes from RightFAX into OmniRush will require custom code to feed into the OmniRush Fax Bridge API (note, Z-Firm does not do this coding). Steps to configure the RightFax module: 1. Check that the RightFAX Server is v6.0 or higher 2. Check that the RightFAX Server is running TCPIP 3. Check that the OmniRush Server PC can map a drive to the RightFAX server (this confirms network connectivity and host name resolution capability). 4. Check that from the OmniRush Server you can ping the RightFAX Server by machine name. E.g: ping <RightFAX server name> 5. Create the module in the OmniRush Administrator 6. Enter the RightFAX server name (or IP address) and a RightFax username & password 7. Configure a track to submit fax jobs to RightFax. 8. Fax! Advanced Configuration: Dialing OmniRush will use its dialing logic to compute the fax number that is submitted to RightFax. All North America calls will be submitted as 1 + 10 digits. Be sure to configure RightFax to properly handle these numbers. A RightFax Technote discusses how to configure RightFax dialing rules. Search the knowledge base at www.captaris.com for Answer ID: 1469 (legacy ID: 9709157199) which may still be available at this url. Follow the steps shown to add a rule that applies to 1+ numbers and strips the first digit in these cases. FacSys (Applies to OmniRush v5.5 and higher) The The OmniRush Bridge to FacSys allows OmniRush to do all its powerful database integration, and then use an existing FacSys server to actually send the fax. True fax status is tracked in the CRM or database. 119 OmniRush Administration & User Manual Requirements: FacSys v4.6 or v4.7 TCPIP communication between the OmniRush Server and the FacSys PC If the FacSys MS Word integration is in use, OmniRush must be on a separate PC. Notes: The FacSys connector is a send-only solution. If your site needs CRM-integrated receiving from FacSys, contact Z-Firm. Steps to configure the FacSys module: 1. Check that the FacSys Server is v4.6 or higher 2. Check that the FacSys Server is running TCPIP 3. Check that the FacSys client utilities have been installed on the OmniRush Server, and that they can log in to FacSys and send faxes. 4. Check that the OmniRush Server PC can map a drive to the FacSys server (this confirms network connectivity and host name resolution capability). 5. Check that from the OmniRush Server you can ping the FacSys Server by machine name. E.g: ping <FacSys server name> 6. Create the module in the OmniRush Administrator 7. Enter the FacSys server name (or IP address) and a FacSys username & password 8. Configure a track to submit fax jobs to FacSys. 9. Fax! Advanced Configuration: Dialing OmniRush will use its dialing logic to compute the fax number that is submitted to FacSys. All North America calls will be submitted as 1 + 10 digits. Be sure to configure FacSys to properly handle these numbers. A FacSys tech doc on this subject is DOCUMENT #: PS00-531 at this writing via this URL. E-Mail Server The email module is very easy to configure. Most OmniRush sites use the Integrated SMTP option. See the Technical Reference for a discussion of internal vs. external. For Integrated operation, only one setting is required (shown below). Internet access requirements for e-mail. 120 Administrator's Guide Note that DNS is an optional field. This is only needed when two criteria are both met: Module is using the integrated SMTP server Module is failing to resolve domain names or tenders DNS errors. If the above criteria both apply, enter the IP address of your DNS server. (Normally, the module will automatically detect DNS from the server TCPIP settings. This setting is for the rare cases when that is does not work properly.) Advanced options can generally be left at the defaults: 121 OmniRush Administration & User Manual When the email module is running, remember to set up a track to feed it! E-Mail Module Advanced Settings Setting Number of Mailing Threads Validate Recipient Email Address Max Attempts/Delay Between Attempts 122 If Running Internal SMTP Depends on your internet connection: 44-128kb: 1-2 threads 128-296kb: 2-4 threads Over 296kb: 3-5, to taste Note that a low number will result in slower throughput, but OmniRush will use less of the internet bandwidth at your site. This causes OmniRush to attempt to check the email address for validity before sending the message. This process is not reliable, and will lead to false failures and false successes. Set this to unchecked. See Tech Ref In Internal SMTP mode, OmniRush retries the email transmission just like retrying a fax. For example, if the If Using External SMTP Generally set to between 1 and 3. Depends on performance and availability of external SMTP server. With Sendmail on Linux (running on a P-II-300), set to one. NA NA Administrator's Guide recipient's email server is being rebooted, serviced, etc. the message may not go through the first time. Typical settings: 2 or 3 attempts, 20 minutes between attempts. Shipping Modules Shipping Services Reference For a conceptual overview of shipping with OmniRush, see the Overview. Feature, Service, or Requirement Uses Internet to communicate with shipping carrier Ground and air shipping services Print labels on laser printers and Eltron EPL based thermal label printers Zebra ZPL thermal label printer support Itemized invoicing from carrier Available for USA Shippers Ship from the USA to international destinations Type of account needed to use shipping service ShipRush Server for FedEx® Shipping Yes ShipRush Server for DHL® Shipping ShipRush Server for UPS® Shipping Yes Yes Yes Yes Yes Yes Yes Yes Yes No Yes Yes Yes Yes Yes Yes (when billed electronically) Yes No No DHL account UPS account (6-digit alpha-numeric shipper number) and UPS Daily Pickup service Yes (Documents-only shipments) Any valid, 9-digit FedEx account FedEx Shipping Server Requirements: 123 OmniRush Administration & User Manual Internet connectivity from the OmniRush Server. Communication to the FedEx host is done with SSL on port 443. (This is the standard SSL port.) Check that your firewall allows SSL communication on this port. (See the Technical Reference on proxy servers if needed.) Valid FedEx account (FedEx accounts are 9 digits, numeric only) Printer for labels: (See the ShipRush for FedEx documentation for supported printers) Installation Steps: 1. Install ShipRush for FedEx on the OmniRush Server PC. Complete the ShipRush wizard, and process one test shipment to confirm proper operation. (The test shipment can be deleted later.) 2. Using the OmniRush Administrator, create a FedEx shipping Module. 3. Demo Mode is for testing purposes. Shipments processed in demo mode will print labels with -TESTING- in place of the address. You will not be billed for these shipments, and the labels produced cannot be used on shipments as there is no address information. OmniRush automatically deletes them from the FedEx server when in demo mode. Demo Mode is useful to see the flow of shipping, from the CRM or SQL system through OmniRush to the label and history record. 4. Configure one or more tracks to feed the module. The vast majority of configuration settings are set in the track. See the Configuring FedEx Shipping Tracks for details. UPS Shipping Server Requirements: Internet connectivity from the OmniRush Server. Communication to the UPS is done with SSL on port 443. (This is the standard SSL port.) Check that your firewall allows SSL communication on this port. (See the Technical Reference on proxy servers if needed.) Daily pickup account with UPS (have your six-digit, alpha-numeric shipper number handy, as it will be needed during configuration) Local or Network printer for labels: Laser printer or supported Eltron/Zebra label printer Local or Network printer for manifests: Laser printer (Note: Printers should be available in the Printers folder of the OmniRush PC) Installation Steps: 1. Log in to the OmniRush Server PC as the Windows user which OmniRush will run under. 2. Install ShipRush Pro for UPS. This can be installed either on the OmniRush Server PC, or on another PC (if installed on another PC, the ShipRush Client must be installed on the OmniRush Server PC). Click here to see the setup options. 124 Administrator's Guide 3. If this is a new installation of ShipRush Pro for UPS, complete the ShipRush setup wizard. Select 'Stand Alone' for the contact manager. Commission the UPS account (this happens automatically at the end of the wizard). 4. If ShipRush Pro for UPS is already installed on the network, or will be installed on a system other than the OmniRush server: Install the ShipRush server, set it up as in the step above. Then install the ShipRush Network Client on the OmniRush Server. 5. Using the OmniRush Administrator, create a UPS shipping Module. Set the module to type: UPS (via ShipRush) 6. Configure one or more tracks to feed the module. The vast majority of configuration settings are set in the track. See the Configuring UPS Shipping Tracks for details. DHL Shipping Module Requirements: Internet connectivity from the OmniRush Server. Communication to the DHL host is done with SSL on port 443. Valid DHL account Printer for labels: (See ShipRush DHL list of supported printer types and models) Installation Steps 1. Install ShipRush for DHL, select Stand Alone operation 2. Complete the ShipRush for DHL wizard. Run a test shipment in ShipRush for DHL to confirm the configuration is working. 3. Using the OmniRush Administrator, create a DHL shipping Module. 4. Configure one or more tracks to feed the module. The vast majority of configuration settings are set in the track. See the Configuring DHL Shipping Tracks for details. Commerce Module Requirements The Commerce Module can run using two ways: Using an Internet credit card gateway (Authorize.net) Simulation mode, no software or internet needed The overall requirements are: Internet based: Many existing merchant accounts are supported. Super quick setup for new merchant accounts. If you have an existing merchant account, let e-online try to match your current rates. Simplest setup and operation. 125 OmniRush Administration & User Manual The module offers two Demo modes to use, depending on your needs: When Atomic is selected, Demo Mode enables %100 OmniRush internal processing. No software or internet connection is needed. Most transactions will be APPROVED and a few will DECLINE so you get a mix of behaviors. When Authorize.net is selected, Demo Mode interacts with the internet payment gateway, but all transactions are test transactions. Recommended setup: 1. Open a new merchant account with e-online and get rolling fast. 2. Configure Commerce Note: E-Online accounts are managed via an internet 'virtual terminal' at https://secure.authorize.net/ It is possible to configure the account in such a way as to make OmniRush transactions impossible. Please use caution when adjusting your merchant account settings. --------------------------------------------------------------------------------------Merchant Account Discussion Merchant accounts take a couple of weeks to get set up, so be sure to allow time for that in your implementation plan. Note that Z-Firm only supports using e-online merchant accounts. New accounts often take one to two weeks to receive approval and to be activated. Plan ahead and allow lead-time for this! If an existing order entry or transaction system is in place, it is advisable to run OmniRush in parallel to the existing system (even if the existing system is manual) before running OmniRush by itself. To do this, it can be desirable to open a second merchant account for OmniRush to use. This way, the transactions of the two systems (existing system and OmniRush) are kept separate, and can be properly tracked during the migration to OmniRush. Commerce Setup Demo / Simulation Mode Operation: For demo operation, simply create the Commerce Module set to Atomic, and set it to demo mode. In demo mode, the module will fail about three of every ten transactions. This shows the operation of the system for approved, failed (e.g. bad credit card number), and declined transactions. Another benefit of demo mode is that no software or internet account is needed. Then create a commerce track. You are now ready to run jobs. For live operation with the internet payment gateway, the installation steps are: 1. 2. 3. 4. Sign up with e-online for a new merchant account. Receive userid and password Log into the Authorize.net console Create a new Transaction Key Starting in v8 of OmniRush, the Authorize.net password is not used, only an Authorize.net Transaction Key may be used. If your Authorize.net console does not allow you to create a transaction key, please contact Authorize.net technical support. 126 Administrator's Guide 5. In the OmniRush Administrator, create a Commerce Module, and enter your Authorize.net userid and transaction key 6. Configure Commerce Track 7. Run Test Job --------------------------------------------------------------------------------------For legacy dial up sites: Dial up is no longer supported in OmniRush v8.0 and higher. Launcher Module Accessing Launcher Settings Open the Server Modules | List by Server PC node. Right-click on the OmniRush Server name, and select Launcher Settings. Start/Stop Controller If OmniRush is running as an NT Service, this tab allows the Launcher to be started and stopped, and also allows the NT Service Login name to be set. Note that these functions are only available if Admin is running on the same PC as the OmniRush Server. Database Backup By default, OmniRush installs to automatically back up the Z-Firm DBEngine every day at 1:00 AM. This can be changed here. For more information on backing up OmniRush, see the help file topic. Alerts This area allows OmniRush to alert you when a critical error happens. The alert can be sent to you via network popup message, or email. The email is 'direct,' using Z-Firm SMTP relay functionality built directly into the Launcher. No external SMTP relay, nor OmniRush email module is required. This is an excellent mechanism to alert a pager or cell phone via a text message that the OmniRush Server has experienced a critical error. Note that ICQ messaging can be unreliable at times when the ICQ messaging gateway is shut down for service. Z-Firm advises using email notification, which can be directed to cell phones, pagers, etc. Track Configuration The Role of Tracks In a CRM environment, Tracks play a key role in telling the Database Connector module what to do. This is illustrated as: 127 OmniRush Administration & User Manual Notes: Multiple tracks can feed a single module. This allows for multiple configurations to be persistent. Each configuration can be used by submitting jobs to the appropriate track host reference. Tracks can be active/inactive to allow for jobs to be taken off line, paused, etc. Creating a New Track Right-click in the track area and select New: Select the Track type: Name the track, and the track is ready for configuration. Universal Track Options 128 Administrator's Guide The third tab of the Track screen has settings specific to the track type. The other tabs (Basic Settings, Extended Settings, Information) are common to all tracks. All tracks have the following settings: Basic Settings: The main purpose of the Basic Settings tab is to set the Host Reference. All other options can be left at default. ( Click on hotspots for details.) Extended Settings: Every track also has Extended settings. The main purpose of this tab is to set: ( Job completion/schedule back options. Alarm options on failed jobs. Job document options. Click on hotspots for details.) 129 OmniRush Administration & User Manual Configuring Fax Tracks Fax tracks have the settings as shown. The only required setting you must set is the Fax Port Type. At least one port type must be selected. (If no port is selected, OmniRush will not import the job, and if a port type is selected that does not have an associated module running, the job will be imported but will not be faxed.) Internet fax configurations (using Easylink) can set the sending station ID (CSID) in this area. Click the area for more information. 130 Administrator's Guide Next: Send fax test jobs Configuring Print Tracks The only setting for print tracks is what printer to print on. This tab shows all the printers in the Printers folder of the OmniRush Server. 131 OmniRush Administration & User Manual NEVER set a track to print to one of the OmniRush printers (e.g. OmniRush Server or Rasterizer). If printing to a network printer, and running OmniRush as an NT Service, it is strongly advised to use IP Printing. Configuring FedEx Shipping Tracks There are several areas of configuration for FedEx shipping. These are divided into Required and Optional configuration settings. Note that OmniRush shipping is not supported by Z-Firm support running in NT Service mode. FedEx Required Settings Setup Procedure Follow these steps to create a FedEx shipping track. Initially, do not set any optional settings, stick to the required settings and run a test shipment before trying optional settings. 1. FedEx Shipping Module must be configured and running (a configuring the track. in Administrator) before 2. Create new FedEx track 3. Set the Basic Settings | Host Reference to FEDEX or other appropriate value 4. If using ShipRush for FedEx with the module: Done! 5. Press Insert to create the FedEx shipping track. 132 Administrator's Guide Testing The Setup 1. Start the OmniRush modules 2. In the CRM or SQL system, schedule a job to track FEDEX with a reference of: /STD_Letter.zpk 3. Check job status after 30 seconds. It should have completed FedEx Optional Settings There are a number of optional settings for FedEx shipping. Before getting to them, remember some items: If you want shipment notifications sent by email, fax, or voice, the corresponding module and track should be set up and tested first. Decide carefully what notifications are appropriate Settings: General Tab: Shipment Notification OmniRush can send a message to the recipient to alert them that a shipment is en route to them. The alert can include the tracking number, tracking URL, and other information (see below for merge codes). Shipment Schedule notification occurs when the shipment is triggered and the label prints. (Note, an OmniRush email module must be running for this email to be sent.) When these options are enabled, tabs appear to allow the notification message to be composed. The message can contain the merge codes noted below (note they are case sensitive). The CC Notification option allows an email message to be copied to a static email (or list of email addresses separated by a semicolon). Note that ShipRush may be configured such that email notifications are sent to the recipient by the carrier. Test out the setup to avoid duplicate notifications. 133 OmniRush Administration & User Manual Notification Merge Codes: These codes are case sensitive. Enter into the notification area in the correct case (shown below). %FirstName% %LastName% %MiddleName% %Company% %TrackingNumber% %CurrentDateTime% %CurrentDate% %CurrentTime% %TrackingURL% (This is the complete URL to track the package with a single click.) %Notes% (This passes Job notes, if any, into the email) New shipping tracks get a default message similar to this: Dear %FirstName%, %Notes% Please use the following url to track your shipment %TrackingURL% <Put your signature here> Edit this to taste. Address/Time Tab The Ship From address is only required if using the FedEx module in legacy FedEx direct mode. When the FedEx module is set to use ShipRush, this setting is optional. If set it will override the FROM address set in ShipRush. Settlement Time: This sets when end of day will be processed. Use contact/account "shipping" address instead of "primary" address. This applies to SalesLogix only. By default, OmniRush uses the address marked as Primary as the shipping address. When this option is set, OmniRush will use the SalesLogix address marked as the Shipping address for the shipment. Label/Manifest Tab This is required when the module is running in legacy FedEx direct mode. When running with ShipRush, the ShipRush configured printer will be used by default, and nothing needs to be set in the track. Set the label printer Left & Top Margin: Set the offset from the edge of the page. Enter fractions of an inch as a decimal (e.g. half an inch is entered as 0.5) If printing to a network printer it is strongly advised to use IP Printing. Advanced Tab: Options to set: Default package dimensions. (Note, if you ship primarily using the FedEx Box, be sure to set these to 12 x 4 x 19) Signature Release Authorization Number This option is deprecated and is no longer needed. 134 Administrator's Guide Add email notation to history record: This adds extra text to the history record noting that an email notification was sent out. Email creates its own history record: This results in two history records. One for the shipment and a second one for the email. International: This is needed if sending document only shipments internationally. Configuring UPS Shipping Tracks There are several areas of configuration for UPS shipping. These are divided into Required and Optional configuration settings. Note that OmniRush shipping is not supported running in NT Service mode. UPS Required Settings Setup Procedure Follow these steps to create a UPS shipping track. Initially, do not set any optional settings, stick to the required settings and run a test shipment before trying optional settings. 1. A UPS Shipping Module must be configured and running (a configuring the track. in Administrator) before 2. Create a new UPS track 3. Set the Basic Settings | Host Reference to UPS or other appropriate value 4. In the UPS | General tab, leave the UPS account number at <default> to use the account configured in ShipRush. 5. In the Address/Time tab, enter a Ship From address and the time to automatically upload to UPS (typically set to about 15 minutes before your UPS driver regularly picks up). 6. In the Label/Manifest tab, set nothing and the ShipRush-configured printer settings will be used. 7. Press Insert to create the UPS shipping track Testing The Setup 1. Start the OmniRush modules 2. In the CRM or SQL system, schedule a job to track UPS with a reference of: /UPS_GND_BOX_2LB.zpk 3. Check job status after 30 seconds. It should have completed UPS Optional Settings There are a number of optional settings for UPS shipping. Before getting to them, remember some items: If you want shipment notifications sent by email, fax, or voice, the corresponding module and track should be set up and tested first. General Tab: Shipment Schedule/Pickup/Delivery Notification OmniRush can send a message to the recipient to alert them that a shipment is en route to them. The alert can include the tracking number, tracking URL, and other information (see below for merge codes). Shipment Schedule notification occurs when the shipment is triggered and the label prints. 135 OmniRush Administration & User Manual When these options are enabled, tabs appear to allow the notification message to be composed. The message can contain the merge codes noted below (note they are case sensitive). The CC Notification option allows an email message to be copied to a static email (or list of email addresses separated by a semicolon). Notification Merge Codes: These codes are case sensitive. Enter into the notification area in the correct case (shown below). %FirstName% %LastName% %MiddleName% %Company% %TrackingNumber% %CurrentDateTime% %CurrentDate% %CurrentTime% %TrackingURL% (This is the complete URL to track the package with a single click.) %Notes% (This passes Job notes, if any, into the email) New shipping tracks get a default message similar to this: Dear %FirstName%, %Notes% Please use the following url to track your shipment 136 Administrator's Guide %TrackingURL% <Put your signature here> Edit this to taste. Address/Time Tab The Ship From address is optional. If set, it will override the FROM address set in ShipRush. Settlement Time: This sets when end of day will be processed. Use contact/account "shipping" address instead of "primary" address. This applies to SalesLogix only. By default, OmniRush uses the address marked as Primary as the shipping address. When this option is set, OmniRush will use the SalesLogix address marked as the Shipping address for the shipment. Advanced Tab: Options to set: Add email notation to history record: This adds extra text to the history record noting that an email notification was sent out. Email creates its own history record: This results in two history records. One for the shipment and a second one for the email. Configuring DHL Shipping There are several areas of configuration for DHL shipping. These are divided into Required and Optional configuration settings. Note that OmniRush shipping is not supported running in NT Service mode. DHL Required Settings Setup Procedure Follow these steps to create a DHL shipping track. Initially, do not set any optional settings, stick to the required settings and run a test shipment before trying optional settings. 1. An DHL Shipping Module must be configured and running (a configuring the track. in Administrator) before 2. Create new DHL track 3. Set the Basic Settings | Host Reference to DHL or other appropriate value 4. Press Insert to create the DHL shipping track Testing The Setup 1. Start the OmniRush modules 2. In the CRM or SQL system, schedule a job to track DHL with a reference of: /DHL_2ndDay.zpk 3. Check job status after 30 seconds. It should have completed DHL Optional Settings There are a number of optional settings for DHL shipping. Before getting to them, remember some items: 137 OmniRush Administration & User Manual If you want shipment notifications sent by email, fax the corresponding module and track should be set up and tested first. Decide carefully what notifications are appropriate Settings: General Tab: Shipment Schedule/Pickup/Delivery Notification OmniRush can send a message to the recipient to alert them that a shipment is en route to them. The alert can include the tracking number, tracking URL, and other information (see below for merge codes). Shipment Schedule notification occurs when the shipment is triggered and the label prints. When these options are enabled, tabs appear to allow the notification message to be composed. The message can contain the merge codes noted below (note they are case sensitive). The CC Notification option allows an email message to be copied to a static email (or list of email addresses separated by a semicolon). Notification Merge Codes: These codes are case sensitive. Enter into the notification area in the correct case (shown below). %FirstName% %LastName% %MiddleName% %Company% %TrackingNumber% %CurrentDateTime% %CurrentDate% 138 Administrator's Guide %CurrentTime% %TrackingURL% (This is the complete URL to track the package with a single click.) %Notes% (This passes Job notes, if any, into the email) New shipping tracks get a default message similar to this: Dear %FirstName%, %Notes% Please use the following url to track your shipment %TrackingURL% <Put your signature here> Edit this to taste. Address/Time Tab The Ship From address is only used if the DHL module is running in legacy direct mode. Settlement Time: Does not apply to DHL shipping. Use contact/account "shipping" address instead of "primary" address. This applies to SalesLogix only. By default, OmniRush uses the address marked as Primary as the shipping address. When this option is set, OmniRush will use the SalesLogix address marked as the Shipping address for the shipment. Label/Manifest Tab Set the label printer Left & Top Margin: Set the offset from the edge of the page. Enter fractions of an inch as a decimal (e.g. half an inch is entered as 0.5) Advanced Tab: Options to set: Add email notation to history record: This adds extra text to the history record noting that an email notification was sent out. Email creates its own history record: This results in two history records. One for the shipment and a second one for the email. Configuring E-Mail Tracks: Message Properties In most cases, the default settings are correct and no manipulation of the Track settings are necessary. For initial use, use the defaults. Message Properties: This allows for track defaults to be used for the e-mail message. Job information such as From Name, From E-Mail address, Subject, Attachment, Message Signature can all be set in the Track. This allows jobs submitted to a track (such as CSEMAIL) to be 'from' Customer Service, no matter who originates the job. Note that the behavior of the From Name and From Email are non-standard. Generally, job settings override track settings. However these two settings override the job. Anything set for the From Name and From Email will apply to all jobs sent via the track. Popular Configurations: Set the Default Subject to effect: "Information from Acme Roofing" so that any email sent without a subject will have a subject automatically set by the OmniRush server. 139 OmniRush Administration & User Manual Next: Send test email jobs Configuring Commerce Tracks Commerce tracks can be configured to send notifications about the transaction to users, within the workgroup (via network popup message) and can send notifications out via email, print, fax, or voice (may require the appropriate module to be licensed). Network Alert: This will send a network popup to one or more stations on job success/failure. The text area can include the special job merge codes below. Transaction Notification: This can be configured to either send a simple text block to an email track (that may include the merge codes below), or merge documents (that may then be sent to an email, print, or fax track). The Notes block set here will merge into the &Notes merge code of merge documents. (For demonstration purposes, try the /macro-merge-codes.rtf sample document to get started.) These messages can have merge codes in them as follows: %CCNUMBER% %AMOUNT% %COMPANY% %FIRSTNAME% %LASTNAME% %JOBNOTES% %TODAY% %NOW% %APRVCODE% Credit card number in XXXXXXXXXXXX1234 format Transaction amount Company name (same as &Company) CC holder (contact) first name CC holder (contact) last name Notes from the database record or Universal Client Notes entry Today's date, in MM/DD/YYYY format Current time, in HH:MM ampm format The approval code that comes back from the merchant processor %USERNOTES% %FULLNOTES% Sample block: Dear %FIRSTNAME%, Your credit card %CCNUMBER% has been charged for %AMOUNT% Today is %TODAY% %NOW% Approve code is %APRVCODE% Advanced Track Options Crystal Reports This setting controls how RPT files should be handled when submitted to the track. 140 Administrator's Guide For fax tracks, it should always be RTF For email tracks, it can be PDF or html. The Database settings allow setting the database login information. Remember that the ODBC DSN that is used to create the RPT file must exist on the OmniRush Server as a System DSN. This setting is typically only needed to set the username and password to log in to the database server. Save Documents For Advanced Users OmniRush can archive the documents it sends. This area allows documents to be saved at various stages during processing. The most frequent use of this option is to save shipping labels to disk when OmniRush is used as a parcel shipping system. Only one option should be used per track. Enabling multiple options can lead to rapid consumption of disk space. Make sure to have a LOT of free disk space on the drive where documents will be saved, and make sure to monitor free space on this volume. Systems that use these options should use a system monitoring tool to monitor free disk space. The OmniRush system will automatically shut down when free space reaches 5 MB. General Options Set the directory to save to and the file type. Note that the file type option is best left at 'Default' initially. Only change it if the resulting type is not appropriate for your needs. Advanced Options Append to File Name: This allows the file name to be made more 'friendly' by adding the recipient company name and/or date to the file name. Group By: The Do Not Group option will drop all files in the base directory set above in the General tab. Group by Day will create a subdirectory under the base directory for each day. Group by Recipient will create a subdirectory for each recipient company name. Generate XML: This option will cause a matching XML file to be pushed to disk. This file will have the structure and contents as shown below. <?xml version="1.0"?> <File> <Filename><![CDATA[\ordocuments-fax\01-042004\MJ1G4QKQJ6E6CLI Acme Roofing 01-042004_1.tif]]></Filename> <DocumentID><![CDATA[]]></DocumentID> <DocumentFilename><![CDATA[]]></DocumentFilename> <OriginalFilename><![CDATA[]]></OriginalFilename> 141 OmniRush Administration & User Manual <JobID><![CDATA[MJ1G4QKQJ6E6CLI]]></JobID> <ContactID><![CDATA[95112934504464664Sco]]></ContactID> <Company><![CDATA[Acme Roofing]]></Company> <FirstName>Scott</FirstName> <LastName>Johnson</LastName> <JobType>1</JobType> <TrackID>TR0000000000003</TrackID> <ModuleID></ModuleID> <Retries>0</Retries> <ActivityID><![CDATA[ABVG9IS(E-W)>QY]]></ActivityID> <SendOn>04/01/2004</SendOn> <User></User> <Email>[email protected]</Email> <OrgFaxNum>(206)555-1212</OrgFaxNum> <FullFaxNum>12065551212</FullFaxNum> <Reference><![CDATA[C:\sales_lit\parts\Acme_Super_Nails.tif]] ></Reference> <TrackingURL><![CDATA[]]></TrackingURL> <ExternalID><![CDATA[]]></ExternalID> <AdditionalID><![CDATA[]]></AdditionalID> </File> Notes on the XML: JobID is the OmniRush internal JobID. This will always be unique, by job. Likewise, ModuleID & TrackID refer to OmniRush internal IDs. ContactID references the source database contactid. Activity.ContactID on SalesLogix Contact1.Accountno on GoldMine OR_Contacts.ContactID on open SQL ActivityID references the source database ActivityID Blank when using the Universal Client (as there is no associated Activity record) Activity.ActivityID on SalesLogix Cal.Recid on GoldMine OR_Jobs.JobID on open SQL Users & Groups User Creation & Management In most cases, users do not need to be directly created. In CRM and database implementations, users are created automatically in OmniRush from the CRM/SQL database. 142 Administrator's Guide Users are listed under their primary group in the Administrator tree. Groups and users can be added from the local menu in the Users branch of the tree. Open a user to modify user attributes, such as: Name Email Phone Private path Private import folder Private cover page etc. Most user information fields can be merged using Job Detail Merge Codes. While users are automatically created, they are not updated in OmniRush after initial creation. If the user full name is changed in the CRM/SQL system, the old full name will persist in OmniRush. To modify, open the user in OmniRush and set the correct name. The Private Path allows the user to have a special, user-specific directory where OmniRush will look for external files. This directory is searched first, before other import folders. So a file that exists in both the Private Path and the global Document Import Folder will be pulled from the Private Path. Such files are imported into the User Import Folder. The user Cover Page setting will override the module setting for cover page, however if a cover page is set on the track the track setting will have priority. User Rights for Universal Client By default, the Universal Client allows access to all OmniRush job types for which there are OmniRush Tracks. (In other words, if there are no shipping tracks, the shipping options will not be available in the Universal Client.) Job types available in the Universal Client can be restricted using the User settings in Administrator: 143 OmniRush Administration & User Manual Remember, the Universal Client will only make available job types for which there are tracks configured. If an OmniRush system only has email and fax tracks, then only those two options will be available in the Universal Client, even if the OmniRush user has rights to all job types. Groups Groups primarily exist to allow for easy rights management. Rights to folders in the Documents tree are administered by granting rights to groups. New groups can be created. Users can be members of multiple groups, though there is always one primary group for each user. Fax Receiving DID Setup for User In the user screen in the OmniRush Administrator, each user has a DID field (25 character) that can contain one or more DID numbers separated with spaces. Uniqueness is not enforced by OmniRush. If multiple users have a given DID value, the first user found will be used by OmniRush. 'On Inbound' Tab This tab controls what happens to a received fax that is forwarded to this user. The fax can be: Submitted to a fax, print, or email track Put in the OmniRush Inbound/Private directory for the user 144 Administrator's Guide Up to two tracks can be assigned. The inbound flowchart can be summarized: 1. Is the fax port on the fax module set to forward to a user 2. If so, lookup the user, and see what On Inbound tracks are set 3. Push the received fax to those tracks. Using this mechanism, the following can be done without any DID lines: Each fax port can be set to auto print to one or two printers. These printers can be unique per port, or shared by multiple ports. Received faxes can be forwarded as email to one or two email addresses per port. Received faxes can be faxed back out to a specific fax number per port. CRM Client Utilities Viewer and Print to Fax Client No configuration is needed for the Viewer and Client. Simply install the Client utilities. See the appropriate sections in the User's Guide for more information on these utilities. Client for SalesLogix Support Client This client uses ADO to connect to the Microsoft SQL Server database. The first time the client is run, it will prompt with a wizard to create a connection string. This connection string is stored in the slx_support.ini file in the same directory as the OmniRush Client. If the connection string needs to be changed, rename this ini file, and restart the client. This file can be copied to multiple systems to propagate the settings easily. -----slx_support.ini----[ADOConnection] ConnectString= { the following are optional parameters that are not present in ini by default, but can be added } QuoteChar=character to quote SQL statements parameters, single quote by default TableOwner=table owner (with following "point" char) "sysdba." by default. OmniRush Toolbar Introduction The OmniRush Toolbar makes one-click job processing a reality. Fully customizable, you create the toolbar with the buttons your firm needs, and your users then get one button ease of use. The Toolbar works with GoldMine v5.x, v6.x and SalesLogix v4.x, v5.x and v6.x The Toolbar offers these features: a) One button scheduling of OmniRush actions b) Simple user interfaces to select job contact and document c) Ability to attach a GoldMine AP track 145 OmniRush Administration & User Manual The key to the toolbar is that it allows non-programmers to create and manage one click buttons for users. One of the best ways to learn about the toolbar is to watch the streaming video (128kb Internet or better required). Also, check the Z-Firm Video Library for other videos on the subject. Initial Setup The Toolbar is installed to the C:\Program Files\Z-Firm LLC\OmniRush\Examples\OmniRushToolbar\ directory on the OmniRush Server. The first steps are: a) Copy this directory to a shared network location b) Copy the appropriate .OFM file from the samples directory to the toolbar directory c) Test the toolbar by running ToolbarLoader.exe Once the demo toolbar works, the next steps are: a) Edit the toolbar to taste using the ToolbarDesigner.exe b) Make icons on user desktops (or in the start menu) to start the shared ToolbarLoader.exe c) Use the Toolbar For details steps on configuring the toolbar, please see the OmniRush Video Library. Macro Buttons Macro buttons allow simple creation of a scheduled activity in GoldMine and SalesLogix. There is no user interaction. One click on the toolbar creates the pre-configured scheduled action. This is then processed by OmniRush. Script Buttons Script buttons execute preconfigured blocks of VBA like code in the Windows Scripting Host. You can use any valid VBScript and it will be run using the Windows Scripting Host. Tips GoldMine Automated Process Attachment Tips You can use VBScript continuation characters and constants to format the text and make the code more readable. For example: call ShowDocumentDialog( "_EMAIL", "_EMAIL", _ "Custom_Price_List.rtf", _ "Custom_Price_List.rtf", _ "Your custom Widget Price List is attached", "Greetings!" + vbCR + vbCR + _ "The price list is attached. To purchase, we need the your credit application and a PO. " + _ "Fax your PO to 206-111-1111." + vbCR + vbCR + _ "Thank you for your interest in our widgets!" ) 146 Administrator's Guide In the example above, the underscore '_' lets us put our code on multiple lines so it is more readable in the script editor. The vbCR reference is a VBScript constant that puts a carriage return (new line) in the text, so the text block is nicely formatted. The '+' is the string concatenation symbol in VBScript, allowing VBScript to see the whole thing as one big long line (which is awkward to edit in the script editor--this is a visual convenience for you, the code editor). GoldMine Attach Process function This function is specific to the GoldMine platform. Syntax: call AttachProcess( "<track ID>" ) This causes the specified track to be attached to the current contact. The track is not executed (an AP system needs to process either continuously or once a day). The track may be specified either by the 3-digit track code that is associated with the track, or by the track RECID. The track code is potentially problematic, as GoldMine does not enforce uniqueness. So you may have multiple tracks with the same code, or a user may change the code, which would break the reference in the script. Example syntax with a track code: call AttachProcess( "MKT" ) The track may be specified by using its RECID from the GoldMine TRACKS table. The syntax to retrieve the RECID from a GoldMine SQL system, via Query Analyzer, is: select name, eventno, recid from tracks where rectype = 'B' order by eventno Example syntax with RECID: call AttachProcess( "AVPQQZS()X1T\9`" ) Note that tracks will not execute, they will only be attached. You need another system processing AP to actually execute the tracks. Advanced Configuration Topics Advanced Configuration A variety of topics fit into the scope of advanced configuration. These items are not required at all sites, and are optional in most cases. These items are for your OmniRush installer or administrator to consider and possibly implement. The areas of configuration are: Track Max Queue Size Schedules OmniRush Backup 147 OmniRush Administration & User Manual Getting Alerts on OmniRush Problems Schedules Schedules allow parts of OmniRush to be turned on and off at certain times of day. Modules and tracks can be controlled selectively. This can be used to: Disconnect OmniRush from the CRM/SQL database to allow for database maintenance. Turn off outbound faxing to prevent late-night faxing, while keeping the fax module running to receive faxes. Shut down all of OmniRush in an orderly way to allow a complete backup of all OmniRush elements. There are two systems in OmniRush for scheduling: The Schedules portion of the OmniRush Administrator, and the ORNETSTOP command line utility. The ORNETSTOP utility is installed to the \Examples\OmniRush System Maintenance\ directory of the OmniRush server. A README and example batch files can also be found in this directory. The Schedules area of the Administrator is found in the main portion of the OmniRush tree: Right-click on Schedules and select New Schedule to create a schedule. A schedule item is either a 'start' or a 'stop' item. A schedule item can stop or start as many Tracks and Modules as needed. Here is an example pair of tracks to stop and restart all fax tracks so that no outbound faxing happens between 11:00 PM and 6:00 AM. The Stop schedule: 148 Administrator's Guide The Start schedule: Here are the schedules listed in the main Administrator Tree: 149 User's Guide Using the Administrator The Administrator User Interface The Administrator is the main tool for administering Modules & Tracks (server side functionality), and for document management. Click on an area of the Administrator for more information. Helpful Tips: Use the F5 key to refresh the view. Use F5 liberally! You can run multiple instances of Administrator, each logged in as a different user, to see the effects of rights management. The document area of the tree allows drag and drop to and from Windows Explorer. The tree can be navigated with the keyboard, and Alt-A activates the Action menu, which is context sensitive to your position in the tree. Ctrl-F4 closes the current document in the work area. Starting and Stopping Modules 151 OmniRush Administration & User Manual Right-clicking on any part of the tree pops up the Local Menu (aka Contect Menu) for the selection. The Local Menu in the modules branch (which is mirrored in the Action menu up on the menu bar at the top of the screen) provides options to start and stop individual modules and all modules at a time. Note that modules in that transition state (e.g. starting or stopping ) cannot be activated or deactivated. Wait until the module has finished starting up or shutting down and then perform the action. Modules can be configured whether running or not, but changes to settings do not take effect until the module is restarted. Track Management Tracks configuration can be though of in three 'buckets:' Activate/Deactivate tracks. This is useful to pause jobs, or take a track off line without deleting it. Jobs for deactivated tracks will not be processed. They will just stay in the database, untouched. View the track job queue. This area allows you to abort and reschedule jobs for the track. Change track settings The track area of the Administrator Tree is as shown below: 152 User's Guide Right-clicking on a track brings up the track Local Menu. From the Local Menu, the track can be activated/deactivated. To see the track job queue, open the track, and go to the Information tab, and then click on All Hosts. Click the areas of the screen below for more information: ODMS: Rights Management Concepts The OmniRush Document Management System has integrated security. This allows document administration tasks to be delegated and controlled, and allows portions of the document library to be restricted to specific users. To administer rights, navigate to a branch in the Documents tree, right-click, and select Manage Rights. The screen below appears. On the left, select the Group that will have rights granted or revoked. 153 OmniRush Administration & User Manual On the right, select the document folder being managed Check or uncheck the Rights check boxes. Users must have Read rights to a folder to see that the folder exists, and to schedule documents from the folder. The Update right allows users to edit and rename files. The Insert right allows users to add documents to the folder. The Delete right allows users to remove documents from the folder. Administrator Settings Server Communication: This configures how Administrator communicates with Launcher. The following recommendations apply: Use Point to Point if: Administrator is on a different IP subnet than the OmniRush Server If only one or two stations at a time will use Administrator Use Broadcast if: Administrator is on the same subnet as the OmniRush Server Multiple users will manage OmniRush Modules concurrently Point to Point is a recommended setting. 154 User's Guide The Administrator communicates with the Launcher on UDP port 1721. Both the client PC (where Administrator is run) and the OmniRush Server PC must allow this traffic to pass. Mouse Drag Behavior: These settings control dragging behavior out of the Administrator Documents branch to GoldMine, Explorer, and other programs. Rename Server *** Caution: Misuse of this option can disable your OmniRush Server *** This is only to be used if the server PC name is changed or an OmniRush installation is restored to a different PC. Run Administrator on the OmniRush Server PC. Select the server from the list (the old server name will be listed). Press Rename. This will prompt before setting the OmniRush server name to the current PC name. The OmniRush Server PC should be rebooted. OmniRush-Managed Documents Drag & Drop with Administrator Files can be dragged in and out of the OmniRush Document Management system. This allows documents to be imported easily, and for documents to be attached to emails, etc. quickly. Features: Dragging to Explorer: Just drag to or from Explorer, or an Explorer-compatible application (like Outlook), and the file is put in the drag target. Dragging to GoldMine: GoldMine is a special case. While it is drag enabled, it only takes a link to a file (e.g. GoldMine stores the path and file name, not the file itself). By default, you must use the middle mouse button to drag to GoldMine from the OmniRush Administrator. OmniRush can handle the situation two ways: 1. If the file is flagged as "Internal" (managed by OmniRush), OmniRush creates a .ZID link file in the "Global Client Root" path (this is a global setting in Administrator) 2. If the file is flagged as "External" (master file is on file system), OmniRush passes a link to the external file to GoldMine. Note that in mode '1' above, GoldMine Links and internal email can be done, but attaching the file to an internet email will not work properly, because only a link to the source document is made. 155 OmniRush Administration & User Manual For GoldMine, drag behavior is controlled by the mouse buttons. The default behavior is: The left mouse button drags <Explorer-Style> The middle mouse button drags <GoldMine Style>. This behavior can be modified in the Administrator File | Settings area. Note: Dragging <Explorer-Style> to GoldMine doesn't work at all. Dragging <GoldMine-Style> To Explorer works but a temp file might be left-over if running in DR-centric mode. Document Packages Document kits let you easily send a package of sever documents as a single 'kit.' OmniRush supports FaxRush v4-style FRP packages (see below), and new OmniRush ZDF packages. Often, it is helpful to have several standard document kits to send out. For example, if your firm sells widgets and gidgets, there might be four kits of literature that your sales reps need to send out. Each kit would include the appropriate product brochure. The reseller kits would include the special reseller price list, and additional reseller information: user widget user gidget reseller widget reseller gidget These kits may have some documents in common (all the widget kits would have the widget brochure), and others might be specific to either the product or the recipient. In this case, document packages can be very helpful. Say the folder structure in Administrator is as follows: /Sales/ /user-Widget/ /user-Gidget/ /reseller-Widget/ /reseller-Gidget/ Now all the documents, brochures, price lists, etc. might all be in the /Sales/ folder. Using ctrldrag, drag the appropriate files into the sub-folders to make each sub-folder a complete kit. Ctrl-drag creates a link to the source document, without duplicating the document itself. The document tree now looks like this: 156 User's Guide Notice that the user-Gidget has 'resellers near you.rtf' and the reseller-Gidget folder has 'reseller policies.rtf.' Now, the package can be scheduled (to fax, print, or email), by scheduling the whole folder. For example, to send the /user-Gidget/ folder, schedule this: /user-Gidget.zdf (ZDF stands for Z-Firm Document Folder.) In this way, kits of documents can be built, and easily scheduled, and maintained. FaxRush v4-style FRP packages are also supported in OmniRush. FRP packages are text files with the FRP extension (user-gidget.frp). You create these files using Notepad or some other text editor. An FRP can reference internal files (ODMS files), External Files (on the file system), or any combination. An FRP file is just a list of file names (with optional UNC paths to reference external files in directories other than the default Document Import Folder ). An FRP open in Notepad might look like this: "gidget pricing.rtf" gidget-brochure.pdf \\server\share\sales-lit\reseller-list.rtf /gidget-leads-program.rtf Note that the file with the space in the file name is quoted. All files referenced are external files. Finding Files 157 OmniRush Administration & User Manual OmniRush has a fast Find feature to help locate files in the Documents area. Simply click anywhere in the Documents branch, and use the Action | Find File or Folder option. Wildcards can be used, e.g. catalog*.* to quickly find what you want. When the found file(s) are listed, double click on them to be instantly navigated to that document in the documents tree. Documents to Send Supported File Types OmniRush supports printing, faxing and emailing the following document types: Merge templates: RTF files created in MS Word v97, 2000 or XP (2000 and higher preferred) Via email, RTF files can be merged, converted to PDF, and then emailed. RPT created with Crystal Reports (v8-v8.5) Static (do not merge): .PDF, .TIF, .RTF, .TXT Document packages: FRP, ZPK, OXP, ZDF (for advanced discussions on these file types, click here) Files for Faxing Fax transmission time (the time OmniRush spends on the phone actually sending the fax) is directly affected by the content of the faxed document. Text and line art fax quickly. Photographs, color logos, and color artwork can cause fax transmission times to hit 2-6 minutes per page, or even more. Wherever possible, files that are to be faxed should be optimized for the fax medium. This means: Convert artwork and logos to line art. Manually convert color artwork and charts to monochrome (usually a job for a graphic artist) Avoid photographs (color and B&W) The desired end result is largely line art, solid black, and text. You can get away with some grayscale/color, but restrict them to less than %10 of the page (by area). A common approach is to have the designer deliver two versions of electronic documents: Color (for color printing and email) and monochrome (for faxing). The TIF File Type TIF files can be faxed, printed, or emailed. Via email, TIF files can be converted to PDF and then emailed. 158 User's Guide For faxing, TIF files must conform to the following specs. (Note, the easiest way to get files into this format is to fax them into OmniRush and use the received TIF.) TIFs that are acceptable by OmniRush (Hardware Fax and Internet Fax) Width: 0..1740 pixels, will be adjusted to 1728 pixels Height: < 100 inches, might be adjusted (see logic below). X dpi: not limited, might be adjusted to 98 or 196 Y dpi: not limited, might be adjusted to 98 or 196 Compression: most formats except LZW. Output:TIF CCIT Group3 1DIM monochrome (file or memory). TIFs handling Width: OmniRush sets the width to 1728. OmniRush tries the actual DPI. First we try to fit source image DPI into 2 ranges (cases 1 and 2). If it fails we do the second part. The second part of logic (cases 3 and 4) determine the correct image DPI depending on image height was introduced because of a bug in FaxRush v4 that set DPI to 300 every time the FaxRush Viewer saved a TIF to disk. 1. Y_DPI = 98, if Y_DPI in [93..103] 2. Y_DPI = 196, if Y_DPI in [186..206] 3. Y_DPI = 98, if Y_DPI doesn’t fit into ranges above and Height < 1200 (where 1200 is a maximum possible height for lowres fax = (11 inches * 98 dpi) + Gap) 4. Y_DPI = 196, if Y_DPI doesn’t fit into ranges above and Height >= 1200 5. Y_DPI = 196, if “Always High” option has been selected in the fax track. In cases 1) and 2) X_DPI stays untouched, in cases 3) and 4) it’s set to 196 explicitly. Height: Destination height depends on source image height and has 2 different branches – “regular” and “resize”. “Resize” is executed if a low resolution fax must be converted into highres because of track setting “Always High”. “Regular” Source TIF Action Taken 0..11,2 inches = make 11 inches, cut if bigger than 11, add white space if smaller than 11 inches 11,3..13 inches= make 11 inches by resizing (may lead to quality loss) 13,1..14,2 inches = make 14 inches, cut if bigger, add white space if smaller 14,3..14,9 inches = make 14 inches by resizing 15..100 inches = send AS-IS >100 inches = raise exception and fail the job. “Resize” 0..13 inches 13,1..14,9 inches = make 11 inches by resizing = make 14 inches by resizing 159 OmniRush Administration & User Manual 15..100 inches >100 inches = send AS-IS = raise exception and fail the job. Page Oriented vs. HTML Merge Forms Microsoft Word, Crystal Reports, Microsoft FrontPage, DreamWeaver, HTML, PDF*, OmniRush does all this. What is the difference? How to decide which format to use? It is best to resolve this by asking some questions. The first one is: Do we care about the printed page, on screen representation, or both? Additional questions to answer: What is the delivery method? Will the document library be sent by email, fax, and print, or just one of these? What is more important: Ease of content management, or ultimate presentation based on the delivery method? Page Oriented Documents: Page based documents start life in Microsoft Word or Crystal Reports. Just about any user can create merge forms in Word, and be sending them in minutes. OmniRush can merge the document and deliver it via fax, print, or email. OmniRush can be configured to merge the document, convert it to PDF, and then email it as an attachment. Benefits of page oriented merge documents: 160 Works with all delivery methods. One set of source merge documents can be used no matter what the delivery method. Most efficient way to manage content. Can be authored by anyone using Word, which everyone knows. Documents can be made attractive with advanced formatting like graphics, tables, frames, text boxes, columns, headers & footers, etc. Documents can even include colored text and graphics which will come through as color when converted to PDF and sent as email attachments. Documents can merge any data in the database using OmniRush custom merge codes. Documents can include dynamically inserted signature graphics, and other dynamic, database-driven content. Documents can include VBA document processing macros, for powerful, on-the-fly, database-driven document construction/modification. Crystal Reports can be used, which some users are comfortable with. Predictable printing. The recipients will be able to print out the document and it will generally look just as it does in your office. User's Guide Excellent control over layout. The document is the layout of one or more pages, so what you see during form creation and testing matches what recipients actually get. Constraints of page oriented merge documents: Fax and print merge documents must be page-oriented. Page based merge documents sent by email will always be an attachment to the email, not the body. When emailing, document attachment size may grow unacceptably large if high resolution color graphics are heavily used in the merge documents. HTML Merge Forms HTML is only useful for email. Visit a few web sites and print them, and it become obvious why.... Web pages are often cut off when printed, and there is no control over where the page will break, what goes at the top or bottom of every printed page, etc. This is because HTML is a kind of screen layout tool, it does not even try to be a page layout system. So we have arrived at the crux of the matter. Page oriented tools are perfect for fax and print, and fine as email attachments, but if you want something pretty right in the recipient's email reader, HTML is the way to go. However HTML content will only be useful for email, not for any other delivery system. That said, HTML is a great system and lets you deliver attractive, flexible, and powerful content into email readers. Benefits of HTML Merge Forms Deliver nice, colorful, merged content right into users' email readers Easily convert existing web pages into personalized, merge html 'push' content Keeps size of email relatively small, while including color graphics, logos, photos, etc. Create cool pre-populated forms that can be posted back to your database. Use powerful server side include (SSI) technology in OmniRush for dynamic, database driven, documents. Merge into links and urls, for powerful subscribe/unsubscribe options built right into the email. Constraints of HTML Merge Forms HTML content can be used only for email, not for other transports 161 OmniRush Administration & User Manual Requires some access to, or knowledge of, company web server for storage of graphics Requires some knowledge of HTML and web pages to use effectively Content must be created using FrontPage, DreamWeaver, or other html editor. Users may not be familiar with these tools. HTML is not as flexible or easy to use as a Word document. There are limits on the formatting options. Merge Documents for Fax, Email, and Print Merge Documents (Page Oriented) Merge documents are page-oriented merge forms created in either Microsoft Word or Crystal Reports. The page-oriented nature allows these merge forms to be: Fax Merge Templates Print Merge Templates E-Mail Merge (native format, document is merged and emailed as an attachment) Merge-to-PDF-to-Email (document is merged, converted to PDF, and emailed as an attachment) These merge templates are either: RTF files you make in Microsoft Word RPT files created in Crystal Reports Do not worry that OmniRush uses RTF files instead of DOC files--there are no limits on the formatting you can use. All the advanced features of Word, such as tables, frames, header/footers, columns, and more are available. Merge documents can be stored internally in the OmniRush Document Store, or they can be on the file system (either in the Document Import Directory, or anywhere that can be referenced by the job). Creating A New Merge Document (MS Word) While a merge document can be created from scratch, most merge documents start life as an existing file that is being brought into OmniRush. This might be a file already in OmniRush that is being copied and modified. To create a merge document in Microsoft Word. The steps are: 1. Create the document with text, artwork, etc. 2. Insert merge codes by typing them in 3. Save file 4. Either save to the default document import directory, or save it to a work folder and drag it into the OmniRush Administrator 5. Schedule a job with this file 162 User's Guide The pages that follow discuss creating merge documents and custom merge aliases in detail. This graphic previews some of the details of merging. Crystal RPT Files Crystal Reports -- Introduction Introduction 163 OmniRush Administration & User Manual Crystal reports is a powerful database reporting program, and is widely used by developers and database administrators. OmniRush allows Crystal RPT files to be merged and emailed, faxed, or printed. This allows users to create merge templates in Crystal, and use OmniRush for processing and delivery. Note: While OmniRush can process RPT files without a copy of Crystal on the OmniRush Server, to create and modify Crystal RPT files, a copy of Crystal Reports v8.0 or 8.5 is required (v9 may work, but has not been tested by Z-Firm). OmniRush does not include Crystal Reports. Note that Crystal is a complex program. This documentation assumes familiarity with Crystal. If you are not conversant with Crystal, seek Crystal training before attempting to use Crystal with OmniRush. Z-Firm does not offer support on Crystal Reports. OmniRush with Crystal Reports offers three different report types: OmniRush-Merge-Code Report Parameter-based Report Stand Alone Report OmniRush Merge Code Report This report uses OmniRush merge codes. Both macro and query based merge codes can be used, including custom OmniRush merge codes. This lets you use a single kit of merge codes for all OmniRush merge document types (RTF, HTML, RPT). This method is perfect for sites that already use OmniRush HTML and RTF merge documents, as the same information can be pulled into RPT merge forms. Parameter-Based Report In this type of report, Crystal is accessing the needed databases directly, using its own database access methods. However the report uses parameter fields to make the queries dynamic. OmniRush can automatically feed relevant parameters (like the contactid of the job contact) for the queries to run. Note: Z-Firm technical support cannot support parameter based reporting. Stand Alone Report This report has the database connection and database query stored in the report. The report is created completely within Crystal, and can be previewed in Crystal. This kind of report can be dynamic, but all the dynamic elements are completely defined within Crystal. No information is passed from OmniRush into the report, Crystal access all the data sources on its own, with its own data access and query tools. Note: Z-Firm technical support cannot support stand alone reporting. Some examples: Lead Sheet Distribution. Using Processes or Workflow in the CRM application, field sales reps or dealers are faxed or emailed a list of recent leads every week. This is a 'lead dunning system' to continually remind dealers that they are getting leads, and to give them all the lead details on a form they can start calling from immediately. PDF Forms. OmniRush can process the report, convert it to a PDF document, and email the PDF. This is perfect for highly formatted information, or forms that the recipient needs to complete and return. 164 User's Guide Crystal with OmniRush Merge Codes There are two types of OmniRush Merge Codes: Macro-based merge codes and Alias-based merge codes. Both can be used in Crystal reports, but each is implemented in a different way. OmniRush Macro Merge Codes To insert an OmniRush Macro merge code, follow these steps: First, add the OmniRush macro fields to the report. Repeat these steps for all the macro merge fields you will want to use in the report: 1. Open the Crystal “Field Explorer” (Insert | Field Object). 2. Select “Parameter Field”, click “New”, 3. Enter parameter name. For the &Contact merge macro, enter “Contact”. Enter any of the OmniRush macro merge codes, without the '&.' 4. Click “OK”. Now, from the Crystal “Field Explorer," select the merge code you want to use in the report and “Insert to report”. Save the report, and schedule from OmniRush. Note: A maximum of 255 characters of data can be passed into a merge code. Merge codes that reference database notes fields may be truncated if the notes block is longer than 255 characters. (This is a Crystal limitation.) Note: Some OmniRush macro merge codes return multiple lines of data (e.g. &FullAddress, &NameAddress, etc.). By default, Crystal will only display the first line. To allow Crystal to automatically grow the field, right click on the field (after inserting it), select Paragraph Formatting | Common and then check 'Can Grow' OmniRush Alias Merge Codes To insert alias merge codes into a report, the steps are a little different. When designing the report, Crystal needs to know what the data is going to 'look' like. Crystal has a system called "Active Data" that lets database query results be 'templated' into special files with the extension TTX. These TTX files are simple, static files, that are used only when designing a Crystal report. They allow the report to be laid out and designed without needing to connect to the actual database. OmniRush includes a full kit of TTX files for the 'out of box' OmniRush merge codes (in the "C:\Program Files\Z-Firm LLC\OmniRush\Examples\Crystal-Reports\TTX-Files\" directory on the OmniRush Server). TTX files have the same names as the merge alias. For example, the C1.TTX maps to the C1 merge alias. OmniRush also allows TTX files to be created from custom merge codes. The steps to create a report based on OmniRush Alias Merge Codes: 1. Decide which OmniRush merge codes will be used 2. For all Alias merge codes, make sure you have the TTX files on hand. If any TTX files are missing, create them now. 3. Open or create the report in Crystal 4. Select Database | Add Database to Report 5. Navigate down to More Data Sources | Active Data | Active Data (Field Definitions Only) 6. Double click on Make New Connection to get this dialog. 165 OmniRush Administration & User Manual 7. Navigate to the appropriate TTX files for the needed merge aliases 8. Repeat for all needed merge aliases 9. When all the needed TTX files are listed in the Data Explorer, click on each of them and press Add to add the virtual data source to the report 10. Press Close on the Data Explorer 11. The Visual Linking Expert appears. Generally, you want NO links to be done by Crystal. Delete any links automatically created by Crystal, and press OK. 12. Now merge code fields can be added to the report by using the Field Explorer | Database Fields or via the Insert | Field Object menu selection Design the report, save, and run through OmniRush. Note, Crystal can apply its own filters to the data. For example, an OmniRush merge code HA might retrieve the most recent 200 history records for a contact. Use this merge code in Crystal, and use a Crystal filter to select on data from the most recent 7 days to further narrow what will be presented. Creating TTX Files for Custom Merge Codes In the merge code administration area (File | Merge Codes in the OmniRush Administrator), there is an Export to TTX button: In this area, select the desired merge code(s) to create TTX files for, and then go through the wizard to connect to the database. Note: A login to the SQL database will be required, however the data does not need to actually return data (e.g. it can have the where recid='&Contactid' syntax, and that is fine). If the SQL query has syntax errors, they will be noted here. Correct the errors and retry. Crystal with Parameterized Database Access Note: Z-Firm technical support cannot support parameter based reporting. In a parameter based report, Crystal handles all the database access, queries, etc. The main role for OmniRush is to pass a parameter into Crystal (like an accountid, or other database ID) that will be used to drive the Crystal query. OmniRush can pass any of the OmniRush Macro Merge Codes or an alias-based Custom merge code as a parameter. Take these steps in the report: 1. Create the Parameter field (see the steps here) 2. Now in the Report | Select Expert and elsewhere, the parameter can be used to control the data queried for the report. If using an alias-based merge code, the code must return just one value (not multiple rows). 166 User's Guide Note that if a Crystal Report uses 'internal' parameters to pass values to subreports or other elements, these 'internal' parameters should not use the underscore character ('_'). OmniRush Example Merge Forms When OmniRush is installed, several sample merge forms are also installed. These can be scheduled to see what OmniRush can do, and they also serve as good starting places for your own merge forms. There are a selection of RTF, HTML, and RPT sample merge forms. Run them through your system to see how they are merged and delivered by OmniRush. You can see the merge forms in the OmniRush Administrator or on the file system. In the Administrator, navigate down the Documents branch to the Samples folder. The samples can also be seen on the OmniRush Server hard drive, in the Examples/Imported/Merge Files directory. Merge Forms Best Practices 1. Create & edit merge forms in the same version of Word that is installed on the OmniRush Server. 2. Save as file type RTF (Rich Text Format) 3. When placing graphics, set the position to be relative to the page for vertical and horizontal positioning 4. Keep the file size under control. Under 350K is optimum, under 1MB is fine. Larger will work, but over 2MB may slow down performance on large broadcast jobs. See the special Word tweak to make RTF files with graphics really small. 5. Complex jobs or large files can often be broken into two chunks: A first page RTF with merge codes, and subsequent, non-merging pages, already converted to TIF with the OmniRush Rasterizer. Then schedule the two files together for the full kit. Managing file size: Inserting graphics is the #1 cause of large files. The first step is to modify the registry on the system where OmniRush templates are made, as this will result in dramatically smaller file size. If more reduction is needed (not likely!) use these guidelines: 1. Scale the graphic to the target size in a picture editor application (such as PhotoShop, Microsoft PhotoDraw or Windows Paint) before inserting into Word. Don't insert a 3 inch square logo into Word and then scale it down to 1 inch square. Scale it first, outside word, then insert it. 2. If the document will be used for faxing, convert color graphics to grayscale or monochrome in a picture editor before inserting into Word. 3. If the document is for emailing and you want color graphics, convert the graphic to either 256 color or 16 color before inserting it into Word. 4. Avoid super high-dpi graphics. A 600 dpi image is appropriate for color glossy printing, but gains nothing for fax, email, and print. 200 or 300 dpi is the most ever needed for email and print documents. 200 is fine for fax (fax is about 200 dpi in any event) Convert graphics to the lowest acceptable dpi before inserting into Word. 167 OmniRush Administration & User Manual Label Printing Printing Labels with OmniRush Easy label printing for parcels, envelopes, and merge jobs. OmniRush is an excellent label printer: Printing to a shared CoStar label printer or to multiple CoStar printers. Printing one at a time or en-masse to tractor fed labels on an impact printer. Printing to one-up labels on a laser printer. The benefits of OmniRush for label printing include: Label printing is logged in GoldMine. Labels can include enclosure codes. Labels can easily print to main and other contacts. Create labels from Automated Processes in the CRM system. Remote users can print labels on the central office label printer. Zero-client-footprint. No software to install on client stations—just GoldMine. Labels can be printed along with the cover letter as a ‘set.’ What you need to print labels with OmniRush: Dot matrix (‘impact’) printer with single wide tractor fed labels, or CoStar label printer either local to the OmniRush Server or on the network (the CoStar printer driver should be installed on the OmniRush Server), or Laser printer with manual feed tray or envelope feeder and a one-up style label (available from Z-Firm and Paper-Direct). Label Tricks At Z-Firm, most labels are printed via OmniRush to a laser printer with one up labels. We also use a CoStar. Our label template includes the Z-Firm logo, and just a few fields: & NameAddress & Country encl: & FX_Ref Putting the FX_Ref merge code lets the user schedule this in the CRM system: lab.rtf Catalog, Demo kit USPS Now, when the label prints, the enclosure list and shipping information prints right on the label and goes into the CRM history record. Another trick is the ad-hoc label. Create a label template that has just one field on it: &FX_Notes 168 User's Guide This lets you type your label inside the CRM system and track what was on the label. For example, schedule an other action with the ref line: lab2.rtf and notes: Your Product Serial Number is: 111-111-111-111 You get a label with just those notes on it. This gives everyone ‘freehand’ label printing. Tips: When creating your label template, make sure you have the correct paper size selected in Word. For one-up labels, use the #10 envelope paper size. For the CoStar, select the paper size of the labels you will use (the CoStar print driver should be installed where the templates will be made). A kit of sample labels, for laser one-up style and for the CoStar is available as a .ZIP in the examples directory, and also on the Z-Firm web site. Printing a label & cover letter 'kit:' There are two ways to print the label with cover letter as a kit: Method 'a' (the way we do it at Z-Firm): -Use one up labels in the power envelope feeder of the laser printer -Print a merge form in one of two styles: · style 1) A single merge form with the last page as a label. See the letter3.rtf and letter2.rtf sample templates that come with OmniRush to see how this is done. · style 2) Two templates, one for the label, one for the letter, scheduled as a single job. Method 'b' (used by many OmniRush installers and consultants): -Have a simple AP track that schedules two events. One event schedules the label to the CoStar or impact printer, and one that schedules the letter to the laser printer. The user just triggers one AP, and stuff spits out of both places. Microsoft Word Tricks Insider Tip: Make RTF Files Smaller with MS Word Secret! OmniRush does its magic using RTF files. But when logos and graphics are inserted, those files can get large, affecting performance. Microsoft has special registry setting that lets RTF files with graphics be super small! For example, a one page document with a screen shot inserted was almost 5MB. Using this tweak, the file saves as 146kb! (Using WordXP on WinXP). The technical document is 224663 Click here to try the current URL, but if that does not work, just search for 224663 (or Q224663 or 262464) at www.microsoft.com Note: This tech doc is for Word2003. Z-Firm has tested that it works for Word2000 and WordXP. However, to enable this feature for other versions of Word, note the version number in the registry path: Here are the keys for other versions of Word: 169 OmniRush Administration & User Manual For Word2000 use: HKEY_CURRENT_USER\Software\Microsoft\Office\9.0\Word\Options For WordXP use: HKEY_CURRENT_USER\Software\Microsoft\Office\10.0\Word\Options For Word2003 use: HKEY_CURRENT_USER\Software\Microsoft\Office\11.0\Word\Options Now that we are at the right key, take these steps: 1. With the Options folder (key) selected, point to New on the Edit menu and click String Value. 2. Type ExportPictureWithMetafile and press ENTER. NOTE: There are no spaces in the string value name. 3. With the string value ExportPictureWithMetafile selected, click Modify on the Edit menu. 4. In the Value data box, type 0. NOTE: Type a zero for the Value data. 5. Click OK. 6. On the Registry menu, click Exit. HTML Merge Email HTML Email Support OmniRush offers powerful HTML email merge. The purpose of HTML Email is to allow the CRM or SQL database to trigger powerful, merged HTML email messages. Just as merged faxes and print jobs can be triggered from the CRM/SQL database, merged HTML emails can also be sent. The HTML feature set offers: 170 Use OmniRush's built-in, or custom merge codes Use any html editor (FrontPage, DreamWeaver, etc.) Merge any database data into the email (may require that custom merge codes be created) Send the html either in the body of the email or as an attachment Use the same merge code library that is used for print and fax User's Guide The overall steps are: Create the html to send Import the HTML file into ODMS Schedule it from your CRM or SQL database HTML: Planning the Content The merged HTML sent by OmniRush can be included in the body of the email message, or sent as an HTML file attachment to the attachment. This is controlled by the track settings of the email track used. OmniRush is optimized to allow existing HTML from websites to be turned into email merge with a minimum of effort. The main consideration is the HTML itself. The HTML may be custom created for email purposes, or it may be an existing web page that is sent out. In all cases, the nature of the links (to graphics and to web pages) in the html requires attention. Since the HTML will be local, in the email reader or as a file attachment to the email, relative links will not function. All links to graphics and web pages must be fully declared. For example: /images/logo.gif products.htm http://www.acme.com/images/logo.gif http://www.acme.com/products.htm // will not work // will not work // will work // will work When html is imported into ODMS, the OmniRush Administrator will detect relative links and alert you during the import process. HTML: Importing into ODMS There are two ways to bring HTML into ODMS: 1. Within Administrator, right click on a document folder, select Import, and navigate to the .htm file. 2. Drag an .htm file from Windows Explorer into the Administrator document tree. When the first method is used, Administrator will check for relative links, and allow you to change them with a global replace procedure to absolute (fully qualified) links. When .htm files are dragged into Administrator, they are imported without checking for relative links. HTML: Database Merge Codes OmniRush allows the HTML files to use the same merge codes as RTF merge forms. This includes all macro merge codes, and multi-row (repeating group) codes. 171 OmniRush Administration & User Manual One of the best ways to get up to speed on HTML merging is to examine the HTML sample merge documents that are included with OmniRush. Find the samples in the /samples/ section of the Documents tree. Sites upgrading from OmniRush 5.0 will not have these samples in ODMS. They can be downloaded from this link. Key aspects of using HTML templates You cannot use client side java scripting (<SCRIPT> html tag) that changes user interface (popup windows, scrolling text, animation, etc) in the template. The recipient mail client (OutLook, GoldMine, etc) will display an error message “Unable to execute script”. Generally, java scripting for non-visual stuff can be used (e.g. button event handlers, math calculations, etc). Remember that HTML pages that contain “relative” links are not going to work properly when received. E.g. <img src="/plus/header.gif"> or links to the local file system (<img src="c:\images\header.gif">). All links must use a valid URL address (<img src="http://www.something.com/plus/header.gif">). The OmniRush Administrator Import Document wizard will offer you to replace invalid links during import. Merge code aliases named LT, GT or REG cannot be used because “<”, “>” and “®” words are reserved by HTML. If you are not familiar with HTML it’s recommended to use tables with invisible borders for specifying repeating groups. Otherwise output might not be exactly as you expected. Using merge codes This section describes how to insert merge codes into HTML template only. For basic knowledge about merge codes (repeating groups, alias-based merge codes, date-time formatting, etc) please refer to OmniRush Help File “Merge Document” section. Please always test all new templates with merge codes before sending to end-users. To insert merge codes into HTML template should open your document in any HTML-editor (Microsoft FrontPage, Macromedia Dreamweaver, etc). All merge codes are simple text – they are not HTML tags. To insert merge codes (as &Company, &Contact, etc) just type it in the HTML editor in the place where you want to appear. You can change font, color, alignment, etc for the new merge code. Please apply formatting to the whole merge code! (for example, OmniRush won’t be able to process “&Company” if “&Comp” is green and “any” is red). This is sample #1 (look for html_merge01.htm sample) 172 User's Guide There are no limitations on where to put merge codes. But if you are not familiar with HTML and using repeating groups it’s preferred to put merge codes inside table. Otherwise (due to the odd definition of HTML “paragraph” and overall complexity of HTML paragraph formatting) the output might not be exactly as you expected. Remember that HTML supports nested tables (a table that is inserted in the cell of a larger table) and table borders can be set to invisible, so you can create a really nice outline for repeating groups. Using tables also allows you to simplify the specification of a repeating group. There is a tag specific to OmniRush HTML merge called “simple repeating group” (&&&). You can start merge code with the tag &&& (example: &&&HA_UserID) and do not need to specify the repeating group end (in RTF merge forms, repeating groups myst start with && and end with &&&). In this case the whole current row (<TR>) of the current table (<TABLE>) will be used for duplication. The “simple repeating group” tag may be specified in any cell in the row. Please note, that you can specify only one repeating group in the row. If you need 2 or more repeating groups in the document then you should put them into different rows or different tables. Html_merge02.htm sample shows how to use simple repeating group. This is sample #2 (look for html_merge02.htm sample) 173 OmniRush Administration & User Manual And this is how it finally looks in the recipient’s Outlook Express. 174 User's Guide . HTML: Tutorial With FrontPage “Quick start” using Microsoft FrontPage Run Microsoft FrontPage Go to File\Open… (Ctrl+O) and type URL you would like to use as a base for your template (“http://moneycentral.msn.com/home.asp”) Note that sometimes you should add “index.htm” to the end of URL. (e.g. http://www.zfirm.com/index.htm) Click “Open” button 175 OmniRush Administration & User Manual Modify web page in the editor window. Insert OmniRush merge codes if necessary. Go to File\Save As… Enter the template filename and specify “Save as type” = “Web Pages” Click “Save” button 176 User's Guide If “Save Embedded Files” dialog appears then click “Set Action” button. And change action to “Don’t Save: Don’t save this file and leave the reference in the page as is” Continue with the section on Merge Codes. Import the document into ODMS (navigate to a folder in the Documents area of Administrator, select Import Document) Schedule .htm file in the CRM or SQL database. HTML: Merge Email FAQ Can I use Flash and other plug-ins (.js, etc.) in OmniRush merge-html ? In most cases, yes. Just remember to use absolute URL references, not relative references to objects on your web site. Remember that the html you send will be in the recipient's email reader, so certain html tricks may not work. Test your html by emailing it to yourself with OmniRush before sending to a group. 177 OmniRush Administration & User Manual Can I use client side scripting? In most cases, the recipient's email reader will not execute script, so generally the answer is no. Can I use ASP code? Including ASP code in the html that will be sent will have no value, since it will not execute. However, you can usually send an auto-refresh url to a web page, and the web page can have asp code, since it is running at a web site, not in the email reader. Can the FROM email address be changed? Yes. Use the OWN: tag and you can set the job FROM information on a job by job basis. HTML: Merging into Links and Tags OmniRush & tags merge data into the HTML body of an HTML document. The & merge codes in 'href' and other HTML tag and control areas are ignored. To merge into these areas, a special merge-code tag is required: {&} This is referred to as an extended control character. The extended control character works in any HTML section or tag, including node attributes and non-text blocks (excepting <SCRIPT> </SCRIPT> blocks). The extended control character is used to specify OmniRush merge macros or custom merge fields only (repeating groups are not supported outside the HTML body). Examples: HTML Source href=http://www.woof.com/cgi/woof.cgi/{&}User_Login href=http://www.woof.com/woof.htm&{&}User_Login woof.htm&{&}C1_Accountno woof.htm&{&}User_Login&GetAll href="mailto:[email protected]?subject=Quit%20sending%20to%20{&}Contact href=http://www.acme.com/unsubscribe.asp?ID=%20{&}ContactID Merged result href=http://www.wo href=http://www.wo woof.htm&A10723466 woof.htm&SAM&GetAl href="mailto:sam@a href=http://www.ac Note that merge codes must have a recognized separator before and after the merge code. A separator is either a punctuation mark or space. For example: href=http://www.woof.com/woof.htm{&}User_Loginanswer.asp 178 Will not work, because the merge code is completely surrounded User's Guide by ordinary text (no separator before {&} and no separator after User_Login). Will not work because answer.asp abuts the merge code. Will not work because before the {&} there is no separator href=http://www.woof.com/woof.htm&{&}User_Loginanswer.asp href=http://www.woof.com/woof.htm{&}User_Login&answer.asp href=http://www.woof.com/woof.htm&{&}User_Login&answer.asp href=http://www.woof.com/cgi/woof.cgi/{&}User_Login actual HTML snippet that works (note trailing space): <a href="href=http://www.woof.com/cgi/woof.cgi/{&}User_Login "> OmniRush Training Videos</a> href="mailto:[email protected]?subject=Quit%20sending%20to%20{&}Contact" <a href="http://16.16.28.15/eFrm/Unsub.asp?cid={&}C1_Accountno "> Click here to be removed from our list</a> HTML: Advanced Topics Quicklinks: Server Side Include support HTML Email Signatures HTML Email Signatures OmniRush email tracks have a 'Default Email Signature' setting. This can be entered as raw HTML, for example: <font face="Arial, Helvetica, sans-serif"> Message Sponsored in part, processed <br> and sent by Z-Firm's OmniRush V5.5. Visit <a href="http://www.zfirm.com">http://www.zfirm.com</a> 179 Will work. Will work as long as there is a trailing space after {&}User_Login Will work. Note the %20 before the {&} and the trailing " Will work. Note trailing space. OmniRush Administration & User Manual <br> to learn more! </font> This will cause: a) Plain text emails (e.g. messages scheduled within the CRM system) to be send as HTML, with the HTML footer included. b) HTML emails will have the signature HTML inserted. Server Side Includes OmniRush HTML email can combine multiple files into a single HTML email. This feature allows standard formatting to be held in external file(s) for ease of document management. External files can either be on the file system (local or network) to the OmniRush server, or they can be pulled from any web server using an HTTP GET performed by the OmniRush server. This functionality is parallel to "server side includes" in HTML-speak. Click here for a pictorial representation of the Include logic. HTML Rules for INCLUDE tag: Note that some of these rules go beyond the scope of the HTML server side include standard. OmniRush can do more than an HTTP server, so Z-Firm extended the tag. Format: <!--#include file="LINK-TO-FILE" persist="NUMBER-OF-MINUTES"--> LINK-TO-FILE entry =filename.ext =\dir\dir\filename.ext =/dir/dir/filename.ext =\\server\share\dir\filename =//file.ext =http://server/file.htm file is found in / by OmniRush looks in root directory set on the track OmniRush starts at the track root directory and finds \dir\dir\filename.ext relative to this root. Same as above UNC notation, absolute path to file. Root directory setting is not used. Internal, ODMS file. Note the double forward slash. OmniRush does an HTTP GET of file.htm. URL must be valid. File.HTM does not not need to be fully formed HTML. Where NUMBER-OF-MINUTES: =0 -- get file every job =NN -- cache file locally for NN minutes This setting is to cache the file if it is retrieved by an HTTP GET. The persist tag is optional. Note that the persist tag should not be used during page development, as the included file will be cached on the OmniRush server. Notes: 180 User's Guide If the <include> tag doesn't have file="LINK-TO-FILE" attribute or LINK-TO-FILE is not defined (empty) then this <include> tag is ignored The email module will fail the job if unable to resolve (unable to find) file from <include> tag. The email module has separate caches for each sending thread. All caches are cleared every start. The email module does not check the <include> file extension, content or size. So there is nothing that prevents user from including binary file. Example Syntax: <!--#include file="incl.htm"--> <!--#include file="\\server\share\temp\htmlinput\small.HTM " persist="10"--> <!--#include file="//or-news-c.htm" persist="10"--> <!--#include file="http://www.google.com/help.html" persist="10"-> Steps to use Include logic: 1. In the email track, enable includes. 2. On the email track, set the root directory for files and relative paths included from the file system. 3. Create HTML source document, in ODMS or on file system, that uses the include tag. 4. Schedule document through OmniRush Merge Codes Anatomy of a Merge Code Merge Codes are simply typed into the Word or HTML document. Here is a merge code that is for the job recipient full name: &Contact &Contact might merge the data: Joe Smith The ampersand (&) is the flag that tells OmniRush this is probably a merge code. You can use ampersands in your regular text without any problem. Simple merge codes, like &Contact and &Company are macro merge codes. Macro merge codes are 'hard coded' into OmniRush and cannot be changed. OmniRush offers table-oriented merge codes as well. These merge codes are often referred to as 'alias based' merge codes. These merge codes are based on database queries and can be customized. OmniRush includes dozens of alias merge codes 'out of the box' and allows you to customize them and add your own. For example, in a SalesLogix environment, &CT_Firstname refers to the firstname field of the CONTACT table for the current job. 181 OmniRush Administration & User Manual The components are: CT This is the table alias. It references the OmniRush CT merge code definition. CT is an 'out of the box' merge code, meaning it is automatically installed in a new OmniRush installation. The CT alias is defined in the OmniRush Administrator as follows: select * from contact where contactid = "&contactid" Since the SELECT statement is for SELECT *, all fields from the CONTACT table are available. The '_' in &CT_Firstname is the separator between the table alias and the field name. 'Firstname' references one of the fields that comes back from the SQL query. Any and all fields from the query may be used, as many times as needed, in the merge document. Types of Merge Codes Merge codes come in the following flavors: Simple. Simple merge codes contain a single piece of data for the entire document. An example is &Company. This is the job recipient company name. This code can be used once or multiple times in the document. It can be placed anywhere in the document (e.g. in a table, frame, header, paragraph, etc.). All macro merge codes are simple merge codes. Table oriented merge codes are also simple if the table alias refers to a single record. An additional class of simple merge codes are the job detail merge codes. Repeating Group. Repeating group merge codes reference one or more records. Multi-record table aliases must be handled as a repeating group in the merge form. Repeating groups are placed into the document as a Word Table, with a couple of special tags to flag the data as a repeating group. Click here for an example of repeating groups. Macro Merge Codes. The simplest merge codes, always ready, easy to use. Alias-Based Merge Codes. Alias codes are based on SQL queries. OmniRush includes dozens of alias-based codes out of the box, and you can make your own custom merge codes, based on SQL statements and stored procedures that you write. An easy way to recognize an alias based merge code is that it has an underscore in it (e.g. &CT_FirstName). The table alias in this case is CT. The field from this query that will be used is FirstName. Aliases are managed in the OmniRush Administrator via File | Merge Codes. Macro Merge Codes Macro merge codes are available on all CRM and non-CRM platforms. A macro code is obvious because it does not have a table alias. For example, &Contact is a macro code. It is the full name of the job recipient. See the example merge form allmacros.rtf to see these merge codes in action. Listing of macro codes: Code &Company &Contact 182 Example Data Acme Corp. John Smith Comments Full company name of job recipient Full contact name of job recipient User's Guide &Dear Mrs. &Firstname &Lastname &Phone &PhoneExt &FaxNum &FaxExt &Title &Address1 &Address2 &City &State &Zip &Country &Address John Smith 707-555-6666 111 707-555-7777 222 &FullAddress &FullAddressOneLine &nameaddress &ukaddress &fxref ¬es &Date() &DateAdd() ¶ms &phone &fax &emailaddress &citystatezip SalesLogix: Maps to Address.Salutation GoldMine: Maps to the Contact1/Contsupp Dear field Phone number of recipient. Phone Extension (GoldMine only) Fax number of recipient. Fax number extension (GoldMine only) First address line Second address line 101 Main Street Address1 + Address2 + Address3, blank lines removed Suite 201 101 Main Street Address1 + Address2 + Address3, blank lines removed Suite 201 Santa Rosa, CA 95404 101 Main Street, Suite 201, Santa Rosa, CA 95404 Sally Jones Z-Firm 101 Main Street Suite 201 Santa Rosa, CA 95404 Sally Jones UK formatted address (Address1, 2, 3, etc.) Z-Firm 101 Main Street Suite 201 Santa Rosa 95404 catalog.rtf // The Acme This is the reference component of a job. The job reference line m Roofing Catalog tag: <file list> // <fxref portion> (The // tag can be changed to another tag (like ##) in the DBIO Ov In this example &fxref is: The Acme Roofing Catalog Job notes (e.g. Notes from the scheduled action in GoldMine or Sa Monday, January 2, This is actually a function. See the documentation. 2003 (and any other format specified) Monday, January 2, This is actually a function. See the documentation. 2003 (and any other format specified) (222)333-4444 (111)222-3333 [email protected] Santa Rosa, CA 95404 The primary phone number of the contact for the job. The fax number of the job The email address of the job Properly formatted 183 OmniRush Administration & User Manual &Amper & http:/<someurl>/local/Unsubscribe.asp?contactid={&}C1_Accountn will be merged to &UserFullName &UserName &JobID &ActivityID Sally Jones SALLY MJ1FGQWZH0VGCLI 9CXCY2A$B6<<\9` &ContactID 96102370324512948ZF &CompanyID AC83838383838 http://<someurl>/local/Unsubscribe.asp?contactid=951129325935 Full name of job creator Short, login name, of job creator. This is the OmniRush internal job ID This is the Activity record ID from the host database. SalesLogix: Activity.ActivityID GoldMine: Cal.RecID SQL: OR_Jobs.JOBID This is the Contact record ID from the host database. SalesLogix: Contact.ContactID GoldMine: Contact.Accountno SQL: OR_Contacts.ContactID This is the Company ID from the host database. SalesLogix: Account.AccountID GoldMine: Contact.Accountno SQL: OR_Contacts.CONTACTID Job Detail Merge Codes Job detail merge codes are available in RTF and HTM merge documents. These codes pull information from the OmniRush User Setup screens onto the merge documents. &User_Login &User_Title &User_FirstName &User_MiddleName &User_LastName &User_EMail &User_PagerNum &User_Phone &User_DID &User_Faxno GoldMine dBase Codes Codes for GoldMine dBase are pre-configured in OmniRush. dBase merge codes cannot be customized or configured. Most available codes can be seen in action in the rep_full.rtf sample template. The available codes are: C1 C2 CH 184 Contact1.dbf table. Single record of data for current contact record. All fields of contact1.dbf can be referenced. Contact2.dbf table. Single record of data for current contact record. All fields of contact2.dbf can be referenced. Conthist.dbf. Pulls multiple rows of data for current contact record. All fields can be referenced. User's Guide CL CS FX HA HU HUA HUB HUC HUI HUL HUM HUO HUR HUS HUT LA LAA LAC LAM LAO LAS LAT LU LUA LUC LUD LUM LUO LUS LUT SC SD SL SP SR Cal.dbf. Pulls multiple rows of data for current contact record. All fields can be referenced. Contsupp.dbf. Pulls multiple rows of data for current contact record. All fields can be referenced. The CAL record that is triggering the current job. All fields can be referenced. Same as CH Conthist.dbf Conthist records for the job creating user. Conthist records for job creating user that are of rectype A Conthist records for job creating user that are of rectype CC Conthist records for job creating user that are of rectype CO Conthist records for job creating user that are of rectype CI Conthist records for job creating user that are of rectype L Conthist records for job creating user that are of rectype M Conthist records for job creating user that are of rectype O Conthist records for job creating user that are of rectype CM Conthist records for job creating user that are of rectype S Conthist records for job creating user that are of rectype T CAL records for current contact CAL records for current contact that are rectype A CAL records for current contact that are rectype C CAL records for current contact that are rectype M CAL records for current contact that are rectype O CAL records for current contact that are rectype S CAL records for current contact that are rectype T CAL records for current user CAL records for current user that are rectype A CAL records for current user that are rectype C CAL records for current user that are rectype D CAL records for current user that are rectype M CAL records for current user that are rectype O CAL records for current user that are rectype S CAL records for current user that are rectype T Contsupp where rectype is C Contsupp where rectype is D Contsupp where rectype is L Contsupp where rectype is P Contsupp where rectype is R GoldMine SQL Codes OmniRush includes the following merge codes 'out of the box.' Run the sample template: rep_full.rtf to see most of these codes in action. You can create additional, custom, codes as well. See the section on creating custom merge codes. C1 Contact1.dbf table. Single record of data for current contact record. All 185 OmniRush Administration & User Manual C2 CH CL CS FX HA HU HUA HUB HUC HUI HUL HUM HUO HUR HUS HUT LA LAA LAC LAM LAO LAS LAT LU LUA LUC LUD LUM LUO LUS LUT SC SD SL SP SR LD3 LFx and LGx 186 fields of contact1.dbf can be referenced. Contact2.dbf table. Single record of data for current contact record. All fields of contact2.dbf can be referenced. Conthist.dbf. Pulls multiple rows of data for current contact record. All fields can be referenced. Cal.dbf. Pulls multiple rows of data for current contact record. All fields can be referenced. Contsupp.dbf. Pulls multiple rows of data for current contact record. All fields can be referenced. The CAL record that is triggering the current job. All fields can be referenced. Same as CH Conthist.dbf Conthist records for the job creating user. Conthist records for job creating user that are of rectype A Conthist records for job creating user that are of rectype CC Conthist records for job creating user that are of rectype CO Conthist records for job creating user that are of rectype CI Conthist records for job creating user that are of rectype L Conthist records for job creating user that are of rectype M Conthist records for job creating user that are of rectype O Conthist records for job creating user that are of rectype CM Conthist records for job creating user that are of rectype S Conthist records for job creating user that are of rectype T CAL records for current contact CAL records for current contact that are rectype A CAL records for current contact that are rectype C CAL records for current contact that are rectype M CAL records for current contact that are rectype O CAL records for current contact that are rectype S CAL records for current contact that are rectype T CAL records for current user CAL records for current user that are rectype A CAL records for current user that are rectype C CAL records for current user that are rectype D CAL records for current user that are rectype M CAL records for current user that are rectype O CAL records for current user that are rectype S CAL records for current user that are rectype T Contsupp where rectype is C Contsupp where rectype is D Contsupp where rectype is L Contsupp where rectype is P Contsupp where rectype is R (and LD7 and LD9) This is a lead sheet merge. It reaches across a Referral record and pulls contact data from the referred contact. Can be used to make a list of recent leads sent to a reseller. Also for lead sheets. It reaches across a Referral record and pulls contact data from the referred contact, and, if present, forecast sales from the referred records. Can be used to make a list of recent leads sent to a reseller. User's Guide SalesLogix Codes OmniRush includes the following merge codes 'out of the box.' See the example template slx_mssql_demo.rtf or slx_oracle_demo.rtf (depending on your platform). You can create additional, custom, codes as well. See the section on creating custom merge codes. On SalesLogix, there are some slight differences in the codes based on the target SQL server (MSSQL or Oracle). For example, this code is for MSSQL: SELECT * FROM %%ACTIVITY A, %%picklist p, %%userinfo u WHERE a.ACCOUNTID = "&COMPANYID" and a.type = p.id and a.userid = u.userid ORDER BY STARTDATE The %% tags are placeholders for the dbo. You can either code it: SELECT * FROM SYSDBA.ACTIVITY A, SYSDBA.picklist p, or SELECT * FROM %%ACTIVITY A, %%picklist p, Here is an example Oracle merge code: SELECT * FROM %%OPPORTUNITY O, %%OPPORTUNITY_CONTACT C WHERE C.CONTACTID = '&CONTACTID' AND C.OPPORTUNITYID = O.OPPORTUNITYID ORDER BY O.CREATEDATE CP CT FX AA AAA Returns single row from Account table for current job. All fields available. Returns single row from Contact table for current job. All fields available. Returns single row from Activity record of the for current job. All fields available. Activity records for current account Association records for current account 187 OmniRush Administration & User Manual AAC AAM AAO AAT AC ACA ACC ACF ACM ACO ACT AD ASS AU HA HAC HAM HAT HC HCC HCM HCN HCT OCI OCM RAC Activity records for current account of type Phone Call Activity records for current account of type Meeting Opportunities for current account Activity records for current account of type To Do Activities for the current contact Association records where the FromID is the current contact Activities for the current contact of type Phone Call Association records where the ToID is the current contact Activities for the current contact of type Meeting Opportunities for the current contact Activities for the current contact of type To Do Primary record for the current contact from the Address table A flat record that has all the fields from the contact and account tables, that are referred FROM the current contact Activity records from the current user History records for the current account History records for the current account of type phone call History records for the current account of type Meeting History records for the current account of type To Do History records for the current contact History records for the current contact of type Phone Call History records for the current contact of type Meeting History records for the current contact of type Note History records for the current contact of type To Do Opportunity fields for the opportunityid set on the activity record that triggers the job. Competitor records for the opportunityid set on the activity record that triggers the job. The 'R' codes are Oracle versions of some of the above codes. See the Merge Code configuration screen in the OmniRush Administrator for details. RAM RAO RAS RCO RHA RHC Formatting Codes Quick Links: Formatting Phone Numbers Formatting Date & Time fields Formatting Phone Numbers 188 User's Guide Database systems vary in how phone numbers are stored. Some systems (GoldMine is one) store fully formatted phone numbers in the database, so phone numbers will automatically be formatted properly. Most SQL databases, and systems like SalesLogix just store the numeric digits in the database, so special steps are required to merge a good-looking phone number on merge forms. OmniRush offers phone number formatting macros to control how phone and fax numbers look in the merged document. This system works with all host platforms - GoldMine, SalesLogix and the OmniRush Open SQL Connector. Syntax: &SetPhoneFormat( MASK ) &ClearPhoneFormat() Examples: &SetPhoneFormat( (###)###-#### ) &SetPhoneFormat( ###(###)###-#### ) &ClearPhoneFormat() Adds a new mask to the OmniRush phonenumber-formatter. MASK is a special kind of character mask that uses the '#' character as a digit placeholder. (Note that OmniRush phonenumber-formatter will not trim space characters between parenthesize and MASK, see the examples below). Clears all current phone format masks. The trailing '()' is required. Creates a 10 digit phone number format mask. Data in a merged database field that is ten numeric digits will be cast to USA formatting. Input data: 1234567890 Merged field: (123)456-7890 Creates (and adds to existing masks) a 13 digit mask. Input data: 1231234567890 Merged field: 123(123)456-7890 Clears existing masks Notes: If a matching mask is not found, OmniRush merges the data as it is stored in the database. For SalesLogix phone numbers, if there is an 'x' character in the phone number, everything before the 'x' is considered the phone number, and everything after the 'x' is considered as a phone extension. The phone formatter will recognize and process the number before the 'x' and then append the extension onto the number. For example: The SalesLogix database contains: 2065680720x105 The document has the phone formatting macro: &SetPhoneFormat( (###)###-#### ) The merged document will contain: (206)568-0720x105 Formatting Date & Time Data When merging date and time fields, you may want to control how the data is formatted. The following codes are available: &SetTimeFormat(<format code>) &SetDateFormat(<format code>) 189 OmniRush Administration & User Manual SetTimeFormat can take the following formatting codes: A or a Display time in American (0-12 am/pm) format. E or e Display time in European (0-23) format. Example: &SetTimeFormat(a) Returns: 1:00 pm &SetTimeFormat2(E) Returns: 13:00 The options for SetDateFormat are below. The following SetTimeFormat() code, which will not appear on merged documents, is to suppress the time being displayed next to the date on SQL systems (if the field being merged is of type datetime). &SetTimeFormat() 1/1/01 &Setdateformat(m/d/yy) 01/01/01 &Setdateformat(mm/dd/yy) Mon Jan 2001 &Setdateformat(ddd, mmm yyyy) Monday, January 1, 2001 &Setdateformat(dddd, mmmm d, yyyy) January 1, 2001 &Setdateformat(mmmm d, yyyy) 01/01/01 &SetDateFormat(dd/mm/yy) Creating Custom Merge Aliases A Job Centric View of Data Merging Custom merge aliases are supported on SQL platforms only. An excellent way to understand merge aliases is to run one of the OmniRush sample merge forms through the system. Then open the source template from the OmniRush Administrator. Now, with the merged output in one hand and the source merge template on screen, examine the merge aliases in the Administrator Merge Alias configuration screen (File | Merge Codes). You can now see all the pieces and how they fit together. When creating merge aliases, it can be very helpful to imagine the merge from the perspective of the job record in the database. This is the CRM or other database record that triggers the job (in the ACTIVITY table in SalesLogix, in the CAL table in GoldMine). 190 User's Guide One of the keys to the kingdom is to remember: 1. Your system creates the Job Record 2. The Job Record can have fields and values that join to any data in the database 3. Custom merge queries can use those values to merge any desired data for the job Examples: The Job Record has an OrderNo value inserted into a field (say [Open SQL] OR_Jobs.OrderNo, or [SalesLogix] Activity.PROJECTID). Your front end code inserts this OrderNo. A custom merge code can now easily pull all the order data with a merge query along these lines: [Open SQL] select * from orders, order_line_items where orders.orderno = order_line_items.orderno and orders.orderno = (select orderno from OR_Jobs where JobID = '&ActivityID') [SalesLogix] select * from orders, order_line_items where orders.orderno = order_line_items.orderno and orders.orderno = (select PROJECTID from Activity where ActivityID = '&ActivityID') Anatomy of a Custom Merge Aliases A Custom merge alias has three attributes: 1. Alias Name, a 2 or 3 digit code that is the table alias portion of the merge code. (See the left hand 'Aliases' column in the Configure Merge Aliases screen below.) 2. The SQL query or Stored Procedure that pulls data from the database. (Shown in the SQL Query section of the screen shot below.) 191 OmniRush Administration & User Manual 3. Alias attributes, such as # of rows to pull, and the maximum number of rows to merge. (See the top area above the SQL in the screen shot below.) (Note that the Retrieve Rows option "From Last Row Backward" can be very high overhead and should be tested on a live database that database server performance is not adversly affected. Z-Firm advises to always use First Row Forward and use the SQL ORDER BY clause to get the desired data (e.g. most recent 10 rows, or oldest 10 rows)). Here is the merge alias configuration screen in the OmniRush Administrator (File | Merge Codes) In Line Replacement Codes In this simple example above for SalesLogix, notice that if you pasted the SQL into MS SQL Query Analyzer, no data would be returned. This is because the WHERE clause has a placeholder, "&COMPANYID." The quotation marks are literal (they will remain part of the query at run time), but the &COMPANYID is an OmniRush In Line Replacement Code (OILRC, pronounced 'oiler'). There are a number of OIRLC's available: Replacement Code &COMPANYID 192 Description Corresponds to: SalesLogix GoldMine MSCRM v3 Open SQL for the current job. ACTIVITY.ACCOUNTID ACCOUNTNO AccountBase.AccountID OR_Jobs.ContactID User's Guide &CONTACTID &ACTIVITYID Corresponds to: SalesLogix GoldMine MSCRM v3 Open SQL for the current job. ACTIVITY.CONTACTID ACCOUNTNO ContactBase.ContactID OR_Jobs.ContactID Corresponds to: SalesLogix GoldMine MSCRM v3 Open SQL for the current job. ACTIVITY.ACTIVITYID CAL.RECID ActivityPointerBase.ActivityID OR_Jobs.JobID Merge aliases can contain SQL queries of any complexity, and even can call stored procedures. It is possible to merge opportunity, sales order, and other data, as well as merging from custom tables. To illustrate, here are some example merge codes that are included with OmniRush: The built in OCI merge code for SalesLogix has this SQL query: SELECT * FROM OPPORTUNITY OP, ACTIVITY AC LEFT JOIN LEADSOURCE LE ON LE.LEADSOURCEID = OP.LEADSOURCEID WHERE AC.ACTIVITYID = "&ACTIVITYID" AND AC.OPPORTUNITYID = OP.OPPORTUNITYID This query pulls the OPPORTUNITYID off the job record in ACTIVITY and then goes and grabs lead source data from that opportunity. For this to work, the ACTIVITY record better have the OPPORTUNITYID field populated! Here is an even more complex query, also in the OmniRush box, this time the LF7 merge code for GoldMine. This query is used when end user records are tied to the reseller records with a GoldMine referral. In this query, OmniRush will look for referral records in CONTSUPP that have been created within the last seven days, and that start with the word NEW. OmniRush will reach across the referral, and grab several CONTACT1 fields for the end user record. If the end user record has a pending sale, it will grab that information too! SELECT CL.NUMBER2, CL.DURATION, CL.ENDDATE, CL.REF, CL.NUMBER1, 'CLCompany' = CL.COMPANY, CL.CREATEBY, CL.USERID, CS.ACCOUNTNO, CS.CONTSUPREF, CS.TITLE, CS.LASTDATE, C1.COMPANY, 193 OmniRush Administration & User Manual C1.CONTACT, C1.LASTNAME, C1.SOURCE, C1.PHONE1, C1.FAX, C1.ADDRESS1, C1.ADDRESS2, C1.STATE, C1.ZIP, C1.DEAR, C1.KEY1, C1.KEY2, C1.CREATEBY FROM CONTSUPP CS, CONTACT1 C1, CAL CL WHERE CS.TITLE=C1.ACCOUNTNO AND CS.ACCOUNTNO = '&CONTACTID' AND CS.RECTYPE = 'R' AND CONTSUPREF LIKE 'NEW%' AND 8 > DATEDIFF(DAY,CS.LASTDATE,GETDATE()) AND CL.ACCOUNTNO=*CS.TITLE AND CL.RECTYPE = 'S' ORDER BY CS.LASTDATE DESC All these examples can be found in your OmniRush administrator. Another example is here, the OCM merge alias that comes with OmniRush. This SalesLogix example retrieves competitors for the opportunity whose ID is in the ACTIVITY.OPPORTUNITYID field of the job record. This is a compound nested join, and runs very nicely thanks to full use of indexes. SELECT CO.* FROM COMPETITOR CO WHERE COMPETITORID IN (SELECT COMPETITORID FROM OPPORTUNITY_COMPETITOR OC WHERE OC.OPPORTUNITYID = (SELECT OPPORTUNITYID FROM ACTIVITY AC WHERE AC.ACTIVITYID = "&ACTIVITYID")) Creating Custom Merge Aliases 194 User's Guide The steps to create a custom merge alias are: 1. Design the merge alias using the database schema and an interactive SQL query tool, like the MS SQL Query Analyzer. 2. Check that your query is optimized to use the database indexes, and that it will not accidentally pull 1000's of records (which will adversly impact the database server and OmniRush performance). 3. When the query pulls the desired data from the database, replace the live data in the SQL WHERE clauses with the OmniRush In Line Replacement Codes. 4. In the OmniRush Administrator, create a new merge alias and paste in your SQL. 5. Create a template with the new merge code, or add the new merge code to an existing template. 6. Test the template. Note on SQL SELECT statements: Large production systems may want to implement custom merge codes as stored procedures (sprocs). The benefit of sprocs is that they can test the query (e.g. by running a SELECT COUNT(*) on the narrowest possible query) before executing the query. A sproc can then decide if the query needs to be opened further. Custom Merge Code Examples These examples address commonly needed functionality. No matter which platform used, review all the merge codes here to see how flexible OmniRush merging is. Many of these examples can be pasted in to the OmniRush Administrator to get you running immediately. Quick List: All SQL Platforms: Future Date & Date Calculation Formatting Returned Data Conditional Data: How to back fill a merge value in case field is NULL or empty Stored Procedure Merge Examples Stored Procedure Merge Examples - Advanced Example 1 GoldMine SQL: Count of records Most Recent Appointment from History Detail / Profile records of type Serial Number History Records of Specific ACTVCODE Conditional Data: How to back fill a merge value in case field is NULL or empty Merge Referred Contacts Merge Opportunity Information SalesLogix Merging Account Manager Information Microsoft CRM v1.x Merge Business Unit Name Future Date & Date Calculation 195 OmniRush Administration & User Manual Microsoft SQL Server and Oracle have a number of date functions that can be called from a merge code. The simplest need is often just to merge a date that is a few weeks in the future. For example, a marketing campaign might email or fax out coupons that are good for only one week. Or a special offer might want to loudly proclaim "Expires on <7 days from transmission date>!!!" (These examples are based on MS SQL Server. Oracle users, please consult the Oracle PL/SQL documentation.) OmniRush can easily do this with a custom merge code. For example, create a custom merge code called D7 (for 7 Days), and paste in this SQL: SELECT DATEADD(day, 7, getdate()) AS orfuturedate This will return a single field, 'orfuturedate' which will have a date 7 days in the future. A test merge document with this code would look like this: &Setdateformat(mmmm d, yyyy) &SetTimeFormat() In 7 days it will be: &D7_ORFuturedate The &Set codes control the format of the merged date. For more information on formatting codes, see the page. As you can see, the DATEADD function can add days, weeks, months, years, and more to any date. In the example above, we are simply adding to the current date. For full information, please refer to the Transact SQL documentation that is part of MS SQL Server. The DATEADD and DATEDIFF functions can be put to many uses. For example, say the CONTACT table has a CONTRACTEXP field that is the date when the customer's contract will expire. The following can be put into merge documents to remind users how much longer their contract will last: SELECT DATEDIFF(month, getdate(), ct.CONTRACTEXP) as orExpDate from contact ct, activity ac where ac.contactid = ct.contactid and ac.activityid = "&ACTIVITYID" DATEADD can also be used against database fields, or DATEDIFF and DATEADD can be used together. Formatting Returned Data When merging from a SQL merge code, the SQL Server itself has a number of features that can be used to format data. (Of course, with a stored procedure, the formatting is completely under your control in code). On SQL Server, the TSQL CAST and CONVERT functions can be used to format all kinds of data. For example, if a table has data in a column of type Money, SmallMoney, Int, or Char, this syntax will work to return a nice dollars and cents result. This example column is named OwedAmount from table Overdue: 196 User's Guide select left(convert(varchar(10), cast(OwedAmount as money), 1), len(convert(varchar(10), cast(OwedAmount as money), 1)) ) from Overdue This would return data that is formatted in dollars and cents, e.g. 123.44 Conditional Data: How to back fill a merge value in case field is NULL or empty In many cases, you are not assured that there will be data in the field you want to merge. For example, a document should be sent out with the Attention block to a field in your table called 'BillingName' but in some cases this field is empty. The Attention block should never be blank, so you want a merge code that will use the ContactName field as a fall back in case the BillingName field is blank or NULL. There are a few different ways to attack this task. One way is to use a Stored Procedure (aka sproc) from the merge alias. An additional, perhaps more accessible, technique is to use the functionality of SQL itself. On the Microsoft SQL Server platform, the CASE, ISNULL, and IIF mechanisms can serve. (See the Transact SQL documentation for details.) Here is an example using the CASE statement. SELECT 'RecipientName' = CASE WHEN len(BillingName) < 1 THEN ContactName -- Handles cases where there is an empty string in BillingName WHEN BillingName IS NULL THEN ContactName -- Handles cases where BillingName is NULL ELSE BillingName END, CONTACTID, BillingName, ContactName from RecipientTable where CONTACTID = '&CONTACTID' For example, to use this on the GoldMine CONTACT2 table where we have a field named UBillingName, the implementation would look like this: SELECT 'uRecipientName' = CASE WHEN len(uBillingName) < 1 THEN C1.Contact WHEN uBillingName IS NULL THEN C1.Contact ELSE uBillingName END, c2.accountno, c2.uBillingName, c1.Contact from contact1 c1, contact2 c2 where c1.accountno = c2.accountno and c2.accountno = '&CONTACTID' GoldMine: Count of Records Say you want to merge in a simple count of records. For example, you want to remind customers that they have received X tech support calls in the last three months. Say that tech calls are tagged with a result code of TS. Create a custom merge code called CTS (Count Tech Support), and enter this SQL: 197 OmniRush Administration & User Manual select count(*) as howmany from conthist where accountno = '&CONTACTID' and (actvcode = 'TS') and 3 > datediff(month,createon,getdate()) Now use the &CTS_Howmany merge code in the document to merge in the count. Here is another way to do the same thing, using a stored procedure (sproc): Step 1: Using Query Analyzer, create the sproc: CREATE PROCEDURE conthist_count @Contact varchar(30) AS select count(*) as howmany from conthist where accountno=@Contact and (actvcode = 'TS') and 3 > datediff(month,createon,getdate()) Now create a custom merge code of CTS, that invokes the sproc: EXECUTE conthist_count '&ContactID' Now use the &CTS_Howmany merge code in the document to merge in the count. GoldMine: Most Recent Appointment from History Create a new merge code, name it HAP (for example). Use this SQL (you can paste this in): set rowcount 1 select * from conthist where accountno = '&CONTACTID' and rectype = 'A' order by ONDATE DESC set rowcount 0 Create a new merge form, name it HAPTEST.RTF, and paste in this text: Most recent history record for &Company: &SetTimeFormat() &Setdateformat(dddd, mmmm d, yyyy) &HAP_Ref &HAP_Ondate &HAP_Notes Schedule HAPTEST.RTF on a record that has multiple appointment records in conthist. 198 User's Guide GoldMine: Serial Number Records from Detail/Profile tab Create a new merge code, name it DSN (for example). Use this SQL (you can paste this in): select * from contsupp where rectype = 'P' and contact = 'Serial Number' and accountno = '&CONTACTID' Create a new merge form and create a table, and use the appropriate fields from the GoldMine CONTSUPP table. GoldMine: Specific History Records within Last 30 Days Create a new merge code, name it DSN (for example). Use this SQL (you can paste this in): select * from conthist where accountno = '&CONTACTID' and actvcode = 'DN' and 31 > datediff(day,ondate,getdate()) Note: Conthist.OnDate is normally not indexed. You may want to add an index to Conthist ("ondate, recid" or "ondate,actvcode,recid") to improve the performance of this query if you have more than 30,000 records in ContHist. Create a new merge form and create a table, and use the appropriate fields from the GoldMine CONTHIST table. GoldMine: Merging the referred contact1 data (e.g. not the current contact data, but contact data from records referred to the current contact). Create a new merge code, call it RC1. Paste in this SQL: select * from contact1 c1 where c1.accountno IN (select title from contsupp where accountno = '&CONTACTID' and rectype = 'R' ) Create a new merge template, RC1TEST.RTF, and insert a table of four columns and two rows. Type in fields as shown: 199 OmniRush Administration & User Manual Note, OmniRush includes, out of the box, the merge demonstration form GM_Referral_List.rtf based on the CRL merge code. The out-of-box CRL merge code should work on SQL Server v7, but will fail on SQL Server 2000 and higher due to a new syntax rule. Modify the existing CRL merge code to the following SQL to bring it back to life: select c1.* from contact1 c1 where c1.accountno IN (select title from contsupp cs where accountno = '&CONTACTID' and rectype = 'R' ) ORDER BY c1.accountno DESC GoldMine: Merging Opportunity Information OmniRush v5.2 has a new merge template, GM-Oppty-Merge.RTF, which demonstrates opportunity merging. The merge codes for this form must be added to OmniRush by pasting in the SQL listed in the template. The instructions here will let you set up this merge form: Merge Code OP (oppty itself) OPT (tasks) OPI 200 Paste this SQL into the code (Note, the ‘&ACTIVITYID’ has a tiny space after the &, paste into OmniRush and remove the space) select op.* from opmgr op where op.opid = (select loprecid from cal where recid = '&ACTIVITYID') and op.rectype = 'O' select op.* from opmgr op where op.opid = (select loprecid from cal where recid = '&ACTIVITYID') and op.rectype = 'OK' select c1.*, c2.* User's Guide (influencer) OPC (competitors) from contact1 c1, contact2 c2 where c1.accountno = c2.accountno and c1.accountno in (select accountno from opmgr where opid (select loprecid from cal where recid = rectype = 'OC') select c1.*, c2.* from contact1 c1, contact2 c2 where c1.accountno = c2.accountno and c1.accountno in (select accountno from opmgr where opid (select loprecid from cal where recid = rectype = 'OP') = '&ACTIVITYID') and = '&ACTIVITYID') and Then make this merge form: SalesLogix: Merging Account Manager Information 201 OmniRush Administration & User Manual Say you want to merge in the account manager name or signature bitmap. In SalesLogix, the account manager can be associated with the Contact or the Account. Here are two merge codes, one for Contact, one for Account. Create a custom merge code called AMA (Account Manager in Account view), and enter this SQL: select ui.*, us.* from userinfo ui, usersecurity us where ui.userid = us.userid and ui.userid = (select accountmanagerid from account where accountid = "&CompanyID") Now create another custom merge code called AMC (Account Manager in Contact view), and enter this SQL: select ui.*, us.* from userinfo ui, usersecurity us where ui.userid = us.userid and ui.userid = (select accountmanagerid from contact where contactid = "&ContactID") Now all the fields in the UserInfo and UserSecurity fields can be merged for the Account Manager. The following merge template can now be created: When merged and faxed/emailed/printed, the output will be similar to the following: 202 User's Guide MSCRM v1.x: Merge Business Unit Name Merge Business Unit Name. This merge code grabs the Business Unit name, that can then be merged into documents. So a single template could be used by multiple Business Units. Steps: 1. 2. 3. 4. Create a new Merge Code Name it BN (for Business Name) Set it to: One Row Paste in the following SQL: select name from businessunitbase where businessunitid in ( select owningbusinessunit from contactbase where contactid='&CONTACTID' ) 5. Now use the merge code: &BN_Name in merge documents Advanced Merge Options Advanced Merge Options OmniRush has a number of advanced options and techniques to enable any dynamic document. This section is for the advanced user. If your site needs assistance implementing these options, 203 OmniRush Administration & User Manual consider Z-Firm's advanced technical consulting services. In this section, the following techniques are discussed: Stored Procedures Merging Signature Graphics Merging External Data Run time VBA processing Calling Stored Procedures from a Merge Alias OmniRush supports the use of stored procedures to grab data to be merged. This opens up more flexibility, as within a stored procedure you can control a large number of parameters. For example: Perform complex joins, including conditional joins Merge default data in cases where the query finds no live data Format data, especially numeric data Call extended stored procedures Control how many rows your query returns. Conditionally execute other queries based on the results of the initial query. etc. Quick List: Example 1 Example 2 Example 3 Example 4 (advanced example #1) Stored Procedures also have the benefit of being pre-compiled by the database server. This means that performance can be better than passing a SELECT statement. The steps to use stored procedures from OmniRush are as follows: 1. Develop the stored procedure in ISQL. 2. Be sure to have the stored procedure accept a parameter for the accountno (on GoldMine, you can pass the accountno, the recid of the calendar record, or both. On SalesLogix, you can pass the contact recid, account recid, activity recid, or any blend.) 3. Test your stored procedure by executing it from ISQL and passing an accountno or recid parameter to validate the output. 4. Add a merge code to OmniRush that calls the stored procedure. 5. Create a merge form that uses the merge code. 6. Test it! 204 User's Guide In the examples, we will use a simple stored procedure that pulls the very first, earliest, history record from GoldMine's conthist. An alternate version is presented that pulls the last, most recent record from conthist. The main benefit of the stored procedure in this instance, as opposed to using a straight SELECT in OmniRush is the availability of the SET ROWCOUNT which controls how many records the SQL server will return. Here is the example: create procedure sp_findhist @gmacct varchar(20) AS set rowcount 1 select * from conthist where accountno = @gmacct order by createon Here is an alternate version: create procedure sp_findhist2 @gmacct varchar(20) AS set rowcount 1 select * from conthist where accountno = @gmacct order by createon DESC We test the stored proc in ISQL by passing an accountno or recid as a parameter in quotes: sp_findhist "941130 2934300 -Ri" Now create a new merge code in the OmniRush merge configurator: 205 OmniRush Administration & User Manual Then, create a merge form. Here is an example. Figure 1 (above): The table in the merge template to receive the stored proc results. The resulting output is then this: Figure 2 (above): The resulting merged document. Merging Signature Graphics Z-Firm's unique merge technology allows for almost anything to merged without writing any code. Merging items like graphics requires a bit of attention to detail in MS Word, but that is all. This section is to introduce and walk through signature merging. Note that the techniques here can be applied directly to merging in the correct photograph of the sender, pictures of feature products, or anything else. The key is to understand the concept, and then the doors open to any kind of dynamic file or bitmap insertion. Background OmniRush merges data into the merge document based on OmniRush merge codes in the document. These merge codes can be placed anywhere in the document (e.g. in headers, footers, frames, tables, etc.). They can also be placed inside invisible MS Word tags. MS Word tags are used by Word for a number of things, including linking to external files. When a file or picture is inserted into a Word document, the link to the inserted file can be dynamic. In other words, MS Word has two ways to insert a bitmap (bmp) file: Static, e.g. the file data is copied from the external bmp into the MS Word document Dynamic Link, e.g. the path and file name are inserted into the MS Word document, and MS Word re-reads the external bmp file every time the document is opened. The Dynamic Link is what is interesting here, because using a merge code in the link itself, OmniRush can insert different data (like a different username) into the path or file name for each merge document. This can allow the appropriate signature bmp to be referenced on each job. Steps Overall, there are these steps: 1. Create the kit of signature bitmaps by scanning in the signature of each user. Establish a central directory and put all the files there (e.g. joe.bmp, sally.bmp, etc). 2. Create the merge document and insert the live link to one of the bitmaps. 3. Edit the MS Word link field and insert the correct merge code in the link field 206 User's Guide 4. Test 5. Done Create The Bitmaps. For discussion, the bitmap directory will be \\omnirush\sigfiles\ The contents of this are currently: ddee.bmp rafael.bmp sally.bmp tom.bmp Create the Document In MS Word, create the document. Insert the signature by selecting Insert | Picture | From File. Check Link to File, Uncheck Save With Document. Navigate to the \\omnirush\sigfiles\ directory and select one of the signature files (any one will do). See the screen shot below from MS Word. Press Alt-F9 to toggle the field codes visible. You will now see an in-line code that looks like this: INCLUDEPICTURE "\\\\OmniRush\\sigfiles\\DDEE" \* MERGEFORMAT it may be formatted with the file extension: INCLUDEPICTURE "\\\\OmniRush\\sigfiles\\DDEE.BMP" \* MERGEFORMAT Notice that all the backslashes have been doubled. This is correct and required. Modify the Link 207 OmniRush Administration & User Manual Put your cursor over the file name (DDEE), and click so you can edit it. Replace DDEE with &C1_OWNER (for GoldMine), so it now looks like this: INCLUDEPICTURE "\\\\OmniRush\\sigfiles\\&C1_OWNER.BMP" \* MERGEFORMAT (If the code had the .BMP extension keep it, if not, leave it out.) Save the file. At merge time, the "\\\\OmniRush\\sigfiles\\&C1_OWNER.BMP" will become "\\\\OmniRush\\sigfiles\\SALLY.BMP" or the correct name of the contact record owner. This will cause the correct signature to merge. The file can now be saved and is ready to test. Notes When merging in text files, it is important that the data coming in from the contact manager not include the extension. In the MS Word merge it should then look like this: "\\\\OmniRush\\sigfiles\\&C2_SIGNATURE.TXT" The data in the CRM/SQL system would just be the file name without extension. This may apply to other file formats. If problems are encountered, it may be because certain Microsoft service packs for Office can break the link functionality in Word. Refer to Microsoft Article: 330079, which is currently available via this link. SalesLogix The only difference in terms of merging a signature is that the SalesLogix usernames are stored as ID's. There are two simple solutions: Name the signature files with the SalesLogix USERID value that corresponds to the correct user. Then fields like &CP_Createuser or &CT_AccountManagerID can be used in place of &C1_OWNER in the example above to drive the signature. Use the &UserName field in place of the &C1_OWNER in the example above Advanced Use As this demonstration shows, data in the database can drive any graphic, not just signatures. A picture of the sales rep could be merged in, or a picture of a product. This technique is not limited to pictures, data from external Word, Excel, Text, or other files can be dynamically pulled in at merge time. Merging External Data External data is data that comes from somewhere other than the database. For example: 208 Dynamic web site content Current inventory lists that are generated nightly by another system Latest price information User's Guide Daily specials Any data that comes from sources other than the main database OmniRush is an excellent system for merging external data into formatted documents for delivery by email, fax, or print. OmniRush offers two mechanisms for merging external data: Extended Stored Procedures. This is an excellent way to merge external data, and leverages the OmniRush merge technology and custom merge codes. Refer to your SQL Server documentation for implementation details (or contact Z-Firm, click here). VBA Document Processing. OmniRush' powerful VBA automation features allow you to fire VBA code to process the document prior to delivery. Data Driven Compound Documents The techniques shown here enable what Z-Firm calls DDECO, Data-Driven-CompoundDocuments. A DDECO is a document that is largely built at run time, using VBA, dynamic insertions (the technique discussed in Merging Signature Graphics), and OmniRush merging. Example #1: Merging Current Inventory Information Say your firm has volatile pricing and inventory (or availability) on your products. When you send a price sheet out, you want something like: Pricing and availability as of <today, say 1/15/01> (pricing and availability subject to change. call sales for latest information) Widget Product Line Super Size Widget qty 3 price $202.50 Regular Size Widget qty 1 price $150.00 The qty and price information might come from a mainframe or production system, and is dropped as a text file each night in a directory. Using dynamic insertions (described here), the merge file will pick up the main-framegenerated text file every time, so it always uses the current data. Further, if your firm has 3 or more) product lines (say: widget, midget, gidget) each dropped to a separate file, dynamic insertions could reference the product interest field in the database. This would cause only the relevant product information data to be inserted into the document. Example 2: Specials and Promotions Say your firm has daily or weekly specials and promotions. You want to make sure that the current promotions are mentioned in the communication. One way to do this would be to make a SQL database table. Say this table has these fields: startdate when promotion begins enddate when promotion ends message the text that describes the promotion 209 OmniRush Administration & User Manual Then, using a custom merge code, the current promotion can be merged onto the document. For example, here is a pseudocode representation of the merge code: Merge Code: PRO SET ROWCOUNT 1 SELECT MESSAGE FROM PROMO WHERE TODAY() => STARTDATE AND TODAY() <= ENDDATE ORDER BY STARTDATE DESC SET ROWCOUNT 0 This code could be inserted in a text box, table, or frame in the merge form. As you can see, the power and flexibility of OmniRush merging is extensive. Ask your system administrator, SQL DBA, or CRM consultant to assist with advanced merging. If questions persist, contact Z-Firm's advanced consulting team. Run Time VBA Processing OmniRush also allows VBA to run on the merged documents. This allows for super-flexible, runtime, document merging and automation. See the Developer's guide to VBA in this help system. Adding Bar Codes to Merge Documents Field Method: Add your merge codes the usual way. For example, to add company, address, and city info you would use: &Company &FullAddress Insert a BarCode field under the &FullAddress (Insert | Field | Numbering | BarCode) Select the field, use alt-F9 to toggle so you can view the text in the field. Now modify the the field text so that it looks like {BARCODE &Zip \*MERGEFORMAT} Save the label or envelope as an RTF file and test it on a small group. Hint: Tag 3 records and schedule to a group! Note that the BARCODE Word field has many switches available in Word. Any or all of them can be used. Simply add them to the text of the code. ---------------------------------Alternate Method: 210 User's Guide (This document submitted by a Z-Firm VAR, Provided on an FYI basis, not supported by Z-Firm) Postal bar codes can be added to labels, envelopes and letters merge printed with OmniRush with the following steps. 1. Add your merge codes as prescribed by OmniRush. For example, to add company, address, and city info you would use: &Company &Address &CityStateZip 2. Create a BOOKMARK (Insert | Bookmark) in Word. Place the Bookmark IN FRONT of the &Company. Insert | Bookmark | (Type Bookmark Name - I like ORADDRESS) 3. Underneath the &CityStateZip macro, place the BARCODE field. Insert | Field | Numbering | Barcode. When inserted into Word, edit the field information so it looks like this: 4. { BARCODE FRADDRESS \b } 5. Save the label or envelope into the OmniRush document store and test it on a small group. Notes On Oracle Merge Codes The OmniRush Database Connector for SalesLogix and the Oracle Database Connector must log in as table owner (sysdba for SalesLogix), or every table reference must be in the format: <tableowner>.<tablename> e.g. sysdba.activity On Oracle, make sure to use single quotes. This can be confusing. The following example is valid on Oracle: (...) WHERE A.ACCOUNTID = "&COMPANYID" AND A.USERID = U.USERID AND A.TYPE = P.ID AND UPPER(P.TEXT) = 'PHONE CALL' At first glance, it would seem that the "&COMPANYID" clause should fail because it is doublequoted, and Oracle requires single quotes. However, will work, because OmniRush converts the double quotes to single quotes downstream. However, note that the line: UPPER(P.TEXT) = 'PHONE CALL' is single quoted. This line is not parsed by OmniRush, and must be singlequoted. Double quotes will cause odd errors (like field not found, or other confusing errors). Optimizing Merge Codes It is important that merge codes contain SQL that is optimized to execute quickly and efficiently. Even the 'out of box' merge codes that come with OmniRush may need tuning to run at their best in your environment. 211 OmniRush Administration & User Manual For example, the GoldMine HUC merge code comes like this: SELECT * FROM CONTHIST WHERE USERID = "&USERID" AND RECTYPE = "CO" In most cases, you will want to optimize it to this: SET ROWCOUNT 10 SELECT * FROM CONTHIST WHERE USERID = "&USERID" AND RECTYPE = "CO" SET ROWCOUNT 0 In most cases, OmniRush will automatically set ROWCOUNT to 20 if it is not specified in the merge code. However, for extra control, you may want to set it explicitly. Currency Display To format merged data as currency, take these steps: In Word, do Insert | Field (doesn’t matter which field type, select the first one on the list since it will be modified later) Toggle so you can see the field you inserted (Alt+F9) Modify the field so it looks like: { mergefield &C2_<UserDefinedField> \# $,0.00 } Replace the UserDefinedField with your own fieldname This can be used with any OmniRush merge code, not just GoldMine Contact2 fields. The above will format values from .01 up to and beyond 9,999,999.99 When merging from a SQL merge code, the TSQL CAST and CONVERT functions can be used to format data. For example, if a table has data in a column of type Money, SmallMoney, Int, or Char, this syntax will work (our example column is named OwedAmount from table Overdue): select left(convert(varchar(10), cast(OwedAmount as money), 1), len(convert(varchar(10), cast(OwedAmount as money), 1)) ) from Overdue This would return data that is formatted in dollars and cents, e.g. 123.44 Merge: GoldMine User Vars What is a User VAR? User VAR stands for User Variable. GoldMine lets you add parameters to the GoldMine USER.INI file that can extend the power of merge forms. The GoldMine FactsBack document #388 should be referred to for documentation. This document is available on the GoldMine web site: www.goldmine.com. 212 User's Guide How do User VARs work? Values are entered into a GoldMine USER.INI under the [user_var] header. These values are then mergeable on OmniRush RTF merge forms. Additionally, global values may be entered into the GM.INI that will be available for all users. Lastly, additional INI files may be created to hold constant values that will be used across many merge forms. Changing the central INI will propagate the change across merge forms instantly as they are merged. Example: You have a merge form that is used by several people. You want the user's full name and title to appear at the bottom. The USER.INI files would contain: Example JOE.INI: [user_var] Title=Customer Service Manager Example MARY.INI: [user_var] Title=Customer Service Agent The merge form would appear as follows: Merge Code Format User VARs are merged by entering the merge code as follows: &Uvar<var name> No spaces are allowed in the variable name. To merge the user var for Title, the code would be: &UvarTitle To specify the INI to reference, the merge code is: &Uvar<var name>@<ini name> The ini name must be 8 characters or less, no spaces or punctuation, do not include the ini extension. To specify the EmergPhone var from the CONSTANT.INI file, use the code: &UvarEmergPhone@constant Advanced Use 213 OmniRush Administration & User Manual You may have other information that appears on many merge forms, but changes from time to time. This information might be special pricing, production lead time, emergency contact phone numbers, special offers, web URLs, or more. Using the GM.INI and other INI files to hold constant values, you can easily change these values across all the merge forms just by editing one file. OmniRush looks for user var values first in GM.INI, and then in the USER.INI of the user who created the fax or print job. If you specify the INI file to use, OmniRush will only look in that file. Emergency phone number example: You want your customers to get through to you no matter what. You might implement this as follows: JOE.INI: [user_var] pager=(222)333-4444 homephone=(222)334-5555 GM.INI [user_var] EmergPhone=(111)222-3434 The template then would look like this: Using a Constant File You may have information that changes daily, weekly, or monthly, that you want merged on several documents. This information might be periodic specials, shipping lead time, 'message of the day,' or other timely information. In this example, Acme Corp. likes to promote special discounts and announce fulfillment lead time on several documents. Every time a price list, order form, cover page, or other document is sent out, the daily special and fulfillment lead time is merged onto the form. This way customers are not surprised when they place an order. 214 User's Guide Acme uses an INI file called NEWS.INI that is located in the GoldMine System Directory. Here it is: NEWS.INI [user_var] Leadtime=Orders placed before 3:00PM are shipped within two business days. Special=This week only, no extra charge for overnight shipping! Discount=Did you know, pay your invoice within five days and take a twopercent discount! Figure 1: OmniRush Merge Template that References User Vars The resulting merged document: 215 OmniRush Administration & User Manual Figure 2: The resulting merged document Location of INI Files INI files referenced by the &Uvar merge codes must be located in the GoldMine System Directory. This is the directory where the GoldMine LICENSE.DBF is located. The location of the this directory can be determined in the following ways: a) In GoldMine, select Help|About|System, and check the entry for 'System Files' b) Open the GM.INI and check for a SYSDIR entry c) Search for the LICENSE.DBF and USER.INI files in the file system Advanced INI Location OmniRush respects the GM INI tag: UserINI to find the user.ini in a directory other than the GoldMine System Directory. However, using this feature will not allow you to use constant INI files or multiple USER.INI files from one template. The reason for this is that OmniRush will not look in three directories for the ini files it needs. By default, OmniRush looks in one directory, the System Directory. The UserINI tag makes OmniRush look in a second directory, but it is then assumed that ALL needed INI files will be in that one location. It is understood that this may well not be the case. Generally, all INI files should be in a single directory. Network security can be used so that these files are only visible to the administrator and the one user. A batch file can be created to reassign these rights automatically in the event of file deletion/recreation. 216 User's Guide Note: Word May Autoformat Merge Codes with @ Symbol as Email Addresses In Word, select Tools|Autocorrect, and go to AutoFormat As You Type tab. Uncheck 'Internet and network paths with hyperlinks.' Do the same in the Autoformat tab. Other Document and File Types Excel Files Excel files can be sent several ways: 1. Print-to-Fax or Email using the OmniRush Client. This method is excellent for 'one off' spreadsheets. 2. Statically Embedded in a Word RTF. If a spreadsheet needs to be faxed, sent as an email attachment, or printed, it can be embedded in a Word RTF that is then scheduled (see below) 3. Dynamically Embedded in a Word RTF. If the spreadsheet is updated often, and you want the contents to automatically be reflected in the document sent by OmniRush, make it a dynamic link. How to embed an Excel file: 1. In Excel, select the range of cells you want in the document. Note that this range should fit on on one page. 2. Press ctrl-C to copy this range to the clipboard. 3. Create a new document in Microsoft Word 4. In the Edit menu, select Paste Special 5. There are now several options. Experiment with them to achieve the results you desire. 1. For dynamic updates, insert as Microsoft Excel Worksheet Object and select Paste Link so that changes to the worksheet are automatically updated in the Word document 6. Format document to taste, add OmniRush merge codes as needed. 7. Save as RTF 8. Reopen and confirm that formatting has been correctly preserved (in some cases, esp. if saved as an Excel Worksheet Object, the object size as set in Word may not be preserved because the size is set back to the size of the object in Excel). 9. Optionally import into ODMS 10. Schedule the document Tips: The leading problems that can be encountered are: 1. Margins. If the document tries to print beyond the printable margins of the page, it will time out (after several minutes). The document must fit within the printable area of the page (this is especially possible when an oversized Excel Worksheet Object is used, as resizing in Word may not be saved, and if the cells are made larger in Excel, it may cause the Object in Word to get larger). 1. One trick is to create a text box, then paste-link into the text box, and size the text box to taste. 2. Bad Links. When you use the Paste Special | Paste Link option, the path and file name to the source XLS is saved into the Word file. This path and file must be valid (e.g. if the file is moved, the link may break), and it must be visible from the perspective of the 217 OmniRush Administration & User Manual OmniRush Server (e.g. the network rights that OmniRush uses to access the network must give it visibility to the source XLS file). Note that if you paste static, this is not a problem. 3. Dynamic Links Require Excel. If Dynamic links are used (Paste Link), then Excel must be installed on the OmniRush Server PC. Document Management Document Management Options OmniRush users have three options for the document library: Use External Documents. What this really means is that the master copies of documents (e.g. the files you edit and change) will be on the file system, not in ODMS. Compatible with FaxRush v4, simply set the Document Import folder to the FaxRush \outfax\ directory (or any valid directory, local or network). Files scheduled without paths will be pulled from the Document Import Folder. Files with paths specified will be accessed from that path. (Note, if drive letters are used in the paths, please see the technical document on the subject.) Use Internal Documents. This means that the master copies of documents (the files you edit and change) will be in ODMS. External files can be imported (automatically or manually) into ODMS. When files are imported into ODMS, the external file is flagged read-only by OmniRush to prevent them from being accidentally edited (with the resulting confusion that would lead to, when the internal, unedited, document is then sent by OmniRush). Documents need to be imported into the ODMS to be scheduled. Documents can be imported manually (with the Import option in the Administrator, or by dragging into Administrator from Explorer). Documents can also be automatically imported by putting them into the Document Import Folder. When a document is scheduled without a directory (e.g. just a file name), OmniRush first tries to find the document internally. If not found, OmniRush will check the Document Import Folder, and will automatically import the document if it is found there. The external file will be marked read-only to prevent accidental editing. Use Both Internal and External. This requires a good awareness of how OmniRush handles documents, but can be done by an experienced administrator. Benefit of External Documents: Easy to use Reduced need to use the OmniRush Administrator Use file system (network) rights to control who can edit documents Use FRP/ZPK files to build kits of documents. Benefits of Internal Documents: 218 Central repository for OmniRush documents Easier to organize documents into a document tree (a document can be deep in the tree, but scheduled just by file name without path) Folders can be moved or renamed, and documents will still be accessible by document name User's Guide Can reference files by their ID, which allows documents to be renamed, moved, etc. and the reference does not change Integrated rights administration, no need to be a network administrator Ability to make document links, so that a single file can appear in multiple folders Ability to schedule entire folders of files Integrated check-out/check-in functions Integrated document viewing and editing. Internal or External The first step to adding or editing a document is to determine if the you are running OmniRush with master files internal or external. Ask the OmniRush administrator at your site. Adding Files To add a document for Internal management by ODMS: 1. Create the file as TIF, RTF or PDF 2. Save to a convenient folder 3. Open the folder in Windows Explorer 4. Drag the file into the desired folder in the OmniRush Administrator 5. The file can now be scheduled in the database or CRM using a leading '/'. E.g. "/widget competititve matrix.rtf" The file in the file system folder will be renamed to: Imported_<filename> and will be tagged read only to prevent accidental editing (since the file is internal master, edits to the file on the file system will not be seen by OmniRush. If the file will be managed Externally, do the following: 1. Create the file as TIF, RTF or PDF 2. Save to the OmniRush Document Import Folder (e..g \outfax\) or to another directory if the job will be scheduled with the full path. 3. The file can now be scheduled in the database or CRM as a file name or with the path. E.g. "widget competitive matrix.rtf" or "\\server\share\directory\widget competitive matrix.rtf" Editing Files First, it helps to be completely clear if the file is internal or external. Here is how to tell: 219 OmniRush Administration & User Manual A. Is the Database Connector set to External Master? If it is, and the the file is in the default ODMS Document Import Folder, and is checked out? This indicates an external master file. B. If the file is in another ODMS folder, and/or is checked in, the file is Internal Master. (For the detailed, advanced, steps, click here.) For External files, simply open the file from Windows Explorer (e.g. from the network directory, not from the OmniRush Administrator), and edit it. For Internal files, navigate to the file in the OmniRush Administrator. Right Click, and select Edit. (If the Edit option is not available, see the Administering Rights section.) The detailed, advanced, steps are: Find the document in the Documents branch of the tree Right-click and select Properties (if the file has a check mark on it, click here to learn about document check-in/check-out) Check the External File and the Import Mode This tells you if the external file will be re-imported into ODMS if it is edited. ODMS: Check In and Check Out OmniRush is a document management system, and it has built-in check-in/check-out functionality. Whenever a document is edited from the Administrator, all users see it in the Document tree with a checkmark. The checkmark is green if you have it checked out yourself, red if another user has it checked out. A document that is checked in has no check. 220 User's Guide If a document needs to be 'forced' back in, either the user who has it checked out or an Admin equivalent user can do an 'undo checkout' from the local menu in the document tree. Documents are checked out automatically when they are edited from Administrator. The benefit is that the document is automatically checked back in when it is closed. There is also an explicit 'Check Out' option that will check out the file and leave it in a directory on disk. This option requires that the user remember to check the document back in. Checked out documents can be scheduled. The most recent version in OmniRush will be used until the updated version is checked in. ODMS: Rights Management Concepts The OmniRush Document Management System has integrated security. This allows document administration tasks to be delegated and controlled, and allows portions of the document library to be restricted to specific users. To administer rights, navigate to a branch in the Documents tree, right-click, and select Manage Rights. The screen below appears. On the left, select the Group that will have rights granted or revoked. On the right, select the document folder being managed Check or uncheck the Rights check boxes. Users must have Read rights to a folder to see that the folder exists, and to schedule documents from the folder. The Update right allows users to edit and rename files. 221 OmniRush Administration & User Manual The Insert right allows users to add documents to the folder. The Delete right allows users to remove documents from the folder. Driving Jobs from the CRM System Driving Jobs from CRM: Introduction OmniRush sees itself as the 'A' in Sales Force Automation. To really automate the CRM environment, one or more of the following steps will need to be taken: One-Click Button's for FUA's (Frequently Used Actions) Trigger OmniRush jobs from Processes Trigger OmniRush jobs from Custom User Interfaces in the CRM system Trigger OmniRush jobs from the Accounting or other systems This section discusses how to do this. Note that in many cases, it is advisable to work with a CRM consultant or discuss plans with Z-Firm's advanced technical services group. Tools that are available for this automation: The SalesMagic toolbar system is an excellent button bar and automation system to drive OmniRush. The AIM Toolbar system is a programmable toolbar system that can be used with GoldMine. The SalesLogix Architect and VBA mechanism is an excellent tool in the SalesLogix environment. Referencing Job Documents An OmniRush job that references a document can refer to the document(s) in the following ways: Specify an 'external' (e.g. file system) document. For example: "\\mainserver\cdrive\documents\sales literature\widget brochure.rtf" Alternately, an OmniRush internal document can be referenced. For example: "/sales literature/widget brochure.rtf" Or, lastly, the document can be simply named, and OmniRush will use its settings to decide where to look for the file. For example: "widget brochure.rtf" If the Database Connector is set for External Master: Jobs with a leading / are looked for only in ODMS (internal) Jobs with just a file name are looked for in the default document import folder (\outfax\) If the Database Connector is set for Internal Master 222 Jobs with a leading / are looked for only in ODMS (internal) User's Guide Jobs with just a file name are looked for first in the ODMS default folder, and then in the external default documuent import folder Multiple files can be on the reference line, separated with a space, comma, or semicolon. Using Override Codes A job trigger record generally requires two elements: Track Reference (the Host Reference for the target Track) File name, Package File, or Template Optional fields: Job Reference Information Notes However, a number of job attributes can be overridden job by job. Some examples: A fax job that is going to a fax number other than that of the contact record A shipping job that needs a shipment weight other than what is preset in the shipping template A credit card job that needs the credit card number passed on the job Override codes allow this. Some examples: To send the package saleskit.frp to a specific fax number: saleskit.frp fax:2134445555 To ship a UPS ground shipment, but set the shipment weight to 11 pounds and reference the shipment as 'PO 23433.' /ugn.zpk WGT:11 // PO 23433 Click here to see the reference list of available override codes. Scheduling Jobs in GoldMine Scheduling from GoldMine - Introduction With GoldMine, OmniRush uses a 'virtual secretary' model in which you schedule actions to GoldMine users. These GoldMine users are not actual people, rather they are virtual users such as EMAIL, LASER, FAX, FEDEX, etc. 223 OmniRush Administration & User Manual Jobs can be scheduled to GoldMine groups, filters, and tagged record lists as well. GoldMine OmniRush integrates with GoldMine in the following ways: Server Side Integration: 'Traditional' interactive use of OmniRush is done by scheduling activities in GoldMine. OmniRush works as a 'virtual secretary' in GoldMine, and you schedule jobs to OmniRush just as you would to another GoldMine user. The key to understanding this part of OmniRush is to remember that the GoldMine CAL table drives OmniRush. A single record can trigger a simple job, or complex job, to any OmniRush module. OmniRush does not care how these CAL records are created. You can use GoldMine's DDE, DLL, Stored Procedures, Remote Sync, Automated Processes, or any other mechanism that will create the appropriate CAL record. Your job is to create the CAL record. OmniRush does everything from there on. For example, to send the document package 'widget_promo.frp' to Sam Jones via email, the following might be scheduled in GoldMine: 224 User's Guide OmniRush logs all jobs into GoldMine history, so the whole workgroup knows what was done, by who, and when. Additionally, all OmniRush job types can be submitted by GoldMine network users, remote users who sync, thin client users, Automated Processes, and GoldMine DDE/DLL/COM/Stored Proc api code. Client Side Integration: All OmniRush client applications (print to fax and viewer) offer their full feature set to GoldMine network users. See the User Guide in this help file for details. Scheduling to GoldMine Groups Broadcast fax jobs, mass mail merge jobs, UPS and FedEx shipments to multiple contacts, this is done in GoldMine by scheduling a job to a GoldMine Filter, Group, or Tagged Record List (TRL). 225 OmniRush Administration & User Manual The steps below show how to do this in GoldMine to GoldMine Primary Contacts. If you need to schedule to GoldMine Mail Merge Codes, GoldMine Other Contacts, or Other + Primary Contacts, use the OmniRush MCSCHED.EXE utility. The steps to do this are as follows: 1. Create your Filter or Group in GoldMine (refer to the GoldMine documentation and help file for steps to do this). 2. In GoldMine, Schedule an Other Action, and populate the Reference, Notes, and Primary User fields appropriately as shown here. 3. Go to the Group Schedule tab, and select the group or filter to schedule to. 4. Select the Group Schedule options. To process the entire job immediately, uncheck 'Span across multiple days.' To send out the job over a number of days, select the appropriate options. To schedule to a tagged group of records, the steps are: 1. Tag the records in GoldMine 2. In GoldMine, Schedule an Other Action, and populate the Reference, Notes, and Primary User fields appropriately as shown here. 3. Go to the Group Schedule tab, and select the Active Contact Filter. Scheduling Jobs in SalesLogix Scheduling from SalesLogix - Introduction With SalesLogix, OmniRush uses a 'virtual secretary' model in which you tag scheduled To Do actions to SalesLogix contacts. The Category code on these actions tags the job as an OmniRush job, and tells OmniRush how to handle the job, e.g. EMAIL, LASER, FAX, FEDEX, etc. 226 User's Guide Jobs can be scheduled in several ways: Interactively, by selecting Schedule | ToDo in the SalesLogix Sales or Web clients Via a toolbar button. Your SalesLogix administrator or programmer can create toolbar buttons to make common actions 'one click' easy. From SalesLogix Processes. From your custom SalesLogix forms. Jobs can be sent to whole groups of contacts as well. See the page on the subject. Scheduling from SalesLogix - Discussion OmniRush integrates with SalesLogix in the following ways: Server Side Integration: 'Traditional' interactive use of OmniRush is done by scheduling activities in SalesLogix. OmniRush works as a 'virtual secretary' in SalesLogix, and you schedule jobs to OmniRush just as you would to another SalesLogix user. The key to understanding this part of OmniRush is to remember that the SalesLogix ACTIVITY table drives OmniRush. A single record can trigger a simple job, or complex job, to any OmniRush module. OmniRush does not care how these ACTIVITY records are created. You can use SalesLogix's VBA, SLGXAPI.DLL, Stored Procedures, Remote Sync, Processes, or any other mechanism that will create the appropriate ACTIVITY record. 227 OmniRush Administration & User Manual Your job is to create the ACTIVITY record. OmniRush does everything from there on. For example, to send the document package 'widget_promo.frp' to Sam Jones via email, the following might be scheduled in SalesLogix: Example email, fax, fax with cover page, shipping, and print jobs from SalesLogix. If you create, programmatically, the same record in ACTIVITY that SalesLogix creates from its UI, then you are driving OmniRush from code. OmniRush logs all jobs into SalesLogix history, so the whole workgroup knows what was done, by who, and when. 228 User's Guide Additionally, all OmniRush job types can be submitted by SalesLogix network users, remote users who sync, thin client users, Processes, and SalesLogix VBA / DLL / COM / etc. api code. Client Side Integration: All OmniRush client applications (print to fax and viewer) offer their full feature set to SalesLogix network users. Also jobs to SalesLogix Groups can be triggered from the OmniRush Universal Client and the OmniRush Toolbar. See the User Guide in this help file for details. Scheduling to SalesLogix Groups Mass jobs can be sent to SalesLogix groups. There are a few ways to schedule to groups: a) Use a simple, one event SalesLogix Process (details below) b) Use the OmniRush Toolbar c) Use the OmniRush Universal Client To use a Process: 1. 2. 3. 4. Open the SalesLogix Architect Create a new process Drag a ToDo onto the process map Double click the ToDo to set its properties, as shown (note the circled areas, these are changed from the defaults): Save the process. The Process can now be scheduled to a group in SalesLogix with two steps in the SalesLogix Sales Client: Schedule | Process Select the process, and select the group. Tools | Processes | Scan All Processes 229 OmniRush Administration & User Manual Shipping Jobs Shipping - Introduction Quick Links: Contents: Understanding Shipping with OmniRush -- The Big Picture Creating the Shipment What OmniRush Does Tracking and Managing the Shipment Creating the Shipment It is easy to ship using a CRM system or SQL database. The job could be as simple as this: Track: UPS Reference: UGN.ZPK WGT:5 VAL:1000 // Sample Widget Kit This example will use the UGN.ZPK template (what we did here was take the UPS_GND_BOX_1LB.ZPK template that comes with OmniRush and rename it to UGN.ZPK to make it short). The shipment weight is set to 5 pounds and the declared value is $1000. These two values are overriding the weight and value set in the template. The shipment reference is 'Sample Widget Kit.' This reference will print on the shipping label, and will also be in the shipment history record. The shipment reference will be the billing reference for FedEx shipments, and prints on the label on all carriers. This shipment can be easily triggered from a macro button, toolbar, Automated Process, or DDE/DLL/VBA code that interfaces with the contact manager. The examples below show how to schedule this shipment interactively, but note that the CAL/ACTIVITY record is what is important. It is not important how that record is created. The scheduling dialogs below are for illustrative purposes. In GoldMine, that might look like this: 230 User's Guide In SalesLogix, it could look like this: 231 OmniRush Administration & User Manual In Microsoft CRM v1.x, it could look like this: 232 User's Guide From an Open SQL System, creating a shipment looks like this: exec zfCreateJob '12', 'C1', '/ground_box.zpk WGT:23 VAL:200 // sample widget', 'ADMIN', 'UPS', '' This creates a record in the OR_Jobs table that will trigger a UPS shipment. The stored procedure 'zfCreateJob' is part of the sample Microsoft SQL database, and it simply creates a record in OR_Jobs with these values: OR_Jobs column JobID Value from the example Explanation 12 ContactID C1 Reference /ground_box.zpk WGT:23 VAL:200 // sample widget UserLastBy ADMIN In the simple example database, the OR_Jobs.JobID is not a unique counter or value, so it is the responsibility of the programmer to insert a unique ID to the job. This is the ContactID of a recipient contact in the OR_Contacts table This is the shipping template, with flags to set the the shipment weight, declared value, and shipment reference This is the 'from' information for 233 OmniRush Administration & User Manual TrackRef UPS the job. Not really relevant for a shipment job. This sets the OmniRush track that will service the job. What OmniRush Does OmniRush takes the template, applies the overrides (in this case, weight and value), and merges in the contact data from the database. It then: Prints the bar coded shipping label Optionally sends a notification to the recipient that a shipment is on the way, including the tracking number (if the shipping track is configured to do so) Logs the shipment to history (see below) Tracking and Managing the Shipment The history record has the complete details of the shipment. Here is a typical history record notes block: --== OMNIRUSH RESULT ==-Reference : Client: CSC/Peak Sales TruFax PCI (/ugn.zpk WGT:2) To track your UPS shipment, please browse to the following URL: http://wwwapps.ups.com/etracking/tracking.cgi?tracknum=1Z999999034 1000670 Ship UPS Ground Tracking #: 1Z9999990341000670 Courtesy estimate of charges: $4.09 UPS transaction successful, label printed on LPT1 --===== USER NOTES =====-This allows easy tracking of the shipment. The ShipRush UPS module also prints a shipping manifest each day with a list of all the shipments for the day. (This list is also saved to a txt file.). Reporting can be done by running a report on the CRM/SQL database. The shipping communication sent to the recipient is configured in the shipping track. The message is completely customizable, and can include the shipment tracking number and tracking URL. The communication can be sent by email, fax, or even text to speech voice. On Open SQL systems, the tracking number and charges are posted to discrete history columns in the history table. Hint: Most templates can operate as COD templates just by using the COD override tag. In most cases, the template does not need to be created initially as a COD template. Next, the shipping feature matrix. Shipping Templates - In Depth 234 User's Guide Shipments can are triggered by scheduling jobs in the SQL or CRM system. These jobs can be scheduled interactively (with the template files on a lookup), or created from a macro button, process, or code. How shipping works: Shipping is done with shipping templates. OmniRush shipping template files may have the extensions FRP, FRU, and ZPK. OmniRush includes dozens of DHL, FedEx and UPS shipping templates for you to use out of the box. Examples are: FedEx: P1_Box_1Lbs.zpk GRND_Box_1Lbs.zpk STD_Box_1Lbs.zpk P1_Letter.zpk delete.zpk For example, P1_Box_1lbs is a Priority Overnight Box, with a weight of 1 lb. STD... is for Standard Overnight. UPS: UPS_NDA_BOX_1LB.ZPK UPS_NDA_LTR.ZPK UPS_2DA_BOX_1LB.ZPK UPS_3DS_BOX_1LB.ZPK UPS_GND_BOX_1LB.ZPK (NDA means UPS Next Day Air®) Shipping templates are created using the interactive ShipRush software. (See the ShipRush Help File, under Templates in the Index for steps.) A general rule is to keep template names short, 12 characters or fewer including file extension. Shipping Overrides For a complete list of overrides, see the master override list. Shipping templates are not carved in stone. Job by job, you can set the main parameters of the shipment using overrides. Shipping overrides include: WGT: VAL: COD: PTP: VTR: The shipment weight The insured value of the shipment The COD amount of a COD shipment (PTP is required when the COD tag is used) COD Payment type Virtual Shipping Track Other overrides are: EML: Set the email address to send the notification to an email other than the database record email address. 235 OmniRush Administration & User Manual Administrative Functions There are the following types of administrative shipping jobs you might need to do: 1) Delete a shipment. 2) Force end of day processing (for UPS and FedEx Ground) Deleting Shipments Deleting shipments is easy. For FedEx, just schedule the delete.frp with the tracking number of the shipment you want to delete. E.g. FedEx: /delete.frp TRK:<tracking number> For UPS: /ups_delete.fru TRK:<tracking number> For DHL: /DHL_delete.frp TRK:<tracking number> Note that FedEx Ground and all UPS shipments must be deleted before the end of day processing has happened. Once the end of day has processed, the shipments will flow to your invoice from the carrier. To have the invoice adjusted, have the manifest handy and contact the carrier's customer service department. The deletion template for UPS shipping must have 'delete' in the file name. End of Day Processing End of day processing is done automatically by OmniRush at the time configured in the shipping track. Sometimes, it is useful to force the end of day. For example, if the UPS driver comes early, or if some shipments are processed after OmniRush has done the automatic end of day. To force end of day processing, use the manifest template. This will cause an upload, manifest, and bar code for the current day, and will also attempt to upload data from any prior day that failed to upload. For UPS, schedule: UPS: /ups_settle.fru The end of day template for UPS shipping must have 'settle' in the file name. For FedEx, end of day is only needed if processing FedEx Ground shipments. OmniRush will process the end of day automatically, at the time set on the shipping track. End of day processing closes the day and causes the manifest of ground shipments to print (the driver will need this). To trigger end of day manually, schedule this: 236 User's Guide FedEx: /manifest.frp DHL/Airborne: No end of day process required. Shipping - Some Examples For a complete list of overrides, see the master override list. Example 1: Shipping using just the template values: UGN.ZPK Example 2: Shipping with the template values, but setting the shipment reference: UGN.ZPK // Order Number 2323 Example 3: Overriding the template weight and value: UGN.ZPK WGT:5 VAL:1000 // Sample Widget Kit Example 4: Using a COD template and overriding the template COD amount to $555.00 and any payment type (note that for UPS COD jobs, the PTP is required if using the COD override tag): UGN-COD.ZPK COD:555 PTP:1 Example 5: Sending a shipment to a contact, but the shipment email to an alternate email address: UGN.ZPK EML:[email protected] Shipping - Canada Origination OmniRush v5.1 and higher support Canadian origination for FedEx Ground and Express shipping. There are several steps required to do Canada origination shipping. They are: For First Overnight shipping, install the sample templates (Automatically installed as samples with OmniRush 219 and higher) Be sure to set the FedEx Track in OmniRush to Canadian Currency (in the advanced tab). You are now ready to ship. For detailed info about services that are available in Canada please visit http://www.fedex.com/ca_english/services/ OmniRush supports following FedEx services from Canada: Intra-Canada (From Canada to Canada) 1. FedEx Priority Overnight (sample: /P1_Box_1Lbs.frp) 237 OmniRush Administration & User Manual 2. FedEx First Overnight (sample: Int_First_1lbs.frp) 3. FedEx Ground (sample: /GRND_Box_1Lbs.frp) International (Canada->Other country) 1. FedEx International Priority Service ( sample: /P1_Box_1Lbs.frp ) 2. FedEx International First Service (sample: Int_First_1lbs.frp) 3. FedEx International Economy Service (sample: /2Day_Box_1Lbs.frp ) 4. FedEx International Ground (Canada->USA only) (sample: /GRND_Box_1Lbs.frp) Shipping Template Notes: The sample templates above in many cases lack some international shipping options. The OmniRush shipping module has the following defaults when the template does not specify: - Sender pays duties and taxes. - "Terms Of Sale" is "FOB" (if applicable) - "Sender" and "Recipient" are unrelated companies - "Country of ultimate destination" = "Recipient country" - "Commodity Number of Pieces" = 1 - "Unit Quantity" = 1 - "Commodity Weight" = "Total package weight" - "Customs Value" = "Declared value" - "CI marks and numbers" = "NO MARKS" Shipping - Virtual Tracks Quick Links: What Is A Virtual Track? Examples: Drop Shipping Shipping from Multiple Locations/Shipper Accounts Routing Labels to Multiple Printers Virtual Track Details Virtual Track Setup Virtual Track Direct Programatic Access Note: Virtual Tracks may be an extra cost option for your OmniRush license. What Is A Virtual Track? Virtual Tracks are a way to override the FROM information on a shipping job. For example, say your company ships out drop shipments on behalf of many other customers. While the shipment will physically come from your warehouse, the FROM Company should be that of your customer, not you. Here are some other examples: Drop Shipping 238 User's Guide A distributor drop ships to end users on behalf of retailers. Shipments are billed to the distributor, and originate from the distributor's warehouse. However, when the order is a drop ship to an end user, the FROM company on the shipping label should reflect the retailer company name, not the distributor name. When shipping to a retailer, the shipment has the distributor from name. Example label when distributor ships to retailer, with distributor name in the FROM information: Example label when distributor drop ships to the end customer on behalf of Super Roof Retail Supply: Shipping from Multiple Locations/Shipper Accounts 239 OmniRush Administration & User Manual In some cases, a single OmniRush system is used to process shipments originating from different locations and/or different shipper accounts. In this case, the entire FROM address block needs to change to match the origination information. OmniRush can support up to 20 locations using regular tracks. For more than 20, use Virtual Tracks. NOTE: The FROM block must match the actual physical origination address or your package may be misrouted. Tendering false shipment information to carriers is a violation of your agreement with the carrier. Routing Labels to Multiple Printers An OmniRush shipping track is associated with a single printer. In some environments, it is necessary to route labels to specific label printers by shipment. Virtual tracks allow a single shipping track to service multiple printers of the same or different printer types (e.g. laser/thermal). Virtual Track Details Virtual tracks are based on this logic: Virtual Tracks can override different kits of information. Each kit is a package, and all elements of a kit must be defined. Multiple kits can be used in a single Virtual Track. Kit Contact Company Address Print Label Notification Account 240 What is overriden Just the contact name in the FROM block Just the company name in the FROM block Address1, Address2, City, State, ZIP, Country If True, printer name and type must be supplied If True, track and content must be supplied For UPS shipping, Address is also required. User's Guide Virtual Track Setup Virtual Tracks are a simple, file based system that allows OmniRush to access configuration information from simple xml files on disk. To use Virtual Tracks, the steps are: a) Create an empty directory for the Virtual Track files b) Enable Virtual Tracks on the shipping track c) Create one or more Virtual Track information files d) Run a shipment with the VTR: override code. Steps: Create a new directory to hold Virtual Track information for the track, such as: c:\program files\z-firm llc\omnirush\data\virt-track-fdx1\ Enable virtual tracks via the tab on the shipping track: Check the Enable option, and set the directory to an empty directory, such as: c:\program files\z-firm llc\omnirush\data\virt-track-fdx1\ Hint: In most cases, each track should have its own Virtual Track directory. Put the Virtual Track directory in a location that gets backed up, like the \data\ branch. Place the Virtual Track directory on the OmniRush Server PC hard drive to preclude network problems from affecting operation. Create one or more Virtual Tracks by pressing Edit Virtual Tracks. Here is the Virtual Track Editor: 241 OmniRush Administration & User Manual Hint: If using Virtual Tracks to set the printer, be sure to run Administrator on the OmniRush Server. Virtual Track names can be one to ten characters long, alpha-numeric, no spaces or punctuation. A maximum length of five characters is recommended. Now run some test shipments. The default override code is VTR. Some example jobs (using the Virtual Tracks shown above): UPS_G.ZPK VTR:PR1 UPS_G.ZPK VTR:TT Note: If a job is submitted for a nonexistent Virtual Track, the job will fail. Shipping key is specific to DHL shipping, and can usually be left blank. If necessary it can be copied from the main track. Importing Virtual Tracks from a CSV File If hundreds of Virtual Tracks are needed, OmniRush can import from a CSV text file and create the xml information files. The format of this file must be: <Virt Track ID>,<Shipping Account>,<Company>,<Contact>,<Address1>, <Address2>,<City>,<State>,<Zip>,<Country> Example data: F1,1234567890,Super Roofing Supply,John Smith,111 99th Street,,San Francisco,CA,94122,US 242 User's Guide F2,0987654321,Ultra Roof Stuff,Mark Olive,12 Main Street,Bay 9,Santa Rosa,CA,95144,US Virtual Track Direct Programatic Access Developers can create the Virtual Track information files directly, from code. The logic is as follows: a) Create Virtual Track information file in the Virtual Track directory. For example, ACME1.ZVT b) Run a shipping job with this Virtual Track override. Example: UPS_G.ZPK VTR:ACME1 The ZVT file is an xml file of the following structure: <fr5VirtualTrack TYPE="Tfr5VirtualTrack"> <ACCOUNT>057500</ACCOUNT> <COMPANY>Z-Firm UPS1</COMPANY> <CONTACT>UPS1 Man</CONTACT> <PHONE>(206)444-5555</PHONE> <ADDRESS1>120 Virtual way suite UPS1</ADDRESS1> <ADDRESS2></ADDRESS2> <CITY>Seattle</CITY> <STATE>WA</STATE> <ZIP>98111</ZIP> <COUNTRY>US</COUNTRY> <PRINTLABEL>False</PRINTLABEL> <PRINTERNAME></PRINTERNAME> <PRINTERTYPE>fpLaser</PRINTERTYPE> <NOTIFICATIONENABLED>True</NOTIFICATIONENABLED> <NOTIFICATIONTRACK>ROOT_TRACKS___/TR0000000000004</NOTIFICATIONTRA CK> <NOTIFICATIONTEXT>Dear %FirstName%, Acme Roofing has sent you a shipment. Please use the following url to track your shipment %TrackingURL% </NOTIFICATIONTEXT> </fr5VirtualTrack> Commerce Jobs Commerce Jobs Jobs are submitted by creating records that are to the Commerce Track and that have the job parameters on the reference line of the job. GoldMine users can also store the credit card information on an Other Contact record. Commerce Track notifications are configured in Track settings. An example reference line: CO:P CX:0202 C$:15.95 C#:1234123412341234 This example runs a charge of $15.95 to the credit card 1234123412341234 that expires on Feb 2002. 243 OmniRush Administration & User Manual Explanation of elements: CO: C#: CX: C$: APR: PONO: Operation to perform. Options are: P Purchase (the usual way to charge) F Force R Return V Void A Authorize S Settle This must be upper case. Credit card number. Must not contain spaces, hyphens, or any other symbols. Numeric only. Card expiration. mmyy E.g. 0202 Amount in US $ Approval number, required if doing a Force. This tag is required on Return and Void transactions. When processing a Return or Void, this would be set to match the original purchase approval number (so that the Void/Return can be applied to the correct transaction). Purchase order or order number. Stored in the Z-Firm DBEngine. The elements can appear in any order on the reference line of the job. OmniRush encrypts the credit card number, so that once the job is processed, the credit card number is no longer stored in clear in the database. If the following job is put into the system: C#:1234123412341234 CX:1003 C$:1.00 CO:P The history record looks like this: Reference line: C#:!+I7Vxu0cuc3bga1URHe2uBI0NWniCeh2 CX:1003 C$:1.00 CO:P Notes block: --== OMNIRUSH RESULT ==-Credit card : XXXXXXXXXXXX9886 Transaction : Purchase Amount = $1.00 Completed on Monday, December 17, 2000 8:49:06 AM Approval code : 0170365 --===== USER NOTES =====-Additionally, you can enter Notes on the CRM/SQL job record. These will be available for merging downstream into the notification messages. Returns and Voids Remember these things about Returns and Voids: 1) The Return/Void must have the APR: tag to reference the original purchase 2) Returns can only be processed after the Purchase transaction settles (which is usually at night). 3) To do a return the same day, prior to batch close, use the Void transaction 244 User's Guide An example Void transaction: CO:V C#:1111111111111111 CX:0108 APR:1020601111 C$111 An example Return transaction: CO:R C#:1111111111111111 CX:0108 APR:1020601111 C$111 GoldMine Support GoldMine users can create other contact records that hold the credit card information. The Other Contact might be named VISA or AMEX. The notes of the Other Contact can contain: C#:<credit card number> CX:<card expiration> Once OmniRush processes a job, the card number is encrypted. The card can be used over and over. The CAL record must be scheduled to the correct Other Contact for this to work, e.g.: Tips: 245 OmniRush Administration & User Manual In GoldMine, jobs can be triggered via an automated process. The AP can use a dbase to build the reference line, and can pull the card number and expiration from contact2 fields. (These fields might be only available on one Fields screen that is only available to specific users.) GoldBox (http://www.redstonesoftbase.com/) can be used to transform data coming from an external source into GoldMine in such a way to create commerce jobs. Driving Jobs from Processes Driving OmniRush from Sales Processes A powerful feature of OmniRush is its integration with Sales Processes. Processes can trigger all OmniRush job types by either: Calling a VBA script that creates the appropriate ACTIVITY record Scheduling a to-do. The VBA approach is discussed in the next page. Here, we discuss how to create a Process event that will trigger an OmniRush job. (Note that this technique can also be used to schedule jobs to a group of contacts. Create a single-event Process and attach it to the desired group, then process all events.) Creating a Process Event to Drive OmniRush: 246 Open the SalesLogix Architect Create a new Process Drag a To-Do event onto the workspace Configure the event along the lines of the following: User's Guide Note the following important details in the screen shot above: 1. The Task Name is descriptive. 2. The Regarding line has file names and a descriptive entry for easier readability of the resulting history record. 3. In this case, the fax is immediately fired after the previous event in the track. A time lapse could be used here. 4. 'Don't wait for task to complete' is checked. This is required. 5. 'Automatically schedule, do not prompt' is checked. This is required. 6. The Start has been set to 1:00 AM. In this example, we want the fax to fire immediately when triggered. If we left this at the default of 9:00 AM, then if the previous event in the Process were triggered at 8:00 AM there would be a one hour delay before the fax was sent. 7. The Category has been set to FAXRUSH (this should be set to the appropriate Host Reference for the desired OmniRush Track). Driving OmniRush from GoldMine Automated Processes (This section assumes familarity with GoldMine Automated Processes.) GoldMine can trigger OmniRush jobs from AP by scheduling Other Actions to the appropriate OmniRush Track. Create a new event in the AP Track Make the action a Schedule Action (type Other Action) Set the Event properties as follows: 247 OmniRush Administration & User Manual (Note, the only important setting above is the Action. The other settings will be specific to your event.) On the Action Properties, set along the lines of the following: Then, on Activity Details, set to taste. Below is an example: 248 User's Guide Driving Jobs from Thin Clients GoldMine Everywhere Server Users of the GoldMine Everywhere server can schedule jobs to OmniRush just as network users can. All OmniRush Server features can be used, including scheduling faxes, print jobs, mailing labels, DHL/FedEx/UPS shipments, merge Emails, etc. These features are available to GoldMine Everywhere users on the Palm, Web and Thin clients. Driving OmniRush from the Web Client The key to driving OmniRush is via the SalesLogix Activity record. Since the SalesLogix Web client has a user interface to schedule activities, all OmniRush jobs can be created from the Web Client, including: Fax Jobs Email Jobs Internet Fax Jobs Print Jobs Mailing Labels DHL/FedEx/UPS shipments 249 OmniRush Administration & User Manual etc. Of course, jobs that include merge documents will merge, and the results of all jobs will be in the contact record history, which can be viewed from the Web Client. A custom user interface could be created for SalesLogix to make the choices easier for the user. For example, instead of the Schedule | ToDo interface built into the Web Client, the user interface could be customized to say: Send Shipment To <contact name> or Send Fax To <contact name>. CRM Tips and Tricks GoldMine Tips and Tricks To easily schedule jobs to a fax number other than the main fax number, an expression can be put in the GoldMine F2 lookup list. This can easily pull the fax number from another field (such as phone2) for the fax job. For example: ~"doc.rtf fax:" + contact1->phone2 Notice the leading tilde '~' character. This tells GoldMine that what comes next is a dBase expression, not plain text. Print to Fax/Email Client Introduction Note: The OmniRush Universal Client, introduced in OmniRush v5.5, has its own help file. Access the Universal Client help file via the menu options in the Universal Client. The basic purpose of the Universal Client is familiar: Open a document in any Windows application, and print to the OmniRush Job Scheduler printer. The Client will pop up, and you then select what to do with the job. First, you select what CRM contact record the job will be sent to. Then decide what transport will be used to send the job by selecting a track to submit to. The job can be submitted to a fax track (hardware, internet, or RightFAX), or email track. That is it. OmniRush does the rest, and records the results in the CRM system. The Client can also be used to print-to-TIF file to add documents to the OmniRush document library from any Windows application. 250 User's Guide Job Flow When launched, the Client sits as an icon in the system tray. It is advisable to leave the Client running all day so it is there when you need it. Note that you should be logged into the CRM software before launching the Client. The steps are simple: Open the document you want to send Print to the OmniRush Job Scheduler printer The Client pops up Select the job options: Track (an email or fax track) Contact record And send! The job will be processed by OmniRush, and the job status will be logged into the CRM system. Main Screen 251 OmniRush Administration & User Manual Click on the areas of the screen below for more information. Resize the screen for a larger Notes area: Options Screen 252 User's Guide The options screen allows you to set: To delete the fax file, or to keep it as a linked document (linked to the CRM contact record) To optionally override the track default behaviors (e.g. to schedule back the job on success and failure) To attach additional files to the job Rasterizing Files When the Client is running, it can be used to convert files to TIF format for emailing and faxing. The steps are: Start Client so it is running in the System tray Open the document you want to convert Print to the OmniRush Rasterizer Printer The Client will pop up in Rasterizer mode. You can select to store the TIF in the OmniRush Document Repository, on the hard drive, or both at once. 253 OmniRush Administration & User Manual Client from the SalesLogix Support Client A video of the OmniRush Client in action with the SalesLogix Support Client can be viewed over the internet. Requires: 128KB of bandwidth to the internet Fresh Windows Media Player from http://windowsmedia.com/download/download.asp View the video via this link. http://www.zfirm.com/video/OR-for-SL-SupportClient.wmv Fax Viewer Introduction The OmniRush Viewer is used to list and manage incoming faxes. Faxes can be annotated, stored in folders, emailed out, and linked to the CRM system. All this is done within the Viewer. (Note: Functionality is based on CRM system functionality and integration possibilities. OmniRush may only allow a subset of these features with some CRM systems.) 254 User's Guide Incoming Fax Flow Newly received faxes are listed by date received in the Inbound branch of the tree in the Viewer and Administrator. The picture below shows that there are new faxes from May 16. Clicking on that node of the tree will list newly received faxes. Using the Viewer, faxes can be linked to contacts, printed, etc. 255 OmniRush Administration & User Manual Viewer Main Screen The main viewer screen shows the Inbound branch of the Document tree. This is a subsection of the main tree that is seen in the OmniRush Admininstrator. (In fact, new inbound faxes can be managed from the Administrator as well, but there is no CRM integration in Administrator. To link and forward faxes in the CRM system, the Viewer must be used.) When there are newly received (unhandled) faxes, the tree will automatically have a new branch added based on the date of the fax. Navigating this list will take you to the new faxes. When a new fax is opened, it can be printed, emailed, deleted, moved to another folder, linked to a contact, etc. Annotation is also built-in to the Viewer. Hint: The Tab key will flip focus between the right and left panes. In the list of faxes, hitting the Enter key will open the fax. Viewing Faxes 256 User's Guide Just double click on a fax in the list (shown above) to view it. In view mode (shown below), the Image menu allows action on the fax, and the Annotation tools are available. Note that the Description field is editable. Set it to the fax content, e.g. PO 343 for Widget, or Proposal revision 6/5/01 Annotating Faxes 257 OmniRush Administration & User Manual The annotation toolbar is available whenever viewing a fax. Some notes about annotations: Annotations are not saved until you save them. Bitmaps can be pasted from the clipboard onto the image, and select areas of the image to cut to the clipboard. (Bitmaps that are on the clipboard can be pasted onto faxes with ctrl-V or via the Viewer Edit | Paste menu.) There are two ways to change the line thickness, font, etc. of an annotation: Before making the annotation, right click on the annotation toolbar button, select properties, and set the line thickness, text font, etc. After the annotation has been made, double click it to select, then double click again to set the properties of the annotation. Organizing Faxes Using the Administrator, folders can be created under the Inbound/Shared folder to allow organization of received faxes. When linking faxes, the appropriate folder can be selected to store the fax. Acting on Faxes The Image menu is where linking, forwarding, exporting, and emailing options are found. Linking Faxes to Contacts The OmniRush Viewer allows received faxes to be linked to the CRM system as Attached Documents. This allows faxes to be organized, and kept on the relevant contact record. For CRM systems that syncronize files, it also allows the fax file to syncronize to remote CRM users. When the Image | Link to Contact option is selected, the Viewer prompts with a contact browser that automatically is populated with the current contact in the CRM system. To link to another contact, select Browse Host DB for Contact to bring up the contact browser and navigate to a new contact. Before linking, note the Description field at the top of the fax. It can be convenient to set this before initiating the link, as it will flow down onto fields during the link and save keystrokes. For example, you might note a fax as Revised Bridge Proposal or as Purchase Order 34333. Additional options on this screen are: Associate CSID with Contact: This checkbox is only available if the sending fax system has a CSID defined. Checking this option will create a CSID record in the host database to allow the Viewer to automatically find the correct contact record next time a fax comes in with that CSID (thereby saving you from having to navigate to the contact again). Create Linked Document: This will instruct the system to create the Document Attachment in the CRM system. Export Shortcut: If checked, a shortcut to the internal OmniRush fax document is created. If unchecked, a copy of the TIF file is made on the file system. 258 User's Guide If using a CRM system that syncs, you will want to leave this unchecked so that the TIF will be pushed to the file system and can sync out. Press Next On the second link screen: Activity Reference defaults to the Description field on the fax. It can be changed at this time if needed. Store Internal Document In. This is for the folder in the OmniRush ODMS to store the file. This setting is 'sticky' and will persist from session to session, though it can be changed on any fax. Document File Name is the friendly name for the file. It is derived automatically, but can be changed at this time. Notes are to allow additional description of the file. Forward Fax to User Forwarding allows a fax to be sent to a user electronically. Forwarding is to send a fax to a user of the CRM system. If the fax needs to go to someone who is not a CRM user (whether inside the company, or outside), use the Image | Send by Email option. On GoldMine, the fax is forwarded as a GoldMine email with a link to the fax attached. On SalesLogix, the fax is sent as an email attachment. Emailing Faxes Out When the fax is open in Viewer, the Image | Send by Email option allows the fax to be sent out as an email attachment. The contact manager is used as an email address book, but the email address can be overridden. The Viewer can either create the outbound email using your MAPI email client (such as Microsoft Outlook/Outlook Express), or using its built in email client (which sends the message using your SMTP server). If you have the OmniRush PDF module, you can attach the fax as a PDF or TIF file attachment. Without the OmniRush PDF module, the fax can be attached as a TIF attachment. Viewer Preferences General Settings Fax Descriptions allows either an MRU (Most Recently Used) type setting, or a fixed list of descriptions to appear on the drop down list of the descriptions. If using a predefined list of descriptions, this screen allows you to manage the list. Printing: 259 OmniRush Administration & User Manual The optimum setting is Compatible with Print Job Size Reduction checked (both of these the default). Experiment with other print settings only if there are problems. Linked Faxes Storage: This allows the Viewer to automatically create and use subfolders of the selected folder, as shown: Rubber Stamps Rubber Stamp management allows text and bitmaps to be defined here. Email This area is to set the email client to use when emailing faxes back out. The options are System Default Email Client (the MAPI client installed on the system, usually Microsoft Outlook/Outlook Express), or Internal, which is an email client built in to the Viewer. Integrating with your CRM System SalesLogix Attaching Faxes to Contacts Faxes attached to SalesLogix contacts are created as SalesLogix attached documents. These documents are sync aware (e.g. they will sync out to remotes). Note that the Viewer makes a copy of the source fax for the SalesLogix attachment. Once the fax is attached, it can be viewed from SalesLogix by clicking on the record in the Attachment tab of the contact. If the OmniRush viewer is installed on the PC, the fax will open in the Viewer. Otherwise, it will open in Kodak/Wang viewer. Emailing Faxes to SalesLogix Users When one of the Forward options is taken on the fax, it is sent as an email attachment to the SalesLogix user it is forwarded to. GoldMine 260 User's Guide Viewer: GoldMine Linking and Forwarding Faxes linked to GoldMine contacts can be accessed from the Links tab. During linking, if the Export Shortcut is selected, the file that is linked is a ZID file, which is simply a pointer to the OmniRush document. The benefit of this is that only one copy of the received fax exists, in OmniRush. The disadvantages are: The OmniRush Viewer must be installed to view the fax The fax TIF will not sync out to remotes Uncheck the Export Shortcut option to export the TIF file itself, which can be viewed with any utility (e.g. Wang/Kodak imaging), and will sync. Forwarded faxes are sent to the Goldmine user as a Goldmine email with the fax attached. Viewing OmniRush Files The Viewer is used to open several file types: .ZID --> Looks up document by ID in the repository .FRD --> Removes .FRD extention and displays file specified by remaining file name .TIF --> (specified by .TIF, .ZID or .FRD) displays file internally Other --> (specified by .ZFS, .ZID or .FRD) Launches external application (e.g. MS-Word) to display the file. Monitoring OmniRush Monitor Fax Ports On the OmniRush Server, fax ports can be monitored in real time. To view fax port activity, start the Fax Port Monitor from the Windows Start menu (Start | Programs | OmniRush). The display will be similar to this: The Fax Port Monitor can be left running all the time, even if OmniRush is being turned on and off (for example the Fax Port Monitor could be in the Startup group). The statistics are for the current session of the OmniRush fax module. When the module is restarted, the statistics will be reset. Reporting on OmniRush Jobs Reporting on Jobs It is often useful to report on OmniRush activity. This can be useful to: Report on marketing activity Report on percentage of successful vs. failed emails/faxes List contacts 'touched' by an OmniRush communication 261 OmniRush Administration & User Manual etc. To report on OmniRush jobs, use Crystal or a similar tool to report on the history table of the CRM or SQL system OmniRush is running with. For example, in a SalesLogix environment, this would be the History table. In a GoldMine environment, the Conthist table. GoldMine users can also use reporting tools like MasterMine. GoldMine Reporting GoldMine Groups GoldMine SQL Query GoldMine Groups You can also build GoldMine Groups based on failed and successful faxes. To build a Group on successful faxes, follow these steps: Select View | Contact Groups: Right-click in the area circled above, and select New Group: 262 User's Guide Make sure to check the 'Build the Group' box. Select the Completed option as shown below: Now you will select the date range, and the user who sent the faxes. If you want all faxes sent, set the user to (public). 263 OmniRush Administration & User Manual On the next screen, select the field you want to sort the group on, and enter a reference. In the reference area, you might just enter "successful fax", or you may want to reference information from the fax itself. In the example below, we will list the user who sent the fax and the reference line so we can see what was sent. 264 User's Guide Similar methods can be used to build groups based on failed faxes, etc. Consult the GoldMine documentation for a full description of group building. GoldMine SQL Reporting on GoldMine SQL (Front Office) is straightforward using MasterMine or Crystal Reports. The following query retrieves a list of failed faxes from history: select c1.company, c1.contact, ch.ref, ch.ondate from conthist ch, mailbox mb, contact1 c1 where mb.recid=ch.linkrecid and c1.accountno=ch.accountno and mb.recid > '8ILT7Haaaaaaaaa' and ch.resultcode='NFX' and mb.rfc822 like '%unable to reach%' and ch.ref like '/new-sl-prosp.rtf%' 265 OmniRush Administration & User Manual 266 Developer's Guide Introduction OmniRush has several API's. Deciding which one to use depends on your needs. Database Driven OmniRush: If an OmniRush database connector ties OmniRush to your CRM or SQL database, you use either the CRM or SQL API's to drive OmniRush. For CRM based OmniRush installations, jobs can be driven by creating records in the CRM database. If necessary, job status can be discovered by looking for specific CRM records created by OmniRush. This technique is used by administrators and developers who drive OmniRush from the automatic event processes built into the CRM software, and by others who will drive OmniRush primarily from the CRM environment. When developing with a CRM system, the ActiveX and other development techniques can also be optionally used. Note that all integration with SQL databases requires implementation of the OmniRush Open DBIO Stored Procedures. Programatic Control of OmniRush: If your Windows application (written in Visual Basic, VBA, Delphi, C++, Access, etc.) needs to interact with OmniRush, the OmniRush ActiveX control is the path to take. The OmniRush ActiveX control offers both a visual tree control (the same tree that appears in the OmniRush Administrator), and a non-visual control to use for job creation and management. Developers using Visual Basic, Delphi, Visual C++, and other COM compatible development environments can use the ActiveX control. Integrate OmniRush with a Fax Server: If you will use OmniRush to connect an existing fax server to a CRM or SQL database, the OmniRush Fax Bridge API is the tool to use. VBA Document Processing Introduction Audience: This section is for advanced OmniRush users and VB/VBA programmers. (Users with FaxRush v4 server-side VBA experience will have a head start here.) First, we will discuss VBA itself (what is VBA), and then VBA Document Processing in OmniRush. What is VBA? Microsoft Visual Basic for Applications VBA) is an easy to use, Visual Basic-like language that can be used as a scripting language to program and automate many applications. Solutions can be easily customized to meed the exact needs of the user. VBA has opened up a new world of capabilities for the OmniRush. Let’s look at just a few of the possibilities: Customized reports – Graphs, geometric descriptions, construction reports, volume tabulations, legal descriptions and other output can be merged directly into the OmniRush document templates dynamically, at merge time, with customized formatting. 267 OmniRush Administration & User Manual Data import - Raw and summarized survey data, geometric information, DTM data, cross sections and many other types of data can be imported from just about any source. Data can also be extracted from databases using ODBC drivers or ADO connections. You are not are not limited to ASCII formats; VBA can read and write complex binary files and can also link directly with other VBA compliant software systems. You can use the Internet to get merge in dynmaic data (see the OmniRush VBA example “zfGetSymbolData” regarding getting stock news and quotes). Graphics output - Custom labeling, highlights, and annotations can be driven in VBA code to make the document conform to your company's look and feel. VBA Document Processing in OmniRush VBA Document Processing (VBADP) allows your custom VBA to execute on the merged documents. This allows for super powerful merging and document processing. VBADP is for RTF merge forms sent via print, fax (or not sent out at all). Normal OmniRush document processing (without VBA): Job is triggered in database OmniRush merges the document, (with or without custom merge codes) Document is sent (via print, fax, or email) or discarded With VBADP: Job is triggered in database OmniRush merges the document, (with or without custom merge codes) Your custom VBA is executed on the document Document is sent (via print, fax, or email) or discarded VBADP allows you to specify on the job record itself in the database the VBA macro to run, and you can also pass parameters to the VBA function. What can be done with VBA: Anything! You have complete programatic control, and can: insert text, compile dynamic documents, insert conditional copy, save the file to HTML and upload to an ftp site, simply anything you can code in VBA for MS Word! And it is all done dynamically, at run time, controllable from the database record that triggers the job. Next: Getting Started with VBA VBA Getting Started 268 Developer's Guide Getting started What we refer to as a “macro” is a public VBA-complaint function (“Public Function” or “Sub”) that is stored in the MS Word “normal.dot” on the OmniRush server. (If there are multiple OmniRush servers running the print/raster module, update “normal.dot” at each of them.)Please include “normal.dot” into your backup routine. Normally, you start creating a server side macro by developing it on your desktop PC, and executing the code in your local copy of Word. Once the macro is ready for use, it is installed in MS Word on the OmniRush PC. To create a macro launch Word and go to the Menu | Tools | Macro | Macros | Create. Then you should give a name to the macro (let’s use “HelloWorld” for example) and when VB editor appears type a following code in the code edit window and save it: Sub HelloWorld() ActiveDocument.Paragraphs(1).Range.InsertAfter “Hello World!” End Sub To see how things work, take these steps: Create a VBA form with a button that invokes HelloWorld Run the form, click the button, and you should see the text inserted into the document (you may have to close the form for the document to refresh) To install on the OmniRush Server: 1. Save the HelloWorld macro made above as a .txt file to a shared network drive 2. Deactivate the Print/Raster module 3. Open MS Word on the OmniRush Server 4. In MS Word, go to the Menu | Tools | Macro | Macros enter the name HelloWorld and press Create 5. Paste in the text of the macro 6. Save and close the VBA editor 7. Close MS Word 8. Activate the OmniRush Print/Raster module 9. Schedule a job to the printer, with a reference line to the tune: /blank_page.rtf::helloworld 10. The print job should say 'Hello World' on it Now every time you schedule a RTF or DOC job to the OmniRush you can specify this VBA macro to execute by using “macro separators” and “macro name”. Syntax: document::macro_name Example: /blank_page.rtf::HelloWorld (You will get “Hello World!” as a first sentence in the “blank_page.rtf” text.) Using parameters 269 OmniRush Administration & User Manual Probably the first feature you are going to use is passing parameters to you macro (VBA function). All parameters should have “string” type and should be double-quoted. Syntax: document::macro_name(“param_name1”[, “param_nameX”]) Sample: /blank_page.rtf::HelloWorld(“Universe!”) Sub HelloWorld(sParameter As String) ActiveDocument.Paragraphs(1).Range.InsertAfter “Hello ” & sParameter End Sub (You will get “Hello Universe!” as a first sentence in the “blank_page.rtf” text.) “fr5WordMacro.dll” – What It Is & How To Use It Once you feel comfortable with simple stuff it is time to customize some forms/letters/reports. So, the question is “How can I get information about current contact (the contact the job is for) in the VBA macro?” And the answer is – “fr5WordMacro.dll”. This DLL exports one function that returns a requested parameter (which is a property of the job contact in your contact manager or database). Example code that uses fr5WordMacro.dll is here. Function declaration Declare Function frGetJobParameter Lib "fr5WordMacro.dll" (ByVal AParameter As String, ByVal ALength As Integer) As String Function used in VBA Public Function GetJobParameter(sParameter As String) As String Dim sValue As String GetJobParameter = "" sValue = frGetJobParameter(sParameter, Len(sParameter)) If (Len(sValue) > 0) And (sValue <> Chr(0)) Then GetJobParameter = sValue End Function Sub zfGetFields() ActiveDocument.Paragraphs(1).Range.InsertAfter "JobID = " & GetJobParameter("JobID") End Sub List of available parameters: JobID ModuleID TrackID CTPos JobType StatMain StatSupp ExternalID QueryOn DocTypes Retries Aborted IsPrivate 270 Developer's Guide ActivityID ContactID AlertVia User SendOn FirstName MidName LastName Company Email OrgFaxNum FullFaxNum Reference PageCount CreateBy CreateOn LastBy LastOn Notes PassThru The most frequently used fields for querying the database are: ActivityID This is the activity.activityid (SalesLogix) or cal.recid (GoldMine) of the record that triggers the job. ContactID This is the contact.contactid (SalesLogix) or cal.accountno (GoldMine) of the record that triggers the job. There is a Z-Firm sample “MacroDemo.bas” file that shows exported function prototype and has a “zfGetFields()” example inside. It is your responsibility to copy the “fr5WordMacro.dll” to you Windows\System directory. Next: VBA Example Code VBA Example Code The following example code is available at this writing. Check the /Examples/ directory on the OmniRush Server and the Z-Firm Web site for the latest details. vba_stock.rtf vba_stock.bas This kit shows how dynamic data can be pulled from the Internet and merged into documents. This example takes a stock symbol and a parameter to instruct the function to get the stock price or the recent news for a stock symbol. To use the sample code: 1. Stop the Print Raster module on the OmniRush server 2. Open Word on the OmniRush ServerSelect Tools | Macros| Visual Basic Editor 3. Insert the vba_stock.bas code 271 OmniRush Administration & User Manual 4. Save and close Word 5. Import the vba_stock.rtf into the OmniRush Document Manager 6. Schedule: /VBA_Stock.rtf::zfGetSymbolData("FDX", "P") 7. This will pull the stock price of FedEx fr5WordMacro.dll Sample Code Another sample kit is the Macro_demo.bas file. Install the code as described above, and schedule: /blank_page.rtf::zfgetfields This shows getting the job attributes at run time (which can then be used to query the database, etc.) Next: VBA Best Practices VBA Best Practices Test code thoroughly. Catch and handle exceptions. Be sure code executes in under 10 seconds or OmniRush may time out the job. Do not use the OmniRush odbc driver to query the OmniRush database. MSSQL ADO queries work great. DDE and COM objects can be invoked without trouble. Make sure to keep backup copies of the code. Word Macro Writing Resources: There are many books about Word VBA programming. For example: 1. “Visual Basic for Application Unleashed” by Paul McFedries 2. “Word 97 Macro & VBA Handbook” by Guy Hart-Davis 3. “Microsoft Word 97 Visual Basic (Step by Step (Microsoft)) Michael Halvorson 4. “VBA Developer’s Handbook” Ken Getz, Mike Gilbert This is a catalog of word macro writing resources like books, newsgroups, articles etc: http://www.practicalmacros.com/word_macro_resources.htm Integrating via CRM Introduction OmniRush is database driven so your CRM system can trigger jobs simply by creating the appropriate record in the CRM database. Any tool that can create the job record can trigger a job. Several features of the CRM system are instantly leveraged: 272 Developer's Guide Automated Processes (since processes can schedule activities and look for completed activities, it is a powerful automation trigger for OmniRush jobs) Remote Synchronization (remote users will see the central OmniRush activity, and can also trigger jobs by scheduling activities and syncing) Groups and filters API's such as DDE, COM and dll API's to the contact manager can be used to create OmniRush jobs. In effect, OmniRush offers a super-high-level API for faxing, printing, emailing, shipping, etc. via the CRM system. The Activity Record OmniRush jobs are triggered by database records in the CRM system or SQL database. In the CRM environment, the record is the scheduled activity: Activity in SalesLogix CAL in GoldMine It is your job to create the activity record in the CRM database. Once the record is there, OmniRush will do the rest. There are four elements of the activity record that matter: Activity Record Element Date/Time activity is scheduled for OmniRush Role Controls when OmniRush imports the job. Jobs can be set in the future simply by setting this to the desired date/time. OmniRush will pick up all jobs with a date/time less than or equal to 'now.' 273 OmniRush Administration & User Manual Track for the Job Reference Line Notes Creating User The OmniRush Track Host Reference. Controls which OmniRush Track will handle the job. Optional: One or more file names. Optional: One or more overrides Optional: RE segment Optioanl notes that will either merge or simply flow into history and not affect the job (depends on the job type) This will be the 'From' user for the job. For merging, and for From email information on email jobs. By populating just five fields, all the power of OmniRush is available. List of Overrides and Special Options Quick Links about Override Codes: How to use override codes How to change override code tokens In some cases, the length of the job record reference field becomes a problem (only so many overrides will fit). The OmniRush Extended Package (OXP) system can be used. This allows the reference line to be as long as desired. There are number of overrides that control how jobs are processed. Each job type has specific overrides. Below are the default override codes. These codes can be seen in the Override Codes tab of the database connector module. If needed, the tags can be changed in this tab. Job Type ALL Override Code // Explanation & Example This is the main 'splitter' that splits the input REF or REGARDING field into two parts: The 'file / control' section from the 'job reference' section. Some examples: (fax job): test.tif FCP // Proposal 3434A (email job): mayspecial.htm OWN:SALLY // May specials! (shipment job): ground.zpk WGT:12 VAL:900 // Order # 1010099 Widget Kit For fax and email jobs, the text after the // is the job reference/regarding/subject. For all these jobs types, this will merge into the &FXREF merge code, and for email it will also be the email subject. In the examples above, the output is as follows: (fax job): The &FXREF merge code will merge: Proposal 274 Developer's Guide 3434A (email job): The &FXREF merge code and the email subject will be: May specials! (shipment job): The shipment reference (which also prints on the label) will be: Order # 1010099 Widget Kit The // token can be changed to another double character value in database connector settings. (On GoldMine systems, it is common to change this from the default to another value [like ##], because / is a reserved symbol in GoldMine lookups.) ALL OWN:<value> Notes: The maximum length of this element is generally 40 characters. For shipment jobs it is typically 25 characters (varies by shipping carrier, will automatically be truncated to the carrier-appropriate length by OmniRush). Stands for 'Owner' This sets the job owner. All the From information can be set to any user using this tag. Example use: catalog.htm OWN:SALES // Acme Widget Catalog email: (causes the email FROM email address and name to be SALES) fax: ALL ALL FWD:<value> Fxx special.rtf OWN:JOE (causes the &Username, &Userfullname to be Joe's information) Stands for 'Forward' If the track is set to schedule back failed jobs, this overrides the user to whom they will be scheduled back. Most frequently used on fax broadcasts to automatically schedule failures to either go to a telemarketer to follow up or to automatically print (GoldMine only). Example use: test.tif FWD:LOIS test.tif FWD:LASER (will automatically print failed faxes) Overrides the track setting on what to do with the job on success or failure. x can be C (complete to history), R (schedule back) or D (delete from CRM/SQL database) The first position is action on success, the second position is action on failure. Examples: FCC Job goes to history on success and failure, regardless of track settings. FRR Job is scheduled back on success and failure, 275 OmniRush Administration & User Manual regardless of track settings. FDR Job is deleted on success, and scheduled back on failure. Example scenarios: The fax track is set to alarm back failures. You do a broadcast, and want all the jobs to go to history. (no need for dozens of alarms). You will run a query or report on history to find the failures for follow up. So just on the broadcast job, you put FCC on the reference line. FAX FAX:<value> FAX FCP / NCP OmniRush is a print merge server. You do not want all these print jobs to clutter up the database. Jobs are created with FDR so that failures are scheduled back, but successes are deleted from the database. Overrides or sets the fax number to send to. Usually used when the job needs to go to a fax number other than the one on the contact record in the database. Example use: test.tif FAX:12064445555 Stands for: Force Cover Page (FCP) / No Cover Page (NCP) Used to either force or suppress a cover page. On fax jobs, the presense of notes on the activity record normally triggers a cover page automatically. These codes can either force a cover page if there are no notes, or suppress a cover page if there are notes. Example use: EMAIL EML:<value> FAX, PRINT, EMAIL JDA:<value> DHL FEDEX UPS FDA:<value> FEDEX UPS 276 test.tif FCP test.tif NCP Overrides or sets the email address to send the job to. Example use: sales-lit-kit.zpk EML:[email protected] Controls what OmniRush should do with the job documents on job completion. By default, OmniRush deletes job documents. This tag allows as follows: Default = X Delete = D Archive = A Link = L Export = E Export & Sync = S Alternate Bill To shipper account. For FedEx and DHL, this can be the consignee or a third party account. COD:<value> For UPS this will cause a Third Party billing method to be used, to the account specified in the FDA: tag, e.g.: UPS-GND.ZPK FDA:111ZZZ Sets the COD amount for a COD shipping template (the frp/zpk must be for a COD shipment). Overrides the COD amount in the shipping template. Example use: Developer's Guide P1-BOX-COD.FRP COD:101.50 Ships the COD for an amount of $101.50 For UPS shipping, when you use COD you may also set the PTP value also (see below) FEDEX UPS DHL FEDEX UPS ENDICIA PTP:<value> VAL:<value> Hint: Most templates can operate as COD templates just by using the COD override. In most cases the template does not need to be created initially as a COD template. Sets the COD payment type. Options are: 1 Any payment type (cash, check, money order) 2 Cashiers Check/Money Order only 3 Cash Example: UPS-GND-COD.ZPK COD:333 PTP:1 Sets the shipment to $333.00 COD and any payment type. Note: DHL supports only types 1 and 2. Sets the shipment declared value. Overrides the declared value in the shipping template. Example use: P1-BOX.FRP VAL:450 Sets the declared value of the shipment to US$450. Do not use cents, value is in whole dollars only. DHL FEDEX UPS USPS ENDICIA WGT:<value> Notes: DHL: "Declared Value" protection type is used. Sets the weight of the shipment. Overrides the weight in the shipping template. Useful to allow a single template for a given class of service (e.g. ground) service many different shipments. Example use: UPS_GND_BOX.ZPK WGT:15 Uses the specified template and sets the weight to 15 pounds. In whole pounds only. For U.S. Postal Service shipping, First Class service can be measured on ounces. For USPS & Endicia shipping, use the lbs.oz format. E.g. WGT:.02 (means 2 oz) WGT:.2 (means 2 oz) /usps_1st_parcel.zpk WGT:.10 (means 10 oz) Note that the lbs.oz format is ONLY for First Class mail. This format should not be used for Priority mail or any other class of mail. DHL FEDEX UPS USPS HGT: pkg height WID: pkg width LEN: pkg Sets the parcel dimensions. Dimensions in inches. If the template is multi-parcel, these dimensions apply to first parcel only. Example: 277 OmniRush Administration & User Manual ENDICIA UPS FEDEX length DCF: UPS_G.ZPK HGT:24 WID:34 LEN:30 Delivery confirmation. Values: UPS: S - Signature Required A - Adult Signature Required (aka ASR) N - Deliver with No Signature Applies to the first package if multi-parcel. Example: UPS_G.ZPK DCF:A FEDEX UPS RES: FedEx: S - Direct Signature Required I - Indirect Signature Required A - Adult Signature Required (aka ASR) N - Deliver with No Signature Residential delivery. No parameter. Presence of the override code sets shipment to residential delivery. For some express services this may be ignored (esp. DHL). Example: UPS_G.ZPK RES: DHL FEDEX UPS DHL FEDEX UPS SAT: VTR: DHL does not support this option. Saturday delivery. No parameter. Presence of the override code sets the shipment to Saturday delivery if this option applies to the shipping service used (e.g. Next Day Air, etc.). If used on a shipping service that does not offer Saturday delivery (e.g. ground), the override is ignored. Example: UPS_G.ZPK SAT: Virtual Track Support to allow use of multiple ship from and/or shipper accounts. Example: UPS_G.ZPK VTR:101 UPS FEDEX UPA:<value> SD:<value> SAD:<value> See the complete documentation on this subject. Alternate bill-to UPS account. Note that this account must be fully activated in ShipRush before it can be used from ShipRush Server/OmniRush. Accounts that will be fed in via UPA must be configured in ShipRush settings and activated (which usually takes 24 hours). Only then can the account be used via UPA: For more dynamic bill-to account options, consider Virtual Tracks for a third-party bill to mechanism. Future ship date override codes. SD is for Ship Date SAD is for Ship Add Days SD:MMDDYY SAD:NN 278 (which must be > Today()) (Requires an integer value =< 99) Developer's Guide Examples: /fedex2day.frp SD:010106 =(print label now with ship date Jan 1 2006) /fedex2day.frp SAD:1 =(print label now with tomorrow shipping date) FEDEX SATP: Note it is the user's responsibility to make sure that the resulting ship date is valid (for example, not a Sunday or holiday). Saturday Pickup Required for shipments being processed on a Saturday (otherwise the FedEx server rejects the job). DHL <ref1> // <ref2> Incurs Saturday Pickup fee (unless waived by FedEx contract). DHL supports two shipment reference lines per shipment. The compound use of the // separator serves this purpose. Example: /airb_2day.frp WGT:5 VAL:1000 //reference 1 //description 2 Note that if description 2 is not populated, and the shipment value is over $5000, reference 1 will be copied automatically into the description 2 field by OmniRush. If there is no reference at all, a shipment with a declared value of over $5000 will fail with an error. CREDIT CARD CO:<value> Each reference element is limited to 25 characters in length. Sets the credit card operation (e.g. purchase, ticket, etc.) P Purchase (the usual way to charge) F Force R Return V Void A Authorize S Settle CREDIT CARD C#:<value> This must be upper case. Sets the credit card number to charge. Should be numeric, no spaces or punctuation. Example: CREDIT CARD CX:<value> C#:1111222233334444 Expiration of the credit card. Four digit, numeric only. Example: CX:1003 CREDIT CARD C$:<value> Is for October, 2003 Sets the dollar amount of the transaction. Example: C$:55.44 CREDIT APR:<value> Is for $55.44 If the transaction needs to be forced, this is for the approval 279 OmniRush Administration & User Manual CARD number. This tag is required on Return and Void transactions. When processing a Return or Void, this would be set to match the original purchase approval number (so that the Void/Return can be applied to the correct transaction). Example: CREDIT CARD PO#:<value> APR:646464 Sets the purchase order number for the transaction. Example: PO#:747474 SalesLogix Driving OmniRush from Sales Processes A powerful feature of OmniRush is its integration with Sales Processes. Processes can trigger all OmniRush job types by either: Calling a VBA script that creates the appropriate ACTIVITY record Scheduling a to-do. The VBA approach is discussed in the next page. Here, we discuss how to create a Process event that will trigger an OmniRush job. (Note that this technique can also be used to schedule jobs to a group of contacts. Create a single-event Process and attach it to the desired group, then process all events.) Creating a Process Event to Drive OmniRush: 280 Open the SalesLogix Architect Create a new Process Drag a To-Do event onto the workspace Configure the event along the lines of the following: Developer's Guide Note the following important details in the screen shot above: 1. The Task Name is descriptive. 2. The Regarding line has file names and a descriptive entry for easier readability of the resulting history record. 3. In this case, the fax is immediately fired after the previous event in the track. A time lapse could be used here. 4. 'Don't wait for task to complete' is checked. This is required. 5. 'Automatically schedule, do not prompt' is checked. This is required. 6. The Start has been set to 1:00 AM. In this example, we want the fax to fire immediately when triggered. If we left this at the default of 9:00 AM, then if the previous event in the Process were triggered at 8:00 AM there would be a one hour delay before the fax was sent. 7. The Category has been set to FAXRUSH (this should be set to the appropriate Host Reference for the desired OmniRush Track). Driving OmniRush Programmatically from SalesLogix It is easy to 'drive' OmniRush from your code to perform a variety of merging, faxing, shipping, and printing tasks. OmniRush is driven by records in the SalesLogix database, so by creating records in SalesLogix, you can fax out merged cover letters, attachments, even reports generated from Crystal Reports! All the OmniRush modules are available to you using this interface, such as faxing, internet fax, shipping, merge email, etc. 281 OmniRush Administration & User Manual This document assumes Familiarity with SalesLogix database structures Familiarity with SalesLogix's Architect, VBA and/or DLL api The discussions here are quite high-level, and assume a solid foundation in SalesLogix and OmniRush on the part of the reader. Possible Applications OmniRush can be used as a powerful fax and print merge server, shipping server, email server, etc., with minimal code required on the part of the developer. Applications include: A VB app that runs a series of Crystal Reports each night, and wants them faxed out automatically. Generating shipments of sales samples, or fulfilling orders by ground or express shipping. A mainframe that kicks out text files that need to be faxed out. An automatic fax response system driven by a simple tool bar you create. Integrating OmniRush with a web site for automatic fax and print fulfillment of product literature, mailing labels, etc. Be sure to name files appropriately. If files are generated programmatically, be sure to use the F$ prefix. Developing with OmniRush OmniRush is driven by SalesLogix Activity records. How the record is created is not material to OmniRush. It just needs to be there. There are a few minor caveats: The Activity record must be linked via the accountid and contactid to the appropriate company and contact. Unlinked Activity records will not work. The CONTACT and ACCOUNT records' contact/company/phone1/fax fields will be referenced by the fax job (for the fax banner, cover page, etc.) This means that if the job is for a destination not currently in the SalesLogix database, your code may need to create ACCOUNT and CONTACT records as well as the Activity record for each job. There are also several benefits: If there is no merging of contact data on the fax, all the Activity records can be linked to one ACCOUNT/CONTACT record set (e.g. a NO CONTACT record). OmniRush job overrides (for fax number, logging, etc.) can be used. Examples: Example #1 In the first example, a TIF file is created once a week, and your application will trigger it being faxed out. The steps are: 282 Developer's Guide The TIF is placed in \outfax\ with the name faxfile.tif Your application creates Activity records all linked to the same ACCOUNT/CONTACT records with the following fields populated: DESCRIPTION faxfile.tif fax:xxxxxxxxx FCC CATEGORY OmniRush STARTDATE today's date, time of 1:00 AM (or a future date if you want the fax to be sent in the future) Where xxxxxxxxx is the fax number to send the fax to. The 'FCC' causes OmniRush to put the job into the HISTORY table on success or failure. Once this record is created, OmniRush will process the job! Be sure to name files appropriately. If files are generated programmatically, be sure to use the F$ prefix. Example #2: A mainframe computer spits out dozens of text files each night. These files might be production schedules, inventory, or accounting statements. Each of this files is destined for a different customer. Your application must fax these files to the appropriate contacts. The flow of your application would be: 1. Iterate through each text file and: 2. Read the customer ID from the text file 3. If no match for this customer ID in SalesLogix (you could store these accounting system ID's in a SalesLogix database field), create ACCOUNT & CONTACT records with (minimally) the company, contact, phone, fax, customer ID information 4. Create an Activity record for this ACCOUNT/CONTACT record. 5. Set the Activity record fields to: DESCRIPTION \\server\share\dir\NameOfTextFile.TXT FCC CATEGORY OmniRush STARTDATE today's date, time of 1:00 AM (or a future date if you want the fax to be sent in the future) Done! Alternately, the Activity->Description could be set to COOLMERGEFORM.RTF, and the text from the text file could be inserted into Activity->NOTES. If COOLMERGEFORM has the &FX_Notes OmniRush merge field on it, the contents of Activity->NOTES will be merged. This can let you deliver a professionally formatted document with logo graphics, advanced OmniRush merging, etc. (Hint: set the font of the &FX_Notes code to Courier or another mono-spaced font so that columns will line up correctly.) Be sure to name files appropriately. If files are generated programmatically, be sure to use the F$ prefix. Example #3 Your VB application automatically runs a series of Crystal Reports every night. You want these printed or faxed. Here is your application flow: 283 OmniRush Administration & User Manual a. Process all reports. Using the Crystal API, each report is saved as an RTF file into a subdirectory of the OmniRush \outfax\ directory, e.g. \outfax\reports\. Name each report with the customer id or company name it is destined for. b. When all the reports have been built, read the name of the first file in \outfax\reports c. Find the ACCOUNT/CONTACT record that corresponds to this file. d. If no match for this customer ID in SalesLogix (you could store these accounting system ID's in a SalesLogix database field), create an ACCOUNT / CONTACT record with (minimally) the company, contact, phone, fax, customer ID information e. Create a Activity record for this ACCOUNT / CONTACT record. f. Set the Activity record fields to: DESCRIPTION \\server\share\dir\…\outfax\reports\<filename>.rtf FCC CATEGORY OmniRush STARTDATE today's date, time of 1:00 AM (or a future date if you want the fax to be sent in the future) g. Iterate through each of the RTF files, following steps C-F h. Done! Be sure to name files appropriately. If files are generated programmatically, be sure to use the F$ prefix. GoldMine Driving OmniRush Programatically from GoldMine It is easy to 'drive' OmniRush from your code to perform a variety of merging, faxing, and printing tasks. OmniRush is driven by records in the GoldMine database, so by creating records in GoldMine, you can fax out merged cover letters, attachments, even reports generated from Crystal Reports! All the OmniRush modules are available to you using this interface, such as faxing, internet fax, shipping, merge email, etc. This document assumes Familiarity with GoldMine database structures Familiarity with GoldMine's DDE and/or DLL api The discussions here are quite high-level, and assume a solid foundation in GoldMine and OmniRush on the part of the reader. The GoldMine database structures and the DDE interface are documented in the GoldMine help file and product manuals. Developing with the DDE and DLL interfaces are supported on the GoldMine news server, news://gmnews.goldminesw.com Possible Applications 284 Developer's Guide OmniRush can be used as a powerful fax and print merge server, shipping server, email server, etc., with minimal code required on the part of the developer. Applications include: A VB app that runs a series of Crystal Reports each night, and wants them faxed out automatically. A mainframe that kicks out text files that need to be faxed out. An automatic fax response system driven by a simple tool bar you create. Integrating OmniRush with a web site for automatic fax and print fulfillment of product literature, mailing labels, etc. Be sure to name files appropriately. If files are generated programmatically, be sure to use the F$ prefix. Developing with OmniRush OmniRush is driven by GoldMine CAL records. How the record is created is not material to OmniRush. It just needs to be there. There are a few minor caveats: The CAL record must be linked via the accountno field to a CONTACT1 record. Unlinked CAL records will not work. The CONTACT1 record contact/company/phone1/fax fields will be referenced by the fax job (for the fax banner, cover page, etc.) This means that your code may need to create a CONTACT1 record and a CAL record for each job. There are also several benefits: If there is no merging of contact1 data on the fax, all the CAL records can be linked to one CONTACT1 record. OmniRush job overrides (for fax number, logging, etc.) can be used. Examples: Example #1 In the first example, a TIF file is created once a week, and your application will trigger it being faxed out. The steps are: The TIF is placed in \outfax\ with the name faxfile.tif Your application creates CAL records all linked to the same CONTACT1 record with the following fields populated: REF faxfile.tif fax:xxxxxxxxx ACTVCODE FCC USERID OmniRush ONDATE today's date (or a future date if you want the fax to be sent in the future) ONTIME blank to send immediately (or a future time to send the fax in the future) 285 OmniRush Administration & User Manual Where xxxxxxxxx is the fax number to send the fax to. The 'FCC' causes OmniRush to put the job into the CONTHIST table on success or failure. Once this record is created, OmniRush will process the job! Be sure to name files appropriately. If files are generated programmatically, be sure to use the F$ prefix. Example #2: A mainframe computer spits out dozens of text files each night. These files might be production schedules, inventory, or accounting statements. Each of this files is destined for a different customer. Your application must fax these files to the appropriate contacts. The flow of your application would be: 1. Iterate through each text file and: 2. Read the customer ID from the text file 3. If no match for this customer ID in GoldMine (you could store these accounting system ID's in a GoldMine contact1->key field), create a CONTACT1 record with (minimally) the company, contact, phone, fax, customer ID information 4. Create a CAL record for this CONTACT1 record. 5. Set the CAL record fields to: REF \\server\share\dir\NameOfTextFile.TXT ACTVCODE FCC USERID OmniRush ONDATE today's date (or a future date if you want the fax to be sent in the future) ONTIME blank to send immediately (or a future time to send the fax in the future) Done! Alternately, the CAL->REF could be set to COOLMERGEFORM.RTF, and the text from the text file could be inserted into CAL->NOTES. If COOLMERGEFORM has the &FX_Notes OmniRush merge field on it, the contents of CAL->NOTES will be merged. This can let you deliver a professionally formatted document with logo graphics, advanced OmniRush merging, etc. Be sure to name files appropriately. If files are generated programmatically, be sure to use the F$ prefix. Example #3 Your VB application automatically runs a series of Crystal Reports every night. You want these printed or faxed. Here is your application flow: a. Process all reports. Using the Crystal API, each report is saved as an RTF file into a subdirectory of the OmniRush \outfax\ directory, e.g. \outfax\reports\. Name each report with the customer id or company name it is destined for. b. When all the reports have been built, read the name of the first file in \outfax\reports c. Find the CONTACT1 record that corresponds to this file. d. If no match for this customer ID in GoldMine (you could store these accounting system ID's in a GoldMine contact1->key field), create a CONTACT1 record with (minimally) the company, contact, phone, fax, customer ID information e. Create a CAL record for this CONTACT1 record. 286 Developer's Guide f. Set the CAL record fields to: REF \\server\share\dir\…\outfax\reports\<filename>.rtf ACTVCODE FCC USERID OmniRush ONDATE today's date (or a future date if you want the fax to be sent in the future) ONTIME blank to send immediately (or a future time to send the fax in the future) g. Iterate through each of the RTF files, following steps C-F h. Done! Getting The Job Status You can test for the status by looking at the CONTHIST->RESULTCODE field which will tell you if it was successful or not. FAX means the fax was successful, NFX means not successful. Remember that if the fax needs to be retried, there may be no status for several minutes (even 10 or 20 minutes). The CONTHIST->duration field has the page count of the fax. Reference There are several excellent points of reference: SQL users should go to the support page on the Z-Firm web site (www.zfirm.com), and search for 'SQL' These technical documents and examples are excellent references for advanced merging. See the OmniRush job behavior override codes for more power. GoldMine Developer information (to learn how to use the GoldMine DDE or DLL apis) is available from these sources: news://gmnews.goldminesw.com The GoldMine Help file ftp://ftp.goldminesw.com has example code FAQ Must the GoldMine DDE/DLL mechanism be used to write to the GoldMine data files? Can't I just do direct writes to the GoldMine .DBF or SQL tables? OmniRush itself does not require that you use the GoldMine DDE/DLL mechanism. However, GoldMine sync requires you to use the DDE/DLL mechanism, and you may not get any help from GoldMine if you write directly. That said, some developers use GoldMine just as a OmniRush work area (e.g. they do not really use GoldMine as such, and certainly do not sync). In this context, you can write to the files any way you want (e.g. ODBC, BDE, or other database drivers). Can OmniRush merge data from my inventory database on our SQL Server? Yes. If you run the SQL version of OmniRush against a SQL GoldMine, OmniRush can query other databases on the same SQL Server for very sophisticated merging. See the tech doc on "Custom SQL Merging" on the OmniRush web site. 287 OmniRush Administration & User Manual When a fax job fails, I want it to print so we can just put it in the mail. How do I do that? If OmniRush is set up to print to a network laser printer, this easy to do. Say you have a GoldMine user LASER that points to laser printer in OmniRush. Make the record as follows: CAL->REF document.rtf FRBU:LASER CAL-ACTVCODE FCR This will cause failed jobs to automatically be printed by OmniRush. Driving OmniRush from GoldMine Automated Processes (This section assumes familarity with GoldMine Automated Processes.) GoldMine can trigger OmniRush jobs from AP by scheduling Other Actions to the appropriate OmniRush Track. Create a new event in the AP Track Make the action a Schedule Action (type Other Action) Set the Event properties as follows: (Note, the only important setting above is the Action. The other settings will be specific to your event.) On the Action Properties, set along the lines of the following: 288 Developer's Guide Then, on Activity Details, set to taste. Below is an example: Using Expressions in Automated Processes 289 OmniRush Administration & User Manual AP opens many powerful doors for OmniRush. Among these is the ability to use expressions to build the OmniRush job dynamically from the GoldMine data. Using AP, you can dynamically control the fax number a fax is sent to, override the files being sent, even alias the fax as being 'from' a rep other than the record owner or AP user. A popular impmentation of this method is found in SalesMagic by Sales Automation Technology, (916)4891600. The technique described here is often used by GoldMine VARs to create an AP track that will fax lead sheets to dealers. The flow looks like this: 1. Telemarketer enters a new record into GoldMine or updates an existing record to PROSPECT 2. GoldMine's LOOKUP.INI looks at the STATE field and populates contact1->key1 with the GoldMine userid of the sales rep for that state, and the contact2-urepfax field with the fax number of that rep. 3. GoldMine Automated Processes schedule the lead sheet to be faxed to that rep, at the fax number in contact2->urepfax Note: Automated Processes is an advanced feature of GoldMine. You must be willing to devote time to experiment with and learn AP. Competent GoldMine VAR's can be a big help in this. Note: Due to the complexity of AP and its related features, Z-Firm cannot support implementations of GoldMine AP. Once your AP creates the job, OmniRush can process it. Getting the job created is in your hands. Knowledge of the GoldMine LOOKUP.INI can also be helpful. Creating a Simple AP Track We will create an AP track with one event that will tell OmniRush to send price.rtf, use a contact2 field for the fax number, fail the job back to user SALLY, and make the & USERNAME and & UserFullName fields merge as if the fax was scheduled by SALLY. 290 Go to File | Automated Processes | Setup Processes Press Maintain Press New Fill in the screen as follows: Developer's Guide Press OK, and you now have the following screen: Press New, and fill out the screen as shown: 291 OmniRush Administration & User Manual Press the Options button, and fill it in as shown: Press the Activity Details button and fill it in as shown: 292 Developer's Guide The Reference line is cut off in the screen shot. The full reference line is: "price.rtf FAX:"+trim(contact2->urepfax) + "FWD:SALLY OWN:SALLY" It could have just been: "price.rtf FAX:"+trim(contact2->urepfax) Which would have scheduled price.rtf, and pulled the fax number to send it to from the contact2>urepfax field. However, we used some additional overrides to demonstrate more advanced features of OmniRush. FWD: This will cause the job to be scheduled back to the specified user if it fails. Note that there are no spaces after the colon, and the colon is followed by the 8 digit short GoldMine user name in upper case. OWN: This causes the & USERNAME and & UserFullName fields to merge as if the fax was scheduled by SALLY. Now this could have even been more creative. For example: 293 OmniRush Administration & User Manual "price.rtf FAX:"+trim(contact2->urepfax) + "FWD:SALLY OWN:" + contact1->key1 (Yes, this does fit on the reference line.) This example would have dynamically assigned who the fax would be 'from' based on the contents of contact1->key1. Note that this must be an 8 character, upper case, GM user id. Integrating via OmniRush ActiveX Introduction The ActiveX has been deprecated and is no longer supported by Z-Firm. Developers should use the Open SQL method to drive OmniRush. The OmniRush ActiveX control allows Visual Basic, VBA, Delphi, C++, MSAccess, FoxPro, and other programers to programatically interact with OmniRush. Jobs of all types can be submitted to OmniRush, and job status can be queried. The best way to get started with the ActiveX is to experiment with the sample applications that come with OmniRush. There three Visual Basic applications and one Delphi application. The sample applications are installed on the OmniRush Server, in the \Examples\Sample Code\ActiveX directory. Additionally, a PDF reference for the ActiveX is installed into \Examples\Sample Code\ActiveX . ActiveX Reference ActiveX Reference The ActiveX has been deprecated and is no longer supported by Z-Firm. Developers should use the Open SQL method to drive OmniRush. This is an html version of the PDF file that is installed to the \Examples\Sample Code\ActiveX on all OmniRush Server installations. OmniRush" ActiveX Application Programming Interface revision: 5.0.194 © 2001 Z-Firm LLC ALL RIGHTS RESERVED Note: Please see the Example Code directory of the OmniRush server for sample apps in Visual Basic, Delphi, etc. and for up to date documentation. This document may only be used to integrate with OmniRush. It is prohibited to use this document for any other purpose. 294 Developer's Guide QuickLinks: Introduction Compatibility Getting started Samples A simple tutorial Component class reference Properties common to all 3 ActiveX controls frTreeView properties frTreeViewEdit properties frapi properties frapi methods (in alphabetical order) 295 OmniRush Administration & User Manual Introduction The OmniRush" ActiveX API provides high-level access to some of the most important features of OmniRush. It allows third parties to easily integrate their client application with the OmniRush server in order to add faxing, printing, shipping (etc&) functionality. Compatibility The API is composed of ActiveX controls that are compatible with a wide variety of programming TM environments. The controls have been tested with Borland Delphi 5 , Microsoft Visual Basic 6.0 TM TM and Microsoft Office 2000 VBA. They should however work with any programming environment that supports ActiveX controls, such as Visual C++, Java (Microsoft) etc& Getting started The component set is comprised of two visual controls and one non-visual component. The visual controls allow the end user to browse and select items (i.e. documents, users etc&) from d the OmniRush repository. The non-visual component allows the 3 party application to submit jobs to the OmniRush server (i.e. Faxes, shipments etc&) and query their status for completion or failure. All three controls require an active connection to the OmniRush database server. The OmniRush d client support files must therefore be deployed with any 3 party OmniRush application (see deployment for details) The OmniRush ActiveX requires that the OmniRush Client be installed on the PC where the ActiveX will be used. The Client installation installs the required network libraries and configuration for the ActiveX to connect to the OmniRush Server. If you are working on the system where the OmniRush Server is installed, there is nothing more to install, as all the required components are already present. The ActiveX is called OmniRushAPI.ocx, and it has an associated .tlb file. The OmniRush API is available on any PC that has the OmniRush Client installed. After installing the OmniRush Client, check that the OmniRush Administrator can launch and log into OmniRush as user ADMIN with no password. This confirms network connectivity. At this point, you are ready to experiment with the sample applications. Samples The following sample projects demonstrate some basic API features. They are installed to the \examples\sample code\ActiveX-Examples\ directory under the OmniRush Server directory: OCX_TestApp ORDemo 296 (Delphi 5) Uses TreeView, TreeViewEdit and frapi. Allow you to navigate tree, create/delete folders, import/export documents, create jobs and query for status. (Visual Basic) Demonstrates scheduling of ad-hoc jobs and querying of job status. No CRM database required. Developer's Guide FaxBlast (Visual Basic) Takes a text file of fax numbers and tiff image filename and creates fax jobs (one per fax number). Has the ability to query created jobs for current status and save results to a different text file. NOTE: FaxBlast project has reference to MSXML 3.0 (Microsoft XML parser). This is a COMobject. You can download a copy from http://msdn.microsoft.com/downloads/default.asp?url=/downloads/topic.asp?url=/msdnfiles/028/000/072/topic.xml&frame=true If this link is no longer valid, just go to www.microsoft.com and search for download MSXML. A simple tutorial For this tutorial we will use Microsoft Visual Basic 6.0. However, the steps can be easily transposed to Microsoft Word 2000 VBA or your favorite programming environment if it supports ActiveX controls. Create a new project Add OmniRush controls Use a visual control Write connection code Execute Launch Visual Basic Select New Project, Standard Exe and Open Select Project | Components& In the controls tab, find frapiOCX Library and check the associated box. Press OK. Three new controls should appear in your Toolbox named frapi, frTreeViewEdit and frTreeView. If the controls do not appear, or if the line frapiOCX Library does not appear in the list, then the OmniRush API probably hasnt been installed correctly and you need to run the OmniRush ActiveX API installer located on your OmniRush CD-ROM. Select the frTreeViewEdit control in your Toolbox and place it on the form. Make sure the new control on the form is selected. Then use the properties window to set the following properties (values are given as examples. Use values appropriate for your OmniRush install): ServerName = ordb SystemLogin = admin SystemPassword = secret UserLogin = admin UserPassword = Add a button on the form. Give it a caption such as Login Double-click on the button and write the following code into the event handler: frTreeViewEdit1.Active = Not frTreeViewEdit1.Active If frTreeViewEdit1.Active Then Command1.Caption = Logout Else Comman1.Caption = Login End If Select Run | Start. Click the Button. The caption should change to Logout. Click the ComboBox. It should popup and display a TreeView with 297 OmniRush Administration & User Manual data from the OmniRush repository. If nothing happens, or an error occurs, your login parameters may be incorrect, or the OmniRush server may not be running, or your network connection may not be working correctly. 298 Developer's Guide Component class reference Described here are properties specific to the OmniRush API. Properties such as frTreeViewEdit.ButtonCaption are considered self explaining. Properties common to all 3 ActiveX controls: This is the alias of your OmniRush database server. This name was defined during installation and normally defaults to OmniRush. ServerName SystemLogin SystemPassword UserLogin UserPassword Active ClientServer About Note: This is a low-level OmniRush database alias. It is not the same as the name of the ODBC data source used to point a report writer at the OmniRush data, nor is it a BDE (Borland Database Engine) alias that may be used to access the OmniRush database via SQL from Delphi or C++ Builder. This is the login name of the account used to access the OmniRush database above. This name was defined at installation and normally defaults to admin. Note: This account is the same as the account that would be used to connect to the database via ODBC or the BDE. This is te password associated with SystemLogin. This password defaults to secret on new OmniRush installations. This is the login name of a valid OmniRush user. The same as would be needed to log into any OmniRush client application. You can use the built in ADMIN user that installs with a new OmniRush installation. The password associated with UserLogin. The built in ADMIN user has no password (unless you set one in the OmniRush Administrator). Set this property to True to establish a connection with the OmniRush Server. Should always be True This is a design-time property only. It displays a small informational screen about the control. 299 OmniRush Administration & User Manual frTreeView properties: Note: Properties not described below are either self-explaining (e.g. Ctl3D) or arent used. Property Active Data Type Default Value Access Boolean False Design-time r/w Set this property to True to establish a connection with the OmniRush Server. The properties listed below must contain valid values prior to setting this property to True. ClientServer See also: ServerName, SystemLogin, SystemPassword, UserLogin, UserPassword properties. Boolean True Design-time r/w This property should always be set to True. CurrentPath String Design-time r/w Sequence of node identifiers specifying the current node in the TreeView. Used to specify objects programmatically. <Root ID> / <Folder ID> / & / <Document ID> Note: Set the Active property toTrue before using this property. DragInEnabled DragOutEnabled NextPath See also: CaptionPath, Value properties, GotoPath method. Boolean False Design-time r/w Set this property to True to allow documents to be imported by dragging them onto a tree node from an outside source such as Explorer, another OmniRush TreeView or the control itself. Boolean False Design-time r/w Set this property to True to allow documents to be exported by dragging them from the TreeView onto a valid target such as Explorer, another OmniRush TreeView or the control itself. Not currently implemented. Boolean RightClickSelect RootTitle ServerName 300 False Design-time r/w If True, nodes may be selected using the right mouse button in addition to the left mouse button. String Root Design-time r/w The caption of the root node, if displayed. String Design-time r/w Developer's Guide This is the alias of your OmniRush database server. This name was defined during installation and normally defaults to OmniRush. Note: This is a low-level OmniRush database alias. It is not the same as the name of the ODBC data source used to point a report writer at the OmniRush data, nor is it a BDE (Borland Database Engine) alias that may be used to access the OmniRush database via SQL from Delphi or C++ Builder. ShowButtons ShowLines SortType SystemLogin See also: SystemLogin, SystemPassword, UserLogin, UserPassword, Active properties. Boolean True Design-time r/w Set to False to make [+] and [-] node icons invisible. Boolean True Design-time r/w Set to False to make lines between nodes invisible Integer 0 Design-time r/w Specifies the sort order for documents. Has no effect on other objects or folders: 0 - No sort order 1 - Sort by type (e.g. TIF, RTF&) 2 - Sort by file name 3 - Sort by file name and type String Design-time r/w This is the login name of the account used to access the OmniRush database above. This name was defined at installation and normally defaults to admin. Note: This account is the same as the account that would be used to connect to the database via ODBC or the BDE. SystemPassword See also: ServerName, SystemPassword, UserLogin, UserPassword, Active properties. String Design-time r/w This is the password associated with SystemLogin. The password is defined at installation (default installed value = secret). UserLogin See also: ServerName, SystemLogin, UserLogin, UserPassword, Active properties. String Design-time r/w This is the login name of a valid OmniRush user. The same as would be needed to log into any OmniRush client application. You can use the built in ADMIN account. UserPassword See also: ServerName, SystemLogin, SystemPassword, UserPassword, Active properties. String Design-time r/w The password associated with UserLogin. The built in ADMIN account has no password. See also: ServerName, SystemLogin, SystemPassword, UserLogin, Active properties. 301 OmniRush Administration & User Manual Value ViewMode String Run-time r-o This property contains the record ID associated with the current active node in the tree-view. It is required as parameter for job creation methods in frapi. Most methods can use CurrentPath or Value interchangeably. See also: CurrentPath property. Integer 4086 Design-time r/w Specifies which branches should be visible in the TreeView. The following values may be combined using simple addition or logical OR: 2 - show Tracks 4 - show Groups 16 - show Modules 32 - show Users 64 - show Shared Document Folders 128 - show Inbound Document Folders 256 - show Private Document Folders 512 - show General Document Folders 1024 - show Document Objects 2048 - show New Inbound Document Folders frTreeViewEdit properties CurrentPath Value TreeHeight TreeWidth TreeRoot ViewMode See frTreeView.CurrentPath. See frTreeView.Value. Height of the popup TreeView. The TreeView normally pops-up underneath the edit control. If TreeHeight is greater than the available space underneath the control, then the TreeView is displayed above instead. Width of the popup TreeView. The TreeView normally pops-up left-aligned with the edit control. If TreeWidth is greater than the available space, then the TreeView pops-up right-aligned instead. See frTreeView.RootTitle. See frTreeView.ViewMode. frapi properties LoggedIn DBIOModuleID 302 frTreeView and frTreeViewEdit login automatically whenever the Active property is set to True. This is not the case with frapi which is intended to be used for client or for server applications. Server applications may require to login to the database repeatedly as different users. Not losing the server connection while switching from one user to another greatly increases performance. The record ID of a Host DBIO module settings record. This record ID can be obtained by using a frTreeViewEdit and navigating to the apropriate DBIO module node and then reading the Value property. This property is required by the UseHostContact method to specify which Host Contact Manager the contact to be used Developer's Guide BatchCount belongs to. Returns the total number of batches configured in OmniRush frapi methods (in alphabetical order) (declared using Pascal syntax) procedure AboutBox; Description :Displays an about box with information about the controls version etc. procedure Activate; Description :Connects to the OmniRush database server. The ServerName, SystemLogin and SystemPassword properties must contain valid values before invoking this method. If the component is already active, an exception is raised. Most functionality of the frapi component requires the component to be activated and an OmniRush user to be logged in. See also : Deactivate, Login, Logout methods. procedure CheckVelocisServer(const sServerName: WideString; out sMessage: WideString; out bServerOK: WordBool); Description :Checks if the provided Z-Firm DBEngine server name is valid (i.e. it has a corresponding entry in the connect.ini file). Then it pings the server to check if it is running. SServerName :The name of the server that is to be checked. sMessage : If an error occurred, this parameter contains the error message. Otherwise, it remains blank. bServerOk : True if the server could be pinged successfully. occurred. False if an error procedure ClearContacts; Description :Deletes all internal contacts. Every job requires an associated contact. In order to schedule jobs, frapi maintains a list of contacts that are either imported from a CRM database or created from scratch (temporary contacts). ClearContact clears this internal list. It does not affect the contacts in the host CRM database or the jobs already created using the contacts in the list. See also : CreateTempContact, DeleteContact, GetContactCount, GetContactFieldByName, GetContactFieldName, GetContactFields, GetContactValue, GetFieldCount, SetContactFieldByName, SetContactFielName, SetContactFields, SetContactValue, UseHostContact and UseHostContactEx. procedure CreateTempContact(const wsFirst: WideString; const wsLast: WideString; out hContact: SYSINT); 303 OmniRush Administration & User Manual Description :Creates a contact in the internal contacts list. This does not affect contacts in the host CRM database. Once the contact is created, contact information may be completed using SetContactFieldByName, SetContactFielName, SetContactFields or SetContactValue. The contact is then ready to be used by job creation methods. If the function fails, an exception is raised. wsFirst : First Name of the contact to be created. wsLast : Last Name of the contact to be created. hContact : If the method succeeds, this parameter contains a handle that may be used to reference the Contact in job creation methods etc. procedure Deactivate; Description :Disconnects from the OmniRush database server. If a user was logged in, he is logged out automatically before the connection is cleared. See also : Activate, Login, Logout methods. procedure DeleteContact(iContact: SYSINT); Description :Deletes the internal contact associated with the handle specified by iContact. For more information about internal contacts, refer to the documentation on the ClearContacts method. See also : ClearContacts method. procedure DocumentCheckIn(const sDocumentID: WideString; const sSource: WideString); Description :Checks-in an OmniRush document that was previously checked-out using the DocumentCheckOut method. For an overview on managing OmniRush documents, refer to the OmniRush user guide. sDocumentID :Identifier specifying the internal document that will be updated by the external file. This identifier is returned by the DocumentImport and FindDocumentInRepositoryEx methods. Also, after successfully invoking the FindDocumentInRepository method, GetDocumentAttributes may be used to read the document ID of the document that was found. sSource : File name (complete with path) of the file that should replace the internal document. See also : DocumentGetLatest, DocumentCheckOut, DocumentUndoCheckout, DocumentImport, FindDocumentInRepository, FindDocumentInRepositoryEx and GetDocumentAttributes methods. procedure DocumentCheckOut(const sDocumentID: WideString; const sTarget: WideString; bOverwrite: WordBool); Description :Checks-out an OmniRush document. For an overview on managing OmniRush documents, refer to the OmniRush user guide. sDocumentID :Identifier specifying the internal document that will be copied to the client. See DocumentCheckIn for details. sTarget : 304 File name (complete with path) of the file that will contain the checked-out document. Developer's Guide bOverwrite :Determines the methods behavior in case the target file already exists. If bOverwrite is False, an exception is raised. If bOverwrite is True, the existing file is saved to a backup file with the same name as the original but with a .old extension and is then overwritten. If the file is flagged as ReadOnly, it is overwritten anyway. See also : DocumentCheckIn method (and list of methods there). procedure DocumentDelete(const sDocumentID: WideString); Description :Deletes an internal OmniRush document. No external file is affected. sDocumentID :Identifier specifying the internal document that will be deleted. See DocumentCheckIn for details. See also : DocumentCheckIn method (and list of methods there). procedure DocumentGetLatest(const sDocumentID: WideString; const sTarget: WideString; bOverwrite: WordBool); Description :Copies an internal OmniRush document to the client without actually checking it out. For an overview on managing OmniRush documents, refer to the OmniRush user guide. sDocumentID :Identifier specifying the internal document that will be copied to the client. See DocumentCheckIn for details. sTarget : File name (complete with path) of the file that will contain the checked-out document. bOverwrite :Determines the methods behavior in case the target file already exists. See DocumentCheckOut for details. See also : DocumentCheckIn method (and list of methods there). procedure DocumentImport(const sDocument: WideString; const sMacro: WideString; const sParentFolder: WideString; iDocumentType: SYSINT; iPageCount: SYSINT; out sDocumentID: WideString); Description :Creates a new document in the OmniRush repository. sDocument : Document local filename with valid path. File must exist. sMacro : Word macro command name and parameters sParentFolder : Valid folder ID of the folder to import document in. ID is returned by CreateFolder function. Or you can use predefined hard-coded folder IDs like: FolderID ROOT_DOCS_G_S_ ROOT_DOCS_G_P_ ROOT_DOCS_I_S_ ROOT_DOCS_I_P_ Description Documents\General\Shared\ Documents\General\Private\ Documents\Inbound\Shared\ Documents\Inbound\Private\ iDocumentType : Type of document. Must be specified properly in order to use it later with OmniRush modules Type of document is not defined. OmniRush modules cannot use dtUndefined document. dtDynamicText Text file (*.txt, *.frp, *.zpk) with merge codes. Is not supported in 305 OmniRush Administration & User Manual dtStaticText dtDynamicTER dtStaticTER dtDynamicWord dtStaticWord dtStaticPDF dtBitmap release 1. Text file (*.txt, *.frp, *.zpk) RTF file with merge codes. RTF or DOC. Acrobat PDF. TIFF (TIFF LZW is not supported, TIFF should have a propriate fax resolution and dimensions) iPageCount : Number of pages in the document (for note only). Might be set to 0. sDocumentID : If function completed it returns a result document ID. procedure DocumentUndoCheckout(const sDocumentID: WideString); Description : Function discards all changes that might be made to local copy of the document after DocumentCheckout. Only the user who check document out can call this function. sDocumentID DR). : ID of the OmniRush document (usually 15 characters started with procedure FetchJob(iFetchMaxRows: Integer; out wsJobs: WideString; out iJobCount: Integer); Description : Fetches up to iFetchMaxRows jobs statuses in XML format to the client. You can call this function multiply times to retrieve a really big list of statuses. One of the InitFetchXXX function must be called prior. iFetchMaxRows : Maximum jobs statuses to return in this function call wsJobs : Response in XML format iJobCount : Actuall number of job statuses in the response. procedure FetchJobByID(const wsJobIDs: WideString; out wsJobs: WideString; out iJobCount: Integer); Description : Fetches jobs statuses (by job ID) in XML format to the client. wsJobIDs : Request in XML format (just JobIDs) Example: <?xml version="1.0"?><Request> <Job><ID>MJ1EJQNDM9K4CLI</ID></Job> <Job><ID>MJ1EJQNDM9K5CLI</ID></Job> </Request> wsJobs : Response in XML format Example: <?xml version="1.0"?><Request> <Job> <ID>MJ1ESIF35Z0MCLI</ID> <HostDB>MS0000000000009</HostDB> <MainStatus>Sending</MainStatus> <SupplyStatus>Standard</SupplyStatus> <FullFaxNum>19166424527</FullFaxNum> <OrgFaxNum>(916)642-4527</OrgFaxNum> 306 Developer's Guide <FirstName>Christopher</FirstName> <MidName>M</MidName> <LastName>Peterson</LastName> <Aborted>F</Aborted> <SendOn>7/2/2001</SendOn> <Notes>![CDATA[ Here is notes block ]]</Notes> </Job> </Request> iJobCount : Actuall number of job statuses in the response. procedure FindDocumentInRepository(const wsExternalDoc: WideString; out bFound: WordBool); Description : This method returns True if the document specified in wsExternalDoc exists in the OmniRush internal repository. This method should rarely need to be invoked directly. It is used by JobCreate and JobCreateEx methods internally. Besides if document is found GetDocumentAttributes function might be used to get document attributes (properties) wsExternalDoc: Filename of document (without path) to look for. bFound : TRUE if document specified in the wsExternalDoc found in the OmniRush repository. procedure FolderCreate(const sCaption: WideString; const sParent: WideString; out sFolderID: WideString); Description : Creates a new folder in the OmniRush document repository. sCaption : Folder caption (name) that will be displayed at the visual controls (TreeView, TreeEdit, etc) sFolderID : ID of the new folder. You need this ID to delete/modify folder or to import new documents to this folder. procedure FolderDelete(const sFolderPath: WideString; bDeleteAll: WordBool); Description : Deletes specified folder from OmniRush repository. sFolderPath : Full path to the folder in the ID1\ID2\ID3\FolderID format. bDeleteAll : Delete all instances of the folder. Is not used in release 1. procedure GetContactCount(out iCount: SYSINT); Description : Returns number of internal temporary contacts. iCount : Number of internal contacts. procedure GetContactFieldByName(iContact: SYSINT; const wsFieldName: WideString; out wsValue: WideString); Description : Returns the value of the contact field specified by FieldName. Returns an empty string if the field does not exist. iContact : Index of contact in the internal contact list. wsFieldName : Name of the field to read. 307 OmniRush Administration & User Manual wsValue : Value of the field. Empty if field is not found. procedure GetContactFieldName(iContact: SYSINT; iIndex: SYSINT; out wsValue: WideString); Description : Returns the value of the contact field specified by iIndex. Returns an empty string if invalid index specified. iContact : Index of contact in the internal contact list. iIndex : Index of the field to read. wsValue : Value of the field. Empty if invalid index specified. procedure GetContactFields(iContact: SYSINT; out wsFields: WideString); Description : Returns all fields of specified contact. Fields are CR/LF separated. The format is compatible with the SetContactFields method. These two methods can be used together to save/load contact information. iContact : Index of contact in the internal contact list. wsFields : List of the fields. See alse : GetContactValue procedure GetContactValue(iContact: SYSINT; iIndex: SYSINT; out wsValue: WideString); Description separated. : Returns all values of specified contact. Values are CR/LF iContact : Index of contact in the internal contact list. wsValues : List of the values. See alse : GetContactValue procedure GetDocumentAttributes(out wsDocID, wsFileName, wsOrgFileName: WideString; out iLastVersion: Integer; out wsMacro, wsOwnerID, wsContactID, wsCheckout: WideString; out iCategory, iDocType, iImportMode: Integer; out wsDescription: WideString; out iPageCount: Integer; out wsRemoteCSID: WideString); Description : Retruns properties of the current document. Use FindDocumentInRepository to set current document. wsDocID wsFileName : Document ID : Document filename without path. wsOrgFileName: Document original filename without path. FileName <> OrgFileName if document was renamed iLastVersion wsMacro 308 : Document last version (is not used in release 1) : Microsoft Word macro command wsOwnerID : Document owner ID wsContactID : Document contact ID Developer's Guide wsCheckout : Username if document is checked out. Otherwise empty. iCategory : Document category iDocType : Document type (see DocumentImport function) iImportMode : Document import mode wsDescription: Document description iPageCount : Number of pages in the document. 0 if undefined. wsRemoteCSID : Remote fax CSID of document is inbound fax. Empty otherwise. procedure GetFieldCount(iContact: SYSINT; out iCount: SYSINT); Description : Retruns number of fields of the specified contact. iCountact : Index of the contact iCount : Number of fields. See also : GetContactValue, GetContactFieldName procedure GetTrackDescription(iIndex: SYSINT; out Value: WideString); Description : Returns description of the specified track. iIndex : Internal track index. Value : Track description See alse : RefreshTracks; procedure GetTrackHostRef(iIndex: SYSINT; out Value: WideString); Description : Returns the host-ref string of the track for the specified index. Host-ref is a string to schedule a job for that track from the contact manager (i.e. GoldMine pseudo-user). iIndex : Internal track index. Value : Host-ref flag See alse : RefreshTracks; procedure GetTrackID(iIndex: SYSINT; out Value: WideString); Description : Returns ID of the specified track. iIndex : Internal track index. Value : Track ID See alse : RefreshTracks; procedure GetTrackTitle(iIndex: SYSINT; out Value: WideString); 309 OmniRush Administration & User Manual Description : Returns title of the specified track. iIndex : Internal track index. Value : Track title See alse : RefreshTracks; procedure InitFetchJobByDate(const wsStartDate: WideString; const wsEndDate: WideString; bForward: WordBool; out bSuccess: WordBool); Description : Request status of all jobs that were created between 2 dates. To receive job status in XML format you should use FetchJob call. wsStartDate : DateTime of the range start (in system short format) wsEndDate : DateTime of the range end (in system short format) bForward : Flag that defines quiery direction (TRUE from StartDate to EndDate, FALSE from EndDate to StartDate) bSuccess : At least one job found that is in the range. You can query now. procedure InitFetchJobByStatus(iStatus: Integer; out bSuccess: WordBool); Description : Requests status of all jobs by specific status. To receive job status in XML format you should use FetchJob call. Be aware it might be thousands of jobs with statuses (jmsCompleteTemp, jmsCompleteLogged) iStatus : Job status to query (jmsMerge, jmsRasterize, jmsPrint, jmsReadyToSend, jmsSending, jmsQuerying, jmsCompleteTemp, jmsCompleteLogged, jmsUndefined) bSuccess : At least one job found that is in the range. You can query now. procedure JobCreate(iContact: SYSINT; const wsTrackID: WideString; const wsJobRef: WideString; const wsJobNotes: WideString; const wsDocuments: WideString; out wsJobID: WideString); Description : Short version of JobCreateEx. OnDate, PhoneNum and Email parameters are ommitted to simplify method usage. This method create job that will be executed immediatelly. procedure JobCreateEx(iContact: SYSINT; const wsTrackID: WideString; const wsPhoneNum: WideString; const wsEmail: WideString; const wsJobRef: WideString; const wsJobNotes: WideString; const wsDocuments: WideString; const wsOnDate: WideString; out wsJobID: WideString); Description : Inserts a job into the OmniRush work queue. iContact : Index of the contact associated with the job and must be previously defined by calling UseHostContact, UseHostContactEx or CreateTempContact methods. wsTrackID : ID of the track that the job belongs to. Track IDs can be obtained by browsing to a given batch in frTreeView or frTreeViewEdit and then reading the Value property. wsPhoneNum 310 : Job phone/fax number. Required for fax/voice jobs. Developer's Guide wsEmail : Job email address. Required for email jobs. wsJobRef : The reference line of a job that would be scheduled using a contact manager associated with OmniRush. It may contain a short description of the job, certain behaviour override codes etc wsJobNotes : Message text for voice job or just user notes. The notes may appear on a Fax cover-page or in the history record created for in the host contact manager after the job is completed. wsDocuments : One or more documents to be scheduled with the job. Multiple documents must be separated by semi-colons (;). Documents can be specified by their external file name, or by their record ID in the OmniRush repository which may be obtained by browsing with a frTreeViewEdit to a given document and reading the Value property. wsOnDate : Date and time on which the job should be executed by the OmniRush server. The format of the string depends on Date/Time short format settings on the local machine. wsJobID successful. : Job ID of the newly inserted job if the operation was procedure Login; Description : Connects to OmniRush server. Servername/Username/etc properties from Properties common to all 3 ActiveX controls section of this doc must be set properly before function call. procedure Logout; Description : Disconnects from OmniRush server. procedure RefreshTracks; Description : Rereads all tracks from OmniRush database. You can access track properties later by using GetTrackXXX functions. See also : GetTrackXXX procedure SetContactFieldByName(iContact: SYSINT; const wsFieldName: WideString; const wsValue: WideString); Description : Sets the value of the contact field specified by FieldName. iContact : Index of contact in the internal contact list. wsFilename : Name of the field to write. wsValue : New value of the field. procedure SetContactFieldName(iContact: SYSINT; iIndex: SYSINT; const wsValue: WideString); Description : Sets the value of the contact field specified by field index. iContact : Index of contact in the internal contact list. iIndex : Index of the field to write. 311 OmniRush Administration & User Manual wsValue : New value of the field. procedure SetContactFields(iContact: SYSINT; const wsFields: WideString); Description : Sets all fields of specified contact. Fields should be CR/LF separated. The format is compatible with the GetContactFields method. These two methods can be used together to save/load contact information. iContact : Index of contact in the internal contact list. wsFields : List of the fields. See alse : GetContactFields procedure SetContactValue(iContact: SYSINT; iIndex: SYSINT; const wsValue: WideString); Description : Sets all values of specified contact. Values are CR/LF separated. iContact : Index of contact in the internal contact list. wsValues : List of the values. procedure UseHostContact(const wsContactID: WideString; out iContact: SYSINT); Description : Creates a new contact in the internal list of contacts. This contact might be used later in JobCreateEx function. wsContactID : ID of the contact in the host database (e.g. GoldMine Accountno). wsHostID database. : ID of the DBIO module interfacing with the contacts host iContact : Index of the new contact in the internal list. you to reference the contact in job creation methods. This index allows Integrating Custom Fax Bridging Introduction to Custom Fax Bridging (Also known as the OmniRush Open Fax API) Custom fax bridging allows you to bridge OmniRush to your fax server or internet fax service. OmniRush includes integrated support for hardware faxing, Easylink, and other options, but users often find it necessary to connect to their own fax server or service. 312 Developer's Guide Bridging allows both outbound and inbound messages to be processed. It also allows for optional true status to flow into the CRM system via status messages. The API is a file based API. A fax message is a combination of two files: Multi-page TIF file of the fax image XML fax information file (fax number, recipient name, etc.) This same format is used for inbound and outbound faxing. Your code plugs into the picture as follows: 313 OmniRush Administration & User Manual Next: Getting Started with Bridging Getting Started with Bridging To get started with bridging, take these steps: 1. Review the sample code in the OmniRush \Examples\Sample Code\ directory. 2. Watch OmniRush work by configuring a Fax module for bridging, then push a job to it to see the output to the file system. Drop the example input files into it to see the fax flow into the OmniRush Viewer. 3. Plan your code to integrate with this data stream. 4. Build a protype and test it with OmniRush. 5. Stress test OmniRush to taste 6. Perform final implementation Next: Configuring Fax Module for Bridging Configuring Fax Module for Bridging In the OmniRush Administrator: 314 Create a new hardware fax module Developer's Guide Configure it for 'local file system' Press the Configure button, and you are prompted to set the root directory, as shown: Set the Parent Folder to a directory on the file system, and the number of ports to 1. Press Continue, and you have the final settings screen: 315 OmniRush Administration & User Manual This screen is where you can activate the virtual port for sending, receiving or both. Save the port. Create a track, and set it to use the OpenAPI. You are now ready to send and receive jobs fax jobs. Notes: If the module is set to execute an application on sending or receiving, that exe must exist or the module will not activate. Next: How Bridging Works: Sending And: How Bridging Works: Receiving How Fax Bridging Works Fax bridging provides a simple file-based mechanism to interact with the OmniRush faxing subsystem. It allows you to leverage all the power of OmniRush while keeping your existing fax infrastructure. When the module has a job to send it creates 2 files in the “port\outbound” and executes the command line from “port\settings” (if it is set) with parameters. The files are: MJxxxxx.xml - Job properties file (sender, recipient, phone number, etc) MJxxxxx.tif - Multipage tif-file group 3 TIF 316 Developer's Guide Your application can scan the outbound folder (for “*.xml” which is always created after the “tif”) and/or it can use the “execute command line” feature. The xml file contains a TiffFileName field, so the tif filename can be derived either by reading the xml data or by taking the filename portion of the xml file and appending a tif extension. The image file is always 1-bit TIFF Group 3, width = 1728 pixels, height depends on original (before burning) height and could be 1) 11 inch. – standard, original file was 0..12.9 inches high 2) 14 inch. – original file was 13..14.9 inches high 3) or XX inch – if the original file was XX inches high (15..100) The xml-Send-Template (generated by OmniRush server (fax module)) XML Data Field TiffFileName Description TIFF image full filename DestFaxNo Destination fax number (always in 11 digits, ready to dial, format) Job start date time as string Number of page in the image OmniRush internal job ID Recipient name (always formatted as CDATA) Recipient company (always formatted as CDATA) Sender name (always formatted as CDATA) Sender company (always formatted as CDATA) Sender fax Sender phone Fax resolution 0 – high, 1 - low OmniRush track name “yes” or “no”. Indicates whether job is waiting for confirmation (“rlt” file) or not. If “WaitForSendConfirmation” = “yes” indicates number of seconds module will wait for confirmation before fail the job (this is a setting in the OmniRush admin). If “WaitForSendConfirmation” = “no”, always equals “0”. StartOn PageCount JobID RecipientName RecipientCompany SenderName SenderCompany SenderFax SenderPhone FaxingRes TrackName WaitForSendConfirmation ConfirmationTimeout Example XML Send File: <?xml version="1.0"?> <Send> <TiffFileName>d:\temp\outbound\MJ1EMSRPDJULCLI.tif</TiffFileName> <DestFaxNo>14159491026</DestFaxNo> <StartOn>3/23/2001 4:45:16 PM</StartOn> <PageCount>1</PageCount> <JobID>MJ1EMSRPDJULCLI</JobID> <RecipientName>![CDATA[Bob Jones]]</RecipientName> <RecipientCompany>![CDATA[Tracker Network]]</RecipientCompany> 317 OmniRush Administration & User Manual <SenderName>![CDATA[Tom Smith]]</SenderName> <SenderCompany>![CDATA[Z-Firm LLC]]</SenderCompany> <SenderFax></SenderFax> <SenderPhone></SenderPhone> <FaxingRes>0</FaxingRes> <TrackName>FAXRUSH</TrackName> <WaitForSendConfirmation>yes</WaitForSendConfirmation> <ConfirmationTimeout>600</ConfirmationTimeout> </Send> If “WaitForSendConfirmation” = “yes” then your application is responsible for creating a MJxxxxx.rlt result file that must contain an error (or success) code and an error (or success) description. xml-SendConfirmation-Template (generated by your application, if OmniRush module is configured to wait for confirmation) XML Data Field Result ErrorMessage Description Acceptable values: “success” Result of the job. or “fail” If result is “success” job become completed. If the result is “fail” the fax module will resend the job in NN minutes for a total of XX attempts maximum according to the retry settings on the fax module (see the fax module general settings for these options). Not used on “success”, describes reason of failure on “fail”. Z-Firm recommends that your application provide a friendly and detailed (20-40 characters) description of 20-40 characters when there is an error. This description will be shown to user. Example xml SendConfirmation: Successful transmission: <?xml version="1.0"?> <ReceiveConfirmation> <Result>success</Result> <ErrorMessage>![CDATA[]]</ErrorMessage> </ReceiveConfirmation> Failed transmission: <?xml version="1.0"?> <ReceiveConfirmation> <Result>fail</Result> <ErrorMessage>![CDATA[No Dial Tone on port 1. Check the line.]]</ErrorMessage> </ReceiveConfirmation> Your application is responsible for deleting the “xml” and “tif” file. The OmniRush fax module is responsible for deletion “rlt” file. 318 Developer's Guide How Fax Bridging Works -- Receiving The OmniRush Fax Module looks for new “*.xml” files in the “port\inbound” directory every 5-15 seconds (depends on system load). Each “.xml” file must have a field for the tif file name. The "tif" file must be created BEFORE the “xml” file. Once the module finds an “xml” file, it executes the regular OmniRush receiving logic (e.g. import the data as an “inbound new” fax, forward to a different track if configured in the fax module, etc). Your application is responsible for creating the “xml” file in the following format: Xml-Receive-Template (generated by your application) XML Field Data RemoteID DID PageCount Description Remote fax ID (this can be empty) DID value (this can be empty) Number of pages in the Tiff file (required, must be non-zero integer) Full filename of fax image. Please make sure that TiffFileName is a unique name within the entire OmniRush document repository. You can use any algorithm to generate names, but it is recommended to start TiffFileName with a prefix of “fax”. The tif must be a 1-bit-per-pixel, Group3, multipage file. Recommended width is 1728 pixels. TiffFileName Example Xml-Receive <?xml version="1.0"?> <Receive> <RemoteID>5887720</RemoteID> <DID></DID> <PageCount>1</PageCount> <TiffFileName>d:\temp\inbound\1\faxE6644350.tif</TiffFileName> </Receive> After the OmniRush Fax Module retrieves the received kit, the module creates a “TheSameFilename.rlt” result file with success code or with error code and error description. Xml-ReceiveConfirmation-Template (generated by OmniRush server (fax module)) XML Field Data Result ErrorMessage Description Indicates status of the import of the received kit. Will be either “success” or “fail” Empty on “success”. On “fail” will describe the reason for the failure. Example xml for ReceiveConfirmation: 319 OmniRush Administration & User Manual <?xml version="1.0"?> <ReceiveConfirmation> <Result>success</Result> <ErrorMessage>![CDATA[]]</ErrorMessage> </ReceiveConfirmation> Integrating via SQL Databases SQL: Introduction The Open Database Connector (ODC) allows OmniRush to connect to, and interact with, any Microsoft SQL or Oracle database. Quick Links: Supported Databases Overall Logic Implementation Steps Supported Databases: Supported database servers include: Microsoft: SQL Server v7, 2000 and 2005 (all editions, including MSDE 2000) Oracle: v8, v8i, and higher Other: (MySQL, Pervasive, etc.) Via Pass Through SQL method OmniRush uses a set of stored procedures (sprocs) to interact with your database. OmniRush expects this set of sprocs to exist in your database, and to take and return a specific set of parameters. These sprocs are simple, and easy to implement. (If you need assistance creating the OmniRush sprocs, you can use Z-Firm's Advanced Consulting to do all or some of the work for you.) Only six stored procedures are required, four additional stored procedures are optional. Overall Logic 320 Developer's Guide OmniRush is driven by job records. A job record is a record in a table that is scanned by OmniRush. To explain, let's look at the simple 4-table sample database that OmniRush comes with: Jobs are triggered by creating records in OR_Jobs. The explanation of the fields in OR_Jobs: JobID ContactID Must be globally unique for the lifetime of the OmniRush Server installation. Must map to a record in OR_Contacts. The OR_Contacts record must have the minimum 321 OmniRush Administration & User Manual ModuleID Reference Notes ResultCode TrackRef UserLastBy required fields for the job type being processed (e.g. must have an email if it is an email job, must have a city/state/zip if a shipping job, etc.) Used by OmniRush. You should never touch this field. This tells OmniRush what job template to use, what override values to use. This can hold text that is merged into a fax or email job. Holds error text if job fails. This is updated by OmniRush when a job fails with the failure code. This is critical. You set this to the OmniRush track that should service the job (e.g. EMAIL for an email job, UPS for a UPS shipping job, etc.) Must map to a record in OR_Users. You create that record, and OmniRush does the rest. Here is an annotated schema: 322 Developer's Guide 323 OmniRush Administration & User Manual The overall logic of OmniRush when integrated with your database application is the same whether stored procedures or pass through SQL scripts are used (graphic below mentions SQL Script, in a stored procedure environment [e.g. Microsoft SQL Server & Oracle], there is no script, all the database code are in the stored procedures): Implementation Steps: The steps to implement the OpenDBIO are: 1. Integrate to your database structures. a. Microsoft SQL Server & Oracle users: Using any Interactive SQL/CASE/DDL Script tool) Create 10 special stored procedures in your host database (see “C:\Program Files\Z-Firm LLC\OmniRush\Examples\Sample Code\Open Database Connector\Open_StoredProcs.rtf” for details). These stored procedures are the core of your new OpenDBIO module. b. Other databases: Implement pass through SQL scripts. 2. (Using any Interactive SQL tool) Test all the procedures/scripts carefully. Test for: . SP's use the input and output parameters specified in the OmniRush documentation. a. SP's make indexed queries on your database. 324 Developer's Guide 3. (Optional, if your OmniRush server will merge data from the SQL database onto forms for fax/email/print) Create merge aliases using the OmniRush Administrator. 4. Configure the OmniRush Database Connector 5. Configure other OmniRush modules and tracks (e.g. to enable OmniRush as a fax server, shipping server, etc.) 6. Run some test jobs through the system to check the configuration. Possible Applications OmniRush can be used as a powerful fax and print merge server, shipping server, email server, etc., with minimal code required on the part of the developer. Applications include: A VB app that runs a series of Crystal Reports each night, and wants them faxed out automatically. Generating shipments of sales samples, or fulfilling orders by ground or express shipping. A mainframe that kicks out text files that need to be faxed out. An automatic fax response system driven by a simple tool bar you create. Integrating OmniRush with a web site for automatic fax and print fulfillment of product literature, mailing labels, etc. Be sure to name files appropriately. If files are generated programmatically, be sure to use the F$ prefix. Developing with OmniRush OmniRush is driven by "Job" records in your SQL database (typically, you create a new "OmniRush_Jobs" table). How the record is created is not material to OmniRush. It just needs to be there. (E.g. it could be created by a GUI or Web application, a stored procedure, a batch process, etc.) There are a few minor caveats: The Job record must be linked to a record where the recipient information (such as fax number, address, email, etc.) is stored. Unlinked Job records will not work. This means that if the job is for a destination not currently in the database, your code may need to create the corresponding recipient record in addition to the Job record. There are also several benefits: OmniRush job overrides (for fax number, email address, logging, etc.) can be used. Examples: Example #1 In the first example, a TIF file is created once a week, and your application will trigger it being faxed out. The steps are: 325 OmniRush Administration & User Manual The TIF is placed in \outfax\ with the name faxfile.tif Your application creates Job records all linked to the same Recipient record with the following fields populated: DESCRIPTION faxfile.tif fax:xxxxxxxxx FCC CATEGORY OmniRush STARTDATE today's date, time of 1:00 AM (or a future date if you want the fax to be sent in the future) Where xxxxxxxxx is the fax number to send the fax to. The 'FCC' causes OmniRush to put the job into the HISTORY table on success or failure. Once this record is created, OmniRush will process the job! Be sure to name files appropriately. If files are generated programmatically, be sure to use the F$ prefix. Example #2: A mainframe computer spits out dozens of text files each night. These files might be production schedules, inventory, or accounting statements. Each of this files is destined for a different customer. Your application must fax these files to the appropriate contacts. The flow of your application would be: 1. 2. 3. 4. 5. Iterate through each text file and: Read the customer ID from the text file If no match for this ID in the Recipient table, create the Recipient record Create a Job record for this Recipient record. Set the Job record fields to: DESCRIPTION \\server\share\dir\NameOfTextFile.TXT FCC CATEGORY OmniRush STARTDATE today's date, time of 1:00 AM (or a future date if you want the fax to be sent in the future) Done! Alternately, the Job->Description could be set to COOLMERGEFORM.RTF, and the text from the text file could be inserted into Job->Notes. If COOLMERGEFORM has the &Notes OmniRush merge field on it, the contents of Job->Notes will be merged. This can let you deliver a professionally formatted document with logo graphics, advanced OmniRush merging, etc. (Hint: set the font of the &Notes code to Courier or another mono-spaced font so that columns will line up correctly.) Be sure to name files appropriately. If files are generated programmatically, be sure to use the F$ prefix. Example #3 Your VB application automatically runs a series of Crystal Reports every night. You want these printed or faxed. Here is your application flow: 326 Developer's Guide a. Process all reports. Using the Crystal API, each report is saved as an RTF file into a subdirectory of the OmniRush \outfax\ directory, e.g. \outfax\reports\. Name each report with the customer id or company name it is destined for. b. When all the reports have been built, read the name of the first file in \outfax\reports c. Find the Recipient record that corresponds to this file. d. If no match for this customer ID in the Recipient table, create the appropriate Recipient record. e. Create a Job record for this Recipient record. f. Set the Job record fields to: DESCRIPTION \\server\share\dir\…\outfax\reports\<filename>.rtf FCC CATEGORY OmniRush STARTDATE today's date, time of 1:00 AM (or a future date if you want the fax to be sent in the future) g. Iterate through each of the RTF files, following steps C-F h. Done! Be sure to name files appropriately. If files are generated programmatically, be sure to use the F$ prefix. Microsoft SQL Server and Oracle Users: Next: Review the Example SQL Scripts Pass-Through SQL Users: Next: Review the Pass Through SQL OmniRush® Open Database Connector Stored Procedures specification Please see the example code directory on the OmniRush Server for specs and examples. On a default installation of OmniRush, the sample SQL code is in this directory: C:\Program Files\Z-Firm LLC\OmniRush\Examples\Sample Code\Open Database Connector\Stored-Procedure-Based\ SQL: Stored Procedures Please review the introduction to OmniRush Stored Procedures and create the OmniRush example database before working with this section. Example scripts are in the "/Examples/Sample Code/Open Database Connector/" directory on the OmniRush Server PC. Additional documentation on the sprocs can be found in the Open_StoredProcs.rtf in the same directory. To test proper execution of either the sample scripts, or your customized live scripts, follow these steps: 327 OmniRush Administration & User Manual Prerequisites: 1. All SP names MUST BE exactly the same as in the specification. 2. All field names and data types MUST BE exactly the same as in the specification. If you are not going to use some fields then just leave them blank, but don’t remove from SP header. 3. CustomField1 and CustomField2 MUST BE of “char” or “varchar” or “text (blob)” data type and COULD have any size. Notes: Stored procedures have different prefix for Oracle and ADO: - ADO flavor expects “@” as a first character of each SP parameter - Oracle flavor expects “s” as a first character of each SP parameter Testing and debugging SP We assume that you have Interactive SQL tool that allows you to execute any SP manually and see result set and output parameter values. (Note that the Query Analyzer that is part of MS SQL v7 does not support interactively calling sprocs that have output parameters.) Or you can use the OmniRush “OpenDBIO_debug.exe” utility. Following steps work with MS SQL, you might need to change some syntax for Oracle. Create 2 new jobs (schedule activity) in your host database for 2 different tracks “TRACK1” and “TRACK2”. Then follow this sequence to make sure that your SPs really work the way OmniRush expects. These steps replicate the steps OmniRush takes when it works with the database. “SELECT” zfQueryNew “TRACK1”, “”, 10 should return 1 record with 1 field “ActivityID”, that contains the first job ID ( JobID_1). “SELECT” zfQueryNew “TRACK2”, “”, 10 should return 1 record with 1 field “AcitvityID” that contains the second job ID ( JobID_2). “SELECT” zfQueryNew “TRACK3”, “”, 10 should return 0 records. “EXECUTE” zfGetActivityRecord JobID_1 (where JobID_1 is ID of the first job) should return at least : @ContactID = Valid contact ID (ContID) @TrackRef = ‘TRACK1’ @Reference = Valid reference line “EXECUTE” zfGetContactRecord ContID (where ContID is “Valid contact ID” from zfGetActivityRecord call) should return at least: @FirstName @LastName @Phone @Fax @Email @Address1 @Address2 @City @State 328 Developer's Guide @ZIP “EXECUTE” zfFlagActivityRecord JobID_1, “~TRACK1”, “MS0000000000001” Function doesn’t have output parameters but should update job (activity) record in host database. “SELECT” zfQueryNew “TRACK1”, “”, 10 should return 0 records “SELECT” zfQueryFlagged “~TRACK1”, 10 should return 1 record with 1 field “ActivityID”, that contains the first job ID ( JobID_1). “EXECUTE” zfGetActivityOwner JobID_1 should return “MS0000000000001” “EXECUTE” zfForwardActivityRecord JobID_1, ContID, @TrackRef = ‘TRACK1’, (set other parameters to your taste) This function doesn’t have output parameters but should update the job (activity) record in the host database. Make sure that this procedure clears “ModuleID” field in the activity record (see SP specification). “SELECT” zfQueryFlagged “~TRACK1”, 10 should return 0 records “SELECT” zfQueryNew “TRACK1”, “”, 10 should return 1 record with 1 field “ActivityID”, that contains the first job ID ( JobID_1). “EXECUTE” zfCreateHistoryRecord (set parameters to your taste). Function should create a valid history record in your host database. “EXECUTE” zfDeleteActivityRecord JobID_1 Function should delete activity 1 from your host database. SQL: Pass Thru SQL via ADO 329 OmniRush Administration & User Manual $Revision: 7 $ OmniRush® Pass Through SQL Database Connector SQL specification Overview The OmniRush connectors for Microsoft SQL Server and Oracle use a kit of stored procedures (sprocs) to interface with the database. This method is very efficient, and easy to implement. However, there are many other database engines in use, many of which lack support for stored procedures, or lack a consistent stored procedure syntax. To allow OmniRush to work with the widest range of database engines, OmniRush v6 and higher offer Pass Through SQL mode. Pass Through mode lets OmniRush 'talk' to your database using regular SQL statements through an ADO data provider. Since ADO can talk to ODBC data sources, most ODBC accessible data sources should work with OmniRush Pass Through SQL. Pass Through SQL has been tested with MySQL 3.23.52-nt, Pervasive SQL 2000i and MS SQL Server 2000 (for demonstration purposes, deployment should use the stored procedure method). Additional database platforms that have ADO or ODBC drivers are likely to work with this method, as long as the system supports standard SQL statements. Note: Oracle and Microsoft SQL Server users are advised to use the OmniRush Stored Procedure method of integration. Complete sample scripts for tested platforms are in the OmniRush Sample Code directory on the OmniRush Server PC. Introduction Pass Though mode lets OmniRush speak to your database using plain SELECT, INSERT, and UPDATE statements. You have complete control over these statements, so the database structure usually does not require changes. However, to implement OmniRush, you should understand the conceptual structure, represented by this graphic: 330 Developer's Guide The "Job" Record & Database OmniRush looks for a 'job' record. The OmniRush samples have two dedicated tables: Job and Job_History. These two tables are the input and output queues for OmniRush. Creating records in the Jobs table tells OmniRush to do something. When OmniRush is done, it posts the results to the Job_History table. These tables are not required in your database structure. Existing tables may be useable for this purpose, or you may create a single table that will play the role of both tables. Your database design will dictate the best path. These job tables have foreign keys that attach them to the "Contact" and "User" data. The contact data is required, this is the information that OmniRush needs to send the job (email address, fax number, address, etc.). The user table is optional, as you could have all the jobs be 'from' the same 'person' by hard coding these values into the SQL statements. The main thing is that the database can have any structure, as long as the queries return the needed fields. If you can code the SQL around your existing structures, that is all that is required. Installation - Demo Database See the kit of scripts in the Sample Code directory. 1. Create a new database in your database administrator 331 OmniRush Administration & User Manual 2. 3. 4. 5. 6. 7. Create the database with createdb.sql Populate the database with test_data.sql In OmniRush, create a new DBIO module Create the ADO connection string to connect to this new database Pull in the dbio_script.sql file Create test jobs to test the system (see test_data.sql for examples of different jobs) Implementation To integrate with your database, there are a few approaches you can choose from: 1. Adapt the sample SQL script (dbio_script.sql) to query from and post to your tables. 2. Create new or_jobs and or_jobhistory tables, and use a hybrid of your existing tables and these job tables. Adapt dbio_script.sql to talk to this hybrid. 3. Create all of the sample tables from createdb.sql in your database, and code your database to duplicate contact data into these tables as needed. Then the dbio_script.sql can be run unmodified. Each script in Open Database Connector represents an action template that will be populated with specified parameters and executed against your database. Script parameters are written by putting simple text merge codes in the SQL script body. The OmniRush SQL Editor has a list of available merge codes (to access the editor, launch OmniRush Administrator and go to Database Connector Module settings/Open API ADO (Host) tab/SQL Editor). At runtime, merge codes will be replaced with string representation of the requested parameter. Merge code example: In order to get list of new jobs, Open Database Connector uses QueryNew script. Default QueryNew script implementation is following: select JobID as ActivityID from OR_Jobs where (TrackRef = '%TrackRef%') Open Database Connector will execute this script N times (where N=number of active tracks in OmniRush) replacing every time %TrackRef% with next track reference. This example shows three tracks with merged data: select JobID as ActivityID from OR_Jobs where (TrackRef = 'INETFAX') select JobID as ActivityID from OR_Jobs where (TrackRef = 'FEDEX') select JobID as ActivityID from OR_Jobs where (TrackRef = 'UPS') (Click on the script name for an example of each) Script name Script type Description [Implementation required] QueryNew SELECT Look for new job records QueryFlagged SELECT [Must exist, but implementation optional] 332 Developer's Guide GetActivityRecord SELECT GetActivityOwner SELECT GetContactRecord SELECT GetUserRecord SELECT CreateHistoryRecord EXECUTE ForwardActivityRecord EXECUTE DeleteActivityRecord EXECUTE FlagActivityRecord EXECUTE Check for db based deletions. Disable by unchecking 'scan for aborts' on the database connector. [Implementation required] Retrieve required fields from job record itself. Must return single record [Implementation required, but can return static values] Check which OmniRush DB Connector owns this job Must return single record [Implementation required] Get the details of the job recipient. Must return single record [Implementation required, but can return static values] Get the details of the From information for the current job. Must return single record [Implementation required to save job details] Save the job details (fax job status, shipping job tracking #, etc.) to database. This is an INSERT and/or UPDATE type action. [Implementation required] When a track is set to Forward a job, this script is fired. It may be implemented the same CreateHistoryRecord, or may be stubbed and tracks set to Complete all jobs. This is an INSERT and/or UPDATE type action. [Implementation required] Remove the job record when the job is finished. This is a DELETE and/or UPDATE type action. [Implementation required] Flag the job record in such a way that it is no longer returned in the QueryNew query. This is an UPDATE type action. === Scripts of type “SELECT” can only contain one SQL statement. Scripts of type “EXECUTE” may contain multiple SQL statements separated by new line and “GO” keyword. In the case of multiple SQL statements, each statement can contain any number of merge codes and each statement will be executed in a different transaction context. Each script of type “SELECT” must return all the fields expected by Open Database Connector. A list of required fields can be seen in the OmniRush SQL Editor. If some fields in your database have a different name than expected by OmniRush, use the “as” SQL keyword in order to cast a new name to the field in the result set. If some fields do not exist in your database, return an empty value (empty string or “0” integer) and use “as” keyword as well. 333 OmniRush Administration & User Manual Fieldname cast example Use the “as” keyword if your database has a new job ID field called JobID, where Open Database Connector expects ActivityID name. select JobID as ActivityID from OR_Jobs where (TrackRef = '%TrackRef%') MySQL details OmniRush uses ADO->ODBC->MySQL connection, which requires additional configuration. In MyODBC configuration screen set the following options: Don't optimize column width True Return matching rows True This is the same as add/set OPTION=3 into ADO connection string. Without these settings you might experience "Invalid field size" error if the database has fields with NULL's or empty CHAR's. Sample ADO connection string: Provider=MSDASQL.1;Password="";Persist Security Info=True;User ID=monty;Data Source=sample-MySQL Next: Review the Example Open SQL Scripts SQL: Creating the Database Connector Setting up the demo database is easy. To connect OmniRush to a SQL database: 1. Create a new database in your database server using the server management tools (Enterprise Manager for SQL Server) 2. Create the tables and stored procedures in the database 3. Test the stored procedures from ISQL and/or the OmniRush OpenDBIO_Debug.exe utility (OpenDBIO_Debug.exe lets you pass parameters to and from stored procedures). 4. Configure the OmniRush database connector (see below) Note that steps 2 and 4 can be reversed, but in any event, the connector cannot be used until all these steps have been done. In a production environment, the steps are: 334 Developer's Guide 1. Working in a test copy of your production database, adapt the OmniRush stored procedures to your database structures 2. Create any needed user interfaces or other mechanisms in your application to create the OmniRush job records 3. Configure OmniRush to run against your development database (see below) 4. Test and tune operation Then when ready to go live: 1. Create the needed stored procedures in the production database 2. Check that the production application has been updated with any new UI elements (as noted above) 3. Stop the OmniRush database connector module and change the ADO connection string to point to the production database 4. Start the OmniRush database connector 5. Test for proper operation Configuring the Database Connector Create a new database connector module, and set it for ADO (for Microsoft SQL Server) or Oracle. For SQL Server installations, go to the "Open API ADO" tab and configure an ADO connect string (press the Create/Modify button to use the ADO wizard to create the connection string). Note that you must save the password with the connection string. Click here for Connection String details. For Oracle installations, complete the fields in "Open API Oracle" (Package is optional, depending on how you created the needed Stored Procedures. Here is a description of the connection string. SQL: Oracle Details Connecting to Oracle OmniRush can connect to Oracle two ways: Direct OCI Network Connection Benefits: No client software or configuration files (e.g. tnsnames.ora) needed. Fast, easy setup. Disadvantages: Does not work if the Oracle server is on the other side of a firewall When configured to use the Direct Network connection, give OmniRush an OCI Connection string, which will look like this: 127.0.0.1:1521:ORCL where: 335 OmniRush Administration & User Manual 127.0.0.1 - Oracle server IP address or server name 1521 - Oracle server port (1521 by default) ORCL - Oracle server SID (ask the DB administrator, “orcl” by default) Oracle Client DLL's (installed when the Oracle Client is installed) Benefits: Can work if the Oracle server is on the other side of a firewall Disadvantages: Requires installation of the Oracle Client, and proper configuration. Check that SQL+ can log into Oracle before configuring OmniRush. When using the Oracle client, you enter the Host Name or Connection String which is the name from tnsnames.ora. Example: oracle SQL: Microsoft SQL Details OmniRush uses ADO to connect to SQL Server. Make sure ADO is installed on the OmniRush PC, and test that it can connect to your SQL server using Query Analyzer. MDAC versions 2.5 - 2.7 and higher are supported with all versions of OmniRush. The OmniRush Database Connector will walk you through a connection string wizard, so once the connection parameters are at hand, getting connected is simple. Connection string tips: a) Do not route to an ODBC provider. Select the "Microsoft OLE DB Provider for SQL Server" b) Here is an example connection string: Provider=SQLOLEDB.1;Password="";Persist Security Info=True;User ID=sa;Initial Catalog=omnirush;Data Source=localhost SQL: Pass Through Details The Pass Through connector requires two settings: 1) ADO Connection String. Press the Create/Modify button, configure and test the connection to the database. 2) SQL Script. Either use one of the sample scripts, or create your own. The documentation is via this link. SQL: MSDE and OmniRush 336 Developer's Guide MSDE is a great tool to use with OmniRush. If you need to bridge OmniRush to other systems, and there is no SQL Server or Oracle system around, you can use MSDE as the data engine. It is easy to implement, and freely redistributable. OmniRush integrates with MSDE just as it does with Microsoft SQL Server, so you can use the OmniRush SQL Server sample code with MSDE. For information on MSDE, please follow these links: http://www.fawcette.com/dotnetmag/2001_12/online/online_eprods/sql_rjennings12_4/ http://www.microsoft.com/sql/techinfo/development/2000/MSDE2000.asp http://www.microsoft.com/sql/techinfo/development/2000/MSDEintegration.asp 337 Technical Reference CRM Technical Discussions Backing Up CRM Systems Possible Issue on GoldMine dBase: Backup Gives Errors Because OmniRush Has Files Open There are these options: Run Open File Manager on your NT or Netware server to enable safe backup of all open files. Manually STOP OmniRush at night. Automatically STOP OmniRush at night with built-in OmniRush scheduler. Automatically STOP OmniRush at night with a batch file, ORNETSTOP, and your own scheduler (or the Windows2000 scheduler service). Enable your backup software to back up open files. Open File Manager dBase Users: Z-Firm strongly recommends Open File Manager (OFM) or similar technology. Why the big deal about open file manager? Because: 1. It works great 2. It can solve ALL GoldMine dBase related backup issues (GoldMine’s GoldSync and Automated Processes will also hold files open) 3. It resolves other backup problems unrelated to GoldMine or OmniRush. 4. It is the only complete solution to file based backup we are aware of. Some backup software has Open File Manager type technology built in, and that should be considered an equal solution. Using OFM, open files on the system can be backed up safely, so even if a user stays logged in, or GoldSync is running, you will be covered. Download the OFM demo from www.stbernard.com or contact Saint Bernard Software. Alternate integrated open file & backup software solution (suggested by a Z-Firm user): www.ultrabac.com Alternatives to OFM Stop the OmniRush Database Connector Module(s) This will disconnect OmniRush from the GoldMine files. However, it will keep a its system tables open until you exit OmniRush. Automatically Stop OmniRush with a Scheduler 339 OmniRush Administration & User Manual You can use a tool like TechScheduler (www.winutils.com) or the NT AT module to automate the OmniRush shut down. Other applications of this kind can be found at www.windows95.com. See the examples for starting and stopping OmniRush services. Enable Open File Backup in the Backup Software Most backup programs (Seagate Backup Exec and others) default to skip open files. However, it is often safe to back up open files that are not being actively written to. You can set programs like Backup Exec up to go ahead and attempt the backup of open files. This can give a moderate (but imperfect!) level of protection. SQL Discussion SQL databases require their own backup approach. Backing up SQL can be done several ways: “Simple”: the SQL DUMP mechanism “Business Use”: Single User Mode: DBCC, check logs (programmatically) + DUMP “Some Experience”: DBCC + DUMP “DBA”: Single User Mode, DBCC, check logs (programmatically), Drop & Recreate all indexes, Update all statistics + DUMP “Enterprise”: All of ‘d’ plus regular (2 or 4 [or more] times during the working day) DUMP’s of the log, so that data can be restored from prior night’s backup all the way up to the latest log dump. Impact on OmniRush: Using MS SQL v7 and higher, options ‘a’ and ‘b’ can be done without cycling SQL Server or going to single user mode. As a result, they can be done without impacting OmniRush at all. Options that take SQL to single user mode, or that cycle the SQL Server service (or the PC itself), require that the OmniRush Database Connector Module be shut down first, and then reactivated after SQL is back up. GoldMine Discussions SQL Technical Discussion - GoldMine Note that in GoldMine v7 and v8 environments, only unified SQL installations are supported. 'Split SQL' systems will not work. OmniRush requires that GoldMine SQL installations run in a single SQL database. Test GoldMine for proper SQL connection and operation. Go to Help | About | System in GoldMine and check that GoldMine is using a single alias for the GoldMine and Contact tables. OmniRush requires that GoldMine SQL installations run in a single SQL database. Note: As of September 2000, GoldMine requires that SQL installations use a single SQL Database for all GoldMine and Contact files. Mixed dBase/SQL and multiple contact files are not recommended by GoldMine/FrontRange. Ask your reseller for the GoldMine Technical Product Information document: “Supported Database Configurations” A Z-Firm discussion of this issue is also available. 340 Technical Reference MS SQL Users: Check your sort order! GoldMine Software Corp only supports one sort order on SQL Servers: Dictionary Order, Case Insensitive. This is Sort Order #52. You can check the sort order on SQL by running Query Analyzer and switching to the MASTER database. Then issue the command: sp_helpsort This will return information on the sort order. On MS SQL Server v6.5 & 7.0, you are looking for a result that looks like this: Sort Order Description --------------------------------------Character Set = 1, iso_1 ISO 8859-1 (Latin-1) - Western European 8-bit character set. Sort Order = 52, nocase_iso Case-insensitive dictionary sort order for use with several Western-European languages including English, French, and German . Uses the ISO 8859-1 character set. Check that the database owner is dbo. Each SQL user can be aliased to a database user. This can be viewed in SQL Enterprise Manager (databases|<database name>|users). If the database owner name is not dbo, use the MS SQL system stored procedure: sp_changedbowner to set it that way. Search the \goldmine\ structure for GM.INI files. There should only be one GM.INI in the environment! Check the contents of GM.INI for correct configuration information. The SYSDIR, GOLDDIR and COMMONDIR entries must be correct! dBase Shutdown Considerations Sorry to take time on such a mundane topic as turning off your PC, but Z-Firm found a problem with GoldMine dBase, and we need to tell you about it. The problem relates to NT Service applications that connect to GoldMine dBase files using BDE. After extensive testing, Z-Firm found that in many cases, NT Service applications holding open GoldMine dBase files will hang on system shutdown. Since they hang, the GoldMine files are not properly closed. BDE with GM DBF files blows up when the SCM initiates shutdown. This causes the GM DBIO to hang, so that it is then terminated by the SCM. This could lead to corruption of the GoldMine files. The way to reproduce this is to start up a GoldMine dBase DBIO in OmniRush. Watch the task list, and stop the service from the service control manager. The DBIO should fail to terminate, and the SCM should eventually say that the service is not responding. This problem does not seem to exist with SQL systems. Testing indicates that it is specific to BDE when used with the .dbf file type used by GoldMine. 341 OmniRush Administration & User Manual GoldMine SQL is mildly at risk because the system tables are maintained as .dbf. These tables are not transactional, and the risk of corruption is small. SalesLogix, MSSQL, and Oracle DBIO's do not have this problem. If you determine that your environment needs an orderly shutdown, there are several options: Use a batch file to shut down OmniRush before turning off the PC. Use the OmniRush Shutdown Service. This service is installed on OmniRush Server PC's by the OmniRush launcher. When this service is started, it cleanly shuts down the OmniRush services, and shuts down the PC. Use the OmniRush Shutdown Trigger. This is an application (FR5ShutdownTrigger.exe) that runs in the background. When either a shutdown or logout is initiated from the user session, this application will intercept the shutdown request, close OmniRush cleanly, and shut down the PC. Example GM.INI For GoldMine SQL [GoldMine] SysDir=\\SERVER\share\program files\goldmine5\ GoldDir=MSSQL: GMSQLPROD: dbo: COMMONDIR=MSSQL: GMSQLPROD: dbo: Notes: For directories, use UNC notation with trailing backslashes. SQL aliases should always end in a colon ':' SQL database owner should always be 'dbo' Single Contact Directory Most GoldMine installations use a single SQL database for the GOLDDIR and the CONTACTDIR (or CommonDir) tables. This is the method recommended by FrontRange and Z-Firm. Make sure BDE Aliases do not have any spaces in the Alias name. However, due to its dBase legacy, GoldMine v4-6.x on a SQL platform can run with the GOLDDIR and CONTACTDIR in separate SQL databases, or in one SQL database with two different BDE aliases pointing to it. Such a configuration introduces a large number of limitations on GoldMine, and even causes many features to degrade or cease to function. GoldMine itself has many limitations when you use multiple contact directories. To see the document from FrontRange Solutions on this subject, request the technical document "Tech Spotlight Newsletter" of April 5, 2002. What follows here is a brief Z-Firm write-up on the subject. While GoldMine can operate in a 'split' environment, the limitations are many, and they are subtle, often rearing up only after a system has been in use for some time. When you look at the 342 Technical Reference landscape of CRM systems, they all operate as a system. Splitting them always leads to problems. Due to many factors, most of them from really ancient DOS versions of GoldMine and pre-security days, GoldMine evolved with the multiple contact set feature. This feature has some benefits, but has a tremendous number of 'gotchas' that are not the fault of GoldMine, they are simply the trade off to supporting multiple contact files from a single shared calendar. Particularly in SQL environments, multiple contact files are fraught with downstream traps. For nearly all sites, being limited to a single contact file, however, is not a 'terminal' problem. A single database can be 'partitioned' into multiple types of records (vendors, customers, prospects, etc.) using a Contact1 key field to flag the record type. Then all the data is in one place, all the time. If multiple contact databases are used, a swath of GoldMine features stop working the moment you introduce multiple contact directories, including: 1) Calendar links to contact 2) History activity analysis 3) User activity analysis 4) Lead source analysis 5) Real time tab of Activity List 6) Activity List link to contact 7) Ability to find a contact (the user has to know which contact file to use or they are out of luck) Another swath of GoldMine features is completely contact directory-centric, including: 1) Automated Processes 2) Some of Remote Sync 3) Reports 4) Mail merge 5) Internet Email 6) Filters 7) Groups This is all by way of saying, that GoldMine is 'married' to a single contact directory. With just one contact directory, you will always know where to find Joe Smith, and all the GoldMine features will work at their finest! Z-Firm strongly recommends that you implement a single contact directory for your GoldMine installation. SalesLogix Discussions API DLL Versioning OmniRush uses the slgxapi.dll to communicate with the SalesLogix environment. During installation, OmniRush requests the version of SalesLogix you are running and installs the correct dll version. However, OmniRush only includes the major release dll versions (e.g. 3.0, 4.0, 5.0). If you run a minor release or service pack, you should read this entire article. Additionally, since SalesLogix does not publish api version compatibility information for service pack and minor revisions, in some cases Z-Firm cannot automatically install the correct dll version to run with your SalesLogix system. By default, OmniRush installs the SalesLogix major version slgxapi.dll that you indicate during installation. If the SalesLogix system is a service release or minor release of SalesLogix (5.0 is a major release, 5.2 is a minor release)the correct dll version will need to be installed on the OmniRush server PC (see steps below). 343 OmniRush Administration & User Manual Contact your SalesLogix reseller or SalesLogix technical support if there is any question on the correct version for your environment. Steps: 1. Shut down the OmniRush SalesLogix Connector module 2. Search the entire OmniRush Server hard drive for slgxapi.dll 3. Any copies found in the search path should be moved out of the search path. 4. Copy the 'known correct' slgxapi.dll from your SalesLogix installation files to the OmniRush server directory (default: c:\program files\Z-Firm LLC\OmniRush\Server\v5\ ) 1. Or, open the SalesLogix Connector in the OmniRush Administrator, and set the path and file to the Slgxapi.dll (this must be a local path) Known DLL Versions: Version 4.0.0.0 4.0.2.1 4.1.1.0 5.0.0.1545 Comment Original SalesLogix v4.0 release. SalesLogix first Service Release SalesLogix v4.1 SalesLogix 5.0 initial release SalesLogix.net (v5) Known Issues The following has been reported by other SalesLogix developers. Z-Firm has not observed this problem with OmniRush and SalesLogix.NET (v5). This is purely FYI: The initial release of the SalesLogix.net (v5) API DLL (used by all applications that work with the SalesLogix database) has a bug that requires attention from all SalesLogix sites that sync. The problem is that it does not put the SalesLogix sync files in the correct directory. Instead of using the shared logging directory, the DLL creates a directory relative to where it executes from (e.g. under c:\program files\Z-Firm LLC\OmniRush\Server\v5\ ) and puts the sync files there. The resolution is that these files need to be copied to the central sync directory. This can be automated with a batch file and a scheduler (like techscheduler at www.winutils.com). Note that the batch file should run frequently (say once every 15 or 30 minutes). The Windows AT scheduler cannot schedule activities more than once a day. FaxRush Bundle for SalesLogix The FaxRush Bundle (FBS) uses the FAXRUSH.INI file to read certain configuration information. OmniRush does not have a FAXRUSH.INI file. The solution is to either create a FAXRUSH.INI or to use the existing FAXRUSH.INI (if FaxRush v4.x was installed at your site). Contact the FBS support team for details. SalesLogix Database Drivers Many sites have started to use SalesLogix with BDE-ODBC driver stack, instead of the BDEDBLIB stack (e.g. the native driver). The SalesLogix Client will often function adequately in this environment. 344 Technical Reference OmniRush builds 170 and higher will work with BDE->ODBC drivers, however this combination is not officially supported by Z-Firm until SalesLogix certifies this combination with SalesLogix.net. The following applies to OmniRush builds earlier than 170: Note that while SalesLogix.net (v5) can be run with ODBC drivers, this has not been certified yet by SalesLogix. OmniRush does not care what drivers SalesLogix users use at user PC's (except for the possible caveats above). In all cases the OmniRush Server PC, and in most cases stations using the OmniRush Client or Viewer should use BDE. The issue is that the SalesLogix API does not yet work properly when the ODBC drivers are used. Since OmniRush makes heavy use of the SalesLogix API's (on the server and on the user PC's when the OmniRush Client or Viewer are used), you may find that the BDE alias may need to be reconfigured at one or more PC. In all cases, SalesLogix must run via BDE + Native drivers on the OmniRush Server PC. On Client PC's, this change only needs to be made if errors are tendered when using the OmniRush Print-to-Job Client or the OmniRush Viewer. SalesLogix Sync Troubleshooting OmniRush is tightly integrated with SalesLogix, and all data created or modified by OmniRush will sync correctly. This has been carefully tested by Z-Firm. If there are any issues related to sync, check the following: 1. Check that the slgxapi.dll is the correct version. 2. Check that the SalesLogix Sales Client runs properly on the OmniRush Server PC. 3. Make sure to use BDE native-driver based aliases, not BDE aliases that route to an ODBC DSN 4. In the OmniRush DB Connector for SalesLogix, go to the SalesLogix tab and check the Sync to All Users check box. 5. On the OmniRush Server PC, schedule two activities and complete one of them. Then perform a sync and make sure that the remote gets the correct representation of the data. Then, again on the OmniRush Server PC, complete the other activity, and sync again. Check for correct data on the network and remote sides. If there are any problems here, there is an issue with SalesLogix that is independent of OmniRush, and it should be resolved. 6. Do not proceed further until step #3 above has checked out. 7. Check that the table owner of all tables on MSSQL is sysdba. If using MSDE on remotes, make this same check on the remotes. 8. Make sure that the OmniRush DB Connector for SalesLogix is set as follows: Extended Settings tab: DB Owner must be blank SalesLogix tab: SQL Login must be sysdba SalesLogix: Sync to All Users Option 345 OmniRush Administration & User Manual The Sync to All Users option changes how OmniRush interacts with the SalesLogix sync subsystem. By default, this option is not checked. The default behavior of OmniRush is that data created or modified by OmniRush will sync only to remotes that subscribe to the affected account. This behavior is correct for most installations. In some cases, you will want data to sync out to all remotes, whether or not they subscribe. Some sites using SalesLogix.net report that account owners will not get OmniRush data unless the Sync to All Users option is turned on in the OmniRush database connector.. Extended Hardware Discussions Memory Requirements On the OmniRush Server, a minimum of 196MB of application RAM must be provided. Actual memory requirements depend on two factors: Number of modules running. For example, each connector to GoldMine or SalesLogix requires 8MB - 16MB of RAM. If connecting to several databases, more RAM may be required. Number of jobs per hour. RAM helps the system perform better, so system utilization is a factor. Recommended: 256MB RAM for systems processing more than 1000 jobs per hour. A typical OmniRush server for small workgroups (e. g. under ten users) and light loads (e.g. under 30 jobs/hour typical) can run at the minimum configuration. For heavier workloads, a typical system will be a 1GHZ CPU or higher, 256 MB RAM. 346 Technical Reference To benchmark memory for your configuration, start up all modules and use the Windows Task Manager. In the Performance tab, note the "Total" in the Commit Charge area. For best performance on heavy workload systems, this should display approximately the amount of system RAM or less. If this number is significantly higher than physical RAM, system performance will suffer on heavy workloads. An Inexpensive OmniRush Server PC A decent OmniRush Server PC can be assembled for less than $500. For example, for two hardware fax ports, shipping, printing, and emailing, here is an example OmniRush Server PC: 1.1 Ghz CPU 512 MB RAM 20GB Hard drive Ethernet Windows2000 Professional or WindowsXP Professional If an adequate PC is not at hand, a used Compaq or Dell desktop of this class can be purchased on E-Bay or from a number of used equipment brokers. A 256MB memory module can be purchased on the web (for example from www.crucial.com) for under $70, bringing system memory up to par. An upgrade to Windows2000 Professional or WindowsXP is available from regular channels (like www.cdw.com and others) for $100-200. A system of this class will handle up to two fax channels, and offer decent throughput for email merge and internet fax. As use of OmniRush grows, faster hardware may be required. Heavy duty marketing, high throughput, etc. can be addressed with a system of these specs: A faster system, with 512MB of RAM. Anything in the 1.6GHZ - 2.6GHZ range will give excellent performance. OmniRush also benefits from multi-processor systems. Brooktrout Discussions Brooktrout: Supported Models Brooktrout has several product lines. Two product lines are supported by OmniRush: TruFax TR1034 There are two flavors of the TruFax board: Old and New. Unfortunately, they are not compatible with each other. While both Old and New are supported in OmniRush, the installation sequence is different. If installing a TruFax, the first step is to determine if it is an Old or New Style board. Note that ISA boards are not supported. The TruFax is a low-cost, fax-board. It is available in one- and two-port models, for the PCI bus. Since early 2005 all TruFax boards are universal PCI and will work in 3.3 and 5 volt PCI slots. (Earlier models only work in 5 volt slots.) Up to four boards can be installed in one PC, (allowing 347 OmniRush Administration & User Manual up to 8 ports). TruFax boards connect to standard analog phone lines (sometimes referred to as POTS lines). Old Style TruFax boards supported in OmniRush v7-v9 (Brooktrout part numbers): 904-030-50 TruFax 200 (the sticker on the board itself may read: 804-063-02) 904-030-40 TruFax 100 904-030-80 TruFax 200 (International) 901-002-16 TruFax 200-R Europe 901-002-18 TruFax 200 UK New Style TruFax supported in OmniRush v9 and up (Brooktrout part numbers): 901-004-08 TruFax 200-R 901-004-07 TruFax 100-R 994-113-70 994-113-50 The TR1034 is the most modern fax board available, and is perfect for analog and digital installations. The TR1034 is available in several configurations: 2-port Analog (loop start) 4-port Analog (loop start) Various models with analog DID support BRI models 4, 8, 16, 24 port digital models with integrated T1/PRI interface. All TR1034 boards are universal-PCI (which can go in any 32-bit or 64-bit PCI slot) or PCIExpress [aka PCIe, PCI-E and PCX]. Multiple TR1034 boards may be installed in a PC, though all must be of the same PCI type (e.g. all universal PCI or all PCI-Express). OmniRush does not support mixing different models of boards in the same system. TruFax PCI boards exist in two flavors: 5 volt and Universal (3.3 volt/5 volt). The Universal boards are usually called ‘uPCI’ (e.g. TruFax uPCI). The 5 volt versions have a single notch in the PCI connector, the universal versions have two notches. Most boards sold as new after September 2002 are Universal. If you have a 5-volt board be sure your PC has 5-volt PCI slots. uPCI TruFax and TR1034 boards are compatible with 64-bit PCI-X slots found in newer servers and PCs. TR1034 boards are full-length PCI boards. They require a PC chassis that has room for a full-length board, and excellent airflow over the boards for cooling. Generally this means that a server-class PC must be used (which is not necessarily expensive... the Dell 400SC / 420 SC models are cheaper than many desktops). Next: Brooktrout Installation DID Boards DID can be done three ways: 348 Technical Reference Using DTMF DID over a regular phone line and a regular analog Brooktrout TR1034 or TR114 board (requires a PBX or other device to 'push' DTMF digits to the Brooktrout board) Analog DID is a method to do DID using special analog DID phone lines from the phone company PLUS an Analog-DID capable Brooktrout board (supported by Brooktrout in North America only, models listed below) Via a digital circuit (T1) and the appropriate digital TR114 or TR1034 from the lists above. Analog DID: DID Capable Brooktrout Boards for Analog DID Phone Lines: (Note: DID power supply required with DID analog boards) TR1034+uP2C-R 1 Channel Loop Start + 1 Channel DID (two channels total) TR1034+uP2D-R 2 Channel DID TR1034+uP4C-R 2 Channel Loop Start + 2 Channel DID (four channels total) TR1034+uP4D-R 4 Channel DID Note that an Analog DID channel cannot send, it can only receive. Digital circuits and DTMF DID allow a channel to send and receive and receive w/ DID. Brooktrout Board Discussion Multiple Boards in One System: Multiple PCI boards of the same type (e.g. all TruFax or all TR114 or all TR1034) is supported. There is a board ID selector on the board. For TruFax boards, the first board should be set to 0, the 2nd board to 1, etc. Each board must have a unique ID. TruFax and TR114: After the boards are installed, run faxinit interactively and all the ports should be listed. BROOKTROUT ADVISORY NOTE – Sept 15, 2000 & Summer 2002 Note: This section refers to the 5-volt TR114 only, and does not apply to the newer uPCI (universal) TR114 boards. TR114 5-Volt PCI boards & Compaq ProLiant servers - There have been reports that some customers cannot install TR114 5-volt PCI boards in the 64bit PCI slots of several Compaq ProLiant servers. In addition, there were instances where Compaq has told customers that they do not support 5.0-volt PCI boards. DID: Overview 349 OmniRush Administration & User Manual When a CRM system is in use with FaxRush, FaxRush by default will use a 'contact-centric' approach to handling received faxes. This involves using the FaxRush Viewer to view received faxes and to link received faxes to CRM contact records. Where CRM is not in use, or when a 'user-centric' approach is desired, faxes can be received on the desktop as email attachments, using whatever email application is already in use. FaxRush can either forward all received faxes to a single email address (say to a receptionist, who then forwards the faxes as email attachments) or FaxRush can automatically send each received fax to the correct recipient. Suppose that each staff member, (or each department) has its own fax number, but all these fax numbers are routed into a single phone line (or block of phone lines). How does FaxRush know what number was dialed (so it can forward the fax appropriately)? The answer is DID/DNIS. DID stands for Direct Inward Dial. DID is usually used in reference to analog phone lines. The equivalent on digital phone lines is DNIS. With DID/DNIS, multiple phone numbers are routed, by the phone company, into a single phone line (or group of lines) into your office. The phone company signals FaxRush as to which number was dialed using DID/DNIS signalling. FaxRush then takes the right action based on configuration. DID/DNIS is a feature of the FaxRush Hardware Fax module. DID allows faxes to be routed to recipients automatically, because each user is given a unique fax number. What is a DID Phone Line? DID is used only for fax receiving. DID can be done these ways: Using a regular analog TR114 behind a PBX or other system that 'pushes' DTMF digits to the Brooktrout board (DTMF DID) Via special analog DID phone lines PLUS DID capable Brooktrout board (North America only) (Analog DID) With a digital circuit (T1) and the appropriate digital TR114 (aka DNIS). A single DID phone line is actually associated with a block of phone numbers, for example, 5443100 through 544-3150 might all ring into a single phone line--your DID line. What is special is that the phone company signals the FaxRush fax hardware, informing FaxRush what number was actually dialed. FaxRush can then take the action appropriate for that number. When a PBX 'pushes' DTMF signalling to the Brooktrout board, it means that the PBX is attached to a digital line or an analog DID line. The PBX is then configured to route certain calls to 'POTS' ports which are connected to the Brooktrout board. When the call comes in, the Brooktrout board answers the call, and the PBX then sends some digits to the Brooktrout which FaxRush uses as DTMF identification. This is the DTMF DID method. Uses of DID For example, say each sales rep in your firm is assigned a unique fax number. Jane is 544-3125, Joe is 544-3126, Jack is 544-3127. When a fax is sent to any of these numbers, the phone company sends the call down your special DID phone line. When FaxRush answers the call, the phone company signals the actual number dialed, or perhaps just the last for digits, like '3126.' In FaxRush, you might have '3126' configured as Joe's DID number. FaxRush might be configured so that when a fax comes in for '3126' it is emailed automatically to Joe. A fax to '3125' might be sent to a specific printer near Jane. The concepts encompassed by DID are: 350 Identification. Each user or function has a unique phone number. Technical Reference Aggregration. Instead of requiring a dedicated phone line for each phone number, a single phone line (or a few of them) receives calls for a block of numbers (10, 25, 50, 100 or more numbers all come into a single line) Automation. Since each number is associated with a user or action in FaxRush, action can be taken on inbound faxes based on the number dialed by the sender. Common applications of DID Each user has a unique fax number. Faxes sent to that user are automatically routed to the user. Different actions are taken on the fax (e.g. emailing, printing, etc.) based on the number the fax is sent to. Requirements for DID To implement DID, several components are required: For Analog Users: DTMF DID: Analog DID: PBX or other phone system capable of routing calls to the FaxRush Brooktrout board intelligently and passing DTMF digits to identify the call. Requires a regular analog TR114 behind a PBX or other system that 'pushes' DTMF digits to the Brooktrout board Brooktrout interface with DID interface (click here for supported models) DID phone line. Ordinary phone lines cannot be used for DID. A special phone line must be ordered from the phone company. North American use only. Brooktrout does not support analog DID outside North America. For Digital Users: T1 line, provisioned to be Brooktrout compatible DID phone numbers configured on this circuit Digital Brooktrout TR114 or TR1034 hardware. Cost of DID FaxRush license: DID support is built in to the Hardware Fax module of FaxRush. You will need fax lines available in your Fax Hardware Module for the DID line(s). For Analog DID: DID capable Brooktrout board. For Analog DID Phone line (analog DID lines are generally more expensive than a regular phone line, and the installation cost from the phone company can be quite high-check the cost of the line before finalizing your decision on analog DID) For DTMF DID: PBX ports and associated programming to connect an analog TR114 or TR1034 Brooktrout board to the PBX. 351 OmniRush Administration & User Manual DID: Ordering the DID Phone Line for Analog DID Quick Review: DID can be done three ways: Using a regular analog TR114 behind a PBX or other system that 'pushes' DTMF digits to the Brooktrout board (DTMF DID) Via special analog DID phone lines PLUS DID capable Brooktrout board (known as Analog DID) With a digital circuit (T1) and the appropriate digital TR114. This page refers to analog DID over special analog DID phone line. Analog DID lines are used with TR114 analog DID boards such as the TR114-P4C, TR114P2C, TR114-P2D and TR114-P4D boards. For complete information on DID, see the Brooktrout Web Site, especially articles: Ordering DID Telephone Service (Brooktrout White Paper #1084) DID / Installing DID FAQs Direct Inward Dialing (DID) Telephone Service (Brooktrout White Paper #1082) T1/E1 White Papers Index Test/Diagnostic tools (Brooktrout White Paper #1085) (The following is from Brooktrout Technology Inc. and is copyright by Brooktrout) Ordering DID Telephone Service IMPORTANT NOTE: This document concerns North American analog DID service. For information on digital DID service, commonly referred to as "DNIS", please consult this page, and also consult with your T1 service provider. Analog DID For DID Service, you must obtain from the telephone company: One DID telephone trunk for each TR114 DID interface you plan to use. A block of DID telephone numbers associated with the trunk(s). When ordering DID telephone service, and before you connect DID channels to DID telephone lines, you must provide the telephone company with: 352 A source of -48Vdc power. The power supply must be installed and running on the TR114 before the telephone company can activate a DID line. Once the DID line is activated, -48Vdc power must be continuous, or the telephone company may disconnect the DID service. You, as the end user, need to supply the voltage on the DID line, through a power supply that connects to your Brooktrout board; your phone company should never put any voltage on the line from their end. (Brooktrout TR114 DID boards include a -48volt power supply for this purpose.) Technical Reference A specification of the DID service options you want. Before you order DID service from your telephone company, find out what DID service options are available in your area and decide which options you want. These service options define how your DID service will operate and include: trunk type reversal service type digit length signaling type two-wire tip-and-ring loop start trunk which works off battery wink vs. immediate (recommend wink) the number of routing digits (usually three or four) DTMF vs. Pulse (recommend DTMF) Trunk Type As stated in the chart above, the phone company needs to give you a two-wire loop start trunk that works off battery reversal, meaning that the end user puts the "battery", or the voltage, on the trunk, never the phone company. Service Type The TR114 supports both wink-start and immediate-start service. Brooktrout recommends winkstart because it is faster and less prone to errors than immediate-start service. The following table describes the difference between wink-start and immediate-start service. Service Type: Wink-Start Interdigit Delay Time: The TR114 expects to see the first DID digit within 5 seconds after the telephone is activated. Each successive digit must arrive within 5 seconds of the previous one. (The "wink" is a voltage reversal, lasting approximately 200ms, which the board sends to the telco side after that side has "seized" the line in preparation to send a call to the board; the "wink" tells the telco provider that it's OK to send the DID digits down the line.) Service Type: Immediate-Start Interdigit Delay Time: The TR114 expects to receive the first DID digit within 18 seconds after the telephone is activated. The maximum interdigit delay is 18 seconds. This service type may be easier to use for hand-dialed testing. Your phone service provider must communicate whether the service is wink or immediate, in order for you to set your fax software appropriately. It will be your software which will tell your Brooktrout DID board what the service type is, so the board can function appropriately with the DID trunk. Digit Length DID service usually sends the last few digits of the dialed telephone number to the TR114 as a routing address. Your telco service provider needs to tell you how many DID digits they're sending down the line (typically it's the last 3 or 4 digits of the phone number, but not necessarily) so you may set up your fax software appropriately; it's your fax software that tells the Brooktrout board how many digits to expect after it sees a call coming down the line. Signaling Type Pulse tones are those generated by rotary-dial telephones. A series of pulses, simulating alternate on-hook/off-hook conditions, represents each dialed digit. Important: If your telephone service provider sends pulse tones down the DID trunk to the board, they should do so at a rate of 10 pulses-per-second (commonly written "10pps"). DTMF tones are those generated by touch-tone telephones. A different combination of two tones, one high-frequency and one low-frequency, represents each of the twelve possible digits and characters on the touch-tone telephone keypad. 353 OmniRush Administration & User Manual When the TR114 receives a call it can automatically detect either DTMF or pulse. When it dials out, your software application tells the board which of the two signaling types it will use. We strongly recommend DTMF over pulse, as DTMF is much less prone to errors and it's much quicker; also, some fax software applications may not handle pulse digits correctly. Other Information Additionally, the telephone company may request other specific information on the TR114 card (the TR114's FCC Registration number, the service order code, the type of wall jack, and the facility interface code). This information is located on the bottom of the TR114 card, and is also given in the TR114 manual. The FCC Registration number EAGUSA-74279-FA-E The Service order code 9.0F The type of wall jack required USOC-RJ-61X The facility interface code 02RV2-T Analog DID: Brooktrout and Line Setup This page applies to TR114 analog DID boards such as the TR114-P4C, TR114-P2C, TR114P2D and TR114-P4D boards. This covers setup of a Brooktrout board with the special analog phone line. This is distinct from DTMF DID To set up DID on an Analog DID line, take these steps: a) Attach power supply (included with Brooktrout DID board) to the Brooktrout interface (see Brooktrout documentation for details). b) Attach DID phone line to the Brooktrout interface. c) Check that the c:\winnt\bfax\btcall.cfg configuration is correct for your installation. Check the did_digits= the correct number of DID digits to capture. Defaults to 4. d) Continue with the setup of OmniRush modules. DID: Testing the Brooktrout Hardware & OmniRush Setup Test that the OmniRush Fax Module can detect the ports, and can send on the non DID ports. This validates the overall OmniRush + Brooktrout Driver + Brooktrout interface. Once this step is completed, configure a user for DID 1111 (or the appropriate number of digits for your installation), and send a fax from a fax machine to that number. Note the flow for DTMF DID: 1. Incoming phone line rings 2. The Brooktrout board picks up the call 3. There is a period of silence during which the Brooktrout port waits for incoming DTMF digits (the quiet duration is configured on the fax port in the Fax Module) 4. The Brooktrout starts to wait for a fax transmission 354 Technical Reference It is simple to test DTMF DID using a simple fax machine: 1. 2. 3. 4. 5. 6. Insert a page to fax Pick up the hand set on the fax machine Dial the number that goes into the OmniRush Brooktrout port Wait for the Brooktrout port to answer the call There will be silence before the Brooktrout board sends out the fax tone During the silence press the desired DID digits (say 1111 for a user who is set to a DID value of 1111) 7. Press Send on the fax machine It is important that the port configuration allow enough time for the digits to be received. A setting of 5 or 7 seconds is good to start with. Note the number of rings the Brooktrout board is configured to answer on. With TR1034 hardware, this is configured in the Brooktrout Boston configuration utility. The fax module log will list DID calls where a DID lookup fails. This is a useful diagnostic when troubleshooting why a specific fax is not forwarded as expected by OmniRush. DID: OmniRush Logic OmniRush handles DID inbound faxes using its standard advanced receiving options. The logic for DID is shown here: 355 OmniRush Administration & User Manual The steps to set up DID are: Analog DID line: Install DID line and hardware DTMF DID xxx Set DID numbers on each user in Administrator Set the On Inbound action on each user Test To simply put received faxes into the private inbound folder in ODMS, no track needs to be selected. On the user settings, select "Store TIF in user Fwd Folder" FaxRush + CRM: DID Options There are two basic ways to setup DID and have CRM users get notified of a new fax: 1. Internet Email forwarding. In this mode, all received faxes will be emailed to the recipient, and faxes are handled in the email program in use. Note: Once the fax is received, it is emailed to the recipient, and may be linked to CRM contacts from the email program in use (if the CRM system supports that). The FaxRush Viewer is not used. 356 Technical Reference To set up this option, edit the OmniRush user profiles. In the email field, enter the email address where the faxes should be sent. In the On Inbound tab, on Track #1 or Track #2 drop down, choose an EMAIL track. If you want the email sent as a PDF rather than a TIF, change the settings for PDF conversion in the EMAIL track. 2. Contact-centric fax receiving with DID. In this mode, received faxes are placed by FaxRush in the users' private inbound folders in the FaxRush Viewer. To set up this option: Edit the OmniRush user profiles. In the On Inbound tab, choose a public or private forward to folder depending on if you want faxes to remain in the public folder or be placed in the user's private folder. To set up new fax notification: a. Each users' workstation must be named with their OmniRush user name. For example, if a user is named JOE in OmniRush, his PC name must also be JOE. b. In the FaxRush Hardware Fax Module, set the Inbound Alarm Recipients, and select the Alarm DID user tick box. FaxRush will NET SEND a message to that user when they receive a new fax. c. After receiving a notification, the user must open OR Viewer where they can view new faxes and then link them to CRM records. Eltron Label Printers Eltron / Zebra Printers: What it Is and Why to Use One The Eltron thermal label printer is ideal for use with OmniRush for UPS and FedEx shipping. The printer generates 4"x6" or 4"x8" self adhesive labels that allow for easy peel-and-stick application. Since OmniRush can tag the label with an enclosure code, the mail room always knows what to do with the label. With OEM label stock, the adhesive is excellent, and the carriers do not require a pass of tape over the label. When the Eltron printers are attached to the network, OmniRush can print labels anywhere in the building, even anywhere your WAN or VPN reaches. Thermal printers usually have both a serial and parallel port, and are ideal for attaching to a network print server in the shipping area. Parallel port attachment offers the simplest interface, as the parallel cable is a standard implementation. To connect an Eltron to a serial port, see the page on that subject. Supported Models include all Eltron/Zebra models that have full bar code kits in firmware (including Maxicode), print a 4-inch wide label, and include EPL2 (Eltron Programming Language). Supported models include, but are not limited to: Eltron Orion (Model LP2443PSA) Eltron Ht-146 Eltron LP2348 Zebra Model 105S and compatible ZPL printers These printers print a four-inch wide label. The label stock comes in different lengths. The label size requirements are as follows: 357 OmniRush Administration & User Manual UPS and FedEx Ground shipping: 6-inch or longer FedEx Express shipping: 6.75-inch or longer Z-Firm recommends that if any FedEx shipping is to be done, that 6.75" or 7" stock be used. This will work for all carriers. UPS shipping supports 'doc-tab' labels of the 2" and 1/2" variety (see the ShipRush v3 documentation). FedEx shipping supports 'doc-tab' labels of the 1/2" variety. Eltron: Setting Up On The Network The Eltron printer can be connected to the network using the parallel port of a network print server, like the Intel Net Express, or can be connected to the parallel port of a PC on the network and shared. Z-Firm strongly recommends stand alone, network print servers such as the Intel NetExpress over PC based sharing. When using a network print server, the most effective mechanism is to set up the print server with an IP address, and use direct TCPIP printing from the OmniRush Server to the Eltron. Connecting the label printer to the network lets you put the printer where shipping is done, anywhere in your organization. The OmniRush Server can service multiple shipping accounts, even in different cities, and the Eltron printers can be printed to with IP printing over the WAN or VPN (as described here). If OmniRush is set up to service multiple shipper accounts, a different printer can be used for each account. With IP printing, the printers can be in different buildings or even different cities, and printing is done over the WAN or VPN. (If many printers or shipper accounts need to be supported, consider the Virtual Track feature of OmniRush.) Note that OmniRush must print directly to the Eltron printer. The Eltron print driver should not be installed. Instead, follow these steps: 1. Create a new printer in the Printers folder on the OmniRush server. 2. Select the network port or print queue that feeds the printer (for direct IP printing, see the appropriate section) 3. When prompted for the Manufacturer and Printer, select the Generic manufacturer and the Generic / Text Only printer 4. Be sure to share out the printer in the Sharing tab. 5. Map a virtual LPT port to this printer. For example, if the printer was shared as ELTRON, do the following at a command prompt: net use lpt3 \\<pcname>\ELTRON /persistent:yes 6. The printer can now be set on the shipping track as type Eltron, port LPT3 Eltron / Zebra Thermal Printers: Using with a Serial Port Z-Firm recommends using the parallel port interface to the thermal printers. If a serial cable is used, it is advised to install the appropriate Windows printer driver for the thermal printer, and use the Test Printer button on the printer in the Printers folder. 358 Technical Reference FAQs Administrator FAQ Q: Why are there question marks on the Module icons? (e.g. or )? A: There is a problem communicating with the Launcher module. See the troubleshooting discussion. Server FAQ Can I set up the OmniRush Module services to autostart in the NT Services Control Panel Applet ? No. By default, the OmniRush installer sets two services are set to start automatically: The Z-Firm Database Engine and the OmniRush Launcher. No other services should ever be set to autostart. All control of the other OmniRush services is handled automatically by the OmniRush Launcher and Administrator. You should never manually manipulate services unless instructed to do so by Z-Firm technical support. Can I use the Windows2000 Service Control Manager to automatically restart an OmniRush service that has stopped? Maybe. Generally, it should not be necessary to have the NT SCM do the work, as the OmniRush Launcher will do it for you. If a module is stopping with a problematic frequency, check the module log and fix the cause of the problem. E-Mail Module FAQ Q: What is the difference between internal and external SMTP server? A: All internet email is delivered as follows: 1. Email software (e.g. MS Outlook, etc.) pushes message onto an SMTP relay server 2. SMTP relay connects to the Mail Exchance (MX) server for the domain of the recipient 3. SMTP relay passes the message to the MX server for final delivery, or further relaying (this is controlled on the receiving end, and is not relevant to the sender). The OmniRush email module can send messages two ways: By pushing the message onto an external SMTP relay (e.g. acting the same as Outlook) By running its built-in, internal, SMTP relay and forwarding the message directly and immediately to the recipient MX server. See the Email Module Technical Reference for a longer discussion on this subject. FAQ: OmniRush General FAQ 359 OmniRush Administration & User Manual Quick Links: Fax Modem Support Server on Win9x Single User PDF Support UPS Shipping Module FAQ Why was support for fax modems dropped in OmniRush? It was not our original intent. In fact, OmniRush has completely re-written fax modem support. We removed faxmodem support from OmniRush for the following reasons: a. The Brooktrout TruFax card is a lot better than a faxmodem can ever be. b. There is a new PCI version of the TruFax card. c. Brooktrout lowered the price for the TruFax. Pricing on the TruFax has dropped to SRP $499 for two ports and SRP $399 for one port. d. Internet Fax in OmniRush is now behavior- and feature-consistent with hardware faxing (fails can be scheduled back to the user, new banner support, etc.) e. Testing. Testing finds that fax modems continue to be unreliable, especially for fax receiving. Brooktrout boards give the best user experience by a large margin. All this together made the case to drop faxmodem support. Z-Firm has long been caught between the inherent weaknesses and imperfections of faxmodems on one side, and the excellent reliability of internet fax and Brooktrout hardware on the other. While fax modems have a lower initial cost, their 'cost of ownership' is usually higher because of incompatibility and transmission problems--what is the cost in time to deal with one customer who cannot send faxes to you? The OmniRush solution with the Brooktrout board offers the lowest overall cost of ownership. I have run my FaxRush v4.x server on Win95/win98. Why can't I run my OmniRush server on Win9x? There are several reasons the OmniRush Server is not supported on Win9x: a. OmniRush has larger hardware requirements than FaxRush v4.x. Most Win9x PC's would require a hardware upgrade to run OmniRush. b. Experienced FaxRush consultants consistently prefer NT over Win9x. Most of them install on NT only as a matter of personal policy. c. Microsoft is phasing out the Win9x platform, and replacing it with Windows2000 and WindowsXP d. OmniRush is designed to run as an NT Service, which cannot be effectively done on Win9x. e. The stability and scaleability of Win2k is much better than Win9x 360 Technical Reference f. OmniRush can run on Windows2000 Professional edition, available at a moderate cost. I run GoldMine and FaxRush v4.x on my stand alone PC as a single user. Is OmniRush for me? Maybe, maybe not. If you do serious fax blasting, and/or need OmniRush to do a lot of processing (printing, voice, shipping, whatever), AND you have a robust PC (at least a 933 mhz with 192MB RAM), you can run OmniRush on a stand alone PC. The same caveats apply as with FaxRush v4.x (primarily that you cannot use MS Office applications when OmniRush is processing documents). Make sure your system meets the other operating system and hardware requirements of OmniRush. If you are an occasional user of FaxRush v4.x, and just need some lightweight fax integration with GoldMine, stick with FaxRush v4.x. What is up with PDF support in OmniRush? Improved PDF support has been a high priority during the development of OmniRush. First, some background: FaxRush v4 has an optional, extra cost, PDF module. This module offers excellent fax quality, but does not support Acrobat v4 or v5 files, forcing users to save PDF files as v2 or v3. OmniRush has a completely re-done PDF subsystem. It is also an optional, extra cost feature. We believe this system offers the best mix of PDF compatibility with features. The OmniRush PDF module enables many different PDF functions. Faxing PDF's is only one of several PDF-related features enabled by the OmniRush PDF Option. Some PDF features in OmniRush require both the OmniRush PDF module and additional third party software. When additional third party software is required, it is not included with OmniRush and is your responsibility to license. Excellent PDF support is a priority at Z-Firm. If you have any feedback on this subject, please let us know. Misc. Discussions FaxRush v4.x to OmniRush Upgrade Checklist GoldMine: GoldMine is v5.0 or higher GoldMine on SQL is running on MSSQL v6.5 or higher 361 OmniRush Administration & User Manual Check that the OmniRush Server PC has BDE installed locally. GoldMine is operational on the OmniRush Server PC. SalesLogix: SalesLogix is v3.0 or higher SalesLogix is running on Microsoft SQL Server v6.5 or higher or Oracle 8 or higher. SalesLogix Client is installed and operational on the OmniRush Server PC. All: If OmniRush is going onto the PC where FaxRush is installed, make a GHOST image of the hard drive before installing OmniRush. Note Brooktrout ISA configuration parameters (IRQ and Port) Note the location of the \outfax\ directory in UNC Copy the entire \outfax\ directory to a safe location Remove Brooktrout drivers Remove FaxRush via Control Panel Delete c:\fr32\ directory Reboot the PC Install OmniRush Server Example FaxRush v4.x to OmniRush Upgrade Set up a new set of aliases/host references in the CRM system for OmniRush to use. As OmniRush is phased in, either migrate to the new host references, or configure OmniRush to use the old aliases (or old and new if you like). The idea here is that both systems can be used in parallel during the transition to OmniRush. CRM Host References (USERID in GoldMine, CATEGORY in SalesLogix) FaxRush v4 OmniRush v5 Notes FAXRUSH FAXBT INETFAX FAXIN LASER1 PRINTR1 LASER2 PRINTR2 FEDEX1 (OmniRush uses a discrete track for shipping, it does not use the print tracks for this like FaxRush.) FEDEX2 (ditto) VOICE In cases where there is Brooktrout hardware in use, set up OmniRush initially for Internet Fax. As OmniRush utilization increases, move the hardware to the OmniRush PC. 362 Technical Reference Supported File Types OmniRush supports printing, faxing and emailing the following document types: Merge templates: RTF files created in MS Word v97, 2000 or XP (2000 and higher preferred) Via email, RTF files can be merged, converted to PDF, and then emailed. RPT created with Crystal Reports (v8-v8.5) Static (do not merge): .PDF, .TIF, .RTF, .TXT Document packages: FRP, ZPK, OXP, ZDF (for advanced discussions on these file types, click here) Files for Faxing Fax transmission time (the time OmniRush spends on the phone actually sending the fax) is directly affected by the content of the faxed document. Text and line art fax quickly. Photographs, color logos, and color artwork can cause fax transmission times to hit 2-6 minutes per page, or even more. Wherever possible, files that are to be faxed should be optimized for the fax medium. This means: Convert artwork and logos to line art. Manually convert color artwork and charts to monochrome (usually a job for a graphic artist) Avoid photographs (color and B&W) The desired end result is largely line art, solid black, and text. You can get away with some grayscale/color, but restrict them to less than %10 of the page (by area). A common approach is to have the designer deliver two versions of electronic documents: Color (for color printing and email) and monochrome (for faxing). The TIF File Type TIF files can be faxed, printed, or emailed. Via email, TIF files can be converted to PDF and then emailed. For faxing, TIF files must conform to the following specs. (Note, the easiest way to get files into this format is to fax them into OmniRush and use the received TIF.) TIFs that are acceptable by OmniRush (Hardware Fax and Internet Fax) Width: 0..1740 pixels, will be adjusted to 1728 pixels Height: < 100 inches, might be adjusted (see logic below). X dpi: not limited, might be adjusted to 98 or 196 Y dpi: not limited, might be adjusted to 98 or 196 363 OmniRush Administration & User Manual Compression: most formats except LZW. Output:TIF CCIT Group3 1DIM monochrome (file or memory). TIFs handling Width: OmniRush sets the width to 1728. OmniRush tries the actual DPI. First we try to fit source image DPI into 2 ranges (cases 1 and 2). If it fails we do the second part. The second part of logic (cases 3 and 4) determine the correct image DPI depending on image height was introduced because of a bug in FaxRush v4 that set DPI to 300 every time the FaxRush Viewer saved a TIF to disk. 1. Y_DPI = 98, if Y_DPI in [93..103] 2. Y_DPI = 196, if Y_DPI in [186..206] 3. Y_DPI = 98, if Y_DPI doesn’t fit into ranges above and Height < 1200 (where 1200 is a maximum possible height for lowres fax = (11 inches * 98 dpi) + Gap) 4. Y_DPI = 196, if Y_DPI doesn’t fit into ranges above and Height >= 1200 5. Y_DPI = 196, if “Always High” option has been selected in the fax track. In cases 1) and 2) X_DPI stays untouched, in cases 3) and 4) it’s set to 196 explicitly. Height: Destination height depends on source image height and has 2 different branches – “regular” and “resize”. “Resize” is executed if a low resolution fax must be converted into highres because of track setting “Always High”. “Regular” Source TIF Action Taken 0..11,2 inches = make 11 inches, cut if bigger than 11, add white space if smaller than 11 inches 11,3..13 inches= make 11 inches by resizing (may lead to quality loss) 13,1..14,2 inches = make 14 inches, cut if bigger, add white space if smaller 14,3..14,9 inches = make 14 inches by resizing 15..100 inches = send AS-IS >100 inches = raise exception and fail the job. “Resize” 0..13 inches 13,1..14,9 inches 15..100 inches >100 inches = make 11 inches by resizing = make 14 inches by resizing = send AS-IS = raise exception and fail the job. Legal Size Forms When faxing, legal size paper handling can be a question. OmniRush supports legal size for sending and receiving. Make sure that RTF merge forms are set as legal paper in Word. 364 Technical Reference See the test documents: testlegal.rtf, testlegal.tif and testlegal.pdf. Send these to yourself to see the legal size handling work. Dialing Configuration File (predial.ini) Dialing Terms The Dialing Configuration File (DCF) Suffix Dialing Advanced Use Configuring the DCF in OmniRush Monitoring and Troubleshooting Note: 'Simple' dialing takes two forms: 1. All numbers in a given area code are dialed as local calls (7-digit dial), all calls outside that area code are dialed as 1 + 10 digits (standard long distance) 2. All numbers are dialed as 1 + 10 digits, regardless of area code Simple dialing can be established simply by setting either the local area code in the fax module (for method 1 above), or by setting a bogus area code (like 999 or 000) to achieve dialing like method 2 above. For more flexible (or convoluted...) dialing, keep reading. Terms OmniRush offers a range of dialing options. These range from the simple (dial 9 before the number) to the very complex (e.g. some ‘local’ calls are dialed with area code, other ‘local’ calls are dialed with 1 + area code, and other ‘local’ calls are dialed with 7 digits). First, let’s clarify terms: A U.S. phone number has three components: (707) 543-2747 The first portion is the area code, the next three digits are the exchange, and the last four digits are the number. (This is approximate. In many cases, the exchange is taken only by the first one or two digits, the balance constituting the number, however the phone number is written the same way, with a three digit block followed by a four digit block.) When we speak of dialing, there are five main dialing modes: 1. 2. 3. 4. 5. Local. A seven digit dial (e.g. 543-2747) Ten digit-dial (707-543-2747) One-plus-seven (1-543-2747) One-plus-ten (1-707-543-2747), or standard long distance Some Prefix plus one of the above (e.g. 8,1-707-543-2747) Variations would include any prefixes, including conditional prefixes (conditional based on the area code or exchange portions of the number). Note that dialing modes 1 and 4 above are handled by OmniRush without needing a dialing configuration file (DCF, also referred to as predial.ini). A DCF is not needed in these cases 365 OmniRush Administration & User Manual unless the area code is split (e.g. within the same area code, some numbers are dialed as seven digits and some as one-plus-ten). Dialing modes 2, 3, and 5 as well as other variations, require the use of a DCF (PREDIAL.INI). Dialing Configuration File: PREDIAL.INI The PREDIAL.INI is a text file, created with Notepad or the DOS based EDIT utility and placed on the local drive of the OmniRush Server (usually in the "C:\Program Files\Z-Firm LLC\OmniRush\" directory, but it can be in any directory local to OmniRush). The file can have any name and any extension. Here is a PREDIAL.INI example: [PREFIX] 801=1-801 801-220= 801-230= 801-231= 801-24= The PREDIAL.INI above will dial 1 + area code + number for all calls in the 801 area code except for those phone numbers that begin with: 220, 230, 231, 24 These numbers will be dialed as 7 digits. If you need to dial area code + number for calls in one or more area codes, and 1 + area code + number for the rest. Here is a sample PREDIAL.INI that dials 10 digits for two area codes, and 11 digits for the rest: [Prefix] 281=281 713=713 The [Suffix] section of the predial.ini works the same as the Prefix section, and allows access codes and other suffixes to be dialed. Be sure to use plenty of commas so that the suffix is entered when the phone system is ready for it. E.g. if all numbers in area codes that begin with 9 need a suffix, it might look like this: [SUFFIX] 9=,,,,,23229 Remember to set the area code in OmniRush Settings | General to blank (or bogus, like 999) if you are using PREDIAL.INI because this setting will override the predial.ini behavior. PREDIAL.INI prefix or suffix support. OmniRush supports PREDIAL.INI for prefix and suffix dialing only based on the phone number (area code and/or exchange). Refer to the GoldMine documentation on predial.ini or to the documentation here for more information. 366 Technical Reference Advanced Use OmniRush has several DCF features that go above and beyond the GoldMine predial.ini feature. Sometimes, a need will arise to dial one prefix (or lack of a prefix) for long distance numbers, but have a prefix for local numbers. This example demonstrates a special extension to the predial logic that can be used in OmniRush. OmniRush allows a wild card on the area code, so that only the first one or two digits of the area code need to be in predial. ; This predial.ini will dial 9, + 7 digits for all local numbers, ; (the 602 area code) ; and 7, + ten digits for all other area codes ; [PREFIX] ; All area codes that start with ; 1,2,3,4,5,7,8,9 are dialed with a ; prefix of 7, and then a 10 digit ; dial 1=7,1 2=7,2 3=7,3 4=7,4 5=7,5 ; Area codes that begin with a 6 are handled below 7=7,7 8=7,8 9=7,9 ;everything in 602 gets a prefix of 9 ;Other area codes that start with ;602 are dialed with a prefix of 7 ;and a 10 digit dial. 602=9, 601=7,601 603=7,603 604=7,604 605=7,605 606=7,606 607=7,607 608=7,608 609=7,609 ;This covers the rest of the area ;codes that start with a 6 61=7,61 62=7,62 63=7,63 64=7,64 65=7,65 66=7,66 367 OmniRush Administration & User Manual 67=7,67 68=7,68 69=7,69 Configuring the DCF in OmniRush 1. Once the DCF has been created, copy it to the OmniRush hard drive. 2. Stop the OmniRush fax module(s). 3. Navigate to Modules | <Your OR Server>, right click, and select General Settings 4. Set the Dialing Instructions File to your DCF 5. Start the OmniRush fax module Monitoring and Troubleshooting To monitor exactly what your DCF is doing, right click on the OmniRush fax module in Administrator. Select Monitor Module, then press the button with the blue dot next to the circling squares. This allows you to watch the exact number being dialed on a job by job basis. In some cases, editing the document in notepad will result in the file being named predial.ini.txt Be sure to set explorer to show all files and all file extensions, or better yet use winfile.exe (File Manager), or a shell replacement that shows the full file names with extensions. The number one cause of dialing problems is a problem with the GoldMine contact1->status field, that controls whether a number is US or International. The symptom is that OmniRush will dial numbers as ten digits (e.g. exactly as entered into GoldMine, without the ‘1’ prefix). OCR on Received Faxes Some sites require OCR (Optical Character Recognition) on received faxes. This is easily done using OmniRush to receive, and setting up some off the shelf OCR software. The configuration is as follows: a) Set OmniRush to save all received faxes as TIF files to a given directory, call this: IN-RAW b) Set up a batch file that fires once an hour and copies the files from IN-RAW to the OCR software scanning dir, call this IN-SCAN c) Set up the OCR software to automatically scan the IN-SCAN directory and save the OCR'd output to whatever directory. How To Send Screen Shots You may need to email screen shots to Z-Firm technical support, or for some other reason. Here is how: a) Go to the screen you want to shoot. b) Hit the Print Screen button on your keyboard (sometimes marked PrtScrn) c) Press Start | Run | enter: PBRUSH <enter> 368 Technical Reference d) Paint will open. Press ctrl-V to paste in the shot e) Save the file as a 16 color BMP file f) Now attach this file to an email Microsoft Word Tricks Insider Tip: Make RTF Files Smaller with MS Word Secret! OmniRush does its magic using RTF files. But when logos and graphics are inserted, those files can get large, affecting performance. Microsoft has special registry setting that lets RTF files with graphics be super small! For example, a one page document with a screen shot inserted was almost 5MB. Using this tweak, the file saves as 146kb! (Using WordXP on WinXP). The technical document is 224663 Click here to try the current URL, but if that does not work, just search for 224663 (or Q224663 or 262464) at www.microsoft.com Note: This tech doc is for Word2003. Z-Firm has tested that it works for Word2000 and WordXP. However, to enable this feature for other versions of Word, note the version number in the registry path: Here are the keys for other versions of Word: For Word2000 use: HKEY_CURRENT_USER\Software\Microsoft\Office\9.0\Word\Options For WordXP use: HKEY_CURRENT_USER\Software\Microsoft\Office\10.0\Word\Options For Word2003 use: HKEY_CURRENT_USER\Software\Microsoft\Office\11.0\Word\Options Now that we are at the right key, take these steps: 1. With the Options folder (key) selected, point to New on the Edit menu and click String Value. 2. Type ExportPictureWithMetafile and press ENTER. NOTE: There are no spaces in the string value name. 3. With the string value ExportPictureWithMetafile selected, click Modify on the Edit menu. 369 OmniRush Administration & User Manual 4. In the Value data box, type 0. NOTE: Type a zero for the Value data. 5. Click OK. 6. On the Registry menu, click Exit. OmniRush System Maintenance Backing Up OmniRush Introduction In many cases, OmniRush is used as an application server, and the job data is not essential, since jobs are being logged in the external database or CRM system. If external documents are used as masters, and the OmniRush job database is not important, the only thing that would be lost in the event of a system failure would be the OmniRush configuration. This is a long way to say that many installations have no real need to backup their systems, since OmniRush may be used just as software, and may not hold data. If you use OmniRush as a UPS shipping server, see notes below. However, make this decision wisely by understanding the components of OmniRush and understanding what is stored, and where. Data Components of OmniRush There are two data components of OmniRush: OmniRush Database The database is a client/server database server that is installed on the main OmniRush server by the OmniRush installer. The database contains everything you see in the left hand tree of the Administrator except the documents themselves. The data in the database contains: System configuration (modules, tracks, users) Tree structure and references to documents Jobs, pending and complete, all job details Physically, the database is in the <OmniRush Root Directory>\DATA\Database\ directory. Note, however, that these files are held open when the Z-Firm DBEngine service is running (e.g. all the time unless it is shut down manually). There are three ways to back up the OmniRush data, which are discussed below. OmniRush Document Store The document store is on the file system of the OmniRush server in the <OmniRush Root Directory>\DATA\Documents\ directory. The file system on disk is a numbered system, and does not correspond to the document tree you use in the Administrator. Further, files 370 Technical Reference are named numerically. Additionally, while all files have the native extension (.tif, .rtf, etc.), all files are pkzipped. These files can be backed up by a normal backup system. Z-Firm advises that the backup system be set to allow backup of open files, as the only risk this will pose is that if a file is being actively written to during the backup, it may not back up correctly. A solution like Open File Manager is also a good choice. UPS Shipping Server State Data If using the UPS shipping module of OmniRush, this state data is held in the ShipRush installation on the OmniRush Server PC. Use the ShipRush utilities to make backups of the shipping data. Note that to enable a full system recovery, the "save system state" feature must be used. Backing Up the OmniRush Database There are two main options for backup: File system native Z-Firm utility based Both will be discussed here, as well as the Z-Firm suggested backup plan. File System Native The most low level approach is to simply shut down the entire OmniRush system, including the ZF DBEngine, and backup the entire hard drive (or at least the entire OmniRush directory structure). This can be done with NT based backup systems and agents, as well as by booting under DOS and using a tool like Ghost. (Ghost type backups are strongly recommended before any upgrade of either the OS or OmniRush.) The benefits of this approach include simplicity, and completeness. The downside is that OmniRush must be shut down, usually via batch file. (Note that a batch file shutdown of OmniRush is only possible when OmniRush is run in NT Service mode.) Z-Firm Utility Based Z-Firm offers automatic and interactive tools for backing up the OmniRush Database. The automatic way is to set up the backup in the OmniRush Launcher Settings. This will make a safe, restoreable copy of the full database as seen in <OmniRush Root Directory>\DATA\Database\. The copy is put in the directory you specify. By default, OmniRush will make a backup every day at 1:00 AM, and put the data into c:\temp\OR_Backup\. The contents of c:\temp\OR_Backup\ are closed files, safe to backup at any time other than when they are being created at 1:00 AM (the process may take several minutes, depending on the amount of data). To change the automatic backup settings, run Administrator and: In Modules, right click on the server PC Select Launcher Settings Go to the Database Auto-Backup tab Set to taste. 371 OmniRush Administration & User Manual Note that as the OmniRush data store grows, this will also grow. Restoration is done by shutting down the ZF DBEngine and copying the file set into the database directory (so the ZF DBEngine must be installed and the core must be operational). Interactively, there are two methods: FR5Maintain.exe This interactive utility, in the OmniRush Client directory, can do the same backup that the Launcher does, but it is interactive. Restoration is done by shutting down the ZF DBEngine and copying the file set into the database directory. (so the ZF DBEngine must be installed and the core must be operational).. FR5DBUtils.exe This interactive utility, in the OmniRush Client directory, can backup the database to dBase (.dbf) files. It can also restore the .dbf files to the database. This utility was designed to allow for a new database structure to be installed. E.g. backup data, install new, empty restructured database, restore data to new structure. Backing Up the OmniRush Document Store There are no utilities for backing up the document store. This is the responsibility of the system administrator. Backing Up the UPS Shipping Server State Data If using the UPS shipping module of OmniRush, this state data is held in the ShipRush installation on the OmniRush Server PC. Use the ShipRush utilities to make backups of the shipping data. Note that to enable a full system recovery, the "save system state" feature must be used. Note UPS state data is not 'mission critical' to restoring an OmniRush system, as the shipping components can be reinstalled, and that OmniRush can be restored without a backup of the shipping state data. However having the data on hand can help recreate a system in the event of a system failure or migration. Z-Firm Recommended Backup Strategy All sites: Use Ghost or similar drive image technology in the following way: Before installing OmniRush Before installing any operating system upgrade or service pack Before installing OmniRush upgrades Once every 30 or 90 days for a recoverable system fall back. Data Back Up: Decide what is right. If you use OmniRush with it set for external master documents, and you do not receive faxes, then the only backup necessary is of the configuration. Use FR5DBUtils.exe once a month, and keep the backup files in a safe place. If OmniRush is used with internal documents as masters, and/or for fax receiving, and/or the job data is used for reporting then: 372 Install your backup software or agent on the OmniRush Server. Use Open File Manager or something similar on the OmniRush Server. Set the backup software to backup open files Technical Reference Backup up the following directories with all subdirectories: <OmniRush Root Directory>\DATA\Documents\ c:\temp\or_backup\ Confirm that the OmniRush auto-backup is running properly When OmniRush (or any application) is used in a mission critical use, test restorations and test recoveries should be performed at least quarterly. OmniRush Database Maintenance Generally, the OmniRush database requires zero maintenance except for backups. If there is concern that the ZF DBEngine database may have become corrupt (due to power interruption, hardware failure, or other problem), the FR5Maintain.exe utility can be used. This interactive tool has options to: Backup Reindex Check Fix Defragment ** Be sure to backup the entire OmniRush system, including the database before performing a fix or defragment. ** Watching Free Disk Space OmniRush will consume disk space with data, so it is important to monitor available disk space on the OmniRush Server. Disk space consumption is minimal if master documents are external, and OmniRush is not set to keep the merged documents. If tracks are configured to keep job documents (Track | Extended Settings | Job Document Defaults), a lot of disk space may be consumed...quickly! The OmniRush system will shut itself down, perhaps crudely (e.g. interrupting jobs in progress), if free space falls too low (even briefly). Generally, 100 MB free space is the absolute bare minimum for OmniRush operation, and depending on settings (especially keeping job documents), OmniRush disk consumption can grow very, very quickly. NT Account for Service Login When installing OmniRush, you are prompted for an NT account and password. This account must be administrator equivalent, as it will be automatically given the 'log on as service' privilege on the OmniRush Server PC. This account will be used by all the OmniRush Server Modules (except Launcher). The account must be able to access network resources required by OmniRush, such as: Network printers Shared directories (such as the SalesLogix Sync directories, and GoldMine directories) 373 OmniRush Administration & User Manual If the password to this account is changed, OmniRush modules will fail to start. There are two ways to update the password used by the modules: A. Run the OmniRush Administrator on the OmniRush Server PC. Right-click on the Server PC under Modules, and select Launcher Settings. The username and password can be set here. B. Use the NT Service Administrator to manually update the login ID and password for each OmniRush module. Note that if 'B' is done, 'A' should be done later, as the settings in Administrator will be used whenever a new OmniRush module is created. NT Services are complex, and require Win2000 expertise to manage. NT Services, especially in a networked environment, are complex to manage. Do not attempt use of OmniRush as an NT Service unless you have appropriate training and/or certification. Z-Firm does not offer technical support for Windows networking/operating system. Stopping & Starting OmniRush from a Batch File OmniRush services can be started and stopped from batch files. This can be useful to: Shut down an OmniRush Database Connector module to backup or maintain the database Shut down all of OmniRush to make a full backup of the OmniRush system Start or shut down certain modules to control when they do their processing An understanding of NT Service dependencies can be helpful here (Note, NT Services are complex). NT Services can be started and stopped from the command line using the NET STOP or NET START commands. For example: c:>net stop "<service display name>" or c:>net start "<service display name>" The name of the service can be found by looking in the NT service manager. Quotation marks are needed if the name has spaces in it. To stop an individual module, a single net stop command will work. To stop all modules and Launcher, each module must be stopped individually, and then stop launcher last. To stop all modules, Launcher, and the Z-Firm DBEngine, each module must be stopped individually, then stop launcher, and finally stop the Z-Firm DBEngine. 374 Technical Reference Start up in the reverse order. However, note that modules do not need to be started if they are set as Active in the OmniRush Administrator. Just start the Z-Firm DBEngine and Launcher, and Launcher will start all the active modules. Examples: Full shutdown of OmniRush: net net net net stop stop stop stop "Hardware fax module" "OmniRush Prt/Raster module" "OmniRush launcher module" "Z-Firm DBEngine" To restart this same system: net start "Z-Firm DBEngine" net start "OmniRush launcher module" The Launcher will take care of starting the Print Raster and Fax modules. Monitoring for Errors OmniRush logs critical errors in the OmniRush logs and in the NT Event Log. NT system management tools can watch the Application area of the NT Event Log for errors from the OmniRush system. Restoring an OmniRush System *** For advanced administrators only *** *** Not supported by Z-Firm technical support *** To understand how to restore OmniRush, please first see the Backing Up OmniRush article. This section applies to: a) Restoring OmniRush to a different PC than the original. b) Moving OmniRush to a different drive on the same PC as the original. (If the Z-Firm DBEngine needs to be restored to the original OmniRush PC, please see the OmniRush Knowledge Base at www.zfirm.com (search for 'restore').) The OmniRush Server installs several subdirectories under "C:\Program Files\Z-Firm LLC\OmniRush\" All of these directories are static program files, except for the \DATA\ subdirectory. This directory holds the Z-Firm DBEngine and the Document Repository. By default, this is located in the "C:\Program Files\Z-Firm LLC\OmniRush\DATA\" directory. If the original OmniRush system is available for the migration, the steps to move to another PC are: On the Original PC: 375 OmniRush Administration & User Manual a) On the original OmniRush Server PC, shut down all OmniRush modules, clients, and launcher. b) On the original OmniRush Server PC, stop the Z-Firm DBEngine service c) Copy the "C:\Program Files\Z-Firm LLC\OmniRush\DATA\" (and all subdirectories) to a safe backup location. On the new PC: d) Install OmniRush on the new PC. Install the same version and build of OmniRush as exists on the original OmniRush Server PC (it can be updated/upgraded after the migration is successfully completed). Reboot at the end of the install as prompted. e) Shut down all OmniRush modules, clients, and launcher. f) Stop the Z-Firm DBEngine service g) Copy the backup data created in step 'c' above into the "C:\Program Files\Z-Firm LLC\OmniRush\DATA\" (Make sure that the base directory structure is not changed!) h) Start the Z-Firm DB Engine service i) Start the OmniRush Administrator j) Go to File | Settings, go to the Rename tab k) Select the server on the left (it will be the original PC name), and press Rename l) Accept the confirmation dialog m) Reboot the system n) Start Administrator, and walk through the "post restore" configuration steps. o) Start Launcher and modules, run some test jobs to confirm proper operation. Check that documents in ODMS open for edit properly. If the original OmniRush system is available for the migration, the steps to move to another drive on the same PC are: On the Original PC: a) On the original OmniRush Server PC, shut down all OmniRush modules, clients, and launcher. b) On the original OmniRush Server PC, stop the Z-Firm DBEngine service 376 Technical Reference c) Copy the "C:\Program Files\Z-Firm LLC\OmniRush\DATA\" (and all subdirectories) to a safe backup location. d) It is strongly recommended to make a drive image (using Ghost or similar) at this point e) Manually remove OmniRush (see the OmniRush helpfile uninstallation directions) f) Reboot the PC g) Install OmniRush to the new drive letter, reboot at the end of the install as prompted. Install the same version and build of OmniRush as existed on the original OmniRush hard drive (it can be updated/upgraded after the migration is successfully completed). Reboot at the end of the install as prompted. h) Shut down all OmniRush modules, clients, and launcher. i) Stop the Z-Firm DBEngine service j) Copy the backup data created in step 'c' above into the "...\Z-Firm LLC\OmniRush\DATA\" (Make sure that the base directory structure is not changed!) k) Reboot the system l) Start Administrator, and walk through the "post restore" configuration steps. m) Start Launcher and modules, run some test jobs to confirm proper operation. Check that documents in ODMS open for edit properly. If the original OmniRush system is not available (e.g. hardware failure makes it unavailable), the steps are the same as above, however tape backup will be needed to retrieve the \DATA\ directory structure to restore to the new OmniRush server. Perform Post Restore Configuration Changes The following tweaks are needed in many cases after restoring to a system with a different PC name. If the new PC name is the same as the original, it is possible that no changes will be needed. 1. Check user private search paths. These may need adjustment to reflect the new environment (especially if they referenced paths on the OmniRush Server PC). Open each user in the OmniRush Administrator and verify/adjust this setting as appropriate. 2. Track settings: Document save path. If merge documents, shipping labels, etc. are being saved to disk, the path to save to may need adjustment in the Track to reflect the new PC name/drive letter. 3. View | Logs: The Log Viewer in the OmniRush Administrator remembers the path to the logs as UNC. If an OmniRush system is moved to a different PC name or drive letter, the Log Viewer will come up empty the first time you use it after a restoration. Set the new UNC path in the Log Viewer to re-enable this feature. 377 OmniRush Administration & User Manual 4. Document Import Directory: In General Server Settings (Administrator | Server Modules | List by Server PC | <right click on your server> | General Server Settings). Set the "Import Documents From" to the correct path if needed. 5. All tracks that print should have the printer reset (applies if the OmniRush Server PC name has changed). 6. If using Virtual Tracks with shipping, printer names may need to be adjusted for new naming conventions. 7. Any other UNC references to the old PC name will need to be changed to the new PC name (in FRP files, etc.) Starting and Stopping OmniRush DBIO for SQL Backup In many cases, the OmniRush Database Connector needs to be shut down temporarily while your SQL server is backed up. If OmniRush is running in NT Service mode, this can be easily done using NET START and NET STOP commands. Note that the following SQL maintenance functions may cause OmniRush to lose its connection to the database: Taking SQL Server to single user mode In some cases, the SQL Server Backup will cause connections to drop Clearing SQL Server client connections (using KILL or equivalent) Stopping SQL Server service Rebooting the SQL Server In most cases, it is nightly backups that cause the issues. When OmniRush is run in NT Service mode, this can be worked around with a method like the following. Scenario: SQL Server backup runs at 10:00 PM weeknights, and runs for 60 minutes. Create two batch files: stop-omnirush-db-connector.bat net stop "OmniRushDefault DB Connector" start-omnirush-db-connector.bat net start "OmniRushDefault DB Connector" (Note, the name of the service will probably differ on your machine. Check your Services list.) The next step is to hang the start and stop batch files on a timer on the OmniRush Server PC. For example, we might set the stop file to trigger at 9:55 PM (5 minutes before the backup), and the start file to trigger at 11:10 PM (10 minutes after the backup finishes). Performance Discussions Server Scaling OmniRush scales very well, and will respond to: 378 Technical Reference More RAM Faster CPU Multiple CPU's Clustering OmniRush supports server clusters. This can be used to many advantages: Two or three inexpensive P-II 233 class machines with 156MB or more of RAM each can make an excellent, high-throughput cluster for very moderate cost. Clusters allow limited failover (not all modules support fail over) High performance hardware can handle very large job volume. Note that clustering requires additional software licenses from Z-Firm. Fax Performance & Throughput (aka Speed) Getting your fax blast out is important. In many cases, OmniRush is not 'tuned' for maximum throughput. This discussion should help. Note: If throughput is important, running OmniRush on a slow PC is not appropriate. Anyone concerned with throughput should be using at least a 1ghz system with 192MB or more of RAM. Fax Throughput Generally The rule of thumb is 60 seconds per page. So one hardware fax port (one phone line) can send or receive 60 pages in an hour. In today's environment this is conservative, and if you are really on the edge you could run your numbers based on 45 seconds per page if you send only text. If graphics, photos, or artwork is part of the mix, 45 seconds may be a little optimistic. The first step is to understand your throughput needs. Ask these questions: How many pages per day does my organization receive? How many pages per day does my organization send? What is the mix of outbound versus inbound fax? Are my outbound faxes time sensitive (e.g. they need to go out now, when I press send, or any time in the next 24 hours, or some time this year). (The technical term for this is latency--the lag time between when you press send and when FaxRush actually tries to transmit the fax.) Executive Summary for Hardware Fax: 500 pages / day: Between 2 and 4 channels needed, depending on how time sensitive the documents are. 1500 pages / day: Between 4 and 12 channels needed, depending on how time sensitive the documents are. 5000 pages / day: Between 10 and 24 channels needed, depending on how time sensitive the documents are. 379 OmniRush Administration & User Manual Note: FaxRush internet fax is equivalent to a 4-to-10 channel system. If you need a ton of outbound throughput, internet fax can do the trick. The downside is that you are paying per page sent. The upside is that there is no up front hardware cost for fax boards. It is fine to mix fax boards and internet fax. You can configure FaxRush to have faxes sent by hardware or internet fax on a job by job (or batch by batch) basis, or to have both hardware and internet fax service the general job queue. Next: More about internet fax. Scenarios With Math: A step by step guide how Z-Firm figures out these questions. A Law Office / Professional Firm: The law offices of Out For Justice sends 250 pages per day, and receives about as many. That is a total of 500 pages per day. But it is very important that inbound callers not get a busy when sending a fax to OFJ. Likewise, on outbound faxes, time matters. A fax sitting for half an hour before it gets attempted is NOT OK at OFJ. The Math: 250 pages is about four hours of channel time (250 pages = 250 minutes. 250 minutes divided by 60 is 4.2 hours). So one inbound channel and one outbound channel could handle this volume, but would be 50% utilized. This means that folks trying to send to OFJ would get busy signals almost half the time because the receiving channel would be in use for 4 hours out of every 8 hour workday. Not OK. OFJ for sure needs 2 channels dedicated to receiving faxes. In this case, less than 25% of inbound calls would get a busy. Since fax machines automatically retry 3 times (typically), it would be essentially a 100% success rate on the first try. Get two phone lines, have the phone company make them a 'hunt group' and inbound is covered. Now on outbound we are dealing with the same issue. 1 channel can do it, but there will for sure be delays, often of an hour or more. Attorneys do not have that kind of time to wait for the machine. So for sure 2 channels are needed for outbound, and maybe 3 if delays want to be kept under 10 minutes at all times. Z-Firm's recommendation: For this customer, start with 4 lines, or with 5 if funds are available. Marketing Firm: Blast It Everywhere (BIE) sends out a lot of literature. They do not receive, only send. At peak they will send 2000-5000 in a shot, and this happens about once a week. These jobs can take hours to send, but not more than a day (8 hours). To stay 'well behaved' BIE needs the system to shut down from 10:00 PM to 8:00 AM every day, and all weekend, so that home fax machines do not ring at night. The Math: BIE can use either FaxRush Internet Fax or hardware fax. Either way, the Schedule feature of FaxRush can be used to shut the system down at night and on weekends so no faxes will be sent at those times. 5000 pages is about 83 hours of channel time (5000 divided by 60 = 83.3 hours). So 10 channels could handle this load in an 8-12 hour window. Clearly the smallest system that would fly here is 10 channels. A 12 or 16 channel system certainly would not hurt in this 380 Technical Reference instance. In most cases, a digital fax board would be used, and the system would be set up with a T1 line. Z-Firm's recommendation: For this customer, a digital Brooktrout board, a T1 line, and either 10 or 12 channels as a minimum. 16 channels would be wise for this kind of volume if budget allows. Finding Bottlenecks: Think your current FaxRush rig should go faster than it does? In any fax performance discussion, there is one question: Where is the bottleneck ? For hardware fax, the bottleneck is nearly always the number of fax ports (unless you have more than eight ports). For example, say you are sending a 5 page fax out, and have a four-port TR114 board. This setup can pump out 30-60 faxes per hour, or 720-1440 faxes per 24-hour period (the range is due to possible differences in the fax content, and the quality of the fax numbers). Now the same 5-page fax, via FaxRush Internet Fax, should pump out 100-350 faxes per hour as long as at least 240kb/sec of internet bandwidth is available to OmniRush. If you are not hitting this number check the following potential bottlenecks: a) Internet bandwidth b) RTF is too large (Make a registry tweak and it gets much smaller! See this help file page for the trick.) c) Track setting Max Queue Size is too small: For hardware fax, set it to 4 times the number of fax ports or 25, whichever is higher For internet fax, set to 250 Note that fax content can impact performance. A typical page of text will transmit in 30-60 seconds. Documents that have photos, color images, or shades (like background color) can take much longer to transmit. If PDF's are heavily used, consider setting the conversion contrast to 75 or 100. Next: Internet Fax Performance Tuning Shipping Server Throughput Quick Links Shipping Server Optimizing Steps Shipping Server Performance Discussion Shipping Server Optimizing Steps Module Optimizations As discussed below, it may be appropriate to run multiple shipping modules concurrently. To implement, simply create multiple modules, and configure. Note that multiple shipping modules are supported for DHL and FedEx only at this time. No other configuration is needed to run multiple modules. 381 OmniRush Administration & User Manual Printing Optimizations Thermal label printing is very low overhead, and has negligible impact on performance. Laser label printing, however, uses the Windows printing system, and can impact performance in a number of ways. OmniRush builds 504 and higher are optimized for much more efficient label printing. The general rule(s) for printing are: 1. If OmniRush is saving the label to disk, uncheck the Print Label option on the OmniRush track. Some sites configure OmniRush to print to a NUL printer because only the label image is really needed. Avoid the NUL printer, as the overhead is high. OmniRush v6.0 and higher allow printing to be turned off. 2. Use a highly compatible print driver. For example, if the laser printer is PCL compatible (as nearly all are), use an HP Laserjet III print driver. This gives excellent results, and improves printing performance. 3. [User suggested, not verified by Z-Firm:] In the printer folder, select Properties on the HP III printer, and go to the Advanced tab. At the bottom is a check box 'Enable Advanced Printing Features,' uncheck this option to reduce print job size. Extreme Printing Sites that print over low-bandwidth connections (e.g. VPN's to remote warehouses, etc.) will want to minimize print job size as much as possible. If thermal label printers are used, there is nothing to worry about here. However, if laser labels are used, print job size can be reduced in most cases to approximately 60-70kb per label with these steps: 1. Use an HP Laserjet III print driver. Configure for direct IP printing to the remote printer. This keeps the print queue on the OmniRush server, and prints directly without remote print servers in the path. 2. [Applies to builds 504 and higher] Create the following registry key: HKEY_LOCAL_MACHINE\SOFTWARE\Z-Firm LLC\Printing Settings Under this key, create a new string value: CompactPrintJob Set this value to: Y 3. Restart the OmniRush shipping modules 4. Test printing some labels to confirm proper operation. Shipping Server Performance Discussion There are two measurements of shipping performance: Single job latency (how long from when the shipping job is created in the SQL database until the SQL database is updated with the results of the job) System throughput (total jobs per hour or per day) (Detailed definitions below.) OmniRush is designed as an asynchronous system. Shipping jobs are 'dropped' into OmniRush, usually through the Open SQL Connector (DBIO). OmniRush is a multi-threaded system, and can scale up to high throughput. Z-Firm has tested OmniRush performance, and provides these figures for reference. 382 Technical Reference Note: These figures are a relative reference point only. Actual system throughput depends on OmniRush hardware, local network performance, internet connection/congestion, and in some cases shipping carrier host load, which can vary from day to day and during the day. Neither ZFirm nor the shipping carriers make any promises or guarantees of uptime, performance or throughput. Performance Background Notes: There are a few OmniRush configuration elements that affect latency and throughput: How quickly jobs are pulled from the database into OmniRush [advanced module setting] OmniRush Job Queue Depth [advanced track setting] Number of shipping modules (OmniRush supports multiple concurrent DHL and FedEx shipping modules on one PC) [affects throughput, not latency] To maximize performance, take these configuration steps when OmniRush is set up and operational: DB Connector Module: Extended Tab: Delay Between Polls: set to 1 second DB Connector Module: Extended Tab: Scan Host DB for Aborts: uncheck Shipping Track: Basic Tab: Max Queue Size: 50 is appropriate for nearly all installations. Super heavy throughput may justify increasing to 100. Additional Shipping Modules: For UPS shipping, only one module can be configured on a given OmniRush server. For DHL and FedEx shipping, a single OmniRush server can support up to six of modules of each type (for a total of twelve). In most cases, three or four modules per carrier are sufficient. OmniRush Shipping Performance Reference Data OmniRush v6 Four DHL modules Four FedEx modules One UPS module Dual-processor Windows2000 system, 256MB RAM Testing one carrier at a time Saving labels to disk, not printing OmniRush Reference Throughput (see notes and disclaimers above) Shipments per Shipments per Hour Minute DHL 40 2400 FedEx 26 1560 UPS 20 1200 Shipments per 8hour day 19,000 12,000 9,000 It is expected that all three of the above carriers could run concurrently, with performance within %10 of the numbers above. Job latency: Latency varies considerably due to a number of factors, including the performance and load of the host CRM / SQL database. Typical end-to-end shipment latency on a lightly loaded / unloaded system will be eight to twenty seconds. When processing a queue of jobs, individual job latency will be significantly higher. 383 OmniRush Administration & User Manual Performance Definitions Latency This is the time from when a job is created to the time when the job has been processed by OmniRush. Latency is usually expressed in seconds or minutes. Shorter times give a system more of a 'real time' or 'interactive' feel. It is normal for any system to experience increasing latency as job load increases. Latency is simply the time it takes from the beginning to the end of a job. These start and end times can be looked at a few different ways: Job start time: This could be defined as (a) the moment when the OmniRush job record is created in the SalesLogix or SQL database; or, (b) the moment when OmniRush first 'sees' the job record in the database. From a technical perspective, there are other possible start times, but the two above are most applicable to system users. Job end time: This can be defined as (a) when the job has been completed, e.g. the fax has finished transmitting, or the shipping label has been saved to disk; or (b) when OmniRush has posted back to the external database (e.g. SalesLogix, SQL, or GoldMine) the job results. Throughput This is the number of jobs a system can process in a given period of time, usually per minute, per hour, or per day. For example, a site may need a system that can process 4000 shipments per eight-hour day. Capacity This is the ability of a system to support a number of jobs every day or week for months and years on end. It is typical for systems to require some periodic maintenance in a situation where the overall job throughput is large. Email Merge Throughput Tuning Generally Email throughput is usually subject to two potential bottlenecks: 1. Message size 2. Available internet bandwidth The message size issue is simple: How large is each message? Is it 1kb or 2kb of text or html, or is it 100kb or more of html and / or attached files (PDF's and what have you). Small messages (under 10kb) can be pushed out very quickly. Larger messages will consume bandwidth on the internet connection and will cause the internet connection to become a bottleneck. (For example, 5000 email messages each with a 750 kb attachment is 3.7 gigabytes of data, which will take some days to send over a full T1 circuit). You have direct control over message size. Some techniques to control message size are: Use a good HTML tool that creates clean, minimal HTML (unlike Microsoft Office) 384 Technical Reference Optimize merge documents to create small PDF files (use line art instead of color photos, etc.) Move file attachments to a file server, and include a link to the file in the HTML (instead of attaching the file) Available internet bandwidth is a more subtle issue. For example, the site may have a full T1 to the internet, but it is already running at 90% utilization for other tasks, without OmniRush in the picture. So how much actual bandwidth is available to OmniRush? Not terribly much. Even small messages may only trickle out in this situation, and large messages will slow to a real crawl. However, 50kb or 100kb of available bandwidth is enough to get out a lot of messages under 10kb, it is attachments that will be problematic. At some sites, everything rolls along fine in this regard until a virus, worm or adware attack sucks up all the available internet bandwidth, bring message transmission to a crawl. Turning to the OmniRush Server, some tweaking can help boost OmniRush email throughput. Items to tune: Template size. As mentioned above, HTML and RTF file size should be monitored. For HTML, anything over 30kb is large. Avoid using FrontPage and Microsoft Word to generate HTML as these applications often create HTML that is much larger than necessary. Tools such as Dreamweaver usually give smaller results (often much smaller). For RTF anything over 2MB is large and may create a bottleneck at the merging or conversion stages. See the tips on how to make RTF's small. If using the RTF-to-PDF merge & email feature, the PDF conversion may be the bottleneck. System analysis may be needed to identify the bottleneck. Make sure the OmniRush Server is at least a 1.5 ghz machine if doing conversion to PDF. Of course, if TIF or PDF attachments are being sent, the outbound internet connection itself may be the bottleneck. Email Track Setting: Track Max Queue Size. For email tracks, this can be set to 100 or 200. 250 is a realistic maximum. Email Module Setting: Advanced: Number of Mailing Threads. Set to 5 Email Module Setting: Advanced: Retrieve up to 40 jobs every 2000 ms Email Module Setting: Advanced: Max Number of Attempts: Set to 2 or 3. Setting higher than 3 may create a throughput problem. Delay between Attempts: 10 minutes. Setting higher than 10 minutes may adversely impact throughput. These settings will dramatically increase email throughput in most cases. Troubleshooting Troubleshooting Resources There are a number of electronic, on-line troubleshooting resources available. These include: Your Reseller. Active OmniRush resellers are trained, and are backed by Z-Firm. Your reseller is your first line of support. On Line Knowledge Base. www.zfirm.com has a full text knowledge base. If you are getting an error, or have a question, ask the knowledge base. The knowledge base is the place to turn if you get an error message. 385 OmniRush Administration & User Manual This Help File. Use the index and search options in this helpfile to find what you are after. The web version of this helpfile is updated frequently and is available at www.zfirm.com Internet Newsgroups. These newsgroups are monitored by Z-Firm support staff and engineers. OmniRush newsgroups are private--access is provided for a limited period as part of the OmniRush purchase. You may need to request access from Z-Firm sales. Z-Firm Technical Support. Paid support incidents are available from Z-Firm technical support staff. Troubleshooting Steps Troubleshooting OmniRush is a linear progression of steps to verify that the components are operating properly. 1. Does Administrator launch on the OmniRush Server? 2. Are all the OmniRush Modules running? If both of these are yes, then the core OmniRush system is running, and problems are probably configuration related. If the OmniRush Administrator cannot log in to the Z-Firm DBEngine, then the DBEngine may be down or problematic. If the Administrator can log in, check that all the modules are running. Often the problem is simply that a module needs to be started, or that a module cannot start due to a configuration or licensing issue. Troubleshooting Brooktrout Cards First, is it Hardware or Software (The Brooktrout card and the Brooktrout driver are considered hardware. OmniRush is the Software component.) Check that: Brooktrout Driver is installed: Check the Windows Device Manager: If the PnP driver is in use, the Brooktrout board should be listed and should not have a question mark on it. Try going to a command prompt and running faxinit manually. The steps are: Open a command prompt Switch to the <windir>\bfax\ directory (e.g. c:\windows\bfax\) type: faxinit -n <enter> You should see something like this (for a 4-port TR114 board) fax0 224 TR114+ fax1 228 TR114+ fax2 22c TR114+ fax3 230 TR114+ Total channels: 4 TR114; 0 TruFax; 0 TR112/TR111MC; 0 TR200 No BRI TR114s found. If the faxinit runs properly, then we assume that the driver and board are functioning. 386 Technical Reference If there are any errors when running faxinit, then: ISA: Set the card to a different IRQ/Port and reinstall the driver to the new settings PCI: Check the Windows Device Manager: Is the Brooktrout board listed properly? If not, reinstall the driver. Try putting the card in a different slot If the problem persists, see the troubleshooting document If Ports Do Not Detect If ports do not detect, even though they are listed in faxinit.cfg, a hardware conflict is likely. See the troubleshooting document. If Ports Detect, But Module Has Errors Opening/Testing Port (This would be visible in the module log in Administrator.) If ports do detect, but cannot be initialized by the fax module, even though they are listed in faxinit.cfg, a hardware conflict is likely. See the troubleshooting document. Port Detection in the Fax Module When ports are detected, the following steps happen: 1. NT Service Mode: If the OmniRush Fax Module NT Service has not yet been created, the Launcher creates it. 2. The Launcher starts the service in port detection mode. 3. The module starts, detects ports, and shuts down. Use the Administrator View | Module Logs to see if there is a problem. A problem at step 1 or 2 will result in an entry in the Launcher log. A problem in step 3 will appear either in the Fax Hardware module log, or if there is a more general issue, in the FR5LOG.txt file. Possible issues when running in NT Service Mode: The NT userid/password given to OmniRush during installation are no longer valid. So the Service cannot start. This can be changed one service at a time in the NT service manager (there is a login ID/PW field pair). Alternately, see how to do it globally in this section. The Module is starting, but is failing to see the ports. (See the fax module log.) The Module sees the ports, but cannot initialize them. (See the fax module log.) Troubleshooting Brooktrout Cards Background check: Using a supported model Running a supported Operating System 387 OmniRush Administration & User Manual New Style TrueFax boards and TR1034 boards use the BOSTON drivers. These drivess have their own configuration and logging system. When working with BOSTON based boards, the first step is to ensure that Boston itself can see and configure the boards. If this cannot be done, contact Brooktrout technical support. For Old Style TruFax and TR114, there is no faxinit.log file. There is also no FaxInit or RunFaxIn NT Service. The way to tell that the driver kit is completely installed is: 1. Open the Windows Device Manager (Control Panel | System | Hardware | Device Manager), check that the Brooktrout board is listed and does not have a ? mark on it ( The ? mark indicates that the driver is not installed or that there is a low level hardware problem of some kind.). 2. Check for the <windir>\bfax\ directory (e.g. c:\windows\bfax\). It should exist, and should have at least 6 files in it, including faxinit.exe, btcall.cfg, and one or more .PEX files. 3. When you run faxinit from a command line, the ports are properly detected. If all the above are true, then the environment is complete, and should operate correctly. If any of the items 1-3 above are not in gear, here are the resolution steps: Issue 1: Brooktrout Driver is not present in Device Manager In Device Manager, select Detect Hardware. The board should be found, and you can then install the driver as described in the driver installation document. Device is present in Device Manager, but has a question mark on it Open the device in Device Manager, select Reinstall or Update Driver. Navigate to C:\Program Files\Z-Firm LLC\OmniRush\Utilities\Brooktrout_PnP_Driver\ and select bfax.inf as the driver. Issue 2: The \bfax\ directory is missing or only has one or two files in it. Navigate to: "C:\Program Files\Z-Firm LLC\OmniRush\Utilities\Brooktrout_PnP_Driver\" and run the Brooktrout_Support_Kit.exe Issue 3: When you run faxinit from a command line, there is an error, or the ports are not listed. This could mean a hardware conflict. Try moving the Brooktrout board to a different PCI slot. This resolves the vast majority of problems. If the issue persists, continue through the rest of this page for troubleshooting. The most likely issues: a. Ports are listed when you run faxinit from a command line but OmniRush cannot detect the ports. b. The driver installed, but the ports are not listed when you run faxinit from a command line and OmniRush cannot detect the ports. Don't Do with Brooktrout 388 Technical Reference Don't even think about installing ANY drivers from ANY source for a Brooktrout board without reading the OmniRush documentation on the subject. Don't install the Brooktrout drivers from a Brooktrout supplied driver disk or download. You must use only the OmniRush drivers for Brooktrout. Don't use Brooktrout drivers from another fax software package on the system with OmniRush. Don't mix board types (e.g. TruFax and TR1034) in a single system. If other Brooktrout drivers are on the system They should be completely removed before installing the OmniRush driver. Whatever was used to get the drivers on the system can be used to get them off. Do you know there are different kinds of PCI boards and slots? Some PCI boards will not fit in all PCI slots! See this article on the web for more information. TruFax PCI and analog TR114 PCI boards exist in two flavors: 5 volt and Universal (3.3 volt/5 volt). The Universal boards are usually called ‘uPCI’ (e.g. TruFax uPCI or TR114-P2LuPCI). If you have the board in-hand, it is easy to tell which flavor it is: The 5 volt versions have a single notch in the PCI connector, the universal versions have two notches. Most boards sold as new after September 2002 are Universal. Many newer PC’s have only 3.3 volt slots. Brooktrout boards with only one notch in the PCI connector will not fit into a 3.3 volt slot. Be sure PC system has PCI slots appropriate for your board. TR1034 & TR114 boards are full length & require excellent airflow over the board(s). Make sure the chassis will accept a full length board and that there is excellent fan-fed ventilation. Digital TR114 boards are 5 volt only. Make sure the PC has sufficient available full length 5 volt slots. Brooktrout boards often require dedicated interrupts (IRQ’s). Some PC’s will ‘share’ an interrupt across multiple devices or PCI slots. In most systems, the BIOS can be used to dedicate an interrupt to the PCI slot used by the Brooktrout card. Some systems (for example, certain models of Dell Dimension) do not allow BIOS control over IRQ assignment by PCI slot. Brooktrout boards (and other advanced hardware, like certain video capture devices) may be incompatible with such systems. (Update the PC BIOS to the latest version, as this may resolve the problem. Support for this type of issue can only come from the PC manufacturer. Neither ZFirm nor Brooktrout has expertise in all PC BIOS issues.) Troubleshooting Try a different PCI slot. In many cases, simply changing slots resolves the problem. OmniRush requires a P-II-900 or higher. Make sure the PC meets this minimum requirement. 389 OmniRush Administration & User Manual In the system BIOS, disable unneeded devices (e.g. sound card, serial port(s), parallel port). Reboot and retry. If the problem persists, try different slots again now that the BIOS devices are disabled. Other Resolutions: Compaq (model 310, may apply to other models): Update the system BIOS to the latest from Compaq. “White Box” (clone) systems: Check the motherboard manufacturer web site for BIOS updates. Update the system BIOS if not running the latest version. Dell (model SC600 and others): Reassign the IRQ’s. See the Brooktrout Knowledge Base Article 1594 (or search www.brooktrout.com for: dell). White Box Systems: See the Brooktrout Knowledge Base Article above. It applies to other systems, though the steps to reconfigure the BIOS will be specific to the motherboard in use (and ergo not documented by Brooktrout). Note: The TruFax board is sensitive to IRQ sharing. The steps above are with the goal of giving the TruFax board a dedicated IRQ that is not shared with any other device. See the section below “PCI Resource Conflicts: TruFax” on page 5 below. FaxRush® v4.x Users Please Note! The #1 problem former FaxRush v4.x sites experience is using the drivers that came with FaxRush for OmniRush®. This will not work! OmniRush requires newer Brooktrout drivers. FaxRush-era drivers must be completely removed from the system, the PC rebooted, and the OmniRush drivers installed. Also note: The Brooktrout TruFax PCI board is not compatible with FaxRush v4.x and will not work with FaxRush. PCI Resource Conflicts: Old Style TruFax In some cases, the PCI bus will assign shared IRQ’s and other resources. While generally this is not a problem, certain devices do not share well with the TruFax PCU/uPCI board. This has been observed in a Dell 600 with a RAID controller, but could be seen in other systems as well. In Windows System Information, it is possible to see resource conflicts listed. The following is for such cases. (This is excerpted from steps provided by Dell technical support.) When the Dell Poweredge 600SC is powering up and displays the DELL logo, press F2SETUP to enter the system BIOS. You can scroll down using the arrows keys to the two subjects: 1. Integrated Devices and 2. PCI IRQ Assignment. Highlight Integrated Devices and press the ENTER key to see all the integrated devices listed. Here you can turn off a device that is not being use such as the Serial Port I which is usually set to AUTO for automatic by pressing the LEFT arrow key for OFF. The Dell system will then automatically use this freed-up IRQ for another device. IRQ resources can be assigned/reassigned to a device by highlighting PCI IRQ Assignment and pressing the ENTER key to see the IRQs being used by the PCI devices. 390 Technical Reference Here are listed the slots that have boards. Use the LEFT arrow key to change the IRQ for the PCI device. These are the methods that should be used when the uPCI Trufax cannot be found because another device is sharing the same IRQ. Troubleshooting the Administrator Module Gears Have Question Marks The Administrator communicates with two parts of the OmniRush Server: Z-Firm Database Engine Launcher Module(s) If communication with the Z-Firm DB Engine fails, you will not be able to log into Administrator. If communication with the Launcher fails, modules will appear in Administrator with question marks on them: In the example above, the modules are set to inactive, but their real-time status is not known. For example, they could be shutting down at this moment (e.g. up, but in transition to down state). A green gear with a question mark would indicate that the module is set to active, but its actual state is not known. It could be up, down, or in transition. To resolve, check the following: Launcher is running on the OmniRush Server PC. From the workstation, the OmniRush Server PC is ping-able by PC name and address. Check the setting in the Administrator's File | Administrator Settings menu. Server communication (which refers to communication with Launcher) can be set here. UDP Point to Point is an excellent choice. Troubleshooting Modules Fax Module Troubleshooting Recipients Receive Trailing Blank Page The Problem:When faxing, your fax machine spits out a blank page at the end of the fax. The Issue 391 OmniRush Administration & User Manual This is a benign issue that is dependent on the receiving fax machine. Many sheet fed fax machines (which includes all inkjet and laser printer based fax machines) 'scale to page' by default. These machines will not exhibit this problem. Others may have this feature turned off. Roll fed fax machines will not exhibit this problem. The HP inkjet fax machines often do not have scale to page turned on. In any event, your recipient generally will not receive the blank second page. In some cases, a merge document may have one or more trailing carraige return characters at the end of the document, and when data is merged into the document, these returns are pushed down, triggering an extra, blank, page. Clean up the merge document to resolve. Bottom line: In most cases, the receiving equipment is generating this, not OmniRush. Most recipients will not get a 2nd page, and those that do, get them from other folks in addition to you ! GoldMine Fax Jobs are Improperly Dialing 1 (or not) The Problem On some or all fax jobs, OmniRush is failing to properly dial 1 on long distance faxes, and/or is dialing local calls as area code + number instead of just the number. Or: OmniRush is dialing an 011 prefix on some faxes. Or: Using Easylink Internet Fax, OmniRush is dialing a '1' before the fax number on international faxes (jobs should only have country code + city code + number on international Easylink Internet Faxes). The Issue This indicates that the GoldMine phone format flag field is not set. This often happens when data is imported into GoldMine (sometimes even when GoldMine is used to import the data), and when data entry operators mistakenly check the 'International' box on the GoldMine data entry screen. For international faxing, it can reflect improper settings in OmniRush, or improperly formatted data in GoldMine. How to enter international fax numbers in GoldMine: This applies to dialing the international number with a modem or using Easylink Internet Fax. You have two options. Both methods require that the contact1->status flag be set properly (described below, and set interactively in GoldMine via Edit|Dial Phone|Edit Phone Format). Method A: Enter the full dialing string into GoldMine, e.g. 011-44-23-4445555 Method B: Use the '+' indicator before the country code, e.g. +44-23-4445555 In both cases, you must make sure that the settings in OmniRush, Settings|General|Fax Number for International Dial Prefix and Country code are correct (U.S.A. users would set international prefix to 011, and country code to 1). Resolution of GoldMine Phone Format Flag 392 Technical Reference The state of this flag can be viewed in GoldMine by going to Edit|Dial Phone|Edit Phone Format in GoldMine. (However, if data was imported into GoldMine, what is displayed here may not be accurate and the data should be checked with BR.) You can set this flag one record at a time via the GoldMine dialog in Edit|Dial Phone|Edit Phone Format. Resolving this problem en-masse on your GoldMine data requires some low-level manipulations of your GoldMine files. If you are not comfortable with global replaces or the Browser utility, please get a GoldMine VAR or a DBA to do this ! ** BACK UP ALL DATA ** 1. First, back up your GoldMine Contact directory. 2. Now, check with BR or a database browser the contact1->status field 3. This field should have a U in the left hand column for USA numbers and an 'I' for International. 4. Use BR or a GoldMine global replace to set it appropriately. Note: This can be modified one record at a time in GoldMine by selecting Edit | Dial Phone | Edit Phone Format. This may show as USA if STATUS is blank. Flipping it back and forth can set it correctly. Steps for using BR to quickly check your data: The BR utility can be used to make a quick count of how many records in your database are set for USA or International. These steps are for the BR4 utility for GoldMine v4. Similar steps apply to BR for GoldMine v5.x 1) Open the CONTACT1 file in BR 2) Press ctrl-J 3) Enter the expression: substr(status,1,1)='U' 4) Hit Enter 5) Hit Esc BR will now count how many records are set to USA format. You can change the expression to look for records with status set to 'I' or blank. Steps for using GoldMine Global Replace to set the phone status flag: 1) Back up all GoldMine data 2) If you have contact records for people outside the U.S. and Canada, create a filter to limit the replace operation to contacts in the U.S. and Canada (e.g. a filter that says 'country='' .OR. country='USA' .OR. upper(country)='CANADA') 3) With applicable filter active, go to Tools | Global Replace Fields | Update a field with advanced options 4) Select Field STATUS 5) Select 'Evaluate value as database expression' 6) In the Expression field, enter: "U" + substr(contact1->status,2,2) 393 OmniRush Administration & User Manual Then follow the signs. This will set all active records (e.g. all records within the current filter or group) to USA format phone numbers. Alternate Plan You can blank out the International prefix in Settings|General|Fax Number. This will prevent OmniRush from pre-pending a 011 to fax numbers that are perhaps unintentionally set to nonUSA. International Dialing from GoldMine The Issue You need to have OmniRush dial internationally, and/or have a lot of control over the fax number OmniRush dials. The Pieces OmniRush takes its dialing information from these places: The GoldMine Contact1->Status field The Fax number field (contact1->fax) OmniRush dialing setup in Settings|General|Fax Number PREDIAL.INI (if in use) Role Each Piece Plays The contact1->Status field is a three digit field. The left-most digit can be either a U, an I, or blank. If it is a U, that indicates that the record is a USA formatted phone number. An I indicates non-USA. A blank entry indicates incomplete data (usually the result of importing data into GoldMine with a home-brewed tool). The contact1->fax field is the Fax number on the GoldMine interface. USA-style contacts would have this as (111)222-3333. Non-USA can have any format here. The key is: If the record is set as USA in contact1->status, then OmniRush will attempt to perform localization and predial.ini processing. If contact1->status is set to I, then OmniRush will attempt to format the phone number for international dialing. The OmniRush dialing setup controls several things, listed here in order of usage: a) Your area code (OmniRush uses this to detect if a USA format phone number is local or long distance) b) Your Country code (used to attempt internationalization of fax numbers that are not fully entered in contact1->fax) c) Your international dial prefix (used to attempt internationalization of fax numbers that are not fully entered in contact1->fax) d) 'Static' prefix and suffix for dialing (e.g. a '9,' before every number) e) Use of PREDIAL.INI Typical Scenarios 394 Technical Reference U.S. dialing can be handled either by the default OmniRush localization method (dial seven digits for local, 1+ ten digits for long distance). International users or dialing is the interesting part. In all cases, you need to have a single approach--either OmniRush constructs the number, or you have the complete number in GoldMine. For U.S. based users, a common approach is to leave the International prefix in Settings|General|Fax Number blank and enter the full fax number in contact1-fax. A fax number might read: 0114465-898-7777 That is the international dial prefix (011), country code (44), city code (65), and number (8987777). The other method is to allow OmniRush to construct the prefix portion of the fax number. This requires that the records in GoldMine be set to I in contact1->status. When OmniRush encounters a fax number that is on a substr(contact1->status,1,1)=1 record, OmniRush will test if the international prefix is already in the fax number. It does this by comparing the international dialing prefix (set in Settings|General|Fax Number) with the first digit(s) of the fax number. If there is a match, OmniRush dials the fax number as is. If there is not a match, OmniRush prepends the international dialing prefix to the number. This method is useful both for U.S. based users and for users outside the U.S. Remember You can control the status flag, record by record, in GoldMine via the Edit|Dial Phone|Edit Phone Format selection. Easylink Fax Module Troubleshooting Nearly all problems with this module stem from problems in the internet connection. Any issues in the connection between the OmniRush Server PC and the internet can cause problems for this module. The first step is to carefully check all internet/TCPIP configuration, routing, connectivity, firewalls, etc. Advanced Diagnostic Logging (Only at the request of Z-Firm technical support) On the module settings, there is an option for Diagnostic Logging. To operate this option: Turn this option on Restart the module Run some jobs through the system Wait several minutes (or all day, as directed by Z-Firm technical support) Check the OmniRush Server directory (...\omnirush\server\v5\) for log files named similar to this: MS1FHK7VFD7UCLI_faxbridge_diagnostic1217.0 MS1FHK7VFD7UCLI_faxbridge_querydiagnostic1217.0 These files will need to be manually zipped up and submitted to Z-Firm technical support. 395 OmniRush Administration & User Manual Note: Be SURE to turn OFF the Diagnostic Logging option after sending the logs to Z-Firm. Leaving it on can fill the hard drive. Note: This logging will not work if the Easylink account is set on the track. To enable logging, set the account on the Easylink fax module only, not on the dbio or track. OmniRush Server Error on NT: Event Log Full I get an error sometimes: "Event Log Full" By default, OmniRush turns off NT event logging for print jobs. However, if this is turned back on, the log will fill sooner or later. There are two approaches to resolution: a) Set the NT print server to stop logging information events b) Set the Event Viewer to overwrite old events as new ones are added To stop logging NT print events: a) Open the printers folder b) Right click, but with NO PRINTER SELECTED c) Select Server Properties d) Go to the Advanced tab e) Uncheck 'Log Spooler Information Events To have the NT Event logger overwrite events as needed a) Open the NT Event Viewer b) Select Log|Log Settings c) Select 'Overwrite events as needed' Troubleshooting Database Connectors Troubleshooting SQL Connectors (incl. SalesLogix & GoldMine) Problem: OmniRush is running, but does not see the job record in the database. Possible Causes: 1. Hit the refresh key in your database client (e.g. F5), and see if the job has failed and has been scheduled back to you. If the job has gone to ~<Track> then the job has been imported by OmniRush and is in progress. 2. Check that OmniRush is set to the correct database alias, and that this alias points to the correct database. 3. Check that there are active Tracks in OmniRush 396 Technical Reference 4. Make sure that OmniRush connects to the database as the object owner of the tables (e.g. sysdba on SalesLogix) 5. Check the date and time on the OmniRush PC. It may be off (e.g. set in the past), which will cause it not to see jobs. 6. Use sql monitor to see the queries that OmniRush is doing on the database. This can give you a clue what is wrong. 7. Ballpark the query. Using isql, do SELECT * FROM SYSDBA.ACTIVITY WHERE CATEGORY='FAX' (or whatever query is appropriate for your database), and see if you get hits.... Software, Network, and Environment Discussion Networking Discussions Networking Details OmniRush is designed to operate on a TCPIP network, that can be homogeneous (e.g. %100 Windows PC's) or heterogeneous (e.g. a mix of Windows, Netware, Unix, Linux, etc. systems). In either event, OmniRush does make some assumptions about your network. In most all cases, this will already be true of your network without any additional configuration required. However, for problem sites, or thorough planning, here are the network requirements. Name to Address Resolution OmniRush assumes that all PC's involved can resolve each other's PC name to a reachable IP address. The PC's involved include the OmniRush Server PC, Client PC's that run the OmniRush Administrator, or any of the OmniRush client applications. This can be done via any name resolution mechanism (e.g. WINS, DNS, hosts file, etc.). The 'grunt' test is using the command line ping utility. The OmniRush Server PC and all the client PC's should be able to ping each other by name, e.g. from all client stations you should be able to successfully: ping <OmniRush Server PC name> IP Address Allocation The OmniRush Server PC should have a static IP address. This can be managed either via the PC local configuration, or by assigning a permanent lease in DHCP to the OmniRush Server PC for a specific address. This should be set up before any OmniRush software is installed. Client PC's can use DHCP or static IP addresses. Wide Area Networks and OmniRush 397 OmniRush Administration & User Manual Distributed companies often have a WAN in place, and need OmniRush to service that WAN. Common needs include: CRM SQL database is in Texas, but OmniRush needs to print in Texas and California. Multiple offices need to use a single OmniRush server. OmniRush administrator is in Seattle, but data center where CRM / OmniRush lives is in California Several rules of thumb can be used to guide the decisions on how to situate the pieces. The OmniRush Server should be on a LAN segment with the CRM SQL database. It should not access the SQL database over a WAN. Several users have done this successfully, however the database connection can be flaky, and Z-Firm will not support this configuration. The CRM sync server should also be local, not remote, to the OmniRush Server. OmniRush can print to printers across the WAN no problem. A single OmniRush server can print shipping labels or any other printables to different printers in different cities. The best way to implement this is to create print queues on a server local to the OmniRush server, and point those queues to the remote printers (using TCPIP printing, or protocol of your choice). The queues can also be created on the OmniRush PC itself. If remote offices need to use a single OmniRush Server, there are a number of possible configurations. Some popular variants are: Central CRM, Central OmniRush, remotes run CRM application via Terminal Server or a web client. No problem here to schedule activities to OmniRush. Terminal Server users can also run all the OmniRush client applications. Can OmniRush Client Apps Run Across WAN? In many cases, yes. These are client/server applications, and are tuned for limited bandwidth. However, latency is a concern. Modern WAN's with 500kb/s or more of bandwidth will usually work fine. However, Z-Firm cannot offer technical support for WAN use, as there are too many variables to manage. Module monitoring should be turned off over WAN circuits. Internet Connectivity Internet connectivity can be required by different components of OmniRush for different reasons. The recommended approach is: Internet access should be transparent (e.g. no proxy or SOCKS configuration required). Required IP ports should be open. For example, the E-Mail Server Module will require port 25 access either: 398 Through the firewall to the Internet (if it runs with the integrated SMTP server), or To the local or ISP based SMTP relay server configured in the email module. Technical Reference Internet Connectivity: Firewalls & Proxy Servers OmniRush core server requires access to the internet on port 80. Proxies must be either transparent or configured in Control Panel. Other OmniRush modules (e.g. Voice, FedEx, Internet Fax) have specific internet connectivity requirements that vary by module. In most the needs are for outbound connectivity on ports 80 (standard http), 443 (standard SSL), and 25 (standard smtp email). Refer to the Module documentation for details. OmniRush assumes an automatic, network connection to the Internet. This can be dial up, as long as it comes up transparently (read: automatically). The vast majority of internet connections will work with OmniRush. There are only a few types of connections that are problematic. For example, the OmniRush FedEx shipping module uses port 443 to establish an SSL connection to FedEx, so your firewall or proxy must be 'open' to allow communication on this port from the OmniRush Server PC. Dedicated Internet Connections Dedicated connections come in many flavors. 'Home' type connections (e.g. DSL & Cable Modem) should work fine. Business connections need to support the following kinds of connections to the internet: http and https Transparent proxy servers require no proxy configuration on the PC. For example, most NAT based solutions are transparent. If you are not sure if your proxy server is transparent, you can check it by checking your web browser configuration. If the web browser has proxy settings installed, then the OmniRush Server PC Control Panel will also need proxy settings. Supported Proxy Servers Supported firewalls and proxy servers include (but are not limited to): NAT (Linux, Cisco, Flowpoint, and many other devices support NAT). Linux IP Masquerade (another name for NAT in most cases). Microsoft Proxy Server WinProxy, however one setting must be modified 'Transparent' proxy servers (e.g. proxy servers that do not require a proxy configuration set in the web browser). Standard http proxy servers, with our without plain text authentication (the Microsoft Proxy Server can also operate in this mode). ZoneAlarm will work, however the correct OmniRush server module and/or ATOMSVC.EXE must be registered. See below for SOCKS server information. Known Problem Proxy Servers and Firewalls The following systems are not supported by OmniRush at this time. If your network has no other route to the Internet, then OmniRush cannot be used. (Note, this will change as OmniRush undergoes further development.) 399 OmniRush Administration & User Manual The Norton / Symantec Personal Firewall is problematic on High Security option. Switch to Low security before installing or using OmniRush. HTTP proxy servers that use SSL or other encrypted forms of authentication WinProxy WinProxy Setting The setting "Permit secure transmission on non standard ports" must be enabled for the OmniRush FedEx shipping module to operate. Linux IP Masquerade The special FTP Upload helper must be enabled in the masquerade configuration file if an OmniRush module requires FTP access to the internet. The following is for qualified Linux administrators only. On Red Hat Linux v5.2 IP Masquerade, to set FTP pass through, it works like this: /etc/rc.d/rc.firewall (or whatever your ip masquerade script is) Find the line: /sbin/modprobe ip_masq_ftp This line must be uncommented, and ip masquerade reinitialized. Other versions of linux may use a different method to enable FTP PORT operations. Documentation on how to enable it can be found in the Linux HOW TO documents for the version of linux you are running. Microsoft Proxy Server OmniRush uses port 7443 to establish an SSL connection to FedEx, so your firewall or proxy must be ‘open’ to allow communication on this port. In some configurations, MS Proxy server will block SSL traffic on port 7443, and you may need to make a registry adjustment to allow SSL traffic on port 7443 to pass. Please consult a qualified network engineer or the Microsoft Web site for details on making this configuration change. SOCKS SOCKS users should use a SOCKS shim. A shim will allow non-SOCKS applications to access the internet through a SOCKS firewall or proxy server. Known SOCKS shims are: The free of charge shim from Hummingbird: Home Page SOCKS Shim Page The NEC SocksCap. Free of charge. Download from CNET (search for sockscap) E-Borders SOCKS shim from NEC Printing to IP Printers: Explanation Printing to printers directly via TCPIP is an excellent way to set up OmniRush printing for all OmniRush modules that print (such as print tracks, shipping modules, etc.). The main benefits of this approach are: 400 Technical Reference a) Avoids network administration issues. If OmniRush is configured to run as an NT Service, it must authenticate to network resources. IP printers can be accessed without authenticating to NT or Netware security, so authentication issues are avoided. b) Avoids print queues that may be rebooted. If a print queue server is unavailable or is being serviced, OmniRush jobs may fail. When IP printing is used the print queue is local on the OmniRush Server PC. The print job is then piped directly to the printer. Print queue management is done locally on the OmniRush PC, so OmniRush printing can be completely managed by the OmniRush administrator. c) Excellent for printing over a Wide Area Network. For example, OmniRush can print to laser printers and thermal printers in other locations by using IP printing over a WAN. Direct IP printing can be done with virtually all laser printers that direct connect to the Ethernet network, and can also be done from print servers like the Intel NetExpress print servers. All kinds of printers can be serviced this way, including laser and impact printers, thermal printers like the CoStar and Eltron printers. Your network administrator can set this up for you. Zebra ZPL based printers such as the 105SL offer an ethernet option that allows them to sit right on the network, just like a laserprinter with a JetDirect card. Click here for the IP Printing How To. Printing to IP Printers: How To There are two sides of the equation to use IP Printing: 1. Set up the printer with an IP address 2. Create the printer on the OmniRush Server Hewlett Packard JetDirect devices (the ethernet interface built-in to HP printers) and network print servers (such as the Intel Net Express) allow an IP address to be defined. This then serves as the address of the printer. If you use DNS, name resolution can be set up so the printer can be referenced by name instead of address. Note that DHCP often cannot be used with network printers. The next step is to set up the printer on the OmniRush PC (or any other PC that needs to print to that printer). This is done using the regular Add Printer mechanism in the Printers Folder. The only special steps are as follows: 1. The printer is added as a local printer, not a network printer (because the print queue will be local) 2. When the Port Selection is displayed, select Create Port and then select 'Standard TCPIP.' 3. Enter the IP address or resolvable name of the printer 4. Select the appropriate print driver to use (e.g. HP Laserjet 4 or Generic/Text Only for Eltron/Zebra printers) 5. Do a test print from Notepad to confirm proper operation. 6. Use this printer in the OmniRush Track 401 OmniRush Administration & User Manual Backing Up CRM Systems Possible Issue on GoldMine dBase: Backup Gives Errors Because OmniRush Has Files Open There are these options: Run Open File Manager on your NT or Netware server to enable safe backup of all open files. Manually STOP OmniRush at night. Automatically STOP OmniRush at night with built-in OmniRush scheduler. Automatically STOP OmniRush at night with a batch file, ORNETSTOP, and your own scheduler (or the Windows2000 scheduler service). Enable your backup software to back up open files. Open File Manager dBase Users: Z-Firm strongly recommends Open File Manager (OFM) or similar technology. Why the big deal about open file manager? Because: 1. It works great 2. It can solve ALL GoldMine dBase related backup issues (GoldMine’s GoldSync and Automated Processes will also hold files open) 3. It resolves other backup problems unrelated to GoldMine or OmniRush. 4. It is the only complete solution to file based backup we are aware of. Some backup software has Open File Manager type technology built in, and that should be considered an equal solution. Using OFM, open files on the system can be backed up safely, so even if a user stays logged in, or GoldSync is running, you will be covered. Download the OFM demo from www.stbernard.com or contact Saint Bernard Software. Alternate integrated open file & backup software solution (suggested by a Z-Firm user): www.ultrabac.com Alternatives to OFM Stop the OmniRush Database Connector Module(s) This will disconnect OmniRush from the GoldMine files. However, it will keep a its system tables open until you exit OmniRush. Automatically Stop OmniRush with a Scheduler You can use a tool like TechScheduler (www.winutils.com) or the NT AT module to automate the OmniRush shut down. Other applications of this kind can be found at www.windows95.com. See the examples for starting and stopping OmniRush services. Enable Open File Backup in the Backup Software Most backup programs (Seagate Backup Exec and others) default to skip open files. However, it is often safe to back up open files that are not being actively written to. You can set programs 402 Technical Reference like Backup Exec up to go ahead and attempt the backup of open files. This can give a moderate (but imperfect!) level of protection. SQL Discussion SQL databases require their own backup approach. Backing up SQL can be done several ways: “Simple”: the SQL DUMP mechanism “Business Use”: Single User Mode: DBCC, check logs (programmatically) + DUMP “Some Experience”: DBCC + DUMP “DBA”: Single User Mode, DBCC, check logs (programmatically), Drop & Recreate all indexes, Update all statistics + DUMP “Enterprise”: All of ‘d’ plus regular (2 or 4 [or more] times during the working day) DUMP’s of the log, so that data can be restored from prior night’s backup all the way up to the latest log dump. Impact on OmniRush: Using MS SQL v7 and higher, options ‘a’ and ‘b’ can be done without cycling SQL Server or going to single user mode. As a result, they can be done without impacting OmniRush at all. Options that take SQL to single user mode, or that cycle the SQL Server service (or the PC itself), require that the OmniRush Database Connector Module be shut down first, and then reactivated after SQL is back up. NT Services, Errata & Discussions Drive Letters and Services NT Services cannot access network resources using drive letters. Drives local to the service (e.g. on the same PC) can be accessed via drive letters, but remote resources cannot referenced by drive letters under any circumstances. Even if a persistent connection to a drive letter, or a login script is in use, the drive letter cannot be used by an NT service on either NT4 or Windows2000. This is a Windows limitation that applies to all software on Windows. Why does this matter? Existing FaxRush v4 sites may have any of the following: FRP files that reference files with a full path including drive letter. Automated processes that reference files with a full path including drive letter. Toolbars or custom code that schedules records in the CRM system with drive letter\file name nomenclature. A shared BDE installation (on a GoldMine system). The registry entries for the BDE HKEY_LOCAL_MACHINE\SOFTWARE\Borland\Database Engine\CONFIGFILE01 and HKEY_LOCAL_MACHINE\SOFTWARE\Borland\Database Engine\DLLPATH may have drive letters that point to network resources. This will not work when OmniRush is run in NT Service mode. Remove the BDE registry entries and install local BDE. 403 OmniRush Administration & User Manual While there are several ways to deal with this issue, Z-Firm will only support drive letters when OmniRush is run as an application. Methods to resolve drive letters include: 1) Use a multi-file global search and replace tool to change all FRP's to use UNC notation instead of drive letters. 2) Run OmniRush as an Application NT User Account for OmniRush Services In most cases, OmniRush will need to access network resources (printers, shared directories, etc.) as part of its operation. (Note that access to SQL servers is not relevant here, OmniRush authenticates separately and specifically to the database server.) NT Services need to be assigned an NT userid and password to be able to authenticate to network resources like printers and file system shares. The OmniRush installer prompts for an NT user. This can be a userid from the local machine or from the NT Domain. OmniRush automatically grants this userid 'run as service' privilege on the local machine. Your responsibility is to make sure this user id: Has rights to all the shares, printers, etc. that OmniRush will need. That the password stays stable, because when it changes, OmniRush will go down until the new password is set using the OmniRush Administrator (in the Launcher Settings area). Note that regular users cannot stop and start services interactively. This task is only available to more privileged users. Running OmniRush Server as an NT Service Also see: Running OmniRush Server as Application NT Services are complex, and require Win2000 expertise to manage. NT Services, especially in a networked environment, are complex to manage. Always configure and run OmniRush in Application Mode before switching to Service mode. In the event of ANY problems with OmniRush, the first step is to switch back to Application Mode. Do not attempt use of OmniRush as an NT Service unless you have appropriate training and/or certification. Z-Firm does not offer technical support for Windows networking/operating system. In some cases, service mode operation is simply not possible. Network configuration issues, CRM configuration issues, and other aspects can simply prevent OmniRush from ever running as a service. 404 Technical Reference Z-Firm technical support for NT Service operation is level II or III support and is on a best effort basis. Due to the networking and environmental complexity of NT Service operation, support for this mode is higher level, and not included in installation agreements, service/maintenance agreements, or initial purchase support. Support for converting to service mode is on a time basis, and there are no guarantees of success. OmniRush Server installs to run in application mode. The reason for this default is that running in NT Service mode is complex. NT Services cannot access drive letters (they must use UNC) Accessing network shares, printers, and other network resources requires planning and often some network administration. Z-Firm research indicates that %25-40 of OmniRush installations require network and environment tuning in order to run as a service. To get OmniRush up and running quickly, OmniRush installs itself to run in application mode. ZFirm requires that all installations initially run in application mode and test out successfully before switching to NT Service mode. Note: Always configure, run, and test OmniRush in Application mode before switching it to run as a service. Steps to Switch to NT Service Operation: 1. Stop all OmniRush Modules 2. Stop and exit the OmniRush Launcher via the System Tray icon 3. Remove the OmniRush Launcher icon from the Start Up group or any other place that might auto-start the Launcher as an application. 4. Open OmniRush Administrator 5. From the computer leaf on the tree, select Launcher Settings: 6. Then, check the Run as NT service box: 405 OmniRush Administration & User Manual 7. Now go to the NT Service Control Manager and take two steps: a. Set the OmniRush Launcher service to start automatically b. Manually start the OmniRush Launcher service You can now start modules. OmniRush is now running in NT Service mode. Be sure to delete the OmniRush Launcher from the Startup group. Test the system for correct operation, particularly examine interaction with the CRM system and network printing. It is crucial that the Application Mode Launcher is not run if the Launcher Service is running (and visa versa). Only a single launcher may run at a given time. If for any reason two launchers (service and application) are started concurrently, reboot the system. If there are any problems, the universal first step is to switch back to application mode. Continuing in NT Service mode may require planning and network research and administration. Also review this help file carefully. There are several articles on how to examine and correct your system for NT Service operation. Software Coexistence OmniRush Server Below are listed some popular software combinations. Note that these applications can all coexist on one network, the only issue is that certain combinations on a single PC may be problematic. Also note that in some cases (e.g. GoldMine Everywhere Server), the other software publisher (e.g. FrontRange) has specified that their software should run on a dedicated system. Running several server applications concurrently on one PC can tax the system hardware, and in some cases can conflict. The list below is for known combinations. 406 Technical Reference Note: Z-Firm recommends that existing production systems have a restore-able image created (using a tool like Ghost) before installing OmniRush or any other software on production systems. FaxRush v1.x or v4.x Server or Client ShipRush for FedEx v2 ShipRush for UPS v3 GoldMine Sync Server GoldMine Automated Processes GoldMine Everywhere Server SalesLogix Sync Server SalesLogix Web Client Server SalesLogix for Palm & WAP Servers Microsoft CRM server Microsoft SQL Server v6.5 / v7 / 2000 OmniRush Server No Yes Yes[4] Yes No Yes, if Sync Server is lightly loaded No No Yes[3] Yes Windows Version Support Matrix With the plethora of versions of Microsoft Windows, this document is to clarify which versions work with OmniRush. Note that OmniRush cannot be installed on x64 and IA64 versions of Windows. The CRM or database server can be a 64 bit system. In such a case, simply install OmniRush on a 32 bit system on the network. Printing Labels with CoStar or Thermal Printer (This section does not apply to the Eltron label printer for shipping labels. See the Eltron section for information on shipping label printing.) OmniRush is excellent for label printing, and can easily print labels with enclosure codes on thermal label printers. Z-Firm has validated the steps below with the CoStar label printer. The following steps are appropriate: 1. Install the label print driver on the OmniRush Server 2. Install the label print driver on the PC where the label templates will be made 3. Connect the label printer to the network using a network print server 4. Open Word on the OmniRush Server PC and test printing a label to the networked CoStar 5. Using the OmniRush Administrator, create an OmniRush Track that points to the CoStar printer. 6. Create label templates (see below for details) 407 OmniRush Administration & User Manual 7. Test template by scheduling to OmniRush To create label templates: 1. Open Word 2. Set the CoStar as your printer 3. Select the paper size the matches the label stock in the printer 4. Set the page margins to 0.1 inches for top, bottom, left, and right 5. Make the template by inserting codes, e.g.: &NameAddress &FX_Ref (The &FX_Ref is for the enclosure list.) 6. Save the template, and schedule to the OmniRush CoStar track you created in step #5 above. See the Examples directory under the OmniRush directory (by default, "c:\Program Files\Z-Firm LLC\OmniRush\Examples\Label Printing Examples\") for a zip file containing sample label templates for thermal label printers. Printing Labels on Impact Printer The key to tractor fed, impact labels is: Use only one-up labels (e.g. stock that is one label wide) Create the template in Word that has the paper set to the size of the label stock Print some tests from Word interactively to make sure the template is the right size, and that the printer properly positions to the top of the next label. Printing Multiple Paper Sizes or Forms The best method is to set up a single laser printer with all the forms mounted concurrently. For example: Power envelope feeder Legal paper Letter paper All in place at all times. Merge documents can then be multi-page documents, with different page sizes for each page (see the example file letter3.rtf for an example of this). The proper pages will pull from the printer in a single pass. Alternately, multiple files can be sent to the printer, and each will pull the correct paper. 408 Technical Reference To set templates to pull the correct form type, when page size cannot be used, set the paper type in the form. This requires that you have the same printer driver installed on the PC where you make templates and on the OmniRush server PC. This technique does not work with all print drivers. It may take some experimentation to make this behave properly. The RTF templates you create in word can be set to print to any tray on the laser printer. The way this is done is to open the RTF in word, and then go to File | Page Setup in Word and select the appropriate tray for the document or for the page within the document. It is easy to test how OmniRush will handle the printing. Just open the raw RTF merge template at your workstation and print it to the printer. When it works from your desk (e.g. pulls from the desired tray), then OmniRush should do the same when it merges and prints. Do note: The same printer driver should be installed on OmniRush and your station. Using this technique, it is straightforward to build a single RTF that has a cover letter and envelope or label, and the printer will put each on the correct stock. (See the sample LETTER3.RTF that comes with OmniRush). OmniRush Internals OmniRush File Types 409 OmniRush Administration & User Manual File Extension or Name .FRP .ZPK .FRU .ZID .ZDF .OXP .ZWV F$ (file name prefix) Description This is a 'package' file. Is either a list of files to send as a kit or is a shipping template for DHL, UPS or FedEx shipping. This is an ID file. Either the file name or the contents of the file will be a database ID of a document in the OmniRush Document Management System (ODMS). The OmniRush Viewer is associated with this extension, and will open the appropriate file when the ZID file is launched. This is the name of an ODMS folder. The contents of the folder (including subfolders) will be sent. For example, if there is a folder named: WidgetSales-Kit The following would be scheduled: /widget-sales-kit.zdf and the whole folder will be sent. OmniRush eXtended Package. An XML document that controls the job. Full documentation here. Z-Firm WAV file. Used for the recorded voice feature. A ZWV is a regular WAV of specific properties. The OmniRush Administrator and Universal Client allow most mono WAV files to be converted to ZWV. Example: F$SalesReport00222.RTF F$ causes the file to be handled as a temporary work file. This is particularly appropriate for sites that generate files programmatically and feed them to OmniRush via a SQL database or CRM system. Manually Uninstall OmniRush ** All ODMS data, documents, received faxes, configuration, etc. will be PERMANENTLY ERASED with these steps. BACK UP DATA BEFORE PROCEEDING ** To manually remove the OmniRush Server: The correct way to remove OmniRush is: 1. Run the OmniRush installer, it will prompt if you want to remove OmniRush. 2. Reboot if the uninstaller prompts you to. 3. Then take the steps below. For example, if the OmniRush installer fails part way through, it may then refuse to re-run because it thinks that OmniRush is already on the system. In this case, manually remove OmniRush, reboot, and retry the installation. Here are the manual uninstall steps: 1. Shut down ZFDBEngine service 2. Delete the \program files\z-firm llc\omnirush directory 3. Run regedit and search for the following registry key. Delete it if it is present: HKEY_LOCAL_MACHINE\SOFTWARE\Z-Firm LLC\OmniRush (this is the OmniRush data area) 410 Technical Reference 4. Still in regedit, search for the following registry key and delete it if it is present: HKEY_LOCAL_MACHINE\SOFTWARE\Microsoft\Windows\CurrentVersion\Unin stall\{6E82EB65-108D-11D4-8ADE-00A0C9497122} (this removes OmniRush from the the list of installed software) 5. Reboot 6. OmniRush can now be reinstalled To manually remove the OmniRush Client from a PC that only has Client installed: 1. Run the OmniRush installer, it will prompt if you want to remove OmniRush. 2. Reboot if the uninstaller prompts you to. 3. Then take the steps below. Manual Client Removal For example, if the OmniRush installer fails part way through, it may then refuse to re-run because it thinks that OmniRush is already on the system. In this case, manually remove OmniRush, reboot, and retry the installation. Here are the manual uninstall steps: 1. Delete the \program files\z-firm llc\omnirush directory 2. Run regedit and search for the following registry key. Delete it if it is present: HKEY_LOCAL_MACHINE\SOFTWARE\Z-Firm LLC\OmniRush (this is the OmniRush data area) 3. Still in regedit, search for the following registry key and delete it if it is present: HKEY_LOCAL_MACHINE\SOFTWARE\Microsoft\Windows\CurrentVersion\Unin stall\{6E82EB65-108D-11D4-8ADE-00A0C9497122} (this removes OmniRush from the the list of installed software) 4. Check for any Universal Client configuration files in User Profile directories. 5. Reboot 6. OmniRush Client can now be reinstalled Uninstall OmniRush from the Installer The OmniRush Updater kit offers the option to remove OmniRush from the system. Renaming the OmniRush Server The Windows PC name of the OmniRush server is stored in the OmniRush system. If the PC is renamed, a couple of steps are required in OmniRush. To see the current PC name, type the following at a command prompt: set computername 411 OmniRush Administration & User Manual The computer name is stored in OmniRush when OmniRush is installed. If the computer name is changed, OmniRush will stop operating. The first step is to set the new name in the Z-Firm DBEngine. Steps: 1. 2. 3. 4. 5. 6. 7. 8. 9. 10. *** Back up the OmniRush hard drive *** Shut down OmniRush client applications on all client PC's. On the OmniRush Server PC, start the OmniRush Administrator Select File | Administrator Settings Go to the Rename Server tab The old PC name should appear in the list of Available Servers Select the old PC name, and press the Rename Server button Exit the Administrator and reboot the PC Log into the OmniRush Administrator and start up modules Confirm proper server operation On Client PC's, the connect.ini may need to be adjusted. This file is usually in this directory: "C:\Program Files\Z-Firm LLC\OmniRush\DB\Client\" and it contains an entry: Host=<OmniRush Server PC Name or IP Address> The Host= entry may need to be changed to the new OmniRush Server PC name or IP Address. The connect.ini is the same on all client PC's, and once it has been changed and tested on one client PC, it can be copied to the other client PC's. How OmniRush Finds Job Files 1.a -- By fully qualified external path and file name Example : h:\office\faxfiles\widg-lit.rtf The server will search ODMS for a document with a file name and external path matching exactly the specified file name. If the file cannot be found in ODMS, the server will look for it in the specified directory (as seen from the perspective of the server PC) and import it if found. Note : It is recommended to specify external file paths using UNC notation. 1.b – By file name alone Example : widg-lit.rtf The server builds a list of fully qualified file names using paths specified in user, group and general server setup. It then iterates through this list using for each file name the logic described in section 1.a. The search stops once a file has been found or the entire list has been exhausted. The external paths are generated and searched in the following order: 1. Private path of the user scheduling the activity (see user setup screen in Administrator) 2. Private path of group that the user is a member of (see group setup screen in Administrator). This will generate up to as many paths as there are group memberships for the scheduling user (duplicate or undefined paths are ignored) 412 Technical Reference 3. Shared path (see “All-modules-settings” screen, “General” tab, “Import documents from” in Administrator) 1.c – By full or partial ODMS path and file name Example : Sales/widg-lit.rtf ODMS paths are specified using ODMS folder names separated with the forward slash character “/” as opposed to external paths which must be specified using the back slash character “\”. The server tries to find the document in ODMS at the specified location. The external file path is irrelevant during the search (but is still relevant later – see import modes). 2/ Rules on ODMS paths ODMS paths are a lot more flexible than external network paths. It is not required to start an ODMS path at the root of the Documents branch of the tree. ODMS paths are interpreted from right to left, starting with the file name and continuing with it’s immediate nd parent folder, then the 2 level parent folder etc. Only as many folders need to be specified as is necessary for an unambiguous identification of the document. If more than one document matches the specified path and file name, no error is raised and any of the valid documents may be chosen (which document is unpredictable). The following document: Documents/General/Shared/Office/Sales/widg-lit.rtf may be specified in any of the following ways: /widg-lit.rtf /Sales/widg-lit.rtf /Office/Sales/widg-lit.rtf /Shared/Office/Sales/widg-lit.rtf /General/Shared/Office/Sales/widg-lit.rtf /Documents/General/Shared/Office/Sales/widg-lit.rtf GS:/Office/Sales/widg-lit.rtf The first “/” is optional (except in the “/widg-lit.rtf” example in which case it forces the server to use ODMS path logic as opposed to the logic described in section 1.b). For details about the “GS:/Office/Sales/widg-lit.rtf “ example, see section 3 below. 3/ Shortcuts for ODMS paths In order to make ODMS paths more readable and smaller (so that more file names may fit on any given activity reference line), the following shortcuts can be used: Shortcut: GS: GP: IS: IP: Replaces: /Documents/General/Shared /Documents/General/Private/<Current User> /Documents/Inbound/Shared /Documents/Inbound/Private/<Current User> For example, if user MASTER scheduled an activity with the following document specified in the reference line: GP:/Cover Pages/widg-lit.rtf The server will interpret the path as: 413 OmniRush Administration & User Manual /Documents/General/Private/Master/Cover Pages/widg-lit.rtf Shortcuts are destined for use in activities scheduled through a host contact manager and cannot be used in client applications such as Administrator. 4/ About file names and extensions The maximum file name length, including extension, is 40 characters (so the maximum effective length is 36 characters). The following file extensions are specific to OmniRush: Extension: Comment: Z-Firm Package. This extension replaces the FRP extension used in FaxRush 4. FRP is still recognized for backward compatibility. ZPK files may contain lists of documents or in some cases shipping ZPK templates use the ZPK extension. Document list ZPKs are not imported into ODMS, but the documents they list are. Z-Firm ID. A file name with this extension specified an object in ODMS by it’s internal identifier (ID). Users don’t normally interact with IDs and ZID rather reference objects by name and path. ZID files are mostly used to link job documents (which don’t have a meaningful name) to a completed activity record or linked document in the Contact Manager. Z-Firm Document Folder. Specifying a ZDF document is ODMS-way of ZDF using packages. If an activity reference line contains <name>.zdf, all documents contained in ODMS folder <name> will be scheduled. Z-Firm File Stub. Document in ODMS. ZFS Files are normally in the form FileName.tif.zfs. The purpose of the ZFS extension is merely to force usage of the Windows file association with the Z-Firm viewer client. ZFS The client then strips-off the ZFS extension and treats the file name as if it was a normal TIF document. OXP FRP ZWV F$ (file name prefix) OmniRush eXtended Package. XML file with job parameters specified. Full documentation via this click. (Stands for FaxRush Package.) Text file list of internal and/or external files that are sent as a kit. Full documentation via this click. Z-Firm WAV file. Used for the recorded voice feature. A ZWV is a regular WAV of specific properties. The OmniRush Administrator and Universal Client allow most mono WAV files to be converted to ZWV. Example: F$SalesReport00222.RTF F$ causes the file to be handled as a temporary work file. This is particularly appropriate for sites that generate files programmatically and feed them to OmniRush via a SQL database or CRM system. OmniRush Log Files OmniRush maintains several types of logs. These can be useful for diagnostic purposes. Here, logs are discussed in order of usefulness to the user. Server Logs 414 Technical Reference The most useful logs are maintained by the server modules. If a module will not start, is shutting down, is failing jobs, or not working properly, the module logs are the most helpful resource available. Module logs are in the same directory as the server executables (usually c:\program files\Z-Firm LLC\OmniRush\Server\v5\ ), and have the extension .txt. The OmniRush administrator has an excellent built in log viewer, that can be accessed via the View | Module Logs menu selection. Client Application Logs Client applications, such as the Administrator, Viewer, and Print to Fax Client, create exception logs in the directory they execute from (usually c:\program files\Z-Firm LLC\OmniRush\Client\v5\ ). These log files are: <application exe name>.log and z-firm exception.log Extracting the Installer If the single file installer or updater was downloaded, it may be useful to extract the installer. The benefits of extracting are: Quicker installation on clients, since the initial unpacking does not need to be performed every time. Option to run silent update on client PC's with the /A command line option. Note that the main installer and the OmniRush updater are two different installers. The steps below may need to performed on each of them, depending on your needs. 1. Exit all programs, including apps running in the Windows System Tray 2. Check to find out where the TEMP directory is located on the PC. From a command prompt, type SET TEMP to see the directory being used by Windows. 3. Navigate to this directory, and clean it out as best as you are able. Especially remove subdirectories. 4. Run the single file installer program. Wait through the "Extracting Files" "Reading contents" Wait until the license agreement is displayed. 5. Switch to your view of the TEMP directory, and press F5 to refresh the view. There should now be a directory named to the effect "pft...tmp" with the current date/time creation stamp. This directory will have 8-12 files in it. 6. Copy these files to a safe network location, for example: \\server\share\software\omnirush\version_6\ 7. Switch back to the OmniRush installer and cancel the installation 8. Setup.exe can now be run from \\server\share\software\omnirush\version_6\ to install the server and clients. OmniRush Versions OmniRush v6 What is New in OmniRush v6 415 OmniRush Administration & User Manual (See what was new in OmniRush v5.5) (See what was new in OmniRush v5.1) Updated Documentation Microsoft CRM support GoldMine v6 support SalesLogix v6 support Crystal Report RPT merge forms: Use RPT files to merge to email, print, & fax. Real-Time fax port monitor New Save Merge File options. Save final output, even of html email, and fax, to disk for archiving or reference. Record-your-own-voice voice messaging Virtual Tracks for shipping New fax-DID features Network popup by DID user name New Universal Client features Restrict access to job types by user Faster pop up times Enhanced shipping and commerce features New Viewer features Auto-create & file faxes into monthly folders Printing enhancements Cover page setting by Track New Commerce features Transaction amount stored to discrete database field New confirmation message merge codes New option for multiple copies of confirmation message Universal Client can save credit card numbers into GoldMine and SalesLogix New Developer features Support for Pervasive database Support for MYSQL and other databases Support for most databases with ADO and/or ODBC driver (SQL syntax support required) Updated Z-Firm DBEngine Improved PDF version of the OmniRush documentation formatting and presentation Detailed Fix & Change List: 416 Technical Reference Build 498: ---------------------------------------------------------------------------***General*** ***Commerce*** FIXED: Commerce tracks set to alarm all fails would not always set the Alarm NEW: Track setting for number of copies of confirmation message. NEW: Additional merge codes for commerce conf message, see Configuring Commerce Tracks in the OmniRush help file. Build 494: ---------------------------------------------------------------------------***General*** FIXED: Rare hung module/yellow module with Internet Fax after thousands of jobs. NEW: Microsoft CRM Support NEW: 2003 UPS Rates are part of the installer out of the box, no update required. NEW: Command line switch for silent, auto-update of Client. Single file updater: -a /A Updater setup.exe: /A ***Administrator*** FIXED: Rare List Index Out Of Bounds error in Rights Management area. ***Universal Client*** FIXED: When launched as the result of a print, client would not auto minimize to tray when cancel or send selected. FIXED: Error when selecting Create Linked File when faxing to multiple GoldMine contacts. ***Viewer*** FIXED: Some problems in annotations. Build 481: ---------------------------------------------------------------------------- 417 OmniRush Administration & User Manual ***Server*** FIXED: GoldMine jobs created with the PRIVATE flag were not being moved to history with the PRIVATE flag. (Problem introduced in October, 2002) FIXED: "Cannot insert the value NULL into column 'LOPRECID', table 'GMPROD.dbo.CAL'; column does not allow nulls. INSERT fails." FIXED: HTML Email: Accented characters (from French and other languages) encoded in HTML similar to J’ now work properly. FIXED: Contact records with zip+4 entered as #####-#### will now work for commerce jobs. FIXED: Successful commerce jobs would go to history with the resultcode of a failed commerce job. NEW: Commerce jobs: The transaction amount is now saved to conthist.duration (for GoldMine) and history.duration (for SalesLogix) ***Universal Client*** FIXED: If set to create a linked file on print to fax, the link would be to a copy of the file in the global directory, not the selected directory. Now, if no directory is set in the Universal Client, the global directory is used. If a directory is set in the Universal Client, it is used. FIXED: In some cases, when looking at job details in the Job History, the notes would only show the first two or three characters of notes. Build 476: ---------------------------------------------------------------------------UPDATED: New Brooktrout driver with 212 firmware. Build 474: ---------------------------------------------------------------------------***General*** FIXED: Toolbar license error when running with GoldMine v6 FIXED: Rare problem of print via word failing once out of a few hundred jobs. FIXED: Rare problem in PDF merge to email on fast server PCs 418 Technical Reference FIXED: Rare NO TRANSID failure on internet fax with Easylink FIXED: Intermittently high CPU use of RDS.EXE on systems used only to receive & email faxes. FIXED: Using GoldMine, a contact with just a first name would be used a the last name, not the first name. FIXED: Viewer on Win98: Regression introduced in 46x that caused Viewer to print too many copies. FIXED: Viewer: When Client Global Root Path is invalid, Viewer would crash on launch. Now it tenders clear error message. FIXED: Universal Client with GoldMine: If print to fax to a group, and select to link the document, errors would be tendered. FIXED: When subfolders are created under inbound\private folders, faxes dragged into are not listed. ENHANCED: 0 page received faxes (usually voice calls) are no longer saved to the system. ENHANCED: DHL setup now only requires an DHL account. There is no need to contact DHL for userid's or keys. Build 470: ---------------------------------------------------------------------------***General*** FIXED: Rare Addcache error on some jobs with cover pages. FIXED: HTML formatting codes bleeding onto cover page with notes from GoldMine v6 SQL NEW: Virtual Tracks for shipping NEW: Server Updater no longer gives option to install clean database. (This can be done via manual steps, and some users accidentally used this option, creating problems for themselves.) Build 466: ---------------------------------------------------------------------------***General*** NEW: Z-Firm DBEngine updated to build 553. 419 OmniRush Administration & User Manual ***Viewer*** FIXED: In Compatible Printing mode, now much faster, and output file size much smaller. (New setting in Preferences) FIXED: When the Clients, Global root path is invalid, Viewer will now tender a clear error instead of terminating on launch. Build 462: ---------------------------------------------------------------------------***General*** NEW: Fax port monitor. An icon is created on the OR server, and this allows real time monitoring of fax port activity on the OR server. FIXED: Rare log entry to effect: WARNING This function is not implemented yet. Please notify Z-Firm if this occurs! FIXED: Rare log entry warning to effect: Error sending UDP data to 0.0.0.0:2721 (10049: [10049] Can't assign requested address). FIXED: Rare log entry warning to effect: ERROR Unidentified message received Build 459: ---------------------------------------------------------------------------***Universal Client*** FIXED: SalesLogix Groups: The same address would be listed for each contact. CHANGED: Several useability features. Schedule Job renamed to be job type specific. Button behavior enhancements in the Job History list. Build 453: ---------------------------------------------------------------------------***General*** FIXED: Super long printer names would cause the print module to fail NEW: DBIO setting to auto-delete internal file if there is a file name collision. 420 Technical Reference This only affects use of external files. If internal file already exists, but is in checked out state, it will be automatically deleted, and the external file used. NOTE: This option is turned off by default. NEW: Track setting for fax cover page. ***EMail Module*** FIXED: Crystal reports sent via html email now format properly if the email track "Include HEAD and STYLE" is checked. NEW: Headers tab on track setting to set additional html email tags. ***Universal Client*** FIXED: When used to schedule large (over 1000) html merge jobs, the DBIO would process OK for some time and then hang, requiring DBIO to be restarted. ***Legacy Client*** FIXED: Print to fax with cover page to a GoldMine secondary contact could merge the cover page to the primary contact. ***GoldMine DB Connector*** FIXED: "nbsp" merging into job notes with GoldMine v6 FIXED: DBIO now pulls text out of html in cal.notes so just text merges CHANGED: DBIO no longer overwrites the cal.loprecid field when scheduling back a failed job Build 446: ---------------------------------------------------------------------------***General*** FIXED: Crystal reports, when sent as HTML, would sometimes lose formatting. NEW: GoldMine v6 HTML in the cal.ref field will now merge properly into fax, print, and email jobs. CHANGED: DB Connector no longer updates LOPRECID when scheduling back a failed job. ***Commerce*** 421 OmniRush Administration & User Manual FIXED: Module would sometimes fail to settle at configured time when using Atomic Authorizor. FIXED: Module would fail jobs when the cc charge succeeded, but the NET SEND failed. ***Universal Client*** FIXED: GoldMine: Print-to-email: Select Other Contact, client would pull the main contact email address. FIXED: Would not list GoldMine Groups. FIXED: "Send on" date + time available on all job types FIXED: Could enter a subject longer than the OmniRush Server would support ENHANCED: Faster popup time when printing to the Client. NEW: Ability to cancel shipments from the Universal Client job history list. New option in Settings to set default deletion template. ***Viewer*** FIXED: If file name is set to 'test' Viewer would sometimes fail to append '.tif' to the name, causing the file to be unviewable from Admin & Viewer ***Shipping*** FIXED: FedEx shipping to Canadian destinations is fixed. FIXED: Registering Canadian FedEx accounts is fixed. FIXED: Airborne in test/demo mode now prints the TEST info on the label. FIXED: Airborne shipments with declared value >= $5000 now work. Build 443: ---------------------------------------------------------------------------***General*** FIXED: FR5DBUtils would 'pause' for long periods when exporting large OmniRush databases. FIXED: FR5DBUtils, when set to zip output, would leave FPT files in the output directory, and not in the zip. 422 Technical Reference ***Universal Client*** FIXED: Send On option for non-fax jobs is now available. NEW: Now allows attaching of HTM and RTF documents, but will prompt that merging will not be done on them. ***Print-Raster*** FIXED: Some PDF's when sent to a printer would print out huge. ***Viewer*** NEW: Setting related to sending faxes out as emails. Allows the email subject to be set to either fax 'description' (current behavior, default), or pages + CSID NEW: Setting to allow Viewer to auto-create child folders by date. Helps organize received faxes. ***Installer*** NEW: SalesLogix v6 option in the installer. NEW: Installer tests for server operating system, and warns if <> Win2000 Build 441: *** Reversioned to OmniRush 6.0 *** ---------------------------------------------------------------------------***General*** >>>>>>NOTE NOTE NOTE CHANGED SYSTEM REQUIREMENTS The OmniRush help file has been updated to reflect changed system requirements. The salient changes are: a) OmniRush Server Operating System: Windows2000 Only (any flavor). b) OmniRush Server RAM: 128MB or 196MB minimum, depending on whether any ADO datasource is used (e.g. SalesLogix v6 or Open Microsoft SQL) <<<<<<NOTE NOTE NOTE NEW: Crystal Reports v8.5 support built-in. (Documentation pending) FIXED: Some received faxes would print sideways if OmniRush was set to auto print received faxes on the server. FIXED: Phone number formatting macros now work on macro merge codes (like &Fax) ***Viewer*** FIXED: When making annotations, the fax would jump to the top of the page (if currently viewing the bottom half of the page) 423 OmniRush Administration & User Manual FIXED: When unable to connect to the Z-Firm dbengine, there were two errors, (the real, normal error, then an assertion failure). Now there is just the one error. FIXED: Fax legibility problem introduced in 440. FIXED: Rare access violation when opening and rotating a fax. FIXED: Printing now defaults to Compatible Build 440: ---------------------------------------------------------------------------***General*** NEW: SalesLogix 6.0 support. NEW: Tracks now have additional options to save merged files to disk, including an xml stub of file details. Includes ability to save merged RTF and merged HTML files to disk. NEW: A4 check box on print raster module, so it will send jobs to the printer as A4, not Letter. NEW: DBIO setting to auto-delete checked out files if there is a name collision. NEW: Track setting for fax cover page. FIXED: Some v1.2 PDF files would not fax or print. Now all 1.2 and most 1.3 PDF files should fax and print. FIXED: Some landscape PDF files would print portrait or improperly scaled. ***Administrator*** NEW: Reset Logs function, under View | Logs CHANGED: Server module list now does not offer the List by Module Type FIXED: When dragging files in ODMS, tree would not scroll. Now it does. ***Shipping*** FIXED: Unable to create FedEx meter numbers on tracks. NEW: Tracks can be set to save labels as png, bmp, etc. NEW: Job override codes: HGT/LEN/WID for FedEx & Airborne FDA (alt shipper acct) for FedEx, Airborne SAT: for Sat delivery RES for residential (where applies) OS1/OS2 (UPS only) (See OR docs for details, & more) 424 Technical Reference ***Universal Client*** FIXED: Loses connection to OmniRush Server after several hours. Now reconnects every 3 hours. Setting to set frequency. NEW: Remembers last job type, and automatically opens to that type. NEW: Print to rasterizer, can now add to GoldMine & SalesLogix lookup NEW: If print high resolution (e.g. 300 or 600 dpi), Client will now downsample automatically so that fax will go through. Build 417: ---------------------------------------------------------------------------REVISED: Hardware fax support with Brooktrout redone for efficiency. NEW: GoldMine 6.0 support. NEW: Nested tables in an RTF merge form should now fail gracefully, with clear error. NEW: Phone number formatting macros (see help file) NEW: Ability to send NET SEND popup message for new inbound fax to DID user or predefined 'static' user. NEW: Merged RTF's being emailed now can have VBA execute on them. NEW: Support for Oracle9 client dll's (and OCI) ***Viewer*** FIXED: Viewer with SalesLogix: CSID lookup should now work. FIXED: Printing legal size faxes ***Universal Client*** FIXED: SalesLogix: With cover notes, attaches correct file (TIF) now. Build 399: ---------------------------------------------------------------------------***Open Database Connector*** NEW: Major new feature is Pass Through SQL mode. This allows the Open DBIO to connect to SQL databases that either do not support Stored Procedures, or support them in odd way to be integrated with OmniRush. Tested platforms (with sample scripts) are: Pervasive, MySQL, PostGres 425 OmniRush Administration & User Manual Build 394: ---------------------------------------------------------------------------***Universal Client*** FIXED: Contact search index is sticky. FIXED: Can invoke Job History from the system tray menu FIXED: DBIO is properly autodetected, and should not need to be set in settings. FIXED: GoldMine v6 support FIXED: error: save rasterized file into folder not defined FIXED: Will not launch from systray for Voice job FIXED: Tab order FIXED: Scheduling call back should now always default to the current user. Build 392: ---------------------------------------------------------------------------***Universal Client*** NEW: Support for the GoldMine GMLINK from GoldMine v5.7 and 6.0 (Requires new OmniRush Client and new GMLINK. GMLINK installs with OmniRush into the \utilities\ directory.) NEW: Support for recording from microphone (and other audio devices) and converting other WAV files to the Z-Firm required audio format. NEW: Ability to schedule voice jobs. NEW: Print job timeout now a setting. Slow PC's / complex jobs could be broken into multiple jobs. FIXED: Errors when attaching RTF files to print-to-fax jobs. FIXED: Email address missing. FIXED: When setting to save fax job as attached file with SalesLogix, the TIF is created RO, which causes the SalesLogix sync server to choke. File is now created RW. FIXED: Schedule Follow Up with SLX now goes to correct user consistently. FIXED: Follow up call user list is now sorted. FIXED: Send an email with a scheduled follow up call, and the follow up activity 426 Technical Reference has a subject of "Regarding Fax...". New users will get correct subject automatically. Existing users will need to change default settings in Settings\Print-to-Fax tab. Set follow up autogeneration\Text = "Regarding %jobtype%: %reference%" FIXED: Category setting. It may be necessary to change the default settings. Go to Settings\OmniRush tab and set "Follow-up category" appropriately. FIXED: SalesLogix 'contact not found' error. FIXED: All other reported SalesLogix related errors. ***Viewer*** FIXED: Sporadic problem/error printing on win98 FIXED: Annotated files grow in size. ***Administrator*** FIXED: In some cases, a Get Latest from a folder other than the default would cause Administrator to hang. FIXED: If a DBIO was configured with an Alias that was then deleted, the DBIO could no longer be opened. FIXED: Possibility for multiple directory navigators when setting up GoldMine DBIO ***Voice/MessageBlaster*** NEW: Support to play your own WAV files. These files must be either recorded or converted using the OmniRush Universal Client. (Use the Tools menu) ***Fax Module*** FIXED: Rare sites would experience hangs in the fax module if tracks of different priorities were in use. ***Open SQL Connector*** NEW: Support for Oracle Client DLL's (in addition to direct Oracle network connection supported in prior versions) ***HTML Email Server*** FIXED: Blank ALT tags now work. FIXED: Message parts order not respected for track default documents. ***Fax Bridge Module*** NEW: Settings for RightFax billing codes, per module. All OmniRush jobs will get the same billing code set. ***Print/Raster*** FIXED: Slower OmniRush servers may choke on native PDF conversion. 427 OmniRush Administration & User Manual FIXED: Landscape PDF's sometimes printed portrait. ***UPS Shipping*** NEW: New shipment override codes. See upcoming help file. Build 379: *** RELEASED AS OMNIRUSH v5.5 *** ---------------------------------------------------------------------------- Build 377: ---------------------------------------------------------------------------NEW: OmniRush Toolbar is in the installer NEW: Extensive sample code for OmniRush shipment rating components is in the installer NEW: Sample code for new OmniRush ActiveX (Bridge) is in the installer NEW: Stock ZPK templates for Airborne shipping in installer (and imported into ODMS) ***General*** FIXED: NT Service mode works fine NEW: TSPrinterInstaller: New -N switch to set to Universal Client New & Updated Documentation Pages in v6 There is a lot new in OmniRush v6. This partial list of new and updated documentation pages is perfect for experienced OmniRush users and administrators to get up to speed quickly: General Topics What is New in OmniRush v6 Merge Documents Page Oriented vs. HTML Merge Forms PDF Conversion Options New Crystal Feature Creating a New Merge Document (Crystal Report) Crystal with OmniRush Merge Codes Advanced Track Options PDF Support Crystal with Parameterized Database Access Supported File Email System Requirements 428 Fax Monitor Fax Ports Internet Fax Throughput Tuning Microsoft CRM Microsoft CRM DB Connectors Open DBIO: SQL: Pass Thru SQL via ADO Shipping Connector Configuration: MS CRM Open DBIO: SQL: Introduction UPS Shipping Rates Operating Environment Microsoft CRM MS CRM: SalesLogix Operating Environment - SalesLogix Database Shipping Server Throughput Shipping Virtual Tracks Overrides Technical Reference Types Attachment Options Troubleshooting Steps Formatting Merge Codes Microsoft Word Tricks User Rights for Universal Client Global Settings Backing Up OmniRush Database Connector for SalesLogix v6 Installing the OmniRush UI Connector for SalesLogix v6 DHL Shipping Module Future Date Date Calculation SalesLogix Account Manager merge Custom Merge Code Examples BDE Discussion Reporting on Jobs Viewer Preferences Overrides and Special Options Email Merge Thoughput Tuning Extracting the Installer What is New in OmniRush v5.1 Major new features in v5.1: and Special Options Support for Client and Server on WindowsXP Professional RightFAX bridge New internet fax provider: Venali HTML Email merge Print-To-Fax Client integrated with SalesLogix Support Client Re-written internal email server Email merged attachments as PDF* Network Alerts on critical errors 429 OmniRush Administration & User Manual Coexistence with backup software Track Priorities (five levels) Canada Origination for FedEx Express and Ground shipping New features for ASP's to share a single OmniRush server across multiple customers Improved operation on Terminal Server Improved Installation Documentation Updated Documentation Enhanced Viewer: All-new Annotation Engine MRU for Descriptions Built-In Email Client Save & Email as PDF* * Requires OmniRush PDF module Detailed Fix List: Build 280: ---------------------------------------------------------------------------***Database Connector*** FIXED: Some SQL2000 systems would cause the database connector to choke. See http://www.zfirm.com/omnirush/kbase/93.txt for details ***FedEx*** FIXED: FRP_Generator now allows signature release contract # to be saved into the FRP when Signature Release is checked. Build 274: ---------------------------------------------------------------------------***General*** FIXED: Several small fixes related to Terminal Server in TSPrinterInstaller and TSPrintingPreferences NEW: RightFAX bridge support now in the internet fax module. ***Administrator*** FIXED: Track aliases can now begin with punctuation characters. Build 263: 430 Technical Reference ---------------------------------------------------------------------------***General*** FIXED: Client only install on Win9x/Win2k connect.ini should be resolved. FIXED: Long, multi-part names, like: "Abbas Masood Liaqat Ali Shehab" would be scrambled by OmniRush name parsing logic. ENHANCED: Deleting users now mangles the user name, so that the user can be reimported without further hassle. ***Launcher*** FIXED: Launcher now protects against two instances of Launcher getting started. ***Fax Module*** ENHANCED: Hardware fax now gives detailed result codes (human voice, etc.) ***GoldMine Connector*** CHANGED: The Goldmine DBIO will not allow itself to be configured to log into GoldMine as the same userid as one of the tracks. This is a safety. ***Client*** FIXED: If other contact has an email address, Client would prompt "contact does not have email address" when selecting the other contact. FIXED: When scheduling a call back, the time is updated to the current time each job. FIXED: The database is now queried after three characters are typed (with a longer pause) or four characters or more with a shorter pause. Space character is counted. NEW: When scheduling a call back, there are new options to auto-advance the date a day/wk/month NEW: Option above track list to show Print tracks. ***Viewer*** 431 OmniRush Administration & User Manual NEW: Emailing out a fax can be done either with a MAPI email client (like Outlook), or the new built in email client (best for users who use GoldMine email and do not have a local MAPI client setup at every PC). Email client set in File | Settings. NEW: MRU for fax description line. NEW: Option of static list of fax description lines, settable in File | Settings. NEW: If OmniRush is licensed for PDF, the Viewer can save and email faxes as PDF attachments (in addition to TIF). NEW: Ability to paste in bitmap from clipboard, and select area of fax to cut/copy to clipboard Build 257: ---------------------------------------------------------------------------***General*** FIXED: Launcher now prevents two instances of Launcher from running. NEW: OmniRush can now install and coexist on the same PC with ArcServe, Backup Exec, and a number of other programs that are currently on the 'cannot interoperate' list. NEW: Examples now get updated when Updater is run. NEW: Merge Macro: &FullAddressOneLine NEW: GoldMine: OmniRush detects if jobs in have 'CREATEBY' = an OmniRush track name, AND if the OmniRush DB Connector is set to log into GoldMine as a track name. Either situation can cause a problem. Now the DB Connector will shut down and log the reason. ***Client*** FIXED: Reference line would not refresh from job to job FIXED: Navigation to other contacts now consistent with Viewer. NEW: Button 'Show Print Tracks' so the client can be used to submit to print tracks (great to print and link to GoldMine) NEW: Some new schedule ahead buttons on Schedule Follow Up Call ***Viewer*** FIXED: On systems with only 256 or 16 colors, display is now much more 432 Technical Reference legible. FIXED: Forwarding a fax in GoldMine, it would be from 'OmniRush', not from the user who did it. Build 247: ---------------------------------------------------------------------------***General*** NEW: WindowsXP Support. Notes: Wang/Kodak imaging is no longer included with XP. Microsoft removed it. It can now be purchased on the internet as a piece of software. The main implication is that out of the box, there is no useful TIF image viewer (XP Paint can open/save TIF files, but does not have good zoom capabilities). To support XP, the Viewer has been largely re-written. Behavior of annotations and image viewing has changed slightly. The good news is that Z-Firm can now respond more directly to requests for specific annotation functionality. XP broke the ability for applications to test for a valid username/password. When you enter the username and password for OmniRush NT Services (in the OmniRush installer and in the Launcher configuration in Administrator), OmniRush cannot test if the password is correct. It will just accept your entry. So if you put in a bad password here, you will only find out IF you run OmniRush in NT Service mode. XP: PCI Hardware Only: Brooktrout ISA boards are not supported on XP, and word is that ISA hardware in general is not supported on XP. At this time, we do not anticipate support for ISA Brooktrout boards on XP. NEW: FIXED: Tracks now have settable priorities. Installer now detects MS Word v10 (Word XP) ***Print to Fax Client*** NEW: Client will launch if contact manager is not running. Contact manager must be started before the client is printed to, however. This allows Client to be in startup group. NEW: Job status list available from the Client System Tray menu. ***Viewer*** 433 OmniRush Administration & User Manual NEW: Will launch if contact manager is not running. NEW: Ability to print multiple copies of a fax, and page ranges. NEW: Better font control of text annotations. NEW: Rubber Stamp Annotation Tool NEW: Arrow annotation tool NEW: Status bar for printing, opening, saving. NEW: Closing thumbnails reduces memory use of Viewer NEW: Can print individual pages, page ranges, and multiple copies Build 232: ---------------------------------------------------------------------------***General*** NEW: OmniRush can coexist with Veritas Backup Exec v8.x ***Enhancements for ASP Operation*** NEW: SLGXAPI.DLL can now be loaded specific to each DBIO. Allows a single OmniRush server to service multiple SalesLogix installations concurrently that are not all of the same major or minor revision of SalesLogix. Note: Increase all BDE memory settings to run multiple DBIO's, and avoid using BDE based applications on the OmniRush Server. ***E-Mail Module*** ENHANCED: Logic now more closely resembles SENDMAIL. E-Mail module can now send to sites whose DNS lacks an MX record (single A record points to web and email). ***Administrator*** ENHANCED: Merge alias configuration UI was made more coherent. Add/Modify functionality is now more logical. NEW: In merge alias configuration, SQL syntax is now highlighted, in a mono-spaced font, and includes line numbers. Build 224: ---------------------------------------------------------------------------***General*** 434 Technical Reference FIXED: Weakness that would case the OmniRush print driver to become corrupted, requiring reinstallation using the OmniRush updater. (This problem was inherited from FaxRush, and is now resolved in OmniRush.) Build 222: ---------------------------------------------------------------------------***General*** NEW: More options on track to allow CRM history record to have less notes. ***Database Connector Module*** NEW: On SalesLogix, can now set DBIO to create history records of different types (email, fax, etc.) so that icon in history tab is correct. FIXED: SalesLogix, in some cases would pull extension info in with phone/fax numbers, causing downstream operations to fail. ***E-Mail Module*** NEW: HTML now supported in body of email. NEW: Super-powerful HTML merging. See OmniRush documentation for details. Supports merge macros, repeating groups, and custom SQL. NEW: Email track option to send merged RTF and static TIF files as attached PDF files (instead of native format). Requires OmniRush PDF module. NEW: Supports SMTP Relay authentication for external SMTP servers. ENHANCED: Integrated, internal SMTP relay server is now completely useable. *** Fax Module*** FIXED: Fax Server Module should wait for dialtone more consistently, leading to fewer 'no dialtone' failure. ENHANCED: Error messages on failures are now the same as FaxRush in most cases. More detail and granularity than earlier versions of OmniRush. 435 OmniRush Administration & User Manual *** FedEx Shipping Module *** NEW: Supports Canada origination for FedEx Express and Ground shipping. See OmniRush K-Base, search for 'canada' *** UPS Shipping Module *** FIXED: Job reference not printing on label. FIXED: If end of day on Monday would fail, but Tuesday succeed, on Tue the Monday data would not get uploaded. Now on every end of day, all pending, prior data is uploaded automatically. ENHANCED: When deleting a shipment, notes are more explanatory. *** Print Module *** FIXED: Some PDF files would print incorrectly. ***Administrator*** FIXED: Can now create Messageblaster/Envoy accounts with Mastercard type credit card. FIXED: Print Raster Module: Cannot easily change printer settings now (which would lead to module mis-configuration) FIXED: User list now in alpha order. FIXED: UPS Modules can now have a comma entered (in case a dialing prefix is req'd, e.g. 9,) ENHANCED: Generally, OmniRush requires that the OmniRush Server and Administrator be able to resolve each other's name to an ip address (using any of the several name resolution protocols that exist on a Windows network). Now the OmniRush server has much less need to be able to resolve the client pc (where Administrator is run). ENHANCED: Monitoring of fax, shipping, email, and other types of jobs now provides useful information about the current job (e.g. company, email address, fax number, etc.) NEW: New shipping tracks get a default email notification text with merge codes. NEW: Administrator will now message user if you try to activate a module that is not licensed. NEW: HTML import capabilities for HTML email. -Includes ability to auto-remap links from relative to absolute web paths 436 Technical Reference -HTML preview built in NEW: Find File / Folder option to search ODMS for a file or folder. Supports wildcards. NEW: Local menu option to copy path and file name in ODMS to clipboard. ***Print to Fax Client*** Fixed: 'import folder must be of higher level' error FIXED: &FXREF merge code from client driven jobs FIXED: Would not accept periods in the leading section of email address on print-to-email FIXED: Printing to Rasterizer did not kick it open. FIXED: Win98: Partial Print Driver Failure error msg. FIXED: Win98: Result of rasterization not found error FIXED: Win98: Temp dir clean up when fax job is cancelled. FIXED: Client would remember prior contact on 2nd print to client job FIXED: If printing-to-email, client would not allow periods in the first section of the email address. FIXED: Unclear error 'import folder must be of a higher level' FIXED: A number of issues with Client on Terminal Server are now resolved, including: -Client not popping up -Problems popping when using MS Word -Interaction between user session and console session. See the OmniRush knowledge base article for Terminal Server (article 80). ***Viewer*** FIXED: When forwarding, user list was not alpha sorted. FIXED: Hot keys on wizard to forward/link Build 202: ---------------------------------------------------------------------------CHANGED: Brooktrout Installer now automatically puts the '-n' option in the registry for all PCI installations. This should improve the 'plug and play' factor on Brooktrout installations. What is New in OmniRush v5.5 Major new features in v5.5: 437 OmniRush Administration & User Manual NEW: Universal Client for non-contact manager users NEW: Toolbar for GoldMine and SalesLogix NEW: Super-high level Bridge mode ActiveX control NEW: Kit of shipment rating components, including ActiveX controls for VB, VBA, Delphi, FoxPro, Access, etc. ActiveX for use in IIS from ASP pages SOAP server Special control to get rates from within MS SQL Server Stored Procedures NEW: Commerce jobs can now be run over the internet with a supported merchant processor Built in scheduling system to activate and deactivate tracks and modules Bridge to FacSys Native email as PDF* Open SQL Stored Procedures now have additional result parameters to more easily post job details (tracking number, etc.) into discrete database fields Save shipping labels to disk option Additional shipping overrides Lightweight ZPK builder for making UPS shipping templates Slew of new HTML email merge features Support for Gammalink fax boards Updated and expanded documentation * Requires OmniRush PDF module and/or third party PDF converter software (not included with OmniRush) Detailed Fix List: Build 370: ---------------------------------------------------------------------------***Commerce*** NEW: Internet mechanism for merchant processing. (Module setting) NEW: Complex commerce jobs, so that an email, fax, or print confirmation can be sent to customer ***UPS Shipping*** NEW: Support for Zebra thermal label printers. NEW: ZPK builder for shipping templates installed into client directory. ***FedEx Shipping*** NEW: PO Box detection fails the job more quickly. Build 359: ---------------------------------------------------------------------------***General*** FIXED: Track settings allowing failed jobs to be schedule back to job owner/ creator/track owner/etc. now work. ***Print to Fax Client*** 438 Technical Reference FIXED: Attaching multiple external PDF files would cause only one to be sent. FIXED: Client may delete external files attached to job. FIXED: Print-to-job on WindowsXP ***Universal Client*** FIXED: Print-to-job on WindowsXP FIXED: When running in Contact Manager mode, the Universal Client now logs into OmniRush as the current Contact Manager user (just as the Print to Fax client does). FIXED: Group listings would show other contacts when used with GoldMine. FIXED: With GoldMine, would pull the incorrect email address. FIXED: RTF/HTM files attached to a job are now merged. FIXED: If 8 contacts were selected, only 5 would be listed in the list at the bottom, and no scroll bar. FIXED: No way to select other contacts when running with GoldMine. ***Administrator*** CHANGED: The Document Repository Path can now be edited by double clicking on it. Build 348: ---------------------------------------------------------------------------***General*** CHANGED: Minimum server hardware requirement increased to P-II-400 CHANGED: OmniRush automatic data backup now does not impact slow systems as much. CHANGED: OmniRush will now post critical errors to the NT event log when running in application and service mode (used to only post when in service mode). ***Print to Fax Client*** FIXED: 'create linked doc' gets error to effect 'cannot find user' ***Universal Client*** FIXED: First name search on GoldMine SQL FIXED: If Client is running, and you print to it, you get two instances. NEW: Option for notes to trigger cover page (in the Advanced options screen) ***Viewer*** FIXED: When forwarding a fax, the GoldMine email center would show the fax as From the To user. CHANGED: All lists in Viewer now show the fax description. NEW: Refresh option added to menu and toolbar ***DBIO*** 439 OmniRush Administration & User Manual FIXED: be htm. FIXED: time set If htm and pdf are scheduled together, email body would not SalesLogix timeless activities were still queried at the on the activity record. Now if timeless is set, the time is not CHANGED: ENHANCED: used, and the job will go immediately. In GoldMine mode, now defaults the back-user to createby. "Carriage-return not allowed in pass-thru field" is now handled intelligently by DBIO and should not cause a job to fail. ***Hardware Fax*** FIXED: Memory leak in fax simulation mode. ***Shipping*** FIXED: FedEx in autodetect mode would choke with error. Build 332: ---------------------------------------------------------------------------***General*** NEW: Bridge to Optus FacSys v4.6 and higher. Operates the same as the OmniRush bridge to RightFax. (Fax track setting) NEW: Support for Gammalink fax boards (for legacy support, not for new installations) (Fax track setting) NEW: Support for Text body in HTML email merge. So a single HTML email merge message can include a text portion that can be read by recipients who lack HTML email readers. (Email track setting) NEW: Option to save shipping labels to disk. (Shipping track setting) NEW: DHL shipping support ***Administrator*** CHANGED: Monitoring now opens to the message list by default. CHANGED: Track setting for Job Document Defaults: Options have been renamed for clarity. NEW: The Forward Folder setting for users can now be set to anywhere in the /inbound/ branch (shared and private) NEW: Option on GoldMine connector to create 'simple' history records. This creates history records as Other Actions instead of emails. (DBIO module setting) ***Viewer*** NEW: Viewer can create, rename, etc. folders in the tree. NEW: Viewer can move faxes with drag and drop to/from any part of the tree. NEW: Viewer can now be used productively by non CRM users. Build 326: 440 Technical Reference ---------------------------------------------------------------------------***General*** NEW: Track and Module schedules. There is a new 'Schedules' option in the main tree of the OmniRush Administrator. Here schedules can be created to automatically start and stop tracks and modules on certain days / certain times. This is a GUI version of ORNETSTOP FIXED: Track options to save and link files, archive files, etc. All these options should work properly now. Some information: 1) In Delete File mode (the default), ZFS files would be created and linked when running in GoldMine mode. Now ZFS files are no longer created at all, in any mode. 2) Full documentation on the options and what they do will be in the 327 help file. ENHANCED: The Microsoft SQL and Oracle sample scripts are now better commented, and are more complete. FIXED: Text files scheduled to fax should now fax or print properly. Build 319: ---------------------------------------------------------------------------***General*** NEW: RTF file size detection. See General Server Settings. OmniRush now detects large RTF files, and will fail files that are too large. This setting can be changed in General Server Settings. NEW: ORNETSTOP can now be used on tracks and modules. ***Toolbar*** FIXED: Assertion error when COD collection type is left blank. FIXED: Tooltips problem in GoldMine on Win9x FIXED: All known performance problems in GoldMine FIXED: Can reload GoldMine multiple times, and toolbar properly reloads each time. NEW: Approval code for returns on Credit Card VOID transaction NEW: Toolbarloader: systray option to reload the OFM file NEW: INI tag that triggers automatic reload of toolbar on client stations. AutoRefreshToolbar=0/1 ; turns the scanning of AutoRefreshInterval on/off, default to 0 AutoRefreshInterval=[integerm # of minutes] AutoRefreshPrompt=0/1 ; Ask the user whether to autorefresh, default to 1 NEW: Toolbar loader can take an OFM file name or path + filename so that diff users can use a central install of toolbar, but each can get a diff toolbar. 441 OmniRush Administration & User Manual ***Administrator*** FIXED: On a network, the PDF options for email tracks would be disabled when Administrator was run over a network. NEW: User settings, Fwd Folder. This can now be set to any folder. ***Viewer*** NEW: Can create/rename/use folders in the folder view. ***Email*** FIXED: Module now passes the HEAD section correctly, without changing it. FIXED: Low resolution TIF files flipped to PDF resulted in a squished PDF. NEW: INCLUDE tag for HTML email merge to pull other files into the HTML. see OmniRush help file for full details (see HTML email in the index) NEW: Can now merge into HTML tags (see HTML email in the index) NEW: XLS and other non-core file types can now be scheduled as email attachments. ***Hardware Fax*** FIXED: If track was set to specific port, module would send on two ports in some cases. ***Fax Bridge*** FIXED: If 100's of jobs were imported, in Sending mode, and were aborted in Admin, they were not exported. FIXED: RightFAX: OmniRush was querying too soon, and timing out too soon. FIXED: Easylink: Option to turn on Easylink debug log is back. ENHANCED: RightFAX: OmniRush would only pass the fax number, not company or contact. Now company and contact are passed into RightFAX. ***DBIO*** FIXED: RTF merging files saved with WordXP (2002), error "zlist assertion error in line 692" resolved. FIXED: Problem licensing open DBIO ***FedEx*** FIXED: Ground Laser Labels now print correctly. Corrects for a problem introduced by FedEx. FIXED: FDA: override code in the database now triggers a third party billing to the FedEx account specified in the FDA tag. FIXED: Misc fixes to the FRP generator ***UPS*** FIXED: correctly If an MPS template is made in ShipRush, it now works through OmniRush. 442 Technical Reference ***Print/Raster*** FIXED: Text files are now rasterized correctly. Build 308: ---------------------------------------------------------------------------NEW: A complete kit of shipment rating tools is now available with the OmniRush Commerce Kit. These tools allow rating from ASP web pages, Visual Basic, and other applications, MSSQL Server Stored Procedures, and other development environments. NEW: Merge codes that pull from the user fields in the OmniRush User screen: &User_Login &User_Title &User_FirstName &User_MiddleName &User_LastName &User_EMail &User_PagerNum &User_Phone &User_DID &User_Faxno ***Administrator*** FIXED: Importing html, bookmarks were considered relative links. FIXED: The EasyLink Diagnostic Info option is back in Administrator ***Viewer*** FIXED: Low res faxes, when annotated, where then distorted. ***Email*** FIXED: When Email Track was set to convert TIF to PDF, behavior was incorrect. FIXED: Low res faxes, forwarded to email and converted to PDF, where then distorted. FIXED: Notes were always merging into the HTML as text. Now this can be turned off on the track, so the &Notes merge code will function properly in the HTML body. FIXED: ALT tags in the html were being modified by OmniRush. NEW: Attachment as PDF: New option in Administrator to use native PostScript to PDF conversion utility for conversion of merged RTF documents to PDF. This allows attached PDF files to be pure, native, clean, color PDF's instead of the 200 dpi 'faxy' PDF. NOTE: This conversion utility is NOT included with OmniRush PDF module. It is the user's responsibility to license and configure a PDF converter. 443 OmniRush Administration & User Manual ***FedEx Shipping*** Several fixes to the FRP_Generator ***Launcher*** CHANGED: On critical error, the popup message is now more verbose to direct the user to the solution. CHANGED: The automatic backup of the Z-Firm DBEngine is now _much_ faster. (Was taking over an hour for 350MB databases, now much less) ***Installer / Updater*** FIXED: In some cases, server DLL files were not installed. FIXED: If Z-Firm DBEngine is not running, installer threw an obscure assertion error. FIXED: PathFix is now built in to the updater Build 303: ---------------------------------------------------------------------------NOTE: OmniRush Open DBIO Stored Procs have been changed. 303 is NOT backward compatible with pre-303 sprocs. See upcoming documentation and updated examples. NOTE: OmniRush ActiveX Control has been greatly expanded. 303 ActiveX is backward compatible, but also exposes new objects. ***General*** FIXED: All OmniRush apps now launches must faster. hit on launch was introduced around 28x. A performance ***Server*** FIXED: A number of problems in the Print Raster module would only should up on slow-CPU (e.g. PentPro200) systems. ***Hardware Fax Module*** CHANGED: Module now stays 'on hook' 2 seconds (by default) between calls. Can be changed in the OmniRush Administrator, on the fax module. Resolves problems with short on-hook times being interpreted by the phone line or PBX as a hook-flash. ***FedEx Shipping Module*** FIXED: COD shipments now create two shipping labels. NEW: COD: FRP_Builder now allows the COD remit-to address to differ from the shipment From address. Defaults to the From address if not set in the FRP. ***Fax Viewer*** FIXED: Searching GoldMine dBase on lastname 444 Technical Reference FIXED: FIXED: IMPROVED: Ctrl-C/V in the Fax Description line Some problems linking faxes to SalesLogix contacts General performance, print performance Build 298: RELEASED: OmniRush 5.1.0 (build 298) -------------------------------------------------------------- Internet Fax Details Internet Fax Throughput Tuning A common need is for maximum throughput with Internet Fax. In this scenario, many thousands of jobs need to be processed and sent in a short period of time. OmniRush can pump out 1000 or more pages per hour of internet fax with the right setup.. To maximize throughput, three parameters are primary: The Merge Document, the Track Settings, and the Easylink settings. Merge Document. Fastest performance is with a static TIF file. Merge forms can be very fast, but you need to watch the size of the RTF template. For speed, the ideal template is 100kb or less, and 250kb or less is acceptable in most cases. (OmniRush can handle larger templates, of course, but over 250kb will start to impact overall throughput.) See the Tips and Tricks page to see how Word can save small RTF files. The main cause of large templates are inserted graphic images, logos, etc. Images should be downsampled to 200 dpi, and converted to monochrome, grayscale, or 256 color before being inserted into the document. Monochrome is best, but getting the half tone right can be tricky. Use grayscale instead of color whenever possible. Use Photoshop or similar image editing application to do this. See the page on optimizing templates for more information. Note that fax content can impact performance. A typical page of text will transmit in 30-60 seconds. Documents that have photos, color images, or shades (like background color) can take much longer to transmit. If PDF's are heavily used, consider setting the conversion contrast to 75 or 100. Venali Users: The Packaged Upload setting is applicable if you send static documents (e.g. PDF or TIF files). OmniRush Server. If performance is important, a fast CPU and sufficient memory are also important. OmniRush can chug along on yesterday's hardware, but throughput will not be optimized until you give OmniRush at least 1ghz of CPU and 256MB RAM. OmniRush Track Settings: Set the Max Queue Size to 150 or 250. Internet Connection. OmniRush performance tests are done with 64kb and 128kb clear channel paths to the internet. Make sure the internet connection is not completely bogged down. If users are watching videos, or other high-bandwidth apps, over the internet link, throughput will suffer. SMTP Relay: If Easylink is used, and the OmniRush internet fax module is set to use an external SMTP Relay, that relay can be a bottleneck. Make sure it is tuned for speed, and has lots of free disk space. Better yet, let OmniRush run direct, and configure the internet fax module without 445 OmniRush Administration & User Manual that external SMTP relay. If throughput is important, cut out the external SMTP relay. OmniRush will run fastest when running direct to Easylink. Other possible bottlenecks: i) CRM System database performance. GoldMine dBase users: The CAL table should be rebuilt often, as high volume internet faxing will place a heavy load on this table. Rebuilding the CAL table weekly is for sure a good practice, and under heavy use rebuild it several times a week. Internet Fax Network Requirements Easylink: OmniRush requires outbound access to the internet on port 25 (SMTP type traffic) and port 80 (http type traffic). Named proxy servers cannot be configured. Firewalls and proxy servers must operate 'transparently' without client configuration required. Port 25 / SMTP Relay Server Discussion: By default, the OmniRush Fax Bridge module communicates directly with the Easylink smtp gateway There is significant latency in this transaction, since the entire internet is traversed. Further, jobs are submitted serially to this gateway. This method requires that TCP port 25 be open for outbound communication from the OmniRush Server PC to the internet. Check with your network administrator. Job latency can be vastly improved using a local SMTP relay server. This will decrease job upload latency, increasing throughput from the Fax Bridge module. The SMTP relay server can then send on multiple threads to the Easylink gateway, which makes best use of available internet bandwidth. Solid SMTP relay servers include Sendmail (available on Linux and NT), and others. In most cases, the SMTP relay should be on another PC (not the OmniRush server), but on the same local ethernet as the OmniRush PC. The SMTP relay system should have plenty of disk space, and should be configured for at least 4 concurrent send threads. Note that the SMTP relay server must meet these requirements: Must allow relaying from the OmniRush Server PC Must not require authentication (authentication is not supported) Module Technical Reference TECH REF: UPS Shipping Module Quick Links: UPS Shipping FAQ 446 Technical Reference Attention existing OmniRush systems (v5 / v6) configured for UPS shipping: When OmniRush v8 is installed, the existing UPS functionality will be disabled until the v8 setup procedures are done. This includes installation of ShipRush v3, and conversion to new templates. UPS Shipping Setup: The OmniRush UPS Module is bridge to the ShipRush UPS Pro SDK. If ShipRush UPS Pro is already in use by desktop users, OmniRush can use it also. If not, ShipRush UPS Pro can be installed on the OmniRush Server PC. Configuration Options: Stand Alone. ShipRush UPS Pro is installed on the OmniRush Server and is used only by OmniRush: Multi-Use ShipRush-Centric. Existing ShipRush UPS Pro Server used by ShipRush Client users & the OmniRush Servers. Shipments are submitted via CRM/SQL system and the ShipRush GUI: 447 OmniRush Administration & User Manual Multi-Use OmniRush-Centric. OmniRush and the ShipRush UPS Pro server are all on one PC. Shipments are submitted via CRM/SQL system and the ShipRush GUI: 448 Technical Reference All of the options shown above result in a single end of day and manifest for all OmniRush and interactive ShipRush users. If separate end of day processes are desired for each process, then OmniRush should use the first setup above (Stand Alone), and interactive ShipRush users should either use ShipRush Basic Edition or ShipRush Pro Edition with the ShipRush Pro Server on its own PC (e.g. a PC other than the OmniRush Server PC). Advanced Configuration Steps It is advised that the ShipRush Client on the OmniRush server be set to use direct ADO database access to the ShipRush server. This is advised in all configurations, even when the ShipRush server is installed on the OmniRush server. Operating Environment OmniRush is consuming the ShipRush UPS Pro SDK. This means the following: 1. ShipRush UPS Pro, either Network Server or Client (if ShipRush v3 Pro Server is installed elsewhere on the network) is installed and operational on the OmniRush Server PC. 2. ShipRush UPS Pro printing has been tested from the OmniRush Server PC 3. OmniRush is logged in to Windows as the same user that configured and tested ShipRush above. Why is #3 important? Because ShipRush maintains its configuration under the 'user profile' directory (at a command prompt, type set userprofile to see the current location). For example, for user Administrator, this directory might be: "C:\Documents and Settings\Administrator\" ShipRush Pro stores its configuration data in a directory underneath the user profile directory: "C:\Documents and Settings\Administrator\Application Data\z-firm llc\shiprush ...\" This is significant because OmniRush requires that the ShipRush environment be operational. Since the ShipRush environment is dependent on the logged in user name, the OmniRush UPS shipping server may function as user 'A' but fail to run as user 'B.' To rectify a situation in which the NT user name for OmniRush will change, two approaches are possible: Copy Files Approach In this approach, you manually create the ShipRush run time environment. For example, ShipRush was configured under user 'Administrator' but OmniRush will run as user 'ORUser.' In this case, we will simply copy all the contents of directory: "C:\Documents and Settings\Administrator\Application Data\z-firm llc\shiprush v3\" To directory "C:\Documents and Settings\ORUser\Application Data\z-firm llc\shiprush v3\" 449 OmniRush Administration & User Manual Note that "C:\Documents and Settings\ORUser\" should already exist before you attempt this copy operation. If it does not, that may not actually be the correct target directory. Log In And Configure Approach In this approach, simply log in to the OmniRush PC as the target user and start ShipRush. The ShipRush wizard will start. Go through the wizard, and at the end ShipRush will go to the Windows System Tray. Exit ShipRush and start OmniRush. Operation: During the day, as shipments are processed, they are actually processed by ShipRush. The UPS track has a setting for Settlement Time. At this time of day the Module will automatically: 1. Trigger an End of Day in the ShipRush system, which: 1. Prints the end of day bar code (which is scanned by the UPS driver) 2. Prints the daily manifest (which lists all the shipments for the day with tracking #'s) 3. Uploads the data file (aka PLD) file to UPS Monitoring There are different kinds of monitoring that can be done. Shipment detail auditing / Accounting Dept Forwarding Typically, this would be done by setting up a batch file to email the .TXT files in the \UPS Manifest\ directory to the accounting staff. A simple batch file could scan for .TXT files, email them, and either delete or archive them. Using ShipRush interactively, shipping history can be exported to CSV, XLS and other data formats. Use the ShipRush v3 reporting feature to print reports or export shipment data to csv, excel, and other formats. PLD Upload The end-of-day barcode will indicate on it in clear text (near the bottom) if the PLD upload has been failing for more than a day. Other ways of monitoring the upload are: 1. Checking the ShipRush End of Day list for the status (via the View Shipments area of ShipRush) Rate Files and Fuel Surcharges Shipment rate file data is part of the ShipRush system. New rates are provided with ShipRush updates. Fuel Surcharge This is set in ShipRush Settings. Overriding the Tracking URL 450 Technical Reference By default, OmniRush saves a tracking URL to the CRM/SQL system that can be used to track the shipment. In certain very specific cases, a site may need this URL directed to a custom tracking server of some kind. This can be done with a registry key on the OmniRush Server machine. Use the carrier module needed: HKLM\SOFTWARE\Z-Firm LLC\UPS Communication Module HKLM\SOFTWARE\Z-Firm LLC\FedEx Communication Module HKLM\SOFTWARE\Z-Firm LLC\Airborne Communication Module Registry string name "TrackURLOverride" Registry string format "http://url...%TRACKNO%...." Sample registry value: http://my-customtrackserver.mydomain.com/processRequest?tracknum=%TRACKNO% %TRACKNO% will be replaced with shipment tracking number UPS Shipping Module FAQ I use my UPS Account # with other shipping software. Can I use it with OmniRush also? Yes. A UPS Account number can be used concurrently with any number of shipping solutions, including those by UPS and third parties. Do I need a modem to use OmniRush UPS shipping? No. Any internet access method will work (e.g. DSL, T1, Cable, ISDN, etc.). A modem can also be used. I do not have Internet access and want to use OmniRush UPS shipping. Can I use a modem? During ShipRush setup, a dial up method and modem can be selected. Can OmniRush do electronic call tags? No. Call tags are supported by the ShipRush for UPS software by Z-Firm. See www.zfirm.com for information. My software is configured to a kit of template names. Do I have to change to the new templates? No. You can keep using the same template names. Version 7 will accept either ZPK or FRU as the file extension for shipping templates. The v7 sample templates are named FRU to differentiate them from prior versions. The new templates can be renamed to ZPK to match the expected file names. Be sure to delete old templates, as they will fail with v7 of OmniRush. What shippment parameters can I pass job by job? The full list of OmniRush overrides is here. Shipment parameters (such as weight, size, class of service, etc.) can be defined %100 in the template, or can be set on the job with reference line codes. Note that only a small number of shipment parameters can be set on the reference line. These are: Weight, Declared Value, COD Amount, COD Payment type For example, this REF line for a regular ground shipment: UPS_GND_BOX_1LB.ZPK This will take all values from the template. 451 OmniRush Administration & User Manual In this example, we override the weight, setting it to 12 lbs and the declared value, setting it to $1100: UPS_GND_BOX_1LB.ZPK WGT:12 VAL:1100 In this example, we ship COD, with all the parameters coming from the shipping template: UPS_COD_GND_1LB_10DOL.zpk Now, we use the same template, but override the amount to $1100 UPS_COD_GND_1LB_10DOL.zpk COD:1100 TECH REF: Email Server OmniRush has a very advanced email system that can help reduce the number of 'bounced' emails. When running in Internal SMTP mode, OmniRush can detect a large portion (%60-%85 in most cases) of emails that would bounce downstream and take two actions in these cases: a) Fail the job in the CRM/SQL database (where you can report on it, clean up your data, or even get an alarm to call a customer to ask for the correct email address) b) Not forward the message, so there will be no bounce. Summary: In Internal SMTP mode, OmniRush will dramatically cut the number of bounces, and make your database of email addresses easy to maintain and clean. Z-Firm recommends running in internal SMTP mode in nearly all cases. Details: The OmniRush email module can run in two modes: External SMTP Relay Server: In this mode, you configure OmniRush with the name or IP address of your SMTP Relay server. This might be a sendmail or Microsoft Exchange system running the SMTP server component. It can be any kind of SMTP software, running on your premises or at an ISP. In this configuration, OmniRush hands outbound email to this SMTP relay computer, and delivery is done by this SMTP system. OmniRush does not know what happens to the email downstream. OmniRush just hands the message off, and completes the job as successful in the CRM/SQL database. OmniRush does not validate the address (except to check that it is formatted as an email address). Bad addresses will be bounced by the SMTP relay server. OmniRush will report close to %100 success rate, and bad email address will cause the emails to bounce. Internal, integrated SMTP Relay: In this mode, OmniRush does a lot more work. The benefits are that OmniRush handles the email all the way to the recipient MX server, which in many cases is the final destination. This allows OmniRush to know a lot more about what happens to the email message. So instead of handing the email off to another computer for SMTP relaying (as OmniRush does in External SMTP mode), in Internal mode, OmniRush acts as an SMTP relay server itself. This means that OmniRush does significant and deep validation of the email address and the actual mail delivery process. If any of these stages fail, OmniRush will fail the email job. When OmniRush fails the job, the email job record in the CRM/SQL system will fail (just like a failed fax job), and there will be no subsequent 'bounce' email to deal with. The nitty gritty of OmniRush in internal mode (for the technically inclined): a) OmniRush looks up the DNS record for the domain portion of the address (the part after the '@' in the address). 452 Technical Reference b) OmniRush asks the DNS server for the name of the MX server (Mail Exchanger) for the domain. c) OmniRush connects to the MX server. d) (optional) OmniRush asks the MX server if the email address is valid e) OmniRush passes the message to the MX server. These steps are tried more than once (so if the DNS or MX server is being rebooted, it will not cause the message to fail). By default, OmniRush makes 3 attempts, 10 minutes apart. This can be modified in the Advanced Settings area of the Module. If any step fails, OmniRush notes the job as a fail in the CRM/SQL database. Step 'd' is only taken if 'Validate Recipient Address' is set in the Advanced tab of the email module. This is off by default, because the process is not %100 reliable. Some small percentage of emails will fail because the MX server returns 'rejected' even though it is valid. Another small percentage of emails will succeed and later bounce. The reason for this is that the email address checking feature on mail servers is often disabled to prevent spammers from probing MX servers for common names in order to build lists of email addresses to spam to. Now at step 'e' OmniRush is handing over the email message. In many cases it is being handed to the final destination (e.g. the actual computer where the recipient mailbox resides). Any failures at this step will cause the email to fail. At this point, it is often discovered that there is no recipient mailbox, and this will cause the job to fail, and OmniRush will fail the job in the CRM/SQL database. Now comes the interesting part: In some cases, the MX server is not the location of the recipient mailbox. For example, at large ISP's (like AOL, etc.), the MX server is actually an intermediate relay system that then forwards the email to computer that hosts the actual mailbox. In such a case, the message deliver to MX will succeed (and OmniRush will complete the job as a success), but downstream the message will fail and bounce. No outbound mail system can detect that this email will eventually bounce. These cases will lead to OmniRush successful jobs that will ultimately bounce. The Bottom Line: OmniRush can only help validate email addresses if it runs in internal, integrated SMTP mode. With Validate Recipient Address OFF, OmniRush will fail some percentage (usually %30-85+) of bad email addresses, allowing you to report on and manage the bad email addresses. With Validate Recipient Address ON, OmniRush will fail a higher percentage, but some of those fails may be 'false' (e.g. the message would go through). Z-Firm recommends running OmniRush in internal mode. This gives you the most benefit and performance. Use database queries/groups/filters to make lists of records with bad email addresses, and then manage these lists as a group (e.g. delete the bad email addresses, call the contacts and request correct addresses, etc.). Internet Access Requirements In External SMTP Relay mode, OmniRush needs to be able to connect to that relay server on port 25. If there is a firewall or other security device between OmniRush and the SMTP server, it needs to allow this traffic to pass. Also, the SMTP relay must accept mail traffic for relay from the OmniRush Server. Many SMTP relays are configured to only relay for mail from specific IP addresses. In such a case, the IP address of the OmniRush Server must be added to the SMTP relay server 'allowed' list. An excellent test for an external SMTP relay is to configure an email program like Outlook or GoldMine to use the desired SMTP relay for sending email. Do this on the OmniRush Server PC 453 OmniRush Administration & User Manual itself. If the mail application can send, OmniRush probably can to. If the mail application cannot send, focus on resolving that (as OmniRush certainly will not be able to use that relay until a mail application can). In Internal SMTP mode, OmniRush needs to be able to access the entire internet on port 25. No inbound connectivity is needed, but OmniRush must be able to access the internet. If there is a firewall or other security device between OmniRush and the internet, it needs to allow this traffic to pass. Some ISP's and other network security devices block outbound port 25 traffic. Be sure your environment allows this traffic to pass. OmniRush needs access to a DNS server as well. It is advisable that the 'public' internet interface have reverse DNS configured. For example, if OmniRush is behind a NAT firewall, and the NAT firewall has an external IP of 22.22.22.22, then best results will be had if your ISP (whoever owns the 22.22.22.22 address) configures reverse DNS to this address. If possible, the host name should match your OmniRush Server PC name. An ideal configuration would have this address resolve to <OmniRush PC Name>.<your domain>.com, e.g. OmniRush.acmeroof.com However, it is not required that the host name or domain name be real. In all events, it is strongly advised that reverse DNS be configured, to any host or domain name, for the OmniRush server, as this will help identify the email as legitimate to spam blockers. Z-Firm DBEngine Z-Firm DBEngine: Introduction The Z-Firm DBEngine is a client/server, zero-administration database engine. It should not be used for any purpose other than OmniRush, and data should never be written to the database. The engine uses the TCPIP protocol to communicate with network clients. Connect.ini The connect.ini file is used by anything that connects to the Z-Firm DBEngine, which basically means everything to do with OmniRush. For example, all modules, clients, and utilities all connect to the Z-Firm DBEngine and use the connect.ini to do so. Connect.ini controls what protocol is used to communicate, and defines the IP Address or hostname of the Z-Firm DBEngine. Supported communication protocols: TCPIP 'Local' The local protocol uses shared memory. It is limited to connections local to the Z-Firm DBEngine PC. It is usually set up by the installer on the OmniRush Server PC. The location of the connect.ini is determined by the CONNPATH environment variable, which is set persistently by the OmniRush installer. Example Connect.ini: 454 Technical Reference Using the local protocol: [Configuration] Sessions=30 [omnirush] Protocol=local ; Sessions the client should allocate ; No host name needed ; because always local to the ; Z-Firm DBEngine Using the TCPIP protocol: [Configuration] Sessions=30 [omnirush] Protocol=tcp host=PRODOR port=1530 ; ; ; ; ; Sessions the client should allocate Header MUST be lower case Defines the protocol as tcp Host name or IP address Req'd param for tcp. ; Always set to 1530 455 Glossary # 'split' GoldMine SQL system: A 'split' GoldMine SQL system has the GMBASE tables in a separate SQL database from the Contact (COMMONDIR/CONTACTDIR) database tables. A Alias-Based Merge Code: Alias based merge codes are based on SQL queries. OmniRush includes dozens of alias-based codes out of the box, and you can make your own custom merge codes based on SQL statements and stored procedures you create. Aliases are managed in the OmniRush Administrator via File | Merge Codes. analog phone line(s): analog phone lines are ordinary lines from the phone company that you can plug an ordinary telephone into. Analog lines are also known as CO (Central Office) and POTS (Plain Old Telephone Service) lines. The technical term for an analog phone line from the phone company or PBX is FXO. C Client Root Directory: The Client Root is a root path for shared files created by the OmniRush. Under the Client Root directory, an \omnirush\ directory is created. Link files (created by the OmniRush Viewer and Server) will be placed in this directory. COMMONDIR: GoldMine Contact Directory. Location (or SQL database) where the CONTACT1 and other contact directory tables can be found. CONTACTDIR: GoldMine Contact Directory. Location (or SQL database) where the CONTACT1 and other contact directory tables can be found. CSID: Calling Station Identification: This is the name that the receiving fax machine sees as the 'name' of the sending fax system. D Database Driven: A Database Driven system is triggered to process a job when a specific type of database record is created in the watched 'job' table. In GoldMine, this is the CAL table, in SalesLogix, the ACTIVITY table. In Open SQL systems it is the OR_JOBS table (or similar). DBIO: Database Input/Output. This is the Database Connector. OmniRush Database Connectors can work with GoldMine, SalesLogix, and nearly any Oracle, Microsoft SQL Server, or ADO accessible database. DID: Direct Inward Dial. This allows multiple phone numbers to be routed into one or more phone lines. This allows each employee to have their own fax number and to set up routing of received faxes to the appropriate person based on the fax number called. DNIS: Dialed Number Identification Service. This is the name used for DID when using digital lines (like T1 and PRI lines). This feature allows multiple phone numbers to be routed into one or more phone lines. This allows each employee to have their own fax number and to set up routing of received faxes to the appropriate person based on the fax number called. 457 OmniRush Administration & User Manual Document Import Folder: This is the directory where OmniRush will look for documents that it expects to find external (on the file system, not in ODMS). (In FaxRush, referred to as the \outfax\ folder.) You can see or set the Import Folder in the General Server Settings screen in OmniRush Administrator. DTMF DID: DTMF DID requires that the OmniRush Brooktrout board be set up behind a PBX or phone system. The Brooktrout board is connected to analog FXO ports on the PBX. The PBX then calls the Brooktrout board and passes digits down to the Brooktrout board to enable the Brooktrout board to receive DID information for the fax. These digits are passed as DTMF digits. A regular analog Brooktrout board is used, and the channels can be used for both send and receive. E External Files: Files residing on the file system of either the OmniRush PC or any network system that OmniRush can access. Files can be of type: RTF, TIF, PDF, OXP, FRP, etc. Contrast to Internal Files that are in ODMS, not in a file system directory. G GOLDDIR: Location of the GoldMine CAL.DBF file (or CAL table on a SQL system). Often specified by the GOLDDIR= tag in GM.INI. On dBase systems, defaults to <SYSDIR>\GMBASE\. M Macro Merge Code: Macro merge codes are available on all CRM and non-CRM platforms. A macro code is obvious because it does not have a table alias. For example, &Contact is a macro code. It is the full name of the job recipient. See the example merge form allmacros.rtf to see these merge codes in action. merge document: Merge documents are made in Microsoft Word, and can merge nearly any data in the database using either built-in OmniRush merge codes or custom OmniRush merge codes. Merge documents can be of any complexity, and can include graphics and advanced Word formatting features. N NT Services are complex: NT Services are complex, and require Win2000 expertise to manage. NT Services, especially in a networked environment, are complex to manage. Do not attempt use of OmniRush as an NT Service unless you have appropriate training and/or certification. Z-Firm does not offer technical support for Windows networking/operating system. O ODMS: OmniRush Document Management System. These are files stored inside OmniRush, in the Documents branch of the OmniRush Administrator. Also referred to as Internal documents (because they are internal to OmniRush). Contrast to External documents, which are stored in directories on a hard drive on the network, on a PC or server file system. S 458 Glossary static: Static documents are standard documents that do not merge, for example product brochures or price lists. Static documents are usually of the PDF, DOC, or TIF file types. SYSDIR: Location of the GoldMine license.dbf file. Often specified in the GM.INI with the SYSDIR= tag. T Table Alias: Aliases are a shortcut to a database query. The query is created and managed in the OmniRush Administrator. U UNC: Universal Naming Convention. UNC paths start with a double-backslash, e.g. \\. UNC paths are an improvement on mapped drive letters, because each PC may map a given path to a different drive letter (which is very confusing). unlimited: (The actual maximum effective length will vary by job type.) 459 Index A ActiveX Introduction ..........................................294 ActiveX.....................................................294 ActiveX Reference ...................................294 Administrator Checking files in and out......................220 Creating Modules ...................................81 Document Packages ............................156 Drag & Drop .........................................155 Finding Files.........................................157 Managing Rights ....................25, 153, 221 Settings Screen....................................154 Administrator..............................................57 Administrator............................................151 ADO Connection String.................................336 Supported Versions .............................336 ADO .........................................................336 API ActiveX API ..........................................294 Custom Fax Bridging ...........................316 Database Driven API ...........................320 Pass Through SQL API........................329 API ...........................................................267 Automated Processes (GoldMine)...247, 288 B Backing Up OmniRush Automatic Z-Firm DB Engine Backup ..127 Using a Batch File to Shut Down .........374 Backing Up OmniRush ............................370 Backing Up SQL DB or CRM...................378 Backup Backing Up the CRM System ......339, 402 Backup.....................................................370 Banner Fax Banner...........................................130 Bar Codes in Merge Documents .............210 BDE Shared BDE and NT Service Operation ..........................................................403 Brooktrout Changing io address of ISA card .........349 Compaq Proliant Servers.....................349 Compatibility with 64-bit PCI slots........349 DID Ordering the Phone Line ..................352 DID -- Direct Inward Dial ..............347, 354 DID -- See Also ......................................37 DID Logic .............................................355 DID Overview .......................................349 Driver Installation .................................104 DTMF DID ................................... 349, 354 Faxinit Manual Test ............................. 386 faxinit.cfg ............................................. 349 Installation ........................................... 104 Monitoring Fax Port Activity ................ 261 Multiple Boards in One PC.................. 349 PCI Slot Types .................................... 347 Supported Models ............................... 347 TR1034................................................ 347 Troubleshooting........................... 386, 387 TruFax ................................................. 347 Brooktrout ............................................... 104 Brooktrout ............................................... 349 C Canada -- FedEx Origination .................. 237 Client Global Root Path ............................ 79 Client Utilities Administrator ......................................... 57 Fax Viewer ............................................ 59 Other Utilities......................................... 59 Print to Fax and Email ................... 58, 251 Client Utilities ............................................ 57 Client Utilities ............................................ 58 Client Utilities ............................................ 59 Client Utilities ............................................ 59 Cluster Install Cluster Member .......................... 70 Cluster....................................................... 70 Commerce Module Commerce Concepts ............................ 54 Configure Atomic................................. 126 Demo Mode......................................... 126 History Record..................................... 243 Internet Payment Setup ...................... 126 Merchant Accounts.............................. 125 Module Requirements ......................... 125 Running Jobs ...................................... 243 Setup ................................................... 126 Supported Merchant Processors......... 125 Track Configuration ............................. 140 Void ..................................................... 243 Commerce Module.................................... 54 connect.ini............................................... 454 CoStar Label Printer ............................... 407 CRM Backup SQL DUMP .............................. 339, 402 Backup ................................................ 339 Backup ................................................ 402 Driving OmniRush from the CRM System ......................................................... 272 GoldMine 461 OmniRush Administration & User Manual Scheduling Jobs ...............................223 GoldMine..............................................223 GoldMine dBase Data Backup.....339, 402 CRM.........................................................222 CRM Integration Activity table ...........................................45 CAL table .......................................46, 224 CRM Integration.........................................44 Crystal Reports Merge Codes........................................165 Overview ..............................................163 Parameterized Database Access.........166 Crystal Reports ........................................163 Crystal Reports ........................................165 Crystal Reports ........................................166 Crystal Reports Options ..........................140 CSID -- How to set Fax CSID ..........106, 130 Custom merge aliases Creating Custom Merge Aliases .181, 191, 194, 195 Example Merge Codes ........................195 Oracle Merge Codes ............................211 Stored Procedures ...............................204 Custom merge aliases .............................190 Custom merge aliases .............................191 Custom Merge Code ......181, 182, 184, 185, 187, 188, 191, 195 D Data Components of OmniRush..............370 Data Driven Dynamic Documents ...........206 Database Connector Aliases for multiple GoldMine contact directories ...........................................88 Aliases for Tracks...................................85 Creating a GoldMine Connector ............87 Creating a SalesLogix Connector ..........91 DB Owner Setting ..................................85 Extended Settings ..................................85 General Settings ....................................84 GoldMine................................................88 Open SQL Connector Oracle Connection String .................335 SQL Creating the Database Connector 334 Introduction ...................................320 Microsoft SQL Details ...................336 MSDE............................................336 Stored Procedures ........................327 Stored Procedures Introduction ....327 Open SQL Connector ..........................320 Override Codes ......................................86 Result Codes..........................................86 SalesLogix v3-v5....................................91 SalesLogix v6.........................................92 Database Connector..................................83 DCF Dialing Configuration File ................365 462 Default Import Folder ................................ 79 Developer's Guide ActiveX ................................................ 294 Custom Fax Bridging........................... 316 Developer's Guide .................................. 267 DHL Configure Shipping Module................. 125 Configuring DHL Tracks...................... 137 OmniRush Features Reference .......... 123 Performance and Throughput ............. 381 Requirements ...................................... 125 DHL ......................................................... 137 Dialing Options Dialing Configuration File (Advanced Dialing)............................................. 365 Dialing Options........................................ 365 DID (Direct Inward Dial) Brooktrout Hardware Setup................. 354 DNIS .................................................... 349 DTMF DID ................................... 349, 354 Hardware Setup .................................... 68 How DID Works........................... 349, 355 Logic Flowchart ................................... 355 Ordering the Phone Line ..................... 352 Overview ............................................. 349 Popup Alerts........................................ 111 Setting Up Users for DID..................... 355 Testing the hardware .......................... 354 User Setup .......................................... 144 Uses For DID....................................... 349 DID (Direct Inward Dial) ............................ 37 Disaster Recovery Backing Up OmniRush ........................ 370 Restoring an OmniRush System......... 375 Z-Firm DBEngine Introduction ...................................... 454 Disaster Recovery................................... 370 DNIS ....................................................... 349 Document Import Folder ............. 23, 24, 218 Document Management ................... 24, 218 Document Packages............................... 156 Document Repository Path....................... 79 Documentation New & Updated Pages for v6.............. 428 E Easylink..................................................... 52 Eltron Label Printer Connecting via Serial Port................... 358 Setting up on the Network................... 358 Eltron Label Printer ................................. 357 E-Mail Generally 36, 56, 120, 259, 260, 359, 384 E-Mail Module E-Mail Track Configuration.................. 139 Internal vs External Mode ................... 452 Module Settings................................... 120 Index Technical Reference ............................452 Validate Email Address ........................452 E-Mail Module..........................................120 E-Mail Module..........................................359 E-Mail Module..........................................452 E-Mail Track Configuration ......................139 E-Mail with OmniRush Attachment Options ...............................36 Email Body Options ...............................36 Merge to PDF Setup ............................113 Override Codes ....................................274 PDF Attachments ...................................36 Print-to-Email .........................................37 Subject Line Control ( // override) ........274 Tuning for Maximum Througput...........384 E-Mail with OmniRush ...............................33 F FacSys Dialing ..................................................119 FacSys .......................................................52 FacSys .....................................................119 FAQ Administrator ........................................359 Server Modules ....................................359 FAQ .........................................................359 Fax Brooktrout Hardware ....................104, 349 Configure Ports ....................................106 Create Module......................................104 CSID.....................................................106 DID .........................................................37 FacSys Integration from OmniRush.....119 High Throughput Faxing ......................445 Initial Setup Walkthrough .......................74 Internet Fax ..........................................117 Module Options ....................................107 Monitor Fax Port Activity ......................261 Override Codes for Job........................274 Performance & Throughput..................379 Preventing Night Faxing.......................148 Receiving Auto-Print Received Faxes...............109 DID (Direct Inward Dial) .....................37 Forward via Email.............................109 Forwarding Inbound Options ............144 OCR of Received Faxes...................368 Popup Notification ............................111 Set Up Receiving..............................108 RightFax Integration from OmniRush ..118 Saving Faxes as TIF Files ...................106 Speed...................................................379 Throughput...........................................379 Fax Bridging Receiving .............................................319 Troubleshooting ...................................387 Fax Bridging.....................................312, 316 Fax module Module Requirements ......................... 103 Monitoring Fax Activity ........................ 261 Fax module ............................................... 51 Fax Viewer Link Faxes to Contacts........................ 258 Fax Viewer ................................................ 59 FaxRush Cannot Share PC with OmniRush....... 406 Changed Override Codes in OmniRush 43 Checklist for Upgrading to OmniRush... 63 OmniRush Backward Compatibility. 39, 41 OmniRush Compared to FaxRush ........ 40 OmniRush Incompatibilities................... 42 OmniRush Product History.................... 15 OutFax Directory Support in OmniRush 23 Planning an Upgrade ............................ 62 Shared Features with OmniRush .......... 39 Transition Plan to OmniRush ................ 62 FaxRush to OmniRush Upgrade Checklist.............................................. 361 Example .............................................. 362 FBS ......................................................... 344 Federal Express........................................ 53 FedEx Canadian Origination .......................... 237 Configure Shipping Module................. 123 Configuring FedEx Track .................... 132 Internet Communication Requirements123 OmniRush Features Reference .......... 123 Override Codes ................................... 274 Performance and Througput ............... 381 Requirements ...................................... 123 FedEx........................................................ 53 File Types Excel Files ........................................... 217 FRD ..................................................... 261 FRP ............................................. 156, 412 OmniRush File Types.................. 261, 409 PDF ............................................. 158, 363 RTF ............................................. 158, 363 TIF ....................................... 158, 261, 363 TXT.............................................. 158, 363 XLS...................................................... 217 ZDF ............................................. 156, 412 ZFS.............................................. 261, 412 ZID............................................... 261, 412 ZPK ..................................................... 412 File Types ............................................... 158 File Types ............................................... 363 Find Files in Documents Branch............. 157 Firewall Internet Fax Requirements.................. 446 Requirements for FedEx Shipping Module ......................................................... 123 FR5DBUtils ............................................... 59 463 OmniRush Administration & User Manual FR5DBUtils.exe .......................................370 FR5Maintain ......................................59, 373 FR5Maintain.exe......................................370 fr5WordMacro.dll .....................................268 FRP..........................................................156 G General Server Settings ............................79 Ghost .......................................................370 Global Root Path .......................................79 Global Settings for OmniRush Server .......79 GoldMine Advanced Merging ...............................195 ASP Settings ..........................................89 Automated Processes ..........247, 288, 289 Backing Up SQL DB ............................378 BDE ........................................................87 Configuring for use with OmniRush .......66 Creating the Database Connector .........87 Currency Format for Merging...............212 dBase Merge Codes ............................184 Driving OmniRush Programatically ......284 Everywhere--Same PC as OmniRush .406 GM.INI....................................87, 340, 342 GoldMine Operating Environment..........87 GoldMine SQL Merge Codes...............185 How To Schedule Jobs ........................223 Linking Received Faxes .......................261 Local or Network Installation..................87 Merge Opportunity Information ............195 Merge Recent History Appointment .....195 Merge Referred Contacts.....................195 Merging Numbers.................................212 Multiple Contact Directories .............88, 89 Multiple Database Connectors...............89 Reporting on Faxes..............................262 Scheduling Jobs...................................223 Scheduling Jobs to Groups and Filters 225 Scheduling Jobs to OmniRush.......46, 224 Scheduling to Tagged Lists..................225 Split SQL Systems .................................88 SQL Single SQL Database...............340, 342 SQL ........................................................87 SQL Database Owner ..........................340 SQL Discussion....................................340 SQL Merge Examples ..........................195 SQL Sort Order ....................................340 Sync Server--Same PC as OmniRush.406 Tips and Tricks.....................................250 Track Aliases..........................................89 User Vars .............................................212 User.ini .................................................212 GoldMine ...................................................46 GoldMine ...................................................87 GoldMine ...................................................87 GoldMine .................................................224 464 GoldMine................................................. 249 GoldMine................................................. 250 GoldMine................................................. 289 GoldMine................................................. 340 H HTML Merge Document Database Merge Codes ...................... 171 FAQ ..................................................... 177 Linking Graphics.................................. 171 Links to Web Sites............................... 171 Merging into HTML Links and Tags .... 178 Pros and Cons vs. Page Oriented Documents....................................... 160 Relative Links ...................................... 171 Server Side Include (SSI).................... 179 Tutorial with FrontPage ....................... 175 HTML Merge Document ......................... 170 HTML Merge Document ......................... 171 HTML Merge Document ......................... 171 HTML Merge Document ......................... 171 HTML Merge Document ......................... 175 HTML Merge Document ......................... 177 HTML Merge Document ......................... 178 HTML Merge Document ......................... 179 I Import Documents From ........................... 79 Installation Directory to install OmniRush to............ 69 E-Mail Server Initial Setup..................... 76 Extracting the Installer......................... 415 Installation Walk Through...................... 60 Installer OmniRush Configuration Screen ........................................................... 70 Installer Screens for Main Server Installation.......................................... 69 Print Merge Server Initial Setup ............ 78 Quick Start Guide .............................. 3, 60 Shipping Server Initial Setup................. 77 Silent Client Upgrade ............................ 71 Installation................................................. 60 Internet Connectivity Firewalls and Proxy Servers ............... 399 Internet Connectivity ............................... 398 Internet Fax About Internet Fax............................... 117 Easylink Troubleshooting ............................... 395 Easylink ............................................... 117 Easylink ............................................... 395 Easylink ............................................... 446 Establishing Service ............................ 117 Internet Fax Throughput...................... 445 Network Requirements........................ 446 Internet Fax............................................... 52 J Job Index Alarm All Fails ......................................128 List of Override Codes .........................274 Override Codes ..............................86, 223 Referencing Job Documents................222 Job .............................................................18 K Knowledge Base......................................385 L Label Printing CoStar ..................................................168 Setting Up the CoStar or Thermal Label Printer ...............................................407 Label Printing...........................................357 Launcher Module Administration & Settings .....................127 Overview ................................................16 Launcher Module .......................................16 Licensing................................................8, 38 Log Files ..................................................414 M Maintenance Back Ups..............................................370 Database Maintenance ........................373 Free Disk Space...................................373 Moving OmniRush to Another PC........375 Manage Rights...........................25, 153, 221 MDAC Supported Versions .............................336 Merge Codes Custom Merge Codes A Job Centric View of Data Merging 190 Anatomy of a Custom Merge Code ..191 Creating Your Own Merge Codes ....194 Custom Merge Code Examples .......195 GoldMine SQL Examples .................195 Stored Procedures ...........................204 Custom Merge Codes ..........................190 Custom Merge Codes ..........................191 Custom Merge Codes ..........................194 Custom Merge Codes ..........................195 Format as Currency .............................212 Formatting Date and Time ...................188 Job Detail Merge Codes ......................184 Macro Merge Codes ............................182 Optimizing Performance ......................211 User Name & Information ....................184 Merge Codes ...........................................181 Merge Codes ...........................................182 Merge Codes ...........................................184 Merge Codes ...........................................185 Merge Codes ...........................................187 Merge Codes ...........................................188 Merge Codes ...........................................191 Merge Codes ...........................................195 Merge Document Advanced Merging .......................203, 206 Anatomy of a Merge Code .................. 181 Bar Code ............................................. 210 Best Practices ..................................... 167 Creating a New Merge Document....... 162 Currency Formatting ........................... 212 Custom Merge Code Examples .......... 195 Data-Driven Documents ...................... 209 Date and Time Formatting .................. 188 Examples..................................... 167, 195 File Size............................................... 167 GoldMine dBase Merge Codes ........... 184 GoldMine SQL Merge Codes ...... 185, 195 GoldMine User Vars ............................ 212 HTML Merge Document Database Merge Codes................... 171 Example Useage ............................. 171 HTML vs Page Oriented Document 160 Importing HTML into ODMS ............ 171 Java Script ....................................... 171 Planning the HTML Content ............ 171 Reserved merge tags ...................... 171 Tutorial with FrontPage ................... 175 HTML Merge Document...................... 170 HTML Merge Document...................... 171 HTML Merge Document...................... 171 HTML Merge Document...................... 171 HTML Merge Document...................... 175 Job Detail Merge Codes...................... 184 Macro Merge Codes............................ 182 Merging External Data ........................ 208 Merging Pictures and Graphics........... 206 Merging Sales Rep Picture ................. 206 Merging Signature Graphics ............... 206 MSCRM Merge Codes ........................ 195 Page Oriented vs HTML Merge Forms 160 Phone Number Formatting.................. 188 Postal Bar Code .................................. 210 SalesLogix Merge Codes ............ 187, 195 Types of Merge Codes ........................ 182 User Information merge codes............ 184 VBA Automation .......................... 271, 272 Merge Document .................................... 162 Microsoft Exchange Server--Same PC as OmniRush........................................ 406 Windows Versions Supported ............. 407 Microsoft CRM MSCRM v1.x Database Connector Settings.... 95, 103 Installing the OmniRush UI................ 96 Operating Environment...................... 94 Overview - OmniRush with Microsoft CRM ............................................... 48 MSCRM v1.x ......................................... 94 Microsoft CRM .......................................... 94 Microsoft SQL Server 465 OmniRush Administration & User Manual Configuring OmniRush Database Connector .........................................334 Microsoft Word Registry Settings ..........................169, 369 Tips & Tricks ................................169, 369 Microsoft Word.........................................169 Microsoft Word.........................................369 Minimum Required Hardware Memory Requirements.........................346 Minimum Required Hardware................5, 64 Module Create Fax Module ..............................104 Creating Modules in Administrator.........81 Database Connector Extended Settings ..............................85 General Settings.................................84 GoldMine ............................................88 Override Codes and Special Options ......................................................274 SalesLogix v3-v5 ................................91 SalesLogix v6 .....................................92 Database Connector ..............................83 E-Mail ...................................................120 Fax (Hardware) Custom Fax Bridging........................314 Fax (Hardware) ......................................17 Start and Stop ......................................151 Module .......................................................17 Monitoring NT Event Log .......................................375 OmniRush Log Files ............................414 Move OmniRush to Other PC..................375 MSCRM .....................................................94 MSDE ......................................................336 MySQL.....................................................329 N NCP - Override Code ..............................274 NET SEND command..............................111 Networking...............................................397 New & Updated Documentation Pages ...428 NT Event Log...........................................396 NT Services Drive Letter Access from NT Services .403 Logon ID and Password.......................373 Running OmniRush as a Service.........404 Starting and Stopping ..........................374 User Account........................................404 NT Services .............................................403 NT User Account .....................................404 O OCR (Optical Character Recognition) .....368 ODMS Check In and Check Out......................220 Finding Files.........................................157 Internal or External Master File............219 What is Managed by ODMS ..................25 466 ODMS ....................................................... 24 ODMS ..................................................... 218 Office Automation ..................................... 14 OmniRush Backing Up OmniRush Data ............... 370 Backing Up Z-Firm DBEngine ............. 127 Database ............................................. 370 Disk Space Consumption.................... 373 Document Store .................................. 370 Free Disk Space.................................. 373 Monitoring............................................ 127 Product History...................................... 15 Rename the Server ............................. 411 Starting and Stopping Automatically ... 148 What is New in 6.0 .............................. 415 OmniRush Universal Client..................... 250 Open Database Connector Introduction.......................................... 320 Microsoft SQL Details ......................... 336 Oracle Details...................................... 335 Pass Through SQL - DBIO Setup ....... 336 Pass Through SQL - Documentation .. 329 Stored Proc Based - DBIO Setup........ 334 Stored Proc Based - Documentation... 327 Stored Procedures .............................. 327 Open Database Connector ..................... 320 Open File Manager ................. 339, 370, 402 Optical Character Recognition................ 368 Oracle Configuring OmniRush for an Oracle Database ......................................... 334 Connection String................................ 335 Merge Code Notes .............................. 211 ORNETSTOP.......................................... 148 outfax directory ......................................... 23 Override Codes Using on the Job Record..................... 223 Override Codes......................................... 86 Override Codes....................................... 274 P Packages Document Packages ........................... 156 PDF Email Conversion ................................ 113 Fax Conversion Contrast .................... 113 Merged PDF Email Attachments........... 36 Module Setup Options......................... 113 PDF Features in OmniRush .................. 22 PDF ........................................................... 22 Performance Email Tuning for Thoughput................ 384 Fax Speed ........................................... 379 Fax Throughput ................................... 379 Shipping Server Throughput ............... 381 Performance ........................................... 379 Pervasive ................................................ 329 Index PREDIAL.INI (Now called DCF) ..............365 Print Module IP Printers ....................................400, 401 Label Printing .......................................408 Overview ................................................55 Paper Sizes and Forms .......................408 Print Module.............................................112 Print to Fax Client Client Job Flow.....................................251 Main Screen .........................................251 R Rasterizer ................................................253 Rename the OmniRush Server ...............411 Reporting GoldMine Reporting .............................262 Reporting .................................................261 Restore OmniRush Data .........................375 RightFAX Dialing ..................................................118 RightFAX ...................................................52 RightFAX .................................................118 RTF Optimizing Graphics to Reduce File Size ..........................................................167 Reducing RTF File Size ...............169, 369 RTF Merge Forms vs HTML Merge Forms ..........................................................160 RTF............................................................21 S Sales Processes ..............................246, 280 SalesLogix Alternate Table Names ..........................93 ASP Configuration .................................94 Attaching Received Faxes to Contacts 260 Attachments Directory............................90 BDE ........................................................90 Configuring for use with OmniRush .......66 Creating the Database Connector .........91 Database Connector Configuration......345 Database Connector Configuration v3-v5 ............................................................91 Database Connector Configuration v6...92 Driving Jobs Programatically ...............281 Emailing Faxes to SalesLogix Users ...260 FBS ......................................................344 Formatting Phone Numbers.................188 History Tab...........................................227 How To Schedule OmniRush Jobs ......226 Interbase is not Supported.....................90 Mass Jobs (fax, email, shipping, etc.)..229 Merge Codes........................................187 Multiple Database Connectors...............94 ODBC Drivers ......................................344 Operating Environment ..........................90 Oracle Merge Codes ............................211 Sales Processes ..........................246, 280 SalesLogix Server Side Integration....... 45 SalesLogix v6 Database Connector...... 92 Scheduing Jobs................................... 227 Scheduling OmniRush Jobs................ 226 Scheduling to Groups.......................... 229 slgxapi.dll....................................... 90, 343 Software Coexistence ........................... 90 Support Client Integration ........... 145, 254 Supported SQL Servers ........................ 90 Sync Server--Same PC as OmniRush 406 Sync to All Users option ...................... 345 Sync Troubleshooting ......................... 345 ToDo Activity ....................................... 226 Track Aliases......................................... 93 Using Sales Processes ....................... 229 Web Client to Drive OmniRush ........... 249 SalesLogix ................................................ 45 SalesMagic ............................................... 41 Schedules ............................................... 148 Service -- Run OmniRush as an NT Service ............................................................. 404 SetDateFormat........................................ 188 SetPhoneFormat..................................... 188 SetTimeFormat ....................................... 188 Shipping Closing Shipping Day.......................... 236 Concepts Introduction ................................ 29, 230 Introduction to Templates .......... 29, 230 TECH REF UPS Shipping Module.................. 446 Understanding OmniRush Shipping .. 26 Concepts ............................................... 29 Concepts ............................................. 230 Configuring and Using DHL.................................................. 137 FedEx .............................................. 132 UPS ................................................. 135 Configuring and Using......................... 132 Configuring and Using......................... 135 Configuring and Using......................... 137 Deleting Shipments ............................. 236 Network Printers.................................. 401 OmniRush Features Reference .......... 123 Overriding the FROM information ....... 238 Performance and Throughput ............. 381 Saving Shipping Labels to Disk........... 140 Shipping Feature by Carrier Matrix ..... 123 Shipping Requirements DHL.................................................. 125 FedEx .............................................. 123 Thermal Label Printers .................... 357 UPS ................................................. 124 Shipping Requirements ....................... 123 Shipping Requirements ....................... 125 Templates for Shipping ....................... 234 467 OmniRush Administration & User Manual Using and Administering Administrative Functions ..................236 Example Jobs ...................................237 Introduction to Using Shipping ...29, 230 Job Override Codes .........................274 Override Codes for Shipping jobs ....235 Setting up label printer on the network ......................................................358 Shipping Templates In Depth ...........234 Using and Administering ......................236 Virtual Tracks .......................................238 shipping module.........................................53 slgxapi.dll .................................................343 slx_support.ini..........................................145 SMTP Relay Servers ...............................359 Software Coexistence..............................406 SQL Databases Custom Merge Code Examples ...........195 Microsoft MSDE ...................................336 Microsoft SQL Server...........................336 Oracle...................................................335 Stored Procedures ...............................327 SQL Databases .......................................320 Stored Procedures Examples for Custom Merging.............204 Merging Data Using .............................204 Open Database Connector ..........320, 327 Stored Procedures...................................204 Stored Procedures...................................320 Stored Procedures...................................327 Stored Procedures...................................327 System Components .................................16 System Requirements Network Requirements ..........................66 Operating System ..............................5, 64 RAM ...................................................5, 64 System Requirements .................................5 System Requirements ...............................64 System Requirements .............................347 T T1 Digital Phone Line ..............................347 table alias.................................................191 Terminal Server Windows Version Support Matrix.........407 TIF File Handling .............................158, 363 Toolbar Macro Buttons ......................................146 Script Buttons.......................................146 Setup....................................................146 Toolbar.....................................................145 Toolbar.....................................................146 Track Advanced Options................................140 Basic Settings ..............................107, 128 Commerce Track..................................140 Configuring DHL Track ........................137 468 Configuring FedEx Track .................... 132 Create.......................................... 107, 128 E-Mail Track Configuration.................. 139 Extended Settings ............................... 128 Fax Tracks Fax Track Configuration .................. 130 Fax Tracks........................................... 130 Management ....................................... 152 Options for All Track Types ................. 128 Print Track Configuration .................... 131 Save Documents ................................. 140 UPS Track ........................................... 135 Track ......................................................... 18 Tracks ....................................................... 18 Troubleshoot Administrator..................... 391 Troubleshooting Brooktrout Hardware ................... 386, 387 Database Connector ........................... 396 Easylink Internet Fax........................... 395 Error Messages ................................... 385 Fax Module.......................... 387, 391, 392 Fax Throughput & Performance.......... 379 Network Popup Messages .................. 111 NT Event Log ...................................... 396 OmniRush Log Files............................ 414 SalesLogix........................................... 396 Server Modules ................................... 359 Steps ................................................... 386 Updater.................................................. 71 Troubleshooting ...................................... 414 U Uninstall Manually Uninstall OmniRush ............. 410 Uninstall OmniRush from Installer....... 411 Uninstall .................................................. 410 Uninstall OmniRush ................................ 410 United Parcel Service ............................... 53 Universal Client Access to Different Job Types ............ 143 Introduction.......................................... 250 Job Flow .............................................. 251 Universal Client....................................... 250 Update ...................................................... 71 Upgrade From FaxRush to OmniRush FaxRush Upgrade Checklist.............. 63 Upgrade from FaxRush Planning ......................................... 62 Upgrade from FaxRush ..................... 62 From FaxRush to OmniRush ................ 62 Upgrading OmniRush -- Steps .............. 71 Upgrade .................................................... 71 UPS Label Printer ........................................ 124 OmniRush Features Reference .......... 123 Override Codes ................................... 274 Index Performance and Throughput ..............381 Requirements.......................................124 Shipping Module Configuration............124 Technical Reference ............................446 Track Configuration..............................135 UPS ...........................................................53 User Variables - Advanced Merge for GoldMine..............................................212 Users Automatically Created from CRM ........142 On Inbound Tab ...................................144 Private Path..........................................142 Universal Client Job Types ..................143 Updating Full Name .............................142 Utilities Fax Port Monitor...................................261 FR5DBUtils ..........................................370 FR5Maintain.................................370, 373 Utilities .......................................................59 V VBA Best Practices ......................................272 Example Code......................................271 Getting Started .....................................268 OmniRush VBA Documents.................267 VBA..........................................................267 Venali.........................................................52 Videos Using Client with the SalesLogix Support Client ................................................254 Viewer Annotating Faxes ................................ 257 Emailing Fax Out................................. 259 File Types............................................ 261 Link Faxes to Contacts........................ 261 Preferences ......................................... 259 Viewer ..................................................... 256 Viewer ..................................................... 257 Viewer ..................................................... 259 virtual secretary......................................... 44 Virtual Tracks .......................................... 238 VisionLab .................................................. 52 W WAN................................................ 397, 400 Wide Area Networks ....................... 397, 400 Windows Version Support Matrix............ 407 Word ............................................... 169, 369 X XLS ......................................................... 217 Z ZDF - File Extension ............................... 156 Zebra Label Printer ................................. 357 zfCheckShell ............................................. 59 Z-Firm Database Engine Communication Protocol ..................... 454 connect.ini ........................................... 454 Introduction.......................................... 454 Z-Firm Database Engine........................... 16 469