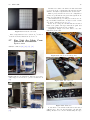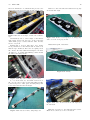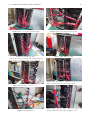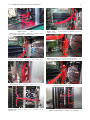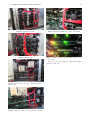
1
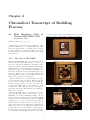
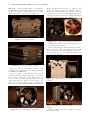
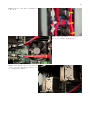
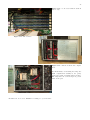
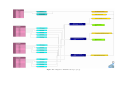
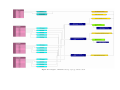
APOLLO
File Server, by alpenwasser
Preface
Abstract
This document describes in chronological fashion the building process for our home server, dubbed APOLLO
(short for Anonymity Protecting Oblivious Long-Legged Ostriches, and no, that does not need to make sense).
Most of the content is comprised of transcripts (sometimes slightly edited) from the build logs posted on
linustechtips.com, themodzoo.com, overclock3d.net and overclock.net (see [1], [2], [3], [4]), which is also why the
posts are mostly written in present tense. This is not a report on the project written in retrospect, but a
faithful, though not literal, transcript of the projet as it developed.
Thanks
— George
for lending his skill, time, dedication and machinery.
— The communities on
linustechtips.com,
themodzoo.com,
overclock3d.net
and overclock.net
for their great support and feedback.
Revision
Current document revision number: 1.0
Switzerland, November 2014
i
Contents
1 Prologue
1.1 Hardware . . . . . . . . . . . . . . . . . . . . . . . . . . . . . . . . . . . . . . . . . . . . . . . . .
1.2 Purpose . . . . . . . . . . . . . . . . . . . . . . . . . . . . . . . . . . . . . . . . . . . . . . . . . .
1.3 Modding . . . . . . . . . . . . . . . . . . . . . . . . . . . . . . . . . . . . . . . . . . . . . . . . . .
2 Chronolical Transcript of Building Process
2.1 First Hardware Tests & Noctua Coolers . .
2.2 Temporary Setup, OS Installed . . . . . . .
2.3 PSU Mounting & LSI Controller Testing . .
2.4 The Disk Racks . . . . . . . . . . . . . . . .
2.5 Chipset Cooling . . . . . . . . . . . . . . . .
2.6 Disk Ventilation . . . . . . . . . . . . . . .
2.7 Fan Unit . . . . . . . . . . . . . . . . . . . .
2.8 Storage Topology and Cabling . . . . . . . .
2.9 Storage and Networking Performance . . . .
.
.
.
.
.
.
.
.
.
.
.
.
.
.
.
.
.
.
.
.
.
.
.
.
.
.
.
.
.
.
.
.
.
.
.
.
.
.
.
.
.
.
.
.
.
.
.
.
.
.
.
.
.
.
.
.
.
.
.
.
.
.
.
.
.
.
.
.
.
.
.
.
.
.
.
.
.
.
.
.
.
.
.
.
.
.
.
.
.
.
.
.
.
.
.
.
.
.
.
.
.
.
.
.
.
.
.
.
.
.
.
.
.
.
.
.
.
.
.
.
.
.
.
.
.
.
.
.
.
.
.
.
.
.
.
.
.
.
.
.
.
.
.
.
.
.
.
.
.
.
.
.
.
.
.
.
.
.
.
.
.
.
.
.
.
.
.
.
.
.
.
.
.
.
.
.
.
.
.
.
.
.
.
.
.
.
.
.
.
.
.
.
.
.
.
.
.
.
.
.
.
.
.
.
.
.
.
.
.
.
.
.
.
.
.
.
.
.
.
.
.
.
.
.
.
.
.
.
.
.
.
.
.
.
.
.
.
.
.
.
.
.
.
.
.
.
.
.
.
.
.
.
.
.
.
.
.
.
.
.
.
.
.
.
.
.
.
.
.
.
1
1
1
1
2
2
4
4
6
9
11
13
15
19
3 Result and Closing Thoughts
21
Appendix
25
A Diagrams
26
List of Figures
30
References
33
ii
Chapter 1
Prologue
Available online at [1], [2], [3], [4].
1.1
So, I deployed ZFS on ZEUS, and it’s been working very nicely so far. However, that brought with it
two major drawbacks: Firstly, I was now missing 5
TB of space, since I had been tempted by ZFS to use
those for redundancy, even for our media files. Secondly, and more importantly, ZEUS is not an ECCmemory-capable system. The reason this might be
a problem is that when ZFS verifies the data on the
disks, a corrupted bit in your RAM could cause a discrepancy between the data in memory and the data
on disk, in which case ZFS would “correct” the data
on your disk, therefore corrupting it. This is not exactly optimal IMO. How severe the consequences of
this would be in practice is an ongoing debate in various ZFS threads I’ve read. Optimists estimate that
it would merely corrupt the file(s) with the concerned
corrupt bit(s), pessimists are afraid it might corrupt
your entire pool.
The main focus of this machine will be
Hardware
• CASE: InWin PP689
• PSU: Enermax Platimax 600 W
• MB: Supermicro X8DT3-LN4F
• CPU: 2 × Intel Xeon L5630 (quadcore, hyperthreaded)
• HS: Noctua NH-U9DX - Socket LGA1366
• RAM: 24 GB Hynix DDR3 1333 MHz ECC
• HBA CARDS: 3 × LSI 9211-8i, flashed to IT
mode
• SSD: Intel 520, 120 GB
• HDD 0: WD VelociRaptor 150 GB (2.5“)
• room to install more disks over time
• HDD 1-3: Samsung HD103UJ 1 TB F1 × 3
• ECC-RAM capable
• HDD 4-7: WD RE4 2 TB × 4
• not ridiculously expensive
• HDD 8-13: WD Red 3 TB × 6
• low-maintenance, high reliability and availability (within reason, it’s still a home and small
business server)
• Total Raw Capacity: 29 TB
1.2
Purpose
1.3
So, yeah, another build. Another server, to be precise. Why? Well, as nice of a system ZEUS is, it does
have two major shortcomings for its use as a server.
When I originally conceived ZEUS, I did not plan
on using ZFS (since it was not yet production-ready
on Linux at that point). The plan was to use ZEUS’
HDDs as single disks, backing up the important stuff.
In case of a disk failure, the loss of non-backed up
data would have been acceptable, since it’s mostly
media files. As long as there’s an index of what was
on the disk, that data could easily be reaquired.
But right before ZEUS was done, I found out that
ZFS was production-ready on Linux, having kept a
bit of an eye on it since fall 2012 when I dabbled in
FreeBSD and ZFS for the first time. Using FreeBSD
on the server was not an option though since I was
nowhere near proficient enough with it to use it for
something that important, so it had to be Linux
(that’s why I didn’t originally plan on ZFS).
Modding
Instead of some uber-expensive W/C setup, the main
part of actually building this rig will be in modifying the PP689 for fitting as many HDDs as halfway
reasonable as neatly as possible. I have not yet decided if there will be painting and/or sleeving and/or
a window. A window is unlikely, the rest depends
mostly on how much time I’ll have in the next few
weeks (this is not a long-term project, aim is to have
it done way before HELIOS).
Also, since costs for this build should not spiral out
of control, I will be trying to reuse as many scrap and
spare parts I have laying around.
1
Chapter 2
Chronolical Transcript of Building
Process
2.1
First Hardware Tests &
Noctua NH-U9DX 1366
for this. The Noctuas would admitteldy be better
suited, but I’ll see how things go with the SAs first.
Novemer 14, 2013
Available online at [5], [6], [7], [8].
M/B, CPUs and memory have all arrived. The
CPUs and M/B seem to be working OK. One of the
memory modules seems to be having a bit of trouble
being recognized, the other five work fine. I’ll see if
it’s really defective or if it’s just the IT gods screwing
with me a bit.
2.1.1
The Noctua NH-U9DX
Figure 2.1: The Noctua box,. . .
The Noctua NH-U9DX 1366 is a cooler from Noctua’s series specifically made for Xeon sockets. For
those who don’t know, LGA1366 sockets have an integrated backplate, just like LGA2011, which makes
them much more convenient than their desktop counterparts. It’s quite a nice and sturdy backplate, too,
in fact it’s among the most solid backplates I’ve come
across yet. This does, however, require a slightly different mounting system. You just have four screws
which you bolt directly into the plate.
Aside from that, the cooler is identical to its desktop counterpart as far as I know. Why the 92 mm
version? For one thing, it was in stock, unlike the
120 mm version of this cooler. Also, the CPUs only
produce 40 W TDP each, so there really is no need
for high-end cooling. And as a bonus, I got supplied
some awesome San Ace fans with my case, which also
happen to be 92 mm.
The Noctua fans which come with the cooler are
just 3 pin fans (the newer models of this cooler for
LGA2011 come with a PWM fan I think), but the
San Ace fans I got with my case are actually PWM
controlled! Since the M/B has a full set of PWM
headers (8, to be exact, how awesome is that!?) I
will try the San Ace fans and see how they play on
lower rpm’s (they run at 4,800 rpm on full speed).
This does not need to be a super-silent machine since
it will be in its own room, and since I really like the
San Ace fans with regards to build quality (and I’m
a total sucker for build quality) I’d love to use them
Figure 2.2: . . . the contents. . .
Figure 2.3: . . . and unpacked.
2
2.1. FIRST HARDWARE TESTS & NOCTUA COOLERS
The Box. Unlike its shiny desktop counterparts,
the NH-U9DX comes in a nice and subtle (but sturdy)
cardbord box with a simple sticker on it. I must
admit I like this box more than the shiny ones.
3
Note: Hooking such a fan up to a desktop board
as its power source would not be advisable, they are
rated for 1.1 A and might burn out the circuits on
a desktop board. Server boards usually have better
fan power circuitry since they are desinged with highperformance fans in mind. Just as a side note.
Figure 2.4: Some glory shots. . .
Figure 2.7: . . . and compared with a Noctua fan.
I might still go with the stock Noctua fans, but it’s
not the plan at the moment.
I had to improvise a bit with mounting the San Ace
fans to the tower. The clips which you’d use with
the Noctua fans rely on the fan having open corners,
which the San Ace’s do not. Ah well, nothing a bit
of cotton cord can’t fix.
Figure 2.5: . . . does look nice, doesn’t it?
There is no info about this fan on the web, I’m
presuming it’s something San Ace makes specifically
for InWin in an OEM deal.
I’ve hooked it up to a fan controller and got a max
reading of 4,800 rpm, and the Supermicro board turns
them down to 2,200 rpm on idle. They seem to be
very good fans, you can only really hear the sound
of the air moving, no bearing or motor noises so far.
Also, they are heavy ( 200 g per piece), which is always nice for a build quality fetishist such as myself.
Figure 2.6: One of the San Ace 92 mm fans. . .
Figure 2.8:
heatsink.
The San Ace fan mounted on Noctua
Figure 2.9:
heatsink.
The San Ace fan mounted on Noctua
Side note: The coolers were actually more expensive than the CPUs.
2.2. TEMPORARY SETUP, OS INSTALLED
2.2
Temporary Ghetto Setup,
OS Installed
November 16, 2013
4
2.3
PSU Mounting & LSI Controller Testing
April 01, 2014
Available online at [9], [10], [11], [12].
Available online at [13], [14], [15], [16].
Yeah, it’s taking a lot longer to finish this than I’d
initially hoped (doesn’t it always with these sort of
projects. . . ). But I’ve been working on it in the last
few weeks and now finally have something to share.
The PSU slides into this case through an opening
from behind, and since the case isn’t really made for
normal ATX-sized PSUs (but server PSUs instead,
it’s a rather tight fit. To be more specific: The PSU
in its stock config does not fit, the screws for the fan
grill and the fan grill itself bump up against the case.
An easy fix though, just needed to remove the fan
grill on the PSU.
Figure 2.10: Boinc at Work
Yeah. . .
Figure 2.12: Bad Fit
Figure 2.11: Ghetto Testing Setup
Hardware Validation. I’ve put the system together temporarily to validate the M/B, CPU and
memory, so far all seems good. A minimal Arch Linux
setup has been installed and is successfully running
BOINC at the moment.
I’m not running BOINC as a hardware validation
tool, that’s not what it’s designed to do. I have
(mostly) validated the hardware and am now just
running BOINC.
Gotta love low-power CPUs, core temps after
about an hour of running BOINC on all cores are:
Figure 2.13: Good Fit
CPU0:
CPU1:
31 ◦ C
32 ◦ C
31 ◦ C
26 ◦ C
35 ◦ C
29 ◦ C
30 ◦ C
31 ◦ C
Table 2.1: Core temperatures during BOINC testing.
Furthermore, since normal server PSUs usually
blow air through along their longitudinal axis, there
is no ventilation hole on the case for a fan on the top
of the PSU, which most of today’s PSUs have. Not
to worry, I still had an old Aquacomputer rad grill
laying around. A bit of dremeling should be able to
fix this problem. Marking for cutting:
2.3. PSU MOUNTING & LSI CONTROLLER TESTING
5
Figure 2.14: Making sure the PSU gets enough air.
Figure 2.18: . . . like so.
Figure 2.15: And with the grill mounted.
Figure 2.19: And mounted.
Since this case was not designed with standard
ATX PSUs in mind, some cutting was required to
make it all fit nicely.
Figure 2.20: Fits nicely now.
Needed to hook up some HDDs to test the LSI
controller. Looks very ghetto, worked like a charm.
Figure 2.16: Just about does not fit.
Figure 2.17: This will be fixed. . .
Figure 2.21: Yeah, I won’t be keeping things like this,
naturally. . .
2.4. THE DISK RACKS
6
thirteen drives. You would need to buy another fourdisk enclosure (which btw. I could not find anywhere
to buy), and a five-disk enclosure for the 5.25“ bays.
Figure 2.22: And the HDD package.
2.4
The Disk Racks
April 02, 2014
Available online at [17], [18], [19], [20].
The main part of this undertaking. . .
As mentioned elsewhere, one of the two main problem of our current server is that it only has seven
HDD slots, and they’re already all filled up. The
only way to get more storage is to install larger disks,
which isn’t really all that optimal.
Figure 2.25: Progress. . .
Since 13 drives aren’t really that many, and since
these enclosures aren’t exactly cheap, I decided to go
another route.
It took me a while to figure out how to do it, but
in the end this is what I came up with. I had very
generous help from one of my neighbours, who has a
mill and a lathe at his disposal, as well as plenty of
time (he’s a pensioneer).
The Mill can also serve as a drill press. The drill
chuck he looks ridiculously huge when you put a small
drill bit into it (he said they didn’t have the smaller
model in stock when he needed to buy his, so he went
with the large one).
Figure 2.23: The mill.
Figure 2.26: It’s pretty massive. . .
Figure 2.24: First steps. . .
One of the main objectives of this build is to have
more disk slots. The PP689 only offers four in its
stock form, which you can upgrade to a maximum of
Figure 2.27: Lots of work. . .
2.4. THE DISK RACKS
7
Lots of holes needed to be drilled for the pop rivets
that were going to hold it all together.
Figure 2.32: The last one of these.
Figure 2.28: . . . and more drilling
This is how the construct looks on the side where
you slide in the disks. You can see the pop rives
I used to assemble it, the slots which are pictured
being milled above for the screwheads and the screws
on the disks. You can also see the recesses into which
the screws mounted on the HDDs lock. The system
works very well.
Figure 2.29: Milling out the slots for the screwheads.
Figure 2.33: A closeup of the rails for the HDDs
Figure 2.30: Side panels for disk racks completed. Using
some old broken HDDs to test fit.
Figure 2.34: Note the cutout for the bolt head to go
through when sliding the drive in.
Figure 2.31: And a different angle.
Obviously, 24 HDDs are going to put out some
heat, so some ventilation is required. I’m using six
Papst fans for that. The fans will be bolted onto the
panels with some L profiles.
Because the fans have a hole spacing of 105 mm
and the HDDs are roughly 100 mm wide, each fan
can only be mounted on one side with two screws.
2.4. THE DISK RACKS
8
fan frames. To reduce the stress on the fan frames,
we made some brass bushings that take the brunt of
the pressure.
The panels are mounted to the bottom and top of
the case with screws. To have some leeway in adjusting things, there are slots instead of round holes in
some places.
Figure 2.35: Taking measurements for the fan mounting
holes.
Figure 2.39: One of the brackets with slots for adjustment.
Figure 2.36: . . . and all three.
Figure 2.40: Mounted – top side.
Figure 2.37: Without bushings. . .
Figure 2.41: Mounted – bottom side.
Figure 2.38: . . . and with.
Since the fan screws need to be tightened rather
heavily, the screws exert significant pressure on the
The Disks just slide into the slots and lock into
place in the recesses you can see above. Since I can’t
tighten the screws, I’m using Loctite to prevent them
from falling out due to vibration. I tried to get some
screws similar to those Lian Li use for their HDD
mounting, but the only ones I could find were so expensive that they’d have cost me more than 100 USD.
So yeah, nope. . .
2.5. CHIPSET COOLING
9
2.5
Chipset Cooling and Adventures in Instability
April 08, 2014
Available online at [21], [22], [23], [24].
Figure 2.42: Simple, reliable, no need to make things
more complicated than needed.
As some may be aware, I originally had some issues when trying to get this machine to run stable.
While stress testing with mprime, it repeatedly and
reproduceably crashed after less than an hour, sometimes even already after a few minutes. Each time
after crashing, it took me several tries and about 10
to 20 minutes to get the board to POST again.
After some troubleshooting and running a few diagnostics, it turned out that the 5520 chipset was
running really hot. It’s temperature threshold as indicated by the system is 95 ◦ C, and when I was last
able to check on it before a crash, it had already
passed 85 ◦ C, so I suspected that it was bumping up
against the threshold, upon which the board did an
emergency shutoff and mandated a cooldown period
until it would run again.
As an emergency fix, I took the 80 mm San Ace
fan that came with the case and mounted it to the
chipset heatsink with some waxed cotton cord, and
voilÃă, somewhere slightly above 70 ◦ C maximum.
Figure 2.44: My temporary solution to stability issues.
Apologies for the horrid picture quality; this is a blowup
out of a larger picture.
Figure 2.43: Finally, mounted in the case. Fits nicely.
Very happy with the result.
Figure 2.45: The stock heatsink.
Unfortunately I forgot to take pictures of that
rather ghetto setup before dismantling it again and
replacing it with something more solid, but I have
2.5. CHIPSET COOLING
10
managed to blow up some sections from another picture that should at least give you an idea of how it
looked.
Figure 2.49: The fan is held down by three screws, two
in the L piece. . .
Figure 2.46: The naked chipset after cleaning off the
TIM (rather annoying as it had dried).
Since the 80 mm fan is quite a bit larger than the
chipset heatsink itself, I needed to either replace the
heatsink or modify it in order to be able to mount
the fan to it. I took a rather crude, but very effective
approach: I took an L piece of aluminium, drilled
two holes across the heatsink, cut some M4 threads
on those two holes (which worked despite the holes
only going through the fins and not being continuous), then bolted the L piece to the heatsink with
two M4 screws. Works like a charm.
Figure 2.47: The holes are a bit unclean, but it’s not
possible to debur them unfortunately.
Figure 2.48: . . . and from the other side.
Figure 2.50: . . . and one in the corner of the heatsink
itself. Some fins are bent from the drilling.
Figure 2.51: And the complete chipset cooling package.
Figure 2.52: For mounting it on the M/B, it needs to
be mounted first without the fan. . .
2.6. DISK VENTILATION
Figure 2.53: . . . then the fan is mounted on top, and
done.
2.6
Disk Ventilation
11
Figure 2.55: Just some foam.
The complete fan panel assembly:
April 09, 2014
Available online at [25], [26], [27], [28].
Although disks have become quite frugal when it
comes to power consumption these days (at least
some of them) and HDD cooling is not really a huge
issue for most people, packing 24 disks as closely together as in this build will cause heat issues without
ventilation. There is no need for 3k rpm Delta fans
though, a whiff of cool air breezing over the disks
should do the job nicely.
For this purpose, as you may have seen in some previous pics, I have chosen 6 120 mm Papst fans, specifically the 4412 GLL model, and am running them at
7 V. The fans draw air in through a vent area, and it
then gets passed through the M/B compartment and
out the back.
Each fan is fixed to a rail riveted to one of the disk
rack panels with two screws.
You’ve seen this before, but for completeness’ sake
I’m adding the pics of the bushings used to prevent
the fan frames from being crushed to this update as
well:
Figure 2.56: Looks neat, doesn’t it?
While doing some test runs, I noticed that a rather
large amount of air was being expelled through the
front of the case instead of going into the M/B compartment and out the back (I wasn’t really surprised
by this seeing as how open the front was). Obviously,
this was not optimal. So I took a 1.5 mm panel of
alu and bolted it to the front.
Because the existing front has a few folds in it, I
needed to do some cutting on the case first.
Figure 2.54: Closeup of the brass bushings. Works
nicely.
I’ve exchanged the copper screws for some silver
ones, and in the process added some dampening foam
between the mouning rails and the fan frame.
Figure 2.57: Can’t mount a panel to the front of the
frame with these folds.
2.6. DISK VENTILATION
12
the bare edge with some model paint to not have the
blank metal staring at me.
I thought about painting the mesh, but at the moment I don’t really have the time, plus I kind of like
the look of this bare piece of alu, so I’ve left it as-is.
Figure 2.58: Making some marks for where I need to
cut.
Figure 2.61: The opening for the mesh
The mesh doesn’t cover the entire fan area (nor
is it very open with those rather narrow slots), but
there is no need for high-power ventilation here, so
this is not a big deal.
Figure 2.59: Making sure it’s bolted down nicely.
Figure 2.62: Checking if it all fits.
It’s fixed to the inside of the panel with some
double-sided adhesive tape.
Figure 2.60: Cut and mounted.
After having done that, I turned my attention to
the side panel, making an opening for the ventilation.
I thought of several ways of doing this, but all of
them were a bit more complicated than I’d have liked
them to be. Cutting such a big hole with a dremel
isn’t really practical, so I considered doing it with our
jigsaw, but after doing a few test cuts I didn’t really
like the result as I couldn’t get a straight enough cut.
And the cut needed to be clean, because there’s no
space to fit a U channel over the edge, and I don’t
really like the idea of covering it up on the outside.
Anyway, the guy just used a nice big angle grinder
for the cut, and since he’s a metal worker by trade,
it turned out almost perfectly straight (not 100but
it’s still cut by hand, after all). After that, I painted
Figure 2.63: The mesh from the inside.
2.7. FAN UNIT
Figure 2.64: And the end result.
◦
13
As hinted at earlier, the airflow in this build will
go from the front compartment through the middle
wall into the M/B compartment and out the back.
This is pretty much how the stock configuration
works, except in that the air gets in through the front
panel, not through the side panel.
Unfortunately I forgot to take pics of the stock config, but luckily tweaktown.com did a review on this
case and took them for me, see [33].
In the stock config, the 92 mm fans are mounted
inside some plastic fan cages that allow quick and
toolless fan replacement in case of failure.
Originally I simply bolted the fans to two aluminium L profile bars.
Drive temperatures hover between 28 ◦ C and 35
C at the moment, ambient is about 23 ◦ C.
2.7
Fan Unit for Main Compartment Ventilation
April 11, 2014
Available online at [29], [30], [31], [32].
Figure 2.67: M4 screws and alu profiles.
Figure 2.65: Stock configuration. The blue cages can be
easily swapped out if needed. . . (Credit: tweaktown.com
[33])
Figure 2.68: The other side.
Figure 2.69: Intake side.
Figure 2.66: . . . as seen here. (Credit: tweaktown.com
[33])
It was fixed to the middle wall with double-sided
adhesive tape. It’s very strong stuff, so the fan unit
falling off was not a concern. Additionally, the tape
2.7. FAN UNIT
has some thickness to it, which should provide some
dampening between the fan unit and the middle wall.
14
Aaand of course I mounted the fans the wrong way
around at first. Sigh.
Figure 2.70: Just a few strips of double-sided adhesive
tape.
Unfortunately, due to some bumps on the middle
wall getting in the way, the tape on the rear angle
didn’t make proper contact with the wall. It held,
but not very well.
Additinoally, I noticed that there were rather
strong vibtrations on the middle wall. It turned out
that the tape did indeed offer some decoupling, but it
also did not offer any additional strength to the middle wall (i.e. no additional stiffness), which meant
the wall could easily vibrate.
Figure 2.73: If there’s a wrong way to do things, they
will be done the wrong way at first. . .
Disassemble again, reassemble.
Figure 2.74: Finally.
Figure 2.71: Tape did not make proper contact.
So, I took the unit out, and while I was at it, I
also cut out some recesses for the fans which I didn’t
bother doing before. I also put some dampening foam
between the fans and the alu angles.
Figure 2.75: Also: Foam between the alu angles and
the wall itself.
Figure 2.72: Cutouts for fans, dampening foam.
This time I bolted it to the wall with some screws.
Much more solid now, no more vibrations.
2.8. STORAGE TOPOLOGY AND CABLING
15
The power cables for the disks are two cables that
came with the PSU and onto which I just put a lot
more connectors while taking off the stock connectors because those were neither placed in the correct
locations nor facing in the right direction.
Figure 2.76: Nice and solid now.
Figure 2.78: Looks harmless, right? Yeah. . .
Figure 2.77: And from the other side.
2.8
Storage Topology and Cabling
April 12, 2014
Available online at [34], [35], [36], [37].
Figure 2.79: And the disks.
An overview diagram of the storage topology at
this stage in the build can be found in appendix A.1.
The idea behind the storage topology is based on
wpirobotbuilder’s post about reducing single points
of failure (see [38]). Any one of the three LSI controllers can fail and I still have all my data available.
You’ll see below that I haven’t yet gotten around
to installing the Velociraptor.
I use coloured zip ties to mark the cables that go
to the different controllers.
BLUE = controller 0
YELLOW = controller 1
GREEN = controller 2
There isn’t really any space to hide the cables, so
this was rather tricky and required three attempts
until I was satisfied with the result. In the end I hid
the extra cable behind the triple fan unit, good thing
they’re 38 mm fans, which makes the space behind
them just about large enough to fit the extra cable
bits.
Figure 2.80: OK then, first try. . .
I soon realized that this wasn’t going to work. The
problem was that I had the disks arranged in the
same way as they will be set up in the storage pool
layout, so the disks which go into the same storage
pool were also mounted below each other. Sounds
nice in theory, but if you want to have disk from
each pool distributed among the different controllers,
you’ll get quite the cable mess.
2.8. STORAGE TOPOLOGY AND CABLING
16
Figure 2.81: Not exactly a splendid result
Figure 2.85: Better than the first attempt.
Figure 2.82: Different angle.
Figure 2.86: Different Angle.
On the second try, I arranged the disks to that the
cables to the controllers could be better laid out.
Figure 2.87: The disks are distributed in the cages for
improved airflow and easier cable management.
Figure 2.83: Round 2, so far so good. . .
Figure 2.84: Hail Hydra?
Figure 2.88: Closeup of the connectors. All in all
though, I still wasn’t quite happy, mainly because. . .
2.8. STORAGE TOPOLOGY AND CABLING
Figure 2.89: . . . of this.
Third time’s the charm. . . This time, I hid the extra
cable length behind the triple fan unit.
Figure 2.90: Attempt 3. Coiling up extra cable length.
Figure 2.91: Loop of for the topmost cable loom.
Figure 2.92: And the cable loom for controller 0, from
the disk side. . .
17
Figure 2.93: . . . and the M/B side. Much better in my
humble opinion.
Figure 2.94: The bottom controller had a bit more extra
cable length to hide, so that part is a bit messier.
Figure 2.95: And the middle one.
Figure 2.96: Much nicer than before methinks.
2.8. STORAGE TOPOLOGY AND CABLING
18
Figure 2.97: Different angle.
Figure 2.101: The SATA cable for the system SSD.
Figure 2.98: Closeup.
Figure 2.102: And the controller LEDs when there’s
some activity.
While not completely flawless, I am rather happy
with the result now.
Figure 2.99: And the other side. Significant Improvement I’d say.
Figure 2.100: The cable looms going off the controllers.
2.9. STORAGE AND NETWORKING PERFORMANCE
2.9
Storage and
Performance
Networking
April 26, 2014
Available online at [39], [40], [41], [42].
An update storage topology diagram for this stage
of the build can be found in appendix A.2.
Beware: This section will be of little interest to
those who are primarily in it for the physical side
of building. Instead, this update will be about the
performance and software side of things. So, lots of
text, lots of numbers.
These results are still somewhat preliminary since
I’m not yet 100the hardware config will remain like
this for an extended period of time (I really want to
put another 12 GB of RAM in there, for example,
and am considering adding some SSD goodness to
my ZFS pools), nor am I necessarily done with tuning
software parameters, but it should give some idea of
what performance I’m currently getting.
As you may recall from my previous update, I’m
running three VMs on this machine, two of which
are pretty much always on (the media VM and my
personal VM), and the third of which is only active
when I’m pulling a backup of my dad’s work machine
(apollo-business).
The storage setup has been revised somewhat since
the last update. I now have a mirrored ZFS pool in
ZEUS for backing up my dad’s business data (so, in
total his data is on six HDDs, including the one in
his work machine). His data is pulled onto the apollobusiness VM from his work machine, and then pulled
onto ZEUS. The fact that neither the business VM
nor ZEUS are online 24/7 (ZEUS is turned off physically most of the time) should provide some decent
protection against most malheurs, the only thing I
still need to implement is a proper off-site backup
plan (which I will definitely do, in case of unforeseen
disasters, break-ins/theft and so on).
For convenience’s sake, I was planning on using
NFS for sharing data between the server and its various clients on our network. Unfortunately, I was
getting some rather disappointing benchmarking results initially, with only 60 MiB·s-1 to 70 MiB·s-1
transfer speeds between machines.
I’m not really a storage benchmarking expert, and
at the moment I definitely don’t have the time to become one, so for benchmarking my storage I’ve used
dd for the time being. It’s easy to use and is pretty
much standard for every Linux install. I thought
about using other storage benchmarks like Bonnie++
and FIO, and at some point I might still do that, but
for the time being dd will suffice for my purposes.
For those not familiar with this: /dev/zero basically serves as a data source for lots of zeroes,
/dev/null is a sink into which you can write data
without it being written to disk. So, if you want to
do writing benchmarks to your storage, you can grab
data from /dev/zero without needing to worry about
19
a bottleneck on your data source side, and /dev/null
is the equivalent when you wish to do reading benchmarks. To demonstrate this, I did a quick test below
directly from /dev/zero into /dev/null.
Basically. It’s a bit of a simplification, but I hope
it’s somewhat understandable.
Before doing storage benchmarks across the network, we should of course get a baseline for both the
storage setup itself as well as the network.
The base pipe from /dev/zero into /dev/null
transfers has a transfer speed of 9 GiB·s-1 . Nothing unexpected, but it’s a quick test to do and I was
curious about this.
2.9.1
Networking
mance
Baseline
Perfor-
The networking performance is where I hit my first
hickup. I failed to specify to the VM which networking driver it was supposed to use, and the default one
does not exactly have stellar performance. It was an
easy fix though, and with the new settings I now get
pretty much the same networking performance across
all my machines (except the Windows ones, those are
stuck at 500 Mbit·s-1 for some reason as you can
see above, but that’s not hugely important to me at
the moment TBH). When using the default QEMU
networking card, I got about 520 Mbit·s-1 typical
transfer speed, when switching to the virtio driver, it
increased to roughly 930 Mbit·s-1 typically.
Partner
Machine
Partner
O/S
Office PC
HELIOS
ZEUS
Dell XT2, WiFi
APOLLO (Host)
APOLLO (VM 2)
APOLLO (VM 3)
Windows 7
Windows 7
Arch Linux
Arch Linux
Arch Linux
Arch Linux
Arch Linux
Bandwidth
513.0
517.0
931.0
12.7
939.0
885.0
858.0
Mbit·s-1
Mbit·s-1
Mbit·s-1
Mbit·s-1
Mbit·s-1
Mbit·s-1
Mbit·s-1
Table 2.2: Example from one run with iperf (not averages). Measured from a KVM/QEMU virtual machine
running Arch Linux.
2.9.2
Storage Baseline Performance
I had a similar issue with the storage subsystem at
first, the default parameters for caching were not very
conducive to high performance and resulted in some
pretty bad results. Writing to a ZPOOL of 4 × 2 TB
WD RE4 resulted in speeds of a miseable 50 MiB·s-1 at
first (with option flag cache writethrough). Reading from the pool was possible at a nice 240 MiB·s-1
though.
Once I fixed that though (setting the
writethrough option to none), much better,
and sufficient to saturate a gigabit networking
connection.
2.9. STORAGE AND NETWORKING PERFORMANCE
QEMU
cache flag
Read
ZPOOL
Write
(MiB·s-1 ) (MiB·s-1 )
writethrough 4×2 TB RE4
none
4×2 TB RE4
none
6×3 TB Red
50
155
240
240
210
240
Table 2.3: Read/Write speeds depending on QEMU’s
cache flag for my two main ZFS pools.
2.9.3
20
Figure 2.104: And the write speed for that specific test
run.
With lz4 compression enabled, the CPU does quite
a bit more work, as expected (though it still seems
that you don’t really need a very powerful CPU to
make use of this):
Actual Performance over Network
The results can be found in appendix A.3.
Initially, I got only around 60 MiB·s-1 for NFS,
after that the next plateau was somewhere between
75 MiB·s-1 and 80 MiB·s-1 , and lastly, this is the
current situation. I must say I find the results to be
slightly. . . peculiar. Pretty much everything I’ve ever
read says that NFS should offer better performance
than CIFS, and yet, for some reason, in many cases
that was not the result I got.
I’m not yet sure if I’ll be going with NFS or CIFS
in the end to be honest. On one hand, CIFS does give
my better performance for the most part, but I have
found NFS more convenient to configure and use, and
NFS’ performance at this point is decent enough for
most of my purposes.
In general, I find the NFS results just rather weird
to be honest. But they have been reproducible over
different runs on several days, so for the time being
I’ll accept them as what I can get.
As an alternative, I’ve also tried FTP on recommendation of Whaler_99, but results were not really
very satisfying, only yielding slightly more than 50
MiB·s-1 on average.
2.9.4
ZFS Compression
Also, for those curious about ZFS’ compression
(which was usually disabled in the above tests because zeroes are very compressible and would therefore skew the benchmarks), I did a quick test to compare writing zeroes to a ZFS pool with and without
compression.
This is CPU utilization without compression (the
grey bars are CPU time spent waiting for I/O, not
actual work the CPU is doing):
Figure 2.103: CPU load without compression.
Figure 2.105: CPU load with compression.
The transfer speed for a zero-file goes up to almost
1 GiB·s-1 with lz4 compression enabled; pretty neat
if you ask me.
Side note: ZFS’ lz4 compression is allegedly smart
enough not to try to compress incompressible data,
such as media files which are already compressed,
which should prevent such writes from being slowed
down. Very nice IMHO.
Chapter 3
Result
and Closing Thoughts
June 23, 2013
Available online at [43], [44], [45], [46].
I could have gone with a single-socket motherboard, or a dual socket one with fewer features (say,
fewer onboard SAS/SATA ports as I’m not using
nearly all of the ones this one has due to the 2 TB
disk limit), but most of the features this one has I
wouldn’t want to miss TBH (the four LAN ports are
very handy, and IPMI is just freaking awesome). And
let’s be honest: A dual-socket board just looks freaking awesome (OK, I’ll concede that that’s not the
best argument, bit still, it does!).
As mentioned previously, the 92 mm fans are rather
noisy, but I didn’t want to replace them. For one
thing, I do actually need some powerful fans to move
air from the HDD compartment into the M/B compartment, on the other hand I didn’t feel like spending more money on expensive fans.
For this purpose, I ordered some AcoustiPack foam
in various thicknesses (12 mm, 7 mm and 4 mm) and
lined parts of the case with them. I wasn’t quite sure
how well they would work, as my past experiences
with acoustic dampening materials weren’t all that
impressive, but to my surprise, they’re actually pretty
damn effective.
I have also put in another 12 GB or RAM. I was
lucky enough to get six 2 GB sticks of the exact same
RAM I already had for 70 USD (plus shipping and
fees, but still a pretty good price IMHO) from eBay.
24 GB should easily suffice for my purposes.
Lastly, I’ve repurposed the 2.5“ drive cage from my
Caselabs SMH10; cleaner than the rather improvised
mount from before.
For the time being, the build is now pretty much
complete.
One of the original goals was to not have this become ridiculously expensive. Uhm, yeah, you know
how these things usually go. . .
Total system cost:
5,000 USD of which were
HDDs: 2,500 USD
My share of the total cost is 42%, the remainder
was on my dad, which is pretty fair I think. In the
long run, my share will probably rise as I’ll most likely
be the one paying for most future storage expansions
(at the moment I’ve paid for 54% of the storage cost,
and 31% of the remaining components).
One thing to keep in mind though is that some
of these costs go back a while as not all HDDs were
bought for this server but have been migrated into
it from other machines. So the actual project costs
were less by about 1,300 USD.
Overall I’m still pretty happy with the
price/performance ratio.
There aren’t really
that many areas where I could have saved a lot
of money without also taking noticeably hits in
performance or features.
Figure 3.1: The inner side of the front panel with sound
dampening.
Figure 3.2: That Caselabs drive cage I mentioned, the
top drive is the WD Velociraptor.
Other than that, I could have gone with some
cheaper CPU coolers as the 40 W CPUs (btw., core
voltage is 0.9 V, nice!) don’t really require much in
that area, but the rest is pretty much what I want
need for an acceptable price.
21
22
Figure 3.3: The box in its closed state.
Figure 3.4: And open on the CPU side.
Figure 3.5: Quite a few fans in there. . .
23
Figure 3.6: Some more cable shots, because
why not. . .
Figure 3.7: . . . and more. . .
Figure 3.8: Connectors. . .
The power connectors look crooked because
they’re not all connected to a drive, so the
ones which are floating freely in the air don’t
align perfectly. Once the build is filled up
with drives, this will look much better.
24
Figure 3.9: One of the cable looms fanning out
to the drives.
Figure 3.10: The Chipset cooler and data cables. Not too much room in there now.
Figure 3.11: Switched the Noctua fans back
on the coolers since I’m using the San Ace ones
for compartment ventilation.
25
Figure 3.12: Looks better with six sticks in
there I’d say.
Figure 3.13: The back side.
Figure 3.14: And the motherboard compartment.
It’s kinda funny: Considering how large the
M/B compartment actually is, it’s pretty
packed now with everything that’s in there.
The impression is even stronger in person
than on the pics.
And that’s it, we’re done. Thanks for reading, see you next time.
Appendix A
Diagrams
26
Figure A.1: Diagram of APOLLO’s storage topology.
27
Figure A.2: Diagram of APOLLO’s storage topology, revised version.
28
Figure A.3: Results of Storage and Networking Benchmarks
29
List of Figures
2.1
2.2
2.3
2.4
2.5
2.6
2.7
2.8
2.9
2.10
2.11
2.12
2.13
2.14
2.15
2.16
2.17
2.18
2.19
2.20
2.21
2.22
2.23
2.24
2.25
2.26
2.27
2.28
2.29
2.30
2.31
2.32
2.33
2.34
2.35
2.36
2.37
2.38
2.39
2.40
2.41
2.42
2.43
2.44
2.45
2.46
2.47
2.48
2.49
Noctua Box . . . . . . . . . . . . .
Noctua Box Contents . . . . . . . .
Noctua Box Contents . . . . . . . .
Noctua Cooler Glory . . . . . . . .
Noctua Cooler Glory . . . . . . . .
San Ace 92 mm Fan . . . . . . . . .
San Ace 92 mm Fan . . . . . . . . .
Noctua San Ace Edition . . . . . .
Noctua San Ace Edition . . . . . .
Boinc at Work . . . . . . . . . . . .
Ghetto Testing Setup . . . . . . . .
PSU – Bad Fit . . . . . . . . . . . .
PSU – Good Fit . . . . . . . . . . .
PSU – Cutout Markings . . . . . .
PSU – Ventilation . . . . . . . . . .
PSU – Bracket Collision . . . . . .
PSU – Bracket Collision w/ Plug .
PSU – Cutout for Plug . . . . . . .
PSU – Mounted . . . . . . . . . . .
PSU – Mounted . . . . . . . . . . .
LSI Controller – Testing . . . . . .
LSI Controller – Testing . . . . . .
Disk Racks – The Mill . . . . . . .
Disk Racks – First Steps . . . . . .
Disk Racks – Progress . . . . . . . .
Disk Racks – Drill Chuck . . . . . .
Disk Racks – Predrilling for Rivets
Disk Racks – More Drilling . . . . .
Disk Racks – Milling . . . . . . . .
Disk Racks – Cage Panels . . . . .
Disk Racks – Cage Panels . . . . .
Disk Racks – Cage Panels . . . . .
Disk Racks – Rail Detail . . . . . .
Disk Racks – Rail Detail . . . . . .
Disk Racks – Ventilation . . . . . .
Disk Racks – Ventilation . . . . . .
Disk Racks – Ventilation . . . . . .
Disk Racks – Fan Mount Bushings .
Disk Racks – Mounting Brackets . .
Disk Racks – Mounting Brackets . .
Disk Racks – Mounting Bracket . .
Disk Racks – HDD Mounting . . . .
Disk Racks – Mounted . . . . . . .
Chipset Cooling – Improvising . . .
Chipset Cooling – Stock Heatsink .
Chipset Cooling – Naked Chipset .
Chipset Cooling – Screws . . . . . .
Chipset Cooling – Screws . . . . . .
Chipset Cooling – Fan Mounting . .
.
.
.
.
.
.
.
.
.
.
.
.
.
.
.
.
.
.
.
.
.
.
.
.
.
.
.
.
.
.
.
.
.
.
.
.
.
.
.
.
.
.
.
.
.
.
.
.
.
.
.
.
.
.
.
.
.
.
.
.
.
.
.
.
.
.
.
.
.
.
.
.
.
.
.
.
.
.
.
.
.
.
.
.
.
.
.
.
.
.
.
.
.
.
.
.
.
.
.
.
.
.
.
.
.
.
.
.
.
.
.
.
.
.
.
.
.
.
.
.
.
.
.
.
.
.
.
.
.
.
.
.
.
.
.
.
.
.
.
.
.
.
.
.
.
.
.
.
.
.
.
.
.
.
.
.
.
.
.
.
.
.
.
.
.
.
.
.
.
.
.
.
.
.
.
.
.
.
.
.
.
.
.
.
.
.
.
.
.
.
.
.
.
.
.
.
.
.
.
.
.
.
.
.
.
.
.
.
.
.
.
.
.
.
.
.
.
.
.
.
.
.
.
.
.
.
.
.
.
.
.
.
.
.
.
.
.
.
.
.
.
.
.
.
.
.
.
.
.
.
.
.
.
.
.
.
.
.
.
.
.
.
.
.
.
.
.
.
.
.
.
.
.
.
.
.
.
.
.
.
.
.
.
.
.
.
.
.
.
.
.
.
.
.
30
.
.
.
.
.
.
.
.
.
.
.
.
.
.
.
.
.
.
.
.
.
.
.
.
.
.
.
.
.
.
.
.
.
.
.
.
.
.
.
.
.
.
.
.
.
.
.
.
.
.
.
.
.
.
.
.
.
.
.
.
.
.
.
.
.
.
.
.
.
.
.
.
.
.
.
.
.
.
.
.
.
.
.
.
.
.
.
.
.
.
.
.
.
.
.
.
.
.
.
.
.
.
.
.
.
.
.
.
.
.
.
.
.
.
.
.
.
.
.
.
.
.
.
.
.
.
.
.
.
.
.
.
.
.
.
.
.
.
.
.
.
.
.
.
.
.
.
.
.
.
.
.
.
.
.
.
.
.
.
.
.
.
.
.
.
.
.
.
.
.
.
.
.
.
.
.
.
.
.
.
.
.
.
.
.
.
.
.
.
.
.
.
.
.
.
.
.
.
.
.
.
.
.
.
.
.
.
.
.
.
.
.
.
.
.
.
.
.
.
.
.
.
.
.
.
.
.
.
.
.
.
.
.
.
.
.
.
.
.
.
.
.
.
.
.
.
.
.
.
.
.
.
.
.
.
.
.
.
.
.
.
.
.
.
.
.
.
.
.
.
.
.
.
.
.
.
.
.
.
.
.
.
.
.
.
.
.
.
.
.
.
.
.
.
.
.
.
.
.
.
.
.
.
.
.
.
.
.
.
.
.
.
.
.
.
.
.
.
.
.
.
.
.
.
.
.
.
.
.
.
.
.
.
.
.
.
.
.
.
.
.
.
.
.
.
.
.
.
.
.
.
.
.
.
.
.
.
.
.
.
.
.
.
.
.
.
.
.
.
.
.
.
.
.
.
.
.
.
.
.
.
.
.
.
.
.
.
.
.
.
.
.
.
.
.
.
.
.
.
.
.
.
.
.
.
.
.
.
.
.
.
.
.
.
.
.
.
.
.
.
.
.
.
.
.
.
.
.
.
.
.
.
.
.
.
.
.
.
.
.
.
.
.
.
.
.
.
.
.
.
.
.
.
.
.
.
.
.
.
.
.
.
.
.
.
.
.
.
.
.
.
.
.
.
.
.
.
.
.
.
.
.
.
.
.
.
.
.
.
.
.
.
.
.
.
.
.
.
.
.
.
.
.
.
.
.
.
.
.
.
.
.
.
.
.
.
.
.
.
.
.
.
.
.
.
.
.
.
.
.
.
.
.
.
.
.
.
.
.
.
.
.
.
.
.
.
.
.
.
.
.
.
.
.
.
.
.
.
.
.
.
.
.
.
.
.
.
.
.
.
.
.
.
.
.
.
.
.
.
.
.
.
.
.
.
.
.
.
.
.
.
.
.
.
.
.
.
.
.
.
.
.
.
.
.
.
.
.
.
.
.
.
.
.
.
.
.
.
.
.
.
.
.
.
.
.
.
.
.
.
.
.
.
.
.
.
.
.
.
.
.
.
.
.
.
.
.
.
.
.
.
.
.
.
.
.
.
.
.
.
.
.
.
.
.
.
.
.
.
.
.
.
.
.
.
.
.
.
.
.
.
.
.
.
.
.
.
.
.
.
.
.
.
.
.
.
.
.
.
.
.
.
.
.
.
.
.
.
.
.
.
.
.
.
.
.
.
.
.
.
.
.
.
.
.
.
.
.
.
.
.
.
.
.
.
.
.
.
.
.
.
.
.
.
.
.
.
.
.
.
.
.
.
.
.
.
.
.
.
.
.
.
.
.
.
.
.
.
.
.
.
.
.
.
.
.
.
.
.
.
.
.
.
.
.
.
.
.
.
.
.
.
.
.
.
.
.
.
.
.
.
.
.
.
.
.
.
.
.
.
.
.
.
.
.
.
.
.
.
.
.
.
.
.
.
.
.
.
.
.
.
.
.
.
.
.
.
.
.
.
.
.
.
.
.
.
.
.
.
.
.
.
.
.
.
.
.
.
.
.
.
.
.
.
.
.
.
.
.
.
.
.
.
.
.
.
.
.
.
.
.
.
.
.
.
.
.
.
.
.
.
.
.
.
.
.
.
.
.
.
.
.
.
.
.
.
.
.
.
.
.
.
.
.
.
.
.
.
.
.
.
.
.
.
.
.
.
.
.
.
.
.
.
.
.
.
.
.
.
.
.
.
.
.
.
.
.
.
.
.
.
.
.
.
.
.
.
.
.
.
.
.
.
.
.
.
.
.
.
.
.
.
.
.
.
.
.
.
.
.
.
.
.
.
.
.
.
.
.
.
.
.
.
.
.
.
.
.
.
.
.
.
.
.
.
.
.
.
.
.
.
.
.
.
.
.
.
.
.
.
.
.
.
.
.
.
.
.
.
.
.
.
.
.
.
.
.
.
.
.
.
.
.
.
.
.
.
.
.
.
.
.
.
.
.
.
.
.
.
.
.
.
.
.
.
.
.
.
.
.
.
.
.
.
.
.
.
.
.
.
.
.
.
.
.
.
.
.
.
.
.
.
.
.
.
.
.
.
.
.
.
.
.
.
.
.
.
.
.
.
.
.
.
.
.
.
.
.
.
.
.
.
.
.
.
.
.
.
.
.
.
.
.
.
.
.
.
.
.
.
.
.
.
.
.
.
.
.
.
.
.
.
.
.
.
.
.
.
.
.
.
.
.
.
.
.
.
.
.
.
.
.
.
.
.
.
.
.
.
.
.
.
.
.
.
.
.
.
.
.
.
.
.
.
.
.
.
.
.
.
.
.
.
.
.
.
.
.
.
.
.
.
.
.
.
.
.
.
.
.
.
.
.
.
.
.
.
.
.
.
.
.
.
.
.
.
.
.
.
.
.
.
.
.
.
.
.
.
.
.
.
.
.
.
.
.
.
.
.
.
.
.
.
.
.
.
.
.
.
.
.
.
.
.
.
.
.
.
.
.
.
.
.
.
.
.
.
.
.
.
.
.
.
.
.
.
.
.
.
.
.
.
.
.
.
.
.
.
.
.
.
.
.
.
.
.
.
.
.
.
.
.
.
.
.
.
.
.
.
.
.
.
.
.
.
.
.
.
.
.
.
.
.
.
.
.
.
.
.
.
.
.
.
.
.
.
.
.
.
.
.
.
.
.
.
.
.
.
.
.
.
.
2
2
2
3
3
3
3
3
3
4
4
4
4
5
5
5
5
5
5
5
5
6
6
6
6
6
6
7
7
7
7
7
7
7
8
8
8
8
8
8
8
9
9
9
9
10
10
10
10
LIST OF FIGURES
31
2.50
2.51
2.52
2.53
2.54
2.55
2.56
2.57
2.58
2.59
2.60
2.61
2.62
2.63
2.64
2.65
2.66
2.67
2.68
2.69
2.70
2.71
2.72
2.73
2.74
2.75
2.76
2.77
2.78
2.79
2.80
2.81
2.82
2.83
2.84
2.85
2.86
2.87
2.88
2.89
2.90
2.91
2.92
2.93
2.94
2.95
2.96
2.97
2.98
2.99
2.100
2.101
2.102
2.103
2.104
2.105
Chipset Cooling – Fan Mounting . . . . . . . . . . . . . . . . . . . . . .
Chipset Cooling – Fan Mounting . . . . . . . . . . . . . . . . . . . . . .
Chipset Cooling – New Cooling Unit . . . . . . . . . . . . . . . . . . .
Chipset Cooling – New Cooling Unit . . . . . . . . . . . . . . . . . . .
Disk Racks – Fan Mount Bushings . . . . . . . . . . . . . . . . . . . . .
Disk Ventilation – Vibration Dampening . . . . . . . . . . . . . . . . .
Disk Ventilation – Overview Shot . . . . . . . . . . . . . . . . . . . . .
Disk Ventilation – Front Frame . . . . . . . . . . . . . . . . . . . . . .
Disk Ventilation – Marking Front Frame for Cutting . . . . . . . . . . .
Disk Ventilation – Cutting the Inner Front Panel . . . . . . . . . . . .
Disk Ventilation – New Inner Front Panel . . . . . . . . . . . . . . . . .
Disk Ventilation – Side Opening . . . . . . . . . . . . . . . . . . . . . .
Disk Ventilation – Side Opening, Mounted . . . . . . . . . . . . . . . .
Disk Ventilation – Mesh . . . . . . . . . . . . . . . . . . . . . . . . . .
Disk Ventilation – Complete . . . . . . . . . . . . . . . . . . . . . . . .
Main Compartment Ventilation – Stock Configuration . . . . . . . . . .
Main Compartment Ventilation – Stock Configuration . . . . . . . . . .
Main Compartment Ventilation – Version 1 . . . . . . . . . . . . . . . .
Main Compartment Ventilation – Version 1 . . . . . . . . . . . . . . . .
Main Compartment Ventilation – Version 1 . . . . . . . . . . . . . . . .
Main Compartment Ventilation – Adhesive Mount . . . . . . . . . . . .
Main Compartment Ventilation – Adhesive Mount Issue . . . . . . . . .
Main Compartment Ventilation – Version 2 . . . . . . . . . . . . . . . .
Main Compartment Ventilation – Version 2, Fans Mounted Wrong Way
Main Compartment Ventilation – Version 2, Fans Mounted Correctly .
Main Compartment Ventilation – Dampening Foam . . . . . . . . . . .
Main Compartment Ventilation – New Mount . . . . . . . . . . . . . .
Main Compartment Ventilation – New Mount . . . . . . . . . . . . . .
Cable Management – Start . . . . . . . . . . . . . . . . . . . . . . . . .
Cable Management – Disks . . . . . . . . . . . . . . . . . . . . . . . . .
Cable Managemenet – First Try . . . . . . . . . . . . . . . . . . . . . .
Cable Management – First Try – Result . . . . . . . . . . . . . . . . . .
Cable Management – First Try – Result . . . . . . . . . . . . . . . . . .
Cable Management – Second Try . . . . . . . . . . . . . . . . . . . . .
Cable Management – Second Try . . . . . . . . . . . . . . . . . . . . .
Cable Management – Second Try . . . . . . . . . . . . . . . . . . . . .
Cable Management – Second Try – Result . . . . . . . . . . . . . . . .
Cable Management – Second Try – Result . . . . . . . . . . . . . . . .
Cable Management – Second Try – Result . . . . . . . . . . . . . . . .
Cable Management – Second Try – Issue . . . . . . . . . . . . . . . . .
Cable Management – Third Try – Hiding the Mess . . . . . . . . . . .
Cable Management – Third Try – Hiding the Mess . . . . . . . . . . .
Cable Management – Third Try – Cable Loom . . . . . . . . . . . . . .
Cable Management – Third Try – Cable Loom . . . . . . . . . . . . . .
Cable Management – Third Try – Cleaning Up . . . . . . . . . . . . . .
Cable Management – Third Try – Cleaning Up . . . . . . . . . . . . . .
Cable Management – Final Result . . . . . . . . . . . . . . . . . . . . .
Cable Management – Final Result . . . . . . . . . . . . . . . . . . . . .
Cable Management – Final Result . . . . . . . . . . . . . . . . . . . . .
Cable Management – Final Result . . . . . . . . . . . . . . . . . . . . .
Cable Management – Final Result . . . . . . . . . . . . . . . . . . . . .
Cable Management – Final Result . . . . . . . . . . . . . . . . . . . . .
Cable Management – Final Result . . . . . . . . . . . . . . . . . . . . .
Storage Benchmarks – CPU Load w/ Compression Disabled . . . . . .
Storage Benchmarks – Write Speed w/ Compression Disabled . . . . .
Storage Benchmarks – CPU Load w/ Compression Enabled . . . . . .
.
.
.
.
.
.
.
.
.
.
.
.
.
.
.
.
.
.
.
.
.
.
.
.
.
.
.
.
.
.
.
.
.
.
.
.
.
.
.
.
.
.
.
.
.
.
.
.
.
.
.
.
.
.
.
.
.
.
.
.
.
.
.
.
.
.
.
.
.
.
.
.
.
.
.
.
.
.
.
.
.
.
.
.
.
.
.
.
.
.
.
.
.
.
.
.
.
.
.
.
.
.
.
.
.
.
.
.
.
.
.
.
.
.
.
.
.
.
.
.
.
.
.
.
.
.
.
.
.
.
.
.
.
.
.
.
.
.
.
.
.
.
.
.
.
.
.
.
.
.
.
.
.
.
.
.
.
.
.
.
.
.
.
.
.
.
.
.
.
.
.
.
.
.
.
.
.
.
.
.
.
.
.
.
.
.
.
.
.
.
.
.
.
.
.
.
.
.
.
.
.
.
.
.
.
.
.
.
.
.
.
.
.
.
.
.
.
.
.
.
.
.
.
.
.
.
.
.
.
.
.
.
.
.
.
.
.
.
.
.
.
.
.
.
.
.
.
.
.
.
.
.
.
.
.
.
.
.
.
.
.
.
.
.
.
.
.
.
.
.
.
.
.
.
.
.
.
.
.
.
.
.
.
.
.
.
.
.
.
.
.
.
.
.
.
.
.
.
.
.
.
.
.
.
.
.
.
.
.
.
.
.
.
.
.
.
.
.
.
.
.
.
.
.
.
.
.
.
.
.
.
.
.
.
.
.
.
.
.
.
.
.
.
.
.
.
.
.
.
.
.
.
.
.
.
.
.
.
.
.
.
.
.
.
.
.
.
.
.
.
.
.
.
.
.
.
.
.
.
.
.
.
.
.
.
.
.
.
.
.
.
.
.
.
.
.
.
.
.
.
.
.
.
.
.
.
.
.
.
.
.
.
.
.
.
.
.
.
.
.
.
.
.
.
.
.
.
.
.
.
.
.
.
.
.
.
.
.
.
.
.
.
.
.
.
.
.
.
.
.
.
.
.
.
.
.
.
.
.
.
.
.
.
.
.
.
.
.
.
.
.
.
.
.
.
.
.
.
.
.
.
.
.
.
.
.
.
.
.
.
.
.
.
.
.
.
.
.
.
.
.
.
.
.
.
.
.
.
.
.
.
.
.
.
.
.
.
.
.
.
.
.
.
.
.
.
.
.
.
.
.
.
.
.
.
.
.
.
.
.
.
.
.
.
.
.
.
.
.
.
.
.
.
.
.
.
.
.
.
.
.
.
.
.
.
.
.
.
.
.
.
.
.
.
.
.
.
.
.
.
.
.
.
.
.
.
.
.
.
.
.
.
.
.
.
.
.
.
.
.
.
.
.
.
.
.
.
.
.
.
.
.
.
.
.
.
.
.
.
.
.
.
.
.
.
.
.
.
.
.
.
.
.
.
.
.
.
.
.
.
.
.
.
.
.
.
.
.
.
.
.
.
.
.
.
.
.
.
.
.
.
.
.
.
.
.
.
.
.
.
.
.
.
.
.
.
.
.
.
.
.
.
.
.
.
.
.
.
.
.
.
.
.
.
.
.
.
.
.
.
.
.
.
.
.
.
.
.
.
.
.
.
.
.
.
.
.
.
.
.
.
.
.
.
.
.
.
.
.
.
.
.
.
.
.
.
.
.
.
.
.
.
.
.
.
.
.
.
.
.
.
.
.
.
.
.
.
.
.
.
.
.
.
.
.
.
.
.
.
.
.
.
.
.
.
.
.
.
.
.
.
.
.
.
10
10
10
11
11
11
11
11
12
12
12
12
12
12
13
13
13
13
13
13
14
14
14
14
14
14
15
15
15
15
15
16
16
16
16
16
16
16
16
17
17
17
17
17
17
17
17
18
18
18
18
18
18
20
20
20
3.1
3.2
3.3
3.4
Sound Dampening – Front Panel .
2.5“ Caselabs Drive Cage . . . . .
Final Pictures – Closed . . . . . .
Final Pictures – Open, CPU Side
.
.
.
.
.
.
.
.
.
.
.
.
.
.
.
.
.
.
.
.
.
.
.
.
.
.
.
.
.
.
.
.
.
.
.
.
.
.
.
.
.
.
.
.
.
.
.
.
.
.
.
.
.
.
.
.
21
21
22
22
.
.
.
.
.
.
.
.
.
.
.
.
.
.
.
.
.
.
.
.
.
.
.
.
.
.
.
.
.
.
.
.
.
.
.
.
.
.
.
.
.
.
.
.
.
.
.
.
.
.
.
.
.
.
.
.
.
.
.
.
.
.
.
.
.
.
.
.
.
.
.
.
.
.
.
.
.
.
.
.
.
.
.
.
LIST OF FIGURES
Pictures
Pictures
Pictures
Pictures
Pictures
Pictures
Pictures
Pictures
Pictures
Pictures
32
3.5
3.6
3.7
3.8
3.9
3.10
3.11
3.12
3.13
3.14
Final
Final
Final
Final
Final
Final
Final
Final
Final
Final
–
–
–
–
–
–
–
–
–
–
Fan Galore . . . . . . . . .
Cabling . . . . . . . . . . .
Cabling . . . . . . . . . . .
Cabling . . . . . . . . . . .
Loom Fanning Out . . . . .
Chipset Cooler and Cables .
CPU Coolers . . . . . . . .
RAM . . . . . . . . . . . . .
Back Side Overview . . . .
Motherboard Compartment
.
.
.
.
.
.
.
.
.
.
.
.
.
.
.
.
.
.
.
.
.
.
.
.
.
.
.
.
.
.
.
.
.
.
.
.
.
.
.
.
.
.
.
.
.
.
.
.
.
.
.
.
.
.
.
.
.
.
.
.
.
.
.
.
.
.
.
.
.
.
.
.
.
.
.
.
.
.
.
.
.
.
.
.
.
.
.
.
.
.
.
.
.
.
.
.
.
.
.
.
.
.
.
.
.
.
.
.
.
.
.
.
.
.
.
.
.
.
.
.
.
.
.
.
.
.
.
.
.
.
.
.
.
.
.
.
.
.
.
.
.
.
.
.
.
.
.
.
.
.
.
.
.
.
.
.
.
.
.
.
.
.
.
.
.
.
.
.
.
.
.
.
.
.
.
.
.
.
.
.
.
.
.
.
.
.
.
.
.
.
.
.
.
.
.
.
.
.
.
.
.
.
.
.
.
.
.
.
.
.
.
.
.
.
.
.
.
.
.
.
.
.
.
.
.
.
.
.
.
.
.
.
.
.
.
.
.
.
.
.
.
.
.
.
.
.
.
.
.
.
.
.
.
.
.
.
.
.
.
.
.
.
.
.
.
.
.
.
.
.
.
.
.
.
.
.
.
.
.
.
.
.
.
.
.
.
.
.
.
.
22
23
23
23
24
24
24
25
25
25
A.1
A.2
A.3
Storage Topology – Diagram . . . . . . . . . . . . . . . . . . . . . . . . . . . . . . . . . . . . . . 27
Storage Topology – Diagram, Revised . . . . . . . . . . . . . . . . . . . . . . . . . . . . . . . . . 28
Storage and Networking Benchmarks – Results . . . . . . . . . . . . . . . . . . . . . . . . . . . . 29
References
[1] alpenwasser. (2013,
Nov) “APOLLO –
Prologue”. linustechtips.com. [Online]. Available:
http://linustechtips.com/main/index.
php?act=findpost&pid=1040187
[Accessed:
Nov 22, 2014].
[10] ——. (2013, Nov) “Temporary Ghetto Setup,
OS Installed”. themodzoo.com. [Online]. Available: http://themodzoo.com/forum/index.php?
act=findpost&pid=19721 [Accessed: Nov 22,
2014].
[2] ——. (2013,
Nov) “APOLLO – Prologue”.
themodzoo.com.
[Online].
Available: http://themodzoo.com/forum/index.php?
act=findpost&pid=19652 [Accessed: Nov 22,
2014].
[11] ——. (2013,
Nov) “Temporary Ghetto
Setup, OS Installed”. overclock3d.net. [Online]. Available: http://forum.overclock3d.net/
showthread.php?p=701635#post701635
[Accessed: Nov 22, 2014].
[3] ——. (2013,
Nov) “APOLLO – Prologue”.
overclock3d.net.
[Online].
Available: http://forum.overclock3d.net/showpost.
php?p=700834&postcount=1 [Accessed: Nov
22, 2014].
[12] ——. (2013, Nov) “Temporary Ghetto Setup
for Testing, OS Installed”. overclock.net. [Online]. Available: http://www.overclock.net/t/
1442386/#post_21202531 [Accessed: Nov 22,
2014].
[4] ——. (2013, Nov) “APOLLO – Prologue”.
overclock.net. [Online]. Available: http://www.
overclock.net/t/1442386/#post_21185159 [Accessed: Nov 22, 2014].
[13] ——. (2014, Apr) “PSU Mounting & LSI
Controller Testing”. linustechtips.com. [Online]. Available: http://linustechtips.com/main/
index.php?act=findpost&pid=1789104
[Accessed: Nov 22, 2014].
[5] ——.
(2013,
Nov)
“First
Hardware Tests & The Noctua NH-UD9X
1366”. linustechtips.com. [Online]. Available:
http://linustechtips.com/main/index.
php?act=findpost&pid=1043570
[Accessed:
Nov 22, 2014].
[14] ——. (2014, Apr) “PSU Mounting & LSI
Controller Testing”. themodzoo.com. [Online].
Available: http://themodzoo.com/forum/index.
php?act=findpost&pid=25037 [Accessed: Nov
22, 2014].
[6] ——. (2013, Nov) “First Hardware Tests & The
Noctua NH-UD9X 1366”. themodzoo.com. [Online]. Available: http://themodzoo.com/forum/
index.php?act=findpost&pid=19676 [Accessed:
Nov 22, 2014].
[15] ——. (2014, Apr) “PSU Mounting & LSI
Controller Testing”. overclock3d.net. [Online]. Available: http://forum.overclock3d.net/
showthread.php?p=742061#post742061
[Accessed: Nov 22, 2014].
[7] ——. (2013, Nov) “First Hardware Tests & The
Noctua NH-UD9X 1366”. overclock3d.net. [Online]. Available: http://forum.overclock3d.net/
showthread.php?p=701017#post701017
[Accessed: Nov 22, 2014].
[16] ——. (2014, Apr) “PSU Mounting &
LSI Controller Testing”. overclock.net. [Online]. Available: http://www.overclock.net/t/
1442386/#post_22042818 [Accessed: Nov 22,
2014].
[8] ——. (2013, Nov) “First Hardware Tests &
The Noctua NH-UD9X 1366”. overclock.net.
[Online]. Available: http://www.overclock.net/
t/1442386/#post_21188827 [Accessed: Nov 22,
2014].
[17] ——.
(2014,
Apr)
“The
Disk
Racks”. linustechtips.com. [Online]. Available:
http://linustechtips.com/main/index.
php?act=findpost&pid=1792154
[Accessed:
Nov 22, 2014].
[9] ——. (2013,
Nov) “Temporary Ghetto
Setup, OS Installed”. linustechtips.com. [Online]. Available: http://linustechtips.com/main/
index.php?act=findpost&pid=1053907
[Accessed: Nov 22, 2014].
[18] ——.
(2014,
Apr)
“The
Disk
Racks”. themodzoo.com. [Online]. Available: http://themodzoo.com/forum/index.php?
act=findpost&pid=25055 [Accessed: Nov 22,
2014].
33
REFERENCES
34
[19] ——.
(2014,
Apr)
“The
Disk
Racks”.
overclock3d.net.
[Online].
Available:
http://forum.overclock3d.net/
showthread.php?p=742203#post742203
[Accessed: Nov 22, 2014].
[30] ——. (2014, Apr) “Fan Unit for Main Compartment Ventilation”. themodzoo.com. [Online].
Available: http://themodzoo.com/forum/index.
php?act=findpost&pid=25379 [Accessed: Nov
22, 2014].
[20] ——. (2014, Apr) “The Disk Racks”. overclock.net. [Online]. Available:
http://www.
overclock.net/t/1442386/#post_22045804 [Accessed: Nov 22, 2014].
[31] ——. (2014, Apr) “Fan Unit for Main Compartment Ventilation”. overclock3d.net. [Online]. Available: http://forum.overclock3d.net/
showthread.php?p=744452#post744452
[Accessed: Nov 22, 2014].
[21] ——. (2014, Apr) “Chipset Cooling & Adventures in Instability”. linustechtips.com. [Online]. Available: http://linustechtips.com/main/
index.php?act=findpost&pid=1823902
[Accessed: Nov 22, 2014].
[22] ——. (2014, Apr) “Chipset Cooling & Adventures in Instability”. themodzoo.com. [Online].
Available: http://themodzoo.com/forum/index.
php?act=findpost&pid=25297 [Accessed: Nov
22, 2014].
[23] ——. (2014, Apr) “Chipset Cooling & Adventures in Instability”. overclock3d.net. [Online]. Available: http://forum.overclock3d.net/
showthread.php?p=743654#post743654
[Accessed: Nov 22, 2014].
[24] ——. (2014, Apr) “Chipset Cooling & Adventures in Instability”. overclock.net. [Online]. Available: http://www.overclock.net/t/
1442386/#post_22079815 [Accessed: Nov 22,
2014].
[25] ——.
(2014,
Apr)
“Disk
Ventilation”.
linustechtips.com.
[Online].
Available:
http://linustechtips.com/main/index.
php?act=findpost&pid=1829673
[Accessed:
Nov 22, 2014].
[26] ——.
(2014,
Apr)
“Disk
Ventilation”.
themodzoo.com.
[Online].
Available: http://themodzoo.com/forum/index.php?
act=findpost&pid=25321 [Accessed: Nov 22,
2014].
[27] ——.
(2014,
Apr)
“Disk
Ventilation”.
overclock3d.net.
[Online].
Available:
http://forum.overclock3d.net/
showthread.php?p=743951#post743951
[Accessed: Nov 22, 2014].
[28] ——. (2014, Apr) “Disk Ventilation”. overclock.net. [Online]. Available:
http://www.
overclock.net/t/1442386/#post_22085853 [Accessed: Nov 22, 2014].
[29] ——. (2014, Apr) “Fan Unit for Main Compartment Ventilation”. linustechtips.com. [Online]. Available: http://linustechtips.com/main/
index.php?act=findpost&pid=1844788
[Accessed: Nov 22, 2014].
[32] ——. (2014, Apr) “Fan Unit for Main
Compartment Ventilation”. overclock.net. [Online]. Available: http://www.overclock.net/t/
1442386/#post_22096775 [Accessed: Nov 22,
2014].
[33] C.
Sebring.
(2011,
Jan)
“IN
WIN
IW-PP689 Pedestal Performance Server
Chassis”. tweaktown.com. [Online]. Available:
http://www.tweaktown.com/reviews/3769/
in_win_iw_pp689_pedestal_performance_
server_chassis/index.html [Accessed: Nov 23,
2014].
[34] alpenwasser. (2014, Apr) “Storage Topology & Cabling”. linustechtips.com. [Online]. Available: http://linustechtips.com/main/
index.php?act=findpost&pid=1853407
[Accessed: Nov 22, 2014].
[35] ——. (2014, Apr) “Storage Topology &
Cabling”. themodzoo.com. [Online]. Available: http://themodzoo.com/forum/index.php?
act=findpost&pid=25412 [Accessed: Nov 22,
2014].
[36] ——.
(2014,
Apr)
“Storage
Topology & Cabling”. overclock3d.net. [Online]. Available: http://forum.overclock3d.net/
showthread.php?p=744591#post744591
[Accessed: Nov 22, 2014].
[37] ——. (2014,
Apr) “Storage Topology
& Cabling”. overclock.net. [Online]. Available:
http://www.overclock.net/t/1442386/
#post_22101845 [Accessed: Nov 22, 2014].
[38] wpirobotbuilder. (2013, Nov) “Reducing Single Points of Failure (SPoF) in Redundant
Storage”. linustechtips.com. [Online]. Available:
http://linustechtips.com/main/index.
php?act=findpost&pid=993585 [Accessed: Nov
23, 2014].
[39] alpenwasser. (2014, Apr) “Storage and Networking Performance”. linustechtips.com. [Online]. Available: http://linustechtips.com/main/
index.php?act=findpost&pid=1934179
[Accessed: Nov 22, 2014].
[40] ——. (2014, Apr) “Storage and Networking
Performance”. themodzoo.com. [Online]. Available: http://themodzoo.com/forum/index.php?
REFERENCES
act=findpost&pid=26162 [Accessed:
2014].
35
Nov 22,
[41] ——. (2014,
Apr) “Storage and Networking Performance”. overclock3d.net. [Online]. Available: http://forum.overclock3d.net/
showthread.php?p=750157#post750157
[Accessed: Nov 22, 2014].
[42] ——. (2014, Apr) “Storage and Networking
Performance”. overclock.net. [Online]. Available:
http://www.overclock.net/t/1442386#
post_22177739 [Accessed: Nov 22, 2014].
[43] ——. (2014,
May) “Sound Dampening
and Final Pictures”. linustechtips.com. [Online]. Available: http://linustechtips.com/main/
index.php?act=findpost&pid=2008737
[Accessed: Nov 22, 2014].
[44] ——. (2014, May) “Sound Dampening and
Final Pictures”. themodzoo.com. [Online]. Available: http://themodzoo.com/forum/index.php?
act=findpost&pid=26875 [Accessed: Nov 22,
2014].
[45] ——. (2014,
May) “Sound Dampening
and Final Pictures”. overclock3d.net. [Online]. Available: http://forum.overclock3d.net/
showthread.php?p=755148#post755148
[Accessed: Nov 22, 2014].
[46] ——. (2014, May) “Sound Dampening and
Final Pictures”. overclock.net. [Online]. Available:
http://www.overclock.net/t/1442386/
#post_22245033 [Accessed: Nov 22, 2014].