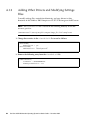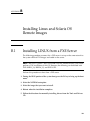
1
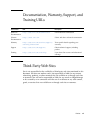
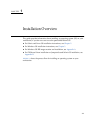
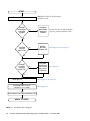
Sun Ultra™ 20 M2 Workstation
Operating System
Installation Guide
Sun Microsystems, Inc.
www.sun.com
Part No. 819-6583-12
November 2007, Revision A
Submit comments about this document at: http://www.sun.com/hwdocs/feedback
Copyright © 2007 Sun Microsystems, Inc., 4150 Network Circle, Santa Clara, California 95054, U.S.A. All rights reserved.
Sun Microsystems, Inc. has intellectual property rights relating to technology embodied in the product that is described in this document. In
particular, and without limitation, these intellectual property rights may include one or more of the U.S. patents listed at
http://www.sun.com/patents and one or more additional patents or pending patent applications in the U.S. and in other countries.
Parts of the product may be derived from Berkeley BSD systems, licensed from the University of California. UNIX is a registered trademark in
the U.S. and in other countries, exclusively licensed through X/Open Company, Ltd.
Sun, Sun Microsystems, the Sun logo, Java, Solaris and NetBeans Sun Ultra are trademarks or registered trademarks of Sun Microsystems, Inc.
in the U.S. and other countries.
AMD, Opteron, the AMD logo, the AMD Opteron logo are trademarks or registered trademarks of Advanced Micro Devices. The PostScript
logo is a trademark or registered trademark of Adobe Systems, Incorporated.
Use of any spare or replacement CPUs is limited to repair or one-for-one replacement of CPUs in products exported in compliance with U.S.
export laws. Use of CPUs as product upgrades unless authorized by the U.S. Government is strictly prohibited.
DOCUMENTATION IS PROVIDED "AS IS" AND ALL EXPRESS OR IMPLIED CONDITIONS, REPRESENTATIONS AND WARRANTIES,
INCLUDING ANY IMPLIED WARRANTY OF MERCHANTABILITY, FITNESS FOR A PARTICULAR PURPOSE OR NON-INFRINGEMENT,
ARE DISCLAIMED, EXCEPT TO THE EXTENT THAT SUCH DISCLAIMERS ARE HELD TO BE LEGALLY INVALID.
U.S. Government Rights—Commercial use. Government users are subject to the Sun Microsystems, Inc. standard license agreement and
applicable provisions of the FAR and its supplements.
Copyright © 2007 Sun Microsystems, Inc., 4150 Network Circle, Santa Clara, California 95054, Etats-Unis. Tous droits réservés.
Sun Microsystems, Inc. détient les droits de propriété intellectuels relatifs à la technologie incorporée dans le produit qui est décrit dans ce
document. En particulier, et ce sans limitation, ces droits de propriété intellectuelle peuvent inclure un ou plus des brevets américains listés à
l'adresse http://www.sun.com/patents et un ou les brevets supplémentaires ou les applications de brevet en attente aux Etats - Unis et dans les
autres pays.
Des parties de ce produit pourront être dérivées des systèmes Berkeley BSD licenciés par l'Université de Californie. UNIX est une marque
déposée aux Etats-Unis et dans d'autres pays et licenciée exclusivement par X/Open Company, Ltd.
Sun, Sun Microsystems, le logo Sun, Java, Solaris et NetBeans Sun Ultra sont des marques de fabrique ou des marques déposées de Sun
Microsystems, Inc. aux Etats-Unis et dans d'autres pays.
AMD, Opteron, the AMD logo, the AMD Opteron logo are trademarks or registered trademarks of Advanced Micro Devices. Le logo PostScript
est une marque de fabrique ou une marque déposée de Adobe Systems, Incorporated.
L'utilisation de pieces detachees ou d'unites centrales de remplacement est limitee aux reparations ou a l'echange standard d'unites centrales
pour les produits exportes, conformement a la legislation americaine en matiere d'exportation. Sauf autorisation par les autorites des EtatsUnis, l'utilisation d'unites centrales pour proceder a des mises a jour de produits est rigoureusement interdite.
LA DOCUMENTATION EST FOURNIE "EN L'ETAT" ET TOUTES AUTRES CONDITIONS, DECLARATIONS ET GARANTIES EXPRESSES
OU TACITES SONT FORMELLEMENT EXCLUES, DANS LA MESURE AUTORISEE PAR LA LOI APPLICABLE, Y COMPRIS NOTAMMENT
TOUTE GARANTIE IMPLICITE RELATIVE A LA QUALITE MARCHANDE, A L'APTITUDE A UNE UTILISATION PARTICULIERE OU A
L'ABSENCE DE CONTREFACON.
Contents
Preface
v
1.
Installation Overview
2.
Installing Solaris and Linux
3.
1–1
2–1
2.1
Choosing and Updating the Operating System
2.2
Setting the BIOS for Linux or Solaris
2.3
Understanding the Diagnostic Partition
2.4
Erasing Partitions on the Boot Hard Disk Drive
2.5
Running the up2date Utility
2.6
Installing Drivers and Mounting the Diagnostic Partition
2–2
2–3
2–3
2–4
2.6.1
Installing the Linux OS and Drivers
2.6.2
Installing the Solaris OS and Drivers
2.6.3
Log in to the system as superuser.
Installing the Windows OS and Drivers
3.1
2–2
2–4
2–5
2–7
2–7
3–1
Setting the BIOS for the Windows OS
3–2
3.1.1
Setting the System BIOS for Windows OS and NVRAID
3.1.2
Setting the NVIDIA RAID BIOS
3.1.3
Setting the LSI RAID Configuration
3–2
3–3
3–3
iii
3.2
Understanding the Diagnostic Partition
3–4
3.3
Erasing Partitions on the Boot Hard Disk Drive
3–4
3.4
Installing Windows 2003/Vista/XP OS Drivers
3–5
3.4.1
Installing RAID Drivers Using the 2003Reburn/XPReburn Script
3–6
3.4.2
Installing RAID Drivers Using a Boot Diskette
3–7
A. Creating Windows Images on a RIS Server and Installing RIS Images
A.1
A.2
A.3
Creating a Windows Server 2003 or Windows XP SP2 32-bit Image on the
RIS Server A–2
A.1.1
Adding the NVIDA Ethernet Drivers to the Windows Image
A.1.2
Adding Other Drivers and Modifying Settings Files
A–3
A–4
Creating a Windows Server 2003 or Windows XP 64-bit Image on the RIS
Server A–7
A.2.1
Adding the NVIDA Ethernet Drivers to the Windows Image
A.2.2
Adding Other Drivers and Modifying Settings Files
Installing a RIS Image onto a Client Workstation
B. Installing Linux and Solaris OS Remote Images
iv
A–1
B.1
Installing LINUX from a PXE Server
B.2
Installing Solaris from a Jumpstart Server
B–1
B–1
B–2
Sun Ultra 20 M2 Workstation Operating System Installation Guide • November 2007
A–12
A–9
A–8
Preface
The Sun Ultra 20 M2 Workstation Operating System Installation Guide contains
information required to configure the Solaris™, Linux, and Windows operating
systems.
Shell Prompts
Shell
Prompt
C shell
machine-name%
C shell superuser
machine-name#
Bourne shell and Korn shell
$
Bourne shell and Korn shell superuser
#
v
Typographic Conventions
Typeface*
Meaning
Examples
AaBbCc123
The names of commands, files,
and directories; on-screen
computer output
Edit your.login file.
Use ls -a to list all files.
% You have mail.
AaBbCc123
What you type, when contrasted
with on-screen computer output
% su
Password:
AaBbCc123
Book titles, new words or terms,
words to be emphasized.
Replace command-line variables
with real names or values.
Read Chapter 6 in the User’s Guide.
These are called class options.
You must be superuser to do this.
To delete a file, type rm filename.
* The settings on your browser might differ from these settings.
Related Documentation
The document set for the Sun Ultra 20 M2 Workstation is described in the Where To
Find Documentation sheet that is packed with your system, and all documents are
posted at the product’s documentation site. See the following URL:
http://www.sun.com/documentation
Translated versions of some of these documents are available at the product’s
documentation site in Simplified Chinese, Traditional Chinese, French, German,
Italian, Japanese, Korean, and Spanish.
English documentation is revised more frequently and might be more up-to-date
than the translated documentation.
vi Sun Ultra 20 M2 Workstation Operating System Installation Guide • November 2007
Documentation, Warranty, Support, and
Training URLs
Sun Function
URL
Description
Hardware
Documentation
http://www.sun.com/documentation
Sun hardware documentation
Software
Documentation
http://docs.sun.com
Solaris and other software documentation
Warranty
http://www.sun.com/service/support/
warranty/index.html
View specific details regarding your
warranty
Support
http://www.sun.com/support/
Obtain technical support, including
patches
Training
http://www.sun.com/training/
Learn about Sun courses and educational
offerings
Third-Party Web Sites
Sun is not responsible for the availability of third-party web sites mentioned in this
document. Sun does not endorse and is not responsible or liable for any content,
advertising, products, or other materials that are available on or through such sites
or resources. Sun will not be responsible or liable for any actual or alleged damage
or loss caused by or in connection with the use of or reliance on any such content,
goods, or services that are available on or through such sites or resources.
Preface
vii
Sun Welcomes Your Comments
Sun is interested in improving its documentation and welcomes your comments and
suggestions. You can submit your comments by going to:
http://www.sun.com/hwdocs/feedback
Please include the title and part number of your document with your feedback: Sun
Ultra 20 M2 Workstation Operating System Installation Guide, 819-6583-12.
viii Sun Ultra 20 M2 Workstation Operating System Installation Guide • November 2007
CHAPTER
1
Installation Overview
This guide provides information about installing an operating system (OS) on your
workstation, if you do not want to use the preinstalled Solaris OS.
■
For Solaris and Linux OS installation instructions, see Chapter 2.
■
For Windows OS installation instructions, see Chapter 3.
■
For Windows OS RIS image creation and installation, see Appendix A.
■
For PXE-based Linux installation or Jumpstart-based Solaris OS installation, see
Appendix B.
FIGURE 1-1 shows the process flow for installing an operating system on your
workstation.
1-1
START
Power on the workstation.
Use the
preinstalled
operating
system?
Yes
See the Sun Ultra 20 M2 Workstation
Installation Guide.
Configure
preinstalled
operating
system.
See the Sun Ultra 20 M2 Workstation
Operating System Installation Guide.
No
Installing
Linux or
Solaris 10?
No
Set the
BIOS for
Windows OS.
See Chapter 2.2 or Chapter 3.1.
Yes
Enough
hard disk
space to
install OS?
No
Use Tools
and Drivers
CD to erase
the primary
boot disk.
See Chapter 3.1.
Yes
Install the OS.
See Chapter 2.6 or Chapter 3.
If installing Red Hat Linux,
run the up2date utility.
See Chapter 2.5
Install drivers from Tools and Drivers CD.
READY TO WORK!
FIGURE 1-1
1-2
Installation Flow Diagram
Sun Ultra 20 M2 Workstation Operating System Installation Guide • November 2007
Chapter 1
Installation Overview
1-3
CHAPTER
2
Installing Solaris and Linux
This chapter provides information about installing the Solaris or Linux OS on your
workstation, if you do not want to use the preinstalled Solaris OS.
This chapter includes the following sections:
■
Section 2.1, “Choosing and Updating the Operating System” on page 2-2
■
Section 2.2, “Setting the BIOS for Linux or Solaris” on page 2-2
■
Section 2.3, “Understanding the Diagnostic Partition” on page 2-3
■
Section 2.4, “Erasing Partitions on the Boot Hard Disk Drive” on page 2-3
■
Section 2.5, “Running the up2date Utility” on page 2-4
■
Section 2.6, “Installing Drivers and Mounting the Diagnostic Partition” on
page 2-4
2-1
2.1
Choosing and Updating the Operating
System
The Solaris OS is preinstalled on the Sun Ultra 20 M2 Workstation. Previous versions
of the Solaris OS are not supported. You can download the Solaris OS from the
following web site:
http://www.sun.com/software/solaris/
The following Linux OSes (or later versions) are supported for this workstation:
■
■
■
Red Hat Enterprise Linux 3 WS Update 7, 32-bit and 64-bit
Red Hat Enterprise Linux 4 WS Update 3, 32-bit and 64-bit
SUSE Linux Enterprise Server 9 SP 3 64-bit only
For an updated list of supported operating systems, refer to the following web site:
http://www.sun.com/ultra20
You can order Red Hat Enterprise Linux WS or SUSE Linux Enterprise Server for the
Sun Ultra 20 M2 Workstation from the following Sun web site:
http://wwws.sun.com/software/linux/index.html
2.2
Setting the BIOS for Linux or Solaris
The default for the Installed OS option in the BIOS is Others. If the default was not
changed, you do not need to perform this setup for Linux or Solaris.
If the BIOS Installed O/S option was changed from the default, do the following:
1. Power on the workstation and press the F2 key at the Sun logo screen to enter the
BIOS Setup menu.
2. Select the Advanced BIOS Features menu.
3. Change the Installed O/S option to Others.
4. Press the F10 key to save your changes and exit the BIOS.
2-2
Sun Ultra 20 M2 Workstation Operating System Installation Guide • November 2007
2.3
Understanding the Diagnostic Partition
Diagnostics (system test) software is included on the Sun Ultra 20 M2 Workstation
Tools and Drivers CD. Instructions for using the diagnostics software are provided
in the Sun Ultra 20 M2 Workstation Service Manual.
A diagnostic partition is required for the test scripts to write their log files. Without
a diagnostic partition, the only output is the display on the diagnostic screens.
The diagnostic partition is preinstalled on the Sun Ultra 20 M2 Workstation. You do
not need to reinstall the diagnostic partition unless you removed it.
If you removed the diagnostic partition, you can re-create it using the Create
Diagnostic Partition option on the Tools and Drivers CD. See the Sun Ultra 20 M2
Workstation Service Manual for instructions.
2.4
Erasing Partitions on the Boot Hard Disk
Drive
To erase all partitions on the boot hard disk drive, except the diagnostic partition,
use the Erase Primary Boot Hard Disk option on the Tools and Drivers CD main
menu.
Caution – The Erase Primary Boot Hard Disk option erases all partitions and all
user data on the hard drive, except the diagnostic partition. Be sure to back up all
data on the hard drive before performing this action.
To erase the primary boot hard disk:
1. Back up all data that you want to save on the hard disk drive.
2. Insert the Tools and Drivers CD into the workstation.
3. When the main menu appears, select the following option from the Tools and
Drivers CD main menu:
3. Erase Primary Boot Hard Disk
This option erases all partitions currently located on the primary hard drive, except
for the diagnostic partition. The diagnostic partition, if it is present, remains
untouched.
Chapter 2
Installing Solaris and Linux
2-3
2.5
Running the up2date Utility
If you are installing the Red Hat Enterprise Linux software, run the up2date utility
after installing the OS and before installing the video drivers from the Tools and
Drivers CD.
Note – If you have already installed the NVIDIA drivers, you must reinstall them
after running up2date, because the kernel is updated.
2.6
Installing Drivers and Mounting the
Diagnostic Partition
After installing the OS, run the installation script provided on the Tools and Drivers
CD to install the drivers that correspond to your OS.
The Tools and Drivers CD is included with your Sun Ultra 20 M2 Workstation. You
can also download the Tools and Drivers CD from the downloads link at:
http://www.sun.com/ultra20
You also need to run this script to mount the diagnostic partition for all supported
operating systems if you created a new diagnostic partition. (See the Sun Ultra 20 M2
Workstation Service Manual for information about how to create a diagnostic
partition.) The diagnostic partition cannot be mounted on a Windows XP
workstation.
This section covers the following topics:
2-4
■
Section 2.6.1, “Installing the Linux OS and Drivers” on page 2-5
■
Section 2.6.2, “Installing the Solaris OS and Drivers” on page 2-7
Sun Ultra 20 M2 Workstation Operating System Installation Guide • November 2007
2.6.1
Installing the Linux OS and Drivers
Installation Process Flow
The order of installation for Linux OS and drivers is as follows:
1. Remove the preinstalled Solaris OS. See Section 2.4, “Erasing Partitions on the
Boot Hard Disk Drive” on page 2-3.
2. If necessary, set up the BIOS for Linux OS installation. See Section 2.2, “Setting the
BIOS for Linux or Solaris” on page 2-2.
3. Install the OS. If you wish to install a previously created remote image, see
Section B.1, “Installing LINUX from a PXE Server” on page B-1.
Note – Make sure to keep the 55 MB diagnostic partition in place when doing the
installation. If the diagnostic partition gets erased for some reason, use the Create
Diagnostic Partition option in the Diagnostics section of the Tools and Drivers CD.
See the Sun Ultra 20 M2 Workstation Service Manual for more details.
4. If you installed a Red Hat Linux OS, run the up2date utility as shown in
Section 2.5, “Running the up2date Utility” on page 2-4.
5. Install the drivers as shown in the following procedure.
Performing the Installation
Perform this procedure to install drivers and mount the Tools and Drivers CD when
running a Linux OS.
1. Log in to the system as superuser.
2. Insert the Tools and Drivers CD into the DVD drive and type:
# cd /mountpoint/drivers/linux/operating_system
Where /mountpoint is the directory to which the CD is mounted and operating_system
is the type of Linux installed on the workstation.
■
If the directory does not exist, the CD did not automount. You will need to mount
the CD and change to the correct directory as shown in Step 3 and Step 4.
■
If you were able to access the operating_system directory, go to Step 5.
Chapter 2
Installing Solaris and Linux
2-5
3. If the CD does not automount, open a terminal window and mount the CD by
typing the following command:
# mount -o ro /dev/cdrom /mountpoint
Where /mountpoint is the appropriate mount point for the OS and optical drive type.
For example:
# mount -o ro /dev/cdrom /mnt/dvdrom
4. Change to the /mountpoint/drivers/linux/operating_system directory.
Where /mountpoint is the directory to which the CD is mounted and operating_system
is the type of Linux installed on the workstation.
For example:
# cd /mnt/dvdrom/drivers/linux/red_hat
5. Run the installation script by typing the following command:
# ./install.sh
This script does not execute if the Xserver is running.
■
If the script exits and you receive an error message, go to Step 6.
■
If the script executes correctly, go to Step 7.
6. If the script exits and you receive an error message, perform the following
procedure to disable the X server:
a. Type the following at the system prompt:
% init 3
b. Log in as superuser.
c. Repeat Step 4 and Step 5.
7. Eject the CD after the driver installation is complete.
8. Reboot the workstation.
2-6
Sun Ultra 20 M2 Workstation Operating System Installation Guide • November 2007
2.6.2
Installing the Solaris OS and Drivers
Perform this procedure to install drivers if you are performing a new installation of
the Solaris OS.
Note – You do not need to reinstall the drivers if you are restoring a backed-up
copy of the preinstalled version of the OS.
Installation Process Flow
The order of installation for Solaris OS and drivers is as follows:
1. If necessary, set up the BIOS for Solaris OS installation. See Section 2.2, “Setting
the BIOS for Linux or Solaris” on page 2-2.
2. Remove the currently installed OS. See Section 2.4, “Erasing Partitions on the Boot
Hard Disk Drive” on page 2-3.
3. Install the OS. If you wish to install a previously created remote image, see
Section B.2, “Installing Solaris from a Jumpstart Server” on page B-2.
4. Install the drivers as shown in the following procedure.
Performing the Installation
Perform this procedure to install the drivers and mount the diagnostic partition
when running the Solaris OS.
2.6.3
Log in to the system as superuser.
1. Insert the Tools and Drivers CD into the DVD drive.
The CD is automounted by the Solaris OS.
2. Change to the /cdrom/cdrom0/drivers/solx86 directory by typing the
following command:
# cd /cdrom/cdrom0/drivers/solx86
Chapter 2
Installing Solaris and Linux
2-7
3. Run the installation script by typing the following command:
# ./install.sh
The system drivers are installed.
The script prompts the user to reboot the system for changes to take effect.
4. Press the Y key to reboot, or the N key to allow a manual reboot.
5. Remove the CD from the DVD drive.
6. When prompted for networking information on your system, enter the
networking information for your server.
2-8
Sun Ultra 20 M2 Workstation Operating System Installation Guide • November 2007
CHAPTER
3
Installing the Windows OS and
Drivers
The Sun Ultra 20 M2 Workstation is supported to run Windows XP SP2 32-bit and
XP 64-bit, Windows 2003 Enterprise SP2 32-bit/64-bit, Windows Vista Ultimate 32bit/64-bit.
You have several options for installing Windows:
■
Install Windows using a Windows CD, and manually load drivers during and
after the OS installation.
■
Use the XpReburn script to create a Windows CD that includes platform and
NVIDIA RAID drivers, then use the newly created CD to install the OS. (You
must install video drivers separately.)
■
Create a RIS image of the Windows OS and drivers, then install the OS from a RIS
server.
The order of Windows OS and driver installation is as follows:
1. If necessary, set the BIOS for Windows. See Section 3.1, “Setting the BIOS for the
Windows OS” on page 3-2.
2. If required, remove the preinstalled Solaris OS. See Section 3.2, “Understanding
the Diagnostic Partition” on page 3-4 and Section 3.3, “Erasing Partitions on the
Boot Hard Disk Drive” on page 3-4.
3. Install the OS.
■
Section 3.4, “Installing Windows 2003/Vista/XP OS Drivers” on page 3-5
■
Section 3.4.1, “Installing RAID Drivers Using the 2003Reburn/XPReburn
Script” on page 3-6 or
Section 3.4.2, “Installing RAID Drivers Using a Boot Diskette” on page 3-7.
4. If desired, create a Windows OS RIS image on a RIS Server and install the image
on a workstation (see Appendix A).
3-1
Note – Do not delete the diagnostic partition when you perform the OS installation.
If the diagnostic partition is erased, the Sun Ultra 20 M2 Workstation Service Manual
contains instructions on using the Create Diagnostic Partition option on the Sun
Ultra 20 M2 Workstation Tools and Drivers CD.
Note – Windows XP cannot mount the diagnostic partition. A workaround is
detailed in the Sun Ultra 20 M2 Workstation Service Manual.
3.1
Setting the BIOS for the Windows OS
This section describes how to set the system BIOS and NVRAID BIOS for the
Windows OS and NVRAID.
3.1.1
Setting the System BIOS for Windows OS and
NVRAID
To configure the system BIOS for a Windows OS and, optionally, NVIDIA RAID
(NVRAID), perform the following procedure.
1. Power on the workstation.
2. Perform the following steps to set the system BIOS for Windows:
a. Press the F2 key at the Sun logo screen to enter the BIOS Setup menu.
b. Select the Advanced BIOS Features menu.
c. Change the Installed O/S option to Win2k/XP.
3. If you will use the onboard NVIDIA RAID controller, perform the following steps
to set the system BIOS for NVRAID. Otherwise, go to Step 4.
a. Select the Advanced BIOS Features Menu.
b. Select the Integrated Peripherals menu.
c. Change the setting for NVRaid Configuration to Enable.
d. Enable RAID on the channels displayed that have disks.
4. Press the F10 key to save your changes and exit the system BIOS.
3-2
Sun Ultra 20 M2 Workstation Operating System Installation Guide • November 2007
3.1.2
Setting the NVIDIA RAID BIOS
To configure the NVRAID BIOS, perform the following procedure.
1. Reboot the workstation.
2. Press the F10 key to enter the NVRAID BIOS.
3. Select the type of RAID array you want to create (mirroring, striping, and so on).
4. Add the appropriate disks to the array.
5. Press the F7 key to complete this part of the configuration.
6. Select Yes when asked if you want to Clear Disk Data.
7. If desired, set the array to be the Boot Array (this is typically the desired
configuration).
8. Press Ctrl-X to exit the NVRAID BIOS.
3.1.3
Setting the LSI RAID Configuration
To configure a RAID Array in LSI:
1. During the BIOS portion of the boot, type ctrl-C to open the LSI configuration
tool.
2. Select the desired SAS controller and press Enter.
3. Select RAID properties.
4. Select the type of RAID array you would like.
5. Choose the volumes you would like to include in the RAID.
Note – Do not mix SAS and SATA volumes within a given RAID.
6. When the array is set up, save changes and exit.
Chapter 3
Installing the Windows OS and Drivers
3-3
3.2
Understanding the Diagnostic Partition
Diagnostics (system test) software is included on the Tools and Drivers CD.
Instructions for using the diagnostics software are provided in the Sun Ultra 20 M2
Workstation Service Manual.
A diagnostic partition is required for the test scripts to write their log files. Without
a diagnostic partition, the only output is the display on the diagnostic screens.
The diagnostic partition is preinstalled on the Sun Ultra 20 M2 Workstation. You do
not need to reinstall the diagnostic partition unless you removed it.
If you removed the diagnostic partition, you can re-create it using the Create
Diagnostic Partition option on the Tools and Drivers CD. See the Sun Ultra 20 M2
Workstation Service Manual for instructions.
Note – Windows XP cannot mount the diagnostic partition. A workaround is
detailed in the Sun Ultra 20 M2 Workstation Service Manual.
3.3
Erasing Partitions on the Boot Hard Disk
Drive
To erase all partitions on the boot hard disk drive, except the diagnostic partition,
use the Erase Primary Boot Hard Disk option on the Tools and Drivers CD main
menu.
Caution – The Erase Primary Boot Hard Disk option erases all partitions and all
user data on the hard drive, except the diagnostic partition. Be sure to back up all
data on the hard drive before performing this action.
Follow this procedure to erase the primary boot hard disk.
1. Back up all data that you want to save on the hard disk drive.
2. Insert the Tools and Drivers CD into the workstation.
3-4
Sun Ultra 20 M2 Workstation Operating System Installation Guide • November 2007
3. When the main menu appears, select the following option from the Tools and
Drivers CD main menu:
3. Erase Primary Boot Hard Disk
This option erases all partitions currently located on the primary hard disk drive,
except for the diagnostic partition. The diagnostic partition, if it is present, remains
untouched.
4. When prompted, confirm that you wish to delete the partitions.
5. When prompted, press any key to reboot the system.
3.4
Installing Windows 2003/Vista/XP OS
Drivers
The Sun Ultra 20 M2 Workstation Tools and Drivers DVD contains NVRAID,
NVIDIA display, and NVIDIA chipset drivers for Windows 2003/Vista/XP. If you
are installing NVRAID drivers, you will need to use the 2003Reburn/XpReburn
script to create a new Windows 2003/XP CD containing the necessary drivers, or
create a boot diskette to install the drivers before installing the Windows 2003/XP
operating system.
The order of Windows 2003/Vista/XP driver installation is as follows:
1. If you plan to use the workstation RAID functionality, install the NVRAID drivers
before installing the operating system by using one of the following methods:
■
“Installing RAID Drivers Using the 2003Reburn/XPReburn Script” on page 6.
■
“Installing RAID Drivers Using a Boot Diskette” on page 7.
2. Install the operating system.
3. Using the Tools and Drivers DVD, install the display and chipset drivers as
described in “Installing Display and Chipset Drivers for Windows 2003, Vista or
XP” on page 9.
4. If necessary, install the RealTek audio driver as described in “Installing RealTek
Audio Driver” on page 10.
Note – The Tools and Drivers DVD does not mount the diagnostic partition for
Windows XP software.
Chapter 3
Installing the Windows OS and Drivers
3-5
3.4.1
Installing RAID Drivers Using the
2003Reburn/XPReburn Script
The Sun Ultra 20 M2 Workstation Tools and Drivers DVD contains a script that
enables you to create a new Windows 2003 or Windows XP CD with the needed
RAID drivers. After the new CD is created, you can boot the CD and install
Windows 2003 or XP normally. This new CD automatically installs the drivers,
making it unnecessary to use a USB diskette drive and to install the NVRAID
drivers.
For specific and current information about the Reburn scripts, see the description at
the top of the script which is located in the XpReburn or 2003Reburn directory under
the /drivers/utilities/ directory on the Tools and Drivers DVD.
To install Windows 2003 or XP using a RAID configuration, you need the following:
■
A system running Solaris Operating System for x86 Systems, RHEL 3. RHEL 4,
RHEL 5, or SUSE Linux Enterprise Server (SLED 10)
■
Access to a CD burner
■
A blank CD-R or CD-RW
■
A Windows 2003 or Windows XP Professional Installation CD (retail media
only—not an OEM version)
■
A Sun Ultra 20 M2 Workstation Tools and Drivers DVD
To create a Windows CD with the Sun Ultra 20 M2 Workstation drivers:
1. On a system Solaris x86, Solaris OS (SPARC Platform Edition), or RHEL 3, RHEL
4, RHEL 5, or SLED 10 software, insert the Sun Ultra 20 M2 Workstation Tools and
Drivers DVD.
2. As superuser, create a temporary directory with at least 1.2 Gbytes of space.
For example:
# mkdir /files
3. Copy the OSReburn_version.zip file to that directory.
Where OS is either 2003 or XP and version is the current version of XpReburn.
For example:
# cp /drivers/utilities/XpReburn_1.0.zip /files
4. Eject the Tools and Drivers DVD and insert your retail Windows 2003 or XP 32
Professional Installation CD.
3-6
Sun Ultra 20 M2 Workstation Operating System Installation Guide • November 2007
5. Unzip the OSReburn_version.zip file.
For example:
# unzip -q XPReburn_1.0.zip
6. Run the Reburn script.
For example:
#./files/XpReburn
The script displays the driver files it expects to be located in the current directory.
When all four driver files have been downloaded into that directory, the script
creates a new ISO image and then automatically burns that ISO image onto a CD if
the system has a CD burner.
7. After the CD has been created, install Windows OS software on the Sun Ultra 20
M2 Workstation.
8. After the OS installation is complete, install the NVDIA display drivers described
in “Installing Display and Chipset Drivers for Windows 2003, Vista or XP” on
page 9.
3.4.2
Installing RAID Drivers Using a Boot Diskette
Note – This step is not required with Windows Vista.
This section explains how to create a boot diskette for the NVIDIA RAID drivers
using the Sun Ultra 20 M2 Workstation Tools and Drivers DVD, and how to install
the drivers onto your workstation.
To install the NVIDIA RAID drivers using a boot diskette, you need the following:
■
A system running Microsoft Windows software, which has a CD and
diskette drive
■
A blank diskette
■
A Sun Ultra 20 M2 Workstation Tools and Drivers DVD
■
A USB floppy drive
■
A Windows 2003 or Windows XP Professional Installation CD (retail media
only—not an OEM version)
This section contains the following subsections:
Chapter 3
Installing the Windows OS and Drivers
3-7
3.4.2.1
■
“Creating a Boot Diskette for NVIDIA RAID Drivers” on page 8
■
“Installing Windows 2003 or XP and NVIDIA RAID Drivers” on page 8
Creating a Boot Diskette for NVIDIA RAID Drivers
To create a boot diskette for NVIDIA RAID drivers:
1. On a system running Microsoft Windows software, insert the Sun Ultra 20 M2
Workstation Tools and Drivers DVD.
2. Change to the appropriate directory on the Tools and Drivers DVD by typing the
following:
C:\> cd/D D:\drivers\windows\OS\chipset\IDE\OS\SATARAID
Where OS is the directory for Windows 2003, XP 32-bit or XP 64-bit.
3. Insert a blank diskette into the workstation.
4. Select all files in the directory and copy them to the diskette drive (a:).
3.4.2.2
Installing Windows 2003 or XP and NVIDIA RAID Drivers
To install Windows 2003 32-bit/64-bit or Windows XP 32-bit/64-bit with the
NVIDIA RAID drivers:
1. Ensure that the system BIOS and NVIDIA BIOS is configured for RAID
operation. See Section 3.1, “Setting the BIOS for the Windows OS” on page 3-2.
2. Attach a USB diskette drive to the workstation.
3. Insert a Windows 2003, or XP Installation CD into the DVD drive.
4. Press the F6 key to install the third-party RAID driver.
5. Press the S key and the Enter key to specify additional drivers and insert the
diskette created in “Creating a Boot Diskette for NVIDIA RAID Drivers” on page 8.
Note – The Tools and Drivers DVD does not mount the diagnostic partition for
Windows 2003/Vista/XP software.
6. Select the NVIDIA NForce Storage Controller.
7. Press the S key and the Enter key to specify additional drivers.
3-8
Sun Ultra 20 M2 Workstation Operating System Installation Guide • November 2007
8. Select the NVIDIA RAID CLASS DRIVER.
9. Press the Enter key to continue the Windows installation.
10. After the OS installation is complete, install the NVDIA display and chipset
drivers as described in “Installing Display and Chipset Drivers for Windows 2003,
Vista or XP” on page 9.
3.4.2.3
Installing Display and Chipset Drivers for Windows 2003,
Vista or XP
Note – If you have created a Windows CD containing NVRAID drivers using the
XpReburn option, you do not need to install the chipset drivers, you need to install
only the display drivers.
To install the NVIDIA display and chipset drivers after installing Windows:
1. Insert the Sun Ultra 20 M2 Workstation Tools and Drivers DVD into the DVD
drive.
2. Install the chipset drivers (If necessary):
a. Change to the appropriate directory on the Tools and Drivers DVD by typing
the following command:
C:\> cd/D D:\drivers\windows\OS\chipset
Where OS is the directory for Windows 2003, Vista, or XP.
b. Double-click the executable file.
c. Follow the instructions in the installation software.
3. Install the NVIDIA display drivers:
a. Change to the appropriate directory on the Tools and Drivers DVD by typing
the following command:
C:\> cd/D D:\drivers\windows\OS\video
Where OS is the directory for Windows 2003, Vista, XP 32-bit or XP 64-bit.
b. Double-click the executable file.
c. Follow the instructions in the installation software.
Chapter 3
Installing the Windows OS and Drivers
3-9
4. Eject the CD from the workstation.
5. If you are using the onboard ATI graphics controller, install the ATI drivers.
a. Change to the directory on the Tools and Drivers CD by typing the following
command:
C:\> cd D:\drivers\windows\OS\ati\version
b. Double-click the executable file.
c. Follow the instructions in the installation software.
6. Reboot the workstation.
3.4.2.4
Installing RealTek Audio Driver
RealTek digital audio (SPDIF) is included on the Tools and Drivers DVD. To use this
feature, you need to install the driver.
To install the RealTek Audio driver:
1. Insert the Tools and Drivers DVD into the DVD drive.
2. Go to the Tools and Drivers DVD directory by typing the following
C:\> cd/D D:\drivers\windows\audio\OS
Where OS is the directory for Windows 2003, Vista, or XP.
3. Double-click the executable.
4. Follow the instructions in the wizard to install the drivers.
5. Reboot the workstation.
3-10
Sun Ultra 20 M2 Workstation Operating System Installation Guide • November 2007
APPENDIX
A
Creating Windows Images on a RIS
Server and Installing RIS Images
This appendix describes how to create Sun Ultra 20 M2 Workstation specific images
on the Remote Installation Service (RIS) server for the following operating systems:
■
Windows XP SP2 32-bit or Windows XP 64-bit
■
Windows Server 2003 32-bit or 64-bit
Once created you can install the images on a client workstation.
This appendix contains the following sections:
■
Section A.1, “Creating a Windows Server 2003 or Windows XP SP2 32-bit Image
on the RIS Server” on page A-2
■
Section A.2, “Creating a Windows Server 2003 or Windows XP 64-bit Image on
the RIS Server” on page A-7
■
Section A.3, “Installing a RIS Image onto a Client Workstation” on page A-12
A-1
A.1
Creating a Windows Server 2003 or
Windows XP SP2 32-bit Image on the RIS
Server
This section describes how to create a Windows 2003 Enterprise 32-bit or Windows
XP SP2 32-bit image on a RIS server and then add platform specific drivers to the
image. All drivers for this procedure are located on the Tools and Drivers DVD,
version 1.2 or later.
Note – Before using this procedure, you must install the RIS onto a Windows 2003
Enterprise server. See the following URL for complete instructions on how to install
the RIS.
http://support.microsoft.com/default.aspx?scid=kb;en-us;325862
To copy Windows 2003 Enterprise and XP SP2 32-bit onto the RIS server, do the
following steps.
Note – Click Next or Finished in each screen to advance to the next screen.
1. Insert the Windows 2003 Enterprise or XP SP2 32-bit CD into the RIS server's
CDROM drive.
2. In the Start menu, select Run.
3. To start the RIS setup program, type the following command:
c:\ risetup.exe
Note – In all commands, c:\ is shown as the DOS command prompt.
4. In the Welcome to the Remote Installation Services Setup Wizard screen, click
Next.
5. In the Remote Installation Services Options screen, choose Add a new OS image
to this remote installation server, and then click Next.
6. In the Installation Source Files Location screen, choose the CDROM drive with
the Windows 2003 Enterprise or XP SP2 32-bit CD, and then click Next.
A-2
Sun Ultra 20 M2 Workstation Operating System Installation Guide • November 2007
7. In the Windows Installation Image Folder Name screen, type a descriptive name
for the Windows 2003 Enterprise or XP SP2 32-bit CD image you are creating. For
example:
Ultra_20_Windows_XP_SP2_32-bit
8. Click Next.
9. In the Friendly Description and Help Text screen, type a description and help text
(for future end-user reference), and then click Next.
10. In the Previous Client Installation Screens Found screen, choose “Use the old
client installation screens, and then click Next.
11. In the Review Settings screen, verify your settings, and then click Finished.
12. After the image installs to the server, click Done.
A.1.1
Adding the NVIDA Ethernet Drivers to the
Windows Image
To add the NVIDIA Ethernet drivers to the Windows 2003 Enterprise or XP SP2 32bit CD image on the RIS server:
1. Insert the Tools and Drivers DVD into the RIS server’s CDROM drive.
2. Type the commands below to accomplish the following actions:
■
■
■
Copy the Windows 2003 Enterprise or XP SP2 32-bit RIS NVIDIA Ethernet driver
zip package to the RIS server.
Unzip the Ethernet driver zip package.
Copy the files to the Windows XP image.
c:\ copy cdrom_drive:\drivers\windows\ris\OS\* C:\temp\nvris
c:\ copy c:\temp\nvris\*.* ris_partition:\RemoteInstall\Setup\English\Images\image_dir\
i386
Where cdrom_drive is the CDROM drive on the RIS server, OS is 2003 or XP, image_dir
is the image directory, and ris_partition is the drive where the RIS image is stored on
the RIS server.
Appendix A
Creating Windows Images on a RIS Server and Installing RIS Images
A-3
A.1.2
Adding Other Drivers and Modifying Settings
Files
To modify settings files, create driver directories, and copy drivers to their
directories in the Windows 2003 Enterprise or XP SP2 32-bit image on the RIS server:
Note – The ristndrd.sif file is located in the following directory on the RIS
server:ris_partition:
\RemoteInstall\Setup\Englsh\Images\image_dir\i386\templates
1. Change these entries in the ristndrd.sif file to read as follows:
[Unattended]
OemPreinstall = yes
[GuiUnattended]
AdminPassword = “desired password“
2. Remove the following entry from the ristndrd.sif file:
[Identification]
JoinDomain = %MACHINEDOMAIN%
DoOldStyleDomainJoin = Yes
A-4
Sun Ultra 20 M2 Workstation Operating System Installation Guide • November 2007
3. Add the following entries to the ristndrd.sif file:
[Unattended]
DriverSigningPolicy = Ignore
OemPnPDriversPath = “\drivers\video;\drivers\audio;\drivers\nic;\
drivers\sata_ide;\drivers\smbus“
[MassStorageDrivers]
“Nvidia RAID CLASS DRIVER (required)“=“OEM“
“Nvidia nForce Storage Controller (required)“=“OEM“
[OEMBootFiles]
nvatabus.sys
nvraid.cat
nvraid.inf
nvraid.sys
txtsetup.oem
[UserData]
ProductKey = XXXXX-XXXXX-XXXXX-XXXXX-XXXXX
[Identification]
JoinWorkgroup = WORKGROUP
4. To create the $oem$ directory for the RIS image, type the following command:
c:\ mkdir ris_partition:\RemoteInstall\Setup\English\Images\image_dir
The $oem$ directory will have a subdirectory tree structure with the following
directory names:
textmode
$1
drivers
audio
nic
sata_ide
smbus
video
ati
nvidida
$$
OemDir
5. To copy Windows 2003 Enterprise or XP 32-bit driver files from the Tools and
Drivers DVD to the $oem$ directory tree, type the following commands:
Appendix A
Creating Windows Images on a RIS Server and Installing RIS Images
A-5
Note – The drivers are located in the following directory on Tools and Drivers DVD.
cdrom_drive:
\drivers\windows\OS\chipset\
a. To copy the chipset drivers to the RIS server, type the following command:
c:\ copy cdrom_drive:\drivers\windows\OS\chipset\* c:\temp
6. To copy the chipset drivers to the proper directories, type the following
commands:
c:\ copy c:\temp\ide\winxp\sataraid\*.dll ris_partition:\remoteinstall\setup\english\
images\image_dir\$oem$\$$\OemDir
c:\ copy c:\temp\ide\winxp\sataraid\* ris_partition:\remoteinstall\setup\english\
images\image_dir\$oem$\textmode
c:\ copy c:\temp\ide\winxp\sata_ide\* ris_partition:\remoteinstall\setup\english\
images\image_dir\$oem$\$1\drivers\sata_ide
c:\ copy c:\temp\ethernet\* ris_partition:\remoteinstall\setup\english\images\image_dir\
$oem$\$1\drivers\nic
c:\ copy c:\temp\nfref_918_wxp\smbus\* ris_partition:\remoteinstall\setup\english\
images\image_dir\$oem$\$1\drivers\smbus\
c:\ copy c:\temp\video\ati ris_partition:\remoteinstall\setup\english\images\image_dir\
$oem$\$1\drivers\video
c:\ copy c:\temp\video\nvidia ris_partition:\remoteinstall\setup\english\images\image_dir\
$oem$\$1\drivers\video
7. The txtsetup.oem file is located in the following directory:
ris_partition:\RemoteInstall\Setup\English\Images\image_dir\$oem$\
textmode\
Add a semicolon to the beginning of each line for files that are of type *.dll in the
[Files.scsi.RAIDClASS] and [Files.scsi.BUSDRV] sections.
A-6
Sun Ultra 20 M2 Workstation Operating System Installation Guide • November 2007
8. To enable the RIS server to distribute the RIS image you created, type the
following commands:
c:\ net Stop binlsvc
c:\ net Start binlsvc
A.2
Creating a Windows Server 2003 or
Windows XP 64-bit Image on the RIS
Server
This section describes how to create a Windows 2003 Enterprise 64-bit or Windows
XP 64-bit image on a RIS server and then add platform specific drivers to the image.
All drivers for this procedure are located on the Tools and Drivers DVD, version 1.2
or later.
Note – Before using this procedure, you must install RIS onto a Windows 2003
Enterprise server. See the following URL for complete instructions on how to install
the RIS.
http://support.microsoft.com/default.aspx?scid=kb;en-us;325862
To copy the Windows 2003 Enterprise or XP 64-bit CD onto the RIS server:
Note – Click Next or Finished in each screen to advance to the next screen.
1. Insert the Windows 2003 Enterprise or XP 64-bit CD into the RIS server's CDROM
drive.
2. In the Start menu, select Run.
3. To start the RIS setup program, type the following command:
c:\ risetup.exe
4. In the Welcome to the Remote Installation Services Setup Wizard screen, click
Next.
Appendix A
Creating Windows Images on a RIS Server and Installing RIS Images
A-7
5. In the Remote Installation Services Options screen, choose Add a new OS image
to this remote installation server, and then click Next.
6. In the Installation Source Files Location screen, choose the CDROM drive with
the Windows 2003 Enterprise or XP 64-bit CD, and then click Next.
7. In the Windows Installation Image Folder Name screen, type a descriptive name
for the Windows 2003 Enterprise or XP 64-bit CD image you are creating. For
example:
Ultra_20_Windows_XP_64-bit
8. In the Friendly Description and Help Text screen, type a description and help text
(for future end-user reference), and then click Next.
9. In the Previous Client Installation Screens Found screen, choose “Use the new
client installation screens, and overwrite the old ones, and then click Next.
10. In the Review Settings screen, verify your settings, and then click Finished.
11. After the image installs to the server, click Done.
A.2.1
Adding the NVIDA Ethernet Drivers to the
Windows Image
To add the NVIDIA Ethernet drivers to the Windows 2003 Enterprise and XP 64-bit
CD image on the RIS server:
1. Insert the Tools and Drivers DVD into the RIS server’s CDROM drive.
2. Type the commands below to accomplish the following actions.
■
■
■
Copy the Windows XP 64-bit RIS NVIDIA Ethernet driver zip package to the RIS
server.
Unzip the Ethernet driver zip package.
Copy the files to the RIS image.
c:\ copy cdrom_drive:\drivers\windows\ris\OS\* C:\temp\nvris64
c:\ copy c:\temp\NVRIS64\*.* ris_partition:\RemoteInstall\Setup\English\Images\
image_dir\amd64
Where cdrom_drive is the CDROM drive on the RIS server, OS is 2003 or XP, image_dir
is the image directory, and ris_partition is the drive where the RIS image is stored on
the RIS server.
A-8
Sun Ultra 20 M2 Workstation Operating System Installation Guide • November 2007
A.2.2
Adding Other Drivers and Modifying Settings
Files
Note – The ristndrd.sif file is located in the following directory on the RIS
server:ris_partition:
\RemoteInstall\Setup\Englsh\Images\image_dir\i386\templates
To modify settings files, create driver directories, and copy drivers to their
directories in the Windows 2003 Enterprise or XP 64-bit image on the RIS server, do
the following steps.
1. Change these entries in the ristndrd.sif file to read as follows:
[Unattended]
OemPreinstall = yes
[GuiUnattended]
AdminPassword = “<desired password>“
2. Remove the following entry from the ristndrd.sif file:
[Identification]
JoinDomain = %MACHINEDOMAIN%
DoOldStyleDomainJoin = Yes
Appendix A
Creating Windows Images on a RIS Server and Installing RIS Images
A-9
3. Add the following entries to the ristndrd.sif file:
[Unattended]
DriverSigningPolicy = Ignore
OemPnPDriversPath = “\drivers\video;\drivers\audio;\drivers\nic;\
drivers\sata_ide;\drivers\smbus“
[MassStorageDrivers]
“Nvidia RAID CLASS DRIVER (required)“=“OEM“
“Nvidia nForce Storage Controller (required)“=“OEM“
[OEMBootFiles]
nvatax64.sys
nvraid.cat
nvrdx64.inf
nvrdx64.sys
txtsetup.oem
[UserData]
ProductKey = XXXXX-XXXXX-XXXXX-XXXXX-XXXXX
[Identification]
JoinWorkgroup = WORKGROUP
4. To create the $oem$ directory for the RIS image, type the following command:
c:\ mkdir cdrom_drive:\RemoteInstall\Setup\English\Images\image_dir
The $oem$ directory will have a subdirectory tree structure with the following
directory names:
textmode
$1
drivers
audio
nic
sata_ide
smbus
video
ati
nvidida
$$
OemDir
5. To copy Windows 2003 Enterprise or XP 64-bit driver files into the $oem$ directory
tree, type the following commands.
A-10
Sun Ultra 20 M2 Workstation Operating System Installation Guide • November 2007
The drivers are located in the following directory on the Tools and Drivers DVD:
cdrom_drive:\drivers\windows\OS\chipset\*
a. To copy the drivers to the RIS server, type the following command:
c:\ copy cdrom_drive:\drivers\windows\OS\chipset\* c:\temp
b. To copy the driver files to the proper directories, type the following commands:
c:\ copy c:\temp\ide\winxp\sataraid\*.dll ris_partition:\remoteinstall\setup\english\
images\image_dir\$oem$\$$\OemDir
c:\ copy c:\temp\ide\winxp\sataraid\* ris_partition:\remoteinstall\setup\english\
images\image_dir\$oem$\textmode
c:\ copy c:\temp\ide\winxp\sata_ide\* ris_partition:\remoteinstall\setup\english\
images\image_dir\$oem$\$1\drivers\sata_ide
c:\ copy c:\temp\ethernet\* ris_partition:\remoteinstall\setup\english\images\image_dir\
$oem$\$1\drivers\nic
c:\ copy c:\temp\nfref_918_wxp64\smbus\* ris_partition:\remoteinstall\setup\english\
images\image_dir\$oem$\$1\drivers\smbus\
c:\ copy c:\temp\video\ati ris_partition:\remoteinstall\setup\english\images\image_dir\
$oem$\$1\drivers\video
c:\ copy c:\temp\video\nvidia ris_partition:\remoteinstall\setup\english\images\image_dir\
$oem$\$1\drivers\video
6. The txtsetup.oem file is located in the following directory.
ris_partition:\RemoteInstall\Setup\English\Images\image_dir\$oem$\
textmode\
Add a semicolon to the beginning of each line for files that are of type *.dll in the
[Files.scsi.RAIDClASS] and [Files.scsi.BUSDRV] sections.
7. To enable the RIS server to distribute the RIS image you created, type the
following commands:
c:\ net Stop binlsvc
c:\ net Start binlsvc
Appendix A
Creating Windows Images on a RIS Server and Installing RIS Images
A-11
A.3
Installing a RIS Image onto a Client
Workstation
This section describes how to install a RIS image onto a client workstation using PXE
boot.
To install a RIS image onto a client workstation:
1. Power on or reboot the workstation.
2. During POST, press the F12 key to enter PXE.
The workstation looks for the RIS server on the network.
3. Type your name and password when the Windows RIS install screen appears.
4. Choose the RIS image to install.
Once selected, the OS installation begins and automatically continues until it
completes.
A-12
Sun Ultra 20 M2 Workstation Operating System Installation Guide • November 2007
APPENDIX
B
Installing Linux and Solaris OS
Remote Images
B.1
Installing LINUX from a PXE Server
The following procedure assumes that a PXE server is set up on the same network as
the system and that PXE images are loaded on the server.
Note – Red Hat 3 Update 7 does not include NVIDIA Ethernet drivers; you cannot
perform a PXE installation of this OS. However, the following can be booted with
PXE: RHEL3_U8, RHEL4_U3, and SLES 9 SP2.
Perform this procedure to boot from a PXE server.
1. During the BIOS portion of the system boot, press the F8 key to bring up the boot
menu.
2. Select the NVIDIA boot option.
3. Select the image that you want to install.
4. Reboot when the installation completes.
5. Follow the directions for manually installing drivers from the Tools and Drivers
CD.
B-1
B.2
Installing Solaris from a Jumpstart
Server
Note – Before you begin, build and place on the Jumpstart server a Solaris image
that includes the nVidia Ethernet Drivers (nge). Solaris does not include nge drivers.
For more information about Jumpstart installations, see Solaris 10 6/06 Installation
Guide: Custom JumpStart and Advanced Installations, 819-5778-xx.
Perform this procedure to install Solaris. If you want to reinstall the preinstalled
Solaris OS, see the Sun Ultra 20 M2 Workstation Service Manual.
1. During the BIOS portion of the boot, press the F8 key to bring up the boot menu.
2. Select the NVIDIA boot option.
3. The system automatically starts the installation process and reboots when it
completes.
4. Follow the directions for configuring the server found in the Solaris section of this
document.
B-2
Sun Ultra 20 M2 Workstation Operating System Installation Guide • November 2007