1
12
6.3 END PURLINS
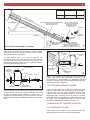
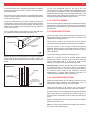
Cut (and mitre if necessary) end purlin/s to span between
the end purlin supports and the hip rafters. 68mm purlin
brackets are to be fastened to the end purlin supports
where they meet the front purlin/s using two 10x16 hex
head self drilling screws.
80mm METAL STRIP
FIXED TO EAVES PURLIN
AT 1200mm CENTRES
DECK
Fix the end purlins to the hip plate connections using two
10x16 hex head self drilling screws and to the 68mm
purlin brackets using two 10x16 hex head self drilling
screws either side.
UNIVERSAL DECK
STRAP
EAVES
PURLIN
Note: If no end purlin support is required then the end
purlins span between hip rafters.
7.0 GUTTER ASSEMBLY
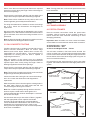
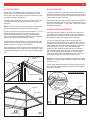
Gutter located along the side of the gable unit is to be fixed
to the eaves purlin. End gutter is fixed with metal strips and
deck straps to the end rafter. Gutters will need to be mitred
at corners and all gutter joins are to be waterproofed with
silicone.
GUTTER
DOWNPIPE POP
PORTAL FRAME
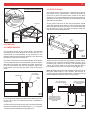
Notch a hole in the gutter and insert a downpipe pop so that
the downpipe is in line with an end portal column. Fasten
the pop in place using rivets and silicone seal.
26
Note: If your column footings are in ground you would have
installed your portal frames with a slight fall towards the
downpipe end. Ensure that the gutter is notched at the right
end. However, if you are bolting the footings on to an
existing concrete slab and there is a slight fall in the slab,
ensure that the downpipe is at the lower end of the slab to
help the water run off.
Construct two 70mm downpipe offsets from the downpipe
lengths supplied and attach to the downpipe pop with rivets.
Waterproof rivets with silicone. Fasten the downpipes with
straps to the adjoining column.
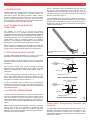
Cut 80mm long metal strips from the band supplied. For
side gutters bend the straps as shown in figure 26 to allow
clearance between roof sheets and gutter. Pop rivet these
tags to the top of the eaves purlins or end frame at 1200 mm
centres as appropriate. Rivet the back lip of the gutter to
these tags, ensuring the back face of the gutter is held
vertical as shown in figure 26. Waterproof rivets with
silicone.
Once the decking is installed, attach the universal deck
straps at maximum 1200mm centres by crest fixing to the
roof sheets with 10x16 screws.
Note: For details on making downpipe offsets and gutter
mitres refer to the Stratco D.I.Y. “Gutter and Downpipes”
brochure.
8.0 ATTACH DECKING
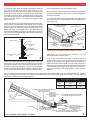
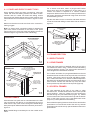
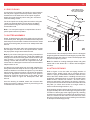
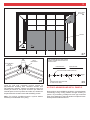
Refer to figure 27 for the order and laying direction of
carport roofing. Initially, begin with a full length sheet in
section 1 laying in the direction indicated, continue to the
side of the Dutch Gable section. Cladding will need to be
positioned, marked and then cut to fit over the side Dutch
Gable sections. Offcuts from section 1 are then used in
section 2 and layed in the direction as shown in figure 27.
This process is continued around the Dutch Gable unit until
fully clad (i.e. offcuts from section 2 to begin section 3,
section 3 offcuts to begin section 4, etc).
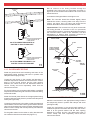
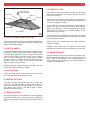
Roof sheeting should overhang at the eaves into the gutter
by approximately 40mm and overhang the top purlin to give
a maximum 100mm gap at the ridge (Figure 28). Sheeting
is layed to the centreline of hip rafters and as offcuts are reused, it is critical cuts are clean and accurate. Also, have
the lap joint facing away from the prevailing wind direction
on all carport roof faces (figure 29).