1
0 2001 by Sony Corporation
KDP-57XBR2
KDP-65XBR2
WARNING
Note on Caption Vision
To reduce the risk of fire or shock hazard, do not expose the
projection TV to rain or moisture.
This television receiver provides display of television
closed
captioning in accordance with §15.119 of the FCC rules.
Note on Convergence Adjustment
Before you use your projection TV, make sure to adjust
convergence.
For details, see "Adjusting
the Convergence
Automatically
(Flash Focus)" on page 36.
RISK OF ELECTRIC SHOCK
DO NOT OPEN
Note to CATV System Installer
A'R'ENTION
RISQUE
This reminder is provided
to call the CATV system installer's
attention to Article 820-40 of the NEC that provides guidelines
for
proper grounding and, in particular,
specifies that the cable ground
shall be connected to the grounding
system of the building, as close
to the point of cable entry as practical.
DE CHOC ELECTRIOUE,
NE PAS OUVRIR
PRECAUClON
RIESGO
DE CHOQUE
NO
ELECTRICO
ABRIR
Use of this television
receiver for other than private viewing of
programs broadcast on UHF or VHF or transmitted by cable
companies
for the use of the general public may require
authorization
from the broadcaster/cable
company and/or
program owner.
CAUTION: TO REDUCE THE RISK OF ELECTRIC SHOCK,
DO NOT REMOVE COVER (OR BACK).
NOTIFICATION
NO USER-SERVICEABLE PARTS INSIDE.
REFER SERVICING TO QUALIFIED SERVICE PERSONNEL
This symbol
is intended
This equipment
has been tested and found to comply with the
limits for a Class B digital device pursuant to Part 15 of the FCC
Rules. These limits axe designed to provide reasonable
protection
against harmful interference
in a residential installation.
This
to alert the user to the
presence of uninsulated
"dangerous
voltage"
within the product's enclosure that may be of
sufficient magnitude
to constitute a risk of
electric shock to persons.
This symbol
is intended
to alert the user to the
presence
of important operating and maintenance
(servicing)
instructions
in the literature
accompanying
the appliance.
equipment
and, if not
may cause
However,
particular
interference
determined
encouraged
following
N
Reorient
or relocate
F1
Increase
the separation
F1
Connect the equipment
into an outlet on a circuit different
from that to which the receiver is connected.
[7
Consult
help.
CAUTION
To prevent electric shock, do not use this polarized
an extension cord, receptacle or other outlet unless
be fully inserted to prevent blade exposure.
AC plug with
the blades can
CAUTION
When
using
TV games,
computers,
and similar
products with your projection
TV, or viewing
TV station whose logo always stays on the
screen, keep the brightness
and contrast
functions
at low settings.
If a fixed
a
(non-moving)
pattern such as a station logo is left on the screen
for long periods of time, especially
at a high
brightness
or contrast setting, the image can be
permanently
imprinted
onto the screen. These
types of imprints are not covered by your
warranty.
generates, uses, and can radiate radio frequency energy
installed and used in accordance with the instructions,
harmful interference
with radio communications.
there is no guarantee that interference
will not occur in a
installation,
if this equipment
does cause hanninl
to radio or television reception, which can be
by turning the equipment
off and on, the user is
to try to conect the interference
by one or more of the
measures:
the receiving
between
antennas.
the equipment
the dealer or an experienced
radio/TV
You are cautioned
that any changes or modifications
approved in this manual could void your authority,
equipment.
and receiver.
technician
for
not expressly
to operate this
Trademark Information
Safety
[1
Operate
[1
The plug is designed, for safety purposes,
to fit into the wall
outlet only one way. If you are unable to insert the plug fully
into the outlet, contact your dealer.
If any liquid or solid object should fall inside the cabinet,
unplug the projection TV immediately
and have it checked
by qualified service personnel
before operating it further.
If you will not be using the projection TV for several days,
VI
71
disconnect
the cord.
[7
the projection
the power
For details concerning
Safeguards."
TV only on 120 V AC.
by pulling
the plug liselL Never
safety precautions,
pull on
internal
XBR is a registered
Sony.
trademark
and CineMotion
is a trademark
of
i.LINK is a h'ademark of Sony used only to designate that a
product contains an IEEE 1394 connector. All products with an
i.LINK connector may not communicate
with each other.
Owner's Record
heat buildup,
do not block the ventilation
TV in a hot or humid place, or in
dust or mechanical
vibration.
D
Avoid operating
(41°F).
VI
If the projection TV is transported
dii_ctly from a cold to a
warm location, or if the room temperature
changes suddenly,
the picture may be blurred or show poor color. In this case,
please wait a few hours to let the moisture evaporate before
turning on the projection
TV.
To obtain the best picture, do not expose the screen to direct
the projection
TV at temperature
below
5°C
illumination
or direct sunlight. It is recommended
to use spot
lighting directed down from the ceiling or to cover the
windows
that face the screen with opaque drapery. It is
desirable to install the projection TV in a room where the
floor and walls are not of a reflective material.
Sony has determined
that this
product
or product
models meets
I_
] Manufacfured
underlicensefromDolby
Laboratories
Licensing
Corporation.
the double-D
symbolare
trademarks
of Dolby Laboratories
Licensing Corporation.
The model
Do not install the projection
a place subject to excessive
FI
[DOLBY
D I (I I T A L Dolbyand
see "Important
Installing
To prevent
openings.
DO
the
ENERGYSTAR
®guidelines
As an
ENERGYSTAR®Partner,
for energy efficiency.
ENERGYSTAR_ is a U.S. registered
mark.
and serial numbers
are located
at the rear of the
projection TV, below the Sony logo, on the sticker, and also on the
TV box (white label). Record these numbers in the spaces provided
below. Refer to them whenever you call upon your Sony dealer
regarding
this product.
Model No.
SerialNo.
Important
Safeguards
For your protection,
please read these instructions
keep this manual for future reference.
completely,
Carefully observe and comply with all warnings,
cautions
instructions
placed on the set or described in the operating
instructions
or service manual.
and
and
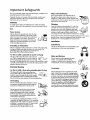
WARNING
Never push objects of any kind into the set
through the cabinet slots as they may touch
dangerous
voltage points or short out parts that
could result in a fire or electric shock. Never spill
liquid of any kind on the set.
Cleaning
To guard against injury, the following basic safety precautions
should be observed in the installation, use and servicing of the set.
Use
Clean the cabinet of the projection TV with a dry
soft
cloth. with
To remove
dust Stubborn
from the screen,
wipe
it gently
a soft cloth.
stains may
This set should be operated
only from the type
of power source indicated
on the serial/model
plate. If you are not sure of the type of electrical
power supplied
to your home, consult your
dealer or local power company. For those sets
designed
to operate from battery power, refer
to the operating
instructions.
_2)
If the picture becomes
dark after using the projection
TV for a long
period of time, it may be necessary
to clean the inside of the
projection
TV. Consult qualified service personnel.
Installation
Attachments
Grounding or Polarization
This set is equipped with a polarized AC power cord plug (a plug
having one blade wider than the other), or with a three-wire
grounding type plug (a plug having a third pin for
gmunding).Foliow
the insti-uctions below:
For the set with a polarized AC power cord plug
plug fully into the outlet, try reversing
If the plug still fails to fit, contact your electrician
outlet installed.
Do not defeat the safety purpose
plug by forcing it in.
Do not use attachments
not recommended
manufacturer,
as they may cause hazards.
by the
Water and Moisture
This plug will fit into the power outlet only one
way. This is a safety feature. If you are unable to
Alternate
f_,_
be removed with a cloth silghtly dampened
with
[_
solution of mild soap and warm water. Never
use strong solvents such as thinner or benzine for cleaning.
Power Sources
insert the
the plug.
a suitable
polarized
Object and Liquid Entry
to have
of the
Warning
Do not use power-line
operated
sets near
water -- for example, near a bathtub,
washbowl,
kitchen sink, or laundry
tub, in a
wet basement,
or near a swimming
pool etc.
Accessories
For the set with a three-wire grounding type AC plug
This plug will only fit into a grounding-type
power outlet. This is a safety feature. If you are
unable to insert the plug into the outlet, contact
your electrician to have a suitable outlet installed.
Do not defeat the safety purpose of the grounding
Overloading
DO not overload wall outlets, extension
cords or
convenience _ceptacles
beyond their capacity,
since this can result in fire or electric shock.
.___/_
plug.
"_
Do not place the set on an unstable cart, stand,
table or shelf. The set may fall, causing serious
injury to a child or an adult and serious damage
to the set. Use only a cart or stand recommended
by Sony for the specific model of TV. No part of
the TV set should overhang
any edge of the TV
cart or stand; any overhanging
edge is a safety
hazard. An appliance and cart combination
should be moved with care. Quick stops,
excessive force, and uneven surfaces may cause
the appliance
Always turn the set off when it is not being
used. When the set is left unattended
and
unused for long periods of time, unplug it
from the wall outlet as a precaution
against
the possibility
of an internal malfunction
that
could create a fire hazard.
If a snapping
or popping
sound from a TV set is
continuous
or frequent while the TV is operating,
unplug
the TV and consult your dealer or service
technician.
It is normal for some TV sets to make
occasional snapping or popping
particularly when being turned
sounds,
on or off.
and cart combination
to overturn.
.._1,
____,_-
,,-.
,,2,
•
/_]J."
Ventilation
Lightning
The slots and openings in the cabinet and in the back or bottom are
provided
for necessary
ventilation.
To ensure reliable operation
of
the set, and to protect it from overheating,
these slots and openings
must never be blocked or covered.
For added protection for this television receiver during a lightning
storm, or when it is left unattended
and unused
for long periods of
time, unplug it from the wall outlet and disconnect
the antenna.
FI
7-1
Never cover the slots and openings
cloth or other materials.
with
a
This will prevent damage
power-line
surges.
to the receiver
due to lightning
and
Service
Never block the slots and openings
by
placing the set on a bed, sofa, rug or other
similar surface.
Damage Requiring Service
FI
Never place the set in a confined
as a bookcase
or built-in cabinet,
proper ventilation
is provided.
_l
When the power cord or plug
is damaged or frayed.
FI
D
Do not place the set near or over a radiator
or heat register, or where it is exposed to
direct sunlight.
If liquid
the set.
space,
unless
such
Unplug the set from the wall outlet and refer servicing
service personnel under the following
conditions:
Power-Cord Protection
FI
or
into
<
If the set has been exposed
rain
Do not allow anything to rest on or roll over the
power cord, and do not place the set where the
power cord is subject to wear or abuse.
has been spilled
to qualified
to
water.
[f the set has been subject to
excessive shock by being
dropped, or the cabinet has
been damaged.
.//
/
Antennas
If the set does not operate
normally
when following
the
operating
instructions.
Adjust
only those controls that are
specified
in the operating
instructions.
Improper
adjustraent
of other controls
may result in daraage and
will often require extensive
work by a qualified technician
to restore the set to normal operation.
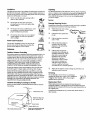
Outdoor Antenna Grounding
If an outdoor antenna is installed, follow the precautions below. An
outdoor antenna system should not be located in the vicinity of
overhead power lines or other electric light or power circuits, or
where it can come in contact with such power lines or circuits.
WHEN INSTALLING
AN OUTDOOR ANTENNA
SYSTEM,
EXTREME CARE SHOULD BE TAKEN TO KEEP FROM
CONTACTING
SUCH POWER LINES OR CIRCUITS AS
CONTACT WITH THEM IS ALMOST INVARIABLY FATAL.
Be sure the antenna system is grounded so as to provide some
protection against voltage surges and built-up static charges.
Section 810 of the National Electrical Code (NEC) in USA and
Section 54 of the Canadian Electrical Code in Canada provides
information
with respect to proper grounding
of the mast and
supporting
structure, grounding
of the lead-in wire to an antenna
discharge unit, size of grounding conductors,
location of antenna
discharge unit, connection
to grounding
electrodes, and
requirements
for the grounding
electrode.
Antenna
Grounding According to the NEC
Refer to section 54-300 of Canadian
Electrical Code for Antenna
Grounding.
FI
When the set exhibits a distinct
indicates
a need for service.
Antenna lead-in wire
Antenna discharge unit
(NEC Section810-20)
round clamps
NEC: National Electrical Code
_
lead-in wire
Power service groundingelectrode
system (NECArt 250 Part H)
in performance,
it
Servicing
Do not attempt to service the set yourself since
opening the cabinet may expose you to dangerous
voltage or other hazards.
Refer all servicing
to
qualified
service personnel.
_
,,_
Replacement Parts
When replacement
parts are required, be sure the service
technician certifies in writing that he has used replacement
parts
specified by the manufacturer
that have the same characteristics
as
the original parts.
Unauthorized
other hazards.
_
change
substitutions
may result
in Ftre, electric
shock
or
Safety Check
Upon completion
of any service or repairs to the
set, ask the service technician to perform routine
safety checks (as specified by the manufacturer)
to
determine
that the set is in safe operating
condition, and to so certify. When the set reaches
the end of its useful life, improper disposal could
result in a picture tube implosion.
Ask a qualified
service technician to dispose of the set.
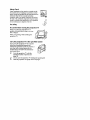
For Safety
Be careful when moving the projection TV
When you place the projection TV in
position, be careful not to drop it on your
foot or fingers.
Watch your footing
projection
TV.
while
installing
the
Carry the projection TV in the specified manner
If you carry the projection
"IV in a manner
other than the specified
manner and
without the specified number of persons, it
may drop and a serious injury may be
caused. Be sure to follow the instructions
mentioned
below.
F1
Carry the projection TV with the
specified number of persons (see
page 10).
Do not can'y the projection
Hold
the projection
TV holding
TV tightly
when
the speaker
carrying
it.
grill.
Contents
Using the Projection
Introducing
the Projection
TV
Overview
.......................................................
Features ..........................................................
1
2
Package Contents
Using the Remote
Frequently
Asked
3
3
7
Setting
.........................................
Control ...........................
Questions
......................
Up the Projection
Overview
TV
.......................................................
9
Carrying
Your Projection
TV ....................
Installing
the Projection TV ......................
Mounting
the Rear Speakers
(not supplied)
.......................................
Projection
TV Controls
and Connectors..
Basic Connections
.......................................
10
10
Connecting
a VCR and Cable ...................
Connecting
a VCR and Cable Box ............
Connecting
Two VCRs for Tape Editing
Connecting
a Satellite Receiver ................
Connecting
a Satellite Receiver
with a VCR ...........................................
19
20
22
23
Overview
Using
Using
Using
Using
Using
Using
Using
Using
the Program
Guide .........................
the Scrolling Channel Index ..........
Favorite Channels
...........................
Wide Screen Mode ..........................
Twin View ........................................
the Freeze Function
........................
the i.LINK Control Panel ...............
the Timer ..........................................
Using the Projection
11
13
17
24
Connecting
an Audio Receiver ................. 25
Connecting
a DVD Player with
Component
Video Connectors
.......... 26
Connecting
a DVD Player with A/V
Connectors
............................................
27
Connecting
a Camcorder
........................... 28
Connecting
a Device with an
Optical IN Connector .......................... 29
Connecting
i.LINK Compatible Devices.30
Using the CONTROL S Feature ............... 34
Setting Up the Projection
TV
Automatically
......................................
35
Adjusting the Convergence
Automatically
(Flash Focus) .............. 36
TV Features
.....................................................
37
38
39
40
43
44
47
48
49
TV Menus
Overview
.....................................................
51
Using
Using
Using
Using
Using
Using
Video Menu ...............................
Audio Menu ..............................
Screen Mode Menu ..................
Channel
Setup Menu ...............
Parental
Control Menu ............
Setup Menu ...............................
52
54
56
58
60
64
Other
the
the
the
the
the
the
Information
Overview
.....................................................
67
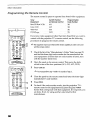
Programming
the Remote Control .......... 68
Operating
Other Components
with Your
Projection
TV Remote Control .......... 71
About i.LINK ..............................................
73
Troubleshooting
..........................................
Specifications
...............................................
Index .............................................................
74
77
79
Overview
This chapter gives an overview
of the projection
TV features, defines
the package
contents,
describes
the remote control, and provides
answers
to frequently
asked questions,
Topic
Page
Features
2
Package
Using
Contents
the Remote
Frequently
Asked
3
Control
3
Questions
7
1
Introducing
the Projection
TV
l eatures
Some of the features
include:
[]
that you will enjoy with your new projection
Built-in Digital Television
(DTV) Receiver: You can watch
digital television programs and enjoy the improved audio/video
quality that these programs offer.
Wide Screen Mode: Watch conventional
broadcasts in wide screen (16:9) mode.
[]
TV
DRC
TM
Multi-Function:
Unlike
4:3 aspect ratio
conventional
line doublers,
the
DRC (Digital Reality Creation) feature doubles vertical and
horizontal
lines, resulting
in four times the density for quality
sources such as DVD, satellite, and digital camcorder.
O
Twin ViewTM: Using
the Multi-Image
Driver
(MIDX),
Twin View
allows you to watch two programs
side by side, with the ability
to zoom in one picture. You can watch pictures from two different
sources (1080i, 720p, 480p, and 480i) simultaneously.
O
Program Guide: Lets you select digital channels and subchannels
and review program information
from an on-screen list.
[]
Scrolling
programs
[]
Favorite Channels: Allows
your favorite channels.
[]
Parental Control: V-Chip technology
unsuitable
programming
for younger
[]
Component
Video Inputs: Offers the best video quality for DVD
(480p, 480i), and digital set-top box (1080i, 720p, 480p, 480i)
connections.
O
S-VIDEO
connected
O
CineMotionTM:
Provides
sources
originally
Channel IndexTM: Lets you preview and select
from a scrolling index of video pictures.
Inputs: Provides
equipment.
(media
you to preview
allows parents
viewers.
a high-quality
optimal
and select from 16 of
picture
video
to block
signal
from
quality for film-based
shot in 24 frames-per-second
format).
[]
i.LINK: Provides
a secure digital interface to other digital home
entertainment
devices, including digital cable set-top boxes.
i.LINK allows for the secure transfer of copyright-protected
highdefinition content between these devices and your digital
television.
[]
Dolby ® Digital: This TV has a Dolby Digital decoder. By adding
rear speakers and a powered subwoofer,
you can enjoy 5.1
channel surround sound from Dolby Digital encoded DTV
programs.
Optical Digital Audio Out: If you have an audio receiver with an
optical digital audio input, you can use it to decode and amplify
the optical digital audio output.
2
Introducing
the Projection
TV
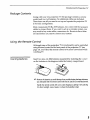
Package Contents
Along with your new projection
TV, the package contains a remote
control and two AA batteries.
No additional
cables are included.
These items are all you need
in its basic configuration.
to set up and operate
the projection
TV
Most components
(VCRs, DVD players, etc.) come with the necessary
cables to connect them. If you want to set up a complex system, you
may need to buy extra cables, connectors,
etc. Be sure to have these
on hand before you start to connect your system.
Using the Remote Control
Although
some of the projection
TV's functionality
can be controlled
using buttons located on the front panel of the projection
TV (see
page 13), you'll find the remote control to be more convenient
while
watching
TV.
Inserting
Batteries
Insert two size AA (R6) batteries
(supplied)
by matching
the + and on the batteries
to the diagram
inside the battery compartment.
_:_ Removethe batteries to avoid damagefrom possible battery leakagewhenever
you anticipate that the remote control will not be used for an extended period.
Handle the remote control with care; avoid dropping it, getting it wet, placing
it in direct sunlight, near a heater, or where the humidity is high.
3
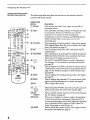
Introducing
Button
the Projection
Descriptions
IV
The following
outside
table describes
and inside
the buttons
on the remote
control's
panels.
Outside Panel
_
[__
__M_NG
8LEE
IO ®
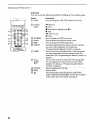
Button
[] MUTING
Description
[]
Press
Press to mute the sound.
restore the sound.
SLEEP
repeatedly
_til
Press
again
the projection
or press
V0L+ to
TV displays
the time
in minutes (15, 30, 45, 60, or 90) that you want the
projection
TV to remain on before shutting
off
automatically.
Cancel by pressing
until Sleep Off appears.
-_
While the Sleep feature
remaining
time.
[]
PICMODE
is set, press
once
to view
Press repeatedly
to step through the video picture modes:
Vivid, Standard, Movie, Game, Pro. Also available in the Video
menu. For details, see page 52.
1_] AI_i:-.................... Pre_-_ge
CABLE
be_een-
the _F/UHF
_put
_d-_e
........
input.
[]WitiEMbeE
..............
Press
repeatediy to Step '_0ugh
_e Wide Mode-s-et_gsi
Wide Zoom, Normal, Full, Zoom. Also available in the Screen
Mode menu. For details, see pages 43 and 56.
_Q
........................Usewi_-i_-Z
9 _cl
]ff]_ ...............
_l
page 13). For details
see page 48.
[]
SONY
iNDEX
Press to clispiay
see page
[_] MENU
[]
[]
Press
VOL ..................
[]-ADD
FAVORITE
DISPLAY....
ENTEI_butt0ns
to Select sul_a_eis
(for example, 2.1). For details on selecting subchannels,
see page 38.
idresst0 d_piay
_e LL_K Control Panel There is aiso
i.LINK button on the front panel of the projection
TV (see
on using
the i.LINK
_e _r0i_g
ch_ei
Control
_aex:
Panel,
For deta_s,
39.
to _spiay
6e pro]ec_on
again
to exit from the menus.
Press
to adjust
select
an item, press
6e voi_e2
_
For details,
see page
of the joystick
_ei
Press
51.
(_)).
to _e Favorite
list. For details, see page 40.
Press once to display the channel
(if set), time, and other
menu:
.....
the center
P-re-ss-to--a-d_d_eC_rrent
0nZscreen
number,
information.
When
ch_ei
Ch_eis
iabei
the DTV is
receiving a digital signal with Dolby Digital, the decoding
type is displayed
(Dolby Digital or Dolby Digital Pro
Logic). Press again to turn Display off.
[]
I:REr:zE
.................
4
...... Press
t6froze
the p!cture.
F0r
wind6wpiCerel
details, see page
47.
Press
aga_
to restore
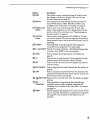
Introducing
Button
Description
I_
Press w_e
RESET
a menu is displayed
(page
the settings to the factory defaults.
Favorite Channels
(see page 42).
[]
MTS/SAP
Press
repeatedly
Sound
[]
[]
_e Mulfi2_ei
(GREEN)
audio/video
FUNO'i0N
remote control. For instructions,
see "Programming
Remote Control"
on page 68.
Press tO Select the equipment
(SAT/CKBLE
or _)
equipment
you have
programmed
GUIDE
[]
CH ..........
[]
EXi'r ............
Pressrei_eatedi
to your projection
2 seconds.
Press
PreSs to dispiay
SURFFAV6RrIE
66
38.
Press
to scan through
press
Pressto
6e video
TV's video
ENTER to select
page
program
the
_at
eq_pment
inputs.
immediately.
g_de:
channels.
For detaOs,
To Scan rapidly
and hold down
ex{t the 0n:screen
normal
JUMP
f to Step t_ough
connected
channels,
either
menu
through
and re_
to
viewing.
Press
to dispiay
page
41.
........Press to j_p
(TWIN VIEW) Press to _n
44 to46.
DIiC .......................................
Press repeate_y
CINEMOTION
see
CHbutton.
or diSpla};
_e Favorite
bacE _d
Ch_eis
for6
be_een
_Stl For details, S_
_o
_eisl
projection
TV alternates
between
the current
the last channel that was selected.
[]
into the
you want to operate. The indicator lights up momentarily
when pushed
to show which device the remote control is
operating.
[]
[]l_
TV
Stereo, Auto SAP, and Mono. Also
available
in the Audio menu. For details, se e page 54.
Press to _rn on and off the projection
TV and other
[_J "I:_iNil)E6 ..........
[]
to clear
PowER buttons
buttons
I_
"IV
51 to 66) to reset
Also used
t0 step _ough
(MTS) options:
the Projection
on _d
off Tw_
to stei_ _ough
resolution
picture modes:
CineM0tion. Also available
see page
_ewl
6e
_e
channel
S_ pages
For deta_s;
available
and
_gh:
Interlaced, Progressive and
in the Video menu. For details,
53.
..............................
Pr XKopr6 am- ebr ecidon
on d
tune to a specific channel at two scheduled
viewing times
(see page 49). Also available
in the Setup menu (see
page 66).
5
Introducing
the Projection
TV
Inside Panel
You can access
the following
Button
WNCR
.....
Press
[]
Transport .........
_
Buttons
I_
•
_
_2
by lifting
up the outside
panel.
Description
[]
0oo®
buttons
to change
be
VHF/UHF
of the VCR.
Rewind
Play
Record
(press
together
II st0p
Fast-forward
•
output
with I_)
............................................
I I Pause
[]
DVD MENU......
[] • .+_
[]
MENU
Press
to _spiay
Press.
6e
D_
_
menul
*+} to move 6e on-screen c_s6rl
Press to dispiay
6e
D_
[] €0DES_ET
................
Osed1orpr0gra_g
non-Sony
video
"Programming
se6p
equipment.
the Remote
POWE-R.....................
Press ;cO-_-on
mend;
6e f6mote€on_oito 6perate
_doff
For details,
Control"
other
see
on page
audio/video
68.
equipmeni
you have programmed
into the remote control. For
instructions,
see "Programming
the Remote Control"
page
[]
a6q_
O_ t6 Swit_ controi f6r c6_ected
aaW_
0v0d
You can program
one video source for each switch
position.
For details, see "Programming
the Remote
Control"
on page
ENTER
1_ _
Press
title.............................
to Seiect.
Press repeatediy to Step6r6ugh 6e £u_o F_ffect
options:
Dolby Surround, Simulated, and Off. Also available
in the Audio
6
video eq_pmentl
68.
[91-DvD"riT-iJE
...................
Press _display _e-D-_
[]
on
68.
menu.
For details,
see page
54.
Introducing
Frequently
What
is digital
Asked
TV
(DTV)
Digital television (or "DTV") refers to the over-the-air
television
broadcast
standards
adopted
by the Federal Communications
Commission
in 1996. Developed
by the Advanced
Television Systems
Committee
(ATSC), a group of manufacturing
companies,
these
standards
define the specifications
for 18 digital broadcast
formats.
in the ATSC DTV standard
that are described
"High Definition
Television."
The remaining
12 video
described
as "Standard
Definition
Television."
Although
the technical aspects
television
viewers,
the benefits
when digital music on compact
even more so.
formats
are
all 18 formats
of
For the television
viewer, digital TV represents
one of the most
significant
advances
in television
since color television
replaced
and white. Here are just a few of the benefits:
Dramatically
superior
picture quality, with
picture detail of today's
analog television.
up to six times
black
the
O
Multichannel
O
Widescreen.
DTV can provide
the same type of widescreen
presentation
as you see in movie theaters. The new screen size
has a 16:9 width-to-height
(or "aspect")
ratio, compared
with a
4:3 aspect ratio of today's
conventional
television.
This means
that digital broadcasts
of movies no longer need to be
"reformatted"
for television.
digital
sound,
as
of these standards
are transparent
to
are as dramatic
as those experienced
disk was introduced
-- probably
Your Sony projection
TV is capable of receiving
digital TV formats, including
high-definition.
Do I need a special
antenna to receive
digital television ?
TV
Questions
There are six formats
What are the
benefits of DTV?
the Projection
including
Dolby ® Digital
sound.
No. Initially, digital television
will arrive through
a standard,
overthe-air VHF/UHF
antenna,
which means you can receive digital
broadcasts
using the same terrestrial
("rooftop")
antenna
you
currently
use to receive conventional
programming.
However,
if you
currently
receive your VHF/UHF
programming
via cable, you will
need to install a VHF/UHF
antenna in order to receive digital
programming.
Your Sony projection
TV, however,
is also equipped
with connectors
that may allow you to connect DTV-compafible
cable
boxes when they become available.
7
Introducing
the Projection
Can this TV receive
conventional
analog
broadcasts that are
available
today?
TV
Yes. This TV is designed
to receive conventional
analog broadcasts,
cable TV, as well as all formats of digital broadcasts.
Of course, you
can also connect VCRs, DVD players, digital broadcast
(satellite)
receivers, and other audio/video
components.
When is digital
broadcasting
being
introduced?
The transition
from today's analog broadcasting
system to digital
television
will take time to complete.
In the fall of 1998, some
networks
started to broadcast
digital programs.
How can I select
digital channels ?
Digital channels
are indicated
by the use of a decimal or "dot" in the
subchannel
number (for example,
"2.1"). This number appears when
you press the CH +/- buttons or press the DISPLAY
button. To select a
subchannel
directly, use the 0-9 buttons,
Q button, and the ENTER
button.
For example, to select subchannel 2.1, press:
Q + O + (_) + ENTER
You can
guide.
8
also
select
See page
digital
channels
38 for details.
using
an on-screen
program
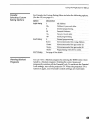
Overview
This chapter includes
projection
TV.
illustrated
instructions
for setting
Topic
up your
Page
Carry_g
Your Projection
_
10
Installing
the Projection
TV
10
Moun6ng
_eRear
Speakers
inot supplied)
1i
Basic Connections
17
Connecting
a VCR and Cable
19
Connecting
a VCR and Cable
Connecting
Two VCRs for Tape Editing
22
Connecting
a Satellite
Receiver
23
Connecting
a Satellite
Receiver
Connecting
an Audio
Receiver
Connecting
Connectors
a DVD Player
with
Component
Connecting
a DVD Player
with
A/V
Connecting
a Camcorder
Connecting
a Device
Connecting
i.LINK
Using
Adjusting
with
20
a VCR
24
25
Video
26
Connectors
27
28
with
an Optical
Compatible
the CONTROL
Setting
Box
IN Connector
29
Devices
30
S Feature
Up the Projection
the Convergence
34
TV Automatically
Automatically
35
(Flash
Focus)
36
9
Setting
Up the Projection
Carrying
TV
Your Projection
Carrying
TV
the projection
TV requires
The projection
TV is equipped
hard surface. Be sure to move
Installing
the Projection
Recommended
Viewing Area
(Horizontal)
Recommended
Viewing Area
(Vertical)
10
TV
three
or more
people.
with casters for easy movement
on a
your projection
TV using the casters.
Setting
Mounting
Speakers
TV
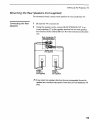
the Rear Speakers (not supplied)
For surround
Connecting
Up the Projection
the Rear
sound,
connect
rear speakers
1
Be sure the TV is turned
off.
2
Using
connect
the speaker
cords,
to your projection
REAR SPEAKER
TV.
OUT L on
your projection
TV to the speaker terminal
on one rear speaker,
and connect REAR SPEAKER OUT R to the terminal
on the other
one.
(Rearof projection"rv)
Speaker cord
(not supplied)
Speaker
SS-MB115
(not supplied)
Speaker
SS-MB115
(not supplied)
If you connect rear speakersother than the ones recommended, be sure the
speakershave a maximum input power of more than 20 W and impedance of 8
ohms.
11
Setting
Up the Projection
Installation
TV
For optimum
surround
sound effect, mount the rear speakers
following
places (as shown in the illustration):
On a wall or table,
Projection TV
as high as the listener's
Rear speaker
(Rear of projection TV)
i
i
Left rear
speaker
12
[]
I-IRightrear
speaker
ears.
in the
Setting
Projection
Front
TV Controls
Panel
Up the Projection
TV
and Connectors
To access the front buttons
and input jacks on the projection
in to release the door on the front of the projection
TV.
TV, push
J
POWI_R
sTza_
_1
LUI_ _ANO If
O
[]
O
[]
I-Push to open
Control
[]
F_
[]
Description
POWER
Press
'STANDBY/
...............
_en
_tin
orange;
indicates
that i.LINK
TIMER .....................
_'enli[:
_dicates
MENU
Press
i:Li6K
_, '4#
to display
......................
Press
one of-_e-t_ers
the projecti0n
_, ,_*#
iar--ess t o _iect-
see page
6e i:_
see page
is6n: _en_t
Stanci6y
is Off. For details,
Standby
For details,
Press 6 aspiay
Control Panel,
5ELE_ ........................
_
_dicates_ti:L_
i.LINK STANDBY
the menus.
[]
TV.
to turn on and off _e projection
see page
is set: For €letails:-see
TV on-screen
menul
Press
[]
:CHANNEL+
[]
:VOLUME+
FLASHFOCUS
.....
Press
.................... Press
Press
page
again
49: .......
to exit from
Con_oi
P_ei:
For detaas
on us6g
6e
i:L_k
48.
tomoveme0nL-_reen_sorana presssELECT
ioseiect.
th-e-on-scr--een_-gidigilteditem_
TV's video
to Scan tl_rough
...................................................
_e
to yo_
.....
inputs.
Ch_eis_
..............
to adjust 6e voi_el
to acijust
66.
51.
--WNI--DEO.......................................-P_ssre---peat--ecl--ly thro-------ugh_--e--vid---eo-equi_-co_ted
to step
projection
_red'
Convergence
..........
(see page
36).
......
13
Setting
Up the Projection
Side of Front
TV
Panel
[]
[]
[]
S VIDEO 2iNPUT
Vi6E62 i6PUT
VIDEO/L(MONO)-AUDIO-R
14
Connects
to the S VIDEO
equipped
VHF/UHF
video component.
Provides
better
jacks or the Video IN jack.
Co_ect
to the audio
component,
OUT jack of your
and video
OUTiac_
camcorder
picture
or o_er
quality
on your camcorder
S VIDEO
than the
or other
Video
Setting
Up the Projection
TV
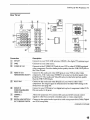
Rear Panel
DtGITAL
AUDIO
AEAR SpcJLKER OUT {lillll IL_
VH_HF
O0
O
--
.aS
oo
Y
o_._
"VIDEO
lZloo,o
J
-N
Connection
Description
[]
VHFiuHF
Connects
to your
VHF/UHF
[]
CABLE
Co_ects
to your
cable
[]
S vIDEO IN 11314
Co_ects
t0 the S _DEO
_]
[]
antenna
input.
O_
ja_
oi your vcR
better picture
quality
SviDE_quipped
than the VI-_/UHF
component.
A 6th video input (VIDEO 2) is located on the front panel of the
projection
TV. The Audio and Video IN jacks provide better picture quality
than the VHF/UHF
IN jack.
Co_e_
OUT jacks on your VCR or other
jacks or
Connect
..........
and video
or Other
VIDEO/L(MONO}-AUDIO-R
io _e audio an{i video _]acks
component.
Setup menu
[]
_
VIDEO IN 1/3/4
--SELEcTo01
to the audio
VHFiUHFis the digital
Sourcel .....................
video component. Provides
the Video IN jack.
[]
antenna.
The output signal
(see page 65).
HDiGvD
iN
co_ect
to your
(1080i/720p/480p/480i)
VIDEO IN 5/6
PR) and
audio
CONTROLS
Allows
the projection
IN/OUT
signals
to other
DIGITALAUDIO (OPTICAL)
OUT PCMIDOLBY DIGITAL
Connect to the optical
and PCM compatible.
D_
(L/R)
piayer;s
on-y0_
is determined
or digital
VCRor
video
other--video .........
by the SELECTOUT setting
_t-t0p
box;s component
video
in the
(Y, _'
jacks.
_
(iN) and Send (OF)
to r_eive
Sony infrared-controlled
audio
input
audio
of an audio
or video
component
remote
control
components.
that is Dolby
Digital
continued on next page
15
Setting
Up the Projection
73/
Connection
Description
[]
i.LINK$200
Used
[]
sewice 0niy
For Sony service
[]
REAR SPEAKER OUT
Used
for connecting
[]
sUBWOOFER
out
used
for C0nnecfing_
[]
AUDIO 007 ivA_Fix)
L(MONO)-AUDIO-R
connect
16
for connecting
u_
i.LINK
equipped
devices.
o_y.
optional
to the left and
rear speakers.
opti0nal
powered
right audio
inputs
subw00fer.
0f your audio
....
or video
component.
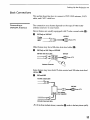
Setting
Up the Projection
TV
Basic Connections
This section describes
how to connect
cable, and CATV cable box.
Connecting
a
VHF/UHF Antenna
a VHF/UHF
antenna,
CATV
The connection
you choose depends
antenna you have in your home.
on the type of VHF/UHF
Newer
with
[]
homes
are usually
equipped
cable ([]):
VHF/UHF
cable
coaxial
[]
coaxial
VHF Only or VHF/UHF
75-ohm
Older
75-ohm
Rear of TV
_=__
homes
may have
300-ohm
twin lead cable (r_):
VHFOnlyor UHFOnly or VHF/UHF
300-ohm twin lead cable
VHFIUHF
Rear of TV
Antenna connector
Some homes
cables ( r_l ):
[]
may have
both
75-ohm
coaxial
and 300-ohm
twin lead
VHFand UHF
75-ohm coaxialcable
VHF/UHF
Rear of "rv
U/V Splitter
(not supplied)
300-ohm twin lead cable
_:_ Of the three methods shown, connection []
results in the best picture quality.
17
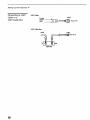
Setting
Up the Projection
Connecting
a CATV
Cable or a
CATV Cable Box
TV
CATV Cable
CABLE
75-ohm
coaxial
cable
__
RearofTV
CATV Cable Box
Cable
CABLE
_1_
|
IN
l
lOUT
Cable Box
18
Rear of TV
Setting
Connecting
Up the Projection
IV
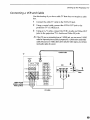
a VCR and Cable
Use this hookup
box.
if you have
cable TV that does not require
1
Connect
2
Using a coaxial cable, connect
projection
TV's CABLE jack.
3
Using an A/V cable,
jacks to the projection
the cable TV cable to the VCR's
the VCR's
a cable
IN jack.
OUT jack to the
connect the VCR's Audio and Video OUT
TV's Audio and Video IN jacks.
If the VCRyou are connecting has an S VIDEOjack, you can use an S VIDEO
cable for improved picture quality (compared to a combination audio/video
cable). Becausean S VIDEOcable carries only the video signal, you will also
need audio cables for sound.
Coaxialcable
W
VHF/UHF
C_ ,LE
@
VIDEO
IN
VCR
2
1
IY
--
Cable
AUDIO-R(red)
AUDIO-L(white)
VIDEO(yellow)
AN cable
19
Setting
Up the Projection
Connecting
TV
a VCR and Cable Box
Usethis hookupif
O
Your cable TV company
scrambles
some channels, but not all of
them (pay channels
vs. regular cable channels),
so you need to
use a cable box
O
You want
feature.
to use the Twin View or Scrolling
Channel
With this setupyou can
O Use the projection
TV remote control to change
your cable box when the signal is scrambled.
Index
channels
using
O
Use the projection
TV remote control to change channels
using
your projection
TV when the signal is not scrambled.
(Your
projection
TV's tuner provides
a better signal than the cable box.)
O
Use the Twin View and Scrolling
O
Record
both
regular
Channel
Index
cable TV and scrambled
features.
channels.
To connect a cable box and a VCR,you will need
O A small inexpensive
device known as a splitter.
O
Three
O
Either a combination
and audio cables.
1
2
3
4
5
Connect
short
coaxial
cables.
audio/video
cable,
the CATV cable to the single
or an S VIDEO
(input)
jack of the splitter.
Use a coaxial cable to connect one of the two output
splitter to the projection
TV's CABLE jack.
Use a coaxial cable to connect the other
to the input jack of the cable box.
Use a coaxial cable to connect
the input jack of the VCR.
the output
output
cable
jacks of the
jack of the splitter
jack of the cable box to
Use the video line (yellow) of a combination
audio/video
(A/V)
cable to connect the video output jack of the VCR to the video
input jack of the projection
TV.
If your VCRhas an SVIDEOjack, you can substitute an S VIDEOcable for
the video line of an AN cable. The S VIDEOcable will provide improved
video signal quality.
6
2O
Connect the left (white) and right (red) audio output channels
the VCR to the respective input jacks on the projection TV.
of
Setting
Up the Projection
TV
VCR
I
AUDIOR AUOIO L 910E0
Coaxial
cable
AN cable
Cable box _-1
IN
TV
3
oaxia,
_
VHF/UHF
_ble
©
Coaxial
cable
_,
SpliCer,
L _not Incluoed)
1
AUDIO-R (red)AUDIO-L (white)
VIDEO (yellow)
_:_ IMPORTANT - To usethe Twin View or Scrolling Channel Index feature or to
watch premium (scrambled) channelsthe VCR MUST BE TURNED ON;
otherwise, you will be unable to view them.
To view scrambled channels:
0
Press W/VIDEO on the remote control
to select the input to which
you connected
the VCR. Turn on the VCR, and make
sure the
VCR
change
input
selection
is set to RF Input.
Then
use
the
cable
box
to
channels.
To prevent the accidental switching of channels:
n
When
feature
using
a VCR
to lock
or cable
in a channel.
box,
you
For
details,
can use
the
see page
Channel
Fix
58.
21
Setting
Up the Projection
Connecting
TV
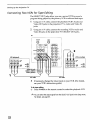
Two VCRs for Tape Editing
The SELECT OUT jacks allow you use a second VCR to record a
program
being played by the primary VCR to edit and dub tapes.
1
Using
Video
jacks.
an A/V cable, connect the playback
VCR's Audio and
OUT jacks to the projection
TV's Audio and Video IN
2
Using
Video
an A/V cable, connect the recording
VCR's Audio and
IN jacks to the projection
TV's SELECT OUT jacks.
TV
VHF/UHF
CABLE
@
O
VIDEO
IN
-_2VCR
(recording)
IZ iNl,°o,o
VCR(playback)
LINE
IN
IN
AUOIOR AU_40L VIOEO
UNE
AUDIO-L (white)---_
VIDEO (yellow)_
AUDIO-R (red) -- 7
AN cable
3
A/V cable
If necessary, change the video input
see your VCR's instruction
guide.)
To do tape editing
El Press WNIDEO on the remote
control
on your VCR. (For details,
to select
the playback
VCR.
You can selectthe output signal from the SELECTOUTjacks in the Setupmenu.
Fordetails, see page 65.
22
Setting
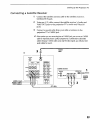
Connecting
a Satellite
|
Up the Projection
TV
Receiver
Connect
the satellite
SATELLITE
antenna
cable to the satellite
receiver's
IN jack.
2
Using
Video
jacks.
an A/V cable, connect the satellite receiver's
Audio and
OUT jacks to the projection
TV's Audio and Video IN
3
Connect a coaxial cable from your
projection
TV's CABLE jack.
cable or antenna
to the
If the receiver you are connecting hasan S VIDEOjack, you can use an S VIDEO
cable for improved picture quality (compared to a combination audio/video
cable). BecauseSVLDEOcables carry only the video signal, you will also need
audio cables for sound.
Coaxial
cable
W
VHF/UHF@
VIDEO
CABLE
IN
H D/DVD
IN
Satellite receiver
VHF_UHF
SJ,TEL_LJTe,_I
1
OUT_
AUBOg AUOm
L WOEO _'_
Satell
I
_
antenna
,. u.=o=l@
@@
/
I
I
I
cable
AUDIO-R(red)
AUDIO-L(white)
VIDEO(yellow)
AN cable
23
Setting
Up the Projection
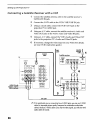
Connecting
TV
a Satellite
1
Receiver with a VCR
Connect
the satellite
SATELLITE
antenna
cable to the satellite
IN jack.
2
Connect
the CATV cable to the VCR's
3
Using a coaxial cable, connect
projection
TV's CABLE jack.
4
Using an A/V cable, connect the satellite receiver's
Audio
Video OUT jacks to the VCR's Audio and Video IN jacks.
5
Using an A/V cable, connect the VCR's Audio and Video OUT
jacks to the projection
TV's Audio and Video IN jacks.
6
If necessary,
change the video input
see your VCR's instruction
guide.)
Coaxial
cable
VHF/UHF
the VCR's
IN jack.
OUT jack to the
on your
antenna
Satellite
cable
Satellite receiver
VHF/UHF@
and
VCR. (For details,
cable
CAW
I:HFtUHF
VIDEO
receiver's
1
SATEL_=_
S VIDEO /_11_0 R AU_
L VIDEO
[]
!@®®® I=oo°
)I"
IN
AUDIO-R (red}
AUDIO-L (white)
VIDEO (yellow)
3
AN cable
Z:_ If the peripherals you are connecting have SVIDEOjacks, you can useS VIDEO
cables for improved picture quality (compared to combination audiolvideo
cables).BecauseSVIDEOcables carry only the video signal, you will also need
audio cables for sound.
24
Setting
Connecting
an Audio
Up the Projection
TV
Receiver
For better sound quality, you may want
to your stereo system's
audio receiver.
to connect
your projection
TV
To connect to an audio receiver
Use audio cables to connect the projection
TV's Audio
to the audio receiver's
audio LINE IN jacks.
OUT jacks
W
REARSPEAKER
OUT Ml# f_)
AUDIO-R
(red) _
@0
@
@o
e
AUDIO-L
(white)
@
@
input
25
Setting
Up the Projection
TV
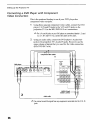
Connecting
a DVD Player with
Video Connectors
Component
This is the preferred
hookup
component
video out jacks.
1
to use if your
DVD player
has
Using three separate component
video cables, connect the DVD
player's
Y, PB and PR jacks to the Y, PB and PR jacks on the
projection
TV. Use the HD/DVD
IN 5 or 6 connections.
The ¥, PBand PRjacks on your DVDplayer are sometimeslabeted Y,CBand
CR,or Y,B-Y and R-Y.If so, connect the cables to like colors.
2
Using an audio cable, connect the DVD player's
Audio OUT
jacks to the projection
TV's Audio IN jacks. Be sure to use the
same column of inputs that you used for the video connection
(HD/DVD
IN 5 or 6).
,TT
Componentvideo cables
W
I
VHF/UHF
1
:AB
©
DVD player
VIDEO
IN
S VIDt_O
VIDEO -
AD_I_
R--
AUDIO-R (red) _
2
Audio cable
AUDIO-L (white) _
You cannot record the signal from any equipment connected into the Y,PB,PR
jacks.
26
Setting
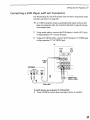
Connecting
a DVD Player
with
Up the Projection
TV
A/V Connectors
Use this hookup
if your DVD player
out jacks (as shown on page 26).
does not have component
video
An SVIDEOconnection will give a good-quality video signal, but if your DVD
player has component video, that connection (describedon page 26) will give
an even better signal.
1
2
Using audio cables, connect
to the projection
TV's Audio
the DVD player's
IN jacks.
Audio
Using an S VIDEO cable, connect the DVD player's
to the projection
TV's S VIDEO jack.
OUT jacks
S VIDEO jack
TV
VHF/UHF
CABLE
@
VIDEO
@
IN
S VIDEO
cable
DVD player
LINE OUT
AUDtOR AUDIOL VIDEO
S VIDEO
2
_
AUDIO-R(red)
AUDIO-L(white)
Audiocable
To switch between your projection TV,VCRand DVD
C3 Press WNIDEO to switch from one input device
to another.
27
Setting
Up the Projection
Connecting
TV
a Camcorder
For easy connection
of the camcorder,
the projection
TV has front
Audio and Video inputs (shown below). If you prefer, you can
connect the camcorder
to the projection
TV's rear Audio and Video
IN jacks.
[]
Using A/V cables, connect
OUT jacks to the projection
the camcorder's
Audio
TV's Audio and Video
and Video
IN jacks.
Insidethe front panel
of the projectionW
I
Pushto open
Camcorder
If you have a mono carncorder,
connect
projection
TV's AUDIO L jack.
its audio
output
to the
If the camcorder you are connecting has an S VIDEOjack, you can use an
SVIDEOcable for improved picture quality (compared to a combination
audio/video cable). BecauseS VIDEOcables carry only the video signal, you
will also need audio cables for sound.
28
Setting
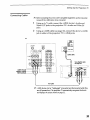
Connecting
a Device
with
an Optical
Up the Projection
IN Connector
You can use the projection
TV's DIGITAL AUDIO OPTICAL
OUTPUT jack to connect an audio device that is Dolby Digital
PCM compatible,
such as an audio amplifier.
O
TV
and
Using an optical cable, connect the device's DIGITAL AUDIO IN
jack to the projection
TV's DIGITAL AUDIO OPTICAL OUTPUT
jack.
Audio amplifier
I
Opticalcable
W
Theoptical output works only for DW programming, so you might also want to
connect the projection lV's analog audio out connectors to the amplifier's
analog audio in connectors, as described on page 25.
29
Setting
Up the Projection
Connecting
TV
i. LINK Compa tible
Devices
This projection
TV is equipped with i.LINK, which provides
a secure
digital interface to other digital home entertainment
devices,
including
digital cable set-top boxes, i.LINK allows for the secure
transfer of copyright-protected
high-definition
content between these
devices and your digital television.
At the time this TV went to market, the Sony digital cable set-top box (DHGM55CV) is the only i.LINK device that is verified to be compatible with this W.
Someearly versions of the Sony digital cable set-top box (DHG-M55CV) may
not support an i.LINK digital connection to your W. If you have difficulty with
the connection between your Sony digital cable set-top box (DHG-M55CV)and
your W, contact Customer Information ServiceCenter at 1-800-222SONY(7669).In most casesyou can continue to useyour set-top box with your
TV,using and analog audio/video connection (as shown on page 31), instead
of the i.LINK digital connection (also shown on page 31).
For more information
Using i.LINK
Cables
about
i.LINK,
see "About
on page
73.
This projection
TV has two 4-pin $200 i.LINK terminals.
You can use
any of the following
i.LINK cables with the projection
TV:
4-pin i.LINK cable
Sony Model Number
Length
VMC-IL4415
1.5 meters
VMC-IL4435
3.5 meters
Do not use cables other than the types listed above.
3O
i.LINK"
Setting
Connecting
Up the Projection
TV
Cables
_:_ Beforeconnecting this unit to i.LINK-compatible equipment, seethe instruction
manual of the i.LINK device to be connected.
1
Using
Video
jacks.
2
Using an i.LINK cable (see page 30), connect the device's
jack to either of the projection
TV's i.LINK jacks.
an A/V cable, connect the i.LINK device's Audio and
OUT jacks to the projection
TV's Audio and Video IN
i.LINK
TV
_010
VHF/UHF
VIDEO
sv,oEo
D° i
CABLE
@
,
@
IN
I
(_
LUNKLS200
$OU_ T
( '_
Iv
_able
Sonydigital cable
set-top box
AUOIO-R(red)
AUDIO-L(white)
VIDEO(yellow)
_ble
._m i.UNK devices can be "hotplugged" (connected and disconnected while they
are still powered on). The projection TV automatically recognizesthe device
and displaysthe screenshown on page 33.
31
Setting
Up the Projection
Notes on Connecting
i.LINK Devices
TV
As additional
compatible
i.LINK devices are introduced in the future,
observe the following
when connecting
devices to the projection
TV.
[]
To connect two or more i.LINK-capable
cables to connect them as shown below.
devices,
use i.LINK
i.UNK
[]
You can connect up to 63 i.LINK devices. However, the
maximum
number
of cables in any serial route is 16.
i.UNK
I,LINK
LLINK
I.LINK
i.LINK
Do not connect
i.LINK
i,LINK
devices
in a way that creates
a loop.
i.UNK
i.UNK
O
32
Connecting
non-compatible
PC peripherals,
may result
devices, such as camcorders,
in malfunctions.
PCs, or
Setting
Completing
Setup
i.LINK
Before you can use an i.LINK device
to register the device as follows.
1
with
Up the Projection
the projection
TV
TV, you need
After you've connected
the cables (as described
on page 31), first
turn on the projection
TV, and then turn on the i.LINK device(s).
The following
screen automatically
appears.
SonyOHG_55cv
Ooyouwamtaadd
_dev_?
To add the i.LINK
device,
highlight
Add and press
Q.
_:_ If you select Cancel, the i.LINKdevice is set up as "hidden" and it does
not appear in the i.LINK Control Panel.To seethe device in the i.LINK
Control Panel,change the i.LINK Setupoption from Hide to Show in the
Setup menu (see page 65).
2
If you selected Addin step 1, and the device requires an analog
video connection
(see the device's
instruction
manual),
the
following
screen appears.
_:_ Depending on the i.LINKdevice you are setting up, this screenmay not be
displayed. In this case, the device'svideo input will be displayed as N/A.
3
Move the joystick t1"and _, to highlight
the video input (VIDEO 1-4)
that connects the i.LINK device to the projection
TV. If you don't
need an analog video connection,
select None. Then press Q.
A confirmation
screen appears, which indicates the i.LINK device
name and video input. The device is now available in the i.LINK
Control Panel (see page 48).
Formore information
To change the setup of the i.LINK device,
For details, see page 65.
For information
C]
For general
on using
information
the i.LINK
about
i.LINK,
use the Setup
Control
Panel,
see page
menu.
see page 48.
73.
33
Setting
Up the Projection
TV
Using the CONTROL S Feature
CONTROL
S allows you to control your system and other Sony
equipment
with one remote control. In addition
to allowing
you to
control multiple
devices with one remote control, the CONTROL
S
feature allows you to always point your remote control at your
projection
TV, instead of having to point it at the other equipment,
which might be hidden or out of direct line of sight.
Use CONTROL
S IN to send
signals
to the projection
Use CONTROL
S OUT to send signals
W
VHF_JHF
CABLE
@
@
VID_EO IN
HD/DVQ IN
0_T
(Iron
CONTROL
34
S1
to connected
TV.
equipment.
Setting
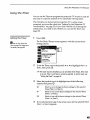
Setting
[]
Up the Projection
The initial setup screensappear
only after turning on the projection
TV the first time, or after selecting
Factory Resetin the Setup menu
(page 66).
If you need to set the clock at a
later time, press the TIMER button
on the remote control (see
Up the Projection
TV
TV Automatically
The first time you turn on the projection
TV, a series of screens guide
you through
the initial setup of the projection
TV. During this setup,
you are prompted
to set the clock and start Auto Program,
which
searches
for and stores a list of analog and digital channels
you are
receiving
for VHF/UHF
and CABLE inputs.
_:_ Be sure to complete all connections before turning on the projection TV the
first time.
1
Press POWERto turn on the projection
screen.
TV and display
the Welcome
page 49).
You can also run Auto Program at
any time from the Channel Setup
menu (see page 58).
2
3
4
5
Press
C) to continue
Setup.
The set clock screen
appears.
Move the joystick 4, and !, to set the current day and time (hour,
minute, and AM/PM).
Press (_) or move the joystick ,_ to confirm
each setting and move to the next setting. Move the joystick _. to
go back to the previous
setting.
After you've set the clock, move the joystick ._ to highlight
and press (_) to continue
Setup. The Auto Program
screen
appears.
To start Auto
Program,
press
(_ to select Auto Program.The
projection
TV automatically
creates a channel list of analog
digital channels.
(This may take a few minutes.)
6
]You
can run the
demonstration again by
selecting Demo from the Setup
menu (see pages 64 to 66).
When the channel
appears.
Next
list is complete,
a Congratulations
and
screen
To see a short demonstration
of the features of the projection
TV,
press C) to select Demo. A self-running
introduction
to the features
of the projection
TV begins. To exit the demo at any time, press
any button on the remote control (or front panel).
To skip the demo and exit Setup,
Done and press (_)
move
the joystick
* to highlight
35
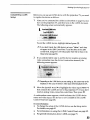
Setting
Up the Projection
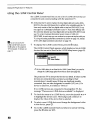
Adjusting
TV
the Convergence
Automatically
(Flash Focus)
The projection
tube image appears on the screen in three colors (red,
green and blue). If they do not converge, the color is poor and the
picture blurs.
Before you use your projection TV, be sure to adjust the convergence.
The Flash Focus feature allows you to adjust the convergence
automatically.
It is recommendedthat you perform Flash Focusabout 30 minutes after the
projection TV is first turned on,
1
2
Tune to a TV or cable TV program.
Press FLASHFOCUSon the front panel
page 13).
of the projection
TV (see
The cross pattern appears and Flash Focus begins to work.
adjustment
is completed
when the TV picture returns.
I-L
.i L
L _ _l Jo.
i i
LI
To Obtain Optimum
Convergence
for
Digital TV Programs
36
The
•
The optimum
convergence
alignment
varies with digital TV formats.
Whenever
you find that the picture blurs, press FLASHFOCUS.
Youcannot perform any other functions until FlashFocushas completed its
cycle. If you perform any other operation while Flash Focusis in progress,the
Flash Focusoperation is canceled.
Overview
This chapter
describes
how to use features
Topic
of your
projection
TV.
Page
Using
the Program
Guide
Using
the Scrolling
Channel
Using
Favorite
Using
Wide
Using
Twin View
Using
the Freeze
Function
Using
the i.LINK
Control
Using
the Timer
38
Index
Channels
39
40
Screen Mode
43
44
47
Panel
48
49
37
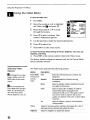
Using the Projection
TV Features
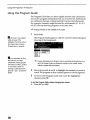
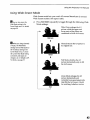
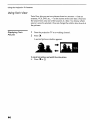
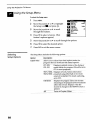
Using the Program
Guide
The
and
are
For
4.4,
Program
Guide lets you select digital channels
and subchannels
review program
information
from an on-screen
list. Subchannels
additional
channels
of programming
broadcast
simultaneously.
example,
channel 4 might include five subchannels
(4.1, 4.2, 4.3,
4.5) that are showing
programs
at the same time.
Analog channels are not available in the Guide.
Press GUIDE.
[]The
Guide is not available
The Program Guide appears,
showing
in the background.
while using any of the
multipicture functions, such as
Twin View, Freeze,Scrolling
Channel Index, or Favorites.
with
the currently
selected
program
Im As an alternative to using
the Guide you can select
subchannelsdirectly using the
0-9 buttons and the C) button
on the remote control. For
example, to select channel 4.1,
press (_) + C) + (_) and then
ENTER.
Program information in the Program Guide is provided by the broadcasters.As a
result, the Program Guide may sometimes include only the channel number
without a program title or description.
2
3
Move the joystick tt and _ to highlight
the channel you want to
watch.The
program
on that channel appears in the background.
To remove the Program
channel, press C).
Guide
and watch
the highlighted
Toexit the ProgramGuidewithout changingthe channel
Press EXITor GUIDE.
38
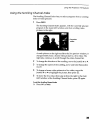
Using the Projection
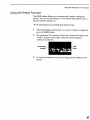
Using the Scrolling
Channel
Index
The Scrolling Channel Index
index of video pictures.
1
TV Features
lets you select programs
from a scrolling
Press INDEX.
The Scrolling Channel Index appears, with the currently
selected
program
in the main (left) window, and four scrolling video
pictures in the right.
window
As each picture on the right scrolls to the live preview window, it
changes briefly from a frozen video picture to a live video. The
right side continues
to scroll through the entire channel list.
2
3
4
5
To change
the direction
To change
tt or _.
the speed
of the scrolling,
of the scrolling,
move
move
the joystick
and hold
the joystick
To change a frozen video picture to a live video, move
joystick 4" or • to highlight
the picture, then press _).
To move the live video (from
(left) window
of the Scrolling
t or _.
the
step 4) from the right to the main
Channel Index, press Q again.
Toexit the ScrollingChannelIndex
0
Press EXITor iNDEX.
39
Using the Projection
TV Features
Using Favorite Channels
You can store up to 16 of your favorite channels
in the
Channels
list. You can use the Surf Favorites feature to
select channels
directly from the list. You can also edit
Channels
list to change the channels
that are included
Adding Favorite
Channels
Tune to the channel
and press ADD.
you want to save to the Favorite
A message appears,
indicating
Favorite Channels
list.
2
To add more
channels
that the channel
(to a total of 16), repeat
Favorite
preview and
the Favorite
in the list.
Channels
was stored
list
in the
step 1.
If you try to add more than 16 channelsto the FavoriteChannelslist
A message
appears,
indicating
that the Favorite Channels
list is full.
To change the Favorite Channels
list, select Edit(then see "Editing the
Favorite Channels
List" on page 42). Or to cancel storing the channel,
select Cancel.
If you try to add a digital subchannelto the Favorite Channelslist
Only the major channel number
is saved as a Favorite Channel.
For
example,
if you are watching
channel 51.4 and you press ADD, only
channel 51 is saved as a Favorite Channel.
Then, when you surf to
Favorite Channel 51, the projection
TV tunes to channel 51 or the first
available
digital subchannel
it finds (channel 51.1, 51.2, etc).
4O
Using the Projection
Surfing the Favorite
Channels List
1
Press SURF.
The Surf Favorites
screen appears,
program
in the main (left) window.
[]The
TV Features
with
the currently
selected
letter "C" indicates that
the FavoriteChannel is a cable
channel.
Main
Window
Window
Favorite
Channels
2
To see a preview of a program
on your Favorite Channels,
move
the joystick tt or 4 through
the Surf Favorites
list. A preview of
the highlighted
channel, when available,
appears
in the preview
window.
_:_ Digital channels are displayed as a black box in the preview window.
If more than eight Favorite Channels
are set, indicated
by scroll
arrows (tt 4,), move the joystick • or _, to see the additional
Favorite Channels.
3
To remove the Surf Favorites
channel,
press C).
list and watch
the highlighted
To exit the SurfFavoriteslist without changingthe channel
Press EXITor SURF.
41
Using the Projection
TV Features
Editing the Favorite
Channels List
1
Press MENU.
2
Move
the joystick
press
Q.
Move
the joystick
3
The
[]The
Favorite
to highlight
the
Setup
icon
to highlight
Favorite Channels and
press
Channels
Channel
[]
and
_).
list appears.
letter "C" indicates
that the Favorite Channel is a
cable channel,
If more than nine Favorite Channels
are set, move
or 4 to see the other Favorite Channels.
4
5
To select
highlight
a Favorite (1-16) to edit, move
the number and press _).
the joystick
the joystick
Move the joystick t or • to scroll through
preview of the highlighted
channel, when
the preview window.
t or • to
the channel list. A
available,
appears
in
Digital channels are displayed as a black box in the preview window.
6
To set the channel
To set additional
[]
Repeat
to the
Favorite
Channel
list, press
C).
channels (to a total of 16)
steps
4 to 6.
To clear a Favorite Channel from the list
After
step
4, press
the
To exit the Edit Favorites list
Press
42
EXIT.
RESETbutton
on the
tt
remote
control.
Using the Projection
TV Features
Using Wide Screen Mode
]You
can also accessthe
Wide Mode settings in the
ScreenMode menu. Fordetails,
Wide
Screen
mode
Wide
Screen
modes
[]
lets
you
(16:9
watch
aspect
Press WIDEMODErepeatedly
Mode settings.
4:3 normal
broadcasts
in several
ratio).
to toggle
through
Wide Zoom
the following
enlarges
Wide
the 4:3
see page 56.
picture, while the upper and
lower parts of the picture are
condensed
to fit the 16:9 screen.
[]
Normal returns the 4:3 picture to
its original size.
When you change channels
or inputs, the Wide Mode
settings revert to Wide Zoom (or
the 4:3 Default setting in the
ScreenMode menu). To retain
the current Wide Mode setting
as channels and inputs are
changed, set 4:3 Default to Off.
Fordetails, see page 57.
Normal
!,
Full Mode
stretches
picture horizontally
the 16:9 screen.
the 4:3
only, to fill
Full
Zoom
Mode
enlarges
the 4:3
picture horizontally
and
vertically
to an equal aspect ratio
that fills the 16:9 screen. Useful
for watching
Letterbox
movies.
Zoom
J
43
Using the Projection
TV Features
Using Twin View
Twin View lets
antenna,
VCR,
the sound from
source's
sound
the pictures.
Displaying
Pictures
Twin
you see two
DVD, etc., -only one of
is selected.)
1
Tune the projection
2
Press
pictures from two sources -- from an
on the screen at the same time. (You hear
the sources at a time. You choose which
You can change the relative size of each of
TV to a working
channel.
1_.
A second
picture-window
appears.
Tocanceltwin picturesand watch the active picture
Press _ or C)
44
Using the Projection
Activating
Picture
the
With Twin View, the picture
picture, you can:
highlighted
TV Features
in blue is active.
In the active
:n
Change
channels.
[]
Adjust
the volume.
[]
Switch the input sources (to go from UHF/VHF
to cable, for
example,
press ANTor WNIDE0 on the remote control).
[]
Change
the picture
size by moving
Toactivate the right picture
[]
Move the joystick ,_.
the joystick
tl, or _.
To activate the left picture
[3 Move the joystick _,.
Factors affecting Twin View include
[]
If you use a cable box to view all channels,
the same channel
appears
in both windows
of Twin View because the cable box
unscrambles
only one channel at a time.
[]
If you use a cable box, you can view the cable box output in one
Twin View window
and view a signal from a different source
(such as a VCR or DVD player) in the second window.
Digital channels
6 inputs display
right.
and equipment
connected
to VIDEO 5 or VIDEO
in the left Twin View window
only, but not the
[]
If you are viewing a 4:3 source and a 16:9 enhanced
as a DVD) side by side in Twin View, the 4:3 source
larger.
[]
Twin View is not available
while
viewing
i.LINK
source (such
will appear
devices.
45
Using the Projection
Changing the
Picture Size
TV Features
The zoom
pictures.
feature
lets you vary the relative
1
Activate
the picture
you want to change.
2
Move the joystick
the picture.
tt to enlarge
3
Move the joystick
picture smaller.
• to make
whose
size of the left and right
size
the
When you adjust the twin screen sizes, the projection
TV memorizes
the change. The next time you use the Twin View function,
the
memorized
sizes appear.
46
Using the Projection
TV Features
Using the Freeze Function
The FREEZE
button allows you to temporarily
capture a program's
picture. You can use this feature to write down information
such as
phone numbers,
recipes, etc.
The Freezefeature is not available while using Twin View.
1
2
When the program
information
press the FREEZEbutton.
you want
to capture
The projection
TV switches
to Twin View mode and displays
"frozen"
picture on the right, while the current program
continues
on the left.
Currentprogram
inprogress
3
is displayed,
To cancelandretumto
bu_on.
the
Frozen
normalviewing,
press
theFREEZEorEXIT
47
Using the Projection
TV Features
Using the i.LINK Control
Panel
The i.LINK Control Panel lets you see a list of i.LINK
connected
to and communicating
with the projection
B
that are
At the time this W went to market, the Sony digital cable set-top box (DHGM55CV) is the only i.UNK device that is verified to be compatible with this W.
Someearly versionsof the Sonydigital cable set-top box (DHG-M55CV) may
not support an i.LINK digital connection to your W. If you have difficulty with
the connection between your Sonydigital cable set-top box (DHG-M55CV) and
your TV,contact Customer Information ServiceCenter at 1-800-222SONY(7669).In most casesyou can continue to use your set-top box with your
W, using and analog audiolvideo connection (as shown on page 31), instead
of the i.LINKdigital connection (also shown on page 31).
Youcan also accessthe
i.LINK Control Panel using the
the |, button on the projection
devices
TV.
I
To display
the i.LINK
Control
Panel,
press
the _ button.
The i.LINK Control Panel appears, which displays a list of i.LINK
devices that are set to Show in the i.LINK Setup menu (page 65).
W's front panel. Fordetails, see
page 13.
Z:_ If the i.LINK device is not listed in the i.LINKControl Panel,you need to
change the i.LINK Setupoption from Hide to Show (see page 65).
The projection
TV is always the first device listed. If other i.LINK
devices are connected,
they are listed according
to their
manufacturer's
model name. If there are duplicate
models
connected,
they are also designated
a number
(1,2,3, etc.). If a
device is unknown,
it is listed as "Device."
If no i.LINK devices are connected
to the projection
TV, the
message
"There are no i.LINK devices available"
is displayed.
2
3
4
48
To check the status of an i.LINK device, move
to highlight
the device name. The background
display the video of the device that is selected.
To select a new i.LINK device
to that device, press C).
and change
To exit the i.LINK Control Panel
press the _ button (or EXIT).
and return
the joystick 4, or
continues
to
the background
to normal
video
viewing,
Using the Projection
TV Features
Using the Timer
You can use the Timer to program
the projection
and tune to a specific channel at two scheduled
TV to turn on and off
viewing times.
The first time you turned on the projection
TV, a setup screen
prompted
you to set the clock (see "Setting Up the Projection
TV
Automatically"
on page 35). If you didn't set the clock during this
initial setup, you need to set it before you can use the Timer (see
page 50).
Setting
[]You
the Timer
1
Press
TIMER.
The Set Clock/Timers
settings shown.
can also accessthe
screen
appears,
with
the current
timer
Timer through the Setup menu.
Fordetails, see page 66.
2
To set the Timer, move
Timer2, then press C).
the joystick
t or • to highlight
Timer 1 or
The clock must be set before you can set either of the Timers.If the clock
is not set, Timer I and Timer 2 cannot be selected.To set the clock, see
"Setting the Clock" on page 50.
3
4
Move the joystick • or • to highlight
options, then press (_).
one of the following
Set
Select to set or change the timer settings for the selected
_mer (Timer 1 or Timer 2).
On
Select to turn on the timer settings for the selected TLrner
(Timer 1 or Timer 2).
Off
Select to turn off the timer settings for the selected TLrner
(Timer 1 or Timer2).
If you selected
Set in step 3, the setup
screen
for the selected
Timer
(Timer 1 or Timer 2) appears.
49
Using the Projection
IV Features
5
Move the joystick t and • to set the day(s), time (hour, minute,
AM/PM),
duration,
and channel number. Press _) or ,_ to
confirm each setting
back to the previous
6
After you've
and move
setting.
set the channel
settings. The settings
Timer is set to On.
to the next setting.
number,
are displayed
press
Press _, to go
C) to save the Timer
in the Timer
screen
and the
The projection
TV is now set to turn on, tune to the channel you've
set, and then turn off at the times you set for that Timer. The Timer
indicator
on the front panel indicates
the Timer is set.
Toturn a Timer setting on or off
[]
Select On or Off in step 3 (page 49).
To changea Timer setting
n
Set the timer (Timer 1 or Timer 2) again. The old timer
overwritten.
setting
is
To set a secondTimer setting
[]
Set the other unset timer (Timer 1 or Timer2).
Setting
[]
the Clock
You can also accessthe
Timer through the Setup menu.
Fordetails, see page 66.
If you didn't set the clock during the projection
TV's initial setup (see
page 35), you need to set it before you can set either of the Timers.
1
TIMER.
The Timer
2
3
4
5O
Press
Move
Setup
the joystick
screen
appears
(as shown
tt or • to highlight
on page
49).
Set the Clock, then press
Q.
Move the joystick • and { to set the current day and time (hour,
minute, and AM/PM).
Press _) or move the joystick ,_ to confirm
each setting and move to the next setting. Move the joystick (, to
go back to the previous
setting.
When you finish
clock settings.
setting
the day and time, press
_) to save the
Overview
TO open and choose a menu
1
Press MENU to display
2
Move the joystick
tt or • to highlight
want to select and press _).
3
Move
4
See the specific
the menu.
The Menu
Menu Icon
To end a menu session
Press
the joystick
the menu
screen.
the icon of the menu
It or • to scroll through
menu
gives you access
the options.
page for instructions
to the following
you
on moving
through
features:
Description
Page
The
allowsletsyou
make adjustments
your Video
picture menu
settings,
you tocustomize
the Picture to
Mode based on the type of program
you are viewing,
and more.
52
Thelistening
Audio menu
offers audio
enhanced
audio options
as
to second
programming
(SAP),such
customizing
the Effect of the sound on your
projection
TV, and more.
54
ModeScreen
The
adjustments
Mode
vertical center.
56
EXIT.
U
menu
and make
allows changes
you to to
make
the screen's
Wide
To move from one menu to
another
Move
return
the joystick (. to
to the menu icons.
The Channel
Setup menu allows you to edit your
Favorite Channels
list, run the Auto Program
function,
and more.
58
The Parental
viewing
of programs
Control
60
Move the joystick tt or •
to choose the next menu
icon and press
select it.
C) to
menu
based
lets
on their
you control
ratings. the
The Setup menu provides
options for setting up
your system, including
selecting closed caption
modes, setting the Tuner, labeling Video inputs,
changing
language
the status of i.LINK devices, selecting
of the on-screen menus, and more.
64
the
51
Using the Projection
TV Menus
Using the Video Menu
To select the Video menu
1
2
3
Press
MENU.
irlli,]
P_ture Mode
Move the joystick
the Video icon !!
• or $ to highlight
and press Q.
]
Picture
Brightness
L/mlj
CoLor
Hue
Press
(_) to select
feature's
a feature.
adjustment
]
That
Color Tern_ure
Use the joystick
6
PressC)
7
Press EXITto exit the menu
to make
A|tet
DRC Mode
hate Video
Cool
Aliernate
Interlaced1
[]
appears.
5
_
Sh_l_mss
Move the joystick + or • to scroll
through the features.
]
4
Vk_d
the desired
adjustments.
to select/set.
screen.
To restore the factory default settings for Picture, Brightness, Color, Hue, and
Sharpness, Color Temp
O
Press RESETon the remote
control
when
in the Video menu.
The factory default settings
that is currently
selected.
Selecting
Options
Video
IKI To change from one Video
Mode to another, use the PIC
MODE button on the remote
control.
m
The Video menu
includes
Option
Description
Picture Mode
Vivid
for enhanced
picture
contrast
for Normal
Viewing
Recommended
conditions.
Movie
Select to display a finely
low-light
environments.
Game
Select
to reduce
(Picture, Brightness, Color, etc).
Pro
Adjust
decrease
Brightness
Adjust
Select to display
enhancements.
to increase
picture
to brighten
picture
contrast
and
contrast
picture
for
of artifacts,
in graphics
and
in a video game). Game
improve the picture
with noisy or poor signal
a picture
and soften
or darken
detailed
the visibility
which often appear
animation
(such as
can also be used to
quality on channels
reception.
Picture
Mode
options.
Standard
Movie, etc.) by changing the
other video menu options
52
only for the Picture
sharpness.
Youcan customize each
Picture Mode (Vivid, Standard,
the following
Select
Preset picture
viewing
modes
are restored
with minimum
and deepen
the color.
the picture.
the color or
Using the Projection
TV Menus
Option
Description
Color
Adjust
to increase
or decrease
color intensity.
Hue
Adjust
to increase
or decrease
the green
Sharpness
Adjust
to Sharpen
Or Soften
Color
Choose
Temperature
White
€001
Select
to give the white
colors
a blue tint.
Neutral
Select
to give the white
colors
a neutral
colors
a red_t
intensity
adjustment
Warm
from
...........
three
tones.
_e picture.
color temperatures:
Selec_t'to give the
white
tint.
(NTSC-Standard).
!
ILITo change from one DRC
Mode to another, usethe DRC
button on the remote control.
DRCMode
Digital
Creates
quality
a high-resolution
picture
sources (i.e., DVD player,
with 4x density, for high
satellite receiver).
Reality
Creation
interlaced
Recommended
for moving
Progressive
Recommended
for still images
CineMotion
Provides
an optimized
automatically
detecting
pictures.
and text.
display by
film content
and
applying
a reverse 3/2 pulldown
process.
Moving pictures
will appear clearer and
more naturaMooking.
Alternate
Video
Allows
current
you to select from the available video streams
program.
(For example,
a sporting event that
broadcasts
multiple
video
for the
streams.)
To select an alternate
video source, move the joystick t or _,
to select an alternate
video option and press C). (Unavailable
when alternate
video streams
are not broadcast.)
53
Using the Projection
U
TV Menus
Using the Audio
Menu
To select the Audio menu
1
2
3
4
Press
MENU.
[]
Q
[]
[]
[]
Move the joystick t or € to scroll
through the options.
That
5
Use the joystick
6
Press
C) to select the desired
7
Press
EXITto exit the menu
to scroll through
Treble
Bass
Eaiame
Move the joystick t or € to highlight
the Audio icon [] and press Q.
Press C) to select an option.
option's
settings appear.
Ib_,ltltt
m===l=====
====ll====
_ect
Dol_ Surround
Stereo
Speake_
Seep
AhernateAuclio
A|t_e
the settings.
setting.
screen.
To restore the factory default settings for Treble, Bass, and Balance
Press RESETon the remote control
when in the Audio
menu.
Selecting
Options
]To
Audio
change from one Effect to
another, usethe q_ burton on the
The Audio
menu
includes
the following
Option
Description
Treble
Adjust
to increase
or decrease
higher-pitched
Bass
Adjust
to increase
or decrease
lower-pitched
Balance
Adjust
to emphasize
Effect
inside panel of the remote
control.
left or right speaker
Oolby
Select for surround
Surround
programs
Simulated
Adds
sounds.
sounds.
balance.
sound
(for stereo
only).
a surround-like
programs
m
IKITo change from one MTS
Mode to anothe_ use the
MTS/SAPbutton on the remote
control.
options:
(requires
stereo
effect to mono
optional
or mono
rear speakers).
OFF
Normal
reception.
MTS
Enjoy stereo,
Stereo
Select for stereo reception
when
program
broadcast
in stereo.
bilingual and
mono programs
Auto SAP
Seiect to automatically
switch
TV to second audio programs
viewing
the projection
when a signal
is received. (If no SAP signal is present,
projection
TV remains in Stereo mode.)
Mono
54
Select for mono reception.
noise during weak stereo
a
(Use to reduce
broadcasts.)
the
I
Using the Projection
TV Menus
Option
Description
Speaker Setup
Speaker
Select to control which of the projection
speakers
are active. Select from
Front/Center/Rear, Front/Center, and Off.
Subwoofer
Select Whether you are Using a powered
subwoofer
(Yes) or not (No).
Test Tone
"l'ou can use the test tone to compare
speaker
output
levels.
TV's
the
Use Center Level/Rear
Level and FrontBalance/Rear Balance to adjust
the levels while the test tone is on. When
select On, a test tone is output from each
speaker, as follows:
B No test tone is output from
the subw00fer.
you
If Speaker is set to Front/Center/Rear:
Left --, Center-_ Right --* RightRear--* LeftiRear
If Speaker is set to Front/Center:
Left --* Center ---* Riqht
f
To turn
off the test tone, press
MENU or EXIT.
(Available
only when Effect is set to Dolby
Surround and Speaker is set to Front/Center/Rear or
Front/Center.)
Center Level
Select to adjust the relative volume
level of
the center speakers. (Available only when
Effect is set to Dolby Surround and Speakeris set
to Front/Center/Rear or Front/Center.)
Rear Level
Select to adjust the relative volume level of
the rear speakers. (Unavailable
to Off or Front/Center.)
Front
Balance
Select to adjust
front speakers.
Off.)
if Speaker is set
the left to right balance of the
(Unavailable
if Speaker is set to
Rear Balance Select to adjust the left to right balance of the
rear speakers. (Unavailable
if Speaker is set to
Off or Front/Center.)
Subwoofer
Level
Select to adjust the relative volume level of
the subwoofers. (Unavailable
if Speaker or
Subwoofer is set to No.)
Alternate Audio
Cycles through
the available
program. (For example,
multiple
commentators.)
audio tracks for the current
a sporting
event that broadcasts
55
Using the Projection
TV Menus
Using the Screen Mode Menu
To select the Screen Mode menu
1
Press
2
Move
MENU.
the joystick
the Screen
3
Move
Selecting Screen
Mode Options
IK_ To change from one Wide
Mode to another, use the WIDE
MODE button on the remote
control.
t or _, to highlight
Mode
icon
the joystick
through
4
[]
the
Press Q
feature's
[]
and press
[]
That
Use the joystick
6
Press
C) to select the desired
7
Press
EXITto exit the menu
[]
to scroll through
menu
includes
the options.
option.
screen.
the following
options:
Option
Description
Wide Mode
Select a Wide
Mode to use for
Wide Zoom
Select to enlarge the 4:3 size picture, while
the upper and lower parts of the picture are
condensed
to fit the wide screen.
4:3sources.
Normal
seiect tO re_
mode.
Full
Select
Zoom
(Wide
_e
to enlarge
horizontally
56
_
features.
to select a feature.
options
appear.
Mode
WideZoorn
VVideZoom
t or • to scroll
5
The Screen
(_.
WideMode
4,3 Default
VerticalCenter
4:-3 picture
to normal
the 4:3 picture
only, to fill the wide
screen.
Select to enlarge the 4:3 picture
horizontally
and vertically
to an equal
aspect ratio that fills the wide screen.
Mode
is unavailable
while
in Twin View.)
Using the Projection
m
If4:3 Default is set to
anything but Off, the Wide Mode
Opiion
Description
4:3 Default
Wide Zoom
Select the default
Screen Mode to
use for 4:3 sources.
setting changes only for the
current channel. When you
change channels (or inputs),
Wide Mode is automatically
replaced with the 4:3 Default
....
Seiect
to enlarge
the upper
condensed
Select to return
mode.
Full.........
Select
aspect
picture
w_e
the 4:3 picture
are
to normal
..........
only, to fill the wide
to enlarge
horizontally
setting. To retain the current
Wide Mode setting as channels
the4:3
to enlarge
horizontally
Se[_t
the 4:3 size picture,
and lower parts of the picture
to fit the wide screen.
Normal .....
Zoom
TV Menus
screen.
the 4:3 picture
and vertically
to an equal
ratio that fills the wide
screen.
6fi...................
and inputs are changed, set 4:3
Default to Off.
Mode
setting
when
the channel
or input
is
changed.
Vertical Center
Allows you to move the position
down in the window.
(Available
Zoom modes.)
Move
the joystick
of the pic_re
up and
only in Wide Zoom and
4" or _, to choose
a position
and press
(9.
57
Using the Projection
TV Menus
Using the Channel
Setup Menu
To select the Channel Setup menu
1
2
MENU.
Press
.alml,i
Move
the
the lY'Ostick
Channel
t or • to highlight
Setup
icon
[]
and
4
ChannelFix
]
O,annel.Logo
Auto Program
Channel Skip/Add
Signa_
Strength
Move the joystick • or € to scroll
through
the features.
Press
C) to select
feature's
Selecting Channel
Setup Options
off
]
press
®.
3
i
FavoriteChannels
a feature.
options
Use the joystick
6
Press
C) to select
7
Press
EXITto exit the menu
Setup
That
appear.
5
The Channel
[]
m
to scroll through
the desired
menu
includes
Option
Description
Favorite Channels
Edit
the options.
option.
screen.
the following
Select
options:
to edit the Favorite
details, see "Editing
List" on page 42.
Channel Fix
Off
Turns
off Channel
Channels
the Favorite
list. For
Channels
Fix.
Useful when you
VIDEO i
Use this setting if you have connected
the
have a cable box or
device to the Audio and Video IN jacks.
satellite receiver
............................
connected
2-6
"Fix" your projection
TV's channel setting
to channels
2-6 and use the cable box, VCR
or satellite
receiver
to change
channels.
Select one of these settings if you connected
the device to the VHF/UHF
jack.
Cable 2-6
Auto Program
Same as 2-6, except you select one of these
settings if you connected
the device to the
CABLE jack.
Automatically
programs
receivable
channels.
Find and
Overwrite
TV for all
Select to automatically
program
the
projection
TV for all receivable channels
the selected
DTV Auto Add
the projection
input
(Cable
Select to automatically
or VHF/UHF).
add new
channels
to the digital channel
(Available
only for UHF/VHF
58
digital
list.
input.)
for
Using the Projection
Option
channel
Skip/Add
TV Menus
Description
Allows you to customize
the channel list that appears
when using the CH+/- buttons on the remote control. The
projection
TV maintains
and analog channels.
separate
channel
lists for digital
Digital
Select
to add or skip digital
channels.
Analog
Select
to add or skip analog
channels.
1
Move
the joystick
channels
until
t or • to scroll
you
find
the
through
channel
you
the
want
to
skip/add.
Channel Logo
2
Press
3
Move the joystick t or { to toggle
and Skip. Then press Q to select.
4
Move
the
Setup
menu,
Allows
(_ to select
joystick
To assign
Select
ai0go
4, to return
or press
you to assign
Channel List
it.
logos
to display
for a ch_ei
Add
to the Channel
EXITto exit
to channel
between
the menus.
numbers.
the channel
list.
number:
Move the joystick t or _, to highlight
the
channel number to which you want to assign
logo. Then press (_ to select that channel
number.
Digital Signal
Strength
a
2
Move the joystick 4, ,_t 6 to highlight
one of the
logos. Then press C) to assign that logo to the
selected channel number.
3
Move
Setup
the joystick _, to return to the Channel
menu, or press EXITto exit the menus.
Displays
the strength
of the terrestrial
digital broadcast
signal, to help you adjust your antenna
to optimize
signal
reception.
When the
signal is locked and
green light appears.
until the green light
TV is receiving
a good signal (the
there are no errors in the signal), the
Adjust the antenna
appears.
59
Using the Projection
_
TV Menus
Using the Parental
Control Menu
The Parental Control menu allows you to set up the projection
TV to
block programs
according
to their content and rating levels. These
ratings are assigned by a federal rating board. Not all programs
are
rated. Using the Parental Lock blocks programs
with a specific rating,
but it does not block an entire channel.
To select the Parental Control menu
1
2
MENU.
Press
ParentalLock
Move the joystick 4t or • to highlight
the Parental Control icon [] and press
®.
3
Use the 0-9 buttons
control to enter
password.
4
on the remote
your
four-digit
Orange
P_J_word
SelectCountrv
off
USA
[]
[]
m
[]
If this is your first time setting a password,
confirm your
password
by entering it again. (The Parental Control menu
options appear.)
5
Move
the joystick
tt or • to scroll through
6
Press
Q to select
the desired
7
Press
EXITto exit the menu
the settings.
option.
screen.
You need your password for any future accessinto the Parental Control
menu. If you lose your password, see "Lost password" on page 75.
6O
Using the Projection
Using the Parent
Menu
The
[]If
i_aientai Lock
you are not familiar with
Parent
menu
Option
the Parental Guideline rating
Turn ratings
system, you should select Child,
Youth, or Young Adult to help
on/off and select a
includes
following
options.
Description
(_f_ ...................
Child
rating system
simplify the rating selection. To
set more restrictive ratings,
select Custom.
the
"IV Menus
Parental
lock is off-i No programs
blocked
from viewing.
Maximum
21
ratings
permitted
are ....
are:
US: TV-Y, TV-G, G
Canada: TV-Y, C, G
Youth
Maximum
ratings permitted
are:
US: TV-PG, PG
:1
Canada:
TV-PG, PG, 8 ans+
Young Adult
Maximum
ratings permitted
are:
US: TV-14, PG-13
Canada:
TV-14, 14+, 13 ans+
Custom
Select
J
your
to set ratings
manually.
US: See page 62 for details.
Canada:
See page 63 for details.
Change Password
For changing
password.
Select Country
USA
Select to use USA ratings
Canada
Select to use Canadian
page 63).
(see page
ratings
62).
(see
61
Using the Projection
United
73/Menus
States:
Selecting Custom
Rating Options
I_
For the
United
following
States,
options.
the Custom
Option
Description
Movie Rating
G
To ensure maximum
blocking capability, the agebased ratings should be
blocked.
The content ratings will
increase depending on the
level of the age-based rating.
Forexample, a program with a
TV-PGV (Violence) rating may
contain moderate violence,
while a TV-14 V (Violence)
All Children
Guidance
Suggested.
PG-13
Parental
Guidance
for children
R
Restricted
Viewing,
suggested
for children
parental
No one 17 and under
Block programs
W-Y
All _dren.
by their rating,
W-Y7 ....
Directed
content
WiG
General
Audience.
W-PG
Parental
Guidance
W-14
Parents
Strongly
W-MA
Mature
Audience
the
AUdience.
Parental
Age-Based Options
rating may contain more
intense violence.
includes
63.)
and General
IV Rating
or both
Menu
see page
PG
NC-17
and X
I_
Rating
(For Canada,
to children
under
under
guidance
13.
is
17.
allowed.
age 7 and above.
suggested.
cautioned.
only.
Content-Based Options
[]
If you block unrated TV
FV
Fantasy
programs, be aware that the
D
Suggestive
following types of programs
may be blocked: emergency
L
Strong
Language.
broadcasts,political programs,
sports, news, public service
announcements, religious
S
Sexual
situations.
V
Violence.
Unrated
Block
Blocks all programs
programs and weather.
Block programs
or movies that
are broadcast
without
62
a rating
broadcast
Allow
Violence.
Dialogue.
without
and movies
that are
a rating.
Allows programs
and movies
broadcast without a rating.
that are
Using the Projection
Canada:
Selecting
Custom
Rating Options
For Canada, the Custom Rating
(For the US, see page 62.)
includes
Option
Description
EnglishRating
C
All children.
C8+
Children
G
PG
General pr0gra_ingl
Parental Guidance.
i4+
FrenchRating
USA W Rating
Viewing Blocked
Programs
Menu
....
the following
TV Menus
options.
8 years and older.
Viewers i4 a_d oiderl
.........................
18+
Adult pr0gra_gl
G
General programming.
8 ans+
Not recommended
for young children.
13 ans+
Not recommended
for ages under 13.
16 ans+
Not recommended
for ages under 16.
18 ans+
Programming
See page
restricted
to adults.
62 for details.
You can view a blocked program
by pressing
the ENTERbutton when
tuned to a blocked program.
Entering
the correct password
temporarily
switches off the Parental
Lock. To reactivate
the Parental
Lock settings, turn off the projection
TV. When the projection
TV is
turned on again, your Parental
Controls settings are reactivated.
63
Using the Projection
TV Menus
Using the Setup
Menu
To select the Setup menu
1
2
Press
MENU.
Move the joystick
the Setup icon _
3
Move the joystick • or _, to scroll
through the features.
4
Press
(_) to select a feature.
feature's
Selecting
Setup Options
options
off
Monitor
4t or • to highlight
and press Q.
Engtish
off
(That
appear.)
5
Move
the joystick
• or 4, to scroll through
6
Press
(_) to select
the desired
7
Press
EXITto exit the menu
The Setup
Menu
includes
option.
screen.
the following
Option
Description
Caption Vision
Allows
options:
you to select from three
programs
the options.
that are broadcast
caption
with closed
CC1, CC2,
Displays
a printed
version
CC3, CC4
sound effects of a program.
CC1 for most programs.)
modes
(for
caption).
of the dialog
(Should
or
be set to
TEXT1, TEXT2, Displays network/station
information
TEXT3, TEXT4 presented
using either half or the whole
screen (if available).
For closed captioning,
set to CC1.
Info Banner
Displays
the program
name and the time
remaining
in the program
(if the broadcaster
offers this service). Displays when the
channel
pressed.
Off
64
Turns
is changed
off Caption
or the DISPLAYbutton
Vision.
is
Using the Projection
Option
Select Out
De"ription
Allows you to select
equipment
connected
DTV.
which input to pass through
to the
to the SELECT OUT jacks on the
Monitor
Outputs
the picture
W
Outputs
the signal
(regardless
screen).
VIDEO 1-4
_You
can also usethe
Video Input
Video Input option to assign
video inputs to i.LINK devices.
When you select that video
on the screen.
that the TV is _ed
of the picture
Outputs
the signal input
(regardless
of the picture
screen).
to
displayed
on the
to the TV
displayed
on the
2 jack, you can select the label DVDfor the VIDEO
To select a label for a video
1
(see "i.LINK Setup") and
which support video input
connection are listed.
displayed
Allows you to select labels to help you recognize
devices
connected
to the audio/video
jacks on the DTV. For
example,
if you have a DVD player connected
to the
VIDEO
input.
input, an i.LINK connection is
established. Only i.LINK
devicesthat are set to Show
TV Menus
2
2
input:
Move
the joystick
4t or 4 to highlight
the video
input
label.
(VIDEO 1-6) that you want to assign
Then press (_) to select the input.
a
Move the joystick tt or 1_to highlight
one of the
displayed
labels. Then press {_) to select it.
If you select the label Skip, your DTV skips this connection
when you press the WNIDE0 button, i.LINK devices
cannot be assigned
to VIDEO 5 or 6.
Language
Select to display
choice (English,
i.LINKSetup
Select to display a list of i.LINK devices that are connected
to the DTV. To change the status of an i.LINK device:
language
of
Move the joystick It or !_ to highlight
an i.LINK
device. Then press (_) to select the device.
2
Move
the joystick
It or I_ to highlight
options.
Then
press
one
C) to select
it.
Select to display
Control Panel.
Hide
Select to not display this device in the
i.LINK Control Panel. This is for devices
page 48.
this device
of the
Show
Fordetails about using
the i.LINK Control Panel, see
in your
I
following
[]
all on-screen
menus
Espanol, Francais).
in the i.LINK
that
are connected
to, but not communicating
with, the DTV (or for devices that you don't
want
Delete
to appear
in the i.LINK
Control
Panel).
Select for i.LINK devices that you have
disconnected
from the DTV. To reconnect
device,
see page
the
30.
65
Using the Projection
[]
TV Menus
Fordetails about power
Option
Description
i.LINK Standby
On
Allows
Allows the i.LINK signal to pass through to
connected
i.LINK devices even when the
projection
TV is turned off. Front panel LED
you to
consumption in standby
manage standby
is orange.
modes, see page 78.
power
consumption
standby
to Off.
Off
The projection
power
Does not allow
than
TV uses more
when
the i.LINK
this option
signal
is set
to pass
through
to connected
i.LINK devices when
the projection
TV is turned off. Front panel
LED is red. The projection
standby power than when
to On.
U
You can also accessthe Timer
Set €10ck/Timeis
using the TIMERbutton on the
remote control.
_iect
to set the clock and to program
your DTV to turn on
and off at two scheduled
viewing
times. For details, see
page
49.
Demo
Runs
a demonstration
Factory Reset
Restores all menu options to their original factory settings.
WARNING:
Factory Reset clears all settings from
memory,
settings,
66
TV uses less
this option is set
of the features
including
channel
timers, clock, etc.
of the DTV.
lists, favorite
channels,
menu
Overview
This chapter
includes
the following
Topic
topics:
Page
Programming
the Rem0te
Control
68 .........
Operating
Other Components
with
Your Projection
TV Remote Control
71
About
i.LINK
73
Troubleshooting
74
Specifications
77
Index
79
67
Other
Information
Programming
the Remote
The remote
Control
control
is preset
Sony brand
video
equipment.
Sony
Equipment
Switch Position
on Remote Control
Programmable
Code Number
Beta, ED Beta VCRs
AV1
303
8 mm VCR
AV2
302
MS
AV3
301
DVD
751
VCR
DVD Player
0oo®
to operate
If you have
control
with
procedures
video
equipment
the projection
to program
other
than Sony brand
TV's remote
the remote
control,
that you want
to
use the following
control.
The equipment must have infrared (IR) remote capability in order to be used
with the remote control.
I
2
3
Check the list of the "Manufacturer's
Codes" listed on page 70,
and find the three-digit
code number for the manufacturer
for
your equipment.
(If more than one code number is listed, start
with the number
listed first.)
Open the panel on the remote control. Then move the slide
switch to one of the four positions
(AV1, AV2, AV3, DVD).
l s°s v_S
Press CODE SET.
Z:_ You must perform step 4 within I 0 secondsof step 3.
4
5
6
68
Close the panel
manufacturer's
on the remote
code number.
control
and enter
the three-digit
Press ENTER,
To check if the code number
works, aim the projection
TV's
remote control at the equipment
and press the green POWER
button that corresponds
with that equipment.
If it responds,
you
are done. If not, try using another
code listed for that
manufacturer.
Other
Tips
[]
If more
Information
than one code number is listed, try entering
them
one until you come to the correct code for your equipment.
one by
[]
If you enter a new code number,
entered at that setting is erased.
[]
In some cases, you may not be able to operate your equipment
with the Sony remote control. In such cases, use the equipment's
own remote control unit.
the code number
you previously
69
Other
Information
Manufacturer's Codes
Manufacturer
Orion
Code
317
VCRs
Panas6nic
_(J8, 309, 306,
307
Pentax
305, 304
GE
Hita_
Philco
....
308; 309
JVC
Manufacturer
Code
Sony
Admiral
301, 302, 303
327
(M. Ward)
Aiwa
Audio
338, 344
314, 337
Dynamic
Br0ksonic
canon
citizen
319, 317
309, 308
332
Craig
cflteri6n
302, 332
315
S_s_
3_, 33&3_
SamS_g
C_
Mathes
....
Fistier
Funai
General
Magnavox
Mitsiil_is_
757
............. 761
Quasar
-308_ 309, 306
Oritron
Panasonic
759
753
............
304, 305, 308,
309, 311, 312,
313, 310, 329
Realistic
....330' 335 ....
338
329, 3_, 309
Electric
G6 Vide6 .......... --3:22_339, 340 ........
309, 330, 32K
335, 324, 338
........ 3_4
......
........ 32Z3i3,
Insist
306; _,
338
Replay-309,
JC Penney
.....
Wc ...................
Kenw66d
LM (_ars)
Ma_avox
M_
Marta
.....
305; ....
308
309, _5; 304,
330, 314, 336,
337
3i4, 336, 337_
345, 346, 347
3i4, 336, 332_
337
335,323,324,
325, 326
sh_
S_t6_
o_i_ic
31S.......
Signature
2000
(M. Ward)
SV2000
338, 327
Samsung
Tos_ba
758
754
........................760 ................
Cable Boxes
Manbfaabre_
Code
Sylvania
308, 309, 338,
310
S_ph6_e
Task6
230
222,
225,
20L
204,
Ha_TRegal
jerr6id/G_
k
338
...........
338.......................
.......
332 ............
223, 224,
226
202, 203,
205, 206,
207, 208, 218
O_ik .......... 2:2% _K 229
Panasonic
219, 220, 221
Pi0n_r
....
2i4, 2i5
Tang
........3i_.336,
337
Tea4 ..................
3i42- 336, 3-38_
....
337
Scientific
209, 2i0, 2ii
Atlanta
Tocdm .................. 2i6, 217
Te_cs
.......................
3_ 308
...........
TosMBa ........
3i:2._
3ii .............
ze_
Wai_dS-
Satellite Receivers
Yam_a
327, 328, 335,
331, 332
....3i4, 330; 336;
337
.......
33i ............
Zenith
30K 309, 310 ....
3i4, 336, 337
332 ........
Laserdisc Players
ManUfacturer
Code ........
:2i2, 2i3
Mar_u_a_ureF
Code
_oE_.....................
801_......
Dish Network
Ech0star
810
810
G-efi_FaI-...........
_2 ..............
Sony
P_iis6_€
Pi6neer
........ 70 i
........ 764,7i5 .......
.......................
-702 ...........
325; 338, 32i
.... 3i4, 336, 337
..............
-309;308-...............
7..................
7O
PROSCAN
.......................
3_7,328.....
Sony
....
332, 305, 330,
335, 338
Mem0rex
309, 335
M_61_a
........... 305, 3_
Mitsubis_/
..... 323, 324, 325,
MGA
326
Muititech
NEC
32i .......
Philips
757
Pioneer
752
RCAi
.................... 755
ze_th
G6Iasiar ...... 332
_ta_
................... 756
308, 309, 310
..............30-8- ............
RCA/
PROSCAN
3i9, 320; 3i6, ....
317, 318, 341
755
758
Philips
Pioneer
D_e_;oo .....................
_i,-3i:2_ 309 ........
DBx
..........
3i4, 336, 537 ......
Dimensia
304
Emefs6h
DVD Players
Mahufa_uker
Code
....................
75i .......
Sony
Electric
Hitachi
805
Hughes
......
804
_ib%_
....... 809 .........
Pahiisei_
........
803
....
RCA7 ............
_2, 808
PROSCAN
Toshiba
................ 806, _7
Other
Operating
Control
Operating
Other Components
a VCR
with
Your Projection
Open the panel on the remote
the position you programmed
Press
Turn on/off
POWER
the slide
switch
normal
playback)
to
W/VIDEO
Select VCR
.........
Change
TV Remote
control and move
for the VCR.
ToDOThisL
Information
T ..................
channels
CH +I-
Record
I_
and
REC simultaneously.
Play
Stop
•
Fast forward
Rewind
Operating
Player
a DVD
the tape
Pause
| | (press
Search the picture
forward
or backward
_
or _
during
(release to resume
Change
W/VCR
Open
input
the
mode
panel
the position
you
on the
remote
programmed
again
to resume
control
and
for the
DVD
To Do This ...
Press
Turn on/off
POWER
Select DVD
TVNIDEO
Play
l_
Stop
•
Pause
II
Step through
different
tracks of an audio disc
_
Step through
different
chapters
of a video disc
Ctl+ to step forward
Display
6eD_
Display
(Setup)
the menu
menu
playback
normal playback)
move
to step forward
the
slide
switch
to
player.
or _41 to step backward
or CH- to step backward
....... DVD MENU
MENU
71
Other
Information
Operating
Box
a Cable
To Do This ...
Press
Turn on/off
_sA:i:/CABLE
(green POWERbutton)
seiect Cable Box
SAT/CABLE(FUNCTIONbutton)
Seleci a channel
0-9 buttons, ENTER
Change
CH +/-
_annels
Back to previous
Operating
Receiver
Channel
JuMP
.....
a Satellite
To Do This ...
Press
TurnOn/o_f ................................
SAT/CABLE(green POWERbutton)
Select Satellite Receiver
SAT/CABLE(FUNCTIONbutton)
Select a channel
0-9 buttons, ENTER
Change channels
CH +/-
Bacl_t0 previous ch_ei
itJMi,................................................
Displa y chann el n_ber
................
DISPLAY
Display
sateilite
...................
GUIDE
Dispiay
sa;eiiiie" menu .................MENLJ...................................................................................
Move
mg_ght
guide
(€+sor)
" Move
joystick
; ..,+
.............
+++!+;m
........
i+;i+
Operating
(Laserdisc
an MDP
Player)
Open the panel on the remote
the position you programmed
control and move
for the MDP.
the slide switch
Play
Stop
•
P_Ge................................................................
I I (press again to resume
_ch
forward
the pic_re
or backward
Search a chapter
forward
or backward
72
............................
_
or _
(release
CH+/-
during
to resume
normal
playback)
playback
normal
playback)
.....
to
Other
About
Information
i.LINK
i.LINK is a digital serial interface
for handling digital video, digital
audio, and other data in two directions
between
equipment
having
an i.LINK jack, and for controlling
other equipment.
i.LINK compatible
equipment
can be connected
using a single i.LINK
cable. Possible applications
are operations
and data transactions
with
various digital AV equipment.
When two or more i.LINK compatible
devices are connected
to the projection
TV, operations
and data
transactions
are possible not only with the equipment
that this unit is
connected
to, but also with the other devices via the directly
connected
equipment.
Note, however,
that the method of operation
sometimes
varies
according
to the characteristics
and specifications
of the equipment
be connected,
and that operations
and data transactions
are
sometimes
not possible on some connected
equipment.
to
Before connecting this unit to i.LINK compatible equipment, refer to the
instruction manual of the equipment to be connected.
About
i.LINK
the Name
i.LINK is Sony's term for the IEEE 1394 data transport
bus, and is a
trademark
approved
by many corporations.
IEEE 1394 is an
international
standard
standardized
by the Institute of Electrical
Electronic Engineers.
i.LINK
as a Repeater
This device functions
as a repeater or node, so that the i.LINK specific
digital signals provided
by one device will be relayed to another
device that is connected
to the first device. This will occur even when
the second
signals.
device
does not have
the means
to use the repeater
digital
When i.LINK devices are connected
to this projection
TV, the
maximum
bit rate (the speed at which data can be sent or received)
200 Mbps (megabits
per second).
is
To use this projection
TV as an i.LINK repeater when the unit is
powered
off, be sure that the i.LINK Standby
option is set to On, as
described
on page 66.
73
Other
Information
Troubleshooting
If, after reading these
your Sony television,
(7669) (U.S. residents
operating instructions,
you have additional
questions
related to the use of
please call our Customer
Information
Services Center at 1-800-222-SONY
only) or (416) 499-SONY (7669) (Canadian
residents
only).
Problem
Possible Remedies
NO picture
(screen not lit),
_a
Make sure the projection
the wall outlet.
no sound
_
If your projection
TV does not turn on, and a red light keeps
flashing, your projection
TV may need service. Call your local Sony
Service Center.
Push
Ij
the power
TV's power
button
cord is connected
on the front of the projection
Check to see if the TV/VIDEO
setting is correct:
set to TV. When watching
connected
equipment,
securely
to
TV.
when watching
TV,
set to VIDEO1,2, 3,
4, 5 or 6, as appropriate.
Remote
control
does not operate
Dark,
poor or no
picture (screen
good sound
lit),
_1
Try another
channel
_
Batteries
_
Press TV (FUNCTION)when
operating
Make sure the projection
the wall outlet.
TV's power
could
(it could
be weak.
Replace
Locate
lights.
the projection
Check
the orientation
_
Adjust
the Picture setting
_
Adjust
the Brightness setting
Check
antenna/cable
Good
......................
picture,
no sound
be station
trouble).
the batteries.
the projection
cord is connected
TV at least 3-4 feet away
securely
from fluorescent
in the Video
menu
in the Video
(see page
52).
menu
(see page
from _e
screen
52).
connections.
(see page 4)i
_
Use Auto Program in the Channel
channels
that are not presently
Setup menu to add receivable
in memory
(see page 58).
No...................
color
a
Adjust
the Color settings
video
Only
_a
Check
the antenna/cable
_
Try another
using
an antenna
snow and noise
appear
on the screen
Press ANT to change
the input
mode
Only
_
Indicates
appears
the Pic_re
there
(see page
53ji
connections.
be station
Try setting
screen
menu
(it could
a
a black
in _e
channel
Picture is displayed;
but
snow or noise is obvious
74
to
of the batteries.
MUTINGso that Muting disappears
Cannot receive upper
channels
(UHF) when
TV.
Mode
is no signal
to Game
trouble).
(see page
4).
(see page
for the digital
channel
52).
you are tuned
to.
Other
Possible Remedies
Problem
Dotted
Information
lines
or stripes
Projection
TV is fiXed to
one channel
Si
Adjust
the ante_al
Move
signs,
the projection
or hair-dryers.
images
Ca_0t
select
or ghosts
from noise sources
your Channel
such as cars, neon
setup menu to add receivable
in memory
(see page 58).
Use Auto Program inthe channel
channels
that are not presently
Check
Double
TV away
Fix settings
(see page
58).
_
Use a highly directional
is caused by reflections
_
if the item you want
be selected.
_
Use Auto Program in the Channel
channels
that are not presently
cable TV
_
Check
Cannot gain enough
volume when using
cable box
_
Increase the volume of the cable box using the cable box's
control. Then press TV (FUNCTION) and adjust the projection
volume.
_
Check
menu
Cannot receive
channels
when
Cannot
receive
item
any
using
a
channels
your
outdoor antenna or a cable (if the problem
from nearby mountains
or tall buildings).
to ch0ose
appears
in gray, it is not available
to
Setup menu to add receivable
in memory
(see page 58).
cable settings.
antenna
remote
TV's
connections.
Adjust antenna.
If you cannot
Signal Strength" on page 59.
receive
DTV channels,
see "Digital
Use Auto Program in the Channel Setup menu to add receivable
channels
that are not presently
in memory
(see page 58).
TV
_
Use Auto Program in the Channel Setup menu to add receivable
channels
that are not presently
in memory
(see page 58).
TV
Lost password
_t
In the password
screen (see page 60), enter the following
master
password:
4357. The master password
clears your previous
password;
it cannot be used to temporarily
unblock channels.
Cannot change channels
with the remote control
_
Be sure you have not inadvertently
switched
your projection
TV
from channel 3 or 4 setting if you are using another device to
change channels.
Unable
to select
a channel
If you are using another device to control channels,
be sure the
"function"
button for that device has been pressed.
For example, if
you are using your satellite receiver to control channels,
be sure to
press the SAT/CABLEbutton.
C_ot-cycle-_ougi_
other video equipment
connected
to the
projection
_
Sure title Vide0_input feature
has not been
set t0skip
(see page
65)
TV
75
Other Information
H
Problem
_ere
Possible Remedies
is a biaCk box on the _
screen
YoU have
selected
a text option
in the Setup
menu
and no text is
available.
(See page 64 to reset Setup selections.)
To turn this
feature off, select Off in the Caption Vision option. If you were
trying to get closed captioning,
select CC1 instead of Text 1-4.
There is no Twin Picture
or it is just static
..t
Be sure your twin picture
program
airing.
is set to a video
21
You may be tuned to a video input
cycling through your video inputs
source/channel
that has a
with nothing connected
to it. Try
using the W/VIDE0 button,
The right Twin Pic_re
_
window
is just a black box
You can display digital channels
in the left Twin View window, but
not the right. Pressing
_) while the black box is active will exit
Twin View and tune to that digital channel.
I get the same program
in both Twin View
_
Both may be set to the same channel. Try changing
either the main picture or the window
picture.
pictures
_
You may be running all your channels
through
a cable box.
cable box will only unscramble
one signal at a time, so you
use the Twin View feature. If possible, run a direct cable to
projection
TV's CABLE input. (This will only work if your
system provides
an unscrambled
signal.)
in
The
cannot
your
cable
I cannot get anything
_
but TV channels
in my left
or right Twin View picture
Be sure the Video input feature
i.LINK device
recognized
_
Upon initial release of this projection
TV to the market, the Sony
digital cable set-top box (DHG-M55CV)
is the only i.LINK device
that is verified to be compatible
with this projection
TV.
Cl
For more information
about using i.LINK devices
projection
TV, see "Connecting
i.LINK Compatible
pages 30 to 33, and "About i.LINK" on page 73.
76
is not
has not been
channels
set to Skip (see page
with the
Devices"
65).
on
Other
Information
Specifications
Projection
Picture
System
3 picture
Tube
7-inch
Cha_ei
DTV
S3)stem .........................................
cOVerage
mon_hr6me
Goes
system
(6.3 raster
Size),
NTSC, American
WS_nc{
ar d_ -/(TSC ............................
.....................
2-69
VHF
2-13
cATv ....................................
Power
h6r_bntai _2itne
3 ienses,
with optical coupling
and liquid cooling system
High performance,
large diameter
hybrid lens F1.05
75 ohmextemai te-_ai-for
9i_I_2OHF ...........................
Projection
Lenses
Antenna
............................
Televisi0n
tubes,
high-brightness
Requirements
i2i25 .........................................
120V AC, 60 Hz
Number of _puts]_uts
V{aeo (_)
..................................
........................................................4 (1on
hon{ pdei)
.................
?{ i 9p¥;
75-O_s_baianced;
C: 0.286 Vp-p
.... ¢6mponent
Waeo _put
(Burst
signal),
2 iY, PB_PR) ...................................... Yi i:O Vp:p; Y5o_s
(IN)
6 total (1 on front
Audio
(OUT)
1
panel)
75 ohms
unbaianced;
negative;
PB: 0.7 Vp-p,
PR: 0.7 Vp-p, 75 ohms
Audio
sync negative
S_c
75 ohms
500 mVrms (100% modulation)
Impedance:
47 kilohm
More than 408 mVrms at the maximum
setting (Variable)
More than 408 mVrms
(Fixed)
Impedance
(output):
2 kilohms
(Outi ...................................................................................................................................................................................
1
More than 408mVrms
at the maximum
- --Subwoofer
volume
volume
setting
Impedance
(output):
2 kilohms
Cutoff frequency:
100Hz
.....SELECT
O_
...................................
Digital Audio Optical Output
Dolby Digital/PCM
c0_R0L
g (_]6_j
1 Video
1 Audio
1 Vp-p, 75 ohms unbalanced, syne negative
More than 408 mVrrns (100% modulation)
Impedance (output): 2 kilohms
Optical Rectangular (1)
1
................... i............................................
i.LINK $200
guppiied Aeees_aes
Rem6teC6ntr0i ..............................
2
............................................................
RM-Y185
.....................................................................................
AA (R6) Batteries
--2-su}pi-ied-forrem66
Optional Accessories
AVcabie
Audio
........
Cable
...........{:C_I_ Table
Componen¢
_deo
Rear speakers
Screen
Size
....................
Cable
(2)
c_-_-of ...............................................................................
VMC-810/820/830
RKC-515HG
HG
_c2i_i5
VMC-10/30
to ,i:p_;
i4:ptn
HG
4-pin $200 i.LINK terminal
i75 meters)7_CLi_35
(,_:p_
to 4:ptn: 3.5 metersi
SS-MB115
57 in measured
diagonally
(KDP-57XBR2)
65 in measured
diagonally
(KDP-65XBR2)
77
Other
Information
speakers
Speaker
Output
Tweeter
100 mm (4") x 2
woofer
160 mm i6 3/8")
Center
Front
100 mm (4") x 2
20 W x 2
Center
20 W x 1
Rear
Dimensions(Wx
H x D)
i380 x ]4_
x2
20 W x 2
x 680 ram (54 3/8 X 55 1/8 x 26 728 in) (KDP-57XBR2)
1558 x 1574 x 735 ram (61 3/8 x 62 x 29) (KDP-65XBR2)
Mass
Power
i26 kg (277 ibs) (KDP-57XBR2)
148 kg (326 lbs) (KDP-65XBR2)
Consumption
In Use
280 W
In Standby
0.9 W
In i.LINK
Standby
24 W
Design
78
and specifications
are subject
to change
without
notice.
Index
0 - 9 buttons
Channel Skip/Add,
setting
Channels,
changing
5
Clock, setting 35, 66
Closed caption modes 64
CODE SET button 6
5
16:9 aspect ratio 43
4:3 aspect ratio 43
4:3 Default settings 57
A
ADD FAVORITE
button
Altemate
Audio,
Alternate
Video,
ANT button 4
selecting
55
setting 53
Antenna,
connecting
17
Audio menu 51, 54
AUDIO OUT (VAR/FIX)
described
16
L (MONO)/R
B
Balance, adjusting
54
Bass, adjusting
54
Batteries, inserting
in remote 3
Bilingual audio 54
Blocking programs.
See Ratings.
Brightness,
adjusting
52
¢
Cable
box, connecting with VCR 20
box, using with TV remote control 72
connecting 17
with VCR, connecting 19
CABLE jack, described
15
Camcorder,
connecting
28
CH buttons
CONTROL
S IN/OUT
64
5, 13
Change Password
61
Channel Fix, setting 58
Channel Logo, setting 59
Channel Setup menu 51, 58
53
jacks, described
Country, setting 61
Cursor movement
buttons
Audio receiver, connecting
25
Auto Program
(channel setup) 35, 58
AV1-3/DVD
slide switch 6
Caption Vision, setting
Carrying
the TV 10
CATV. see cable
Color temperature,
adjusting
Color, adjusting
53
CONTROL
S 34
4, 40
59
15
6, 13
jacks,
Delete setting, in i.LINK Setup 65
Demo, running
35, 66
DIGITAL AUDIO OPTICAL OUTPUT
Digital/PCM)
jack, described
15
Digital channels,
using the Guide 38
Digital Reality Creation
setting 53
Digital Signal Strength
59
Digital TV FAQs 7
DISPLAY button 4
Dolby Digital 4, 29
Dolby Surround
54
DRC CINEMOTION
DVD MENU button
button
6
(Dolby
5
DVD player
using with TV remote control 71
with A/V connectors, connecting 27
with component video connectors, connecting
26
DVD TITLE button 6
E
ENTER button
5
EXIT button
5
F
Factory Reset, setting 66
FAQs, about DTV 7
Fast-forward
button 6
79
Index
Favorite
M
Channel
clearing 42
editing 58
exiting 41
using 40--42
Features
2
FREEZE
Freeze,
button
using
4
47
Frequently
asked
questions
Full mode,
FUNCTION
setting
56
buttons
5
7
G
Game,
Guide
Picture
Mode setting
exiting 38
using 38
GUIDE button
52
52
setting, in i.LINK
adjusting
53
setting
72
mode,
setting
56
O
5, 38
Setup
jacks,
equipped devices, connecting 2, 30, 31
notes on connecting 32
setup screens 33
i.LINK button 4, 13
i.LINK $200 jacks, described
16
i.LINK Setup 65
i.LINK Standby
13, 66
INDEX button
4, 39
J
5
connecting
Parental
Control menu 51, 60
Parental
control, described
2
Parental
Lock, setting 61
Password,
changing
61
Pause button 6
PIC MODE button 4
Picture contrast, adjusting
52
Picture Mode, setting 52
Play button 6
POWER button 5, 6
Powering
on/off, the DTV 5
Presetting channels 58
Pro, Picture Mode setting 52
Problems,
troubleshooting
74-76
Program
Guide, see Guide
R
L
Labels, assigning
to video inputs
Language,
setting 65
Logos, assigning
to channels
59
Off, turning
off the DTV 5
On, turning
on the DTV 5
Optical IN-equipped
devices,
P
65
i.LINK
cables 30
8O
Movie, Picture Mode
MTS/SAP
button
5
MUTING
button 4
Normal
HD/DVD
IN (1080i/720p/480p/480i)
described
15
Joystick 4
JUMP button
control
N
H
Hide
Hue,
MDP, using with TV remote
MENU button 4, 6, 13
Menus
Audio 51, 54
Channel Setup 51, 58
Parental Control 51, 60
Screen Mode 51, 56
Setup 51, 64
Video 51, 52
65
Ratings, setting 60-63
Ratings, viewing blocked programs
Rear panel, described
15
REAR SPEAKER OUT jack 16
Rear speakers, mounting
11
Record buttons 6
63
29
Index
Remote
S-VIDEO
control
inserting
batteries
programming
RESET button
described
3
68-70
T
5
Test tone 55
TIMER button
5
TIMER LED 13
Resetting
Audio
Video
Resetting
Rewind
options
options
54
52
settings
66
button
6
$
S VIDEO
connecting 19, 20, 23, 24, 27, 28
described 14, 15
SAT/CABLE
button
5
Satellite receiver
connecting, with VCR 24
using with TV remote control 72
Screen Mode menu 51, 56
Scrolling
SELECT
Channel Index,
button
13
using
SELECT OUT jacks, described
Select Out, setting 65
Set Clock/Timers
66
Setting up 35
Setup menu 51, 64
Sharpness,
adjusting
53
Show setting, in i.LINK Setup
Signal, displaying
level 59
Simulated,
audio effect 54
SLEEP button
4
39
15
65
Speakers
center, adjusting level 55
front, adjusting balance 55
rear, adjusting balance 55
rear, adjusting level 55
selecting Front/Center/Rear
55
turning on/off 55
Specifications
77-78
Standard, Picture Mode setting 52
STANDBY/i.LINK
STANDBY LED 13
Stop button
Subwoofer
2
6
activating 55
adjusting level 55
SUBWOOFER
OUT jack 16
SURF FAVORITE button 5, 41
Transport
buttons
6
Treble, adjusting
54
Troubleshooting
74-76
Turning on/off the DTV 5
TV/VCR
button 6
TV/VIDEO
button 5, 13
Twin View
described 2
using 44--46
Twin View button
5, 44
V
VCR
using with TV remote control 71
with cable box, connecting 20
with cable, connecting 19
with satellite receiver, connecting 24
Vertical Center, adjusting
57
VHF/UHF
jack, described
15
Video Input, setting 65
Video menu 51, 52
VIDEO/AUDIO
jacks, described
Vivid, Picture Mode setting 52
VOL buttons 4, 13
Volume,
adjusting
14, 15
4
W
Welcome
screen
35
What
Wide
WIDE
Wide
is digital TV 7
Mode 56
MODE button 4
Screen mode 43
Wide
Screen,
Wide
Zoom
described
mode,
2
setting
56
Z
Zoom
Zoom
feature, with Twin View
mode, setting 56
46
81
if, afterreading this instructionmanual,youhaveadditional
questionsrelatedto the useof yourSonyTV, pleasecallone
ofthe following numbers(Englishonly).
SonyOline
Sony Corporation
http://_Nw.wodd.sony.com/
Printed in U.SJ_,
Customers in the continental United States contact
the Sony Customer Information Service Center at:
1-800-222-SONY (7669)
Customers in Canada contact the
Sony Customer Relations Center at:
(416) 499-SONY (7669)