1
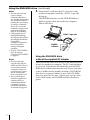
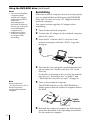
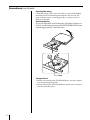
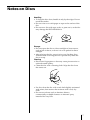
4-647-113-11(1) DVD-ROM Drive Operating Instructions PCGA-DVD51 2000 Sony Corporation WARNING To prevent fire or shock hazard, do not expose the unit to rain or moisture. Dangerously high voltages are present inside the unit. Do not open the cabinet. Refer servicing to qualified personnel only. Pour prévenir tout risque d’incendie ou d’électrocution, garder cet appareil à l’abri de la pluie et de l’humidité. Pour prévenir tout risque d’électrocution, ne pas ouvrir le boîtier. Confier l’entretien de cet appareil exclusivement au personnel qualifié. For customers in the U.S.A. Owner’s Record The model number and the serial number are located on the bottom of the drive. Record the serial number in the space provided below. Refer to this number whenever you call your Sony dealer regarding this product. Model No. PCGA-DVD51 Serial No. FCC Notice This equipment has been tested and found to comply with the limits for a Class B digital device, pursuant to Part 15 of the FCC Rules. These limits are designed to provide reasonable protection against harmful interference in a residential installation. This equipment generates, uses, and can radiate radio frequency energy and, if not installed and used in accordance with the instructions, may cause harmful interference to radio communications. However, there is no guarantee that interference will not occur in a particular installation. If this equipment does cause harmful interference to radio or television reception, which can be determined by turning the equipment off and on, the user is encouraged to try to correct the interference by one or more of the following measures: 2 – Reorient or relocate the receiving antenna. – Increase the separation between the equipment and receiver. – Connect the equipment into an outlet on a circuit different from that to which the receiver is connected. – Consult the dealer or an experienced radio/TV technician for help. The shielded interface cable (audio cable) recommended in this manual must be used with this equipment in order to comply with the limits for a digital device pursuant to subpart B of Part 15 of FCC. You are cautioned that any changes or modifications not expressly approved in this manual could void your authority to operate this equipment. For questions regarding your product or for the Sony Service Center nearest you, call 1-888-476-6972 in the United States or 1-800-961-7669 in Canada. The number below is for FCC related matters only. Regulatory Information Declaration of Conformity Trade Name: SONY Model No.: PCGA-DVD51 Responsible Party: Sony Electronics Inc. Address: 1 Sony Drive, Park Ridge, NJ 07656 USA Telephone No.: 201-930-6972 This device complies with Part 15 of the FCC Rules. Operation is subject to the following two conditions: (1) This device may not cause harmful interference, and (2) this device must accept any interference received, including interference that may cause undesired operation. CAUTION - VISIBLE AND INVISIBLE LASER RADIATION WHEN OPEN. DO NOT STARE INTO BEAM OR VIEW DIRECTLY WITH OPTICAL INSTRUMENTS. Caution: The use of optical instruments with this product will increase eye hazard. As the laser beam used in this product is harmful to eyes, do not attempt to disassemble the cabinet. Refer to servicing to qualified personnel only. Laser diode properties Laser output 30.2 µW Wave Length 785 nm and 650 nm For customers in Canada This Class B digital apparatus complies with Canadian ICES-003. Pour les utilisateurs au Canada Cet appareil numérique de la classe B est conforme à la norme NMB-003 du Canada. Welcome! Thank you for purchasing the Sony DVD-ROM drive PCGA-DVD51. Before operating the drive, be sure to read this manual thoroughly and retain it for future reference. This DVD-ROM drive is designed for use with your Sony PCG-505, N505, Z505, SR, C1 Series* Notebook Computer, check your computer. * As of June, 2000 Caution This DVD-ROM drive is compatible with WindowsR 98, and WindowsR 2000 Professional. Display windows appearing when you use this drive may vary depending on the operating system you use. Sony, VAIO and the VAIO logo are registered trademarks of Sony Corporation. DirectCD and the logo of Adaptec, Inc. are trademarks of Adaptec, Inc. Before using the PCGA-DVD51, be sure to read the End User Software License Agreement that accompanies it. • Copyright laws prohibit reproducing the software or the manual accompanying it in whole or in part, or renting the software without the permission of the copyright holder. • In no event will SONY be liable for any financial damages, or loss of profits, including claims made by third parties, arising out of the use of the software supplied with this drive. • In the event a problem occurs with this product as a result of defective manufacturing, SONY will replace it. However, SONY bears no other responsibility. • The software provided with this drive cannot be used with other drives. • Please note that, due to continued efforts to improve quality, the software specifications may be changed without notice. • Operation of this drive with software other than that provided is not covered by the warranty. Microsoft, MS, MS-DOS, Windows and the Windows logo are registered trademarks of Microsoft Corporation. Intel, Pentium and Celeron are trademarks and registered trademarks of Intel corporation. Copyright 1999, 2000 Adaptec, Inc. All rights reserved. Adaptec, the Adaptec logo, and DirectCD are trademarks of Adaptec, Inc. All other trademarks are trademarks of their respective owners. This product incorporates copyright protection technology that is protected by method claims of certain U.S. patents and other intellectual property rights owned by Macrovision Corporation and other rights owners. Use of this copyright protection technology must be authorized by Macrovision Corporation, and is intended for home and other limited viewing uses only unless otherwise authorized by Macrovision Corporation. Reverse engineering or disassembly is prohibited. 3 Table of Contents Overview ........................................................ 5 Usable discs ...................................................... 6 Unpacking the DVD-ROM drive .................... 7 Locating the controls and connectors .......... 8 Setting up the DVD-ROM drive .................... 9 Installing the driver (WindowsR 98) ...................... 9 Installing the driver (WindowsR 2000 Professional) ...................... 12 Using the DVD-ROM drive .......................... 13 Connecting the DVD-ROM drive to the notebook computer .............................. 13 Removing the DVD-ROM drive from the notebook computer ......................... 15 Transporting ........................................................... 16 Inserting a disc ....................................................... 17 Playing a DVD-VIDEO .......................................... 19 Notes about DVD-VIDEO discs ........................... 22 Playing an audio CD ............................................. 23 Reinstalling ............................................................. 24 Precautions .................................................... Notes on Discs .............................................. Specifications ............................................... Getting Help ................................................. Troubleshooting ............................................ 4 25 27 28 30 31 Overview The DVD-ROM disc is a data memory medium that can be used to read a program or other data for a computer only. You cannot save your own data on it. The data capacity of a single-layer and single-sided DVD-ROM disc, at 4.7 GB (Giga Byte), is 7 times that of a CD-ROM disc. Furthermore, the data capacity of a dual-layer and single-sided DVD-ROM disc is 8.5 GB, a single-layer and double-sided disc, 9.4 GB, and a dual-layer and double-sided disc, 17 GB. Features of the PCGA-DVD51 are as follows: • Enables the reading of DVD-ROM disc data at a speed of 8× max. (about 11000 KB/s) and CD-ROM data at a speed of 24 × max. (3600KB/s) with the supplied AC adapter. • Even without the supplied AC adapter, it enables the reading of DVD-ROM disc data at a speed of about 2× max. (about 2200 KB/s) and CD-ROM data at a speed of 12 × max. (1800KB/s). • You can enjoy DVD-VIDEO discs by installing the supplied software (with limited models). See page 19. • You can enjoy Audio CD discs from the speakers of your notebook computer which are suitable for digital Audio CD disc play. See page 23. • You can reinstall the operating system on your notebook computer by a recovery CD-ROM disc using the DVDROM drive easily. See page 24. • This drive supports a PC card interface function compatible with both the CardBus and 16-bit mode. If you use this DVD-ROM drive with the supplied AC adapter, the drive is set to the CardBus mode automatically. If you use the drive without the supplied AC adapter (with the electric power from the connection to your notebook computer), the drive is set to the 16-bit mode automatically. • The CardBus mode enables high speed copying of data. • The PC card and cable can be stowed in the bottom of the DVD-ROM drive. This is convenient when transporting the drive. • The supplied compact and lightweight AC adapter supports the following power requirements. AC-CDR51 :100~240 V 5 Usable discs 1) 2) To play CD-R discs written using “DirectCD“ software, close the operation when the writing is finished. If you use a Windows R 98 models and play CD-RW discs written using “DirectCD“ software, “UDF Reader“ software must be installed in your notebook computer. To check if “UDF Reader“ software is installed, click the [Start] button, point to [Settings], click [Control Panel], and then double-click [Add/Remove Programs]. If “Adaptec DirectCD Reader“ is in the list, “UDF Reader“ software has already been installed. Notes • Only use circular discs. Do not use discs with any other shape (star, heart, etc.), as this may damage the DVD-ROM drive. • Do not use scratched or damaged discs, as doing so may damage the DVD-ROM drive. • When using a video CD, an MPEG playback video card or playback application software must be installed. • When using discs, search application software or playback application software must be installed. Your DVD-ROM drive can use all discs with the following icons. This drive can play Icon DVD-ROMs DVD-VIDEOs DVD-Rs (reading only) CD-Rs1) (reading only) CD-RWs2) (reading only) CD-ROMs Audio CDs CD TEXTs CD EXTRAs VIDEO CDs Photo CDs ———— Electronic Books You cannot use any of the following discs. • DVD-RAMs 6 • DVD-RWs Unpacking the DVD-ROM drive After taking the DVD-ROM drive out of the box, check that the package contains the components listed below. If anything is missing, contact the Sony dealer where you purchased this product or a Sony service representative serving your area. • PCGA-DVD51 DVD-ROM drive (1) • Software CD-ROM (1) • Manual eject pin (1, stowed in the back of the drive) • AC adapter AC-CDR51 (1) • Installation disk (1, 3.5 inch floppy disk) • DVD-ROM Drive Operating Instructions (1, this manual) • Warranty card (1) 7 Locating the controls and connectors 1 DC IN connector 2 LINE OUT connector 3 POWER indicator 4 Manual eject hole 5 Eject button 6 BUSY indicator 7 Manual eject pin (P. 18) 8 Setting up the DVD-ROM drive If you are using one of the following models PCG-505GX, 505G, 505FX, 505F, 505TX, 505TS, 505TR, Z505SX, Z505S, Z505HSK, PCG-C1X Before installing the DVD-ROM drive, the required driver must be installed in the notebook computer. If you are using other than those above, you do not need to install the driver. Follow the procedure on page 13 to connect the DVD-ROM drive to the notebook computer. Installing the driver (WindowsR 98) Make sure you connect the supplied AC adapter to the drive before installing the device. 1 Connect the floppy disk drive to the computer. If you use a USB floppy disk drive, it can be connected after the computer has been turned on. 2 Turn on the computer. Do not attempt to operate the computer until Windows is functioning. 3 Insert the supplied installation disk in the floppy disk drive. 4 Connect the AC adapter included in the package, to the DVD-ROM drive and an AC outlet, and then insert the PC card into the PC card slot on the notebook computer. Note Make sure to connect the supplied AC adapter to the drive before installing the driver. The driver cannot be installed without the AC adapter. For details, see “Connecting the DVD-ROM drive to the notebook computer” on page 13. The “Add New Hardware Wizard” dialog box appears. 5 6 Click [Next]. Ensure that “Search for the most appropriate driver for using a device (Recommendation)” is selected and then click [Next]. (Continued) 9 Setting up the DVD-ROM drive (continued) 7 Ensure that “Floppy disk drive” is checked and the supplied floppy disk is inserted in the floppy disk drive. Then, click [Next]. 8 Wait until the search is complete and the window changes. 9 Click [Next]. Copying starts. Wait until copying is finished and the window changes. 10 Click [Finish]. The driver installation is finished. In step 11, confirm the installation. 11 Click the [Start] button, point to [Settings], and then click [Control Panel]. 12 Double-click [PC card]. [PC card (PCMCIA)] opens. If “Sony CardBus ATAPI-Socket 1” appears on the list, the driver is installed correctly. If you use any of the following models, follow the steps below to complete the installation PCG-505GX, 505G, 505FX, 505F, 505TX, 505TS, 505TR, C1X Remove the connected PC card and keep the supplied installation disk in the floppy disk drive. 1 Click the [Start] button, point to [Settings], and then click [Control Panel]. 2 Double-click [Add New Hardware]. The “Add New Hardware Wizard” window appears. 3 4 Click [Next]. Click [Next]. Wait until the search is completed and the screen display changes. 5 10 Select “No” and click [Next]. 6 Select “SCSI controllers” from “Hardware types” and then click [Next]. 7 8 Click [Have Disk]. 9 Check that the supplied installation disk is in the floppy disk drive, ensure that “Copy manufacturer’s files from” is “A:\” and then click [OK]. Ensure that “Sony 16Bit ATAPI PC Card” appears on the “Model” item and then click [Next]. 10 Click [Next]. 11 Click [Finish]. In step 12, confirm the system settings. Note When confirming the system settings, connect the PC card of the DVDROM drive without the supplied AC adapter. 12 Confirm the system settings. To confirm the system settings When the DVD-ROM drive is connected to the computer after installing the driver, click the Start button, select [Settings] , click [Control Panel], double-click [System], click [Device Manager] and then double-click [SCSI controllers]. If “PCMCIA ATA Card” appears in the “System Properties” window, you must perform the following procedure: 1 Click “PCMCIA ATA Card” and then click [Remove]. The “Confirm” window appears. 2 Click [OK]. 3 Remove the DVD-ROM drive from the computer. 4 Reconnect the DVD-ROM drive to the computer. 5 Ensure that “SCSI controllers” shows “Sony 16Bit ATAPI PC Card” in the “System Properties” window. 11 Setting up the DVD-ROM drive (continued) Installing the driver (WindowsR 2000 Professional) Tip When the icon does not appear on the taskbar, see the tip on page 16 to display it. 1 Connect the floppy disk drive to the computer. If you use a USB floppy disk drive, it can be connected after the computer has been turned on. 2 Turn on the computer. Do not attempt to operate the computer until Windows is functioning. 3 Insert the supplied installation disk in the floppy disk drive. 4 Connect the AC adapter included in the package, to the DVD-ROM drive and an AC outlet, and then insert the PC card into the PC card slot on the notebook computer. For details, see “Connecting the DVD-ROM drive to the notebook computer” on page 13. The “Add New Hardware Wizard” dialog box appears. 5 6 Click [Next]. 7 Ensure that “Floppy disk drive” is checked and the supplied floppy disk is inserted in the floppy disk drive. Then, click [Next]. If the “CD-ROM drive“ is checked, remove the check. 8 Wait until the search is complete and the window changes. Ensure that “Search for the most appropriate driver for using a device (Recommendation)” is selected and then click [Next]. 9 Click [Next]. 10 Click [Finish]. The driver installation is complete. In step 11, confirm the installation. 11 Double-click the icon in the taskbar on the right side of the display. [Unplug or Eject Hardware] appears. If [Sony CardBus ATAPI] in the [Hardware Devices] list, the installation is finished correctly. Click [Close] to close the window. 12 Using the DVD-ROM drive This section describes how to connect the DVD-ROM drive to your notebook computer and how to insert or remove a disc. Connecting the DVD-ROM drive to the notebook computer Note Do not connect or disconnect the supplied AC adapter while the DVD drive is in use or the notebook computer is in power saving mode. Disconnect the AC adapter after removing the PC card. Using the DVD-ROM drive with the supplied AC adapter When using the supplied AC adapter, the PC card interface is set to the CardBus mode automatically and the DVD-ROM drive enables high-speed data transfer (enables reading of DVD-ROM disc data at a speed of 8× max. and CD-ROM data at a speed of 24× max.). When you use the drive in the CardBus mode, the POWER indicator lights in green. 1 2 Turn on the notebook computer. 3 Connect the supplied AC adapter to the DVDROM drive and an AC outlet. Remove the PC card from the bottom of the DVDROM drive. To an AC outlet (Continued) 13 Using the DVD-ROM drive (continued) Notes • The disc tray does not open by simply connecting the drive’s AC adapter and pressing the eject button. Before pushing the eject button, you must connect the drive’s PC card to the notebook computer and verify that the power lamp is on or flashing. • Changing the power management settings during operation of this drive might destabilize thenotebook computer’s operations. Do not change the settings during the operation. • To play a DVD-VIDEO disc, see notes in “Playing a DVD-VIDEO“ on page 19 . Notes • Do not connect the supplied AC adapter while the DVD drive is in use or the notebook computer is in power saving mode. Connect the AC adapter after removing the PC card. • Never use the drive with the supplied AC adapter when you reinstall the notebook computer. For more information about how to reinstall, see page 24. 14 4 Insert the PC card into the PC card slot on the notebook computer with the “SONY“ logo side facing up. The POWER indicator on the DVD-ROM drive lights in green when the notebook computer detects the drive. “SONY“ logo side POWER indicator Using the DVD-ROM drive without the supplied AC adapter The DVD-ROM drive also works on the electric power from your notebook computer. The PC card interface is set to the 16-bit mode automatically and the DVDROM drive enables data transfer at a slower rate than in the CardBus mode (enables reading of DVD-ROM disc data at a speed of about 2× max. and CD-ROM data at a speed of 12× max.). When you use the drive in the 16-bit mode, the POWER indicator flashes in green. Notes • When removing the DVD-ROM drive while the notebook computer is off, it is not necessary to follow steps 1 ~ 4 on this page (Windows R 98/95) or 1 ~ 5 on page 16 (Windows R 2000 Professional). Perform step 5 or 6 only. • Ensure that there is no disc in the disc tray before removing the DVD-ROM drive. • Instead of [Sony CardBus ATAPI], [Sony 16 Bit ATAPI Card] (Windows R 98) or [Sony 16Bit ATA PC Card] (Windows R 2000 Professional) appears when using the drive without the supplied AC adapter. • Do not remove the PC card by pulling the cable; doing so may cause a malfunction. Be sure to grasp the card by the edges and pull it out. Tip If the PC card icon does not appear on the taskbar, display it by following the procedure below. 1 Click the [Start] button, point to [Settings], and then click [Control Panel]. 2 Double-click [PC card]. 3 Click “Sony CardBus ATAPI” and then click [Stop]. 4 Confirm that “You may safely remove this device” is displayed and then click [OK]. 5 Press the PC card slot eject button on the computer. Removing the DVD-ROM drive from the notebook computer When removing the DVD-ROM drive while the notebook computer is on, be sure to follow the procedure below. Failure to do so may cause the notebook computer to malfunction. For notebook computers with WindowsR 98 1 Terminate the software application that is using the DVD-ROM drive. 2 Click the PC card icon on the right side of the taskbar. The short cut menu appears. 3 4 5 Click [Sony CardBus ATAPI]. Confirm that “You may safely remove this device” is displayed and then click [OK]. Press the PC card slot eject button on the computer. The PC card ejects from the connector. Grasp the card by the edges and pull it out. Eject button 15 Using the DVD-ROM drive (continued) Tip icon does not If the appear on the taskbar, display it by following the procedure below. 1 Click the [Start] button, point to [Settings], and then click [Control Panel]. 2 Double-click [Add/ Remove Hardware]. 3 If [Add/Remove Hardware Wizard] appears, click [Next]. 4 Select “Uninstall/ Unplug a device“ and then click [Next]. 5 Select “Unplug/Eject a device“ and then click [Next]. 6 Select “Sony CardBus ATAPI” and then click [Stop]. 7 Confirm that “Sony CardBus ATAPI” is displayed and then click [Next]. 8 Click [Finish]. 9 Press the PC card slot eject button on the computer. For notebook computers with WindowsR 2000 Professional 1 Terminate the software application that is using the DVD-ROM drive. 2 Double-click the icon in the taskbar on the right side of the display. 3 Click [Sony CardBus ATAPI] from the [Hardware devices] list in [Remove Hardware] and click [Stop]. 4 If [Stop a Hardware device] appears, confirm [Sony CardBus ATAPI] is displayed and then click [OK]. 5 Confirm that “The ‘Sony CardBus ATAPI’ device can now be safety remove from the system.” is displayed and then click [OK]. 6 Press the PC card slot eject button on the computer. The PC card ejects from the connector. Grasp the card by the edges and pull it out. Transporting The PC card and cable can be stowed in the bottom of the DVD-ROM drive as illustrated below. This is convenient when transporting the unit. 1 “SONY“ logo side 2 3 1 Attach the PC card with the “SONY“ logo side facing the bottom of the DVD-ROM drive. If you attach the PC card upside down, the cable may twist and may not fit into the groove. 2 Fit the cable into the groove. 3 Attach the ferrite core part of the cable to the rear of the DVD-ROM drive. 16 Inserting a disc Before attempting to insert a disc, connect the AC adapter and then turn on the notebook computer. 1 Press the eject button. The disc tray ejects. Eject button 2 Place the disc on the center of the disc tray and, while supporting the bottom of the disc tray, press gently on the center of the disc until it clicks into place. Disc 3 Close the disc tray by gently pushing it. When the notebook computer starts reading data from the disc, the BUSY indicator on the DVDROM drive flashes. BUSY indicator 17 Using the DVD-ROM drive (continued) Removing a disc Confirm that the BUSY indicator is not flashing and press the eject button. BUSY indicator Eject button Note Place the DVD-ROM drive on a level surface and then insert the manual eject pin into the manual eject hole. When the disc tray does not eject Confirm that the BUSY indicator is not flashing, detach the manual eject pin from the PC card depression of the bottom panel, and insert it into the manual eject hole. The disc tray ejects and you can remove the disc. Manual eject pin Manual eject hole 18 Playing a DVD-VIDEO To play a DVD-VIDEO disc, your notebook computer must meet the following requirements. – CPU : 400 MHz PentiumRII processor or higher, or 450 MHz Celeron™ or higher – WindowsR 98 or WindowsR 2000 Professional preinstalled models – Software : “Media Bar Version 2.0“ or higher Note You cannot install the supplied software if your notebook computer does not have “Media Bar Version 2.0“ or higher. For more information about the version of “Media Bar“ software, see the operating instructions of your notebook computer. If your notebook computer meets these requirements, you can enjoy DVD-VIDEO discs after making the following settings. Setting up to play a DVD-VIDEO Install the supplied software, “DVD Software Decoder“ and “Media Bar DVD Player“, (on the supplied CD-ROM disc) to play a DVD-VIDEO using the DVD-ROM drive. First, install “DVD Software Decoder“ and then install “Media Bar DVD Player“. To install “DVD Software Decoder“ 1 Connect the DVD-ROM drive and insert the supplied CD-ROM disc. 2 3 Double-click the icon in [My Computer]. Double-click the “DVD Software Decoder“ folder and double-click the icon (setup.exe) in the folder. Installation starts. Follow the messages appearing in each window. After installation, the “DVD Software Decoder“ window will appear automatically. To install “Media Bar DVD Player“ 1 Click [Back] on the upper-left of the “DVD Software Decoder“ window. 2 Double-click the “Media Bar DVD Player“ folder icon (setup.exe) in the and double-click the folder. Installation starts. Follow the messages appearing in each window. After installation, the “AV-Play Settings“ window of the “Media Bar“ software will appear automatically. (Continued) 19 Using the DVD-ROM drive (continued) Note When you use a notebook computer with Windows R 2000 Professional, restart the notebook computer after the step 3. 3 Ensure that “DVD-VIDEO” is checked and click [OK]. The setting is complete. Close the window and remove the disc. Playing a DVD-VIDEO using “Media Bar“ To play a DVD-VIDEO, use the “Media Bar“ software on your notebook computer. For more information about the “Media Bar“ software, see the operating instructions of the “Media Bar“. • For playing back DVD-VIDEOs, the CardBus mode is recommended (use the DVD-ROM drive with the supplied AC adapter). In 16-bit mode (using the DVD-ROM drive without the supplied AC adapter), playback performance may not be satisfactory. • Use the “Media Bar“ software when playing back DVD-VIDEOs. If you playback using an other software, it may cause a malfunction. • There may be some restrictions on operations, or there may be sound drops or image drops, depending on the DVD discs. • Some discs recorded at 20 or 24 bits may produce noise while playing. If you connected audio devices to this computer, this may cause damage to your hearing and the speakers. It is recommended that you reduce the volume before playing the discs. • If you have inserted a DVD-VIDEO disc into the DVD-ROM drive, you cannot toggle between the display modes using the Jog Dial control or Fn+F8 on your notebook computer. • If your notebook computer has an a (external display) connector, you cannot connected a TV and play DVD-VIDEOs using your notebook computer over this connector. 20 Tips • With the default settings, the “DVD Player“ window cannot be reduced in size. To reduce the size of the window, change the display mode of the “DVD Player“ window to normal display mode by following the instructions in “To play a DVD-VIDEO disc in normal display mode“ in the right hand column. • With the default settings, the wallpaper is not displayed while playing a DVD-VIDEO disc. To display the wallpaper while playing a DVD-VIDEO disc, do one of the following: – Follow the instructions in “To play a DVD-VIDEO disc in normal display mode“ in the right hand column . – Follow steps 1 and 2 of “To play a DVDVIDEO disc in normal display mode“ in the right hand column , then remove the check from “Do not display wallpaper while playing a DVD video disc“. This method may alter the wallpaper color however . • If you use a Sony C1 Series Notebook Computer, some part of display will not appear depending on titles of software. Display modes while playing a DVD-VIDEO While playing a DVD-VIDEO disc, the display mode (except for the “DVD Player“ window) is 1024 x 768 dots and the number of colors is set to 256 (default settings). This improves the DVD-VIDEO play performance and shows pictures in high quality. However, on the display of the “DVD Player“ window, you will see pictures in full color*. * This is accomplished by the graphic accelerator using dithering. To play a DVD-VIDEO disc in normal display mode 1 Click [Stop] in the “DVD Player“ window. If you have maximized the “DVD Player“ window, right-click the window to display the pop-up menu. Choose “Display the operation window forward“ to display the “DVD Player“ operation window forward. 2 Click [Setup] to display the “DVD Setup“ window. 3 Remove the check from “Play a DVD video disc using 256 colors“. 4 Click [OK] to confirm the setting. 21 Using the DVD-ROM drive (continued) DVD region code settings If a region code warning appears when you are using the DVD player, it could be that the DVD you are trying to play is incompatible with the DVD-ROM drive in your notebook. The region code is listed on the disc's packaging. The region code default setting is “1“ for this drive. Do not change the settings using the region code change function in Windows 2000 Professional or other software. System malfunctions encountered from using this function are beyond the scope of your warranty and will result in service charges for repair. Notes about DVD-VIDEO discs Region code of DVD-VIDEOs you can play Region code indications such as 1 are labeled on some DVD-VIDEOs to indicate which type of drive or player can play the discs. Unless “1“ is included in the indications or ALL is labeled on the DVD-VIDEOs, you cannot play the discs on this drive. If you try to play these discs, the message “Playing this disc prohibited by area limits.“ will appear on the display. Depending on the DVD-VIDEO, no region code indication may be printed on the label even though playing the DVD-VIDEO is prohibited due to the area limits. Note on playback operations of DVD-VIDEOs Some playback operations of DVD-VIDEOs may be intentionally limited by software producers. Since this drive plays DVD-VIDEOs according to the disc contents provided by the software producers designed, some playback features may not be available. Also refer to the instructions supplied with the DVD-VIDEOs. Marks on DVD-VIDEO discs The following marks are labeled on DVD-VIDEO discs or their packages. Each mark details the contents or features recorded on the disc. Depending on the DVD-VIDEO, no marks or indications may be printed on the label even though the disc has some contents or features. For more information about these marks, see the instructions on the DVD-VIDEO discs. Mark Meaning Indicates the number of tracks 3 2 Indicates the number of subtitles 3 Indicates the number of angles. 16:9 LB 1 22 Indicates the ratio of display aspects you can select. Indicates region code you can play. Notes • The following notebook computers do not support digital audio CD playback. PCG-505GX, 505G To playback audio CDs use the audio cable RKG136, sold separately, to connect the DVDROM drive’s LINE OUT connector and your notebook computer’s LINE IN connector. • Depending on the notebook computer operating mode (while accessing the hard disk, etc.) noise may occur during digital audio CD playback. • To adjust the volume, click the “volume” icon in the taskbar, or use the Fn + F4 key. Playing an audio CD If you are using a digital audio CD playbackcompatible notebook computer, connecting the DVDROM drive to the notebook computer allows you to enjoy audio sound via the built-in notebook computer speaker or headphones. In this case, the audio signal is not output from the LINE OUT connector on the DVD-ROM drive. For notebook computers with WindowsR 98 1 Connect the DVD-ROM drive to the notebook computer and click the [Start] button, point to [Settings], and then click [Control Panel]. The “Control Panel” appears. 2 Double-click [Multimedia]. The “Multimedia Properties” appears. 3 4 Click the [CD Music] tab. Confirm that the “Enable digital CD audio for this CD-ROM device” checkbox is checked and click [OK]. If not, check the “Enable digital CD audio for this CD-ROM device” checkbox and click [OK]. For notebook computers with WindowsR 2000 Professional 1 Connect the DVD-ROM drive to the notebook computer and click the [Start] button, point to [Settings], and then click [Control Panel]. The “Control Panel” appears. 2 Double-click [Sounds and Multimedia]. The “Sound and Multimedia Properties” appears. 3 4 Click the [Hardware] tab. 5 Confirm that the “Enable digital CD audio for this CD-ROM device” checkbox in the [Properties] tab is checked and click [OK]. Select “TOSHIBA DVD-ROM SD-C2402...“ from the list and click [Properties]. If not, check the “Enable digital CD audio for this CD-ROM device” checkbox and click [OK]. 23 Using the DVD-ROM drive (continued) Notes • You cannot reinstall the computer with the supplied AC adapter connected to the DVDROM drive. Reinstalling can be done in the 16-bit mode (electric power from the connected notebook computer) only. • Make sure to use the notebook computer’s AC adapter when reinstalling. Reinstalling When the notebook computer does not work properly, you can reinstall the hard disk using the DVD-ROM drive and “Product recovery CD” supplied with the notebook computer. You cannot use the supplied AC adapter when reinstalling. 1 2 3 Turn off the notebook computer. Connect the AC adapter to the notebook computer and an AC outlet. Insert the PC card into the PC card slot on the notebook computer with the “SONY“ logo side facing up. “SONY“ logo side 4 Eject the disc tray using the supplied manual eject pin and place the “Product recovery CD” in the disc tray. For details on inserting a disc or using the manual eject pin, see “Inserting a disc” on page 17 and “When the disc tray does not eject” on page 18. Note Be sure to place the “Product recovery CD” in the disc tray before turning on the notebook computer. 5 Turn on the notebook computer. The POWER indicator on the DVD-ROM drive flashes green when the notebook computer detects the drive. POWER indicator 6 24 Reinstall the notebook computer by following the procedure described in the operating instructions for the notebook computer. Precautions Safety Should any solid object or liquid fall into the casing, unplug the DVD-ROM drive and have it checked by qualified personnel before operating it any further. Installation Do not place the DVD-ROM drive in a location where it is : • On an unstable surface • On a rug or carpet • In very humid areas or where there is no ventilation • Subject to excessive dust • Subject to direct sunlight or extreme heat • Extremely cold • In a car with its windows closed. Operation • If the DVD-ROM drive is brought directly from a cold to a warm location, or if it is placed in a very damp environment, moisture may condense on the lenses inside the drive. Should this occur, the drive may not operate properly. Remove the disc and leave the DVD-ROM drive on for approximately one hour or until the moisture evaporates. Then, turn the DVD-ROM drive off. • Do not move the DVD-ROM drive while it is operating as this may cause a malfunction. PC card • Do not directly touch the connector. • The card consists of electronic components that have precise dimensions. Do not bend, drop, or bump the card. • To remove the card, follow the instructions for the PC card slot on your computer. If you remove the PC card with force, the PC card or your computer may be damaged. • Do not expose the card to water. • Do not disassemble the card. (Continued) 25 Precautions (continued) Cleaning the casing Clean the casing with a soft, dry cloth or a soft cloth slightly moistened with a mild detergent solution. Do not use any type of abrasive pad, scouring powder, or solvent such as alcohol or benzine. Cleaning the lens If you accidentally touch the lens with dirty fingers or if dust on the lens prevents the DVD-ROM drive from operating properly, clean the lens. Lens Transportation • When you transport the DVD-ROM drive, use the original box and packing materials. • Before moving the DVD-ROM drive, make sure to remove the disc from the drive. 26 Notes on Discs Handling • To keep the disc clean, handle it only by the edges. Do not touch the surface. • Do not write on or stick paper or tape to the surface of the disc. • Do not use a disc with tape, seals, or paste on it, as the disc may damage the DVD-ROM drive. Not this way Storage • Do not expose the disc to direct sunlight or heat sources, such as hot air ducts, or leave it in a car parked in direct sunlight. • After playing the disc, store it in its case. Stacking discs without cases or leaving the disc exposed may cause the disc to warp. Cleaning • Dirt from a fingerprint or dust may cause picture noise or reduced sound quality. • Clean the disc with a cleaning cloth. Wipe the disc from the center out. • For dirt, clean the disc with a soft cloth slightly moistened with water, then remove the moisture with a soft, dry cloth. • Do not use solvents such as benzine, thinner, commercially-available cleaners or antistatic spray intended for vinyl LPs. 27 Specifications Disc Compatible discs • DVD-ROM • DVD-VIDEO • DVD-R (reading only) • CD-R (reading only) • CD-RW (reading only) • CD-ROM • Photo CD (multisession) • CD-DA (music CD) • Video CD • CD Extra (CD+) • CD TEXT • Electronic Book Disc diameter: 12 cm (43/4 in.), 8 cm (3 in.) Drive performance 1) The maximum data transfer rate varies with the notebook computer‘s performance. Data transfer rate1) • Electric power from the supplied AC adapter Max : approx. 8× speed (DVD-ROM) : approx. 24× speed (CD-ROM) • Electric power from the connected notebook computer) Max : approx. 2× speed (DVD-ROM) : approx. 12× speed (CD-ROM) DVD-ROM:1× speed=1352 KB/s CD-ROM:1× speed=150 KB/s Access time Average (1/3 stroke): 150 ms Interface card Interface: Conforms to PCMCIA 2.1/JEIDA 4.2 Card type: PCMCIA Type II (Conforms to CardBus/ 16 bit mode) 28 AC adapter Power requirements 100-240V AC, adjustable, 50/60 Hz Power consumption 15W max. Output voltage and current 10 Vmax., 1.5 A Other Specifications Power source DC IN connector: 10 V Connecting the supplied AC adapter supplies power from an AC outlet. Power consumption Approx. 6 W (reading) Operating temperature 41°F to 95°F (5°C to 35°C) (temperature gradient less than 18°F (10°C)/hour) Operating humidity 20% to 80% (not condensed), provided that humidity is less than 65% at 95°F (35°C) (hygrometer reading of less than 84°F (29°C)) Storage temperature -4°F to 140°F (-20°C to 60°C) (temperature gradient less than 18°F (10°C)/hour) Storage humidity: 10% to 90% (not condensed), provided that humidity is less than 20% at 140°F (60°C) (hygrometer reading of less than 95°F (35°C)) Dimensions Approx. 53/4 × 11/16 × 61/8 inches (Approx. 144 × 26 × 153mm) (w/h/d) Mass Approx. 18.5 oz. (520 g) (drive only) Design and specifications are subject to change without notice. 29 Getting Help This section describes how to get help and support from Sony, as well as troubleshooting tips for your DVD-ROM drive. About Sony’s Support Options Sony provides several support options for your DVD-ROM drive. When you have questions about your DVD-ROM drive and the software, check these places for answers: ❒ This guide explains how to use your DVD-ROM drive. ❒ The Sony Sales and Marketing Support number offers information about your notebook computer and other Sony products that work with your computer. To contact Sony Sales and Marketing Support, call 1-888-4SONYPC (1-888-476-6972). ❒ The Sony fax-back service provides you with answers to commonly asked questions. You can use this automated service to request a list of available topics and then select the topics that you want to receive. To contact the Sony fax-back service, call 1-888-4SONYPC (1-888-476-6972). ❒ The Sony e-mail support service answers your questions by electronic mail. Just send your question in an e-mail message, and a customer service representative will send you a reply. To send a question to Sony e-mail support, address the message to [email protected]. 30 Troubleshooting If you experience any of the following difficulties while using the DVD-ROM drive, use this troubleshooting guide to help remedy the problem. If the problem persists, consult your nearest Sony dealer. The disc tray does not eject even when the Eject Button is pressed. cCheck that the notebook computer is turned ON. cEnsure that the AC adapter that is supplied with the DVD-ROM drive is connected and that the PC card is inserted correctly into the PC card slot of the notebook computer. The disc tray does not eject even when you insert the pin into the manual eject hole cPlace the DVD-ROM drive on a level surface and then insert the pin into the manual eject hole (page 18). The disc tray does not eject even when the eject button on an application software is pressed. cEnsure that the driver for the DVD-ROM drive is installed (page 9). cThis operation may be prohibited by the application software. The disc tray does not lock into place. cPush in the disc tray securely. The disc tray ejects when it has already been locked into place. cEnsure that the disc is placed with the label side facing up. cClean the disc and the DVD-ROM drive lens (pages 26). cThe disc may be scratched. To confirm that the DVD-ROM drive is not malfunctioning, replace your disc with another disc. cCondensation may have developed in the DVDROM drive or on the disc. Remove the disc and allow it to stand for approximately one hour. (Continued) 31 Troubleshooting (continued) The DVD-ROM drive is not detected by the notebook computer or the POWER indicator does not light. cEnsure that the driver for the DVD-ROM drive is installed (page 9). cEnsure that the PC card is seated securely in the PC card slot of the notebook computer. cThe PC card slot pin may be bent or broken. cEnsure that the PC card is connected correctly and the notebook computer is turned on. cCheck if the PC card is connected inside out. No sound is heard during audio CD playback. cEnsure that “Volume Control” on the notebook computer is not muted. See the operating instructions for the notebook computer. No sound is heard during audio CD playback when connecting analog audio equipment. cCheck that the plug is securely connected to the LINE OUT connector. cThe “Volume Control” on the notebook computer may be set too low. See the operating instructions for the notebook computer. cThe audio CD playback setting on the Control Panel may be set to the digital audio CD playback. No sound is heard during digital audio CD playback. cYour notebook computer might not support digital audio CD playback. See the operating instructions for the notebook computer. cThe “CD Audio Volume” of the notebook computer may be set too low. See the operating instructions for the computer. cThe audio CD playback setting on the Control Panel may not be set to the digital audio CD playback. The sound skips during audio CD playback. cThe disc may be scratched or dirty. Clean the disc or replace it with another disc (page 27). 32 The sound skips during digital audio CD playback. cAnother application may be functioning. Exit the other application. To playback an audio CD while another application is functioning, perform the analog audio connections. See the operating instructions for the notebook computer. cThe notebook computer may be in power management mode. Check the CPU speed setting. See the operating instructions for the notebook computer. The sound skips or data cannot be read. cEnsure that the disc is placed with the label side facing up when you use a single-sided disc. cDo not insert a disc that the DVD-ROM drive cannot play. cClean the disc and the DVD-ROM drive lens (page 26). cThe disc may be scratched. To confirm that the DVD-ROM drive is not malfunctioning, replace it with another disc. cDirt may have accumulated on the turntable. Clean it. cCondensation may have developed in the DVDROM drive or on the disc. Remove the disc and allow it to stand for approximately one hour. The “Q*:\ is not accessible. The device is not ready. “ message appears and asks you to select [Retry] or [Cancel]. * Q (drive name) may be changed. cCheck if the disc is inserted in the DVD-ROM drive or inserted correctly. Open the disc tray and insert correctly again while the message appears and then click [Retry]. cRecognition of a DVD-ROM drive sometimes takes longer. Insert the disc correctly and access the disc if the POWER indicator does not light completely. The data transfer rate is too low. cThe power management mode of your notebook computer may be active. Be sure to verify the CPU speed setting. For more information, see the operating instructions of your notebook computer. (Continued) 33 Troubleshooting (continued) The notebook computer cannot enter power saving mode. cThe notebook computer may not be able to enter power saving mode while accessing the DVDROM drive. Set your notebook computer so that it cannot enter the power saving mode. Refer to the notebook computer operating instructions for the setting instructions. The PC card cannot be removed. cThe PC card cannot be removed while the DVDROM drive is functioning. cIf you use a notebook computer with WinodwsR 2000 professional, the PC card sometimes cannot be removed. In that case, quit all applications of “Media Bar“ and remove the PC card after about one minute. The notebook computer cannot reinstall. cCheck if that disc is the “Product recovery CD“ or not. cEnsure that the AC adapter that is supplied with the DVD-ROM drive is not connected. There are some image drops on the DVD disc. cThe notebook computer may be in power management mode. Check the CPU speed setting. See the operating instructions for the notebook computer. cThe drive is set to 16 bit mode (used without the supplied AC adapter). For playing back a DVDVIDEO disc, connect the supplied AC adapter. The DVD-ROM drive cannot be recognized even in 16 bit mode (without the supplied AC adapter) cWhen the notebook computer starts up, the DVDROM drive with the supplied AC adapter may be connected to the notebook computer. Restart the notebook computer disconnected with the DVD-ROM drive and connect it without the supplied AC adapter. The display screen gets blue and “Error Reading CD-ROM in Drive Q*: Please Insert CD-ROM UH1 With Serial Number xxxx-xxxx in Drive E:“ message appears. * Q (drive name) may be changed. cIf you touch the eject button while playing back a DVD-VIDEO disc, the disc tray will be opened and the software cannot read data. If you remove a disc, push the eject button after stopping a DVDVIDEO disc using the “DVD Player“ software. 34 Sony Corporation Printed in Japan