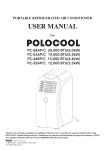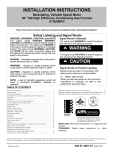
1
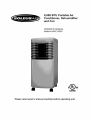
8,000 BTU Portable Air
Conditioner, Dehumidifier
and Fan
OWNER'S MANUAL
Model # MAC-8000
Please read owner's
manual carefully before operating
unit.
TABLE OF CONTENTS
INTRODUCTION
.............................................................................................................................................................
I3dPOR FANT 5_ FE G UARDS .....................................................................................................................................
LCDI POWER
PRODUCT
CORD
DIAGRAM
AND PLUG .................................................................................................................................
....................................................................................................................................................
3
3
4
5
FRONT ........................................................................................................................................................................
5
BACK ..........................................................................................................................................................................
5
ACCES_'ORIES.
..........................................................................................................................................................
5
...............................................................................................................................................................
6
.SELECTING
THE LOCATION
...................................................................................................................................
6
MOUNTING
THE EXHAUST
HOSE ..........................................................................................................................
6
INSTALLATION
WALL MOUNTING
.....................................................................................................................................................
WINDOW KJT INSTALLATION
CONTROL
PANEL
OPERATION
...........................................................................................................................................................
8
9
...................................................................................................................................................................
9
DEH{ 73dlDIFYING
.....................................................................................................................................................
.............................................................................................................................................................................
EMPTYING
THE WATER BU(XET
CONTINUOUS
REMOTE
7
.....................................................................................................................................................................
COOLING
FAN
..................................................................................................................................
6
DRAINAGE
CONTROL
MAINTENANCE
...........................................................................................................................
.........................................................................................................................................
....................................................................................................................................................
............................................................................................................................................................
9
Q
9
10
10
11
CLEANING
]HE HOU57NG
....................................................................................................................................
11
( ZEANING
]'HE FIL ]'ER .........................................................................................................................................
11
END OF SEASON
TROUBLESHOOTING
STORAGE
.......................................................................................................................................
..................................................................................................................................................
TECHNICAL
SPECIFICATIONS
................................................................................................................................
WARRANTY
...................................................................................................................................................................
11
12
13
14
INTRODUCTION
Thank you for purchasingthe SoleusAir MAC-80008,000 BTU PortableAir Conditionerand Dehumidifier.This unit is designed
to improve indoor livingand working comfort by providingcooling, dehumidifying,and ventilationwith minimal installation.
This multi-functionalunit operates as an air conditioner,dehumidifierand fan. When operating as an air conditioner,this unit is
designedfor spot cooling or cooling a roomno largerthan 150 square feet with a standard eight foot ceiling height. When using
this appliance,always exercisebasic safety precautions.
Pleasecomplete the following informationfor future reference.Retain this owner's manualwith your sales receipt as a
permanentrecord of your purchase.
Serial Number:
Date of Purchase:
Place of Purchase:
IMPORTANT SAFEGUARDS
Before installing and using your portableair conditionerand heater,it is importantthat you read this owner's manual
carefully.Store this manual in a safe place for future reference,
This instruction manualis usedfor guidanceand does not form partof a contract.It reservesthe right to make technicalchanges
without prior notice.
1.
Always placethe unit on a level surface.
2.
The applianceshall be installed in accordancewith nationalwiring regulation.
3.
The unit must be connectedto a correctly grounded power supply.For your safety,this unit is groundedthrough the
powercord plug when connectedto a groundedwall outlet. Do not use an adapter plug or extensioncord.
4.
Do not install the unit in an area where gas leakagemay occur andtor in an explosiveatmosphere.
5.
Do not apply an insecticide or any type of flammable spray on the unit.
6.
Confirmdrainage piping is connected properly.
7.
Do not start or stop the unit by inserting or pullingout the powerplug.
8.
Do not operate with wet hands.
9.
Close supervisionis necessarywhen the unit is used near children. The unit in not intendedfor use by children.
10. Do not insert anything into the air outlet. Do not obstruct air inlet or outlet grills.
11. Do not expose skin or eyes directlyto cool air for a long period of time.
12. If an abnormalodor or smokecomes out of the unit, disconnectthe unit immediatelyand contact a qualifiedservice
technician.(see page 14)
13. Whenopening the filter cover, do not touch the metal parts in the unit's interior.
14. Do not immersethe unit in water or any type of liquid. Do not use the unit in the immediatesurroundingsof a bath,
shower,or swimming pool,or in any other steamy,wet areas.
15. Whencleaning the unit, alwaysturn the unit off and unplugthe power cord.
16. Always inspectthe powercord for signs of damagebefore use. If the powercord is damaged,it mustbe replacedby the
manufactureror a qualified servicetechnician.
17. Do not placea plant or allow a pet in the direct path of the airflow to avoid injury.
18. Do not put a stove, etc, where it would be exposedto the direct airflow. It may affect combustion.
19. Do not sit on the unit or place anything on it.
20. Do not dispose of the remote control in fire, the batteries inside may explodeor leak.
21. Beforestoring, the water must be drained from the unit and the filters cleaned.
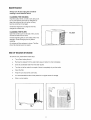
LCDI POWERCORDAND PLUG
This air conditioner is equipped with an LCDI (LeakageCurrent Detection and Interruption)powercord and plug as requiredby
US NationalElectricCode 440.65. This cord consistsof a lengthof shieldedflexible cord with no terminationon the load side and
a LCDI attachmentplug on the line side.
The LCDI powercord and plug will removethe supply source via electricaldisconnect (circuittrip) if the nominalcurrent leakage
betweenthe cord shield and either load conductorexceeds a predeterminedvalue. The cord will remain de-energizeduntilthe
devise has been manually reset.This is intendedto reducethe risk of a fire in the power cord or combustiblematerials nearby.
The cord shields are not grounded and they must be considereda shock hazards if exposed.The cord shield must not be
connectedto ground or to any exposed metal.
The test and reset buttonson the LCDI Plug are used to check if the plug is functioningproperly.Totest:
1. Plug power cord into wall outlet
2. Press TEST Button, circuitshould trip, cutting powerto the air conditioner
3. Press RESETbutton for use
If a test is performed and the indicator light remains ON, current leakagehas been detected. Do not use the air conditioner or
attempt to reset the LCDIPlug. Contact SoleusAir Customer Service for troubleshootingrecommendations.
)
)
FRONT
BACK
WARNING:
1.
2.
DO NOT press TEST button while the air conditioner is operating.
The TEST and RESET buttonsshould not be usedas "ON" and "OFF"
3.
4.
The cord and plug are not intendedto offer protectionto externallyconnectedloads or supply circuits.
The cord and plug are intendedfor indoor use only.
switches.
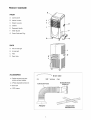
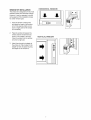
PRODUCTDIAGRAM
A
FRONT
A. Control panel
B. Interior Louvers
E
C. Exterior Louvers
E
E
D. Casters
E. Recessed Handle
F. Water Bucket
G. PowerCable and Plug
BACK
A. Hot air outlet grill
B. Air inletgrill
C. Filter
D. DrainValve
ACCESSORIES
• Flexibleexhaust hose and
window exhaustadapter
• 3-Piece adjustablewindow kit
• Drain tube
• 4 3/8" screws
Adapter
Adjustable
Window Kit
INSTALLATION
SELECTING THE LOCATION
Place the unit in a flat location where the air outlets are not obstructed.Place the unit at least 20" (50cm) away from a wall or
other obstacle.
MOUNTING THE EXHAUST HOSE
Slide the square end of the exhaustduct over the hot air outlet on the back of the unit.
The exhausthose should be kept as short and straightas possible. Preventany sharp bends in the exhaust hose, as this will
trap hot exhaust air.
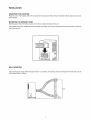
WALL MOUNTING
The hotexhaust air canbe vented throughthe wall or out a window.If mountingin the wall, the heightof the hole shouldbe 16
to 50 inches (40cm to 130cm).
50 in.
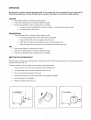
WINDOW KIT INSTALLATION
The window kit is designedto fit into most
standard vertical and horizontalwindows.
HORIZONTAL
WINDOW
However,it may be necessaryto modify
some aspects of the installationprocess
for certain window types.
.
.
Open the window or slidingdoor
and adjust the lengthof the window
kit to fit the opening. Mark and cut
down a single panel of the window
kit if necessary.
Place thewindow kit between the
window and the window frame as
shown in the imagesto the right.
Close the window onto the window
kit to form a tight seal.
.
Attach the exhaustduct adapter to
the window kit. Tabs located on the
adapter will lock into place securing
the adapterto the window kit.
VERTICAL
WINDOW
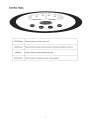
CONTROL PANEL
©
POWERButton
MODE Button
FAN Button
SWING Button
Press this button to turn the unit on or off.
Press this button to select amongthe modes of cooling, dehumidifying,or fan only.
Press this button to select the desired fan speed.
Press this button to oscillate the louvers or stop oscillation.
OPERATION
Plug the power cord into a properly grounded outlet. Do not connectthe unit to an outlet that is also being used for
other electrical appliances. The unit will beep after two seconds, then press the on/off button to begin operation.
COOLING
1.
Press the ModeButton to choose the coolingfunction.
2.
Press the Fan Speed Button to choose the desired fan speed.
3.
Press the Swing Button to select a steady airflow or oscillation.
•
In order to improve coolingefficiency,draw the curtains in a room exposedto direct sunlight.
•
Do not place near a heat source.
DEHUMIDIFYING
1.
FAN
1.
Press the Mode Buttonto choose the dehumidifyingfunction.
•
Inthe DehumidifyingMode, thefan speed cannot be adjusted.
•
Ensure that the water bucket is properlyplaced in the unit.
•
When the unit is usedas a dehumidifieronly, do not use the exhaust duct.
•
Keep the windowsand doors closed to aid in effectivelydehumidifyingthe room.
Press the ModeButton to choose the fan function.
2.
Press the Fan Speed Button to choose the desired fan speed.
3.
Press the Swing Button to select a steady airflow or oscillation.
EMPTYING THE WATER BUCKET
Whenthe unit is in coolingmode, unwantedwater is extractedfrom the air. Whenthe water bucketis full, thecompressorwill stop
but the fan will continue to run.
Toresume operation, empty the water bucketaccording to the following steps:
1.
Turnthe unit off. Do not move the unit when the water container is full.
2.
Using the handle,slowly remove the water bucketfrom the unit.
3.
Pour out anywater accumulated in the bucket.
4.
Washthe water bucket usingwarm water and a mild dishwasherdetergent.
5.
Allow the bucket to dry completely
6.
Replace the water bucket in the unit.
Pull
handle
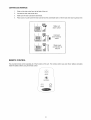
CONTINUOUS DRAINAGE
1.
Slide out the drain valve from the left side of the unit.
2.
Connectthe drain tube to the valve.
3.
Make sure the drain tube drains downward.
4.
Placea pan or bucket under the drain tube to hold the condensatewater,or let the tube drain down a gravitydrain.
Slide out
drain valve
Connect
drain tube to
valve
Make sure
connection is
secure
REMOTECONTROL
The provided remote control operatesall of the functions of the unit. The remote control uses one lithium battery (provided).
Installthe battery before usingthe remote control.
ON,OFF
FAN!SPEED
SWHNG
MOD£
i0
MAINTENANCE
Always turn off and unplugthe unit before
cleaningto avoid electricalshock.
CLEANING THE HOUSING
Wipe the surface of the unitwith a soft, damp cloth.
Do not use abrasive chemicalsor detergents to
clean the surface of the unit, as the unit may
become scratched or damaged.
Avoid direct exposure to sunlight as this may
change the surface color.
CLEANING THE FILTER
FILTER
Open the air filter cover on the side of the unitand
remove the filter from the cover.
Immerse the filter gently in warm water with a mild
detergent.Rinse thoroughlyand dry before
replacing.
An uncleanair filter reduces air volume.The filter
should be cleanedevery two weeks.
END OF SEASON STORAGE
Tostore the unit, pleasefollow these steps:
•
Turn off and unplugthe unit.
•
Removethe stopper from the water drain pipe and allow it to drain completely.
•
Drain all condensatewater from the water bucket.
•
Turnthe unit to fan mode for a couple of hours to completelydry out the inside.
•
Clean the filter.
•
Wrap the cord around the cord hooks.
•
It is recommendedthat the unit be packed in its original carton for storage.
•
Store in a drylocation.
11
TROUBLESHOOTING
Beforeseeking repair or service, please check the following:
PROBLEM
Unit does not operate or
only runs in fan mode.
Cooling efficiencyis not
satisfactory.
Unit is noisy or vibrates,
Water Leaks from the
Unit.
POSSIBLE CAUSE
REMEDY
Is the unit plugged in?
Securely plug the powercord into the wall outlet.
Is the main powersupply on?
Reestablishthe main powersupply.
Is the water bucketfull indicator light on?
Empty the water bucket.
Is the water bucket installed correctly
Completely insertwater bucket
Is the air inlet or outlet blocked?
Clear the blocking.
Is there any other heatsource in the room?
Move the heat source.
Are the air filters dirty?
Cleanthe air filters.
Is the fan speed set at low?
Increasethe fan speed.
Is the roomtoo large for this unit?
This unit providesspot cooling or coolingfor
rooms up to 150 sq. ft. with a standard 8 ft. ceiling.
Is the machinepositioned unevenlyon a level
surface?
Place the unit on a level surface.
Is the unit positionedon an unevensurface?
Place the unit on a levelsurface
Was the unit moved before emptyingthe
bucket?
Empty the water bucket before moving the unit
and keepthe unit uprightat all times.
Is the stopper on the water drain pipe loose?
Make sure the stopper on the water drain is
securely in place.
Is the voltage from the powersource correct?
Use a proper power source.
Is the exhaust hose positioned incorrectly?
Position the exhaust hose correctly and keepthe
exhaust hosestraight as possible.
The unit starts and stops
frequently.
12
TECHNICALSPECIFICATIONS
MODEL
MAC-8000
Cooling Capacity
8,000 BTU/Hr
DehumidifyingCapacity
75 Pints per day
Power Consumption
850 W
t Cooling:
Dehum:
Air Flow Volume
680 W
170 CFM
Power Source
115V/60 HZ
Rated Current
7.4A
t Cooling:
Dehum:
Sound PressureLevel
5.9A
Weight
<53 db(A)
67 Ibs
Dimensions
16.125X 12.75X 31.5 inches (WxDxH)
Refrigerant
R22
DISCLAIMER
ALL INFORMATION AND THE TECHNICAL SPECIFICATIONS
PRESENTED IN THIS USER'S MANUAL
ARE THE PRESENTATION
OF THE MANUFACTURER.
SOLEUS INTERNATIONAL
HAS NOT
CONDUCTED INDEPENDENT TEST TO THE INFORMATION AND THE SPECIFICATIONS
PRESENTED
HEREWITHIN.
13
WARRANTY
One Year Limited
Warranty
Soleus International Inc. warrants the accompanying
Soleus Air MAC-8000 to be flee of detects in material
and workmanship
for the applications specified in its operation instruction for a period of ONE (1) year from
the date of original retail purchase in the United States.
If the unit exhibits a detect in normal use, Soleus International Inc. will, at its option, either repair or replace
free of charge within a reasonable time after the unit is returned during the warranty period.
As a condition to any warranty service obligation,
with a copy of the original purchase invoice.
THIS
1)
2)
3)
4)
5)
WARRANTY
the consumer
must present
this Warranty
Certificate
it,
along
DOES NOT COVER:
Damage, accidental or otherwise, to the unit while in the possession of a consumer not caused by a
detect in material or workmanship.
Damage caused by consumer misuse, tampering, or failure to follow the care and special handling
provisions in the instructions.
Damage to the finish of the case, or other appearance parts caused by wear.
Damage caused by repairs or alterations of the unit by anyone other than those authorized by Soleus
International Inc.
Freight and Insurance
cost for the warranty
ALL WARRANTIES,
INCLUDING
ANY
LIMITED
TO ONE-YEAR
DURATION
service.
IMPLIED
OF THIS
WARRANTY
OF MERCHANT
ABILITY ARE
EXPRESS
LIMITED
WARRANTY.
SOLEUS
INTERNATIONAL
INC. DISCLAIMS
ANY LIABILITY
FOR CONSEQUENTIAL
OR INCIDENTAL
DAMAGES AND IN NO EVENT SHALL SOLEUS INTERNATIONAL
INC'S LIABILITY EXCEED THE
RETAIL VALUE OF THE UNIT FOR BREACH OF ANY WRITTEN OR IMPLIED WARRANTY WITH
RESPECT TO THIS UNIT.
This warranty covers only new products
used, salvaged, or refurbished products.
purchased
fi'om our authorized
dealers or retailers.
It does not cover
As some states do not allow the limitation or exclusion of incidental or consequential
damages, or do not
allow limitation on implied warranties, the above limitations and exclusions may not apply to you. This
warranty gives you specific legal rights, and you may also have other rights that vary from state to state.
For Warranty, Technical Support,
Please Call (888) 876-5387
Or Write To:
Soleus International
9451 Telstar Ave.
E1 Monte, CA91731
www. soleusair.com
Customer
Service,
Inc.
USA
14
Missing
or Defective
Parts