1
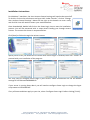
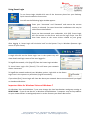
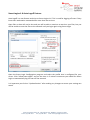
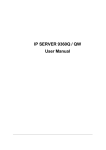
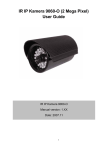
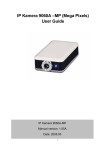
Smart Login v1.6.5
Smart Login allows workstations to login to a Smart-Net server without having to join a domain.
Smart Login is suitable for both laptops and desktop PC’s.
Features
• Users can have their own custom wallpaper displayed
• Installation and setup can be totally automated
Benefits
• Fully supports logging in to a Smart-Net server and other Windows domains
• Avoids the need to join a workstation to the domain to be able to login to a server
• Smart Login can be configured to support multiple servers and domains
• User profiles are not synchronized every time you login
Requirements
Smart Login has been tested and works on the following operating systems:
• Windows 2000 Professional
• Windows XP (all versions)
• Windows Vista (all versions)
• Windows 7 (all versions)
• Windows 2003 / 2003 R2 (all versions)
• Windows 2008 / 2008 R2 (all versions)
NOTE: Smart Login may work with other versions of Windows but has not been tested. We also
recommend upgrading non-SP3 versions Windows XP as SP3 fixes a number of networking related
issues.
Install Smart Login by downloading Smart Login from our website
http://www.smartcom.co.nz/support/downloads.php or from the Applications share on your
Smart-Net Server by typing into run on XP or Win 7, Search Programs and Files Æ V:\smartlogin\
and opening smartlogin-setup.exe.
Alternatively you can download Smart Login from
http://smartlogin.homelinux.net/downloads/smartlogin-setup.exe
Save the installation file to your Desktop.
Smart Computer Systems Ltd, 1 Birmingham Drive, Middleton, Christchurch 8024
Phone: (03) 982-2233
Fax: (03) 982-2234
Email: [email protected]
Installation Instructions
For Windows 7 machines, the User Account Control settings will need to be turned off.
To do this, click on the start button and type UAC. Under “Results”, click on “Change
User Account Control Settings’. Move the bar right to the bottom to never notify
and click OK. You will need to restart your machine before.
Once downloaded, double left-click on the Smart Login icon to start the installation
process. You will be presented with a setup wizard leading you through several
screens. The screens are shown in sequence below.
Click [Next] to follow through the various screens.
Specify which icons you would like to create when Smart Login is installed, then click “Install” to
proceed with your installation of the program.
You may need to configure Smart Login if your server’s name and domain are not the default
settings of SATURN and WORKGROUP.
If your server is running Smart-Net 1 you will need to configure Smart Login to change the logon
script name to NTLOGON.BAT.
If any of these conditions apply to your site, select ‘Configure Smart Login’ before clicking [Finish].
Smart Computer Systems Ltd, 1 Birmingham Drive, Middleton, Christchurch 8024
Phone: (03) 982-2233
Fax: (03) 982-2234
Email: [email protected]
Smart Computer Systems Ltd, 1 Birmingham Drive, Middleton, Christchurch 8024
Phone: (03) 982-2233
Fax: (03) 982-2234
Email: [email protected]
Configuring Smart Login
To configure Smart Login for a different server and domain name, select the Smart-Net Default
session and enter the settings appropriate for your site as per the screen below.
If you are unsure what your Server and Domain are, login to the Smart-Net Intranet and click
Server Information on the left. Note down the details under SMB Server as per below.
All settings will be saved under the name “Smart-Net Default”.
You may elect to create a new session rather than updating “Smart-Net Default”
You can make Smart Login display a session as the default by highlighting its session name and
ticking the checkbox “Make this the default session when Smart Login starts).
Click [Update Session] to automatically save your settings.
Click [Close] to exit the configuration program.
Smart Computer Systems Ltd, 1 Birmingham Drive, Middleton, Christchurch 8024
Phone: (03) 982-2233
Fax: (03) 982-2234
Email: [email protected]
Using Smart Login
To use Smart Login, double-click one of the shortcuts placed on your Desktop,
Quick Launch toolbar or Start menu.
You will see the following login window appear:
Enter your ‘Username’ and ‘Password’ and ensure the correct
session is selected. For most Smart-Net installations this may be
called ‘Smart-Net Default’.
Once you have entered your credentials, click [OK]. Smart Login
will run connect to the server and run the login script. You will
then have access to the server drives related to your group
permissions.
After logging in, Smart Login will minimize itself to the System Tray in Windows (bottom right
corner of your screen).
A single left-click on the Smart Login icon in the system tray will
show details and login status of the user logged in.
To logoff the network, click [Log Off] from the Smart Login window.
To close Smart Login click [Cancel]. This will leave your network
shares connected.
To logoff the network and end your Windows session, right click on the Smart
Login icon in the system tray and select [Log Off username].
If you select [Exit], Smart Login will close but leave your network shares connected until you logoff
or shutdown Windows.
Important Note for Windows Vista and Windows 7
On Windows Vista and Windows 7 you must change the local workstation workgroup setting to
DESKTOPWG. If you do not do this, a Windows Vista/Windows 7 computer may cause problems
on your network when its workgroup name is set the same as your Smart-Net server.
Smart Computer Systems Ltd, 1 Birmingham Drive, Middleton, Christchurch 8024
Phone: (03) 982-2233
Fax: (03) 982-2234
Email: [email protected]
Smart Login v1.6 Auto-Logoff Feature
Auto Logoff is a new feature exclusive to Smart Login v1.6. This is used for logging off users if they
leave their workstation unattended for more than the set time.
Open files or data will not be lost and you will be able to continue to work on your files, but you
will be unable to save the files to the network until you login again using Smart Login.
Open the Smart Login Configuration program and select the profile that is configured for your
server. Click “Allow Auto-Logoff” and set the time in 5 minute increments you would like Smart
Login to automatically log the user off the network.
It is important you click on “Update Session” after making any changes to ensure your settings are
saved.
Smart Computer Systems Ltd, 1 Birmingham Drive, Middleton, Christchurch 8024
Phone: (03) 982-2233
Fax: (03) 982-2234
Email: [email protected]
Smart Login FAQ
Q1.
A.
What is Smart Login?
Smart Login is a Windows logon client for Samba. It provides an alternative method for
workstations to logon to a Smart-Net server.
Q2.
A.
What platforms does Smart Login run on?
Smart Login is supported on the following operating systems:
•
•
•
•
•
•
Q3.
Windows 2000 Professional
Windows XP (all versions)
Windows Vista (all versions)
Windows 7 (all versions)
Windows 2003 / 2003 R2 (all versions)
Windows 2008 / 2008 R2 (all versions)
What are the advantages of using Smart Login?
• Smart Login allows workstations to logon to the server without the requirement of
having to join a domain.
NOTE: Domain logins are only supported by business, professional or enterprise
versions of Windows when enabling workstations to logon to Windows
2000/2003/2008 Server or Smart-Net running Samba.
•
Smart Login can easily be configured with multiple profiles to support multiple server
and domain configurations without requiring a restart.
•
Profiles are not used and therefore do not need to be synchronised between the
workstation and the server when you logon or logoff. Not using profiles will
significantly reduce the time to logon to the server.
•
Desktops and laptops are able to login to the server even if they're running a Home
version of Windows.
Q4.
A.
What are the disadvantages of using Smart Login?
Network profiles are not used.
Q5.
A.
I get the error message ‘User name or password incorrect’.
The server has rejected your attempt to logon because you have incorrectly typed your
username or password.
Q6.
A.
I get the error message ‘Invalid password’.
You have specified a username that does not exist and the server cannot validate the
password for the non-existent user.
Smart Computer Systems Ltd, 1 Birmingham Drive, Middleton, Christchurch 8024
Phone: (03) 982-2233
Fax: (03) 982-2234
Email: [email protected]
Q7.
A.
I get the error message “The credentials supplied conflict with an existing set of
credentials” or "Multiple connections to a server or shared resource by the same user are
not allowed"
This problem may affect Windows XP Home Edition and Windows XP Professional. Your
workstation has already authenticated to the server using alternative credentials. Windows
XP’s security policy does not allow you to authenticate as a different user within the same
windows session. You may be able to eliminate the problem using one of the following
methods, although success is not guaranteed.
Solution 1:
Ensure your version of Windows XP is Service Pack 3 or later. Windows XP Service Pack 3
fixes a number of issues that may cause the above error.
Solution 2:
Clear any persistent drive mappings then logout or restart your workstation before using
Smart Login again.
Solution 3:
When you create a connection to the server you can refer to the server by its NetBIOS
name or by its IP address. Each method of referencing the server can use their own set of
credentials without causing the error message above. Enabling “Translate server name to
IP address” in the configuration program tells Smart Login to run a copy of the login script
with references to the server name changed to its IP address.
Q8.
A.
When I click the ‘Check for Updates’ button in the configuration program I get the error
message “Unable to connect to the update server at this time.”
Your System Administrator should add the following URL to your Smart-Net server’s
‘Unrestricted Sites Editor’ for Smart-Net 1 or ‘No Authentication Required’ access list for
Smart-Net 2.
smartlogin.homelinux.net
The update feature within the Smart Login Configuration program is unable pass any
credentials to the Smart-Net proxy server and therefore needs to access the update site
without using authentication.
Smart Computer Systems Ltd, 1 Birmingham Drive, Middleton, Christchurch 8024
Phone: (03) 982-2233
Fax: (03) 982-2234
Email: [email protected]
Q9.
A.
When I run Smart Login the login script says it can’t find NTLOGON.BAT.
You are most likely running a Smart-Net 1 server. Smart Login v1.30 and greater have
changed to an alternate method of connecting to the server. As a result Smart Login no
longer requires the use of a drive letter to run LOGON.BAT or NTLOGON.BAT. A side effect
of this change for Smart-Net 1 servers means Windows will look in the current path for
NTLOGON.BAT rather than in the NETLOGON share on the server.
This occurs only if all of the following statements are true:
• Smart Login is set to run LOGON.BAT
• Your server is Smart-Net 1
• You are using Smart Login v1.30 or greater
There are two ways to fix the above problem:
• Use the Smart Login configuration to change the default login script from
LOGON.BAT to NTLOGON.BAT
OR
• Amend the line in \\SERVER\NETLOGON\LOGON.BAT which calls NTLOGON.BAT:
Change the line:
if %OS%x==Windows_NTx NTLogon.bat
To the following:
if %OS%x==Windows_NTx \\SERVER\NETLOGON\NTLogon.bat
Where:
\\SERVER is the name of your Smart-Net server.
This is normally SATURN.
Q10.
A.
•
•
•
•
Why does Smart Login take such a long time to run the logon script?
I’ve also noticed logging off takes a while too!
A number of users have reported significant slowness when the “Preserve Internet
Explorer Settings” option is enabled. This option should only be enabled for laptop users
who wish to preserve their Home internet settings. Although there is no simple solution for
this problem a few suggestions below may assist in troubleshooting:
You can safely disable the “Preserve Internet Explorer Settings” option if you run Smart
Login on a Desktop computer or a laptop without dial-up Internet access.
You may have antivirus or antispyware software running that is actively scanning the
registry. Some of these programs can slow down registry access.
Make sure your Temp folder has been emptied. Large numbers of files in the Temp folder
may cause your computer to run slower than normal.
Your computers registry may be bloated. The registry is similar in behaviour to a database
and is used to store the majority of your system hardware and software configuration. It
may dramatically increase in size as software is installed and uninstalled. Several programs
are available to assist in tidying up your computers registry.
NOTE: The "Preserve Internet Explorer Settings" option was removed from Smart Login
v1.50 onwards.
Smart Computer Systems Ltd, 1 Birmingham Drive, Middleton, Christchurch 8024
Phone: (03) 982-2233
Fax: (03) 982-2234
Email: [email protected]
Q11.
A.
How do I create an unattended install for Smart Login?
You can now specify a /SILENT command line parameter to the Smart Login setup program.
Smart Login automatically installs with the default options of SATURN and WORKGROUP or
automatically upgrades and keeps your existing settings.
You can also specify a /VERYSILENT command line parameter. This has the same effect as
the /SILENT option except that you won’t see the installation window appear at all during
the install process.
Q12.
A.
How do I create additional icons for Smart Login during an unattended install?
QuickLaunch, Desktop and Startup group icons can be optionally created using the /TASKS
command line parameter. The /TASKS parameter takes a comma separated list of icon
names.
Example:
/TASKS=”quicklaunchicon,desktopicon,startupfoldericon”
You may specify any or all icon names as required.
You may specify any command line parameters in the ‘Target’ field property of a shortcut
to the Smart Login setup program. Optionally you may run the setup program from a batch
file with extra parameters as required.
E.g. smartlogin-setup.exe /verysilent /tasks=”startupfoldericon”
Q13.
A.
How can I setup Smart Login with different server and workgroup names other than
SATURN and WORKGROUP during an unattended install?
It is now possible to supply your own settings by copying an existing ‘smartlogin.ini’ file to
the same location as the ‘smartlogin-setup.exe’ program. If the setup program detects
‘smartlogin.ini’ in the same directory as itself it will use those settings instead of the builtin defaults.
To find your ‘smartlogin.ini’ file you can install and configure a copy of Smart Login; then
copy the resulting ‘smartlogin.ini’ file to your setup program location.
The INI file is located in the directory where Smart Login was first installed.
E.g. in “C:\Program Files\Smart Login\smartlogin.ini”
Q14
A
The “DeleteFile failed Code 5, Access is denied” message came up during the installation!
DeleteFile failed: Code 5 is an error that can sometimes occur when trying to replace a file
during the installation of a program. This is usually caused by a program locking the file's
that the installation routine attempts to replace.
Solution: Make sure none of the Smart Login programs are running when attempting to
install a new version of Smart Login.
Smart Computer Systems Ltd, 1 Birmingham Drive, Middleton, Christchurch 8024
Phone: (03) 982-2233
Fax: (03) 982-2234
Email: [email protected]