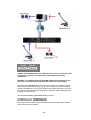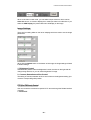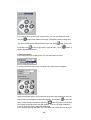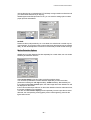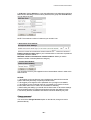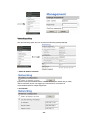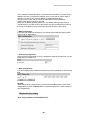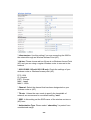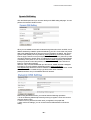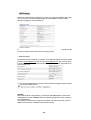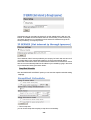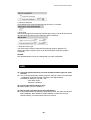
1
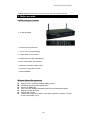
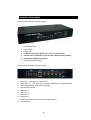
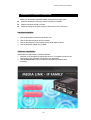
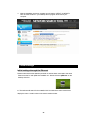
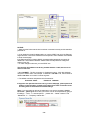
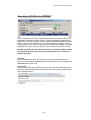
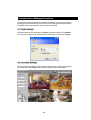
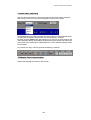
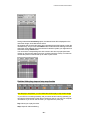
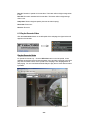
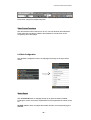
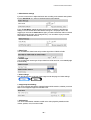
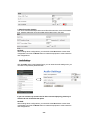
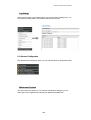
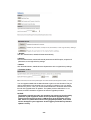
IP SERVER 9360Q / QW
User Manual
IP SERVER 9360Q USER MANUAL
USER MANUAL
IP Server 9360Q
Firmware Version: 1.04
Oct. 1, 2008
-1-
Warning: Any changes made to this equipment without permission may cause
damages to your equipment!
IMPORTANT NOTICE
1. IP SERVER 9360Q is designed for educational purposes .
2. IP SERVER 9360Q is designed for indoor use only, and Aviosys carries no
responsibility for the possible damages caused by misuse of the product. This
product was not intended for outdoor use and any damages caused by rain or
water is the sole responsibility of the owner.
3. Please use the power adaptor provided by the dealer, Aviosys carries no
responsibility for the incorrect use and possible damage caused by using other
adaptors.
4. Do not shake the IP SERVER 9360Q in any manner.
5. If IP SERVER 9360Q is not working properly, please contact the dealer. Please
do not open or tamper with the 9360Q. If the warranty seal is broken your
warranty for the 9360Q will be voided.
Copyright © 2008 Aviosys. All rights reserved. No part of this publication may be
reproduced, stored in a retrieval system, or transmitted in any form or by any means,
electronic, mechanical, photocopying, recording or otherwise, without the prior written
consent of Aviosys.
All trademarks and products mentioned in this document are the properties of Aviosys.
-2-
IP SERVER 9360Q USER MANUAL
Table of Content
1. INTRODUCTION .......................................................................................................... 4
FEATURES ....................................................................................................................... 4
2.
BEFORE YOU START ............................................................................................ 5
9360Q PACKAGE CONTENTS ......................................................................................... 5
MINIMUM SYSTEM REQUIREMENTS.................................................................................. 5
3. INTERFACE DESCRIPTION ...................................................................................... 6
4.
HARDWARE & SOFTWARE INSTALLATION .................................................... 7
HARDWARE INSTALLATION ............................................................................................... 7
SOFTWARE INSTALLATION ............................................................................................. 7
5. INITIAL SETTINGS...................................................................................................... 8
INITIAL SETTINGS THROUGH THE ETHERNET ................................................................. 8
SEARCHING FOR 9360Q IN THE INTERNET................................................................. 11
6. INTRODUCTION TO WEBPAGE FUNCTIONS...................................................... 12
6.1 LOGIN SETTINGS................................................................................................... 12
6.2 LIVE VIEW SETTINGS............................................................................................ 12
4 ROADS VIDEO SWITCHING ......................................................................................... 13
FULL-DUPLEX VOICE COMMUNICATION .......................................................................... 13
IMAGE SETTINGS .......................................................................................................... 15
PTZ (PAN TILL ZOOM) CONTROL .................................................................................. 15
MOTION DETECTION OPTIONS ....................................................................................... 17
MOTION DETECTION ZONE SETTING .............................................................................. 18
REAL TIME VIDEO PLAY, STOP AND STOP SNAP FUNCTION ............................................. 19
6. 3 PLAY THE RECORDED VIDEO.................................................................................. 20
PLAY THE RECORDED VIDEO ......................................................................................... 20
VIDEO FORMAT TRANSFORM ......................................................................................... 21
6. 4 BASIC CONFIGURATION .......................................................................................... 21
STATUS REPORT ........................................................................................................... 21
USER MANAGEMENT ..................................................................................................... 22
CHANGE PASSWORD ....................................................................錯誤! 尚未定義書籤。
NETWORKING SETTING .................................................................錯誤! 尚未定義書籤。
WIRELESS FUNCTION SETTING ....................................................................................... 25
PPPOE CONFIGURATION ............................................................................................. 27
DATE & TIME SETTINGS ................................................................................................ 28
VIDEO SETTINGS ........................................................................................................... 30
AUDIO SETTINGS ........................................................................................................... 32
LOG SETTINGS .............................................................................................................. 33
6. 5 ADVANCE CONFIGURATION .................................................................................... 33
MAINTENANCE FUNCTION .............................................................................................. 33
DYNAMIC DNS SETTING ............................................................................................... 35
SMTP SETTING ............................................................................................................ 36
FTP SETTING................................................................................................................ 37
IP SERVER SETTINGS ................................................................................................ 37
SNAP SHOT SCHEDULE ................................................................................................. 38
7. FAQ ............................................................................................................................. 39
-3-
1. Introduction
The 9360Q video server is a convenient way for you to view four video inputs at once.
You can virtually transmit any video and audio feeds through your network by just using
an IP address. With the 9360Q you, the user has the capability to watch surveillance,
check on children in a day care or home, monitor elderly parents in a nursing home,
teach class through the internet from anywhere in the world, watch TV, watch
someone play video games, and etc. all through a standard internet browser like
Internet Explorer (IE).
The 9360Q features a plug-and-play functionality, gives you the user, the ability to
achieve instant INTERNET video broadcasting through the internet without a direct
connection to a PC.IP Video 9360 series can convert 4 analog video signals into
IP/Ethernet MPEG-4 compliant streams, which are optimized for low bandwidth and
high-resolution DVD-quality video applications. The unit offers streaming audio/video;
digital I/O and Rs232 /485 control in a wide operating temperature range.
With Aviosys state of the art IP Service Finder assistance, you can easily find the IP of
your 9360Q from any internet accessible location, even from behind a router. With this
technology there is no longer any need to memorize your IP anymore. Just type the
name of your 9360Q and the IP Service Finder will tell you the exact internet IP of your
equipment. This compact MPEG-4 video server is well-suited for almost any video
device, CCTV, camera or direct TV on internet monitoring applications.
Features:
* High Quality Full D1 MPEG-4 compliant Video with G.726 Audio lip-sync streaming.
* Record to MPEG-4 AVI format with D1/SIF/QSIF at full frame
* Network protocol HTTP/IP/DHCP/PPPoE/DDNS/SMTP/NTP
* Automatically Network Traffic Control
* Support Internet IP service finder, Easy to find!
* Video compression frame rate and bit rate adjustable for advance user.
* Email picture or ftp storage if Motion Detection has been Detected
* Multiple PT ( Pan & Tile ) camera support through the RS-485 interface
* Control through RS-232 interface.
* Build in OSD ( On Screen Display) function for customer's application.
* File management for Long time recording (over 1 months D1 /300G)
* UPNP, 802.11g / b wireless LAN
Specification:
* Browse by IE through the internet.
* 4 Channel video input, 4 channel audio input ( 1 for Microphone in and 3 for
audio on ) 1CH audio output.
* Video record and save the snap pictures.
* Built in MPEG-4 decoder and support multiple combination of different grade
image quality and frame rate.
* Adjusting color, bright, contrast, hue, saturation, sharpness and image clipping.
* Motion detection with customizable sensitivity .
* E-mail snapshot pictures to preset mailbox as motion detection
* Upload snapshot pictures to FTP server appointed by use.
* Playback the recorded video (special AV format video file) directly.
-4-
IP SERVER 9360Q USER MANUAL
* Support default HTTP port or you can set your own port of HTTP service.
2. Before you start
9360Q package contents
* 1 IP Server 9360Q
* 1 network wire with RJ45 port
* 1 12V 1A (for 110~220V) adaptor
* 2 Video Cable – RCA (Yellow)
* 2 Audio cable 3.5 to RCA( Red/White )
* 1 Euro Terminal block ( for RS-485 )
* 4 Video jack converters : BNC to RCA
* 1 CD with IP search tool & manual
* 1 Quick installation
Minimum System Requirements
Minimum Intel 1.5G MHz/compatible AMD processor
WINDOWS operating system (IE6.0+SP1)
Minimum 512MB RAM
VGA Card: with capability of displaying full-Colors and DirectDraw support
Network card with RJ45 port
Ethernet Hub / Router
Internet network (Ethernet, ADSL or other ways, depends on whether you need
far end control ability or not)
-5-
3. Interface Description
The front panel of 9360Q :( from left to right) :
1. Power indicator led
2. Power switch
3. RS-232 port
4. 4 LED for video input indicator ( by choose video Channel )
5. Clear All ( Press and hold for 3 sec to restore back to factory default )
6. Reset button ( Reboot the system)
7. RS-485 PT control interface
The back panel of 9360Q :( from left to right) :
1. Audio Input 1 : Microphone in / singer track
2. Audio Input 2 ~ 4 : Only line input, ( VCR DVR / DVD player / TV BOX) dual track
3. Audio output interface : audio output to speaker
4. RJ45 network interface
5. Video input 1
6. Video input 2
7. Video input 3
8. Video input 4
9. Video output ( same as video show in web page setting )
10. 12v power input
-6-
IP SERVER 9360Q USER MANUAL
4. Hardware & Software installation
Before you start using IP SERVER 9360Q, please follow the steps below:
Check the package to make sure that the contents are complete.
Prepare one Ethernet HUB, or Router
Check the voltage of the power supply to make sure it is AC 110-240 volt
Hardware installation
1
Connect the 9360Q to HUB through network wire
2
Connect the video and audio source to 9360Q.
3
Connect the HUB to the Internet (May through ADSL/XDSL modem).
4. Connect the power adapter to the 9360Q.
Software Installation
Please follow the steps below to install the software.
1. Insert the CD in package and windows will auto-run. If not please browser the file
Autorun.html in CD. Choose the language of your preference.
2. Click IP KamVid 1070 in driver of CD and click OPEN top install the driver
procedure.
3. Follow the wizard and install all the programs proposed.
-7-
4. After the installation has been complete you will see the “IPEDIT” & “INFINITY
Cam” shortcut located on your Desktop and in program list of start of your
computer
5. Initial Settings
Initial settings through the Ethernet
Please make sure that the 9360Q is powered on and has been connected to the same
Ethernet as the PC with ipEdit.exe installed on it. Double click the ipEdit.exe on the
desktop of the PC.
2. The software will search for the 9360Q which is located in the same network and
display the name / model number in the search results window.
-8-
IP SERVER 9360Q USER MANUAL
.
3. Under the local devices section of IPEDIT, select and highlight the equipment you
want to edit, its name will turn dark and IP address will display in the little window below.
You can rename the equipment (please use numbers and letters only), set the IP
address and subnet mask (please set it in the same network as the pc you want to
connect to). Click submit button when finish setting, the new setting will work in 20
seconds. Click the search button again and the software will search for all equipments
in the same network.
User can also click “REF” button in IPEDIT to check user PC to get the subnet
information. Then directly press “APPLY“ to amend the IP setting of selected 9211
-9-
NOTICE:
1. Make sure the RJ45 network wire have been connected correctly and the 9360Q is
powered on.
2. It can obtain the virtual IP address after you run the IPEDIT.exe only if the Ethernet
supports DHCP. Click the IP address that corresponds to the IP address of the 9360Q
to enter the web page.
If the Ethernet does not support DHCP, the 9360Q will automatically change its IP
address to a virtual fixed IP address. Please follow the steps below to change the
subnet of user PC:
* To make changes make sure you use IPEDIT.exe
The last digit of IP address can be any number between 1~254, but can not be
same as users PC.
* Same SUBNET : The first 3 number of IP address is same - XXX.XXX.XXX.abc.
The part of XXX is same. Fro Example : IP address is 192.168.1.100 , then another IP
address 192.168.1.123 is the IP in same segment .
4. The default username and password for the 9360Q is:
Username: admin
Password: 12345678
If forget the new password and can not log in to the webpage , please press and
hold the “Clear all button“ located in front panel for at least 3 second to reset
all setting back to manufacturers default settings.
Note : If you are unable to get into the webpage or you see the message “Cookie
timed out “ , please go to IE to clear your cache. You can accomplish this by going to
IE settings: “ Tools “ “ Internet options ” , please click “ Delete Cookies “ and
“Delete files “ in “ Temporary Internet file “.
- 10 -
IP SERVER 9360Q USER MANUAL
Searching for 9360Q in the INTERNET
After you finish setting a correct IP setting for 9360Q and connected it to internet, the
9360Q will send data to the preset IP server, report the IP address of 9360Q (as the
figure shows, you need to open the IP server option and set the IP address of IP server
properly). Then you can run IPEDIT in any PC connected to the internet to submit a
search request to the IP server in order to obtain the IP address of 9360Q. The default
IP address of IP server is 220.135.169.136, you can also set up your own IP server.
NOTICE: The default IP server (220.135.169.136) is free and we DO NOT assume
any responsibility if the IP server doesn’t provide perfect service because of
network abnormity.
First step:
Fill the IP address of IP server in the IP server column, the default IP address is
220.135.169.136. Click the connect button. If connect to the IP server successfully, the
disconnect button will turn red.
Second step:
Input the key words and click search to find your device, this will populate the column
below with all cameras with the same key words in the column (the key words may be a
part of the 9360Q name).
- 11 -
6. Introduction to Webpage Functions
After you have set the IP address of the 9360Q with IPEDIT, you can directly change
the settings for the 9360Q through IE. Click the corresponding 9360Q video directly in
the IPEDIT window and it will open IE login interface of 9360Q.
6.1 Login settings
The default username of administrator is admin, and default password is 12345678 ,
User can add / change the ID and password of administrator in the setting webpage.
6.2 Live View Settings
When you enter the webpage it will look like the picture below, click the play button on
the top left side of the webpage and it will show the input video of the 9360Q.
- 12 -
IP SERVER 9360Q USER MANUAL
4 roads video switching
Click the video control button on the left of image then this button will be changed to
button “play control“), the menu below will appear on the top of the image:
The 9360Q gives you the option to watch one input at a time or 4 inputs simultaneously,
you also have the option to add the OSD (On Screen Display) on screen.
NOTICE: Click the submit button after selecting your choice. If you have turned on the
motion detection settings, the displaying image maybe not the image of the video input
your have chosen. Please refer to the descriptions in ‘motion detection settings’ section
for more detail.
PS: Please click “play” control to get back the following control bar:
Full-duplex Voice Communication
Please refer following connection for this function :
- 13 -
PC MIC: The Talk-Start button for PC MIC allows the viewer or client side which
is the person(s) whom is not directly next to the 9360Q to talk into the
microphone
9360 MIC: The Talk-Start button for 9360 MIC enables the microphone for the
person who is located near the 9360Q to talk while there is video output.
By clicking on the talk-start button on the top of the image, you can talk to the area
where the 9360Q server is by using your pc. Your voice (you will need to have your
microphone installed on your pc) will be output from the audio output port. The voice
you hear is from one of the 4 audio output ports, output from which road depends on
the image you are watching.
Click the video control or play control button on the left.
The toolbar on the top of the image will switch between input video source selection
window and play control window.
- 14 -
IP SERVER 9360Q USER MANUAL
When on the video control mode, you can select to input video from which road on
Video CH column, or choose to display the 4 roads input video in four divisions. If you
select the OSD Display, the preset OSD menu will display on the image.
Image Settings
There are four setting slides on the left of webpage which are used to set the image
parameters.
When click the Default button on the bottom of the image, the image settings will back
to default settings.
1. Brightness Control
Shift the slide’s position under the Brightness Control, the value on the right side will
change along with that, so you can set the brightness of image.
2. Contrast, Saturation and Hue Control
The setting of contrast, saturation and hue are in similar to the brightness setting, just
move the corresponding slide position.
PTZ (Pan Till Zoom) Control
User can control the movement of special CCTV camera through the RS485 interface
of 9360Q.
1. Virtual PTZ
- 15 -
If your camera does not have PTZ control function, you can use virtual PTZ mode.
Click the
button in the middle of the image, a transparent window will appears.
You can move this window with the direction keys, then click
button to zoom out
the window. Click
button to get back the original video . Click
disable Virtual PTZ function .
button to
2. Real PTZ control
If your camera has PTZ control function, you can select real PTZ mode.
If you have selected Control option, the follow PTZ control buttons will appear.
Clicking the direction keys in PTZ control area under the image setting area, user can
control PTZ to move towards corresponding direction. Among them,
is auto scan
Is the stop button, PTZ will stop
button, PTZ pressing it will start auto scanning.
auto scanning when this button has been pressed. F+ and F- are used to adjust the
focus. Z+ and Z- are used to adjust the visual angle.
If you select the Running Step option, the PTZ will move one step every time when you
- 16 -
IP SERVER 9360Q USER MANUAL
click the direction keys. Otherwise the PTZ will keep moving towards one direction until
you click another direction key or stop key.
9360Q supports manifold protocols of PTZ, you can enter the setting option to select
proper protocol and address.
NOTICE:
Please use the model provided by us or our dealer, the other brand or model may not
control properly. The movement of the camera has some delay because of the network
delay, so user should adjust the movement of camera softly to avoid exceed the range.
Motion Detection Options
9360Q can run motion detection function separately for 4 roads video, user can set the
sensitivity and detection area etc.
Select motion detect in function option as the figure above shows.
You can set the parameters of motion detection separately for each road video,
parameters including turn off, high sensitivity, middle sensitivity, low sensitivity etc.
If you select the fix video channel option, the video image with motion detection on will
be displayed on the screen.
If two or above roads input video turn on the motion detection function at the same time,
the screen will display in four divisions.
You also can select motion display function separately for each input video channel.
After that, the corresponding zone trigged by motion will be signed by panes as the
figure below shows.
- 17 -
You can set the detecting zone for each input video. As the figure below show, when
the corresponding zone has been selected in zone display, the corresponding zone will
be displayed with purple panes.
Motion Detection Zone Setting
You can set the detection zone of motion detection separately for each road input video.
If you have not set detecting zone but you have set the motion detection option within
high, middle, low sensitivity, the default detecting zone will be the whole image of the
input video.
Enter the zone setting as the figure below shows
Selecting the corresponding channel and set it separately. The example below is
setting for the road 3.
- 18 -
IP SERVER 9360Q USER MANUAL
Having selected the immediately option, the selected zone will be displayed on the
real screen image, as the last section shows.
We suggest user not select this option when operating through the internet or when the
network is busy. So you must click submit button to send the zone selecting instruction
when finish zone selecting. Due to the reason of network or system you might wait for a
while after clicking submit button.
You can click the corresponding zone with mouse to let it turn to purple (have been
chosen) or click the zone again to let it turn to white (cancel the choice). You also can
use the dark panes on the left and top to make a quick choose.
Real time Video play, stop and stop snap function
Click the play or stop button, you can realize the real time play or stop receive image.
* If your CPU is not running smoothly, and you need it to be functioning optimally you
can stop the video transfer to lower the processing so that you can use your computer.
*Sometimes if you do not see the video you might want to press play
Play: Allows you to play live video.
Stop: Stops all video transferring.
- 19 -
Rec AV: Records in special AV format video. This button will turn bright orange when
in use.
Rec AVI: Records in standard AVI format video. This button will turn bright orange
when in use.
Snap Shot: Takes a single snapshot picture of the video input(s)
Zoom Out: Zooms out
Zoom In: Zooms in
6. 3 Play the Recorded Video
Click the return menu button on the left upside of the webpage, the figure below will
appear on the left side.
Play the Recorded Video
For special AV format only : Click the REC View button on the left upside, a new
webpage as the figure below shows will appear. User can find the video file you want to
play on the browser column on the upside of the webpage. Click the play button to
start playing. You can use Windows Media Player to play the AVI video files recorded
by 9360Q.
- 20 -
IP SERVER 9360Q USER MANUAL
With the other button, you can perform such functions as stop, pause, fast forward and
fast reverse, snap picture, adjust image size.
Video Format Transform
Click the transform button under the AV to AVI, user can transform the selected AV
format video files recorded by 9360Q to the standard AVI format which can be
accepted by other video player.
6. 4 Basic Configuration
Click the Basic configuration button, the webpage will change as the figure below
shows:
Status Report
Click the STATUS button, a webpage will pop up to report the status of 9360Q,
including the version of firmware, IP parameters and OCX parameter of activeX control
etc.
NOTICE: 9360Q is does not support the wireless function, the corresponding type is
9360QW.
- 21 -
User Management
Click the Administrator button on the left side, the user management webpage will pop
up. In this webpage you can add or remove users, change the login password.
Users are divided into 2 kinds:
Administrators and Normal users. The administrators can manage user can change
the video parameters, but ordinary user only can watch the video.
1. Remove user: To remove a user select the user and click Remove button.
- 22 -
IP SERVER 9360Q USER MANUAL
2. Add user: Use the Add button, a new area will appear in the webpage as the figure
below shows. After filling in the new name, password, user group and click Add button,
you can add a new user.
NOTE: The maximum number of customers you can add is 20.
3. Anonymous User Settings:
Enable anonymous viewer login: If yes, is selected then no username or password
is required to view the 9360Q.
Maximum number of simultaneous viewers limited to: Allows you set the
maximum number of viewers (Maximum being 20).
4. Camera Name Setting:
You can set the name of your equipment in the Camera Name column in order to the
search service
NOTICE:
1. We suggest you do not allow too many simultaneous users which means the
system source maybe mainly occupied by irrelevant users.
2. We suggest you change the user’s password once you begin to use 9360Q.
3. We suggest you set a particular name for your 9360Q if you use the IP server
function at the same time, in order to be convenient for searching.
4. After finishing the settings, you should click the Save button to save those settings.
Then click Reset button to restart the equipment and let the new settings in work.
5. For security reasons, the default name “admin“cannot be deleted by any user.
Change password
You can click the Change Password option on the left side, change one user’s
password directly.
- 23 -
Networking setting
Click the networking option and you can enter the networking setting webpage.
1. Obtain IP Address via DHCP
If you are not sure that whether there is a DHCP server in your network but you really
need to use DHCP service, we suggest you use fixed IP for convenience in
communication between multiple equipments.
2. Use Fixed IP
- 24 -
IP SERVER 9360Q USER MANUAL
The IP address of 9360Q should be in the same subnet with the PC you want to visit
9360Q in the LAN. For example, IP address of the PC you plan to visit the video of
9360Q is 192.168.10.155, so the IP address of 9360Q should be set to
192.168.10.x(x=1~254, and can not be the same with the exits IP address).
Subnet mask: same as the PC in the LAN
Route: viz. the default gateway preset in PC. The default gateway when factory is
192.168.0.254. if you want the PC in the internet can visit your 9360Q in the LAN via
the router or the gateway of the LAN, please fill the IP of router in this column.
3. DNS Configuration
If you want your 9360Q on the internet, you need to set the DNS IP properly, please
ask your ISP for DNS setting.
4. HTTP Port Configuration
The port of HTTP is 80 usually. If your IP configuration needs to use other port, you can
fill the new port number here.
5. MAC Configuration:
You can change the MAC address to 9360Q as your need, please fill it in the following
field.
NOTICE:
After finishing above configurations, you should click the Save button to save those
configurations and click the Reset button to restart the equipment in order to start the
new configurations.
Wireless function setting
*Note: Only Available on the 9360QW version
- 25 -
* Infrastructure: Use this setting if you are connecting the 9360 to
the network through an Wireless Access Point (AP).
* Ad-hoc: Please choose ad-hoc if there is no Wireless Access Point
(AP) and you are using a regular Wireless router to connect to the
network.
* 802.11B 802.11G mix/ 802.11B only: Check the settings of your
wireless router or Wireless Access point (AP).
FCC: USA
IC: Canada
ESTI:Europe
MKK:Japan
MKK1:ASIA
* Channel: Select the channel that has been designated on your
wireless router or (AP).
* TX rate: Unless the user needs to specify the bandwidth of
network, we recommend to use default setting "auto".
* SSID: In this setting set the SSID name of the wireless routers or
(AP) here
* Authorization Type: Please select “shared key” to protect from
unauthorized usage.
- 26 -
IP SERVER 9360Q USER MANUAL
* Encryption Type: Please select “WEP” to protect from
unauthorized usage.
* Default Key ID: Please select “wep” and enter one wep key to
protect from unauthorized users from using and viewing your
device..
* Key: Please type in the designated password -10~26 characters in
Arabic numerals only.
PPPOE Configuration
If you want your 9360Q to dial and connect to the internet automatically, you need to
finish the PPPoE configuration. Click the PPPOE option and you can enter the PPPoE
configuration webpage.
1. Enable PPPoE:
Select Yes in the position as the figure bellow shows you can enable the PPPOE dial
function.
2. Input user’s name and password for PPPOE:
Please ask your ISP for the user’s name and password of PPPOE (viz. the user’s
name and password of ADSL) and fill that in the position as the figure bellow shows. If
you want 9360Q to email the internet IP obtained by PPPOE to your preset mailbox,
please select Yes in email notification when IP is changed option.
For instance :
Username: aviosys
Paxssword 12345678
- 27 -
NOTICE:
After finishing above configurations, you should click the Save button to save those
configurations and click the Reset button to restart the equipment in order to start the
new configurations.
3. Check the Status of PPPOE:
The status of PPPOE is displayed on the bottom of the webpage and you can check
the status of PPPOE. The parameters will refresh when you click the Refresh button.
Date & Time Settings
Click the DATE&TIME option as the figure bellow shows you can enter the Date &
Time Settings webpage.
- 28 -
IP SERVER 9360Q USER MANUAL
1. Time Zone settings
Click on the drag down arrow in the Time Zone field and select your time zone in the
menu.
2. NTP Server settings:
If you want to adjust the time of 9360Q with NTP server, please fill the address of NTP
servers.
3. Update Server Time:
You can choose to update server time via the NTP server, or input the time manually
then click the Update button to finish the update.
NOTICE:
After finishing above configurations, you should click the Save button to save those
configurations and click the Reset button to restart the equipment in order to start the
new configurations.
- 29 -
Video Settings
Click the video option you can enter the video setting menu.
There are two buttons on the top of the menu, Image and Other.
Clicking the image button, the video settings function menu will appear as the figure
below shows.
NOTICE:
After finishing setting, you should click the Save button on the bottom, then
click the Reset button to make the new settings work.
1. Image Appearance
You can set the resolution and quality of image as your need.
NOTICE: The higher the quality is, the more of network bandwidth and pc resource are
needed. When the bandwidth is not good enough, too much higher quality may cause
the image not fluently, so please set the quality properly as your need.
- 30 -
IP SERVER 9360Q USER MANUAL
2. Video Stream settings
if you are not sure how to adjust the frame rate according to the network state, please
turn the Auto Mode on in order to let 9360Q set this automatically.
If turn off Auto Mode, 9360Q will adjust its frame rate according to the following
settings. You can set the frame rate within the range of 1-30 fps per viewer. We
suggest you not to set the frame rate too high if you want to watch the video on internet
because that may do harm to the image fluency. You can select 15 fps per viewer
when watch in local area network.
3. Video Type
You can select the video format of input video signal from YCBCR or RGB
4. Camera Type
You can select the camera type of input video from NTSC and PAL, or let 9360Q judge
it automatically.
5. Other settings
Click the Other button on the top of the image to enter the page 2 of video settings.
6. Image Snap Shot Setting:
You can choose the path that the snapped images will be saved to, whether put a time
label on the snapped images and the label color.
7. OSD Setting:
You can choose whether enable the OSD on the video played by 9360Q and the
content, position, color, font size of OSD.
- 31 -
8. Video Recording Setting:
You can choose the directory that the record file will be saved to, the record duration
time, whether enable the record time label and the label color in this area.
NOTICE:
After finishing above configurations, you should click the Save button to save those
configurations and click the Reset button to restart the equipment in order to start the
new configurations.
Audio Settings
Click the audio option in the following figure, you can enter the audio setting menu, you
can set the compression parameter here.
If you can not hear any sound in the PC after connected properly, please try to
switch to A-Law in Data Format option.
NOTICE:
After finishing above configurations, you should click the Save button to save those
configurations and click the Reset button to restart the equipment in order to start the
new configurations.
- 32 -
IP SERVER 9360Q USER MANUAL
Log Settings
Clicking the log option in the following figure, you can enter the log setting menu. You
can check the working status, save mode and flash write time here.
6. 5 Advance Configuration
Click the advance configuration option you can enter the advance configuration menu.
Maintenance Function
Click the maintenance option you can enter the maintenance webpage, you can
restart, get back to original factory settings and update the firmware here.
- 33 -
1. Restart:
Click the Restart button, 9360Q will restart automatically.
2.Restore:
Click the Restore button, 9360Q will reset all parameters in MPEG option, except the IP
parameters, to the original factory settings.
3.Default:
Click the default button, 9360Q will reset all parameters to the original factory settings.
4.Firmware Update:
You can upgrade 9360Q with the latest firmware to gain more new functions. First you
need to download the new firmware from our company’s website or from your dealer
and save it to your PC. Then you can use the browse button to locate the new firmware
file and click Upgrade button to update it. The update process needs about 1 to 10
minutes, and then restarts the equipment to finish the upgrade procedure.
NOTICE:
The firmware upgrade has risks, this operation may cause you lose the quality
guarantee of your equipment. Please do not operate the upgrade through
internet and we suggest you do it in LAN because of the possibility of losing
date. If there is a power failure while running upgrade procedure, it will cause
serious damages to your equipment. So we suggest you DO NOT try firmware
update in a hurry.
- 34 -
IP SERVER 9360Q USER MANUAL
Dynamic DNS Setting
Click the DDNS option and you can enter the dynamic DNS setting webpage. You can
perform the internet IP obtain function.
When you use 9360Q connect to the internet through the method such as ADSL, the IP
address obtained by 9360Q is dynamic distribute by your ISP. So the visitor may not be
able to visit 9360Q because he does not know the IP address of 9360Q. We use the
dynamic DNS (DDNS) service provided by www.DynDNS.org to solve this problem.
First we apply a domain name (for example: 9360Q.homelinux.com), then we input the
use name, password, domain name, IP address of proxy server in the DDNS webpage
of 9360Q.(in some place we can not visit the www.DynDNS.org directly. We need to
find a proxy server to solve this problem, such as 210.0.212.98). Then click submit
button to confirm above settings.
After this, every time after 9360Q dial up to the internet, 9360Q will send a datagram
including its current IP address and domain name to www.DynDNS.org.
www.DynDNS.org will link the current IP address of 9360Q to its domain name. so that
the visitor can visit the 9360Q through type the domain name of 9360Q
(9360Q.homelinux.com) in the address field of IE browser.
Before using the DDNS function, you need to finish the following operations:
1 Go to the following website http://www.dyndns.org to register a set of user account
and user domain name.
2. Fill the account, password, domain name you applied in the propel field.
3. After confirm the settings, you can click the Save and Reset button to finish the
setting.
- 35 -
SMTP Setting
9360Q can obtain internet IP address via e-mail, can report its IP address after power
on via e-mail, can send the snapped images to preset mailbox when the motion
detection is trigged or on the preset time.
You can set two sets of send and receive mailboxes, using the first set usually. Use the
second set mailbox when the first set is not work properly.
1. Mailbox Settings:
We take the first set of mailbox for example, in the following settings we set the e-mail
send from [email protected] and receive by [email protected]. We choose it need
the user name and password when sending e-mail ( the user name and password of
[email protected]).
2. if you want the 9360Q sent email when motion detection is trigged, select this option
as the figure bellow shows.
NOTICE:
After finishing above configurations, you should click the Save button to save those
configurations and click the Reset button to restart the equipment in order to start the
new configurations.
If the address of mail server you input is IP address, you need to input the correct IP
address of DNS server, otherwise it will not work normally.
- 36 -
IP SERVER 9360Q USER MANUAL
FTP Setting
Click the FTP option in the left side you can enter the ftp settings webpage. You can
perform the function of save the snapped images or recorded video files to FTP server
here.
For example, we use the port 21 of www.aviosys.com to setup an ftp server. The
directory 9360Q under the root directory of ftp server is used to store the images and
video files of 9360Q. User name is 9360Qtest and password is xxxxx. So you should
fill in the settings as the following figure shows.
NOTICE:
After finishing above configurations, you should click the Save button to save those
configurations and click the Reset button to restart the equipment in order to start the
new configurations.
IP SERVER Settings
Click the IP SERVER option you can enter the IP server settings webpage. You can
obtain the IP address of your 9360Q through the free IP server provided by our
company.
- 37 -
Sometimes user can not obtain the internet IP of their 9360Q which is dial up to the
internet. The DDNS service sometimes does not work normally. At this moment you
can search the name of your 9360Q to know its internet IP address through the IP
server provided by our company for free.
The IP address of the IP server provided by our company for free is 220.135.169.136. If
you enable this function, 9360Q will register it in IP server automatically after it
connected to the Internet. User can use the IPEDIT software to connected to IP server
220.135.169.136 and easily obtain the IP address of your 9360Q by typing in the name
of your 9360Q and clicking the search button.
Snap Shot Schedule
Click the SNAPSHOT SCHEDULE option you can enter the snapshot schedule setting
webpage.
1. Time to snap shot
you can choose snap shot everyday or snap shot on a weekday.
- 38 -
IP SERVER 9360Q USER MANUAL
2. Interval to snap shot
As the following figure shows 9360Q will snap shot every 10 minutes.
3. Work Time
As the following figure shows the snap shot take place during 17:30 to 08:30 in the next
day.(this option will work only if the snap shot option is selected)
4. Snap Shot Save Type
You can choose to send the snap shot image through email or upload to FTP
server.( this option will work only if the FTP and Email option have been properly
configured)
NOTICE:
Click the save button to save your settings after you finish configuration.
7. FAQ
Q1: I forgot the password and can not enter the administration page now, what
can I do?
A1: Turn on the power normally, and then press the “Clear All “ button in the rear panel
of 9360Q for 10 seconds at least; it will back to the default settings.
The default IP address is: 192.168.1.126,
User name: admin,
Password: 12345678.
Q2: I cannot open the IE web page, why?
A2: Please update your IE to version 6.0.
Q3: why the video recording can not stop immediately?
A3: if your 9360Q obtain its IP address through DHCP server, the video recording will
stop immediately. But if 9360Q use fixed IP address or obtain its IP through
PPPOE method, you need to wait for about one second.
- 39 -
Http command:
1. www.ipaddress/GetChannel.cgi
means: reply the Channel number of the live view video
Message receive format : Channel = x
x = 21 -> Video channel = 1
x = 22 -> Video channel = 2
x = 23 -> Video channel = 3
x = 24 -> Video channel = 4
x = 25 -> Video channel = Quad
2. www.ipaddress /SetChannel.cgi?channel=x
means: change the video channel of 9360Q
x = 21 -> Video channel = 1
x = 22 -> Video channel = 2
x = 23 -> Video channel = 3
x = 24 -> Video channel = 4
x = 25 -> Video channel = Quad
3. www.ipaddress /GetMotion.cgi
means: reply the setting information each channel
Message receive format:
Motion Channel1 = x; Display1=y;
Motion Channel2 = x; Display2=y;
Motion Channel3 = x; Display3=y;
Motion Channel4 = x; Display4=y;
Motion Channel Fix = z;
x = 0 -> Motion level = Off
x = 1 -> Motion level = Low
x = 2 -> Motion level = Middle
x = 3 -> Motion level = High
y = 0 -> Motion display = Off
y = 1 -> Motion display = On
z = 0 -> Fix Motion channel = Off
z = 1 -> Fix Motion channel = On
4.
www.ipaddress/SetMotion.cgi?channel=x&level=y&dis=z&fixc
h=t
means: setup the motion detection status of each channel
x = 21 -> Motion channel = 1
x = 22 -> Motion channel = 2
x = 23 -> Motion channel = 3
x = 24 -> Motion channel = 4
y = 0 -> Motion level = Off
y = 1 -> Motion level = Low
y = 2 -> Motion level = Middle
y = 3 -> Motion level = High
z = 0 -> Motion display = Off
- 40 -
IP SERVER 9360Q USER MANUAL
z = 1 -> Motion display = On
t = 0 -> Fix Motion channel = Off
t = 1 -> Fix Motion channel = On
5. www.ipaddress /GetMotionFTP.cgi
means : reply the saving status in FTP as motion detection status
6. www.ipaddress /SetMotionFTP.cgi?enable=x
means : set the status in FTP as motion detection status
x = 0 -> Motion save to FTP disable
x = 1 -> Motion save to FTP enable
7. www.ipaddress /GetMotionMail.cgi
means : reply the status of E-mail function setting as motion
detection status
8. www.ipaddress /SetMotionMail.cgi?enable=x
means : set the status of E-mail function setting as motion detection
status
x = 0 -> Motion save to Mail disable
x = 1 -> Motion save to Mail enable
- 41 -