1
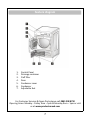
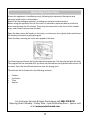
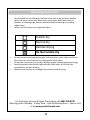
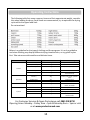
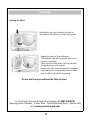
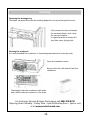
Condenser Tumble Dryer
Instruction Manual
Model number: RHCTD200B
For Customer Services & Spare Parts please call 0845 208 8750
Opening times: Monday - Friday 9am – 5pm & Saturday 9am – 1pm or visit
us at www.productcareuk.com
Contents
Page
Important information…….......................................
Warnings…………………………………..............................
Feature diagram…....................................................
Control Panel…………………….....................................
Operating instructions.............................................
Cleaning………………………………………………………………..
Installation………………..………………..……………..….….…
Technical Specification............................................
Connection to mains supply…………………………….……
2
6
7
8
9
15
17
18
19
Important information
•
•
•
•
•
•
•
•
•
•
•
•
•
This tumble dryer is intended for NORMAL DOMESTIC USE ONLY.
Adequate ventilation must be provided around the tumble dryer.
Exhaust air must not be discharged into a flue which is used for exhausting other
fumes from appliances burning gas or other fuel.
Please note it is not recommended that the dryer is placed directly next to ovens,
cookers, or other heat sources as the performance of the dryer may be affected.
A carpet must not obstruct the ventilation openings in the base of the dryer.
Do not stack the tumble dryer on top of other appliances .
Any electrical work required to install the appliance should be carried out by a
qualified person.
It is important to clean the lint filter after each drying cycle or the restrictions to
airflow will extend drying times and could cause the safety cut-out to trip.
Under no circumstances should anything other than the recommended articles be
placed in the tumble dryer.
The tumble dryer should be serviced by an appointed service team with genuine
parts. Please contact the service team below for assistance with any repairs.
It is dangerous to alter or modify the product in any way other than fitting
authorized accessories.
We recommend that the appliance is unplugged each time after use. It should
always be disconnected from the electricity supply when not in use for long
periods of time.
The rear of the dryer gets quite hot during use. Position the dryer so that the back
is not accessible while in operation, but ensure that the sides have a space
available to allow airflow. Use the hose to assist with the ventilation.
For Customer Services & Spare Parts please call 0845 208 8750
Opening times: Monday - Friday 9am – 5pm & Saturday 9am – 1pm or visit
us at www.productcareuk.com
2
Important information
•
•
•
•
•
•
•
•
•
•
•
•
•
•
•
•
•
•
The special mains cable and plug assembly must only be replaced with a genuine
part from the manufacturer, please contact the customer support team below .
It is important to clean fluff from the window of the dryer and around the door
seal after each drying cycle.
This appliance is not intended for use by persons (including children) with reduced
physical, sensory or mental capabilities, or lack of experience and knowledge,
unless they have been given specific supervision or instruction concerning use of
the appliance by a person responsible for their safety.
Children should be supervised to ensure they do not play with the appliance.
The plug of the appliance must be connected to a three-core socket with an earth
wire grounded properly.
If the supply cable is damaged, it must be replaced by the manufacturer, please
contact the customer support team listed below.
Do not disconnect the plug from the socket by pulling the power supply cord.
Always hold the plug when disconnecting.
Do not attempt to disconnect the plug from the socket with wet hands.
Do not over bend the power cord.
Do not put too much stress or heavy weights on the power cord.
Do not use the appliance if the power cord, socket, or plug are damaged.
Do not install the appliance close to a fire or heat source.
Do not rest anything burning, such as a candle, on the appliance.
Do not install the appliance in a damp environment, the dampness may cause
damage to the tumble dryer.
Do not install the tumble dryer in direct sunlight, or in a hot environment.
Do not use excessive, or high pressure water when cleaning the tumble dryer.
Do not use the appliance to dry cushions, quilts, duvets, or similar items.
Do not place items that have any type of oil soaked in to the fabric, in the tumble
dryer. There is a potential the oil could catch on fire.
For Customer Services & Spare Parts please call 0845 208 8750
Opening times: Monday - Friday 9am – 5pm & Saturday 9am – 1pm or visit
us at www.productcareuk.com
3
Important information
•
•
•
•
•
•
•
•
•
Make sure clothing is fully rinsed of detergent and stain remover, before placing in
the tumble dryer.
Do not put combustible liquid or solids, such as oil, gasoline, petrol and alcohol
into the appliance or nearby.
Remove all objects from pockets before use, especially potentially flammable
items such as lighters and matches.
If leakage of a combustible liquid occurs near the appliance, do not connect or
disconnect the mains plug.
This appliance is designed for domestic use only. It should not be used for
purposes other than those for which it was designed.
Only dry fabrics that are designed to be machine dried. Follow the instructions on
each garment label.
Adjust the feet so that adequate air can circulate freely under the appliance,
especially if the appliance is placed on a carpeted floor.
Do not climb on to the dryer or rest heavy objects, heating devices, or items
containing water or liquid on to the dryer. They may all cause damage.
Repairs must only be carried out by a qualified professional, if there is a problem,
please contact the customer service company listed below.
For Customer Services & Spare Parts please call 0845 208 8750
Opening times: Monday - Friday 9am – 5pm & Saturday 9am – 1pm or visit
us at www.productcareuk.com
4
Important information
•
•
•
•
•
•
•
•
•
•
•
•
Make sure items that may cause damage, do not get in to the dryer, items such
as coins, safety pins, nails, screws, stones . Check the pockets on all the items of
clothing.
Check the appliance is not standing or pressing on the power cable.
Foam rubber, latex, shower caps, waterproof textiles, rubber backed articles and
any other items with foam rubber pads should not be dried in the tumble dryer.
Always unplug the appliance after use, clean and maintain.
Do not overload the appliance.
Do not place clothes that are dripping wet in the tumble dryer..
Clothes that have been in contact with volatile liquids should not be machine
dried. Any fluid should be fully removed from the item before it can be dried.
Do not dry unwashed items in the tumble dryer.
The final part of a tumble drying cycle occurs without heat (cool down cycle) to
ensure the items are not damaged. Do not stop the dryer before it has fully
finished the drying cycle.
Do not use excessive, or high pressure water when cleaning the tumble dryer.
Do not use the appliance to dry cushions, quilts, duvets, or similar items.
Do not place items that have any type of oil soaked in to the fabric, in the
tumble dryer. There is a potential the oil could catch on fire.
For Customer Services & Spare Parts please call 0845 208 8750
Opening times: Monday - Friday 9am – 5pm & Saturday 9am – 1pm or visit
us at www.productcareuk.com
5
Warnings
WARNING: Never stop a tumble dryer before the end of a drying cycle, unless the
items are removed very quickly
•
•
•
•
•
•
•
•
•
•
•
Do not use a two-way adaptor, or extension lead. The dryer must be connected
to its own socket.
Do not block the air inlets at the front, base, rear and side of your dryer.
Do not allow fluff to accumulate around the tumble dryer. There is a risk the
fluff may cause a fire.
Do not exceed the recommended maximum load.
Do not dry unwashed items in the tumble dryer.
Do not place articles in the dryer if anything other than a water solution has
been used in the cleaning process.
Do not attempt to dry dripping wet articles.
Do not use the tumble dryer if you suspect that it is damaged in any way. Under
no circumstances should you attempt to repair the appliance yourself. Repairs
carried out by inexperienced persons may cause serious injury. Contact the
helpline on the telephone number listed below.
Do not let children play with the packaging supplied with this appliance.
Do not handle laundry in the dryer, until it has stopped completely.
Check the dryer containers only laundry before closing the door to start it
working.
For Customer Services & Spare Parts please call 0845 208 8750
Opening times: Monday - Friday 9am – 5pm & Saturday 9am – 1pm or visit
us at www.productcareuk.com
6
Feature diagram
1.
2.
3.
4.
5.
6.
7.
Control Panel
Drainage container
Fluff filter
Door
Condenser cover
Condenser
Adjustable feet
For Customer Services & Spare Parts please call 0845 208 8750
Opening times: Monday - Friday 9am – 5pm & Saturday 9am – 1pm or visit
us at www.productcareuk.com
7
Control Panel
1
2
3 4 5
6
7
8
9
10
1.
2.
3.
4.
5.
6.
7.
Buzzer
Quick
Delicate
Lock
Delay start
Display panel
Indicator lights
Drying
Cooling
End
8. Start/Pause
9. Indicator lights
Condenser unit
Drainage container
Fluff filter
10. Program selector dial
For Customer Services & Spare Parts please call 0845 208 8750
Opening times: Monday - Friday 9am – 5pm & Saturday 9am – 1pm or visit
us at www.productcareuk.com
8
Operating Instructions
Ensure the appliance is installed correctly, following the important information and
warnings listed earlier in the booklet.
Remove all the packaging material, including any material inside the drum.
Before using the appliance for the first time it is advised to place two damps inside the
drum and dry them for 30 minutes. There may be some dust in the drum of the tumble
dryer, and this will help remove the dust.
Open the door, place the laundry in the drum, one item at a time, lightly shake and loosen
the clothing to prevent it getting tangled.
Close the door, ensuring no items are trapped in the door.
Turn the program selector dial to the required programme. The start/pause light will flash.
The program will be switched off if you have not pressed the start/pause button within 10
minutes. Press the Start/Pause button to start the drying cycle.
The selector dial is divided into the following sections;
•
•
•
•
Cottons
Synthetics
Time
Special
For Customer Services & Spare Parts please call 0845 208 8750
Opening times: Monday - Friday 9am – 5pm & Saturday 9am – 1pm or visit
us at www.productcareuk.com
9
Operating Instructions
Automatic controlled drying (Cottons, Synthetics and Special)
The appliance detects the moisture in the load automatically, adjusting the drying time for
optimal performance. Select the program according to the fabric. This drying system is
suitable for all cotton programs, synthetic programs and the special settings for anti
bacterial and silk.
Time controlled drying (Time)
The drying time can be selected at 30,60 or 90 minutes for cottons, synthetics are better at
30 minutes.
Instead of the dryer automatically sensing when the items are dry, it runs for a fixed period
of time. At the end of the drying time, turn the selector dial to “0” to switch the machine
off before removing the laundry.
Combinations
Different functions can be combined. These must be selected after choosing the desired
program and before pressing the start/pause button. When these buttons are pressed the
corresponding lights illuminate, if it is pressed again the light will go out.
Some combinations cannot be selected.
Error (ErS) display
If you select functions that cannot be combined, the display will show ErS. If during the
cycle you select a function that cannot be combined with the running program, ErS will
display. In both cases de-select the additional function, it is not compatible.
Delayed start
The drying cycle can be delayed by up to 24 hours. This option must be selected after
selecting the required program and before pressing the start/pause button. It is also
possible to use the delay with other combinations (Buzzer, quick or delicate). Press the
button repeatedly to increase the delay by 1 hour, up to 24, the display shows the delay
time.
The delayed start cannot be selected combined with the special program.
The dryer will start counting down to the start time after the start/pause button has been
pressed.
For Customer Services & Spare Parts please call 0845 208 8750
Opening times: Monday - Friday 9am – 5pm & Saturday 9am – 1pm or visit
us at www.productcareuk.com
10
Operating Instructions
Buzzer function
If you select the buzzer, the corresponding indicator light will illuminate.
The machine will buzz whenever a button is pressed, and at the end of a cycle. To
de-activate the buzzer, press the button so that the indicator light turns off.
Quick function
The quick function will reduce the drying time by 10 minutes. When selected the
corresponding light will illuminate. This option cannot be selected with the delicate
function.
Delicate function
The delicate function can be selected when cottons, or synthetics are selected.
Pressing this button lowers the temperature for delicate items, the corresponding
light will illuminate when the button is pressed.
Start/Pause
This button must be pressed to start the dryer after selecting the desired
programme. If the door of the dryer is opened during a cycle, the start/pause button
must be pressed again to continue the cycle. At this point the light on the
start/pause button flashes to remind you that the start button needs to be pressed
again.
LEDs/illumination
There are lights next to the various stages in the drying cycle. The drying light
illuminates during the drying phase, the cooling light illuminates as the appliance
cools down. The end light illuminates at the end of the cooling phase, this is an anti
creasing phase. The filter light illuminates at the end to remind the user the filter
needs cleaning.
Lock Function
When the dryer is on, press the Delicate and Delay Start buttons together, after
several seconds the dryer will lock all the buttons. To unlock, in the same way, press
the Delicate and Delay Start buttons together for several seconds.
For Customer Services & Spare Parts please call 0845 208 8750
Opening times: Monday - Friday 9am – 5pm & Saturday 9am – 1pm or visit
us at www.productcareuk.com
11
Operating Instructions
Display
The duration of the drying cycle is displayed in hours and minutes. This time is
calculated automatically unless the time setting is selected. The remaining time to
the end of the cycle counts down in minute intervals.
Indicator lights
This light comes on as a reminder to clean the condenser. It is
recommended to clean the condenser three or four times per
year.
This light comes on when the water container is full, try to empty
the water container after every load.
This light comes on as a reminder to clean the filter, it is
recommended to clean the filter after every load. The drying
efficiency of the machine will deteriorate if the filter is not
cleaned.
All drying programs end with a 5 or 10 minute cooling phase. Following this, if the
laundry is not removed then at the end of the cycle the dryer will perform an anti
creasing phase. The duration of the anti creasing phase is approximately 30 minutes.
If you do not remove the laundry , the dryer will stop automatically at the end of the
anti-creasing phase. The ‘End’ light will illuminate and the buzzer will sound for 15
seconds, if it has been selected, at the end of the phase. Turn the programme
selector dial to ‘0’ and all lights will go out.
If the drying program is stopped before the end of the program, it’s suggested the
dial is turned to ‘warm to wear’ then wait until the machine has completed the
cooling phase before removing the laundry. This avoids a build up of heat inside the
appliance. To do this, first turn the dial to ‘0’ and then rotate the dial to ‘warm to
wear’ and press the start button.
To change a program that has already started, firstly cancel it by rotating the dial to
‘0’. Then select the desired programme and press the start button.
Important , after each use make sure the filter is cleaned.
For Customer Services & Spare Parts please call 0845 208 8750
Opening times: Monday - Friday 9am – 5pm & Saturday 9am – 1pm or visit
us at www.productcareuk.com
12
Operating Instructions
•
•
Never tumble dry the following; Delicate items such as net curtains, woollen
items, silk items, items with metal trims, nylon tights, bulky items such as
blankets, or sleeping bags, feather quilts and items containing or including
rubber foam.
Follow the instructions on the garment label;
Tumble dry
Normal dry
Delicate drying
Do Not tumble dry
•
•
•
•
To prevent some items getting tangled, make sure zips, press studs, and hooks
are closed, to try and prevent any tangling with other items.
Do not over dry laundry, by not over drying it avoids creasing and saves energy.
Avoid drying dark clothes with light coloured fluffy items, the fluff will be
noticeable on the dark clothing.
Make sure the laundry is thoroughly spun before tumble drying.
For Customer Services & Spare Parts please call 0845 208 8750
Opening times: Monday - Friday 9am – 5pm & Saturday 9am – 1pm or visit
us at www.productcareuk.com
13
Operating Instructions
The following table lists some common items and their approximate weight, consider
this when loading the dryer. Small loads are uneconomical, try to optimise the drying
cycle within the upper load limit.
Do not overload.
Below, is a guideline for the type of clothing and the programs. It is only a guideline
and some clothing may display different drying characteristics, so try gentle cycles
first. Take extra care with woollen and delicate items.
Section
Course
Extra Dry
Cupboard Dry
Mid Dry
Max load
8kg
8kg
8kg
Guideline clothing
Jeans, work wear and similar
Jeans, work wear and similar
Shirts, T-shirts, cotton trousers
Iron Dry
Extra Iron Dry
8kg
8kg
Knitted items, cotton shirts
Sheets, bed linen, table linen,
starched laundry
Extra Dry
4kg
Sheets, table cloths, synthetic
items
Cupboard Dry
Iron Dry
30, 60, 90
4kg
4kg
8kg
Synthetic items
Knitted items, shirts
Multi-layered fabrics, bath
towels, tea towels
Anti-Bacterial
Silk
Refresh
Warm to Wear
4kg
2kg
4kg
8kg
Heavily soiled items
Silk items
Lightly soiled items
Underwear, shirts, T-shirts,
cotton trousers
Cottons
Synthetics
Time
Specials
For Customer Services & Spare Parts please call 0845 208 8750
Opening times: Monday - Friday 9am – 5pm & Saturday 9am – 1pm or visit
us at www.productcareuk.com
14
Cleaning
Cleaning the filters
Periodically clean the inside of the door. It
will improve the efficiency of the drying cycle
Regularly clean the filter indicated.
The indicator light will illuminate after every
cycle as a reminder.
Clean this filter after every cycle to optimise
the performance of the dryer.
Remove the filter from the position indicated,
and clean with a brush or warm water. Make
sure the filter is dry before replacing.
Do not use the dryer without the filter in place
For Customer Services & Spare Parts please call 0845 208 8750
Opening times: Monday - Friday 9am – 5pm & Saturday 9am – 1pm or visit
us at www.productcareuk.com
15
Cleaning
Emptying the drainage tray.
The water extracted from the wet clothing deposits in a tray at the top left corner.
Fully remove the tray and empty
the contents down a sink, clean
the tray and replace.
It is good practice to empty this
tray after every drying cycle.
Cleaning the condenser
It is recommended the condenser is cleaned approximately four times per year.
Open the condenser cover
Remove the lock rods and pull out the
condenser.
Thoroughly clean the condenser with water
and a soft brush,then replace it in the dryer.
For Customer Services & Spare Parts please call 0845 208 8750
Opening times: Monday - Friday 9am – 5pm & Saturday 9am – 1pm or visit
us at www.productcareuk.com
16
Installation
For convenience, dryers are often positioned close to the washing machine, so the
laundry can be easily transferred. The tumble dryer will expel some moist air, so make
sure the room is well ventilated. Install the dryer in a clean environment, and make sure
there are no obstructions around any vents. It should be placed on a firm level surface,
this helps keep noise and vibration to a minimum.
There should be no movement from the dryer. Adjust the feet underneath the dryer to
make sure it is completely stable. Do not remove the feet from the dryer.
The hot air emitted from the tumble dryer can reach temperatures of 60c, therefore,
make sure the floor can handle these temperatures. The tumble dryer works best in a
room between 5c and 35c.
Drainage pipe
There is an alternative to the drainage tray if desired. It’s possible to fit a drainage
pipe and feed the water from the condenser directly to a drainage outlet.
Remove the water pipe
Fit the drain pipe, and position so the waste
water exits to another desired outlet.
For Customer Services & Spare Parts please call 0845 208 8750
Opening times: Monday - Friday 9am – 5pm & Saturday 9am – 1pm or visit
us at www.productcareuk.com
17
Technical Specification
For Customer Services & Spare Parts please call 0845 208 8750
Opening times: Monday - Friday 9am – 5pm & Saturday 9am – 1pm or visit
us at www.productcareuk.com
18
Connection to the mains supply
WARNING- THIS APPLIANCE MUST BE EARTHED
This appliance is designed to operate from a mains supply of AC230V ~ 50HZ.
Check that the voltage marked on the product corresponds with your supply voltage.
This product is fitted with a 13A plug complying with BS1363.
If this plug is unsuitable or needs to be replaced, please note the following:
Important: The wires in the mains lead are
Coloured in accordance with the following code:
GREEN/YELLOW - EARTH
BLUE - NEUTRAL
BROWN - LIVE
For UK use only – Plug fitting details (where applicable):
As the colours of the wires in the mains lead of this appliance may not correspond with
the coloured markings identifying the terminals in your plug, proceed as follows:
The GREEN/YELLOW wire is the EARTH and must be connected to the terminal which
is marked with the letter E or by the earth symbol or coloured GREEN or
GREEN/YELLOW.
The BLUE wire is the NEUTRAL and must be connected to
the terminal marked with the letter N or coloured BLACK.
The BROWN wire is the LIVE wire and must be connected
To the terminal marked with the letter L or coloured RED.
Always ensure that the plug cord grip is fastened correctly.
If a 13A (BS1363) fused plug is used it must be fitted with a 13amp fuse conforming to
BS1362 and be BSI or ASTA approved.
For Customer Services & Spare Parts please call 0845 208 8750
Opening times: Monday - Friday 9am – 5pm & Saturday 9am – 1pm or visit
us at www.productcareuk.com
19
For Customer Services & Spare Parts
please call
0845 208 8750
Opening times: Monday - Friday
9am – 5pm & Saturday 9am –1pm
or visit us at
www.productcareuk.com
Revision 1
This symbol is known as the 'Crossed-out wheelie bin Symbol'. When this symbol is
marked on a product/batteries, it means that the product/batteries should not be
disposed of with your general household waste. Only discard electrical/electronic/battery
items in separate collection schemes, which cater for the recovery and recycling of
materials contained within. Your co-operation is vital to make sure the success of these
schemes and for the protection of the environment. For your nearest disposal facility, visit
www.recycle-more.co.uk or ask in store for details.
We reserve the right due to possible changes to design to alter the instruction manual
without prior notice.
For Customer Services & Spare Parts please call 0845 208 8750
Opening times: Monday - Friday 9am – 5pm & Saturday 9am – 1pm or visit
us at www.productcareuk.com