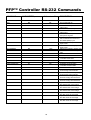
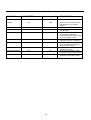
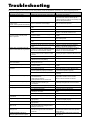
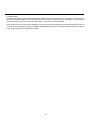
1
Creating a video wall
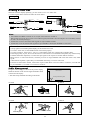
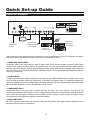
With buit-in matrix display capability, you can create a 2×2 or 3×3 video wall.
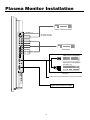
• Connect signal cables and remote cables as shown below.
Video signal
RGB/DVD/HD signal
BNC connector
R/
Cr/Pr
VIDEO Signal
IN
B/
Cb/Pb
RGB signal/
DVD/HD signal
(MONO)
AUDIO 1
R
HD
RGB2 / DVD2 / HD2
G/
Y
OUT
VIDEO 2
VIDEO 3
VIDEO Signal
VIDEO
( IN /OUT)
RCA phono plug
VIDEO 1
IN
BNC connector
L
VD
Y
DVD1
RGB 1
( I N / OUT)
IN
OUT
IN
REMOTE
Remote
control
OUT
RGB signal/
DVD/HD signal
OUT
Remote
control
IN
IN
REMOTE
Remote
control
OUT
OUT
Remote
control
Note:
1. The VIDEO1 and RGB1 terminals can be used for either INPUT or OUTPUT.
When LOOP OUT is ON, do not connect an OUTPUT signal from another unit, that will place an extraordinary load on
the other unit and may damage it.
2. LOOP OUT can not be turned ON while signals are input to RGB1 terminal.
3. LOOP OUT can be turned ON while signals are input to RGB1 terminal if the POWER is switched ON.
Information
• To loop signals out to another plasma display, set the LOOP OUT to ON.
• To create a video wall, set the VIDEO WALL menu items properly.
• To connect monitors, please use a 1~2m (3.3~6.6 feet) BNC cable (any commercially available cable).
• If the image quality is poor, do not use the monitor’s out terminal. Use a distribution amplifier (any commercially
available distribution amplifier) to connect the split signals to the respective monitor INPUT terminals.
• Being used as a video wall function, maximaly 4-screen is rough-standard with lower than 1024768, 60Hz
signal.
• A distribution amplifier is particularly recommended when using a 9-screen video wall.
• From the second monitor onward, connections require a BNC-RCA conversion cable or connector, a mini D-Sub
15 pin cable-BNC (5) cable or a conversion connector.
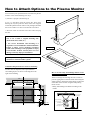
Cable Management
Using the cable clamps provided with the plasma display,
bundle at the back of the unit the signal and audio cables
connected to the display.
* The cable clamp will differ according to the model.
Back of the unit
mounting hooks/mounting holes
To attach
To detach
1.
2.
clamp
cables
mounting hook
To attach
1.
To detach
clamp
2.
cables
mounting hole
11