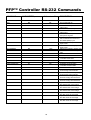
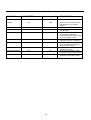
1
Troubleshooting
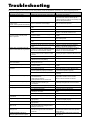
If the picture quality is poor or there is some other problem, check the adjustments, operations, etc., before requesting service.
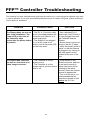
Symptom
Mechanical sound is heard.
The unit emits a crackling sound.
Checks
Remedy
• Maybe the sound from the cooling fans used to prevent over heating.
• Are the image and sound normal?
• If there are no abnormalities in the image
and sound, the noise is caused by the
cabinet reacting to changes in humidity. This
will not affect performance.
• Is a connected component set directly in • Leave some space between the display and
front or at the side of the display?
the connected components.
Picture is disturbed.
Sound is noisy.
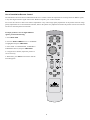
Remote control operates erroneously.
The remote control does not work.
• Are the remote control’s batteries worn
out?
• Is IR REMOTE set to ON?
• Has an ID number been set for the main
unit?
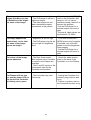
Monitor’s power does not turn on
• Is the monitor’s power cord plugged into
when the remote control’s power
a power outlet?
button is pressed.
• Are all the monitor’s indicators off?
• Are the remote control’s batteries worn
out?
• Is IR REMOTE set to ON?
• Has an ID number been set for the main
unit?
Monitor does not operate when the
• Is the remote control pointed at the
remote control’s buttons are pressed. monitor, or is there an obstacle between
the remote control and the monitor?
• Is direct sunlight or strong artificial light
shining on the monitor’s remote control
sensor?
• Are the remote control’s batteries worn out?
• The remote cable is plugged into the
REMOTE IN terminal (Wired).
• The front panel buttons do not function
The front panel buttons of the main
during Control Lock.
unit do not function.
No sound or picture is produced.
• Is the monitor’s power cord plugged into
a power outlet?
Picture appears but no sound is
• Is the volume set at the minimum?
produced.
• Is the mute mode set?
• Are the speakers properly connected?
• Is AUDIO INPUT set correctly?
Poor picture with VIDEO signal input. • Improper control setting.
Local interference.
Cable interconnections.
Input impedance is not correct level.
• Improper control setting.
Poor picture with RGB signal input.
Incorrect 15 PIN connector pin
connections.
• Are the tint and colors properly adjusted?
Tint is poor or colors are weak.
• Is the computer’s power turned on?
Nothing appears on screen.
• Is a source connected?
• Is the power management function in the
standby or off mode?
• Is LOOP OUT set to ON?
• Is the position adjustment appropriate?
Part of picture is cut off or picture is
not centered.
• Is the screen size adjustment
Image is too large or too small.
appropriate?
• Is the computer’s resolution setting
Picture is unstable.
appropriate?
• Horizontal and / or vertical sync signal is
POWER/STANDBY indicator is
not present when the Intelligent Power
lighted in red.
Manager control is on.
• The temperature inside the main unit has
POWER/STANDBY indicator is
become too high and has activated the
blinking in red.
protector.
POWER/STANDBY indicator is
——————
blinking in green and red, or green.
60
• Replace both batteries with new ones.
• Set IR REMOTE OFF on OPTION3 menu.
• Set an ID number with the ID SELECT
button, or set the ID number to ALL.
• Plug the monitor’s power cord into a power
outlet.
• Press the power button on the monitor to
turn on the power.
• Replace both batteries with new ones.
• Set IR REMOTE OFF.
• Set an ID number with the ID SELECT
button, or set the ID number to ALL.
• Point the remote control at the monitor’s
remote control sensor when pressing
buttons, or remove the obstacle.
• Eliminate the light by closing curtains,
pointing the light in a different direction, etc.
• Replace both batteries with new ones.
• Unplug the remote cable from the monitor.
• Set the Control Lock to OFF.
• Plug the monitor’s power cord into a power
outlet.
• Increase the volume.
• Press the remote control’s MUTE button.
• Connect the speakers properly.
• Set AUDIO INPUT on the AUDIO menu
correctly.
• Adjust picture control as needed.
Try another location for the monitor.
Be sure all connections are secure.
• Adjust picture controls as needed.
Check pin assignments and connections.
• Adjust the tint and color (under PICTURE).
• Turn on the computer’s power.
• Connect source to the monitor.
• Operate the computer (move the mouse,
etc.).
• Set LOOP OUT OFF.
• Adjust the IMAGE ADJUST properly.
• Press the WIDE button on the remote
control and adjust properly.
• Set to the proper resolution.
• Check the input signal.
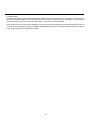
• Promptly switch off the power of the main
unit and wait until the internal temperature
drops. See*1.
• Prompty switch off the power of the main
unit. See *2.