1
Firmware Upgrade Installation Guide
Install Hardware (if required)
Disconnect the ACTIV board from the power supply before
plugging in the radioACTIV transceiver.
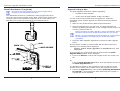
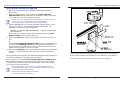
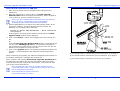
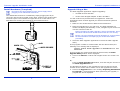
The radioACTIV transceiver is installed by simply plugging the 25 pin
connector into the slot provided on the upper surface of the ACTIV board
electronics pod. This is behind the upper left corner of the board. Two
alternatives for housing the transceiver are illustrated below:
Firmware Upgrade Installation Guide
Upgrade Using a Mac
The Flash Upgrader application supports upgrading:
•
Via USB on OS X and OS9
•
Via the serial Keyspan adapter on OS X and OS 9
You will need the CD provided with the upgrade kit. Follow the
instructions below to flash upgrade your ACTIV board Plus system to
ACTIVote:
1. Make sure the ACTIV board is attached and switched on.
2. Place the upgrade CD in your CD drive. The Flash Upgrader US
window will display automatically. If not, navigate to your CD drive to
view the contents of the CD.
Before launching the Flash Upgrader, ensure ACTIVstudio, Device
Allocation and the ACTIV board Control Panel are not running.
Ensure you have installed the ACTIV board driver, as described in
the documentation accompanying the ACTIV board before
proceeding.
3. Select the Flash Upgrader application to launch the Flash Upgrade
Utility.
If the program is unable to communicate with the ACTIV board, the
following error message will be displayed:
Cannot launch Flash Upgrader as ACTIVboard is not
detected.
If the program can communicate with the ACTIV board, the Flash
Upgrade Utility window will be displayed:
4. Click on the Choose... button and navigate to the new version .bin
file.
Or,
From the Flash Upgrader US window, click and drag the .bin file to
the Flash Upgrader.exe file.
The filename will appear in the Upgrade file text box and the version
number of the .bin file will be shown next to the Upgrade file version.
5. Click on the Upgrade button. The message Preparing ACTIVboard
for upgrade... will be displayed. When performing the upgrade, a
progress bar will be displayed.
2
7