1
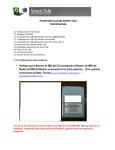
Mobile CRM Solution
for Recruiters
Overview
Your candidates are your business. The better the talent pool your acquire, the more rapidly you are able
to fill positions- and the happier you keep both your clients and candidates.
With Coretalk Software you can promote positions to your existing database, manage interviews, track
feedback and remain in constant contact. Always professional - always on top of things.
Coretalk enables you to automate your responses to certain adverts: you can have job seekers complete
assessments and judge their suitability, prior to even meeting them. Save time for your priority candidates,
without neglecting the development and growth of your database as a whole.
What is Coretalk Mobile CRM for Recruiters?
Coretalk is a software solution, it is installed on your PC/laptop and requires Microsoft Windows O/S, to
operate.
Coretalk uses an iTegno 3800 GSM Modem, which directly connects via USB cable to your PC or Laptop.
The GSM modem comes with USB cable and its drivers are automatically installed on your PC with
Coretalk installation.
You are required to get a simple GSM SIM card and an attractive SMS/Text package from your local Mobile
provider, just like the SIM card that you have in your mobile phone. Plug in the SIM card in the GSM modem
as illustrated below and you are ready to go…
The following steps describe the insertion of SIM Card to the Modem
The software is designed to enable your applicants to send you TEXT messages which you receive on your
PC. They send the TEXT to the number of the GSM sim card, in exactly the same way as they would send
an TEXT to your personal mobile phone.
Once the TEXT arrives in your Coretalk Software, you will have the ability to efficiently manage the TEXT
communication in a proffesional manner and respond to applicants using TEXT messages.
The software is far more than a receive, reply or send bulk TEXT solution.
It has been designed to:
Maintain & Build Relationships
Through consistent interactive SMS/Text you remain in contact with candidates and clients, ensuring you
are always their “go-to” recruitment specialist.
Save Time
Automate much of the process that you would personally have handled in the past. Job seekers can be
judged on their suitability through completion of assessment forms sent directly to them on their initial
enquiry.
Communication & Records
Use SMS instead of phoning and decrease costs. All correspondence is recorded to the database and the
communication history so you always know who you are dealing with, and what has gone before.
Targeted Marketing & Keyword Promotions
Market directly to candidate groups in your database and run interactive SMS/Text keyword promotions, for
specific job descriptions and requirements.
Integrate Systems
Coretalk Software operates seamlessly with your existing database.
Appointment Manager
Manage, amend and track meetings and interviews with the task and scheduler tool. Send SMS reminders
directly to candidates to avoid no shows for interviews.
Cost Effective
Pay a monthly fee for software and using your dedicated GSM number you are able to make use of one of
the cheapest methods of communication around: SMS
Here is a simple example of how Mobile CRM enhances your Recruitment
communication processes:
1. Upload all your staff’s / applicants names and cell phone numbers from your existing contacts database
into coretalk.
2. Create a Mobile Report Form with specific questions that applicants can fill in and setup the screening
process.
3. Create an SMS Promotion with specific keyword and place the tagline with company information on
various advertisement materials.
4. Applicants TEXT the keyword if interested making it simple and convenient to apply.
5. Coretalk receives the TEXT and automatically replies with a link.
6. The applicant clicks on the link and completes the pre-qualification form
7. Coretalk receives the form and intelligently filters the results.
8. Applicants that meet the minimum criteria are automatically sent a TEXT message requesting them to
email their CV, whilst applicants that don’t meet the requirements are fairly notified.
9. All applications and potential candidate forms are captured in the system including their mobile numbers
for future use and analysis. Alternatively they are exported to a third party database for higher end
requirements.
Follow the instructions below to see how to use Coretalk Mobile CRM in the
Recruitment Industry.
1.Upload Applicants contact details from an existing database and manage contacts
One of the most important parts of Coretalk is to manage and maintain the contact details database. At first
you will need to upload your current contact details from an existing contacts database. You can achieve
this by importing the contact details from a Microsoft Excel, .xls,.csv file, or manually create contacts in
Coretalk.
Because it is a Recruitment Industry, detailed/special applicant information might be required, to be
captured in the contact database. So you will need to create custom fields in the database to allocate the
special information for each applicant.
To setup custom fields, please go to Setup (coretalk logo), preferences and select Custom Fields option.
Once in custom fields screen, use the Add Field button to create a new field. Specify the name of the field
and once done select OK and continue with the next one. Please see screenshot below:
Manually adding contacts in Coretalk
Step 1: Click on Manage Contacts shortcut on the CoreTalk front screen, or you may access it from the
Menu (CoreTalk Logo)
Step 2: On the Next screen click on
Step 3: Type in all Contact information available as shown on the example:
Step 4: Once you have filled in the basic Contact information, you may proceed with adding the extra
information about the contact, by selecting Custom Fields.
As mentioned above, the extra/special information will be stored in the custom fields that you have
previously created. In a Recruitment industry you might capture the applicant`s: work experience, health
status , qualifications etc..
Please also note that if you haven’t pre-configured your Custom Fields you may do so by clicking on
“Manage Custom Fields” option.
Step 5: Allocate the contact to a Contact Group.
If you haven’t pre-configured your Contact Groups you may do so by clicking on “Create New Group”
option* To allocate your contacts to groups is very important process that ensures that all your contact
information are sorted and can be easily accessed.*
Step 6: You may now click Save & Close to close the Contact Management Screen or click Save & Next
to save the contact details and let you create another one. The Contact Management Screen can also
allow you to view the Contact History of Communication, and Send a Business Card from the contact to
another party.
Importing Contacts from an existing database
Import contact files option in CoreTalk Is used to import contact details from a file such as .xls, .csv … As
mentioned above this process is normally done in the beginning when your CoreTalk database is empty
and you would like to import all your contacts that you have on an excel spread sheet.
Step 1: To Import a Contact File please click on
from Manage Contact Screen.
Step 2: Select the contacts .xls file that you are intending to import.
Step 3: Clean the File, CoreTalk provides you with a Tool that you can clean all the unnecessary info or
adjust the information layout as required on your excel file. See sample below:
Step 4: Assign columns from the contact file to correct field on CoreTalk. Double click with the mouse on
“Not Used” and assign the correct Field of Information. Please repeat this process for all the columns on the
import file. Press “next” to proceed.
Double Click
with your
mouse on
“Not Used”
and assign
the Correct
Field.
Creating and managing contact groups
Manage groups enables you to create groups, allocate members or setup remote access to TEXT groups
when you are away from your PC. Profiling your contacts and TEXTING them as a group saves time and
ensure that you provide relevant information to the right person. You can associate CoreTalk contacts with
one another in groups. A contact can belong to as many groups as you like.
Step 1: Once in Manage Groups Screen, click on
.
Step 2: On the right side of the screen, click on “Create New Group”
Step 3: Type in the Group Name and Group Description as per sample below:
Step 4: Proceed by clicking on “Save”
Please note that you can Edit the Group Name/Details by clicking on “Edit a group details”.
CoreTalk allows you to either “Delete by Group only” – delete the group but leave the contacts that were
assigned to the group, or “Delete Group & Contacts” – delete the group and the contacts associated to the
group.
Once you have imported your contacts and associated them to a group you may continue…
2.Create a Mobile Report Form with specific fields that applicants can fill in.
You first need to create a mobile report form with the necessary fields that users can fill in. Once the form is
created an URL link will be generated that users can click on and access the form.
Let`s begin by explaining how to create a Mobile Report Form
Creating and managing mobile reports
Step1: Open CoreTalk and select Cellphone Reporting from the shortcut menu, as illustrated below.
Step2: Please read through the CoreTalk Reporting Terms and Conditions, understand the processes
involved. Select “I Agree” to continue.
It is optional to disable the Terms and Conditions notification by selecting: “Do not show this screen again”
Step3: Once the Cell phone reports Menu is displayed, you may select the option you would like to use.
Since we are creating a new form select “Create Form” option.
Step4: You may notice that CoreTalk includes a list of built in Generic Forms, you may use their content
and customise them according to your requirement, or if you would like to create a completely new template
you may choose “Blank - Template”
Step5: To add a new Item select - INSERT ITEM to insert the required Item type. You may choose from
the menu options available.
When creating a form you should normally start with the Subject Line or Heading Item. Please refer to our
detailed Cell phone Reporting Manual for more info on the Item types.
http://support.coretalkgroup.com/manuals/Coretalk%20Cellphone%20Reporting%20V2.zip
Once you have created all the necessary items, you may edit their content by selecting
particular item.
on the
Select from the options provided for further action.
Proceed to the next screen by clicking “Next” on the Form Wizard.
Step6: The next step required is to decide on how these forms will be captured.
Coretalk provides four methods of sharing forms; you must select the one that suits your requirement.
Please refer to complete Cell phone Reporting Manual to understand the four sharing methods.
http://support.coretalkgroup.com/manuals/Coretalk%20Cellphone%20Reporting%20V2.zip
In this case we will select Public Report since we would like to see the contact details of the applicants that
are submitting the reports.
Public Report
This option is for reports filled in by public users using their
cell phones.
Coretalk provides one URL Link for a specific form that is shared to
the public via various marketing campaigns. To submit the form the
user has to supply their Mobile Number. The users who have
submitted their responses become active contacts in CoreTalk.
Step7: When the correct sharing option is selected proceed to the next screen where you can save the
name for the report form that you are creating.
Step8: Well done, you have created your Cell phone Report form. You need to wait up to 5 minutes for
CoreTalk to upload your newly created form and provide you with a URL link that is used to access the
report. Select Finish to Save the changes.
Step9: Now let`s find out the URL link created for the Job Application report form so that we can share it to
the applicants that need to access it.
Open Cell phone Reporting from the CoreTalk Desktop screen and select Manage Forms.
Step 10: You will now see the Form that you have just created. Left click on the form and click on View
Links.
Let`s assume you have previewed the form that you have created and you are satisfied with its
content. Now go to View Links and check whether CoreTalk has created the URL link for the particular form.
If the link is displayed you may select one of the sharing options available.
CoreTalk provides you with list of options that you can use to share the URL links to users.
Select the link and click on “Copy” so that we can copy the link in the SMS promotion that we will create in
the next section of this manual.
2.1Setting up the Screening Process to enable Coretalk to automatically filter out the
results
Once the Form is created you need to configure the screening option so that Coretalk can automatically
check and filter out the results.
To begin, click on Manage Forms in the Cellphone Reporting Menu
Step1: Select the Job Application Form that you have created and click on Advanced
Step2: In the Advanced Menu select Auto Reply.
Step3: Click on New Service to create a new auto reply service.
In this case we will create an Auto Reply service for Qualified Applicants. The applicants that meet the
minimum results will be notified that the application has been successful and to send the supporting
documents.
Step4: Give the service a name, in this
case we will call it “Qualified Applicants” .
Proceed by selecting “Next”
Step5: Now select the required option and choose the constraints that will trigger the auto reply.
For the Qualified Applicants, we have selected : Send reply to user if every of the defined constraint
matches the report data, and set the constraints to filter out the lever of education and years of experience.
Please see example:
Once you have defined the constraints click on “Next”
Step6: Now compose an Auto Reply message that will be automatically send to applicants that meet the
qualifying criteria. Once completed, click “Next”
Please note that you can create a second Auto Reply service that will notify clients that have not met the
minimum requirements. Follow the same steps as above and specify the necessary constraints accordingly.
3.Create an SMS Promotion with specific keyword and place the tagline with
company information on various advertisement materials.
Now let`s create an SMS Promotion that will enable applicants to TEXT a specific keyword ,Coretalk will
automatically reply back with required content and URL Link that they can click on and fill in the application
form.
Open CoreTalk , on the Desktop Screen select SMS Text Marketing from the Shortcut Menu as illustrated
below.
Once in SMS Promotions screen you will notice the defined SMS Promotion options available.
•
•
•
•
Standard Keyword
Contact Details
Question and Answer
Multiple Choice
These options can be utilized as per requirement, by selecting each one of them you will be provided with
an example TEXT on the screen, explaining the purpose that one can be used for, for an easy
understanding.
In this case we will be using the Standard Keyword option. When the system receives an entry, it will
capture the mobile number of the sender and automatically reply with a custom response, which is easily
changed from time to time in the system according to the requirement.
Step1: On the SMS Promotion Screen, select Standard Keyword and select Set Up this Promotion.
Step2: Enter the Keyword for the SMS Tagline. Click “Next” to proceed to the next screen. For this
purpose we will enter “Apply” as a keyword.
Step3: Next task would be to setup an Automated SMS/TEXT reply. Now compose the necessary
message and paste the URL link of the Mobile Report form that you have previously created.
On the Messaging Tool you may use the Template Fields provided by selecting the “Add” button. A menu
with predefined info such as (Name, CellNumber, e-mail) will be shown, you can select one and add it a
strategic place on the reply message.
In this case we have entered “Hi, %CELL NUMBER%. Please click on the link
: http://mobi.coretalk.biz/Default.aspx?id=BOX and fill in the Job Application Form. We will inform you via
SMS whether the application has been successful or not!
Once finished typing the Auto Reply message click Next to proceed.
Step4: On the next screen you can configure CoreTalk to allocate the received entries for this SMS
promotion to a particular group. You may either select the group that exists in your database, or Create a
New Group. Select Create a New Group and name it according to the requirement and Save the changes.
The newly created group will be automatically displayed. Please note that you may ignore the group
allocation if not required.
Step5: Final step is to save the SMS promo that you have just created. Give the SMS Promo a Name and
click on Save to finalize the process.
That`s it, you have created a Standard Keyword SMS promo. Next step would be to insert the SMS tagline
information on a strategic place on your website.
4.Applicants TEXT the keyword if interested making it simple and convenient to
apply.
Example of the newly created SMS tagline for Job Applications on a website and how applicants TEXT the
keyword to apply.
Applicants SMS
the word APPLY
to 083 999 7788
The applicant
instantly
receives an
SMS with the
necessary info
5.Coretalk receives the TEXT and automatically replies with a link.
Once the SMS with keyword is received in Coretalk, the automated reply message that we have specified is
sent to the applicants.
6.The applicant clicks on the link and completes the pre-qualification form
The applicant opens the received SMS message and click on the URL link provided to complete the prequalification form. Please note that sufficient mobile internet access is required for the URL link to be
accessed.
Once all the necessary information is filled in, the applicant clicks on “Submit” to submit the report. A
reference number is also provided once the report is submitted.
7.Coretalk receives the form and intelligently filters the results.
Shortly after submitting the form the report is received in Coretalk, where the background screening process
occurs as per the specified criteria.
8.Applicants that meet the minimum criteria are automatically sent a TEXT message
requesting them to email their CV, whilst applicants that don’t meet the requirements
are fairly notified.
9.All applications and potential candidate forms are captured in the system including
their mobile numbers for future use and analysis. Alternatively they are exported to a
third party database for higher end requirements.
Coretalk automatically keeps record of the
complete communication with the applicants
and their contact details.
To access the communication history of a
particular applicant, client simply type in their
name in the search box in the Coretalk
desktop screen.
Once you have searched and selected the
correct contact in the Deal with A Contact Screen you will see the complete history of communication and
variety of tools that you can use to deal with that contact.
Contact Details of the applicant or client.
By selecting the Magnifying Glass you
can update the contact details.
Send an SMS, Forward SMS to third
party, Add Note/Task, Schedule
Appointment, Capture more info about
the contact in form of internal report.
Complete History of Communication
with the particular Contact. Click on a
particular item to view its content.
To View the received applications and further analyse the applicant`s information, select Cellphone
Reporting from the Coretalk Desktop Screen and Click on View Reports.
A list of received reports is displayed, you can search for a specific report select it and click on View to View
its content.
In the View selected report screen, you can view the application and use the provided tools to deal with the
applicant further.
Send an SMS, Forward report to third
party, Add Note/Task, Schedule
Appointment, Capture more info about
the contact in form of internal report and
Print the application.
Add and View Comments for the
particular application.
You can also export the reports/applications to Microsoft Excel document or Third Party Databases.
To export select the required applications from the View Reports Screen, and click on Export To Excel.
Navigate to where the file should be placed and the content will be automatically exported.
Example of Exported Applications to Excel
Additional functionality includes:
•
•
•
•
•
•
•
•
Integrate into your existing systems.
Manage interview process
Bi-directional TEXT communication with new and existing candidates.
Profiled database with full communication history.
Time sheets.
Salary queries.
Leave requests.
Performance reviews.
Text the word, Recruit, to plus +27832873864 and we will get back to you in 5 min.
Feel free to browse the Coretalk Knowledgebase to see how the rest of the software functionality works
http://support.coretalkgroup.com/index.php?/Knowledgebase/List
For a general overview of the features and benefits of the solution navigate to www.coretalk.co and then
view the information in the about Coretalk section of the website.
Want to see how the Coretalk value comes together for other companies? Simply navigate
to www.coretalk.co and then view the detailed video material in the Coretalk by industry section of the
website.
Thank you for purchasing Coretalk, we appreciate your business.
Copyright MMG Holdings 2012