1
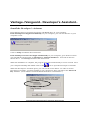
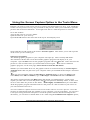
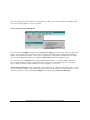
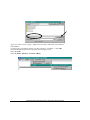
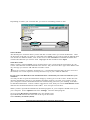
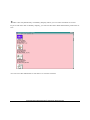
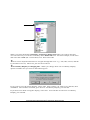
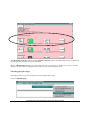
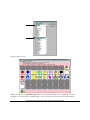
Vantage™/Vanguard™
Developer’s Assistant™
PRENTKE ROMICH COMPANY
1022 Heyl Rd. • Wooster, Ohio 44691
Telephone: (330) 262-1984
Fax: (330) 263-4829
E-Mail Address: [email protected]
Web Site Address: www.prentrom.com
Prentke Romich International
Minerva House, Minerva Business Park
Lynch Wood, Peterborough, Cambridgeshire
PE2, 6FT
UK
Fax: +44 1733 391939
E-Mail Address: [email protected]
Developer’s Assistant, Vantage, Vanguard, Vanguard II, and MTI (Memory Transfer Interface) are
trademarks of Prentke Romich Company.
Minspeak is a registered trademark of Semantic Compaction Systems. Minspeak uses the methodology
derived from the concepts covered by U.S Patent Numbers 4,661,916; 5,097,425; 5,210,689 and
subsequent patents and applications of Bruce Baker.
Unity is a registered trademark, in the USA, UK and Canada, of Semantic Compaction Systems.
MSPaint, WordPad and PowerPoint are registered trademarks of Microsoft, Inc.
Picture Communication Symbols (PCS) is a copyright 1981-2002 of Mayer-Johnson, Inc.
PRENTKE ROMICH COMPANY•1022 HEYL RD.•WOOSTER, OH 44691•330-262-1984 or 800-262-1984
VANTAGE/VANGUARD DEVELOPER’S ASSISTANT INSTRUCTIONS
13784
2
Table of Contents
Install the Developer’s Assistant .................................................................................................. 5
About the Developer’s Assistant ............................................................................................ 6
The Developer’s Assistant Emulator ............................................................................................ 7
Using the Screen Capture Option in the Tools Menu.................................................................. 9
Screen Capture....................................................................................................................... 9
Set Preferences in the File Menu ......................................................................................... 10
Welcome Message ................................................................................................................ 10
Using the MTI Options in the Tools Menu ................................................................................ 11
Creating a Memory Transfer to E-mail ................................................................................ 11
Sending an MTI File E-mail................................................................................................. 13
Load an MTI E-mail File into your Device.......................................................................... 13
Now You Can…......................................................................................................................... 15
Working with Vocabulary Displays........................................................................................... 17
Using the Vocabulary Display Options...................................................................................... 17
Core Key Assignments Option ............................................................................................. 18
Background Color .......................................................................................................... 18
Read-Only Displays ....................................................................................................... 18
Printing Tip .................................................................................................................... 21
Return to the Emulator ......................................................................................................... 21
Return to Vocabulary Display.............................................................................................. 22
Core Vocabulary (Sequences) Option.................................................................................. 22
A Note about Embellished Icons ..................................................................................... 24
Dynamic Activities Option ................................................................................................... 25
Specific Activity Option........................................................................................................ 26
Specific Page Option............................................................................................................ 28
Look Up Vocabulary Location Option................................................................................. 30
Write with Icons Option ....................................................................................................... 35
Now You Can…......................................................................................................................... 37
Addendum: Importing Sound (.wav) Files for Recorded Messages ......................................... 39
VANTAGE/VANGUARD DEVELOPER’S ASSISTANT INSTRUCTIONS
3
4
Vantage™/Vanguard™ Developer’s Assistant™
Install the Developer’s Assistant
Insert the Developer’s Assistant CD into the CD-ROM drive on your computer.
If the install process begins automatically on your computer, you will see this box on your
computer screen:
Click on Setup and follow the instructions.
If the Install process does not begin automatically on your computer, go to the drive where
you inserted the CD and click on Developer’s Assistant Install.exe. You will see the box
shown above. Click Setup and follow the instructions.
When the installation is complete, the program will close automatically in a few seconds. Go to
your computer Desktop and double-click on the
icon to open the Developer’s Assistant.
When the Developer’s Assistant opens, you will see the screen below. In order to use the
Developer’s Assistant, you must call PRC to get a password. They will ask for the Password
Key numbers. (Your numbers will be different from those circled below.)
VANTAGE/VANGUARD DEVELOPER’S ASSISTANT INSTRUCTIONS
5
About the Developer’s Assistant
ÂFiles created in the Developer’s Assistant can be used with both the Vantage and Vanguard II
communication devices. For ease of reference, we will simply use "Vantage" in this manual.
The Developer’s Assistant contains a Vantage Emulator. This means that when you open up the
Developer’s Assistant, you will see a copy of the Vantage screen on your computer monitor that
looks and runs almost exactly like the PRC Vantage device. The biggest difference between the
emulator and the Vantage is that the Computer Pages, Computer Activities, IR and some of the
Selection Techniques will not work from the emulator.
The Developer’s Assistant also offers some new features that you will learn about in the
following pages.
ÂAll examples in these instructions use the default Vantage vocabulary, Unity® Enhanced 2hit. This is already loaded into User Area 2.
ÂPCS™ symbols are turned on and available for use in this emulator.
VANTAGE/VANGUARD DEVELOPER’S ASSISTANT INSTRUCTIONS
6
The Developer’s Assistant Emulator
Double-click on the Developer’s Assistant icon,
, on your desktop. This opens the
Developer’s Assistant emulator. Click OK on the Welcome Message. You should then see the
Unity® Enhanced 2-hit Overlay.
If you see a different overlay, please change to the 2-hit overlay.
To Change the Overlay: go to the Toolbox (open the Options menu on the menu bar at the top
of the screen and click on Go To Toolbox or press key F9 on your computer). Activate the
CHOOSE OVERLAY menu in the Toolbox. If the text in the Text Display Area does not say Unity
Enhanced 2-Hit, activate Switch User Area and select the Unity Enhanced 2-Hit User Area.
Click OK. Activate Go To Minspeak™.
You are now using the Vantage Emulator. Notice the Menu Bar above the Text Display Screen.
Open the Options Menu.
Select Go To Toolbox.
VANTAGE/VANGUARD DEVELOPER’S ASSISTANT INSTRUCTIONS
7
You see the Toolbox display.
Now you are in the Toolbox and can use it the same way you would on your device. For
example, select the MODIFY ACTIVITY menu. You see:
You can modify any activity you want to, the same way you would on your device.
Select Cancel to return to the Toolbox.
VANTAGE/VANGUARD DEVELOPER’S ASSISTANT INSTRUCTIONS
8
Using the Screen Capture Option in the Tools Menu
Perhaps you want to create a new activity in order to teach people how to do it. You would like
to take a screen picture of every step you make in the process. Then you would like to print the
pictures and use them as handouts. You might even like to e-mail the pictures to someone.
Go to the Toolbox.
Activate the CREATE ACTIVITY Menu.
Spell the name for your Activity.
Open the Tools menu in the menu bar at the top of Text Display Area.
Notice that the second option in the menu is Screen Capture. This allows you to take a picture
of the screen you are working on.
Select Screen Capture.
The default graphics program on your computer will open up. This is usually MS Paint®
The emulator will take the screen shot and the graphics program will display it on your
computer. Open the File menu on the graphics program and select Save As. Name and save the
picture to a file or folder where you will be able to find it again. ÂTo select a different
graphics program, see the next page, Set Preferences from the File Menu.
Whether you select Save As or not, the graphic will be saved automatically in the Developer’s
Assistant folder that was placed on your computer when you installed the Developer’s Assistant
program.
ÂIf you can’t remember where the Developer’s Assistant folder is, open your Start menu ,
select Find, select Files or Folders, type in Developer’s Assistant and click on Find Now.
The picture will be placed in the Bmp folder and named "screendump.bmp". Each screen
capture you take will overwrite the picture that was last placed in the Bmp. folder, so there will
never be more than one picture in this folder. ÂWe highly recommend that you select Save
As in the graphics program and name and save the picture to a file or folder of your choice so
you will remember where it is.
You can continue to capture and save each screen in the CREATE ACTIVITY process. Once the
pictures are named and saved into a folder on your computer, you can print them; you can open
a word processing document and paste or insert the pictures into the document and print the
document; you can insert or attach them to an e-mail using the E-Mail Screen Capture option;
VANTAGE/VANGUARD DEVELOPER’S ASSISTANT INSTRUCTIONS
9
you can use them in a PowerPoint® presentation. In short, you can do anything with them that
you can do with graphics on your computer.
Set Preferences in the File Menu
You can select a graphics program and a word processing program of your choice in this menu
option. If you do not set a preference, the Developer’s Assistant will use WordPad® and MS
Paint® as the default programs. Once you set a preference, all graphics and documents will be
saved in those programs unless you return to Preferences and select different ones.
You can also set a Comm Port for doing regular MTI transfers. A regular MTI is when you
have connected the Vantage or Vanguard to your computer Comm Port and you are going to
save or load vocabulary from the device to the computer or vice-versa.
The Welcome Message can be turned On or Off in this menu. When this is turned On, you will
see a screen that contains a few quick tips about often-used Developer’s Assistant options. You
can also see this screen by opening the Help menu and selecting Welcome Message.
VANTAGE/VANGUARD DEVELOPER’S ASSISTANT INSTRUCTIONS
10
Using the MTI Options in the Tools Menu
ÂMake sure your e-mail program has the MAPI server enabled.
The Developer’s Assistant allows you to do a Memory Transfer while you are in the emulator.
This means you can create a Page or Activity and save it as an MTI file in your computer. Or
you can save a whole User Area or the complete emulator vocabulary as an MTI file on your
computer. Once you have created the MTI file you can e-mail it to someone if you would like
to.
For example, let’s say you created a Page. You want to save it as an MTI file and then e-mail it
to someone so they can download it to their computer and load it into a device or into their
Developer’s Assistant emulator.
Once you have created the Page, open the Tools menu in the menu bar at the top of the
emulator’s Text Display Area.
Select Memory Transfer (MTI)
You see the TRANSFER MEMORY MENU.
Select Save A Page.
Select the Page you want to save.
You will see a screen similar to this one:
VANTAGE/VANGUARD DEVELOPER’S ASSISTANT INSTRUCTIONS
11
Type in a name for your page. Make sure the name ends with .mti (dotmti).
Select Save.
A yellow box will appear telling you the transfer is complete. Click OK.
Open the Tools menu at the top of the Text Display Area.
Select E-mail.
Select E-Mail - Memory Transfer (MTI)
VANTAGE/VANGUARD DEVELOPER’S ASSISTANT INSTRUCTIONS
12
Depending on where you saved the file, you will see something similar to this:
Select the File
The Developer’s Assistant shows you the last file or folder where you saved an MTI file. Click
on the name of the file you want to e-mail and select Open. If you want to send an MTI file that
was stored in a different folder, click on the arrow in the Look In box and find the folder that
contains the MTI file you want to send. Highlight the file and then select Open.
Send the E-mail
When you have selected Open, a new message from your e-mail program will appear on your
screen. The MTI file will be attached to the e-mail. All you have to do is type in an address and
any message you want to add and then send the e-mail.
ÂYou can e-mail a vocabulary document (i.e., a Vocabulary Display that you have saved as a
document) or a screen capture in exactly the same way as you e-mail an MTI file.
If you receive an MTI file as an attachment in an e-mail and you want to load it into your
emulator:
You may be able to open the attachment simply by clicking on it in the e-mail. If this does not
open the attachment, drag it to your desktop and then click on it to open it. If you have set up
your computer so that e-mail attachments are automatically placed on your desktop, look there
for the MTI attachment. If none of these suggestions work, find your e-mail Attachments folder
and look for the MTI attachment in the folder. You can open it from there.
When you have opened the attachment, the MTI program on your computer should come up on
your computer. Select Options and select Vantage. Close the MTI program.
Now open the Developer’s Assistant if it is not already open.
Open the Tools menu in the menu bar at the top of the screen.
Select Memory Transfer (MTI).
VANTAGE/VANGUARD DEVELOPER’S ASSISTANT INSTRUCTIONS
13
Select the appropriate option from the TRANSFER MEMORY menu in the Toolbox.
Find the MTI file you received and click on it.
Click OK in the yellow box when the transfer is complete.
You can load any MTI file into your emulator as long as the file is on your computer. For
example, if you want to load a User Area from a Vantage into a User Area in your emulator, you
must first perform a regular device-to-computer MTI. Once the Area is saved as an MTI file on
your computer you can use the Memory Transfer (MTI) option in the emulator Tools menu
and transfer the Area into your emulator.
If you want to load a User Area from your emulator into a User Area in a device, first you have
to save the emulator User Area as an MTI file using the Go to Memory Transfer option in the
emulator’s Tools menu. Once the Area is saved, use the regular computer-to-device MTI process
to load the Area in the device.
You can also e-mail any screen capture or vocabulary document from the E-mail option.
VANTAGE/VANGUARD DEVELOPER’S ASSISTANT INSTRUCTIONS
14
Now You Can…
•
•
•
Save a picture of the Vantage display
Save pictures of the steps used to create a Page or Activity
Save a picture of a User Area Overlay
•
•
•
Use these pictures as teaching tools
Save the pictures in a graphics program and print a picture or e-mail it
Insert the pictures into a document and save them
•
•
•
Create a specialized vocabulary for a client in one of the Developer’s Assistant User Areas
Turn the Vocabulary into an MTI file and download it into the client’s Vantage or Vanguard.
E-mail an MTI file to a colleague who can then download it into a device or into their
Developer’s Assistant emulator.
E-mail vocabulary documents and screen pictures.
•
VANTAGE/VANGUARD DEVELOPER’S ASSISTANT INSTRUCTIONS
15
16
Working with Vocabulary Displays
The Vocabulary menu has a Vocabulary Display option which allows you to do a number of
things with the vocabularies in the emulator. You can do vocabulary sorts for Core vocabulary,
Activities, Pages, etc. You can see where icons and sequences are stored, what the rationales are
for different icons, etc. You can add your own comments to rationales. You can find specific
phrases. You can even type in text and see the icons that represent your text.
Using the Vocabulary Display Options
ÂWhen you are using options in the Vocabulary Display menu, you will see a display of the
vocabulary that is in the current User Area of your emulator. You can switch User Areas in the
emulator to see different vocabularies.
For example:
Double click on the Developer’s Assistant icon on your desktop to open the program, if it is not
already open. (If the Developer’s Assistant did not open up in Minspeak, select the Go To
Minspeak® key.)
Now you should see the overlay in the current User Area. For this example, we are going to use
the Unity® Enhanced 2-Hit overlay. Make sure this is the overlay you are using. To check this,
go to the Toolbox. Activate the CHOOSE OVERLAY menu. If the text in the Text Display Area
does not say Unity Enhanced 2-Hit, activate Switch User Area and select the Unity Enhanced 2Hit User Area. Click OK. Activate Go To Minspeak.
Open the Vocabulary menu at the top of the Text Display Area and then open Vocabulary
Display Options.
All of the new options allow you to view vocabulary in different ways.
Select the Core Key Assignments option.
VANTAGE/VANGUARD DEVELOPER’S ASSISTANT INSTRUCTIONS
17
The Core Key Assignments Option
You now see a copy of the current User Area vocabulary (Unity 2-hit).
ÂNotice the background color of the display (on your screen) and the directions at the top of
the page. Both of these are indicators that you are in a Read-Only display. This means that
basically the only things you can do are what the directions at the top of the page tell you. The
Edit menu is not available for use.
All Read-Only displays (there are 3) have the pink background and similar directions at the top
of the display. All other Vocabulary Displays have a cream colored background and the Edit
Menu is active.
Read-Only Vocabulary Display Directions
If you place your mouse over a key and hold down the right mouse button, you will see details
about the key. For example, right click on the SUN icon.
You will see, among other things, the icon name, its location on the overlay and the file name
under which you can find that exact icon.
VANTAGE/VANGUARD DEVELOPER’S ASSISTANT INSTRUCTIONS
18
If you want to add a rationale to the icon, double click on the key you want. For example,
double click on the SUN icon.
This box appears over the display.
Type in the rationale.
"The sun is YELLOW" has been added to the rationale. If you select OK, the program will save
the edited rationale. It will remain a part of the SUN icon’s rationale unless you bring up the box
again and delete your addition.
If you decide you don’t want the rationale, select Cancel before you select Save. The program
will return to the default details.
VANTAGE/VANGUARD DEVELOPER’S ASSISTANT INSTRUCTIONS
19
ÂThis is the only Read-Only Vocabulary Display where you can edit a rationale on-screen.
If you scroll down the vocabulary display, you will see the same detail information printed out as
text.
You can save this information to use later or to send to someone.
VANTAGE/VANGUARD DEVELOPER’S ASSISTANT INSTRUCTIONS
20
Open the File menu at the top of the screen.
To save this file, click on Save.
Select a place to save the file and a name for the file. For this example, you might save it to your
desktop and name it "Core Keys Vocab", or something similar.
The program will save the file as a word processing document (.rtf).
Go back to the File menu and select Open.
Go to where you just saved the file and select the file..
Click on Open.
The file opens up as a word processing document. You can now make any changes you want
and/or e-mail the document to someone, print it out, etc.
You can also select Save and Open from the File Menu. This will save your file and
immediately open it as a word processing document for you to work on. As with the Save
command, you will have to tell the program where to save the file and you will have to give it a
name before it will be saved.
ÂPrinting Tip:
Before you print any vocabulary file or overlay that you saved as a
document, we recommend that you set your printer’s "paper" option to Landscape instead of
Portrait.
To Return to the Emulator
When you have opened the Vocabulary Display menu and are working in or looking at one of
the options, you are not in the emulator. To return to the emulator and check something out, you
VANTAGE/VANGUARD DEVELOPER’S ASSISTANT INSTRUCTIONS
21
must open the Vocabulary menu and select the Return to Emulator option. You are now in the
emulator and can use it as you normally would.
Return To Emulator
To Return to Vocabulary Display
If you went from a vocabulary display to your emulator and you want to return to the Vocabulary
Display you were viewing/working on, open the Vocabulary menu and select Go To
Vocabulary Display. You will see the vocabulary display you were using.
You must use these two options any time you want to switch from a vocabulary display to the
emulator or back.
ÂA vocabulary display must be open in order to switch between a display and the emulator.
ÂKeyboard Shortcut: Use the F2 key on your keyboard to toggle between vocabulary and
emulator displays.
Viewing Core Vocabulary (Sequences)
You might like to know if an icon is used in any sequences in a particular vocabulary.
Open the Vocabulary Display Options menu.
Select Core Vocabulary (Sequences).
Select whether you want to find sequences that Starts with, Ends with or Contains a particular
icon.
For example, you might want to know if the VERB icon is used as an ending icon in any
sequences in the current vocabulary. You would select the Ends with option.
VANTAGE/VANGUARD DEVELOPER’S ASSISTANT INSTRUCTIONS
22
When you select the Core Vocabulary (Sequences) Ends with option you will see this box.
You can select any icon in the vocabulary as the Ends with icon. For this example, scroll down
and select the VERB (Mr. Action Man) icon. Then select OK.
ÂYou can use keyboard shortcuts to navigate through the icons. e.g.
Tab, OK, Cancel, and the
Up and Down arrows; otherwise, just use the scroll bar.
ÂVocabulary Display is changing Box:
When you change from one Vocabulary Display
option to another one you will see the following box:
If you want to save the earlier display, select YES. Select where you want to save the file, then
click Save. The emulator will then go to the new Vocabulary Display you selected.
If you don’t care about saving the display, select NO. You will then see the new Vocabulary
Display you selected.
VANTAGE/VANGUARD DEVELOPER’S ASSISTANT INSTRUCTIONS
23
Scroll down
To see this
display
When you selected Ends with: VERB, the program produced this screen. You can see where
each sequence is stored and how it is stored. If you want to copy a sequence in a custom
vocabulary, just save the document and print it out as a reference for later storing. With
sequences ending in the VERB icon you might want to check on grammatical endings. You can
look at a sequence in this display then go to the emulator, activate the sequence and check how it
works. Then return to the Vocabulary Display.
ÂA Note About Embellished Icons: In the sequences above, the final icon in each sequence
has been embellished, or changed, in some way. In these cases the icon that has been changed is
the VERB icon. In the first example, DRINK DRINK, the VERB icon was changed to the
DRINK icon. In the third example down, the VERB icon was changed to the MIX icon. This
screen tells you that the last icon in each sequence is VERB and that it has been embellished.
VANTAGE/VANGUARD DEVELOPER’S ASSISTANT INSTRUCTIONS
24
Viewing Dynamic Activities
The next Vocabulary Display option is Dynamic Activities: Starts with, Ends with, Contains
Among other things, this allows you to discover if there is a Dynamic Activity that starts, ends or
contains any icon you are interested in. It can also be helpful if you are looking at Core
Vocabulary on the emulator and you find a Dynamic Activity that you would like to use
elsewhere. You can find how it is stored by going to the Dynamic Activity option and selecting
one of the icons from the sequence.
Activate OK when you have selected an icon.
VANTAGE/VANGUARD DEVELOPER’S ASSISTANT INSTRUCTIONS
25
In the example above, PHONE is the Starts with icon. You can easily see what Dynamic
Activities start with PHONE, their sequences, and which Activity is activated. As usual, you
can edit in the display, save it and print it later.
Viewing Specific Activity
Using the previous Dynamic Activity example, let’s say that you found out that PHONE +VERB
activates the Sentence Builder 4 activity. Now you would like to know about that activity.
Open the Vocabulary Display menu and choose Specific Activity.
VANTAGE/VANGUARD DEVELOPER’S ASSISTANT INSTRUCTIONS
26
Now, select the activity you want. In this case, scroll down to WORD SENT BLD4. Click OK.
You see a display of all the keys in the Activity. As you scroll down the display, you will also
see all the links to this activity. If you scroll down a bit, you’ll see that the PHONE+VERB
sequence is a Dynamic Activity link to the SENT BLD4 activity.
ÂA right click on a key will also show you that key’s details.
VANTAGE/VANGUARD DEVELOPER’S ASSISTANT INSTRUCTIONS
27
The Dynamic Activity option and the Specific Activity option can help make it easy to find and
modify specific activities on your emulator.
This is a Read-Only Display so you cannot edit it as you look at it. However, you can save the
display in a word processing document, edit it if you wish and print it out.
Viewing Specific Page
This option allows you see all the items associated with a Page.
Click on Specific page
VANTAGE/VANGUARD DEVELOPER’S ASSISTANT INSTRUCTIONS
28
Select a Page to view.
When you choose the Specific Page option, you must pick a Page to be displayed. For this
example, we selected the COLORS Page. You see all the keys that are associated with the
VANTAGE/VANGUARD DEVELOPER’S ASSISTANT INSTRUCTIONS
29
selected Page, their assignments, etc. The display will also tell you if there are any links
associated with the Page.
You can even select to display the PAGES Page. This gives you a list of all the individual pages
in a vocabulary and how to get to them.
This is a Read-Only Display so you cannot edit it as you look at it. However, you can save the
display in a word processing document, edit it if you wish and print it out.
ÂA right-click on a key will also show you that key’s details.
Look Up Vocabulary Location
Find where particular text is used in the Area.
Type in the text you want to find. Phrases work best. Here, we are searching for the phrase, "I
don’t like".
VANTAGE/VANGUARD DEVELOPER’S ASSISTANT INSTRUCTIONS
30
Look Up Vocabulary Location works best with phrases. In the above example we wanted to
find where the phrase, "I don’t like" was used. The Developer’s Assistant has given us a display
of all the places we can find this phrase.
The Developer’s Assistant will show up to 25 results for the text you entered. If you see a
message box that says there are more than 25 examples, try being more specific when entering
the search text.
VANTAGE/VANGUARD DEVELOPER’S ASSISTANT INSTRUCTIONS
31
For another example, go to the Look Up Vocabulary Location option, then type in go to as the
phrase. You see:
Notice that every instance in which the phrase "go to" is used is displayed, beginning with Core
vocabulary.
VANTAGE/VANGUARD DEVELOPER’S ASSISTANT INSTRUCTIONS
32
If you type in a single word, such as "eat", you will see a display that contains every instance of a
word where the letters "eat" are used. This includes such words as "weather", "cheat", "great",
etc.
VANTAGE/VANGUARD DEVELOPER’S ASSISTANT INSTRUCTIONS
33
You can narrow a search by adding a space before, after or before and after a single word, but
this may miss some of the places where the word is used. For example, if you type a space and
then type "eat" into the Find Text box, you will see:
Scroll through the display and you will see that some of the instances where "eat" is stored are
the same as the first display and some are no longer there.
You should play with this option some to discover how it will best suit your needs. If you create
your own overlay, you could use this option to find partial words or misspelled words.
VANTAGE/VANGUARD DEVELOPER’S ASSISTANT INSTRUCTIONS
34
Write with Icons
The Write with Icons option allows you to type text, word by word, and see it displayed as
icons. Words that are in the Core Vocabulary and Dynamic Activities of the current User Area
in your emulator will be displayed. You must type the word then add a space, tab, return or
punctuation after it. If you type a word and nothing happens, either you forgot to add a space,
etc., at the end of the word, or that word is not available in the current vocabulary.
For example:
Select the Write with Icons option.
Type the word, I and add a space.
You see an "I" sequence.
Type the word, WANT and add a space.
If the result is a Dynamic Activity sequence, you see an Activity Row Choices box:
You can add an ending to the sword or phrase from the Activity, or you can select the No
Activity Key and continue writing. In this example, select No Activity Key to see the WANT
icons on the screen.
Now, type the word, TO and add a space.
VANTAGE/VANGUARD DEVELOPER’S ASSISTANT INSTRUCTIONS
35
You see the sequences under which I, WANT and TO are stored. Since these are Core
vocabulary words, they are often used in Dynamic Activities as "building block" words. In this
example you saw message boxes that gave you various choices that are available in the Activity
Row after the sequence is selected. You can add an ending or select No Activity Key to stay
with just the Core words.
Finding Phrases
You can also find sequences for phrases by using the F6 and F7 keys on your keyboard.
For example,
Let’s try the phrase, "I want".
Select the Write with Icons option in the Vocabulary menu.
Select F6 on your keyboard. This tells the Developer’s Assistant you are going to enter a phrase.
Type: I WANT and then select F7. This tells the Assistant that you have completed the phrase.
Type a space.
You see the sequence for I WANT. I WANT is part of a Dynamic Activity so you will also see
the endings for I WANT that are produced by the Dynamic Activity. You can select an Activity
word to add to the phrase or you can close the box and start a new word or phrase.
VANTAGE/VANGUARD DEVELOPER’S ASSISTANT INSTRUCTIONS
36
Now You Can…
•
•
•
•
•
•
See details of a Vocabulary (use any option in Vocabulary menu)
Teach all the associations that start with, contain or end with a specific icon (Use Core
Vocabulary (Sequences)
Save a record of all the Dynamic Activities that start with, end with or contain a specific icon
in its sequence (Core Vocabulary (Sequences) )
Print a specific Page, including its details, for training; make copies for the staff who work
with the client. (Specific Page)
Discover where a particular text item (word, phrase, sentence and/or character string) is
stored (Look Up Vocabulary Location)
See icon sequences that match the words you are typing (Write with Icons)
ÂRemember: you can also take pictures of the emulator displays, save the displays as
word processing documents, and e-mail pictures and documents.
VANTAGE/VANGUARD DEVELOPER’S ASSISTANT INSTRUCTIONS
37
38
Addendum: Importing Sound (.wav) Files
for Recorded Messages
The Developer’s Assistant now allows you to import .wav files and store them as recorded
messages.
Any Toolbox Menu that allows you to store recorded messages now has a button labeled Import
Sound File that becomes active when you select Recorded Message. Instead of recording a
message you can find a sound file (.wav file) that you have saved on your computer and store it
as the recorded message.
ÂYou cannot use .wav files for prompts.
For Example, in the picture above:
We are in the MODIFY ACTIVITY Menu and have selected the Modify Item Within Activity
option. This is a storing screen. We have activated the Recorded option.
Activate the Import Sound File option.
Search for the file or folder where you have .wav files stored.
VANTAGE/VANGUARD DEVELOPER’S ASSISTANT INSTRUCTIONS
39
Select the file you want to use and activate Open.
You don’t see anything happen, but the file will be used as your Recorded Message. Activate
Listen to Recording to check that you got the correct file. When you have finished with this
screen, save your changes by activating OK to exit. If you decide not to save any changes,
activate Cancel instead of OK.
ÂIf you have a previously recorded message assigned to a key and you import a .wav file, the
.wav file will replace the recorded message. Any macros assigned to the key will remain with
the key.
VANTAGE/VANGUARD DEVELOPER’S ASSISTANT INSTRUCTIONS
40