1
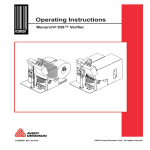
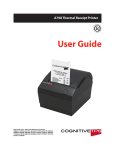
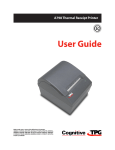
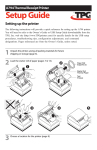
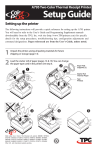
A758 Thermal Receipt and
Impact Slip Printer
Setup Guide
TM
A758-D110
A758 Setup Guide
Introducing the A758 Printer
The A758 is an extremely fast, quiet, and reliable point-of-sale printer.
It consists of two specialized printers in one compact package: a thermal
printer on top that prints receipts, and an impact slip printer in front to print
on forms and checks that you insert. The thermal printer is optimized for
ease-of-use in busy environments. There is no ribbon or ink cartridge to
change, and you load the paper by simply dropping in a new roll. The impact
printer provides the power and flexibility necessary to print on checks or
multi-part forms up to five plies, in a wide variety of sizes
and orientations.
1
Unpacking the Printer
Save all packing materials in case you need to repack the printer. Check that
the materials shipped with the printer match the following list.
The following items are packed in the shipping box (printers shipped in
bulk may not include all of these items):
•
Printer enclosed in a plastic bag and foam pack
•
Thermal receipt paper roll (inside receipt bucket)
•
Test printout protecting the printhead (inside receipt bucket)
•
Cardboard support for cantilever (on slip table)
•
Foam restraint for carriage (behind front cover)
•
Power supply with cable connecting to printer and power supply cord
connecting to power outlet (only if ordered with the printer)
•
Ribbon cassette
•
Installation report card (please complete this form and return to
Axiohm)
•
A758 Thermal Receipt and Impact Slip Printer: Setup Guide (this book)
•
Communication cable, if ordered with the printer (from host computer
to printer)
To report any missing materials, or to report a printer that was damaged
during shipping, call your supplier or call an Axiohm representative at
1-800-732-8950.
2
Choosing a Location
Place the printer on a level surface, and make sure there is enough room to
open the receipt cover to change the paper and to open the front cover to
change the impact printer’s ribbon cassette. Leave several inches around the
printer for connecting and accessing the cables.
Note: If your printer has an optional Magnetic Ink Character
Recognition (MICR) check reader installed, you may need
to make additional adjustments to the printer’s location.
Because devices such as CRT monitors, security devices, or
large metal surfaces affect the printer’s magnetic field, they
can cause intermittent check reading errors.
September 1999
1
A758 Setup Guide
3
Remove the Packing Restraints
Front
Cover
Cardboard
Support
Carriage
Foam
Restraint
1. Open the front cover, remove the foam restraint holding the carriage.
2. Remove the cardboard support from the slip path.
Receipt
Cover
Paper Roll
Supports
Test
Printout
Paper
Roll
3. Open the receipt cover and remove the test printout.
4. Lift the thermal paper roll out of the paper bucket and remove the
paper supports.
September 1999
2
A758 Setup Guide
4
Connecting the Cables
Caution: Connect the cables to the printer before plugging in
the power supply. If power is received from the host
computer, turn it off before connecting any cables.
Strain Relief
Back of
Printer
DIP
Cash
Power
Drawer Switches Supply
Connector
Connector
Communication
Connector
(9-pin connector
shown)
Note: Depending on your printer configuration, the connector panel
may vary from the above illustration.
1. Turn off the host computer.
2. Secure the communication cable to the communication connector.
3. Connect the cable to the host computer.
4. Connect the cash drawer cable to the cash drawer connector at the
left rear of the unit.
If your system has two cash drawers, attach a Y-cable to the printer’s
cash drawer connector first.
5. Connect the power supply cable to the power supply connector last.
To the
Communications
Connector
Strain
Relief
Power
Supply
or Adapter
Cable
Communications
Cable
Cash Drawer
Cable
Cash Drawer
Cable
6. Route the cash drawer and the power supply cables through the strain
relief as shown.
7. Plug the power cord into the power supply, then plug the power supply
into an outlet. The green LED on the top cover will light up.
September 1999
3
A758 Setup Guide
5
Loading Receipt Paper
1. Tear off the end of the roll so that the edge is loose.
2. Place the roll into the paper bucket with the paper unrolling from the
bottom of the roll, and with a few inches of paper extending over the
cabinet front.
The paper must unroll from the bottom of the roll to insure the image
will print.
3. Close the cover while holding the paper over the front of the cabinet.
4. Remove the excess paper by tearing it against the tear-off blade.
5. Press the Paper Feed Button to advance the paper.
September 1999
4
A758 Setup Guide
6
Putting In the Ribbon Cassette
1. Unwrap and tighten the ribbon by turning the knob on the cassette
in the direction of the arrow.
Front
Cover
Knob
Ribbon
Cassette
(Shown in
Position)
Cassette
Caution: Do not remove
Mylar shield.
Printhead
Mylar
Ribbon Shield
2. Open the printer’s front cover, position the ribbon cassette onto
the carriage making sure the ribbon is underneath the printhead.
3. Snap the cassette into place and close the front cover.
September 1999
5
A758 Setup Guide
7
Testing the Printer
The Configuration Menu allows you to set general printer parameters.
The test prints a list of various printer settings and partially cuts the
paper if a knife is installed. The test printout may vary depending on
the printer model. To change the default settings, enter the Configuration
Menu as instructed on the bottom of the test printout. The printout may
be useful to a service representative if there is a problem. If something
appears to be wrong with the test printout (such as missing or faded
text), additional troubleshooting and diagnostic guides are available
by calling 1-607-274-2424.
Receipt
Receipt
Cover
Front
Cover
Slip or
Check
Paper Feed
Button
On-Line,
Paper Status,
Error LED (Green)
Extended
Slip Table
Slip In
LED (Green)
Front of Printer
Front Cover
Reset
Button
September 1999
6
A758 Setup Guide
1. To run the test, either
a. Open and close the receipt cover while holding down the
Paper Feed Button,
OR,
b. Press the Paper Feed Button and the Reset Button at the
same time.
2. When the printer begins printing let go of the Paper Feed Button.
Print Test and Configuration Menu Samples
(shown approximately 60% of size)
8
Setup Complete
The printer is now ready to communicate with the host system.
September 1999
7
Federal Communications Commission (FCC) Radio Frequency Interference Statement Warning
Changes or modifications to this unit not expressly approved by the party responsible for compliance could void the user’s
authority to operate the equipment.
Note
This equipment has been tested and found to comply with the limits for a Class A digital device, pursuant to Part 15 of the FCC
Rules. These limits are designed to provide reasonable protection against harmful interference when the equipment is operated in
a commercial environment. This equipment generates, uses, and can radiate radio frequency energy and, if not installed and used
in accordance with the instruction manual, may cause harmful interference to radio communications. Operation of this equipment
in a residential area is likely to cause harmful interference in which case the user will be required to correct the interference at his
own expense.
Information to the User
This equipment must be installed and used in strict accordance with the manufacturer’s instructions. However, there is no
guarantee that interference to radio communications will not occur in a particular commercial installation. If this equipment does
cause interference, which can be determined by turning the equipment off and on, the user is encouraged to contact Axiohm
immediately.
The Axiohm company is not responsible for any radio or television interference caused by unauthorized modification of this
equipment or the substitution or attachment of connecting cables and equipment other than those specified by Axiohm. The
correction of interferences caused by such unauthorized modification, substitution or attachment will be the responsibility of
the user.
In order to ensure compliance with the Product Safety, FCC and CE marking requirements, you must use the power supply,
power cord, and interface cable which are sold for use with this product or which meet the following parameters:
Power Supply
UL Listed (QQGQ), Class 2 power supply with SELV (Secondary Extra Low Voltage), non-energy hazard output, limited energy
source, input rated 100-240 Vac, 1.5/0.8 A, 50/60 Hz, output rated 24 Vdc, 2.3 A.
Use of this product with a power supply other than the Axiohm power supply will require you to test the power supply and Axiohm
printer for FCC and CE mark certification.
Communication Interface Cable
A shielded (360 degree) interface cable must be used with this product. The shield must be connected to the frame or earth
ground connection or earth ground reference at EACH end of the cable.
Use of a cable other than described here will require that you test the cable with the Axiohm printer and your system for FCC
and CE mark certification.
Power Cord
A UL listed, detachable power cord must be used. For applications where the power supply module may be mounted on the floor,
a power cord with Type SJT marking must be used. For applications outside the US, power cords which meet the particular
country’s certification and application requirements should be used.
Use of a power cord other than described here may result in a violation of safety certifications which are in force in the country
of use.
Industry Canada (IC) Radio Frequency Interference Statement
This Class A digital apparatus meets all requirements of the Canadian Interference-Causing Equipment Regulations.
Cet appareil numérique de la classe A respecte toutes les exigences du Règlement sur le matériel brouilleur du Canada.
Voluntary Control Council for Interference (VCCI) Radio Frequency Interference Statement
This is a Class A product based on the standard of the Voluntary Control Council for Interference by Information Technology
Equipment (VCCI). If this equipment is used in a domestic environment, radio disturbance may arise. When such trouble occurs,
the user may be required to take corrective actions.
Disclaimer
Information in this document is subject to change without notice. Consult your Axiohm sales representative for information that is
applicable and current. Axiohm reserves the right to improve products as new technology, components, software, and firmware
become available.
No part of this document may be reproduced or transmitted in any form or by any means, electronic or mechanical, for any
purpose without the express written permission of Axiohm.
Copyright
Copyright © 1999 by AXIOHM
Ithaca, New York USA. All rights reserved. Printed in USA. Confidential, Unpublished. Property of AXIOHM.
Trademarks
AXIOHM is a trademark of AXIOHM IPB, Inc.. Other trademarks and registered trademarks are the property of their
respective holders.
TM
189-9200248 A
A758-D110
09/99